
WT34A202IN - Coffee maker SIEMENS - Free user manual and instructions
Find the device manual for free WT34A202IN SIEMENS in PDF.


| Product Type | Tumble Dryer |
| Model | WT34A202IN |
| Brand | Siemens |
| Dimensions (H x W x D) | 85 x 60 x 60 cm |
| Weight | Approx. 37 kg |
| Maximum Load | 7 kg |
| Connected Voltage | 220-240 V |
| Connected Load | Max. 2200 W |
| Fuse Rating | 10 A |
| Ambient Temperature Range | 5 - 35 °C |
| Programs | Cotton Cupboard Dry, Cotton Iron Dry, Easy-Care, Outdoor, Towels, Mix, Warm, Cold, Shirts/Business, Rapid 40', Woollen finish, Lingerie |
| Key Features | Moisture sensor, Anti-crease, Childproof lock, Low-Heat Drying, Ready-in timer, Adjustable dryness levels, Drum interior light |
| Energy Consumption (Cotton Cupboard Dry 7 kg at 1400 rpm) | 3.49 kWh, 111 min |
| Energy Consumption (Cotton Iron Dry 7 kg at 1400 rpm) | 2.66 kWh, 85 min |
| Fluff Filter | Clean after each cycle; dishwasher safe |
| Exhaust Air Duct | Connection on back or left side; max total pressure loss 50 (100 mm diameter) |
| Moisture Sensor | Stainless steel; clean regularly with coarse sponge |
| Safety Features | Childproof lock, door lock, auto shut-off, grounding instructions |
| Accessories Included | Basket for woollens |
| Optional Accessories | Washer-dryer stack connection set (WZ20311), platform (WZ20500), exhaust air duct hose (WZ20180) |
| After-Sales Service Contact (GB) | 0344 892 8999 |
Frequently Asked Questions - WT34A202IN SIEMENS
User questions about WT34A202IN SIEMENS
0 question about this device. Answer the ones you know or ask your own.
Ask a new question about this device
Download the instructions for your Coffee maker in PDF format for free! Find your manual WT34A202IN - SIEMENS and take your electronic device back in hand. On this page are published all the documents necessary for the use of your device. WT34A202IN by SIEMENS.
USER MANUAL WT34A202IN SIEMENS
siemens-home.bsh-group.com/welcome
en Installation and operating instructions
Register your product online
Your new tumble dryer
You have opted for a tumble dryer manufactured by Siemens.
Please take a few minutes to read and become familiar with the advantages of your tumble dryer.
To meet the high quality demands required by Siemens, every tumble dryer that leaves our factory is carefully checked to ensure that it functions correctly and is in perfect condition.
For more information on our products, accessories, replacement parts and services, see our website www.siemens-home.bsh-group.com or contact our Customer Service centres.
If the operating and installation instructions describe different models, any differences will be pointed out at the relevant points in the text.
Read these operating and installation instructions before operating the tumble dryer.
Display rules
⚠ Warning!
This combination of symbol and signal word indicates a possibly dangerous situation. Not heeding the warning can cause death or injuries.
Caution!
This signal word indicates a possibly dangerous situation. Not heeding the caution can cause property and/or environmental damage.
Note/tip
Information about the optimum use of the appliance/any other useful information.
1. 2. 3. / a) b) c)
The steps are represented by numbers or letters.
/ -
Lists are represented by a small box or a dash.
Contents

Intended use. 4

Safety instructions .....4
Children/people/pets 4
Installation....6
Operation 8
Cleaning/Maintenance ..... 10

Environmental protection .....12
Packaging/used appliance ..... 12
Energy-saving tips....12

Installation and connection ...13
Scope of delivery 13
Installing and connecting the dryer. . 13
Grounding Instructions ..... 14
Installation for the exhaust air duct . . 15
Optional accessories 19

The main points in brief .....20

Getting to know your appliance ....21
Dryer....21
Control panel 22
Display panel 23

Laundry .....24
Preparing the laundry ..... 24
Sorting laundry according to: ..... 24

Programs and buttons .....25
Programs 25
Buttons 27

Operating the appliance .....28
Loading laundry
and switching on the dryer ..... 28
Setting a program. 28
Starting the program. 28
Program sequence 28
Changing the program
or adding laundry 29
Program interruption .....29
Program end .....29
Removing laundry
and switching off the dryer .....29
Clean the fluff filter .....30

Signal setting....31

Cleaning 32
Cleaning the dryer
and the control panel .....32
Cleaning the moisture sensor .....32
Cleaning the exhaust air duct .....32

Faults and what to do about them 33

After-sales service 35

Consumption values. . . . . . . 36

Technical data 37

Intended use
■ This appliance is intended for private domestic use only.
- Do not install or operate this appliance anywhere that is liable to experience frost and/or outdoor conditions. There is a risk that the appliance will be damaged if residual water in it freezes. If hoses freeze up, they may crack/burst.
This appliance must only be used for drying and freshening up domestic laundry, consisting of items that have been washed with water and are suitable for tumble drying (see label on item). Using the appliance for any other purpose is outside of the scope of its intended application and is forbidden.
■ This appliance is intended for use up to a maximum height of 4000 metres above sea level.
Before you switch on the appliance:
Check that there is no visible damage to the appliance. Do not operate the appliance if it is damaged. Should you have any problems, please contact your specialist dealer or our customer service.
Read and follow the operating and installation instructions and all other information provided with this appliance.
Retain the documents for subsequent use or for subsequent owners.

Safety instructions
The following safety information and warnings are provided to protect you from injury and to prevent material damage to your surroundings.
It is nevertheless important to take the necessary precautions and to proceed with care when installing, maintaining, cleaning and operating the appliance.
Children/people/pets

Warning
Risk of death!
Children and other people who are unable to assess the risks involved when using the appliance may injure themselves or may find themselves in life-threatening situations. Therefore please note:
■ The appliance may be used by children over the age of 8 years and by persons with reduced physical, sensory or mental capacity or by persons with a lack of experience or knowledge as long as they are supervised or have received instruction on how to use the appliance safely and they have understood the potential risks of using the appliance.
■ Children must not play with this appliance.
■ Do not allow children to clean or maintain this appliance unsupervised.
- Keep children under 3 years and pets away from this appliance.
■ Do not leave the appliance unattended when children or other people who are unable to assess the risks are in the vicinity.
⚠ Warning Risk of death!
Children may lock themselves inside appliances and find themselves in a life-threatening situation.
■ Do not position the appliance behind a door, as this may obstruct the appliance door or prevent it from opening completely.
■ Once an appliance has reached the end of its life, pull the mains plug from the socket before severing the mains cable, and then destroy the lock on the appliance door.
⚠ Warning Risk of suffocation!
If allowed to play with the packaging/plastic film or packing components, children may become caught in these or pull them over their heads and suffocate. Keep packaging, plastic film and packing components away from children.
⚠ Warning Risk of poisoning!
Detergents and care products may result in poisoning if consumed. If accidentally swallowed, seek medical advice. Keep detergents and care products out of the reach of children.
⚠ Warning Eye/skin irritation!
Contact with detergents or care products may cause eye/skin irritation. Rinse eyes/skin thoroughly if they/it come(s) into contact with detergents or care products. Keep detergents and care products out of the reach of children.
Installation
Warning
Risk of electric shock/fire/material damage/damage to the appliance!
If the appliance is not installed properly, this may lead to a dangerous situation. Make sure that:
■ The mains voltage on your power socket matches the rated voltage specified on the appliance (identification plate). The connected loads and the required fuse protection are specified on the identification plate.
■ The appliance is only connected to a source of alternating current via a nationally recognized and grounded outlet that has been correctly installed.
■ The mains plug and the grounded socket match and the earthing system has been correctly installed.
■ The cross section of the cable is sufficiently large enough.
■ The mains plug is accessible at all times.
If using a residual current circuit breaker, only use one that bears the following mark: 📐. The presence of this mark is the only way to be sure that it fulfils all the applicable regulations.
Warning
Risk of electric shock/fire/material damage/damage to the appliance!
If the appliance's mains cable is altered or damaged, this may result in electric shock, short circuiting or fire due to overheating.
The mains cable must not be kinked, crushed or altered, and must not come into contact with any heat sources.
Warning
Risk of fire/poisoning!
Connecting the exhaust air duct to ventilation shafts or chimneys to which gas or coal-burning stoves, cookers or ovens or gas-fired space heaters are already connected runs the risk of causing fire or poisoning.
Channel the exhaust air through an exhaust air duct that is routed directly outdoors.
Always have the chimney sweep responsible confirm that your appliance is operating safely.
Warning
Risk of fire/material damage/ damage to the appliance!
The use of extension cords or power strips may result in fire due to overheating or short circuiting.
Connect the appliance directly to an earthed socket that has been correctly installed. Do not use extension cords, power strips or multi-way couplers.
Warning
Risk of injury/material damage/damage to the appliance!
■ The appliance may vibrate or move when in operation, potentially resulting in injury or material damage.
Place the appliance on a clean, even, solid surface and, using a spirit level to guide you, level it with the screw-in feet.
■ Incorrectly placing (stacking) this appliance on top of a washing machine may result in injury, material damage and/or damage to the appliance.
If this appliance is to be placed on top of a washing machine, the washing machine must be of at least the same depth and width as the appliance, and it must be secured in place with the appropriate connection set if available → Page 19. The appliance MUST be secured with this connection set.
Stacking the appliance in any other way is forbidden.
If you take hold of any of the appliance's protruding parts (e.g. the appliance door) in order to lift or move it, these parts may break off and cause injury.
Do not take hold of any of the appliance's protruding parts in order to move the appliance.
⚠ Warning Risk of injury!
■ The appliance is very heavy. Lifting it may result in injury. Do not lift the appliance on your own.
■ The appliance has sharp edges on which you could cut your hands. Do not take hold of the appliance by its sharp edges. Wear protective gloves to lift it.
If the hoses and mains cables are not correctly routed, they may constitute a tripping hazard, which may result in injury.
Route hoses and cables such that they do not constitute a tripping hazard.
Operation
⚠ Warning Risk of explosions/fire!
Laundry that has come into contact with solvents, oil, wax, wax remover, paint, grease or stain remover may ignite when dried in the machine, or even cause the appliance to explode. Therefore please note:
■ Rinse the laundry thoroughly with warm water and detergent before drying it in the machine.
■ Do not place laundry in this appliance to be dried if the laundry has not been washed first.
■ Do not use the appliance if industrial chemicals have been used to clean the laundry.
⚠ Warning Risk of explosions/fire!
If there is any residual material left in the fluff filter, this may ignite when drying is in progress, or even cause the appliance to catch fire or explode.
Clean out the fluff filter each time the appliance is used to dry laundry.
■ Certain objects may ignite when drying is in progress, or even cause the appliance to catch fire or explode. Remove any lighters or matches from pockets on items of clothing.
If there is coal dust or flour in the air around the appliance, this may cause an explosion. Make sure that the area around the appliance is kept clean when it is in operation.
⚠ Warning Risk of fire/material damage/ damage to the appliance!
If a program is terminated before the drying cycle has finished, this prevents the laundry from cooling down sufficiently and may cause the laundry to ignite, or may result in material damage or damage to the appliance.
■ During the last part of the drying cycle, the laundry in the drum is not heated (cooling cycle). This is to ensure that it remains at a temperature at which it will not be damaged.
- Do not switch off the appliance before the drying cycle has finished unless you remove all items of laundry from the drum immediately and spread them out (to dissipate the heat).
Warning
Risk of poisoning!
If additional appliances (such as gas heaters, gas-fired tankless water heaters, coal-burning stoves connected to a chimney or open fireplaces) are being operated in the same room as this appliance or in adjacent rooms, this may create a vacuum that sucks exhaust gases back in. There is a risk of poisoning if these gases are inhaled. Make sure that the area is adequately ventilated. Always have the chimney sweep responsible confirm that your appliance is operating safely.
Warning
Risk of poisoning!
Poisonous fumes may be given off by cleaning agents that contain solvents, e.g. cleaning solvent.
Do not use cleaning agents that contain solvents.
Warning
Risk of injury!
■ If you support your weight/sit on the appliance door when it is open, the appliance may tip over, which may result in injury.
Do not support your weight on the appliance door when it is open.
■ If you climb onto the appliance, the worktop may break, which may result in injury.
Do not climb onto the appliance.
■ If you reach into the drum while it is still rotating, you risk injuring your hands. Wait until the drum has stopped rotating.
Caution!
Material damage/damage to the appliance
If the amount of laundry in the appliance exceeds its maximum load capacity, it may not be able to operate properly, or this may result in material damage or damage to the appliance. Do not exceed the maximum load capacity of dry laundry. Make sure you comply with the maximum load capacities specified for each of the programs → Page 25.
If you operate the appliance without a fluff filter, or if the fluff filter is defective, this may result in damage to the appliance.
Do not operate the appliance without a fluff filter, or with a fluff filter that is defective.
■ Light objects such as hair and lint may be sucked into the air inlet when the appliance is in operation. Keep these away from the appliance.
■ Foam and foam rubber may deform or melt if dried in the appliance.
Do not dry laundry items that contain foam or foam rubber in the appliance.
If you pour the wrong quantity of detergent or cleaning agent into the appliance, this may result in material damage or damage to the appliance. Use detergents/care products/cleaning agents and softeners in accordance with the manufacturers' instructions.
If the appliance overheats, it may not be able to operate properly, or this may result in material damage or damage to the appliance. Make sure that the appliance's air inlet is never obstructed when the appliance is in operation, and that the area around the appliance is adequately ventilated.
Cleaning/Maintenance
Warning
Risk of death!
The appliance is powered by electricity. There is a risk of electric shock if you come into contact with live components. Therefore please note:
■ Switch off the appliance. Disconnect the appliance from the power supply (pull out the plug).
■ Never take hold of the mains plug with wet hands.
- When removing the mains plug from the socket, always take hold of the plug itself and never the mains cable, otherwise this may damage the mains cable.
■ Do not make any technical modifications to the appliance or its features.
■ Repairs and any other work on the appliance must only be conducted by our customer service or by an electrician. The same applies for replacing the mains cable (when necessary). - Spare mains cables can be ordered from our customer service.
Warning
Risk of poisoning!
Poisonous fumes may be given off by cleaning agents that contain solvents, e.g. cleaning solvent.
Do not use cleaning agents that contain solvents.
Warning
Risk of electric shock/material damage/damage to the appliance!
If moisture penetrates the appliance, this may cause it to short circuit.
Do not use a pressure washer or steam cleaner to clean your appliance.
Warning
Risk of injury/material damage/damage to the appliance!
The use of spare parts and accessories supplied by other brands is dangerous and may result in injury, material damage or damage to the appliance.
For safety reasons, use genuine spare parts and accessories only.
Caution!
Material damage/damage to the appliance
Cleaning agents and agents for pretreating laundry (e.g. stain removers, prewash sprays, etc.) may cause damage if they come into contact with the surfaces of the appliance.
Therefore please note:
- Do not allow these agents to come into contact with the surfaces of the appliance.
■ Clean the appliance with nothing but water and a soft, damp cloth.
■ Remove any detergent, spray or other residues immediately.

Environmental protection
Packaging/used appliance

Dispose of packaging in an environmentally-responsible manner. This appliance is certified in accordance with the guidelines on E-waste (Management) Rules 2016 which govern waste electrical and electronic equipment. The guidelines provide a framework for the return and recycling of used appliances.
Note: This product doesn't contain any of hazardous substances as specified in the E-waste (Management) Rules 2016.
Do's
■ Hand over the old/discarded electronic equipment only to authorized collection centers for disposal http://www.siemens-home.bsh-group.com/in/Preserve.html See also:
Contact No: 180042535287 (toll-free)
E-mail: recycle@ewasteindia.com
Online www.ewasteindia.com website:
- Consult the authorized service center as to whether the Electronic Equipment can be repaired or not, before discarding
- Consult the retailer about appliance take back schemes
Don'ts
- Don’t dump the discarded Electronic Equipment in the open or in any land fill site, as this will result in contamination of the soil and the ground water
- Don’t dispose of the discarded Electronic Equipment in household bins or Municipal bins
■ The product is not meant for re-sale to any unauthorized agencies/scrap dealers - Don't keep any replaced spare part(s) from the product in an exposed area
Energy-saving tips
■ Spin the laundry before drying. The drier the laundry, the shorter the drying time will be, thus consuming less energy.
- Load the dryer with the maximum load.
Note: Do not exceed the maximum load for the programs, as this prolongs the drying time and increases energy consumption.
■ Ventilate the room and keep the air inlet on the dryer free to ensure air exchange.
■ Clean the fluff filter after each drying cycle. If the fluff filter is dirty, the drying time is prolonged and energy consumption is increased.
■ Energy-saving mode: If the dryer is not operated for a prolonged period, it automatically switches off before the program starts and when the program has ended to save energy. The display panel and indicator lamps go off after a few minutes and the Start button flashes. To activate the lighting, press any button, open or close the dryer door or turn the program selector.

Installation and connection
Scope of delivery
Dryer
■ Installation and operating instructions
■ Basket for woollens *
Installing and connecting the dryer

Warning
Risk of death!
There is a risk of electric shock as the dryer is operated with electricity.
- Check the dryer for visible damage. You must not operate the dryer if it is damaged.
■ Before connecting the dryer to the power supply, ensure that the electric voltage specified on the rating plate matches the voltage of your socket.
■ Only use earth-leakage circuit breakers with the following symbol:
■ Ensure that the mains cable is not kinked or trapped, and that it does not come into contact with heat sources or sharp edges.
■ Electrical connection and grounding instructions
→ Page 4 → Page 14

Warning
Children may lock themselves in the dryer, putting their lives at risk!
Do not set up the dryer behind a door or sliding door, as this may obstruct the dryer door or prevent it from opening.
Caution!
Risk of injury
■ Due to the heavy weight of the dryer, you may injure yourself if you lift it. Do not lift the dryer on your own.
■ You could cut your hands on the sharp edges of the dryer. Do not hold the dryer by the sharp edges.
■ Protruding parts on the dryer may break off when it is lifted or pushed. Do not move the dryer by holding onto protruding parts.
Caution!
Risk of material damage to the dryer or fabrics.
- Check the dryer for damage caused during transportation. Never operate a dryer if it is damaged.
■ Any residual water in the dryer may freeze and damage the dryer. Do not install the dryer in rooms that are at risk of frost.
During installation, ensure that:
■ The dryer is placed on a clean, level and firm surface,
■ The mains plug can be accessed at all times,
■ The air inlet on the dryer is kept clear and there is sufficient ventilation,
■ The area around the dryer is kept clean and
■ The dryer is levelled using the threaded feet.
Note: Check the alignment of the appliance with a spirit level and correct if necessary. Change the height by turning the appliance feet. All appliance feet must stand firmly on the ground.

natural_image
Mechanical gear assembly diagram with blue directional arrow indicating motion (no text or symbols)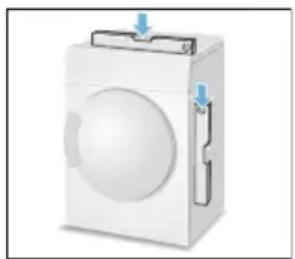
natural_image
Illustration of a white washing machine with blue arrows indicating inlet or outlet points (no text or symbols)Incorrect alignment may cause high noise levels, vibrations and improper movement of the drum.
Note: If in doubt, have the appliance connected by a specialist.
Grounding Instructions
Warning
Danger of death!
Improper connection of the ground may result in electric shock. Have the appliance checked by a qualified technician or licensed electrician if you are in doubt as to whether the washing machine has been properly grounded.
This appliance must be grounded. In the event of malfunction or breakdown, grounding will reduce the risk of electric shock by providing a path of least resistance for the electric current. This appliance is equipped with a cord that has an equipment grounding conductor and a grounding plug. The plug must be plugged into an appropriate outlet that is properly installed and grounded in accordance with local codes and ordinances. To ground the appliance use a 3 pin plug and properly grounded socket of 16 A rating.
Notes
- Do not modify the plug provided with the appliance. If the plug will not fit into outlet have a properly grounded outlet installed by qualified electrician. Do not cut, remove or bypass the grounding prong on the washing machine power cord plug.
■ The wiring for the electrical outlet circuit must be sufficient to meet the appliance requirements. Use of Ground Fault Circuit Interrupter (GFCI) is recommended. - Do not use the machine with an extension box, extension cord, spike busters etc., as this may lead to improper grounding conditions.
Installation for the exhaust air duct
Caution!
Damage to the appliance
Inappropriate connecting of the exhaust air duct to the dryer may cause damages to the appliance. In order to avoid it follow advises included in this chapter.
Notes
It is recommended to route the exhaust air directly into the open air through an exhaust air duct. A drain check valve must be fitted then to prevent air from flowing back.
■ The air extraction system must not exceed the specified pressure losses.
■ Clean the exhaust air duct regularly, at least once a year.
When operating the dryer without an exhaust air duct, the following must also be observed:
■ Ensure that the room is well ventilated, otherwise energy consumption and drying time will increase. Bad ventilation of the room may lead to the increase of moisture which may cause damages, e.g. to walls or furniture.
■ Do not cover the exhaust air opening. Leave approx. 1 m of free space around the exhaust air opening.
Connections on the dryer
Connections for an exhaust air duct are located:
■ on the back panel

natural_image
3D technical illustration of a mechanical housing or enclosure with internal components and a circular opening (no text or symbols)The exhaust air opening on the back panel is open when the dryer is delivered (bayonet ring). The exhaust air opening on the left side panel is sealed with a cover.
■ on the left side panel

natural_image
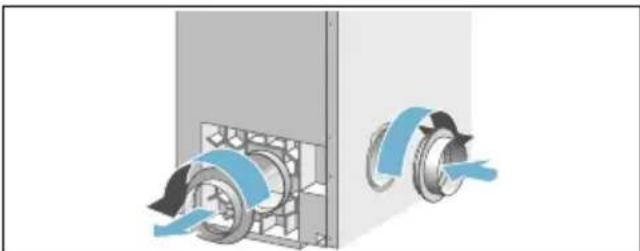
3D technical illustration of a mechanical housing or enclosure with internal components (no text or symbols visible)You can switch the connection on the back panel to the left side panel as follows:
- Remove the cover on the side panel.

natural_image
Technical illustration of a mechanical component with a side view showing internal components and a blue arrow indicating motion (no text or symbols)- Remove the bayonet ring from the back panel and attach it to the opening on the side panel.
natural_image
Diagram of two mechanical components with blue flow arrows indicating motion or fluid flow (no text or symbols)3. Seal the opening in the back panel with the cover.

natural_image
Diagram of a mechanical device with a rotating shaft and housing, showing airflow direction (no text or symbols)Note: If there is a high level of condensation in the exhaust air duct, it is advisable to fix a condensation collector (standard) or a drain hole with a diameter of approximately 3 mm to the lowest part of the exhaust air duct.
Exhaust air duct
All standard products can be used for the exhaust air duct:
- flexible pipes
■ galvanised metal ducts or pipes
■ connectors, adapters and diverters for flat duct systems and pipe systems
■ wall boxes for evaporation into the open air or into a ventilation shaft
■ adapters on rectangular ducts
■ rectangular ducts or plastic pipes
■ back pressure flap
Note: The material must be heat resistant up to 80 °C and moisture resistant.
Pressure losses
Note: The type and length of the exhaust air duct, particularly elbows or bends with small radii, can impede the air flow. Keep diameter reductions and pressure losses (resistance) to a minimum.
The following must be avoided:
■ long exhaust air ducts
■ exhaust air ducts with small diameters
■ exhaust air ducts with many bends and elbows.
Pressure losses through friction
Duct or pipe friction resistance, i.e. friction on the inside of the exhaust air duct, affects the air flow as follows:
■ the smoother the internal wall
■ the larger the diameter of the internal wall
■ the shorter the pipe
the lower the friction resistance.
Pressure losses due to fixtures
The exhaust air encounters further resistance through fixtures built into the pipe, e.g. diverters (bends, elbows, angles), wall boxes with grids or backpressure flaps.
Installation for pipe connection
■ inside diameter = 100 mm In order to ensure the minimum required air flow, a certain pressure loss (resistance) must not be exceeded. The permissible total pressure loss in an exhaust air duct must not exceed a certain value. This is calculated as the sum of all individual pressure loss values for the straight pieces and fixtures in the exhaust air duct.
Note: The value for the maximum permissible total pressure loss for an exhaust air duct is 50*.
■ inside diameter > 100 mm If the pipe connection has an inside diameter > 100 mm and total pressure loss greater than 50 ^* , increase the inside diameter of the pipe connection.
* To determine the total pressure loss see table → "Individual pressure loss values" on page 17
Individual pressure loss values
| Pipe connection diameter >100 mm Flat duct connection | ||||||
| Model variant | Internal wall Pipe, smooth | Flexible pipe, grooved | Flexible pipe, corrugated | 110 x 54 smooth | 220 x 54 smooth | |
| straight piece per 1 m length 4 6 12 10 3 | ||||||
| Fixtures | ||||||
 | Bend | |||||
| R = 300 mm | 3 5 7 6 3 | |||||
| R = 200 mm 4 7 8 8 4 | ||||||
| R = 100 mm 6 9 10 12 6 | ||||||
| Diverters | 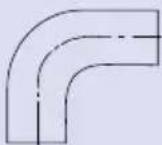 | Angle | 10 16 17 26 8 | |||
 | Elbow | 19 22 24 | >50 | 17 | ||
| Telescopic wall box with grid | 14 | 28 7 | ||||
| Wall box with backpressure flap | 6 | 13 3 | ||||
Total pressure loss values
| Total pressure loss | Pipe connection |
| 0 - 50 | 100 |
| 0 - 80 | 110 |
| 120 | |
| 130 |
Installation option
Notes
- Route the exhaust air duct in such a way that the dryer cannot draw the moist, warm exhaust air back again.
■ The outlet for the exhaust air must be designed or positioned in such a way as to prevent any additional backpressure (e.g. from a direct ingress of wind) in the escaping exhaust air, e.g. by using 90°, facing down → Page 19
■ The outlet for the exhaust air duct must be no more than 2.5 m higher than the exhaust air opening on the appliance.
Installation options for the exhaust air duct:
■ Through a wall box into the open air
Example: pipe connection - inside diameter = 100 mm, smooth
A = straight piece (1.0 m) 4
B = curved pipe (R = 200 mm) 4
C = straight piece (1.5 m) 6
D = pipe elbow 19
E = telescopic wall box with grid 14
Total pressure loss 47

■ Directly into the open air
Route the exhaust air duct directly into the open air via an exhaust air pipe through an open window.
Example: pipe connection - inside diameter = 100 mm, flexible pipe, corrugated
A = curved pipe (R = 300 mm) 7
B = straight piece (1.5 m) 18
C = curved pipe (R = 100 mm) 10
D = straight piece (0.5 m) 6
Total pressure loss 41

■ Through a wall box into chimneys or ventilation shafts
Notes
- It is not permitted to connect the exhaust air duct to chimneys which are connected to gas or coal-fired ovens/cookers or gas-fired heating systems.
- If the appliance is being connected to a moisture-insulated ventilation shaft the responsible chimney sweep must be informed and the approval of the local building department (building supervision office) or the owner of the building must be obtained.
Caution!
Risk of poisoning
If other appliances are operated in the room where the appliance is installed or in adjoining rooms, e.g. gas-fired heating systems, gas-fired boilers, coal-fired ovens connected to a chimney, or open fireplaces, a vacuum may be created, leading to waste gases being sucked back.
Note: In every case, have safe operation confirmed by the responsible chimney sweep, boiler engineer, ventilation specialist, etc.
Installing more than one dryer
Up to 7 exhaust air dryers can be connected to an intercepting pipe with a smooth internal wall.
Note: The following points must be observed:
It is imperative that there are drain check valves in the interception pipe for every dryer. These valves prevent the moist exhaust air from flowing back into the washing and drying room through dryers which are not in operation.
■ The outlet for the exhaust air must be arranged/routed in such way as to prevent any additional backpressure (e.g. from a direct ingress of wind) on the escaping exhaust air.
In every case, have safe operation confirmed by the responsible ventilation engineer/installer.
When connecting to the interception pipe, avoid the following:
■ mutual interference between dryers
■ discharge of moisture in the washing and drying room
■ higher pressure losses (increase in energy consumption and time)
■ The exhaust air ducts of the individual dryers (DT = R >= 100 mm) should already be extended to the dimension of the interception pipe upstream of the drain check valves.
■ Possible backpressure (e.g. caused by wind ingress) can be minimised by using a 90° bend, facing down.

Optional accessories
■ Washer-dryer stack connection set:
To save space, the dryer can be placed on top of a suitable washing machine of the same width and depth.
The dryer must be secured to the washing machine using this connection set.
Order number without pull-out worktop: WZ20311.
Platform:
For easier loading and unloading, use a platform to raise your dryer.
Transport laundry with the integrated clothes basket integrated in the platform's pull-out drawer.
Order number: WZ20500.
Exhaust air duct:
The exhaust air duct is extracted via a hose.
Order number: WZ20180.

The main points in brief

Switch off the dryer. Clean the fluff filter Clean the exhaust air duct
(at least once a year).

Getting to know your appliance
Dryer
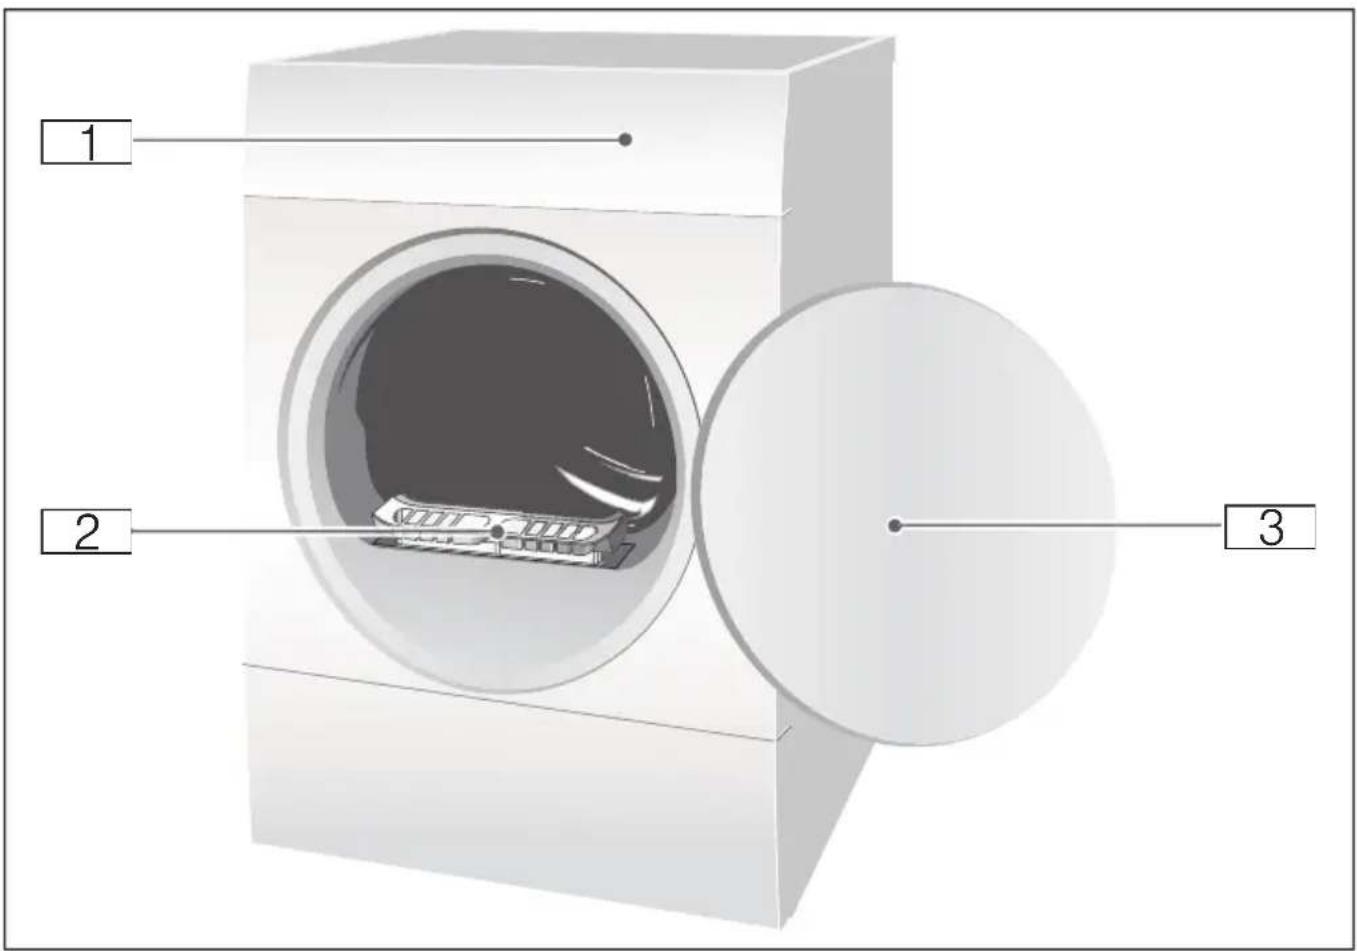
1 Control and display panel
2 Fluff filter
3 Dryer door
Control panel

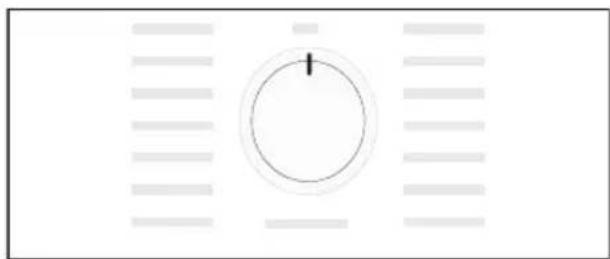
1 Use the program selector to switch the dryer on and off and to select the program.
2 Programm → Page 25.
3 Start button for starting or interrupting the program → Page 27.
4 Buttons → Page 27.
5 Display panel with buttons → Page 23.
Display panel
Buttons in the display panel

1 Select the degree of dryness.
2 Select the drying time.
3 Select the Ready in time.
4 Select Anti-Crease.
5 Select Low-Heat Drying.
For a detailed description of all buttons, see Page 27 onwards.
Display panel

☀¹ Fine adjustment of the dryness level.
Anti-crease selected.
Childproof lock selected.
Low-Heat Drying selected.
▶Ⅱ Start or Pause selected.
3 h Program delay in hours when "Ready in" time is selected.
1:27 Expected program duration in hours and minutes.
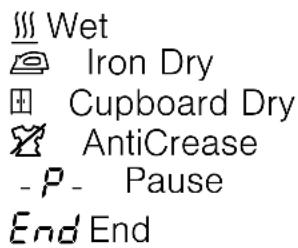
End-P-
Program progress:
Wet; Iron Dry; Cupboard
Dry; Anti-Crease; End and Pause.
Clean the fluff filters; → Page 30.

Laundry
Preparing the laundry

Warning
Risk of explosion or fire!
Remove any cigarette lighters and matches from pockets.
Caution!
The dryer drum and fabrics may be damaged.
Remove all objects from pockets and observe the following information:
■ Tie cloth belts, apron strings, etc. together or use a laundry bag.
■ Close zips, hooks and eyelets and buttons. Button up large items of laundry, such as covers.
■ Remove any metal objects, such as paper clips, from pockets.
■ To ensure a consistent drying result, sort laundry by fabric type and drying programme.
■ Always dry very small items of laundry, e.g. babies' socks, together with large items such as towels.
- Knitted fabrics such as T-shirts and jerseys often shrink the first time they are tumble-dried. Use a gentle programme.
- Do not overdry easy-care laundry. This increases creasing of the laundry.
■ Use timed programmes for single garments.
■ Some detergents and care products, e.g. starch or softeners, contain particles which may be deposited on the moisture sensor. This may impair the sensor function and in consequence the drying result.
Notes
- When washing laundry to be tumble-dried, use the correct amount of detergent and care products as specified in the manufacturer's instructions.
- Clean the moisture sensor regularly Page 32.
Sorting laundry according to:
☐ Suitable for tumble drying
Dry at normal temperature
Dry at low temperature
Do not tumble-dry
Note: Do not load laundry from the washing machine directly into the tumble dryer. Sort the spun laundry before placing it in the dryer drum.
If you dry thin, thick and multi-layer fabrics together, they will dry to differing degrees. To achieve an even drying result, you should therefore only dry together laundry of the same type of fabric and structure. If you feel that the laundry is still too damp, you can select a timed programme for subsequent drying Page 25.
Caution!
Possibility of material damage to the dryer or laundry.
Do not tumble-dry the following fabrics:
■ Laundry contaminated with oil.
■ Unwashed fabrics.
■ Non-breathable fabrics (e.g. rubber-coated).
- Easily damaged fabrics such as silk, synthetic curtains.

Programs and buttons
Programs
| Program and fabrics Maximum load and program set- | |
| tings/info | |
| Name of the programWhich fabrics is the program suitable for? | The maximum load is based on the dry weight of the fabricsPossible program settings |
| Cotton Cupboard Dry ExtraHard-wearing, heat-resistant fabrics that are made of more than one layer of cotton or linen and do not dry readily. | 7 kg |
| Cotton Cupboard DryNormal, hard-wearing and heat-resistant fabrics made of a single layer of cotton or linen. | 7 kg |
| Cotton Iron DryNormal, hard-wearing and heat-resistant fabrics made of a single layer of cotton or linen that need to be damp after drying and are suitable for ironing or hanging up. | 7 kg |
| Easy-Care Cupboard Dry ExtraSynthetic or blended fabrics that are made of more than one layer and do not dry readily. | 3.5 kg |
| Easy-Care Cupboard DryNormal synthetic or blended fabrics made of a single layer. | 3.5 kg |
| Easy-Care Iron DryNormal synthetic or blended fabrics made of a single layer that need to be damp after drying and are suitable for ironing or hanging up. | 3.5 kg |
| OutdoorWeatherproof and outdoor clothing with a membrane coating and water-repellent fabrics. | 1.5 kg |
| TowelsHard-wearing towels made of cotton. | 6 kg |
| MixMixed load consisting of cotton and synthetic fabrics. | 3 kg |
| Warm 🌐 | 3 kg |
| All types of fabric; time programme. Suitable for pre-dried or slightly damp laundry and for drying off multi-layered, thick laundry. | You can adjust the programme length using the button for the drying time. |
| Notes | |
| ■ Only dry wool, sports shoes and soft toys with the basket for woollens → Page 19. ■ In the time programme, the laundry's residual moisture is not automatically detected. If the laundry is still too damp after the drying programme, repeat the programme and, if required, extend the programme length. | |
| Cold 🌐 | 3 kg |
| All types of fabric. For freshening up or airing items of laundry that have not been worn for long. | You can adjust the programme length using the button for the drying time. |
| Shirts/Business | 1.5 kg |
| Non-iron shirts or blouses made of cotton, linen, synthetic fibres or blended fabrics. | |
| Rapid 40' | 2 kg |
| Synthetics and light cottons. | |
| Woollen finish | 3 kg |
| Machine-washable fabrics made of wool or containing wool. | |
| Notes | |
| ■ Fabrics become fluffier but not dry. ■ Remove fabrics once the programme has ended and allow to dry. | |
| Lingerie | 1 kg |
| For delicate, washable underwear, e.g. made of velvet, lace, Lycra, silk or satin. | |
Buttons
| Buttons Explanations and notes | |
| Note: Not all buttons and their functions can be selected in all programs. | |
| Adjust Level ※ | If the laundry is too damp after drying, you can finely adjust the dryness levels e.g. Cupboard Dry. The dryness level can be increased with the degree of dryness in three stages, from ※' to ※'.If you have adjusted the dryness level, the setting for all programmes with a selectable dryness level is retained even after the dryer is switched off.Note: The higher the degree of dryness, the longer the programme duration. |
| Drying Time 🎨 | Adjust the programme length for the time programmes. Between 20 minutes and 3 hours, in 10-minute increments. |
| Finish In ⏻ | The programme will end in 1-24 hrs. Set the "Ready in" time in increments of one hour to delay the start of the programme. The required number of hours after the programme ends is displayed in the display panel. |
| ∞ 3 sec.(Childproof lock) | Press and hold the "Ready in" time button and the drying time button at the same time for 3 seconds to activate or deactivate the childproof lock. |
| Less Ironing | The drum moves the laundry at regular intervals for 60 minutes after drying, in any program, to prevent creasing. Automatic anti-crease function can be extended by up to 180 min. |
| Low Heat | Reduced temperature for delicate fabrics, e.g. polyacrylic or elastane. Selecting the button will extend the drying time. |
| Start/Pause ▶II | Starts or pauses the programme. |

Operating the appliance
Loading laundry and switching on the dryer
Note: The dryer must be correctly positioned and connected, Page 13.
- Place the laundry in the drum.
- To switch the dryer on, turn the program selector to any program.
- Close the dryer door.
Caution!
Risk of material damage to the dryer or laundry.
Take care not to trap any laundry in the door.
Setting a program
Note: If you have activated the childproof lock, you must deactivate it before you can set a program, see Page 27.
- Select the required program; detailed information on the programs can be found from → Page 25 onwards.
- Use the program selector to set the required program. The default program settings for the selected program appear in the display panel.

natural_image
Simple diagram with a circular progress bar and arrow, no text or symbols presentNote: Default program settings are standard settings that are already defined when a program is selected. After selecting a program, you can see the default program settings in the display panel.
- If required, adjust the default program settings. You can find detailed information on this from → Page 25 onwards.
Starting the program
Press the Start button.
Note: If you want to lock the program to prevent it from being inadvertently adjusted, you can select the childproof lock, see Page 27.
Program sequence
The programme status is indicated in the display field.
e.g. Expected programme duration 1:27 in hours and minutes.
Note: When a programme is selected, the expected drying time for the recommended load is displayed. During drying moisture sensors detect the remaining moisture in the load and adjust the programme length (except timed programmes). This is visible via the time remaining leaping forward.
Changing the program or adding laundry
You can remove or add laundry and change or alter the program at any time during drying.
- To pause the program, open the dryer door or press the Start button.
- Add or remove laundry.
- Select another program or an additional function, if required.
- Close the dryer door.
- Press the Start button.
Note: The program duration in the display panel is updated depending on the load and residual moisture in the laundry. The values displayed may change after the program is changed or the load is adapted.
Program interruption
The program can be interrupted at any time; to pause, open the dryer door or press the Start button.
Caution!
Risk of fire. Laundry may catch fire.
If you cancel the program, you must remove the laundry items and spread them out so that the heat can disperse.
Program end
End appears in the display panel.
Removing laundry and switching off the dryer
- Remove the laundry.
- Turn the program selector to the "off" position.
natural_image
Simple circular diagram with a plus sign inside, surrounded by horizontal lines (no text or symbols)Clean the fluff filter
Note: During drying, fluff and hair from the laundry is trapped by the fluff filter. If the fluff filter is blocked or dirty, this reduces the flow of air, which prevents the dryer from achieving its maximum performance. Clean fluff filters also reduce energy consumption and the drying time.
Clean the fluff filter after each drying cycle:
- Open the dryer door and remove all fluff from the door.
- Remove the fluff filter.

natural_image
Diagram showing a circular object with an upward arrow inside, possibly indicating a process or operation (no text or symbols present)- Remove the fluff from the recess in the fluff filter.

natural_image
Circular object with two blue arrows pointing to a horizontal line inside, no text or symbols present.Note: Ensure that no fluff falls into the open shaft.
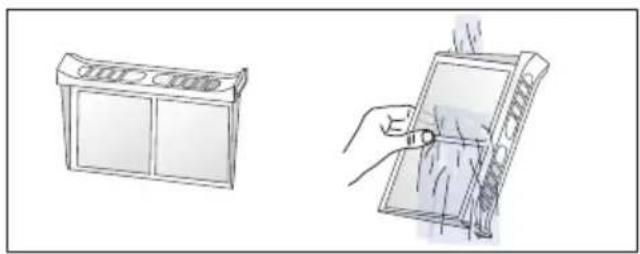
- Open the fluff filter and remove all the fluff.
- Rinse away the fluff under running water or clean the fluff filter in the dishwasher.
natural_image
Illustration of a microwave oven and its corresponding electric fan device (no text or symbols)- Dry the fluff filter, close it and reinsert the fluff filter.

natural_image
Cross-sectional view of a circular mechanical component with a blue arrow pointing to a textured surface (no text or symbols)Caution!
The dryer may be damaged.
Do not operate the dryer without a fluff filter or if the fluff filter is defective.

Signal setting
You can change the following settings:
■ The spin speed that is used for spinning your laundry before it is dried,
■ The volume of the audible signal at the end of the program,
■ The volume of the audible button signals.
You will need to activate the setting mode in order to change these settings.

Activating setting mode
- Switch the dryer on.
-
Select the "Cottons" programme in position 1 and wait for five seconds. The symbols go out in the display panel and the programme duration is displayed.
-
Press and hold the Start button and, at the same time, turn the programme selector clockwise to position 2.
-
The spin speed is shown in the display.
-
Press the "Finish in" time button or the drying time button to change the spin speed.
-
Turn the program selector clockwise to position 3.
-
The volume of the audible signal at the end of the program is shown in the display.

0 = off, 1 = quiet, 2 = medium, 3 = loud, 4 = very loud
- Press the "Finish in" time button or the drying time button to change the volume.
- Turn the program selector clockwise to position 4.
- The volume for the audible button signal is shown in the display.

0 = off, 1 = quiet, 2 = medium, 3 = loud, 4 = very loud
- Press the "Finish in" time button or the drying time button to change the volume.
Exiting setting mode
Turn the program selector to the "Off" position once you have set the required spin speed and the volume. The settings have now been saved.

Cleaning
Cleaning the dryer and the control panel

Warning
Risk of death!
There is a risk of electric shock as the dryer is operated with electricity. Disconnect the dryer from the mains before cleaning.
Clean the dryer using only water and a soft, damp cloth.
Remove all detergent residue, spray residue or other residues immediately. Do not use cleaning agents or agents for pre-treating laundry (e.g. prewash sprays, stain removers). Do not use high-pressure cleaners or steam jet cleaners to clean your appliance.
Cleaning the moisture sensor
Note: The dryer is equipped with a stainless-steel moisture sensor. The moisture sensor measures how damp the laundry is.
After long periods of usage the moisture sensor may become covered by a fine layer of limescale or residues of detergents and care products. Such residues must be removed regularly as the sensor function and in consequence the drying result may be impaired.
Open the door and clean the moisture sensor with a coarse sponge.

natural_image
Illustration of a computer monitor with a blue arrow pointing to a stack of books inside (no text or symbols)Caution!
Moisture sensor may be damaged.
Do not clean moisture sensors with abrasives and steel wool.
Cleaning the exhaust air duct
Notes
-
Check the exhaust air duct as it may be clogged.
■ Clean the exhaust air duct at least once a year.
■ Do not bend the exhaust air duct. -
Switch off the dryer and allow it to cool down.
- Disconnect the mains plug.
- Remove the exhaust air duct.
- Clean the exhaust air duct.
- Refit the exhaust air duct → Page 18.

Faults and what to do about them
| Faults Cause/remedy | |
| on the display panel. | Clean the fluff filter. Select the Start button to reset the displayed indication and then select the Start button again to restart the appliance if necessary.Check if exhaust air duct is blocked or bent. Clean the exhaust air duct → Page 32. If necessary, clean the insect screen on the exhaust air pipe. |
| Dryer does not start. Mains plug plugged in or fuse checked?Start button selected?Dryer door open? Close the door.Program selected? Select a program.Childproof lock activated? Deactivate the childproof lock."Ready in" time selected? Program starts after a delay. | |
| Display panel goes off and Start button flashes. | Not a fault. Energy saving mode is active → Page 12. |
| Programme terminates shortly after starting. | Ambient temperature greater than 5 °C?Is the appliance loaded with the laundry?Load too small for selected programme? Use timed programme.Loaded laundry dry? |
| The door opens by itself. Push the door closed until you hear it engage. | |
| Creasing. Creasing occurs when you have exceeded the maximum load or selected the wrong program for the type of fabric. All the required information can be found in the program table.Remove clothes immediately after drying. Creasing may occur if they are left in the drum. | |
| Water is leaking out. Not a fault. The dryer may be positioned on an incline. Level the dryer. | |
| Laundry is not dried correctly or is still too damp. | After the end of the program, warm laundry feels damper than it actually is.Spread the laundry out and allow the heat to disperse.Finely adjust the dryness level - this extends the drying time but does not increase the temperature. Your laundry will become drier → Page 27.Select a program with a longer drying time or increase the drying level. This does not increase the temperature.Select a timed program for subsequent drying of laundry that is still damp → Page 25.If you have exceeded the maximum load for the program, the laundry may not be dried properly.Clean the moisture sensor in the drum. A fine layer of limescale or particles from the detergent and care products used in washing may residue on the sensor and adversely affect it performance. It may cause that your laundry will not dry properly → Page 32.Drying has been interrupted as a result of a power cut, because the condensate container is full or because the maximum drying time has been exceeded.Note: . See also the laundry tips → Page 24. |
* depending on the model
| Faults Cause/remedy | |
| Drying time too long? | The fluff filter may be dirty and cause a longer drying time. Clean the fluff filter.Unsuitable programme selected?Dryer installed too closely to other objects? Provide adequate air circulation.If the ambient temperature is higher than 35 °C, this may extend the drying time.Insufficient air circulation in the room may increase the drying time. Ventilate the room.Mains failure? Restart the dryer. |
| Condensation in the exhaust air duct. | Exhaust air duct too long? Check the maximum exhaust air duct lenght. Further information Page 15. |
| Displayed drying time changes during drying process. | Not a fault. The moisture sensors detect the remaining moisture in load and correct the programme lenght (except timed programmes). |
| Humidity in the room increases. | Not a fault. Make sure the room is sufficiently ventilated.Exhaust air duct installed/the exhaust air routes directly into the open air? Page 15 |
| One or more indicator lights are flashing. | Clean the fluff filter Page 30.Check the installation condition Page 13.Exhaust air duct blocked or bent? Clean the exhaust air duct Page 32.Switch off, allow to cool, switch back on, and restart the programme. |
| Power cut. The drying program is interrupted. Remove the laundry and spread it out, or restart the program.Note: . Be careful as the door , the drum and the laundry may be hot. | |
| * depending on the model | |
Note: If you cannot rectify the fault yourself by turning the dryer off and on, please contact our after-sales service.

After-sales service
After-sales service
If you cannot rectify the fault yourself (faults, what to do?), please contact our after-sales service. We will always find an appropriate solution to avoid unnecessary visits by engineers.
The contact information for your nearest after-sales service can be found here or in the enclosed after-sales service directory.
Please provide after-sales service with the dryer's product number (E-no.) and production number (FD).
E-Nr. FD
You can find this information on the inside of the dryer door or on the rear of the dryer.
Trust the expertise of the manufacturer.
Contact us. You can therefore be sure that the repair is carried out by trained service technicians who carry original spare parts.

Consumption values
| Program Spin speed which is used for spinning the laundry | Duration** Energy consumption** | |
| Cotton 7 kg 7 kg | ||
| Cupboard Dry* 1400 rpm 111 min 3.49 kWh | ||
| 1000 rpm 130 min 4.10 kWh | ||
| 800 rpm 150 min 4.72 kWh | ||
| Iron Dry* 1400 rpm 85 min 2.66 kWh | ||
| 1000 rpm 100 min 3.13 kWh | ||
| 800 rpm 115 min 3.60 kWh | ||
| Easy-Care 3.5 kg 3.5 kg | ||
| Cupboard Dry* 800 rpm 50 min 1.41 kWh | ||
| 600 rpm 62 min 1.75 kWh | ||
| * | Program setting for testing in accordance with the applicable IEC 61121 standard. | |
| ** | The values may differ from those specified, depending on the type of fabric, composition of laundry to be dried, residual moisture in the laundry, the degree of dryness that has been set, the amount of laundry being loaded, the environmental conditions, and any additional functions that have been activated. | |

Technical data
Dimensions:
85 × 60 × 60 cm
Height x width x depth
Weight:
Approx. 37 kg
Maximum load:
7 kg
Connected voltage:
220 - 240 V
Connected load:
Max. 2200 W
Fuse:
10 A
Drum interior light\*
Ambient temperature:
5 - 35 °C

Repair order and advice in the event of faults
GB 0344 892 8999 (Calls charged at local or mobile rate.)
IE 01450 2655 (0.03 € per minute at peak. Off peak 0.0088 € per minute.)
You can find the contact information for all countries in the attached after-sales service directory.
BSH Hausgeräte GmbH
Carl-Wery-Straße 34
81739 München
GERMANY
siemens-home.bsh-group.com
Manufactured by BSH Hausgeräte GmbH under Trademark License of Siemens AG


- Your new tumble dryer
- Display rules
- ⚠ Warning!
- Caution!
- Note/tip
- 2. 3. / a) b) c)
- Contents
- Intended use
- Before you switch on the appliance:
- Safety instructions
- Children/people/pets
- Warning
- Risk of death!
- ⚠ Warning Risk of death!
- ⚠ Warning Risk of suffocation!
- ⚠ Warning Risk of poisoning!
- ⚠ Warning Eye/skin irritation!
- Installation
- Risk of electric shock/fire/material damage/damage to the appliance!
- Risk of fire/poisoning!
- Risk of fire/material damage/ damage to the appliance!
- Risk of injury/material damage/damage to the appliance!
- ⚠ Warning Risk of injury!
- Operation
- ⚠ Warning Risk of explosions/fire!
- ⚠ Warning Risk of fire/material damage/ damage to the appliance!
- Risk of poisoning!
- Risk of injury!
- Material damage/damage to the appliance
- Cleaning/Maintenance
- Risk of electric shock/material damage/damage to the appliance!
- Environmental protection
- Packaging/used appliance
- Do's
- Don'ts
- Energy-saving tips
- Installation and connection
- Scope of delivery
- Installing and connecting the dryer
- Children may lock themselves in the dryer, putting their lives at risk!
- Risk of injury
- Risk of material damage to the dryer or fabrics.
- Grounding Instructions
- Danger of death!
- Notes
- Installation for the exhaust air duct
- Damage to the appliance
- When operating the dryer without an exhaust air duct, the following must also be observed:
- Connections on the dryer
- ■ on the back panel
- ■ on the left side panel
- Seal the opening in the back panel with the cover.
- Exhaust air duct
- Pressure losses
- Pressure losses through friction
- Pressure losses due to fixtures
- Installation for pipe connection
- Individual pressure loss values
- Total pressure loss values
- Installation option
- Installation options for the exhaust air duct:
- ■ Through a wall box into the open air
- Total pressure loss 47
- ■ Directly into the open air
- Total pressure loss 41
- ■ Through a wall box into chimneys or ventilation shafts
- Risk of poisoning
- Installing more than one dryer
- Note: The following points must be observed:
- When connecting to the interception pipe, avoid the following:
- Optional accessories
- ■ Washer-dryer stack connection set:
- Platform:
- Exhaust air duct:
- The main points in brief
- Getting to know your appliance
- Dryer
- Control panel
- Display panel
- Laundry
- Preparing the laundry
- Risk of explosion or fire!
- The dryer drum and fabrics may be damaged.
- Sorting laundry according to:
- Possibility of material damage to the dryer or laundry.
- Do not tumble-dry the following fabrics:
- Programs and buttons
- Buttons
- Operating the appliance
- Loading laundry and switching on the dryer
- Risk of material damage to the dryer or laundry.
- Setting a program
- Starting the program
- Program sequence
- Changing the program or adding laundry
- Program interruption
- Program end
- Removing laundry and switching off the dryer
- Clean the fluff filter
- The dryer may be damaged.
- Signal setting
- Activating setting mode
- Exiting setting mode
- Cleaning
- Cleaning the dryer and the control panel
- Cleaning the moisture sensor
- Moisture sensor may be damaged.
- Cleaning the exhaust air duct
- Faults and what to do about them
- After-sales service
- Trust the expertise of the manufacturer.
- Technical data
- Dimensions:
- Weight:
- Maximum load:
- Connected voltage:
- Connected load:
- Fuse:
- Drum interior light\*
- Ambient temperature:
- Repair order and advice in the event of faults
Brand : SIEMENS
Model : WT34A202IN
Category : Coffee maker