38219 - Audio/video extension Lindy - Free user manual and instructions
Find the device manual for free 38219 Lindy in PDF.
| Product Type | HDBaseT HDMI 2.0 Audio/Video Extender |
| Brand | Lindy |
| Model | 38219 |
| Category | Audio/Video Extender |
| Main Function | Extension of HDMI 2.0 signals over long distance via Cat.6/7 cable |
| Maximum Resolution | Ultra HD 4K 60Hz (4:4:4 8bpc) with visually lossless compression |
| Transmission Distance (1080p) | Up to 100m with solid-core Cat.6 cable |
| Transmission Distance (4K) | Up to 70m with solid-core Cat.6 cable |
| HDR Compatibility | HDR10, HDCP 2.2/1.4 |
| Input Connectors | HDMI IN, HDBaseT OUT, IR IN, RS-232, Ethernet RJ45 |
| Output Connectors | HDMI OUT, HDBaseT IN, IR OUT, RS-232, Ethernet RJ45 |
| Power Supply | 24VDC 1A (power adapter included) |
| PoC (Power over Cat.6) | Yes, allows powering the receiver via Cat.6 cable with a single power supply |
| Recommended HDMI Cable Length | 5m max for 4K 30Hz, 2m max for 4K 60Hz |
| Casing | Metal with mounting kit |
| Dimensions (L x H x D) | 157 x 90 x 20 mm (each unit) |
| Unit Weight | 0.333 kg (each unit) |
| Operating Temperature | 0°C to 40°C |
| Humidity | 20 to 90% RH (non-condensing) |
| Warranty | 2 years (lifetime technical support) |
| Package Contents | Transmitter, receiver, 2 IR emitter cables, 2 IR receiver cables, 2 Phoenix RS232 connection blocks, mounting kit, 24VDC power supply, manual |
Frequently Asked Questions - 38219 Lindy
User questions about 38219 Lindy
0 question about this device. Answer the ones you know or ask your own.
Ask a new question about this device
Download the instructions for your Audio/video extension in PDF format for free! Find your manual 38219 - Lindy and take your electronic device back in hand. On this page are published all the documents necessary for the use of your device. 38219 by Lindy.
USER MANUAL 38219 Lindy
Only use a direct Cat.5e/6/7 cable connection between the HDBaseT ports. Do not connect these ports to Network or Ethernet equipment or any active components
WICTIG !!!
Thank you for purchasing the Lindy C6 HDMI 2.0 18G HDBaseT Extender. This product has been designed to provide trouble free, reliable operation. It benefits from both a LINDY 2 year warranty and free lifetime technical support. To ensure correct use, please read this manual carefully and retain it for future reference.
The C6 Lindy HDMI 2.0 18G HDBaseT Extender is a cost effective, high performance solution for sending HDMI 2.0 signals over long distances, helping break the distance barrier for HDMI 2.0. Using a single low cost Cat.6 cable to make the long distance connection, the HDMI Extender provides full support for Ultra HD 4K 60Hz resolutions, including support for HDR10 (High Dynamic Range) and HDCP 2.2, ensuring it meets the demands of contemporary AV installations. Support for the full range of HDMI 2.0 defined resolutions, which need up to 18Gbps of bandwidth, requires the Extender to use a visually lossless compression, latency free technology, to enable the extension of signals via HDBaseT Technology.
For added convenience and to enable discreet installation of the Receiver unit the Extender supports PoC (Power over Cat.6) allowing a single power supply to be used with either the Transmitter or Receiver to power both units.
Please Note: The quoted lengths and resolutions are possible with a direct connection between Transmitter and Receiver using good quality Cat.6 solid core cable. Using a different cable type, or introducing wall plates, couplers or patch panels will result in a reduction of possible distances.
Package Contents
HDMI 2.0 18G Transmitter
HDMI 2.0 18G Receiver
- 2 x IR Emitter Cables
- 2 x IR Receiver Cables
2 x Phoenix Block for RS232
- Mounting Kit
24VDC 1A Power Adapter (EU, UK, US, AUS)
This manual
Specification
HDMI 2.0b 18Gbps compliant
- Extends HDMI 2.0b, 10/100 Ethernet, RS232 & Bi-directional IR
Using solid core Cat.6 U/UTP or F/UTP cable supports resolutions up to:
100m 1080p60 (4:4:4 12bit) / 3D 1080p30 (4:4:4 12bit)
- 70m 4K 2160p60 (4:4:4 8bpc) / 1080p120 (4:4:4 8bit) / 1080p60 (4:4:4 16bit)
Compatible with HDR10
Support for HDCP 2.2/1.4, CEC and Lip Sync pass-through
- PoC (Power over Cat.6) requires only a single 24V 1A PSU to be attached
- Screw Type 5.5/2.1mm (Outer/inner) DC Socket
Audio Pass-through of all HDMI audio formats including Dolby Atmos and DTS:X
Bi-directional control of IR (30-60kHz) equipment via the extender
Maximum HDMI Cable length: Up to 4K 30Hz: 5m in/out, 4K 60Hz: 2m in/out
- ESD Protection: ± 8kV (air-gap discharge)
Human Body Model: ± 4kV (contact discharge)
- Operating Temperature: 0^ - 40^ (32°F - 104°F)
Storage Temperature: -20^ - 60^ (-4°F - 140°F)
Relative Humidity: 20 - 90% RH (Non-condensing)
Metal Housing with mounting kit
Dimensions (WxDxH): 157x90x20mm (6.18x3.54x0.79in) each unit
Weight: 0.333kg (0.73lb) each unit
HDBaseT™ and the HDBaseT Alliance logo are trademarks of the HDBaseT Alliance.
Overview
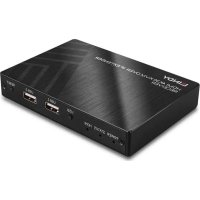
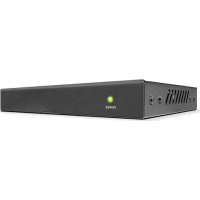
Transmitter - Front & Back Panels
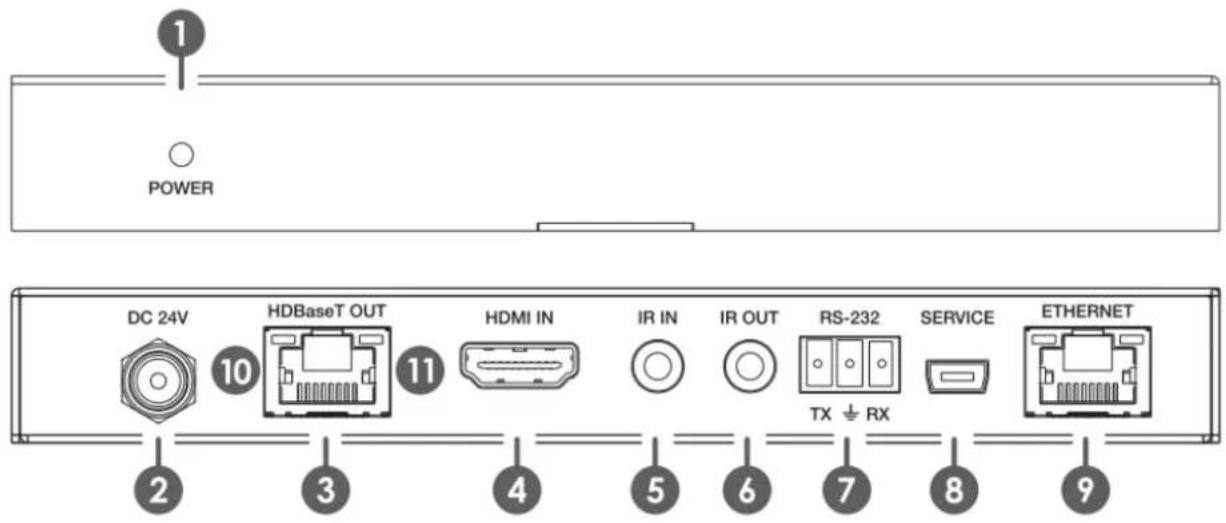
- POWER: Illuminates when the unit is powered
- DC 24V: Plug the supplied 24V DC power supply into the unit
- HDBaseT OUT: Connect to the HDBaseT IN port on the Receiver unit with a single Cat.6/7 cable for transmission of all data signals - never connect to a network port
- HDMI IN: Connect to an HDMI source device using an HDMI cable
- IR IN: Connect the supplied IR Extender cable for IR signal reception. Ensure that remote being used is within the direct line-of-sight of the IR Extender
- IR OUT: Connect the supplied IR Blaster Cable for IR signal transmission. Place the IR Blaster in direct line-of-sight of the equipment to be controlled
- RS-232: Connect to a PC, Serial Controller or Serial device via phoenix block 3 way connection for the transmission of RS-232 commands
- SERVICE: Reserved for future use
- ETHERNET: Connect to an internet or network connection – never connect to an HDBaseT port
User Manual English
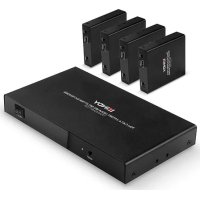
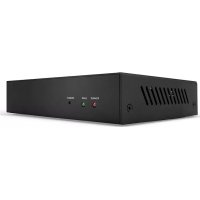
Receiver - Front & Back Panels


- POWER: Illuminates when the unit is powered
- DC 24V: Plug the supplied 24V DC power supply into the unit (if not connected to the Transmitter)
- HDBaseT IN: Connect to the HDBaseT OUT port on the Transmitter unit with a single Cat.6/7 cable for transmission of all data signals - never connect to a network port
- HDMI OUT: Connect to an HDMI display using an HDMI cable
- IR IN: Connect the supplied IR Extender cable for IR signal reception. Ensure that remote being used is within the direct line-of-sight of the IR Extender
- IR OUT: Connect the supplied IR Blaster Cable for IR signal transmission. Place the IR Blaster in direct line-of-sight of the equipment to be controlled
- RS-232: Connect to a PC, Serial Controller or Serial device via phoenix block 3 way connection for the transmission of RS-232 commands
- SERVICE: Reserved for future use
- ETHERNET: Connect to an internet or network connection – never connect to an HDBaseT port
IR Receiver IR Emitter

Installation
Important! Before starting the installation, please ensure that all devices are powered off.
Please Note: The maximum HDMI cable length which can be used in/out is 5m with resolutions up to 4K 30Hz, or 2m with 4K resolutions with 60Hz refresh rate.
- Connect your HDMI equipped source device to the Transmitter unit using a good quality HDMI cable.
- Connect one end of the Cat.6/7 cable (max. length 100m @ 1920x1080p or 70m @ 3840x2160p) to the HDBaseT OUT port on the Transmitter and the other end to the HDBaseT IN port of the Receiver. U/UTP or F/UTP solid core installation cable is recommended.
- Use another HDMI cable to connect your HDMI display device to the HDMI output port on the Receiver unit.
- Plug the DC power supply into the Transmitter or Receiver and switch on.
- Power on your source device and display to complete the installation.
In addition to the basic installation steps outlined above the HDMI 2.0 18G Extender can also provide the following additional/optional functionality:
10/100 Ethernet
The Transmitter and Receiver units both feature a single RJ45 port for the connection of network equipment such as a Router, Network Switch, IP Camera, Wireless Access Point or Smart TV.
RS-232 Serial
The Transmitter and Receiver both feature a phoenix block Serial connection for the extension of control signals.
Infrared Control
The Transmitter and Receiver units both feature an IR In and Out port, with two pairs of IR extension cables provided. The extension cables allow an IR remote control to be used from the Transmitter to the Receiver or vice versa.
Troubleshooting
There is no display on the screen.
- It has been found that there are significant differences in the cable lengths/types and even input ports which can be used on different brands of HDTV using HDMI 2.0 4K 60Hz. If you experience problems, please use the following steps:
Try a different input port on your HDTV.
- Reduce the cable length on the Input and Output to 1m .
Try a different type of 1m HDMI Cable.
- Check that the DC plug and jack used by the external power supply is firmly connected and that the power LED is illuminated on both the Transmitter and Receiver.
- Check that the Cat.6/7 cable is plugged in correctly and that the Green Link Status LED on the left side of both the HDBaseT In and Out ports are lit.
- Check that the Yellow Sync Status LED on the right side of the HDBaseT In and Out ports are flashing, if not please power cycle the source and display.
- For several HDMI devices it may be helpful to unplug and replug their HDMI connection to re-initiate the HDMI handshake and recognition.
Power off all the devices, then power on in this order: first, the extender, then the display and finally the source. - Reduce the length of Cat.6/7 or HDMI cable used, or use a higher quality cable.
Einführung
This equipment complies with the requirements relating to Electromagnetic Compatibility Standards. It has been manufactured under the scope of RoHS compliance.
This equipment has been tested and found to comply with the limits for a Class B digital device, pursuant to part 15 of the FCC Rules. These limits are designed to provide reasonable protection against harmful interference in a residential installation.
You are cautioned that changes or modification not expressly approved by the party responsible for compliance could void your authority to operate the equipment.
This device complies with part 15 of the FCC Rules.
Operation is subject to the following two conditions:
- This device may not cause harmful interference, and
- This device must accept any interference received, including interference that may cause undesired operation.
WEEE (Waste of Electrical and Electronic Equipment), Recycling of Electronic Products
Europe, United Kingdom
In 2006 the European Union introduced regulations (WEEE) for the collection and recycling of all waste electrical and electronic equipment. It is no longer allowable to simply throw away electrical and electronic equipment. Instead, these products must enter the recycling process.
Each individual EU member state has implemented the WEEE regulations into national law in slightly different ways. Please follow your national law when you want to dispose of any electrical or electronic products. More details can be obtained from your national WEEE recycling agency.