38265 - Audio/video extension Lindy - Free user manual and instructions
Find the device manual for free 38265 Lindy in PDF.
| Product Type | KVM over IP Extension Receiver |
| Brand | Lindy |
| Model | 38265 |
| Category | Audio/Video Extension |
| Power Supply | DC 5V via included power adapter |
| Maximum Resolution | 4K@30Hz 4:4:4 (8-bit) |
| Supported Standards | HDMI 1.4b, HDCP 1.4 |
| Video Ports | 1 x HDMI OUT |
| USB Ports | 2 x USB Type A (for keyboard and mouse) |
| Network Port | 1 x RJ45 (UTP) Cat.5e/6 |
| Infrared Port | 1 x 3.5 mm port for IR receiver |
| Maximum Distance (point-to-point) | 150 m with Cat.5e/6 UTP cable |
| Multipoint Configuration | Yes, via dedicated network switch or VLAN |
| Main Functions | HDMI, USB and IR extension over IP; EDID copy |
| Compatible USB Devices | Wired USB keyboard and mouse (HID) |
| Care and Cleaning | Clean with a soft, dry cloth |
| Safety | Use only the supplied power adapter; do not expose to moisture |
| Warranty | 2 years (lifetime technical support) |
| Package Contents | Receiver, multi-country power supply, IR receiver cable, manual |
Frequently Asked Questions - 38265 Lindy
User questions about 38265 Lindy
0 question about this device. Answer the ones you know or ask your own.
Ask a new question about this device
Download the instructions for your Audio/video extension in PDF format for free! Find your manual 38265 - Lindy and take your electronic device back in hand. On this page are published all the documents necessary for the use of your device. 38265 by Lindy.
USER MANUAL 38265 Lindy
KVM Over IP Extender
User Manual English Benutzerhandbuch Deutsch Manuel Utilisateur Francais Manuale Italiano
No. 38264 - Transmitter

No. 38265 - Receiver
lindy.com
Introduction
Thank you for purchasing the Lindy KVM Over IP Extender system. This product has been designed to provide trouble free, reliable operation. It benefits from both a LINDY 2-year warranty and free lifetime technical support. To ensure correct use, please read this manual carefully and retain it for future reference.
The Lindy KVM Over IP Extender lets you control an HDMI and USB source through a standard Ethernet network, reaching a maximum resolution of 4K30Hz and adding a convenient IR extension feature to let you control the remote appliance through a native IR remote control. This system can work both in point to point (using one transmitter No.38264 and receiver No.38265 directly connected with an Ethernet cable) and point to multi-point (using one transmitter and many receivers connected through a dedicated Ethernet Switch or via a dedicated VLAN) configurations, enabling the control of a single system from different remote locations.
Package Contents
Transmitter Unit (No.38264)
Transmitter Unit
Multi-country Power Supply
- USB Type A Male to Type A Male cable
- IR Transmitter Cable
This manual
Receiver Unit (No.38265)
Receiver Unit
Multi-country Power Supply
IR Receiver Cable
This manual
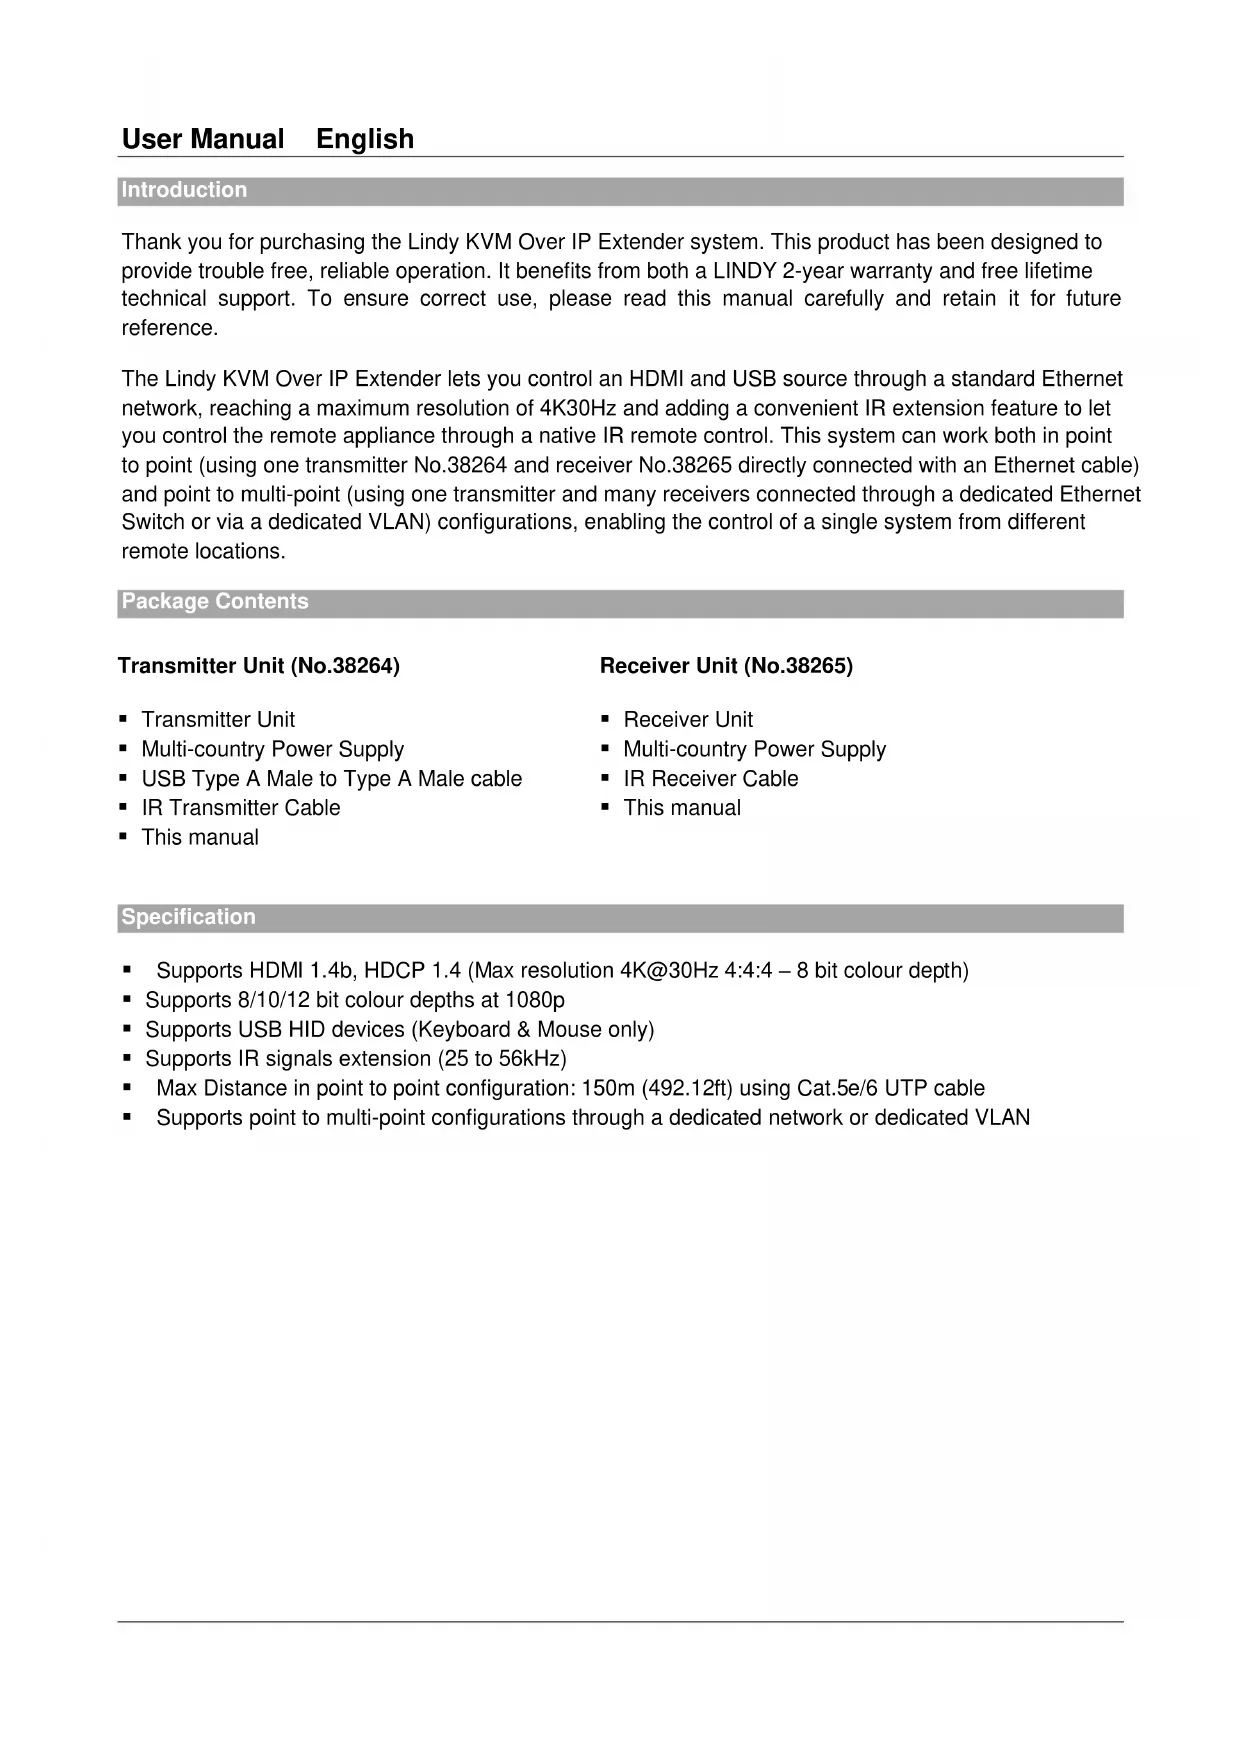
Specification
Supports HDMI 1.4b, HDCP 1.4 (Max resolution 4K@30Hz 4:4:4 - 8 bit colour depth)
Supports 8/10/12 bit colour depths at 1080p
Supports USB HID devices (Keyboard & Mouse only)
Supports IR signals extension (25 to 56kHz)
Max Distance in point to point configuration: 150m (492.12ft) using Cat.5e/6 UTP cable
Supports point to multi-point configurations through a dedicated network or dedicated VLAN
Overview
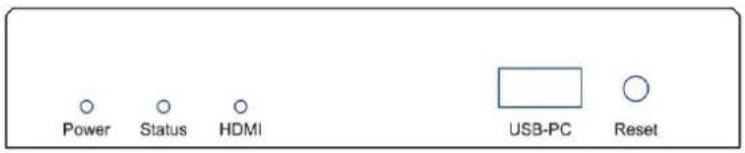
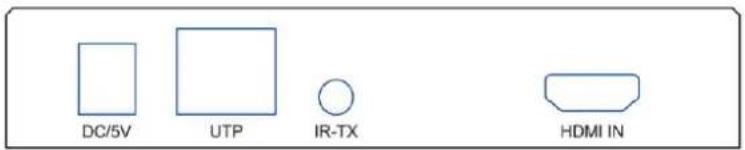
No. 38264 - Transmitter

Port, button and LED description:
Power LED: Power indicator
- Status LED: Status indicator - slow flash: normal operation / quick flash: abnormal operation
HDMI LED: Indicates the presence of an HDMI signal when lit
- USB-PC port: Connect this port to a host device's USB port
- Reset button: Press this button to re-initialize the unit
DC/5V port: Connect to the DC connector of the included power supply
- UTP Network port: Connect a Cat.5e/6 cable
IR-TX port: Connect the included IR Transmitter cable
- HDMI IN port: Connect the video source using an HDMI cable
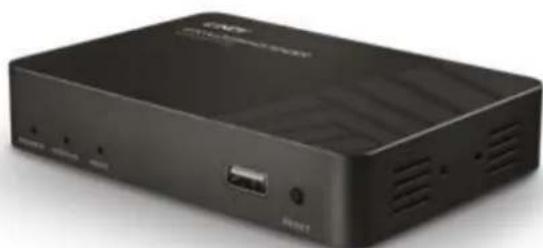
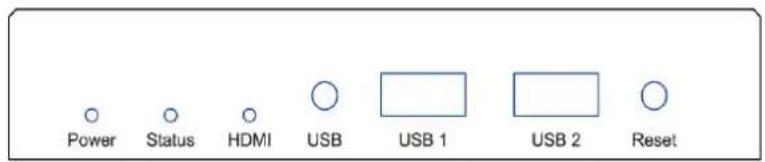
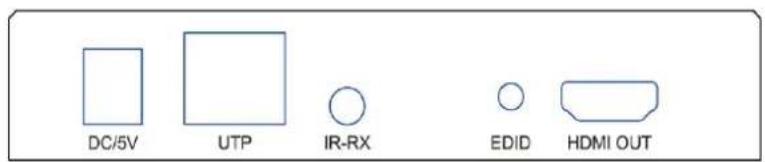
No. 38265 - Receiver
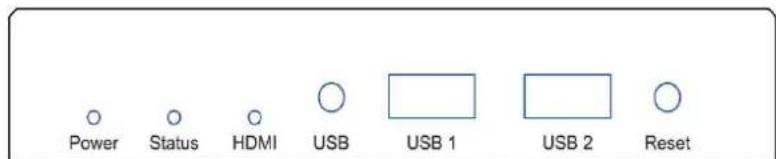
Port, button and LED description:
Power LED: Power indicator
- Status LED: Status indicator - slow flash: normal operation / quick flash: abnormal operation
HDMI LED: Indicates the presence of an HDMI signal when lit
- USB button: Press to get control of the source USB device
- USB 1 & USB 2 ports: Connect these ports to a standard USB keyboard and mouse
- Reset button: Press this button to re-initialize the unit
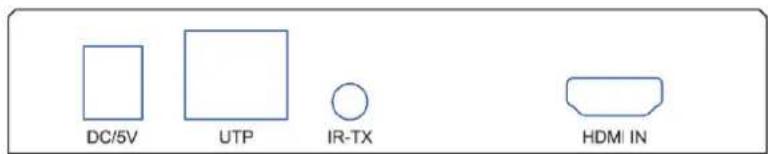
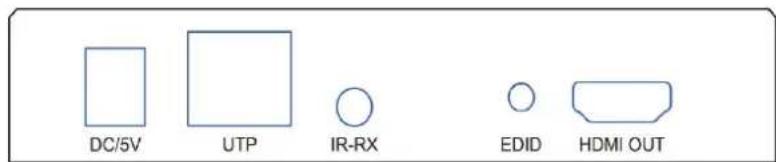
DC/5V port: Connect to the DC connector of the included power supply
- UTP Network port: Connect a Cat.5e/6 cable
IR-RX port: Connect the included IR Receiver cable
- EDID button: Press for 3 seconds to copy the connected display EDID to all receivers within the same network segment
HDMI OUT port: Connect to an HDMI display / projector using an HDMI cable
Installation
Please refer to the following installation examples to set up your system.
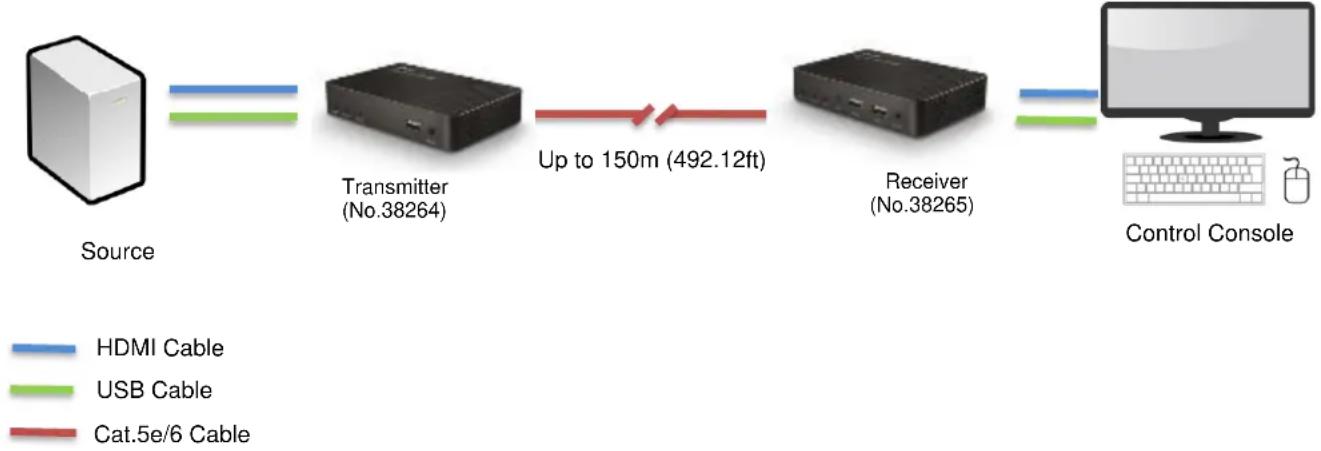
POINT TO POINT CONFIGURATION
In this configuration please follow these steps:
- Connect your HDMI source to the HDMI Transmitter using a High Speed HDMI cable (not included).
- Connect one end of the Cat.5e/6 cable (maximum length 150m or 492.12ft – not included) to the RJ45 (UTP) port on the Transmitter, and the other end of the cable to the RJ45 (UTP) port of the Receiver. Lindy recommends using solid core installation Cat.5e UTP cable or higher.
- Connect your HDMI display device to the HDMI OUT port on the Receiver using a High Speed HDMI cable.
- Connect a free USB port on the source device to the USB-PC port on the Transmitter using the included USB Type A cable.
- Connect a USB keyboard and mouse to the USB 1 and USB 2 ports on the Receiver.
- To use the IR remote control functionality, connect the included IR Transmitter cable to the 3.5mm IR port on the Transmitter and the IR Receiver cable to the IR port on the Receiver.
- Place the IR Transmitter in front of the IR port of the equipment you want to control, ensuring the Eye is in a clear line of sight.
- Power on both the HDMI source and display.
- Plug the included DC power supply into the Transmitter and Receiver. The power LED will illuminate on both units to show they are receiving power.
- The devices will start to communicate and set up the link. When the link is set up the Status LED will illuminate and flash slowly on both units.
- You can now start using the remote console.
Please Note: In order to copy the EDID check that the Transmitter and Receiver are connected and powered on correctly. When the display shows 'Wait Link Up' press and hold the EDID button on the Receiver for at least 3 seconds and release when the display becomes blank. The EDID has now been successfully updated.
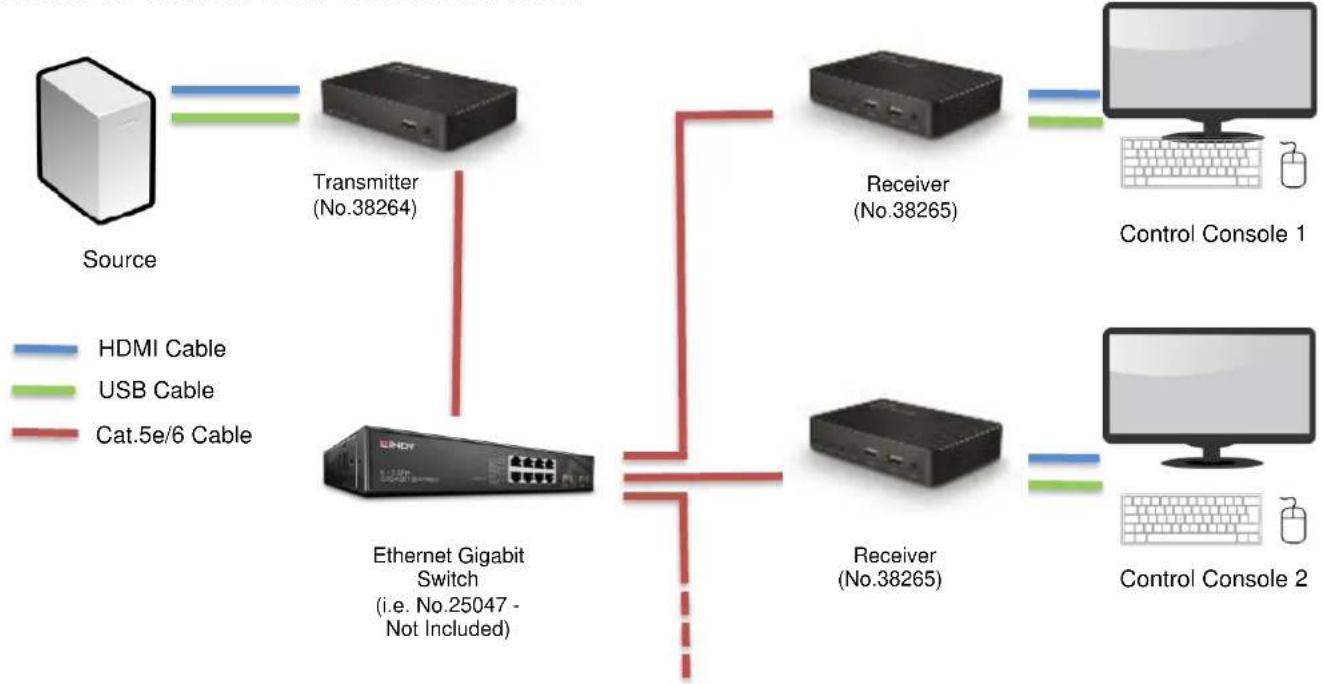
POINT TO MULTI POINT CONFIGURATION
To create a point to multi point installation please be sure to use a dedicated Gigabit Ethernet Switch or a dedicated VLAN created on a Gigabit switch.
To install a point to multi-point configuration please follow the steps in the previous section taking care to repeat all steps involving the receiver for each unit installed.
Please Note: When using multiple Receivers and USB input devices in a point to multi-point configuration press and hold the USB button on any Receiver to gain control of the HDMI source device from that specific control console.
IMPORTANT! As the extender uses the Broadcast protocol please ensure that you are using a dedicated network switch or a port based VLAN before connecting the extender, otherwise you may flood the network causing disruption for other connected devices.
Troubleshooting
There is no display on the screen.
- Check that the DC plug and jack used by the external power supply are firmly connected.
- Check that the Cat.5e/6 or higher cable is plugged in correctly and that the Status LED is flashing slowly.
- Check that the HDMI source and display are both powered on and active.
- Power off all the devices, then power on in this order: first, the Transmitter and Receivers, then the display and finally the source.
- For some HDMI devices it may be helpful to unplug and re-plug their HDMI connection to re-initiate the HDMI handshake and recognition.
- Reduce the length of HDMI cable used, or use a higher quality cable. Please refer to the Specification section for the maximum distance/resolution/cable combinations.
- Check no other IP device is generating traffic on the same network dedicated to the extender system.
USB Keyboard or mouse are not working
- Check that the DC plug and jack used by external power supply are firmly connected.
- Check that the CAT5e/6 or higher cable is plugged in correctly and that the Status LED is flashing slowly.
- Check that the USB keyboard and mouse work correctly when connected directly to the source device.
If you are using wireless USB devices, please replace them with wired devices.
Einführung
Transmitter (No. 38264)
Receiver (No. 38265)
No. 38264 - Transmitter
No. 38265 - Receiver
This equipment complies with the requirements relating to Electromagnetic Compatibility Standards. It has been manufactured under the scope of RoHS compliance.
This equipment has been tested and found to comply with the limits for a Class B digital device, pursuant to part 15 of the FCC Rules. These limits are designed to provide reasonable protection against harmful interference in a residential installation.
You are cautioned that changes or modification not expressly approved by the party responsible for compliance could void your authority to operate the equipment.
This device complies with part 15 of the FCC Rules.
Operation is subject to the following two conditions:
- This device may not cause harmful interference, and
- This device must accept any interference received, including interference that may cause undesired operation.
WEEE (Waste of Electrical and Electronic Equipment), Recycling of Electronic Products
Europe, United Kingdom
In 2006 the European Union introduced regulations (WEEE) for the collection and recycling of all waste electrical and electronic equipment. It is no longer allowable to simply throw away electrical and electronic equipment. Instead, these products must enter the recycling process.
Each individual EU member state has implemented the WEEE regulations into national law in slightly different ways.
Please follow your national law when you want to dispose of any electrical or electronic products. More details can be obtained from your national WEEE recycling agency.