
38143 - Audio/video extension Lindy - Free user manual and instructions
Find the device manual for free 38143 Lindy in PDF.


| Product type | Audio/Video Extender |
| Brand | Lindy |
| Model | 38143 |
| Connectors | HDMI (input and output) |
| Cable length | 1.5 meter |
| Maximum resolution | 4K at 60 Hz |
| Bandwidth | 18 Gbit/s |
| Dimensions | 150 x 50 x 20 mm |
| Weight | 120 g |
| Power supply | Via HDMI port (5 V) |
| Power consumption | 0.5 W |
| Housing material | ABS plastic |
| Operating temperature | 0 °C to 45 °C |
| Operating humidity | 10% to 85% RH |
| Main functions | HDMI signal extension, amplification, equalization correction |
| Maintenance and cleaning | Unplug before cleaning; use a dry, non-abrasive cloth |
| Safety instructions | Do not expose to moisture; avoid shocks; indoor use only |
| Spare parts and repairability | No spare parts available; device not user-serviceable |
| General information | 2-year warranty; made in China |
| Package contents | Audio/video extender, user manual |
Frequently Asked Questions - 38143 Lindy
User questions about 38143 Lindy
0 question about this device. Answer the ones you know or ask your own.
Ask a new question about this device
Download the instructions for your Audio/video extension in PDF format for free! Find your manual 38143 - Lindy and take your electronic device back in hand. On this page are published all the documents necessary for the use of your device. 38143 by Lindy.
USER MANUAL 38143 Lindy
No. 38143
www.lindy.com
CE

Tested to Comply with
FCC Standards
For Home and Office Use!
Introduction
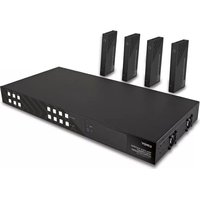
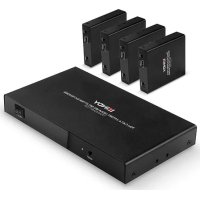
The LINDY HDMI & IR CAT6 Extender 4x4 Matrix supports the transmission of high definition video (resolutions up to 1080p Full HD and 1920×1200@60Hz, including 1080p 3D*), multi-channel digital audio and control via push button, IR, RS-232 and TCP/IP from four high definition sources to four remote displays over a single CAT5e/6 cable of up to 50m for each output. Each of the 4 outputs is also simultaneously mirrored on local HDMI output ports, perfect for monitoring outputs or for the creation of a secondary local zone.
It supports high resolution digital audio formats such as LPCM 7.1 CH, Dolby TrueHD, Dolby Digital Plus and DTS-HD Master Audio as well as 3D content that can be displayed when connecting a 3DTV and 3D source.
This flexible feature rich product has been designed to be used in a number of different applications, such as:
■ Domestic HDMI Matrix system
■ Video/TV wall display and control
■ Security surveillance and control
■ Commercial advertising, display and control
■ University Lecture hall display and control
■ Retail Sales and demonstration
Package Contents
■ HDMI & IR CAT6 Extender 4x4 Matrix
■ 4 x HDMI & IR CAT6 Receivers
■ 12V DC 2.5A Multi County PSU (with Euro, US, UK & Australian/China AC connectors)
- 4 x 5V DC 1A Multi County PSU (with Euro, US, UK & Australian/China AC connectors)
- 4 x IR Emitter with 3.5mm connector
- 5 x IR Receiver with 3.5mm connector
- 4 x IR Remote Control (with CR2025 battery)
■ RS-232 9 Pin Male/Female Cable
■ Mounting Ears & Screws
This Manual
Specification
■ Extends HDMI 1.4 & IR signals via CAT5e/CAT6 UTP Cable
■ Supports resolutions: 1080p24/30/50/60, 1080i, 720p, 576p, 480p
- 4K 30Hz is only supported by EDID setting/cloning on local HDMI output ports
■ Support for 3D Signals, including 1080p 3D according to HDMI 1.4
- Deep Colour capable: supports 30/36/48 bit colour depth
■ Audio Formats: LPCM, DTS Digital, DTS HD, Dolby Digital & Dolby True HD
■ Supports 20 – 60kHz IR Frequencies (Bi-directional: Rx to Tx or Tx to Rx)
■ Maximum HDMI Cable length, 5m in/out
- Preset or Cloned EDID can be used independently on each port
■ Each Output (A-D) supports simultaneous output over HDMI & CAT6
- Transmitter/Matrix ports: 4 x HDMI Type A In, 4 x HDMI Type A Out, 4 x CAT6 Out, 4 x 3.5mm IR In, 4 x 3.5mm IR Out, IR Ext In 3.5mm, DC Socket, RS232 & RJ45 (TCP/IP)
- Receiver ports: HDMI Type A Out, 1x CAT6 In, 3.5mm IR In, 3.5mm IR Out, Coaxial SPDIF Out & DC Socket
■ Supports RS-232, remote control, on-panel control and TCP/IP Control
■ Power consumption: 23W Maximum, 0.5W standby
Overview
Front Panel
![graph TD A["①"] --> B["②"] B --> C["③"] C --> D["④"] D --> E["INPUT"] E --> F["OUTPUT"] F --> G["④"] G --> H["END"] B --> I["POWER"] B --> J["LOCK"] C --> K["INPUT"] C --> L["OUTPUT"] C --> M["ALL"] D --> N["MENU"] D --> O["UP"] D --> P["DOWN"] style A fill:#f9f,stroke:#333 style B fill:#ccf,stroke:…](/content/2026/06/1273383/images/424e061ba4f48565f4281b9bdd87c903d6514bee6ee0429d5581c650baad50a5.jpg)
1. LCM
Display's the current Input/Output status and can be used to view the EDID Management Window
2. IR Window / Power / Lock
IR Window – Receives commands from the supplied IR Remote Control
Power – Use to switch the Matrix On (LED illuminates Green) or to Standby (LED illuminates Red)
Lock – Press to Lock all other buttons on the front panel, press again to unlock.
3. Output/Input
Press one of the Output A – D or All buttons and then press Input 1 – 4 to select which Input to display Press PTP to reset the Input/Output combination to A1, B2, C3 and D4.
4. EDID
Configure which EDID is used for each input port
Rear Ports

1. PC Control
TCP/IP: Connect the Matrix to an Ethernet network to allow it to be controlled by a PC/Controller on the network
RS-232: Connect a PC/Controller to the Matrix using a 9 Way RS-232 cable
2. IR Ports
IR Output: Ports 1 – 4 control the HDMI Equipment on the corresponding HDMI Input port
IR Input: Ports 1 – 4 control the HDMI Display connected to the Receiver using the corresponding CAT5e/6 Output port
IR Ext: Allows the IR port used to control the matrix to be extended
3. HDMI Inputs 1 – 4
Connect 4 HDMI Source devices, such as Bluray Player, Media Streaming Box or Satellite STB
4. CAT5e/6 & HDMI Outputs A - D
Connect to the 4 Receiver units via CAT5e/6 Cable and 4 local HDMI Displays. Each Output A – D is mirrored to a CAT5e/6 Receiver and HDMI Display.
5. DC Power
Connect the supplied 12V power supply
CAT5e/6 Receiver

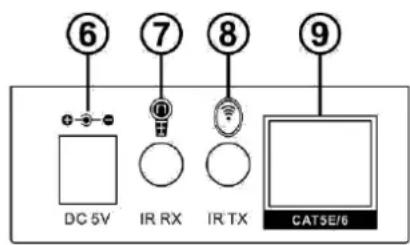
1. HDMI Out
Connect a Display using a HDMI cable of up to 5m
2. Power LED
Illuminates when the device is powered on
3. Lock LED
Illuminates when a HDMI signal is being transmitted
4. Coaxial Out
Connect to an Amplifier or Active Speakers using coaxial cable
5. ARC Switch
Select On to send audio from your Display's ARC channel to the Receiver's Coaxial Out port, select Off to use the audio from the selected HDMI Input of the Matrix.
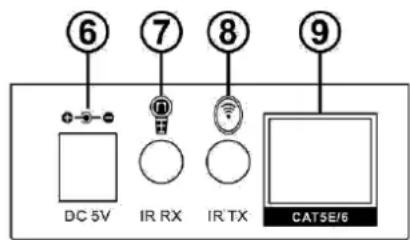
6. DC Power
Connect the supplied 5V power supply
7. IR RX
Connect an IR Receiver to control the current HDMI source being viewed via the Matrix
8. IR TX
Connect an IR Emitter to allow your HDMI Display to be controlled remotely from the Matrix
9. CAT5e/6 In
Connect a CAT5e/6 cable of up to 50m between this port and a CAT5e/6 Output port on the Matrix
IR Receiver & Emitter
IR Receiver (RX)
To control a HDMI source plug an IR Receiver into the IR RX port of CAT5e/6 Receiver unit. Place the IR Receiver on or near your display. To control a display plug an IR Receiver into the corresponding IR RX port of the Matrix unit. Place the IR Receiver in a position where it is able to receive remote signals.
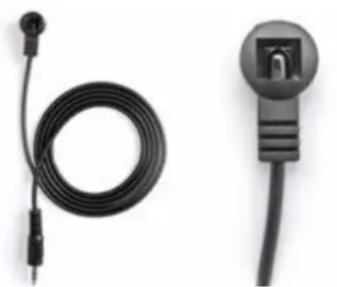
IR BLASTER (TX)
To control a HDMI source plug an IR Emitter into the corresponding IR TX port of the Matrix unit. Place the Emitter in front of the IR eye of the source.
To control the display plug and IR Emitter into the IR TX port of the CAT5e/6 Receiver unit. Place the Emitter in front of the IR eye of the display.

Installation
- Connect up to 4 sources such as a Blu-Ray Player, Digital Signage Player, A/V Receiver, Cable or Satellite Receiver, etc. to the HDMI inputs on the unit using HDMI cables of up to 5m in length.
Important! Do not hot plug devices! Insert and remove cables carefully with the power SWITCHED OFF. Connecting/disconnecting while the unit is powered can result in damage to Matrix's circuitry. - Connect the output UTP ports to the CAT5e/6 Receiver using good quality Cat5e/6 UTP cables no longer than 50m. Displays can also be connected directly to the corresponding HDMI output ports using HDMI cables of up to 5m in length. If you require a longer cable please use a LINDY Active HDMI Cable (Part No. 41052 – 55) or a LINDY HDMI Extender.
- Plug in IR Emitters to the back of the Matrix unit (IR TX ports), the IR Emitters are labelled IR TX, place the eye in front of the IR receiver of the source.
- Plug in IR Receivers to the IR RX port of the CAT5e/6 Receiver's, the IR Receivers are labelled IR RX, place the IR Receivers in a location that will receive a remote signal.
- Plug in and power on all sources first, followed by the Matrix unit (power supply included), followed by the display receivers, followed by each of the Displays.
At this point each display connected should display the assigned source (Input 1 at default when powered on initially). Scroll through each of the sources on each display to ensure everything is in working order. Use the included IR remote at each display receiver to test switching function between sources and IR function itself.
Operation
EDID
The Matrix is capable of using either preset or cloned EDID data to ensure maximum compatibility. The table shows the different EDID values which can be set using the Matrix's front panel buttons or using the supplied software via RS-232 or TCP/IP.
Using the buttons on the front of the Matrix, press Menu to enter the EDID Management Window. Press Up or Down until you get to the EDID value which you want to set and then press Enter. Now use Up or Down to scroll to the Input you want to apply the EDID to and then press Enter again.
| EDID Mode | EDID Description |
| 1 | 1080i, 2CH AUDIO |
| 2 | 1080i, DOLBY/DTS 5.1 |
| 3 | 1080i, HD AUDIO |
| 4 | 1080p, 2CH AUDIO |
| 5 | 1080p, DOLBY/DTS 5.1 |
| 6 | 1080p, HD AUDIO |
| 7 | 3D,1080p, 2CH AUDIO |
| 8 | 3D, 1080p,DOLBY/DTS 5.1 |
| 9 | 3D,1080p, HD AUDIO |
| 10 | 4k*2k, 2CH AUDIO |
| 11 | 4k*2k, DOLBY/DTS 5.1 |
| 12 | 4k*2k, HD AUDIO |
| 13 | DVI 1024x768 |
| 14 | DVI 1920X1080 |
| 15 | DVI 1920X1200 |
| 16 | Copy from HDMI OUTPUT A |
| 17 | Copy from HDMI OUTPUT B |
| 18 | Copy from HDMI OUTPUT C |
| 19 | Copy from HDMI OUTPUT D |
IR Control
The Matrix supports bi-directional IR signal extension, allowing control of the HDMI sources remotely from the Receiver and displays remotely from the Matrix, simply install the supplied IR Receivers and Emitters according to your requirement.
Each of the IR TX ports (1 - 4) located on the back of the Matrix unit is allocated to the corresponding HDMI Input (1 - 4), this allows you to control whichever HDMI source you are viewing from a remote location even after switching between inputs.
Each of the IR RX ports (1 - 4) located on the back of the Matrix unit is allocated to the corresponding HDMI Input (1 - 4), this allows you to control the HDMI display(s) currently using this Input.
Please Note: Misplaced or poorly secured IR Emitters and Receivers may result in intermittent IR control signals passed to and from the matrix. Check your placement and adjust if necessary.
PC Controller
The Matrix can be controlled by a Windows PC connected via RS-232 (9 Way) cable or via a LAN using TCP/IP.
Begin by connecting the PC and Matrix by your preferred method and then switch the Matrix on.
Download the latest version of MatricController.exe from www.lindy.com and then open it by double clicking on it.
When you open the software you will be presented with the screens shown on the following page, you can now begin to configure the Matrix according to your requirement.
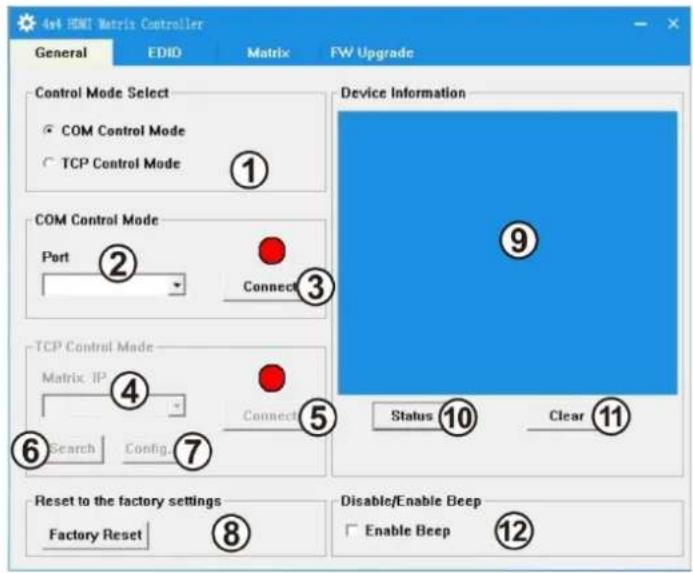
General
- Select RS-232 COM or TCP Control Mode
- Select RS-232 COM Port
- Click to Connect/Disconnect from the Matrix (COM Mode)
- Select the Matrix IP address
- Click to Connect/Disconnect from the Matrix (TCP Mode)
- Search Matrix IP address
- Configure the Matrix' IP & MAC address'
- Click to Factory Reset the Matrix
- Device Information display area
- Click to Refresh Device Information and Input/Output settings (Matrix tab)
- Click to Clear Device Information
- Enable/Disable the Matrix' Beep function
TCP Configuration
After clicking button 7 you will be presented with the TCP Configuration menu:
- Choose from Auto (DHCP) or Static IP
- Enter the Matrix IP address (Static IP only)
- Enter the MAC address of the Matrix

EDID
The Matrix has 3 methods to set the EDID mode. Set mode, Copy mode and Open EDID mode.
- Set Mode: Select the required EDID from the drop down menu, choose an Input and finally click Set.
- Copy Mode: Select which Output you want to copy the EDID from, then choose an Input and finally click Set.
- Open EDID Mode: Click the folder and navigate to the location where you have saved the EDID File. Select the file, then choose an Input and finally click Set.
- Click the status button to refresh Input/EDID status

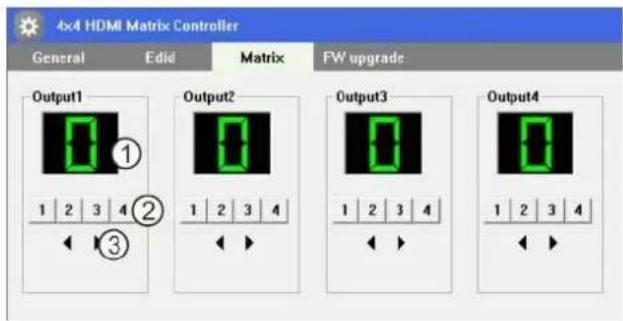
Matrix
The Matrix menu allows you to easily set the Input/Output combination you require using a simple graphical interface, simply set the Input value for each Output individually.
- Displays which Input is being used on each Output
- Click to select an Input for that Output
- Click to select the previous or next Input for that Output

FW Upgrade
Please contact LINDY support for information on upgrading the Firmware of this product.
Trouble Shooting
- Check that the HDMI source and display are both powered on and active.
- Power off all the devices, then power on in this order: first, the HDMI source(s), followed by the Matrix Unit, then the Receiver units and finally the display(s).
- Please check all cable and power supply connections are made correctly
- Please check that the dip switches on the side of the receivers are set to the correct setting for the length of CAT5e/6 cable you are using.
- Check that the Lock LED is illuminated, if it is not please try a shorter or better quality CAT5e/6 UTP cable
- If the Lock LED is illuminated and no picture is received please try a different HDMI Input on the Matrix. If this is successful please use the same EDID setting for both of these inputs and then retry.
Einführung

1. HDMI Out
IR Receiver & Emitter Kabel
IR Receiver (RX)
Installation
Reiter Matrix

1. HDMI Out
IR Receiver & Emitter
IR Receiver (RX)
Installation
EDID
Matrix
1. HDMI Out
Installazione
EDID
CE Certification
This equipment complies with the requirements relating to Electromagnetic Compatibility Standards EN55022/EN55024 and the further standards cited therein. It must be used with shielded cables only. It has been manufactured under the scope of RoHS compliance.
This equipment has been tested and found to comply with the limits for a Class B digital device, pursuant to part 15 of the FCC Rules. These limits are designed to provide reasonable protection against harmful interference in a residential installation.
You are cautioned that changes or modification not expressly approved by the party responsible for compliance could void your authority to operate the equipment.
This device complies with part 15 of the FCC Rules.
Operation is subject to the following two conditions:
-
This device may not cause harmful interference, and
-
This device must accept any interference received, including interference that may cause undesired operation.
postmaster@lindy.co.uk

WEEE (Waste of Electrical and Electronic Equipment), Recycling of Electronic Products
Europe, United Kingdom
In 2006 the European Union introduced regulations (WEEE) for the collection and recycling of all waste electrical and electronic equipment. It is no longer allowable to simply throw away electrical and electronic equipment. Instead, these products must enter the recycling process.
Each individual EU member state has implemented the WEEE regulations into national law in slightly different ways. Please follow your national law when you want to dispose of any electrical or electronic products. More details can be obtained from your national WEEE recycling agency.
2nd Edition, January 2016


Tested to Comply with
FCC Standards
For Home and Office Use!
www.lindy.com

- INTRODUCTION
- PACKAGE CONTENTS
- SPECIFICATION
- OVERVIEW
- FRONT PANEL
- LCM
- IR WINDOW / POWER / LOCK
- OUTPUT/INPUT
- EDID
- REAR PORTS
- PC CONTROL
- IR PORTS
- HDMI INPUTS 1 – 4
- CAT5E/6 & HDMI OUTPUTS A - D
- DC POWER
- HDMI OUT
- POWER LED
- LOCK LED
- COAXIAL OUT
- ARC SWITCH
- IR RX
- IR TX
- CAT5E/6 IN
- IR RECEIVER & EMITTER
- IR RECEIVER (RX)
- IR BLASTER (TX)
- INSTALLATION
- OPERATION
- IR CONTROL
- PC CONTROLLER
- GENERAL
- TCP CONFIGURATION
- MATRIX
- FW UPGRADE
- TROUBLE SHOOTING
- EINFÜHRUNG
- IR RECEIVER & EMITTER KABEL
- REITER MATRIX
- INSTALLAZIONE
- CE CERTIFICATION
- WEEE (WASTE OF ELECTRICAL AND ELECTRONIC EQUIPMENT), RECYCLING OF ELECTRONIC PRODUCTS
- EUROPE, UNITED KINGDOM
Brand : Lindy
Model : 38143
Category : Audio/video extension