38345 - Audio/video extension Lindy - Free user manual and instructions
Find the device manual for free 38345 Lindy in PDF.


| Product Type | Audio/Video Extension |
| Brand | Lindy |
| Model | 38345 |
| Dimensions (approx.) | 100 mm x 50 mm x 20 mm |
| Weight (approx.) | 150 g |
| Power Supply | USB powered (5V DC) |
| Input Interface | HDMI (Type A female) |
| Output Interface | HDMI (Type A female) |
| Supported Resolutions | Up to 4K@60Hz (3840x2160) |
| Maximum Transmission Distance | 50 meters (over CAT6 cable) |
| HDCP Support | HDCP 2.2 |
| Color | Black |
| Operating Temperature | 0°C to 50°C |
| Storage Temperature | -20°C to 60°C |
| Certification | CE, FCC |
| Package Contents | 1x HDMI Extender, 2x Power Cables, 1x User Manual |
| Warranty | 2 years |
Frequently Asked Questions - 38345 Lindy
User questions about 38345 Lindy
0 question about this device. Answer the ones you know or ask your own.
Ask a new question about this device
Download the instructions for your Audio/video extension in PDF format for free! Find your manual 38345 - Lindy and take your electronic device back in hand. On this page are published all the documents necessary for the use of your device. 38345 by Lindy.
USER MANUAL 38345 Lindy
Please read the following safety information carefully and always keep this document with the product.
Failure to follow these precautions can result in serious injuries or death from electric shock, fire or damage to the product.
This device has a switching type power supply and can work with supply voltages in the range 100...240 VAC.
Touching the internal components or a damaged cable may cause electric shock, which may result in death.
To reduce risk of fire, electric shocks or damage:
- Do not open the product nor its power supply. There are no user serviceable parts inside.
■ Only qualified servicing personnel may carry out any repairs or maintenance.
■ Never use damaged cables. - Do not expose the product to water or places of moisture.
- Do not use this product outdoors it is intended for indoor use only.
- Do not place the product near direct heat sources. Always place it in a well-ventilated place.
- Do not place heavy items on the product or the cables.
- Please ensure any adapters are firmly secured and locked in place before inserting into a wall socket
Introduction
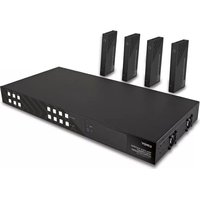
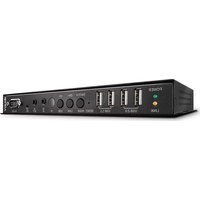
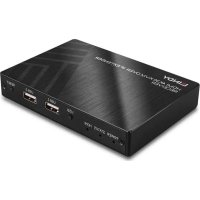
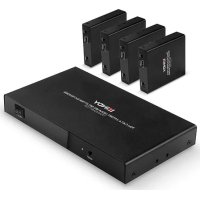
Thank you for purchasing the 150m Cat.6 4x4 HDMI 4K60 HDBaseT Matrix Extender. This product has been designed to provide trouble free, reliable operation. It benefits from both a LINDY 2 year warranty and free lifetime technical support. To ensure correct use, please read this manual carefully and retain it for future reference.
This high-end HDBaseT Matrix Extender allows the connection for 4 HDMI sources and 4 HDMI displays, each output is mirrored to provide HDBaseT extensions up to 150m (4 HDBaseT receivers are included). It supports resolutions up to 4K60, each HDMI output can also be downscaled to FullHD independently while Audio can be de-embedded thanks to the analog and coaxial outputs.
IR matrix function is supported on the main unit, then IR signal follows the HDMI video channel at the respective HDBaseT receiver end.
User can easily manage the matrix via front panel buttons with OLED screen, IR remote control, RS-232 or TCP/IP commands and web GUI.
Package Contents
■ HDMI 4K60 HDBaseT Matrix Extender
■ 4 x HDBaseT Receiver
- IR remote control
■ RS-232 Male to Female cable, 1.5m
■ 4 x 3-Pin Terminal Block
■ 4 x 5-Pin Terminal Block
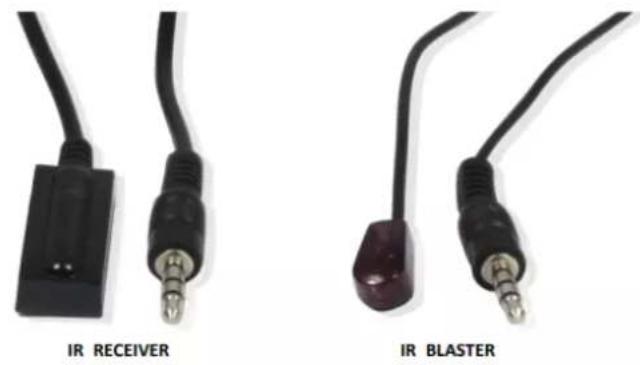
■ 5 x IR Emitter cable, 1.5m
■ 5 x IR Receiver cable, 1.5m
■ 10 x Mounting Ears with screws
■ 4 x IEC mains cables (EU, UK, US & AUS), 1.5m
■ Lindy Manual

Features
■ Supports resolutions up to 3840x2160@60Hz 4:4:4 8bit
■ 4x4 Matrix function
■ 4 HDMI inputs
■ 4 HDMI & HDBaseT mirrored outputs
■ Support 4K to 1080p downscaler function on each output
■ EDID management and CEC control
■ Support IR matrix function
■ Audio Pass-through of all HDMI audio formats including Dolby Digital, Dolby TrueHD, Dolby Digital Plus (DD+), DTS-HD, DTS HD-HRA, DTS-X, Master Audio, LPCM up to 7.1
■ Audio de-embedded via analog and coax ports
■ 24V PoC (Power over Cable) function on HDBaseT ports
- Manageable via front panel buttons with OLED display, IR remote control, RS-232 or TCP/IP commands and Web GUI
Specification
■ HDMI 2.0b, 18Gbps compliant
■ HDCP 2.2/1.4 pass-through
- The following distance and resolution combinations are possible when using high quality Cat.6 U/UTP or F/UTP solid core cable:
- 150m: 1920x1080@60Hz 4:4:4 8bit
- 120m: 3840x2160@60Hz 4:4:4 8bit / 4:2:2 12bit
■ Coax Audio Formats: PCM 2.0, Dolby Digital / Plus, DTS 2.0/5.1
■ Analog Balanced Audio Formats: PCM 2.0CH
■ SNR: >90dB
■ THD+N Ratio: <0.1% (V_max) 0.001%\~0.01% (V_best)
■ Crosstalk: >80dB
■ Frequency Response: 20Hz\~20kHz ±0.5dB
■ ESD Protection: ± 8kV (air-gap discharge)
■ Human Body Model: ± 4kV (contact discharge)
■ Operating Temperature: 0°C - 40°C (32°F - 104°F)
■ Storage Temperature: -20°C - 60°C ( -4°F - 140°F )
■ Relative Humidity: 20 - 90% RH (Non-condensing)
■ Metal Housing
Colour: Black
■ Power Requirements: AC100-240V 50/60Hz
■ Power Consumption: 60W
Installation
Front

- OLED Screen: Shows matrix switching status, Input/Output ports, EDID, baud rate and IP address.
- PWR: This LED will illuminate green when the unit is on, red when the unit is in standby.
- OUTPUT / INPUT: Press an OUTPUT button first and then an INPUT button to select the source to display on the output port.
- MENU / UP / DOWN / ENTER: Browse and manage the features via the OLED display:
- EDID setting: press MENU button to enter Select EDID feature, press UP / DOWN button to choose the required EDID, then press ENTER button to enter in Copy to Input sub-menu; press UP / DOWN button to select the input port and press ENTER button to confirm.
- Baud rate setting: press MENU button two times to enter Select Baud feature, press UP / DOWN button to select the required baud rate, then press ENTER button to confirm.
- IP Address: press MENU button three times to enter IP Address menu and check the current IP Address, press UP / DOWN button to switch DHCP ON / OFF, then press ENTER button to confirm. Press MENU button again to return to the initial OLED display status.
- POWER: keep this button pressed for 3 seconds to set the unit in stand-by mode, press the button again to switch it on again.
- IR: IR receiver window for the remote control.
- LOCK: press this button to lock front panel buttons except for POWER button, press it again to unlock.
Rear
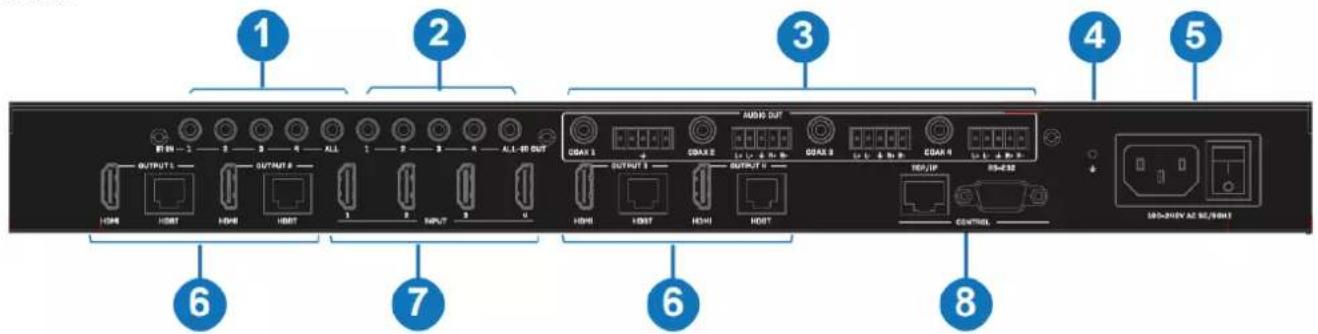
- IR IN: Connect to IR Receiver cables, the IR signal will be emitted to the respective IR OUT port on the HDBaseT Receiver.
- IR OUT: Connect to IR Emitter cables, the IR signal will be received from the respective IR IN port on the HDBaseT Receiver.
- AUDIO OUT: 4 groups of COAX and balanced analog audio mirrored output ports related to the respective video OUTPUT ports (6).
- GND: Connect the housing to the ground.
-
POWER: Connect to a IEC-C13 100\~240V AC 50/60Hz power cable. Press the switch button to turn on/off the power.
-
OUTPUT: HDMI and HDBaseT mirrored output ports, connect to HDMI displays and to HDBaseT Receivers.
HDBaseT RJ45 LEDs:
- Data signal: illuminates when HDMI signal is with HDCP; flashes when HDMI signal is without HDCP; off when there is no HDMI signal.
- Connection signal: illuminates when the connection between the main unit and the HDBaseT Receiver is stable; flashes when the connection between the main unit and the HDBaseT Receiver is not stable; off when there is no connection.
- INPUT: HDMI input ports, connect to HDMI source devices.
- CONTROL: TCP/IP and RS-232 control ports, connect to a PC or serial control system to manage the unit via Web GUI or RS-232 commands.
Receiver panels

- POWER LED: Indicates power.
- SERVICE: Firmware update port.
- DC 24V: Connect a 24VDC 1A PSU to an AC wall outlet and securely connector to receiver. This is not required powering on the main unit, all receivers are powered on via PoC function.
- HDBT IN: HDBaseT Input Port, connect the main unit or a compatible HDBaseT transmitter using a single Cat.6 or above cable for all data signals.
- Connection signal LED: illuminates when the connection between the main unit and the HDBaseT Receiver is stable; flashes when the connection between the main unit and the HDBaseT Receiver is not stable; off when there is no connection.
- Data signal LED: illuminates when HDMI signal is with HDCP; flashes when HDMI signal is without HDCP; off when there is no HDMI signal.
- HDMI OUT: Connect to an HDMI display.
- AUDIO OUT: 3.5mm analog output, connect to a compatible speaker, headphones or amplifier.
- IR IN: Connect the supplied IR Receiver cable for IR signal reception. Ensure the remote being used is within the direct line-of-sight of the IR Extender.
- IR OUT: Connect the supplied IR Emitter cable for IR signal transmission. Place the IR Emitter in direct line-of-sight of the equipment to be controlled.
- RS-232: Connect to a PC, serial controller or serial device via phoenix block 3-way connection for the pass-through transmission of RS-232 commands.
Operation
EDID settings
The following EDID modes can be selected from the EDID menu in the OLED panel or via Web GUI and RS-232 control commands (see below):
| EDID Mode | EDID Description | EDID Mode | EDID Description |
| 1 1080p, Stereo Audio 2.0 14 4K2K60_420, Dolby/DTS 5.1 | |||
| 2 | 1080p, Dolby/DTS 5.1 | 15 | 4K2K60_420, HD Audio 7.1 |
| 3 | 1080p, HD Audio 7.1 | 16 | 4K2K60_444, Stereo Audio 2.0 |
| 4 | 1080i, Stereo Audio 2.0 | 17 | 4K2K60_444, Dolby/DTS 5.1 |
| 5 | 1080i, Dolby/DTS 5.1 | 18 | 4K2K60_444, HD Audio 7.1 |
| 6 | 1080i, HD Audio 7.1 | 19 | 4K2K60, Stereo Audio 2.0 HDR |
| 7 | 3D, Stereo Audio 2.0 | 20 | 4K2K60, Dolby/DTS 5.1 HDR |
| 8 | 3D, Dolby/DTS 5.1 | 21 | 4K2K60, HD Audio 7.1 HDR |
| 9 | 3D, HD Audio 7.1 | 22 | User define1 |
| 10 | 4K2K30_444, Stereo Audio 2.0 | 23 | User define2 |
| 11 | 4K2K30_444, Dolby/DTS 5.1 | 24~27 | Copy from HDMI OUTPUT 1~4 |
| 12 | 4K2K30_444, HD Audio 7.1 | 28~31 | Copy from HDBT OUTPUT 1~4 |
| 13 | 4K2K60_420, Stereo Audio 2.0 | ||
IR Remote control
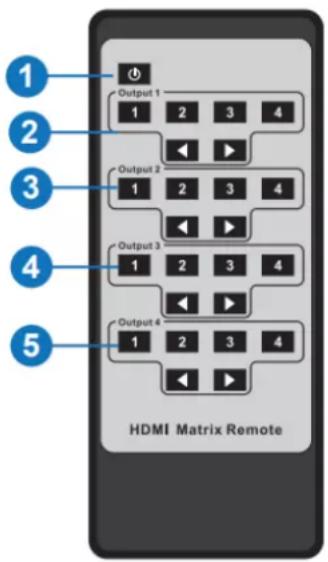
- Power on / Standby: power on the unit or set it to standby mode.
- Output 1: press 1/2/3/4 button to select the input source to assign to HDMI OUTPUT 1.
- Output 2: press 1/2/3/4 button to select the input source to assign to HDMI OUTPUT 2.
- Output 3: press 1/2/3/4 button to select the input source to assign to HDMI OUTPUT 3.
- Output 4: press 1/2/3/4 button to select the input source to assign to HDMI OUTPUT 4.
◀ ▶ : select the previous or next input source button.
TCP/IP Control
The unit can be controlled by a Web GUI, the default IP address is 192.168.1.100. To get the current IP address press 3 times MENU button to enter the IP interface in the OLED display as shown under Installation paragraph. Is possible to get it also via RS-232 control with the command "r ipconfig" through a serial tool and get the information as shown below:
![[11:00:55.617]发→◇r ipconfig! □ [11:00:55.710]收←◆IP Mode: DHCP IP:192.168.61.103 Subnet Mask:255.255.255.0 Gateway:192.168.61.1 Mac address:6c-df-fb-03-d5-e0 TCP/IP port=65534 telnet port=998](/content/2026/07/1410169/images/a46c5c5a1f39dca26219b88244c81e3da8e1158419f16d36e4de16793ad9e0d0.jpg)
All the parameters can be changed by Software GUI and RS-232 command, see below for details.
After connecting the TCP/IP port of the unit to a PC using a standard RJ45 network cable, set the IP address of the PC under the same network segment of the Matrix.
Then type the current IP address of the Matrix into a browser page on the PC.

Default Username and Password are:
Username: Admin
Password: admin
Username: User
Password: user
Click on LOGIN button, then the following Status page will appear:
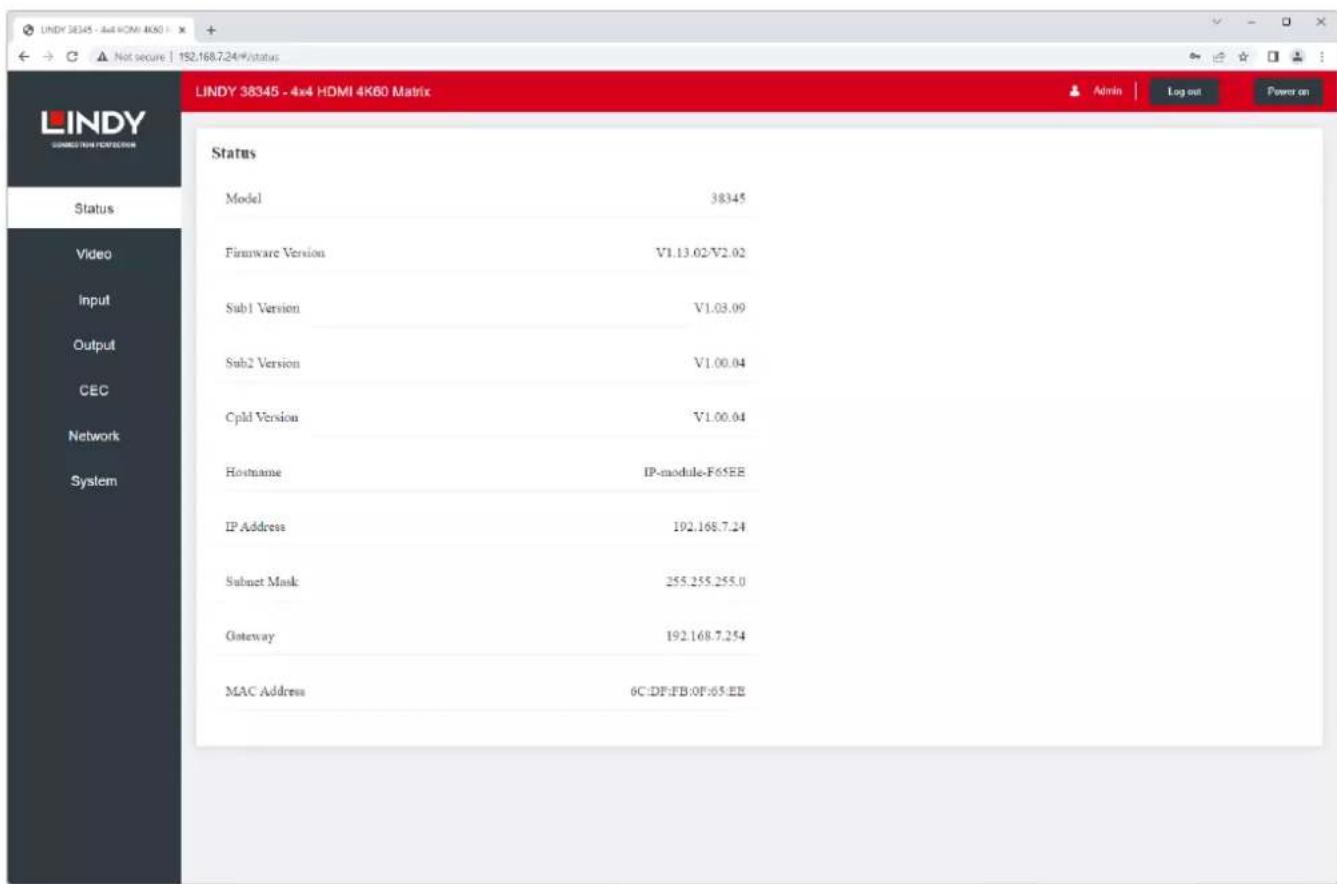
All basic information are provided in this page such as product model, installed firmware and network settings of the unit.
Video

Output: Current device's output ports.
Input: Click on the drop-down menu to select the signal source to assign to the corresponding Output port.
Presets Name: Name the current setup, maximum 12 characters are allowed.
Preset Set: Restore the settings of the last saved matrix switching.
Preset Save: Save a matrix switching.
Presets Clear: Clear a saved matrix switching.
Input

Active indicates whether the channel is connected to a signal source. Is possible to change input's Name clicking on each box, maximum 12 characters are allowed. Click on the drop-down menu under EDID to select a preset, see the complete list under EDID settings chapter.
Click on Browse button to select a bin file, select User 1 or 2 from Select Destination field and then click on Upload button.
To download an EDID file click the drop-down box near Select EDID File to select the corresponding input channel and then click on Download button.
Output
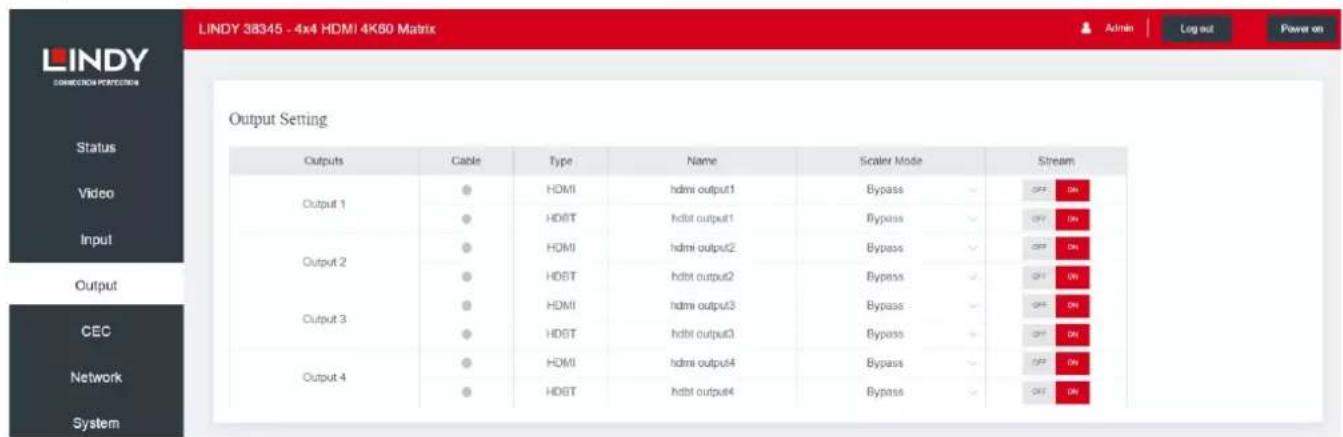
Cable indicates the connection status of output ports, when an output is connected to a display (Type can be HDMI or HDBT), it will be green, if not it stays grey.
Each output can be renamed by clicking on each Name box, maximum 12 characters are allowed.
Select an output resolution in the drop-down menu under Scaler Mode, Bypass, 4K -> 1080P and AUTO are the available choices.
Turn off the Stream if needed by clicking on OFF button, by default all is set to ON.
CEC

Control the operation of each input source and displays via CEC by pressing the icons.
Network
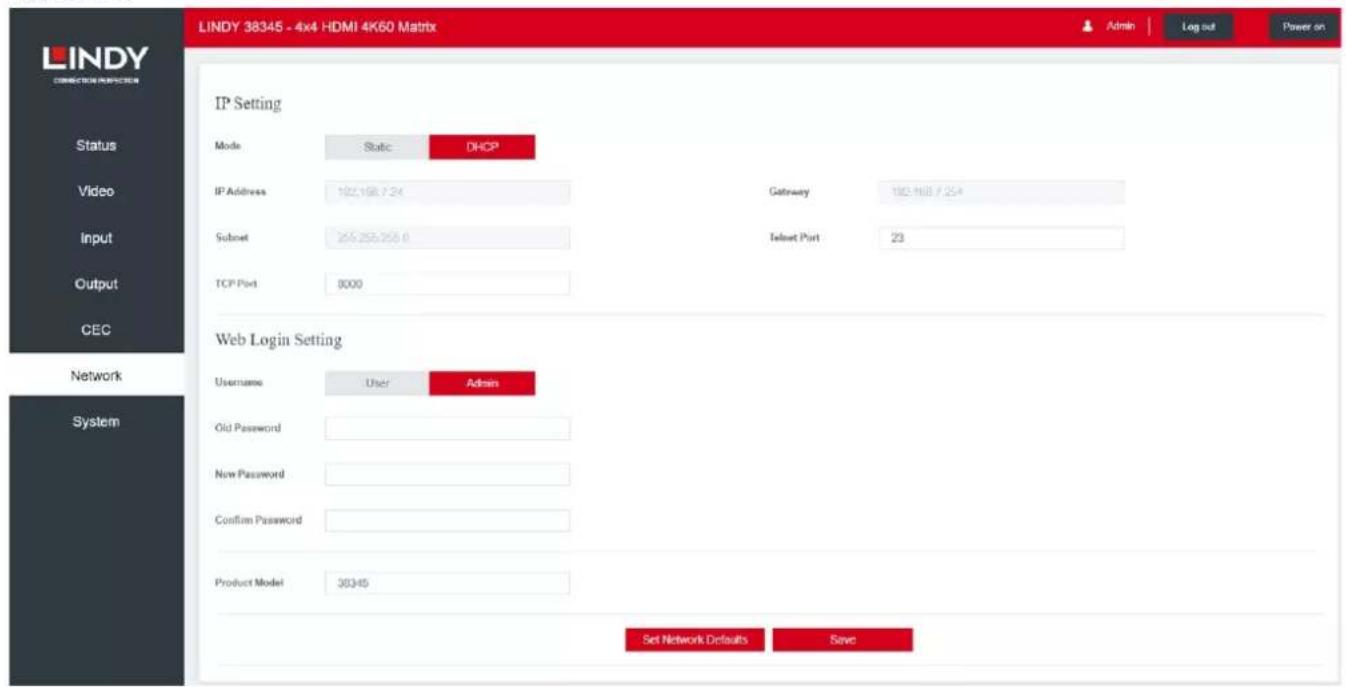
IP Setting
Set up Mode, IP Address, Gateway, Subnet Mask and Telnet Port as required, click Save button to confirm.
If the selected mode is Static, it will switch to the corresponding IP Address; if the mode is DHCP, it will automatically search and switch to the IP Address assigned by the router.
Click on Set Network Defaults button then click OK in the next pop-up window to confirm the choice; after the searching is completed, it will switch to the login page again.
Web Login Setting
Here you can change the password and click on Save button to confirm. Please note that the new password can't be empty and can't be the same as the Old Password.
System

Panel Lock: lock/unlock panel buttons, click ON to lock the buttons.
Beep: turn ON/OFF the acoustic signal of the buttons.
LCD: turn OFF, Always on or set the turn-on time (15s, 30s or 60s)
Serial Baud Rate: select the value of the serial baud rate.
Firmware Update: click Browse button to select an update file (if available), then click on Update to confirm.
Factory Reset: click Reset button to reset the unit to factory defaults.
Reboot: click Reboot button to reboot the unit.
Infrared Control
The Transmitter and Receiver units feature an IR In and Out port so that IR control can be bi-directional and managed in the following ways:
At the Matrix end (Local end): the IR signal is one-to-one transmission.
For example, the IR IN 1 port signal of the Matrix will emit to IR OUT port of the HDBaseT Receiver 1, and the IR IN 3 port signal of the Matrix will emit to IR OUT port of the HDBaseT Receiver 3. It doesn't follow the video switch.
IR IN ALL port signal of the Matrix will emit to all IR OUT ports of HDBaseT receivers simultaneously.
At HDBaseT receiver (Remote end): IR signal follows video switch.
For example, the HDMI output signal on the HDBaseT Receiver 1 is from the HDMI INPUT 2 port, so IR input signal of the HDBaseT Receiver 1 will emit to IR OUT 2 port of the Matrix. The HDMI output signal on the HDBaseT Receiver 3 is from the HDMI INPUT 4 port. Then, IR input signal of the HDBaseT Receiver 3 will emit to IR OUT 4 port of the Matrix and so on.
Any of HDBaseT Receiver's IR IN signal can output from IR OUT ALL port of the Matrix and the IR OUT ALL signal of the Matrix depends on the IR remote of source device.
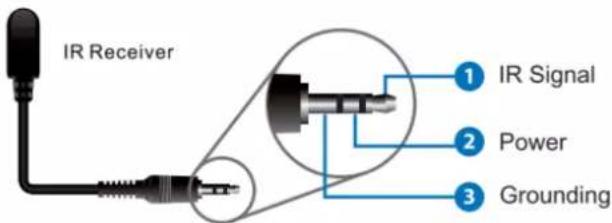
IR Cables Pin Assignment

RS-232 Control
Default: Baud rate 115200, 8 data bits, 1 stop bit, no parity.
Baud rate can be changed via web GUI and RS-232 commands. All the commands begin with 's' (for Set) or 'r' (for Get), end always with '!'.
| Command | Function | Example | Feedback | Default Setting |
| Power | ||||
| s power z! | Power on/off the device,z=0~1 (z=0 power off, z=1 power on) | s power 1! | Power onSystem Initializing... Initialization Finished! FW version x.xx.xx | power on |
| r power! | Get current power state | r power! | power on/power off | |
| s reboot! | Reboot the device | s reboot! | Reboot...System Initializing... Initialization Finished! FW version x.xx.xx | |
| System Setup | ||||
| help! | List all commands | help! | ||
| r type! | Get device model | r type! | HDP-MXB44H150 | |
| r status! | Get device current status | r status! | Get the unit all status: power, beep, lock, in/ out connection, video/ audio crosspoint, edid, scaler,hdcp, network status | |
| r fw version! | Get Firmware version | r fw version! | MCU BOOT:Vx.xx.xx MCU APP :Vx.xx.xx SUB1 APP :Vx.xx.xxSUB2 APP :Vx.xx.xx CPLD APP :Vx.xx.xx WEB GUI :Vx.xx | |
User Manual English
| Command | Function | Example | Feedback | Default Setting |
| r link in x! | Get the connection status of thex input port , x=0~4(0=all) | r link in 1! | hdmi input 1: connect | |
| r link out y! | Get the connection status of the y output porty=0~4(0=all) | r link out 1! | hdmi output 1: connect hdbt output 1: connect | |
| s reset! | Reset to factory defaults | s reset! | Reset to factory defaults System Initializing...Initialization Finished!FW version x.xx.xx | |
| s panel sound z! | Enable/Disable buzzer function,z=0~1(z=0 panel sound off, z=1 panel sound on) | s panel sound 1! | panel sound on panel sound off | panel sound on |
| r panel sound! | Get buzzer state | r panel sound! | panel sound on / panel sound off | |
| s lock z! | Lock/Unlock front panel button,z=0~1 (z=0 lock off,z=1 lock on) | s lock 1! | panel button lock on panel button lock off | panel button lock off |
| r lock! | Get panel button lock state | r lock! | panel button lock on/off | |
| s screen on time z! | Set LCD screen remain on time, z=0~4 (0: off, 1: always on, 2: 15s, 3: 30s, 4: 60s) | s screen on time 1! | Lcd screen always on | Lcd screen on 30 seconds |
| r screen mode! | Get the backlight status of lcd screen | r screen mode! | Lcd screen always on | |
| s save preset z! | Save switch state between all output port and the input port to preset z, z= 1~4 | s save preset 1! | save to preset 1 | |
| s recall preset z! | Call saved preset z scenarios,z=1~4 | s recall preset 1! | recall from preset 1 | |
| s clear preset z! | Clear stored preset z scenarios, z= 1~4 | s clear preset 1! | clear preset 1 | |
| r preset z! | Get preset z information, z= 1~4 | r preset 1! | video/audio crosspoint | |
| s logo1**********! | Set the logo name displayed on the first line of LCD screen, the max character is 16 | s logo1 Matrix Swtich! | logo1: Matrix Swtich | |
| s baud rate xxx! | Set the serial port baud rate of RS02 module, z= (115200, 57600, 38400, 19200, 9600, 4800) | s baud rate 115200! | Baudrate:115200 115200 | |
| r baud rate! | Get the serial port baud rate of RS02 module | r baud rate! | Baudrate:115200 | |
| s id z! | Set the control ID of the product, z= 000~999 | s id 888! | id 888 | 0 |
| Output Setting | ||||
| s in x av out y! | Set input x to output yx= 1~4, y= 0~4 (0= all) | s in 1 av out 2! | input 1 -> output 2 | ptp |
| r av out y! | Get output y signal status y= 0~4 (0= all) | r av out 0! | input 1 -> output 1input 2 -> output 2input 3 -> output 3input 4 -> output 4 | |
| s hdmi y stream z! | Set hdmi output y stream on/off, y= 0~4(0= all) z= 0~1(0: disable,1: enable) | s hdmi 1 stream 1!s hdmi 0 stream 1! | enable hdmi output 1 stream disable hdmi output 1 stream enable hdmi all outputs stream disable hdmi all outputs stream | enable |
| r hdmi y stream! | Get hdmi output y stream status, y= 0~4 (0= all) | r hdmi 1 stream! | enable hdmi output 1 stream | |
| s hdbt y stream z! | Set hdbt output y stream on/off, y= 0~4 (0=all) z=0~1 (0: disable,1: enable) | s hdbt 1 stream 1!s hdbt 0 stream 1! | enable hdbt output 1 stream disable hdbt output 1 stream enable hdbt all outputs stream disable hdbt all outputs stream | enable |
| r hdbt y stream! | Get hdbt output y stream status, y= 0~4 (0= all) | r hdbt 1 stream! | enable hdbt output 1 stream | |
| s hdmi y scaler z! | Set hdmi output y port output scaler mode , y= 0~4 (0= all), z= 1~3(1= bypass,2= 4k->1080p, 3= Auto) | s hdmi 1 scaler 1!s hdmi 0 scaler 1! | hdmi output 1 set to bypass modehdmi all outputs set to bypass mode | hdmi all outputs set to bypass mode |
| r hdmi y scaler! | Get hdmi output y port output mode y=0~4(0=all) | r hdmi 1 scaler! | hdmi output 1 set to bypass mode | |
| s hdbt y scaler z! | Set hdbt output y port output scaler modey= 0~4(0= all), z= 1~3 (1= bypass, 2= 4k->1080p, 3= Auto) | s hdbt 1 scaler 1!s hdbt 0 scaler 1! | hdbt output 1 set to bypass modehdbt all outputs set to bypass mode | hdbt all outputs set to bypass mode |
| r hdbt y scaler ! | Get hdbt output y port output mode y=0~4(0=all) | r hdbt 1 scaler ! | hdbt output 1 set to bypass mode | |
| EDID Setting | ||||
| s edid in x from z! | Set input x EDID from default EDID z,x= 0~4 (0= all), z= 1~311, 1080p, Stereo Audio 2.02, 1080p, Dolby/DTS 5.13, 1080p, HD Audio 7.14, 1080i, Stereo Audio 2.05, 1080i, Dolby/DTS 5.16, 1080i, HD Audio 7.17, 3D, Stereo Audio 2.08, 3D, Dolby/DTS 5.19, 3D, HD Audio 7.110, 4K2K30_444, Stereo Audio 2.011, 4K2K30_444, Dolby/DTS 5.112, 4K2K30_444, HD Audio 7.113, 4K2K60_420, Stereo Audio 2.014, 4K2K60_420, Dolby/DTS 5.115, 4K2K60_420, HD Audio 7.116, 4K2K60_444, Stereo Audio 2.017, 4K2K60_444, Dolby/DTS 5.118, 4K2K60_444, HD Audio 7.119, 4K2K60_444, Stereo Audio 2.0 HDR20, 4K2K60_444, Dolby/DTS 5.1 HDR21, 4K2K60_444, HD Audio 7.1 HDR22, User define123, User define224~27, copy from hdmi output 1~4 28~31, copy from hdbt output 1~4 | s edid in 1 from 1!s edid in 0 from 1! | input 1 EDID:1080p,Stereo Audio 2.0all inputs EDID:1080p, Stereo Audio 2.0 | 1080p,Stereo Audio 2.0 |
| r edid in x! | Get EDID status of the input xx= 0~4 (0= all input) | r edid in 0! | input1 EDID: 4K2K60_444,Stereo Audio 2.0 input2 EDID:4K2K60_444, Stereo Audio 2.0input3 EDID: 4K2K60_444,Stereo Audio 2.0 input4 EDID:4K2K60_444, Stereo Audio 2.0 | |
| r edid data hdmi y! | Get the EDID data of the hdmi output y port, y=1~4 | r edid data hdmi 1! | EDID: 00 FF FF FF FF FF FF 00 ...... | |
| r edid data hdbt y! | Get the EDID data of the hdbt output y port, y=1~4 | r edid data hdbt 1! | EDID: 00 FF FF FF FF FF FF 00 ...... | |
| CEC Setting | ||||
| s cec in x on! | set input x power on by CEC, x= 0~4 (0= all input) | s cec in 1 on! | input 1 power on | |
| s cec in x off! | set input x power off by CEC, x= 0~4 (0= all input) | s cec in 1 off! | input 1 power off | |
| s cec in x menu! | set input x open menu by CEC, x= 0~4 (0= all input) | s cec in 1 menu! | input 1 open menu | |
| s cec in x play! | set input x play by CEC, x= 0~4 (0= all input) | s cec in 1 play! | input 1 play operation | |
| s cec in x pause! | set input x pause by CEC, x= 0~4 (0= all input) | s cec in 1 pause! | ilnput 1 pause operation | |
| s cec in x stop! | set input x stop by CEC, x= 0~4 (0= all input) | s cec in 1 stop! | input 1 stop operation | |
| s cec in x rew! | set input x rewind by CEC, x= 0~4 (0= all input) | s cec in 1 rew! | input 1 rewind operation | |
| s cec in x mute! | set input x volume mute by CEC, x= 0~4 (0= all input) | s cec in 1 mute! | input 1 volume mute | |
| s cec in x vol-! | set input x volume down by CEC, x= 0~4 (0= all input) | s cec in 1 vol-! | input 1 volume down | |
| s cec in x vol+! | set input x volume up by CEC, x= 0~4 (0= all input) | s cec in 1 vol+! | input 1 volume up | |
| s cec in x ff! | set input x fast forward by CEC, x= 0~4 (0= all input) | s cec in 1 ff! | input 1 fast forward operation | |
| s cec in x previous! | set input x previous by CEC, x= 0~4 (0= all input) | s cec in 1 previous! | input 1 previous operation | |
| s cec in x next! | set input x next by CEC, x= 0~4 (0= all input) | s cec in 1 next! | input 1 next operation | |
| s cec hdmi out y on! | set hdmi output y power on by CEC, y= 0~4 (0= all hdmi output) | s cec hdmi out 1 on! | hdmi output 1 power on | |
| s cec hdbt out y on! | set hdbt output y power on by CEC, y= 0~4 (0= all hdbt output) | s cec hdbt out 1 on! | hdbt output 1 power on | |
| s cec hdmi out y off! | set hdmi output y power off by CEC, y= 0~4 (0= all hdmi output) | s cec hdmi out 1 off! | hdmi output 1 power off | |
| s cec hdbt out y off! | set hdbt output y power off by CEC, y= 0~4 (0= all hdbt output) | s cec hdbt out 1 off! | hdbt output 1 power off | |
| s cec hdmi out y mute! | set hdmi output y volume mute by CEC, y= 0~4 (0= all hdmi output) | s cec hdmi out 1 mute! | hdmi output 1 volume mute | |
| s cec hdbt out y mute! | set hdbt output y volume mute by CEC, y= 0~4 (0= all hdbt output) | s cec hdbt out 1 mute! | hdbt output 1 volume mute | |
| s cec hdmi out y vol-! | set hdmi output y volume down by CEC, y= 0~4 (0= all hdmi output) | s cec hdmi out 1 vol-! | hdmi output 1 volume down | |
| s cec hdbt out y vol-! | set hdbt output y volume down by CEC, y= 0~4 (0= all hdbt output) | s cec hdbt out 1 vol-! | hdbt output 1 volume down | |
| s cec hdmi out y vol+! | set hdmi output y volume up by CEC, y= 0~4 (0= all hdmi output) | s cec hdmi out 1 vol+! | hdmi output 1 volume up | |
| s cec hdbt out y vol+! | set hdbt output y volume up by CEC, y= 0~4 (0= all hdbt output) | s cec hdbt out 1 vol+! | hdbt output 1 volume up | |
| s cec hdmi out y active! | set hdmi output y active source by CEC, y= 0~4 (0= all hdmi output) | s cec hdmi out 1 active! | hdmi output 1 active source | |
| s cec hdbt out y active! | set hdbt output y active source by CEC, y= 0~4 (0= all hdbt output) | s cec hdbt out 1 active! | hdbt output 1 active source |
User Manual English
| Command | Function | Example | Feedback | Default Setting |
| Network Setting | ||||
| r ipconfig! | Get the Current IP Configuration | r ipconfig! | IP Mode: Static IP: 192.168.1.72 Subnet Mask: 255.255.255.0 Gateway: 192.168.1.1 TCP/IP port=8000 Telnet port=10 Mac address: 00:1C:91:03:80:01 | |
| r mac addr! | Get network MAC address | r mac addr! | Mac address: 00:1C:91:03:80:01 | |
| s ip mode z! | Set network IP mode to static IP or DHCP, z= 0~1 (z= 0 Static, z= 1 DHCP) | s ip mode 0! | Set IP mode:Static (Please use "s net reboot!" command or repower device to apply new config!) | |
| r ip mode! | Get network IP mode | r ip mode! | IP Mode: Static | |
| s ip addr xxx.xxx.xxx.xxx! | Set network IP address | s ip addr 192.168.1.100! | Set IP address: 192.168.1.100 (Please use "s net reboot!" command or repower device to apply new config!) DHCP on, Device can't config static address, set DHCP off first. | |
| r ip addr! | Get network IP address | r ip addr! | IP:192.168.1.100 | |
| s subnet xxx.xxx.xxx.xxx! | Set network subnet mask | s subnet 255.255.255.0! | Set subnet Mask address:255.255.255.0 (Please use "s net reboot!" command or repower device to apply new config!) DHCP on, Device can't config subnet mask, set DHCP off first. | |
| r subnet! | Get network subnet mask | r subnet! | Subnet Mask: 255.255.255.0 | |
| s gateway xxx.xxx.xxx.xxx! | Set network gateway | s gateway 192.168.1.1! | Set gateway: 192.168.1.1 Please use "s net reboot!" command or repower device to apply new config! DHCP on, Device can't config gateway, set DHCP off first. | |
| r gateway! | Get network gateway | r gateway! | Gateway:192.168.1.1 | |
| s tcp/ip port x! | Set network TCP/IP port (x= 1~65535) | s tcp/ip port 8000! | Set TCP/IP port:8000 | |
| r tcp/ip port! | Get network TCP/IP port | r tcp/ip port! | TCP/IP port:8000 | |
| s telnet port x! | Set network telnet port (x= 1~65535) | s telnet port 23! | Set Telnet port:23 | |
| r telnet port! | Get network telnet port | r telnet port! | Telnet port:23 | |
| s net reboot! | Reboot network modules | s net reboot! | Network reboot... IP Mode: Static IP: 192.168.1.72Subnet Mask: 255.255.255.0Gateway: 192.168.1.1 TCP/IP port=8000 Telnet port=10Mac address:00:1C:91:03:80:01 | |
| s uart x datalen y! | Set the data length of x hdbt uart, x= 0-8, y= 1-2, 1:8bit 2:7bit | s uart 1 datalen 1! | hdbt uart1 data len is 8bit | |
| s uart x baudrate y! | Set the baudrate of x hdbt uart, x=0-4, y=1-8, 1: 115200 (Default) 2: 57600 3: 56000 4:384005:19200 6:14400 7:9600 8:4800 | s uart 1 baudrate 1! | hdbt uart1 baudrate is 115200 | |
| s uart x parity y! | Set the Parity of x hdbt uart, x= 0-4, y= 1-3, 1:none 2:odd 3:even | s uart x parity 1! | hdbt uart1 parity is none | |
| s uart x type z senddata y end! | Send data y from x hdbt uart, z=0 ascii, z=1 hex, x= 0-4 | s uart 1 type 0 senddata abcdefg end! | hdbt uart1 data: abcdefg | |
| r uart status x! | Get the Status of x hdbt uart, x= 0-4 | r uart status 1! | hdbt uart1 baudrate 9600, data 8bit, parity none |
Troubleshooting
There is no display on the screen.
It has been found that there are significant differences in the cable lengths/types and even input ports which can be used on different brands of display using HDMI 18G 4K@60Hz resolutions. If problems are experienced, please apply the following steps:
- Check that the Receiver used supports distance and resolution required.
- Try a different input port on the display.
- Reduce the cable length on the Input and Output to 1m.
■ Try a different type of 1m HDMI Cable. - Check that the DC plug and jack used by the external power supply is firmly connected and that the power LED is illuminated on both the Transmitter and Receiver.
- Check that the Cat.6/7 cable is plugged in correctly and that the Connection LED on the left side of both the HDBaseT In and Out ports are illuminated.
- For several HDMI devices it may be helpful to unplug and re-connect their HDMI connection to reinitiate the HDMI handshake and recognition.
- Power off all the devices, then power on in this order: first, the extender, then the display and finally the source.
- Reduce the length of Cat.6/7 or HDMI cable used or use an higher quality cable.
Lindy regularly checks and tests our product range to ensure maximum compatibility and performance. For the most up to date version of this manual, please refer to your local Lindy website, search for the relevant part number and find the manual under Downloads.

WEEE (Waste of Electrical and Electronic Equipment), Recycling of Electronic Products
Europe, United Kingdom
In 2006 the European Union introduced regulations (WEEE) for the collection and recycling of all waste electrical and electronic equipment. It is no longer allowable to simply throw away electrical and electronic equipment. Instead, these products must enter the recycling process. Each individual EU member state, as well as the UK, has implemented the WEEE regulations into national law in slightly different ways. Please follow your national law when you want to dispose of any electrical or electronic products. More details can be obtained from your national WEEE recycling agency.
LINDY declares that this equipment complies with relevant European CE requirements.
LINDY declares that this equipment complies with relevant UKCA requirements.
FCC Certification
This equipment has been tested and found to comply with the limits for a Class B digital device, pursuant to part 15 of the FCC Rules. These limits are designed to provide reasonable protection against harmful interference in a residential installation.
You are cautioned that changes or modification not expressly approved by the party responsible for compliance could void your authority to operate the equipment.
This device complies with part 15 of the FCC Rules.
Operation is subject to the following two conditions:
- This device may not cause harmful interference, and
- This device must accept any interference received, including interference that may cause undesired operation.
The enclosed power supply has passed Safety test requirements, conforming to the US American versions of the international Standard IEC 60950-1 or 60065 or 62368-1.
LINDY Electronics Ltd


- INTRODUCTION
- PACKAGE CONTENTS
- FEATURES
- SPECIFICATION
- INSTALLATION
- OPERATION
- EDID SETTINGS
- TCP/IP CONTROL
- IP SETTING
- WEB LOGIN SETTING
- INFRARED CONTROL
- RS-232 CONTROL
- TROUBLESHOOTING
- THERE IS NO DISPLAY ON THE SCREEN
- WEEE (WASTE OF ELECTRICAL AND ELECTRONIC EQUIPMENT), RECYCLING OF ELECTRONIC PRODUCTS
- EUROPE, UNITED KINGDOM
- FCC CERTIFICATION
Brand : Lindy
Model : 38345
Category : Audio/video extension