
DG 700 - Grinder METABO - Free user manual and instructions
Find the device manual for free DG 700 METABO in PDF.
| Product type | Pneumatic grinder (compressed air tool) |
| Brand | Metabo |
| Model | DG 700 |
| Power supply | Compressed air, maximum permissible operating pressure (see technical data) |
| Intended use | Fine grinding with mounted points, polishing with polishing bodies, flap wheels in professional environments |
| Rotation speed | Variable depending on adjustment (speed adjustment screw on some models) |
| Collet chuck | For shanks of compatible diameters (DG 25 Set: collets for different diameters) |
| Maximum mounted point diameter | See technical data (not specified in the excerpt) |
| Minimum clamping length | 10 mm |
| Pneumatic connection | Quick coupling 1/4" |
| Maintenance and cleaning | Daily lubrication with pneumatic oil (3-5 drops per 15 minutes of operation), clean the coupling filter at least once a week |
| Safety | Wear safety goggles and ear protection; do not exceed max pressure; use suitable gloves; do not modify the tool; always disconnect before maintenance |
| Spare parts and repairability | Use only original Metabo spare parts; repair by competent technician; contact a Metabo agency |
| Accessories | Metabo accessories specially designed for this tool (see catalog or Metabo website) |
| Environmental protection | Comply with regulations for disposal and recycling |
| General information | Instructions available in multiple languages (FR, DE, EN, etc.); observe accident prevention guidelines |
Frequently Asked Questions - DG 700 METABO
User questions about DG 700 METABO
0 question about this device. Answer the ones you know or ask your own.
Ask a new question about this device
Download the instructions for your Grinder in PDF format for free! Find your manual DG 700 - METABO and take your electronic device back in hand. On this page are published all the documents necessary for the use of your device. DG 700 by METABO.
USER MANUAL DG 700 METABO
Original instructions
1. Declaration of Conformity
We declare under our sole responsibility: These compressed air bar grinders, identified by type and serial number 1 , comply with all relevant requirements of the directives 2 and standards 3 . Technical file at 4 - see page 3.
For UK only:
UK We as manufacturer and authorized person to CA compile the technical file, see *4) on page 3, hereby declare under sole responsibility that these compressed air bar grinders, identified by type and serial number *1) on page 3, fulfill all relevant provisions of following UK Regulations S.I. 2008/ 1597 and Designated Standards EN ISO 12100:2010, EN ISO 11148-9:2011
2. Specified Use
This compressed air tool is designed for...
- ... for fine grinding work with abrasive points
- ...for working with polishing bobs
- ...for working with felt polishing tools
- ...for working with lamellar grinding wheels by professionals.
The tool must only ever be operated with a compressed air supply. The maximum supply pressure specified on the air tool must never be exceeded. The air tool must not be operated using explosive, inflammable or hazardous gases. It must not be used as a lever, crushing tool or striking tool.
Any other use does not comply with the intended purpose. Unspecified use, modification of the air tool or use of parts that have not been tested and approved by the manufacturer can cause unforeseeable damage.
The user bears sole responsibility for any damage caused by improper use.
Generally accepted accident prevention regulations and the enclosed safety information must be observed.
3. General safety instructions

For your own protection and for the protection of your pneumatic tool, pay attention to all parts of the text that are marked with this symbol!

WARNING - Reading the operating instructions will reduce the risk of injury.

WARNING Read all safety warnings and instructions. Failure to follow all safety warn-and instructions may result in electric shock, nd/or serious injury.
Keep all safety instructions and information for future reference.
Pass on your pneumatic tool only together with these documents.
- The user or the user's employer must evaluate the specific risks associated with each application of the tool.
- The Safety Instructions must be read and understood before installing, operating, repairing or maintaining the tool, and also before replace any accessory parts or carrying out any work in the vicinity of the pneumatic tool. Failure to read and follow the instructions may lead to serious injury.
- Only qualified, trained operators are authorised to install, adjust or use the pneumatic tool.
- The pneumatic tool must not be modified. Any modifications may reduce the efficiency of the safety measures and increase risks for the operator.
- Never use pneumatic tools that have been damaged. Look after your pneumatic tools carefully. Regularly check that all moving parts are functioning correctly without jamming, ensure that no parts are broken or damaged to an extent that they affect the operation of the pneumatic tool. Check that all signs and labels are legible and intelligible. Have damaged parts repaired or replaced before using the tool. Many accidents are caused by poorly maintained pneumatic tools.
4. Special Safety Instructions
4.1 Risks associated with ejected parts
- If either the workpiece, accessory parts or the pneumatic tool breaks, parts may be ejected at high speed.
- While operating, maintaining or repairing the pneumatic tool, or replacing accessory parts, you must always wear impact-resistant safety goggles. The degree of protection required for each individual task must be evaluated separately in each case.
- Ensure that the workpiece is secure.
- Regular checks must be carried out to verify that the rotational speed of the pneumatic tool does not exceed the speed specified on the pneumatic tool. These speed checks must be conducted when no accessory is fitted. Metabo's Service Centre can perform these checks for you.
- Ensure that any sparks or fragments emitted during operation do not pose a risk.
- Disconnect the pneumatic tool from the compressed air supply before replacing the accessory or accessory parts, and also before carrying out maintenance, settings or cleaning.
- Also ensure that no other people are placed at risk.
4.2 Risks associated with items catching/getting entwined
- Wear suitable clothing. Do not wear loose clothing or jewellery. Keep hair, clothing and gloves at a safe distance from the pneumatic tool and moving parts. Loose clothing, jewellery or long hair could catch in moving parts. There is a risk of injury in this case.
4.3 Risks during operation
- Avoid any contact with the rotating shaft and the accessory to prevent cuts to your hands and other body parts.
- When using the pneumatic tool, the operator's hands may be exposed to potential risk of cuts, abrasions and heat damage. To protect your hands, wear suitable gloves.
- The operator and maintenance staff must be physically capable of handling the size, weight and power output of the pneumatic tool.
- Make sure you hold the pneumatic tool correctly: Be prepared to counter any standard or unexpected movements, so keep both hands ready.
- Ensure you stand in a safe position and keep your balance at all times.
- Avoid accidental operation. If the air supply is interrupted, switch off the pneumatic tool using the On/Off switch.
- Only use lubricants that have been recommended by the manufacturer.
- Wear personal protective equipment and always wear safety glasses. By wearing personal protective equipment such as gloves, protective clothing, a dust mask, non-skid safety shoes, a safety helmet or ear protectors, to suit the type of machine and its use, you reduce the risk of injury. Wearing this equipment is recommended.
- The rated speed of the accessory must be at least equal to the maximum speed marked on the pneumatic tool. Accessories running faster than their rated speed can break and fly apart.
- Wear a safety helmet if carrying out work above your head.
- The tool continues running after the pneumatic tool has been switched off.
- Ensure the sparks emitted during use do not pose any risk. Explosive or flammable dust may be generated while you work on workpieces. There is therefore a risk of explosion or fire.
4.4 Risks associated with recurring movements
- When working with the pneumatic tool, you may experience an uncomfortable sensation in your hands, arms, shoulders, neck or in other body parts.
- Make sure you are in a comfortable position to carry out work with the pneumatic tool, check that the tool is held securely, and avoid any awkward positions that make it difficult, for example, to keep your balance. If carrying out work over an extended period, the operator should change position occasionally. This should help to avoid fatigue and any unpleasant sensation.
- If the operator experiences persistent symptoms such as feeling unwell, aches, pains or throbbing, a prickling or burning sensation, loss of hearing, or joint stiffening, these warning signs must not be ignored. The operator should advise the employer of these symptoms and consult a qualified doctor.
4.5 Risks associated with accessory parts
-
Disconnect the pneumatic tool from the air supply before the accessory or accessory part is secured or replaced.
-
Only use accessories that are designed for this machine and that fulfil the requirements and the specifications listed in these operating instructions.
- Avoid any direct contact with the accessory both during and after use because it may be hot or have sharp edges.
- The rated speed of the accessory must be at least equal to the maximum speed marked on the pneumatic tool. Accessories running faster than their rated speed can break and fly apart.
- Never fit a grinding wheel, cut-off wheel or milling cutter. If a grinding wheel burst, it can cause serious or even fatal injury.
- Do not use wheels that are chipped, ripped or that may have fallen.
- Only the permissible accessories with the appropriate shank diameter must be used.
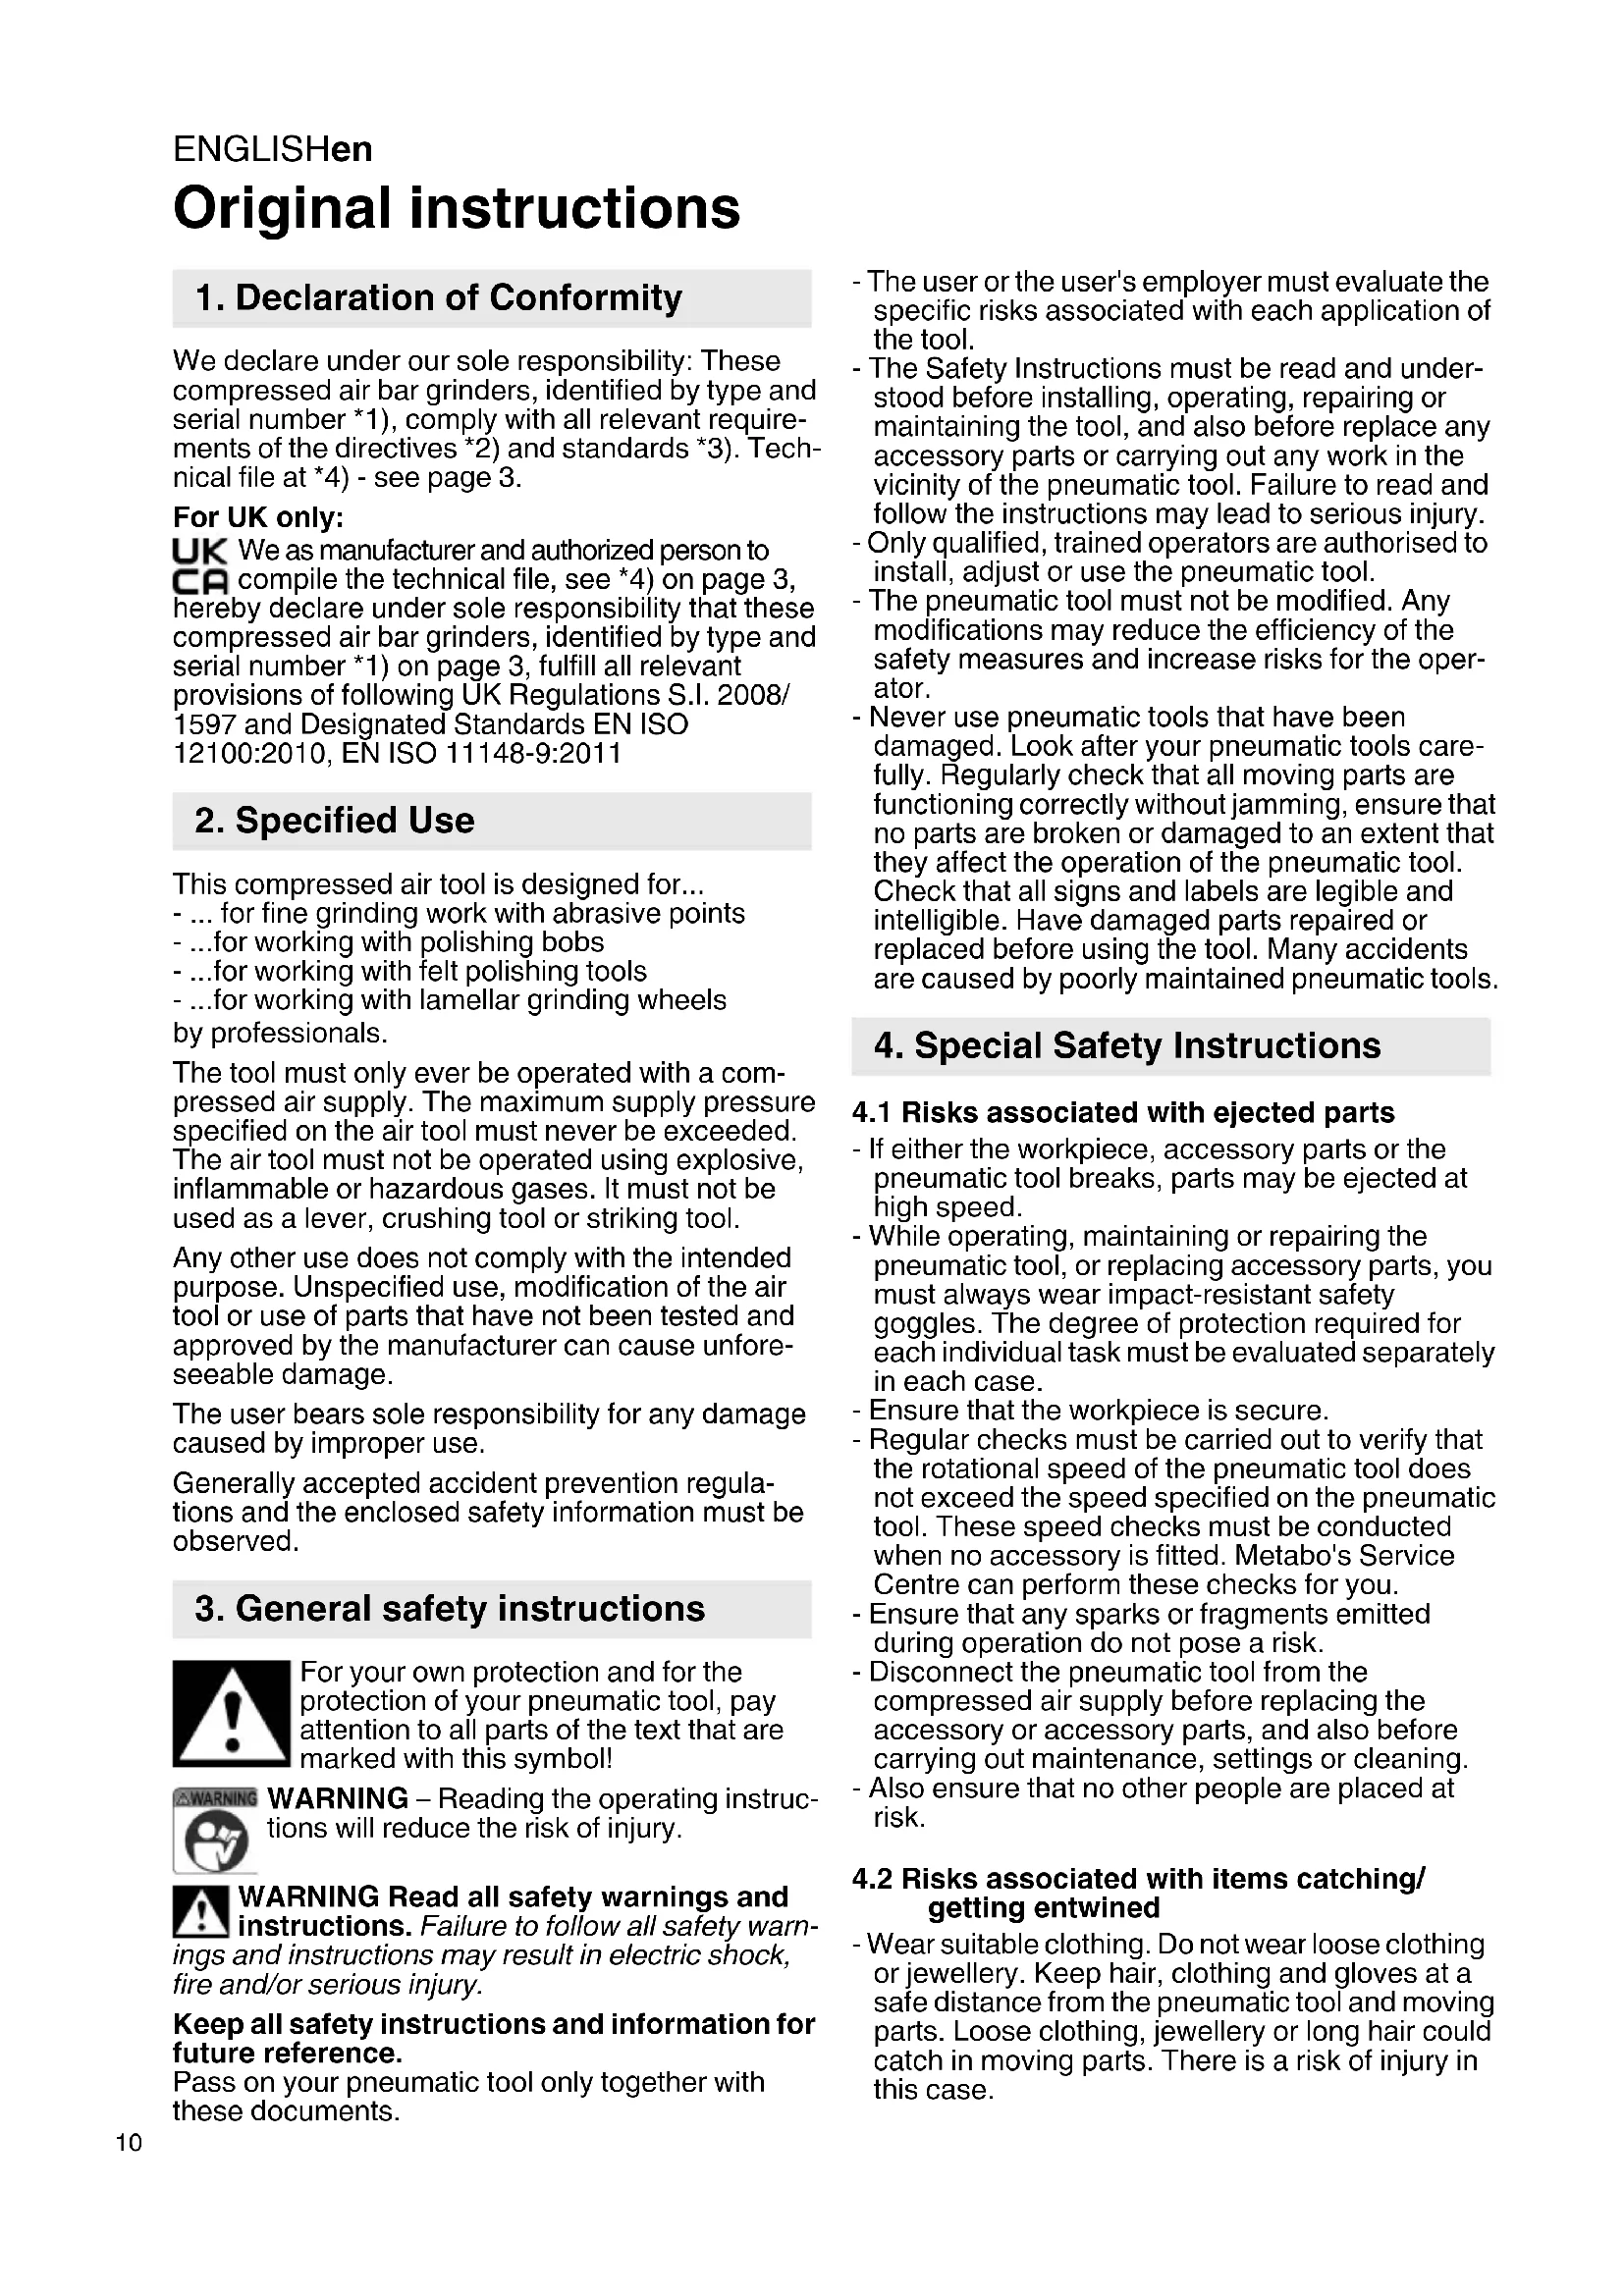
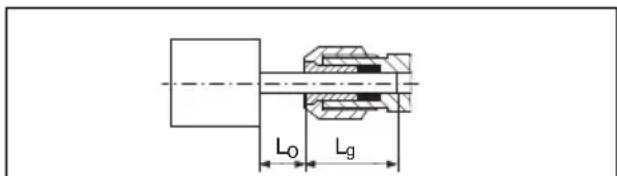
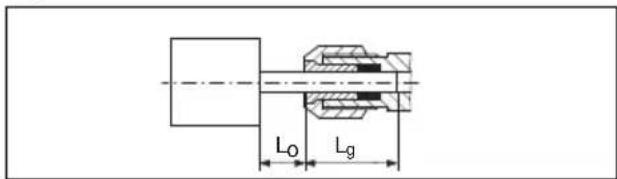
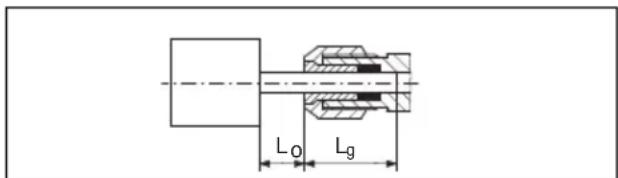
- Observe the manufacturer's recommendations for small grinding tools. For small grinding tools, the maximum permissible projection allowed by the manufacturer (L0 = length of shank between the end of the collet chuck and the small grinding tool) must not be exceeded! If the projection is increased (L_0) , the permissible speed must be lowered. Insert the accessory with the full length of the shank if possible into the collet chuck. Ensure that the clamping length (L) is at least 10mm .
- The accessory's shank diameter must correspond exactly to the collet bore of the collet chuck!
4.6 Risks in the workplace
- Slipping, tripping and falling are the main reasons for accidents in the workplace. Pay attention to surfaces that may have become slippery as a result of using the pneumatic tool, and also watch that the air hose does not cause someone to trip.
- Proceed carefully when working in unfamiliar environments. Power cables and other supply lines may represent a hidden risk.
- The pneumatic tool is not designed for use in explosive environments and is not insulated against contact with sources of electric power.
- Ensure that the spot where you wish to work is free of power cables, gas lines or water pipes (e.g. using a metal detector).
4.7 Risks associated with dust and vapours
- The dust and vapours generated when the pneumatic tool is used may carry health risks (e.g. cancer, birth defects, asthma and/or dermatitis); it is therefore imperative that a risk assessment is carried out in relation to these risks and that suitable controls are then implemented.
- The risk assessment should take into account both the dust generated while the pneumatic tool is used and any existing dust that may be raised during operation.
ENGLISHen
- The pneumatic tool must be operated in accordance with the recommendations set forth in these instructions and must be maintained in order to minimise the release of dust and vapours.
- The extracted air must be discharged in such a way that the minimum of dust is raised in a dust-filled environment.
- If dust or vapours are generated, the main priority is to control these at the location where they are released.
- All built-in or accessory parts on the pneumatic tool that are designed to collect, extract or prevent air-borne dust or vapours must be used and maintained in accordance with the manufacturer's instructions.
- To avoid increasing the amount of dust or vapours generated unnecessarily, it must ensured that consumables and the accessory are selected, maintained and replaced in accordance with these instructions.
- Use protective breathing apparatus in accordance with your employer instructions or in accordance with health and safety regulations.
- Working with certain materials causes emissions of dust and vapours that can give rise to potentially explosive conditions.
4.8 Risks associated with noise
- Failure to use adequate ear protectors when the noise level is high can result in lasting damage to hearing, hearing loss and other problems, such as tinnitus (ringing, whistling or buzzing in the ear).
- It is vital to carry out a risk assessment in relation to these risks and to implement appropriate control measures that take the risks into account.
- Appropriate risk control measures may include, for example, the use of sound-insulating materials to prevent the knocking sounds that occur on the workpieces.
- Use ear protection in accordance with your employer instructions or in accordance with health and safety regulations.
- The pneumatic tool must be operated in accordance with the recommendations provided in these instructions and must be maintained in order to avoid unnecessarily raising the noise level.
- To avoid increasing the noise level unnecessarily, consumables and the accessory must be selected, maintained and replaced in accordance with these instructions.
- The integrated sound absorber must not be removed. You must ensure it is in good working order.
4.9 Risks associated with vibration
- The effects of vibrations can damage nerves and impair blood circulation in the hands and arms.
- When working in cold environments, you must wear warm clothing and keep your hands warm and dry.
- If you notice that the skin on your fingers or hands is numb, prickling or turning white, stop working with the pneumatic tool immediately, notify your employer and consult a doctor.
- The pneumatic tool must be operated in accordance with the recommendations provided in these
instructions and must be maintained in order to avoid unnecessarily raising the level of vibration.
- To avoid increasing the level of vibration unnecessarily, consumables and the accessory must be selected, maintained and replaced in accordance with these instructions.
- To support the weight of the pneumatic tool, use a stand, a clamp or an equaliser whenever possible.
- Hold the pneumatic tool firmly but not too tightly using the required manual torque reaction: the risk of vibration is increased when the grip force is higher.
- An accessory that is either damaged or incorrectly mounted can cause excessive vibration.
4.10 Additional safety instructions
- Compressed air can cause serious injury.
- When the pneumatic tool is not in use, before replacing accessory parts or when carrying out repairs, you must ensure that air supply is shut off, that the air hose is depressurised and that the pneumatic tool is disconnected from the compressed air supply.
- Never direct the air jet at yourself or other people.
- Hoses that whip about can cause serious injury. Therefore always check that the hoses and their fixtures are in good condition and that they have not become loose.
- If universal swivel couplings (claw couplings) are being used, locking pins must also be used. You should also use whip check hose restraints in case there is a problem with the connection between the hose and pneumatic tool or between the hoses themselves.
- Ensure that the maximum pressure specified on the pneumatic tool is not exceeded.
- Never carry pneumatic tools by the hose.
- Secure the pneumatic tool if it is operated in a holder. Loss of control can cause personal injury.
4.11 Additional Safety Instructions
- If applicable, observe any particular health and safety or accident prevention regulations governing the use of compressors and compressed pneumatic tools.
- Ensure that the maximum supply pressure specified in the Technical Specifications is not exceeded.
- Do not overload the tool - use it only within the performance range for which it was designed (see "Technical Specifications").
- Use non-hazardous lubricants. Ensure the workplace is adequately ventilated. If there is a large amount of discharge: Check the pneumatic tool and have it repaired if necessary.
- Do not operate the tool unless you are completely focused. You must be alert, pay attention to what you are doing and proceed cautiously when working with a pneumatic tool. Never use a tool when you are tired or under the influence of drugs, alcohol or medication. Just one moment's carelessness when using the tool can cause serious injury.
- Make sure your workplace is clean and well lit. Untidy or poorly lit workplaces can cause accidents.
-
Keep pneumatic tools away from children.
-
Do not store the tool outdoors or in damp conditions without protection.
- Protect the pneumatic tool, especially the compressed air connection and the control elements from dust and dirt.
Information in these operating instructions is categorised as shown below:

Danger! Risk of personal injury or environmental damage.

Caution. Risk of material damage
4.12 Symbols on the pneumatic tool

Read the Operating Instructions before starting to use the machine.

Wear safety goggles.

Wear ear protectors.

Direction of rotation
5. Overview
See page 2.
1 Open-ended spanner
2 Collet chuck nut
3 Collet chuck
4 Collet chuck holder
5 Spindle
6 Open-ended spanner
7 Switch (on/off)
8 Switch-onlock
9 Adjusting screw for
10 Air outlet
11 Compressed air connection with filter
12 Plug-in nipple 1/4"
* depending on model
6. Operation
6.1 Before using the tool for the first time Insert plug-in nipple (12).
6.2 Inserting the collet chuck
The tool's shank diameter must correspond exactly to the collet bore of the collet chuck (3)!
DG 25 Set: Various collet chucks are available for different shank diameters.
Insert the collet chuck (3) into the collet chuck holder (4) and manually tighten the collet chuck nut (2).
If there is no tool inserted in the collet chuck, you can tighten the collet chuck manually rather than with the open-end spanner.
6.3 Attaching the accessory
For small grinding tools, the maximum permissible projection allowed by the manufacturer (L0) must not be exceeded! Insert the accessory with the full length of the shank if possible into the collet chuck (3). Ensure that the clamping length (L) is at least 10mm
The accessory's shank diameter must correspond exactly to the collet bore of the collet chuck (3).
- Bring the spindle (5) to a standstill using the open-end spanner (6).
- Tighten the collet chuck nut (2) using the open-end spanner (1).
- Ensure that the accessory is fitted securely.
6.4 Using the pneumatic tool
To benefit from the pneumatic tool's full performance, always use compressed air hoses with an inner diameter of at least 10mm . Tool performance can be significantly impaired if the inner diameter is too small.

Caution. The compressed air line must not contain any water condensation.

Caution. To preserve and extend the service life of this tool, you must ensure that it is regu-. maintained with pneumatic oil lubricator. You do this as follows:
- Use oiled compressed air by fitting an oil-fog lubricator.
Without speed oil-fog lubricator: Manually apply oil every day via the compressed air connection. Use approx. 3-5 drops of pneumatic oil lubricator for each 15 minutes of continuous operation.
If the tool has not been in use for several days, you should manually apply about 5 drops of pneumatic oil lubricator into the compressed air connection.

Caution. Only allow the tool to run at idle speed for a brief period.
- DG 25 Set: Select a suitable collet chuck (3) (see Chapter 6.2).
- Fit an appropriate accessory (see Chapter 6.3).
- DG 25 Set: You can adjust the speed on the adjusting screw (9).
- Adjust the supply pressure (this is measured at the air outlet while the pneumatic tool is switched on). For details of the maximum permissible supply pressure, see the Chapter on "Technical Specifications".
- Connect the pneumatic tool to the compressed air supply.
- To switch on: Push the switch-on lock (8) in the direction of the arrow (see Fig., Page 2) and press switch (7).
To switch off: Release switch (7)
7. Care And Maintenance

Danger! Disconnect the compressed air connection before carrying out any work.

Danger! Repair and maintenance work other than described in this section should only be used out by qualified specialists.
- Carry out regular maintenance to ensure the safety of the pneumatic tool.
- Check that all screw fittings are seated securely, and tighten if necessary.
- Clean the filter in the compressed air connection at least once a week.
- It is recommended that you install a pressure reducer with an air-water separator and lubricator upstream of the pneumatic tool.
- If a large amount of air or oil is escaping, check the pneumatic tool and have it maintained if necessary. (see Section 9.)
- Check the rotational speed regularly and after every use. Also carry out a simple check on vibration emission.
- Avoid contact with dangerous substances that have collected on the tool. Wear suitable personal protective equipment and take appropriate measures to remove any dangerous substances before maintenance.
8. Accessories
Use only genuine Metabo accessories.
Only use accessories that are designed for this pneumatic tool and that fulfil the requirements and the specifications listed in these operating instructions.
For a complete range of accessories, see www.metabo.com or the catalogue.
9. Repairs

Danger! Repairs to pneumatic tools must only be carried out by qualified specialists, using manual Metabo spare parts!
If you have Metabo pneumatic tools that require repairs, please contact your Metabo service centre. For addresses see www.metabo.com.
You can download spare parts lists from www.metabo.com.
10. Environmental Protection
Observe national regulations on environmentally compatible disposal and on the recycling of disused pneumatic tools, packaging and accessories. You must not cause risks to people or the environment.
11. Technical specifications
Explanatory notes on the specifications on page 3. Changes due to technological progress reserved.
$$ V _ {1} = \textsf {A i r r e q u i r e m e n t} $$
p_max. = maximum permissible supply pressure
n_0 = Rotational speed
d_S = Collet bore of the collet chuck
_ = maximum diameter of the small grinding tool
d_i = Hose diameter (inner)
C = Connecting thread
A = Dimensions:
Length x Width x Height
$$ m = \bar {W} e i g ^ {-} h t $$
The technical specifications quoted are subject to tolerances (in compliance with the relevant valid standards).

Emission values
Using these values, you can estimate the emissions from this tool and compare these with the values emitted by other tools. The actual values may be higher or lower, depending on the particular application and the condition of the tool or accessory. In estimating the values, you should also include work breaks and periods of low use. Based on the estimated emission values, specify protective measures for the user - for example, any organisational steps that must be put in place.
Vibration (acceleration value, frequency-weighted according to EN 28927):
a_h Vibration emission level
K_h^n = Measurement uncertainty (vibration)
Sound level (EN ISO 15744):
LpA =Sound pressure level
LWA =Acoustic power level
K_DA , K_WA = Measurement uncertainty

Wear ear protectors!
4.5 Risques inherents aux accessoires
Programa completeness of accessories véase www.metabo.com o CATALOGO.
9. Reparación

4.3 Farer under drift
6.2 Sette inn spenttang
Verktoyets tangediameter m'a passage noyaktig til spentntangens (3) boring!
4.2 Onachoctn BCJeCDTBHe 3aXBaTa/HamaTbIBAHN
- Pa6oTaIe B NOxOJaUeN (cneuaJIbHOJ) OeJKeHe. He naDeBaIte npocToPhyIO OeKdY nn yKpaWeHn. ObepaTe BOLOcbI, OeKdY n nepuATKn NpdaJIbWe OT BpaUaOuXcR y3IOB nHEBMOnHCTpyMeHTa. CBo6OHaN a OeJDa, yKpaWeHn IIN dInHHbIe BOLOcbI MOrT 6bITb 3axBaueHbI Hm. OnaChOcTb TpaBMnPoBaHn!
4.3 Onachoctn B xode 3Kcnnyatauhi
-ИзбeraиTe KOHTaKt a C BpaUaIOUIMc XBOCTOBHKOM I CMEHHbIM INHCTpyMeHTOM, YTObI HeДОуСТИТь NOpe3OB KINCTeR pyK IpyrNx YAcTeY TeJa.
- Ppi pa6oTe c nHeBMOHCTpyMeHTOM KnCTn pyK NOJIb3OBaTeJI NaDBepraIOTc pa3JIuHbIM ONaCHOCTM, HAnpImeP nope3aM, CcaINHaM IN HaRpeBy.ДЯ 3aUnTbI pyK HaJeBaIte NODxoJaIe nepUaTKI.
-Пользовател NGбслгнваioшп nepcohaI DOЛЖнbl 6bITB COCTOЯн OбpaцаTbcR C ПHEBMONHCTpyMeHTOM C yчETOM erо pa3mepOB, BEcaN MOUHOCTN.
- PpaBnIbHO DepeKHTe NHeBMOnHCTpyMeH: 6yDbTe rTOBbI CpeaHnpoBaTb Ha OKnIdaembIe HneOHNdaHHbIe DBNXKeHnra - DepeKHTe oBe pyKn HAroTOBe!
- PpIMnTe yCTOuHBOe NOLOXKeHne N ObecneYbTe HaJekHbI XBaT 3JIeKTPoHnCtpyMeHTa DnA COxpaHeHn paBHOBecnB LIO6oN pa6Oey CNTy-a4nn.
- I36eraIte HnpeHamepeHHoro BkIOueHnnaHEBMOHCTpyMeHTa. B clyuae npepbIBaHnnaNOdaun BO3dyxa BBIKIOUHTe NHEBMOnHCTpyMeHTC NOMOUsbIO BbIKIOUcATEJIa.
- IcnoIb3yIe ToIbKO peKOMeHIOBaHHble n3rToBHTeJIem COH.
-Пользунтусь сретбтами ИндИндУально 3auntbIи BCEГда надевайе 3auntHье OчК. ИспOLTбОВане сретдВ ИнДИВdyaalbHO 3auntbI, HApPIMeP 3auntHBIX nepaTOK, 3auntHOJdeXdbI, pecnnapToPA, HeCKoJIb- 3rauei 3auntHOJOByBn, 3auntHOrO WJIeMa IIN 3auntHBIX HayuHInKOB, B 3aBNCIMOCtN OT BnDa I O6laCTn npIMeHEnH INHCTpyMeHTa CHNJaET PnCK TpaBMIpOBAHnI N03TOMy HAcTOrTeJIbHO peKOMeHdyetc.
-OnyctmamacToTaBpaueHnpa6oery HNCTpymeHTaDJIKHa 6bItbHeHNKeMaKcMmaIbHOuactOTbBpaueHn, yKa3aHHoHa nHEBMOnHCTpymeHTe. PnHaJNeXHoCTn, BpaauOuineCcnpeBblWeHnEmOnyCTmOc CKOpOCTn, MoryTpa3pyWntBCr.
-Пи ВьЮЛнЕнп pa6OT haД roLOBOH haDEBaHTe 3aHTbI ŠJIEM.
- Pocne BbIKIOUeHn IHeBMOHCTpyMeHTa pa6OuH INCTpyMeHT eE HeKOTOpoe BpeMa pa6OtaET NO INHePcHn.
- N03a60TbTeCb O TOM, YTO6bI BO3HnKaIOuZe Ne npn BbINOJIHeHn pa6OT NCKpbI He npeIcTaBJIaII INOacHOCTN. Pn O6pa6OTKe KOHCTpyKUOnHHbIX MaTePnaIOB BO3MOXHO NOBJIeHne B3pbIBOO-NachOH nIN rOpUeH bIINI. B pe3yJIbTaTe 3TOrO cyueCTByeT pNCH B3pbIBa IIIN BO3rOpAHnI.
4.4 Onachoctn BCJeCDTBHe NOBTOHuxxCa DeIcTBn
- PnBbINOJIHeHn pa6OT c NHEBMOnHCTpyMeHTOM BO3MOXHO NOBLeHn HEnpNrTHbIX OuYueHn B KnCTaX pyK, npeIneLeybX, Ileayax, B oBlaactn WEN INDpyRnx YacTAX TeHa.
-ПинмаTe npabHoe NOLOKeHneДЯ pa6Otbl C nHEBMOnHCTpyMeHTOM,OBpaauaTe BHNMaHHe Ha 6e30nacHOCTb H N36eRaTe pa6Otbl B TaKHX NOLOKeHnX,B KOTOpbIX Bam CLOXHO COxpaHNTb paBHOBecne H KOTOpbIe DOCTaBnIOT Bam DnCKOMΦoT.B xOJe HenpePpbIBHO pa6Otbl NOJb3OBaTeNb DOJNKeH MeHrTB NOLOKeHne TeLa BO N36eKaHne NOBLeHnYcTaIOCTn IN DnCKOMΦoTa.
-HeIb3a IrHopnpoBaTb TaKHe Cmntombl KaNpOdoJXnTeJIbHOe HeDOMorAHne, HApUSeHnecepIe6BnEHn, NOBLeHne 60Je, «MypaWeK»,OnemHn. PoiIb3OBaTeJIb DoJIkeH yBeDOMtBob 3TOM CBOero pa6oToDaTeJIu N pPOKOHcyJIbTHIpObaTbC BpaHOM-CneuaJIInCTOM.
4.5 OnacHOCTN OT HcNoJIb3yEmoJ OCHACTHn (npHaJIeHHOCTeI)
- OTOeINHnIte INHeBMOnHCTpyMeHT OT CnCTEmbl NOdaHcTAHor BO3dyXa nepeD yCTaHOBKO Hn3aMeHOcMehHO INCTpyMeHa/npHnAdJeK-HoCTeN.
- IcnoIb3yIte ToIbKO Te npHaJdIeKHOCTN, KOToPbIeCnEuaJIbHOIpEaHa3HaueHbI DnA 3TOO INCTpyMeHTa NOTBeaKaT Tpe6oBaHnM XapaKTePncTtKam, PpIBoDmMbIM B HaCToIeM pyKOBOIDCTBE NO 3KcIIyatauIN.
- N36eraIte npramo KONTaKTa c pa6OuHm HNCTpyMeHTOM BO Bpempa60TbI n Cpa3y NocJe Hee, TaK KaK INCTpyMeHT MOKeT 6bITb TOpAUM IIN IMETb OCTpbIE KpOMKn.
-Донустимая устоа Врашени рабочero нстурмента должна бить He Нхе MaКС- мально устоы Врашени, указаHHОн Ha пневMonнстурмен. Пинадлесхости, Врашюшесс с пебышени Донустимо скоportи, могут пашиль. - KaTeROpUneCkn 3anpeuaeTcra yCTaHaBnBaTb a6pa3nHBhIe/OTpe3HbIe KpyrN IIN φpe3bl. JOMaIOuIcnA 6pa3nHBbI Kpyr MoKeT CTAb TpUHHoOueHb TAnKJIbIX N daKe CMePeTeJbHbIX TpaBM.
-He nCnoB3yIe Kpyr, KOToPbIe MOryT HepaBHomepHO BpaAaTbcra, pAcTepeCKaTbcra NIn COCKOHTb BHn3. - Pazpewaaetcncnojb30BaTb Toblko Donyu-ueHHbIe CMeHHbIe INHCTpyMeHTbl C XBOCTOBHKOM NOxOJaIeO dHaMeTpa.
CleyuTe yka3aHnM npOn3BODHTeIa 6pa3BbIX rOLOBOK.BcLyue HeNcNoIb3OBaHnA 6pa3HBbIX rOLOBOK 3aIpeUaeTcR npeBbIaTb yka3aHHbI npOn3BODHTeIeMaKcHmAlbHO DOnyCTHMbIBblET (L_0 = dInHa XBOCTOBnHa MeKdy KOHcOM ZaHROBORo 3aKIma I a6pa3NBHO rOLOBKO)! B cLyue npEbnHeH NcHTeTa (L_0) Heo6XoDMo CHN3NTb DOpyCTMHyU qactOTy BpaSeHn. BctabIte pa6ouH INHCTpymEt B zauHROBbI 3aKIM IO BO3MOH HOCTn Ha BCIO dInHy XBOCTOBnKa.Y6eIITecB TOM, YTO dInHa 3aKImaEMo qactn (L_g) coCTaBJIeT He MeHee 10 MM.

Диametp XBOCTOBnka pa6oeyo INHCTpymEnTa DOJKeH TOUHO COOTBeTCTBOBaTbДиametpy OTBepCTnAaHROBOrO 3aKIma!
4.6 Onachoctn Ha pa6ooyem MecTe
-ПОСКАЛБ3БВАНЕ,СNOTБИKHANЕ И ПАDEHNEЯВЛI-TOTCY OCHOВыIMN INPUNHAMN TpaBMnPOBaHINHa pa6OчEM MeTe.ОБрацайТЕ BHMaHne HaNOBepxHOCTN, KOTOpbIe B pe3yJIbTaTe HcNoJIb3OBAHINI PHeBMOnHCTpymEHTaMOrYT CTaTb CKOJIb3KIMN, a TaKHe Ha ONaCHOCTb CNOTKHHTbcr OBO3dUshhI WJlaHr.
-Пи ВьлОнHeHn pa60В He3HaKOMbIX yCIOBnIX CO6JIIOaIte OCTOpOxHOCTb: BO3MOxHO HAIINue CkpyIToI npOBoDkn IOD 3JIeKTpNueCKIM HAprrKeHnEM.
-ПпевMonHCTpymEnHT He npedHa3HaueHДЯ
ИСПОЛБ3OBaHINBO B3рьIBOONaCHOB03dUshOH
Срдe И He n3OJIIpOBaH OT KOHTaC NcTOCHN-
KAMn 3JIeKtpuYeCKOro TOKa.
- Y6eIntecb, yTO B TOM MeCTe, rIe 6ydyT npOn3BO-DnTbcra paoTbI, He npoxoJrT JINHn 3JIeKTHPO-, BOIO- n Ra3OCha6KeHnR, (HaNPmep, C NOMOuBIO MetaIIIONCKaTeJI).
4.7 Onachoctb BCleDCTBne nbIIN napOB
-Bo3HnKaIOUe B XOe pa6oTb C INHEBMOnHCTpyMeHTOM NblN napbIMORYT pnpHHNTB BpeD BaWemy 3dOpOBbIO (HaNPmep CNOCO6CTBOBaTb pa3BHTNO paKa, npnpODhbIX HeDOCTaTKOB, actMbI N/INIOBJIeHNIO KOHHbIX BOCpAJIeHN); B O6r3aTeJbHO NOPaIKe OcEHNTe BO3MOKhbIe PnCKN C yETOM 3TNX ONACHOCTe N pPIMITe COOTBETCTBYUOJe MEpbI npeDOCTOPOXHOCTN.
- Pn OueHKe pncOB, CBra3aHHbIX C BO3HNKHOBeHHeM NblIN B XOe BblIOJIHeHn pa6OT C INHeBMOnHCTpyMeHTOM, CNeDyET TaKKe yuHTbIbA Tb N Ty Nbl, KOTOPaYx Bo3MOXHO IMeJIacB MecTe npOBedeHn pa6OT N 6blIa NOdHrTa B BO3dYpa6OtaUqIM HNCTpyMeHTOM.
-ПНЕВМОИСHTРМЕNTСLEДYEET3KCNLYAТNPOBAtb N O6CNYKINBaT B COOTBETCTBn C peKOMeHda- cIaMn,уka3aHHbIMN B HAcTOIeM pyKOBOdCTBe, DЯ CBeDEHnK MmHmMy BbICBO6OJDeHn ONaCHbIXДЯ 3DOpOBbЯ Пbln И napOB.
- OTPa60TaHHbI BO3DyX CJIeDyET OTBOHITb TaKHM O6pa3OM, YTO6bI CBECTN K MHNIMMy 3aBHXpeHHe NblIN B yCIOBnX CNJbHOH 3aNblEHHOCTN B MeCTe IPOBeDEHnPa6OT.
-Пи BO3HKNKHOBEHIN nbIIN nI IN napOB OCHOBHON 3aJaey RAJIeTcR KOHTpoJIb IX BbICBO6O-JKDeHn.
-Heo6xOJIMNO npaBnIbHO nCNoJIb30BaTb N O6cIyKINBaTb BcIO Heo6xOJIMyIO IIA C6Opa, BCacblBaHnI ydaJIeHnI JeTyueN PbIIn IIn napOB OCHACTKY INHEBMOnHCTpyMeHTa cOrJaIacHo yKa3aHNrM N3TOTOBNTeJI.
PacxohbIe MaTepnaJIbI pa6OHy IHCTpyMeHT CJeDyET Bbl6nPaTb, O6ClyHNBaTb N 3aMeHrTb COJIaCHO yKa3aHnM n3 HAcToJUeRo pyKOBOdCTBa BO n36eKaHHe HeHyHHO yBeJIuYeHnI NbIe- nI npo06pa3ObaHnI. - IcnoIb3yIte 3aunTHbIe peCnnpaTOpbl COJIaCHO pON3BODCTBHeHbIM HCHTpYKUm NIN B COOTBeTCTBnC Tpe6ObaHnMn IO OxpaHe Tpyda n TexHnke 6e3OnacHOCTn.
- 06pa6oTka onpeJeIeHbIx MaTePnaIaOB cOprrKeHa C BblJeIeHnEM NblN I npa, KOTOpblcMOryT Co3daTb NToEHuaJIbHO B3pbIBOONaCHyIO BO3dyuHyo CpeDy.
4.8 Onachoctb BCJeCDTBne wyma
- BbICOKn yPoBeH yMoBbIX Harpy3OK npn OTCyTCTBnI DoJIKHoN 3aUHTbI CnyXa MoKET npNBecTN K npOIOJKNTeJIbHbIM HApUWeHNrM CnyXa, NOtepe CnyXa N HbIM npO6JIeMaM, HApPImep yShOMy (3BeHraUeMy, CBNC7AeMy IIN JyKHaUeMy) UMy.
CneNyET HeHpeMeHHO OeHNb BO3MOXHbIe pNcKn C yUeTOM 3TNX ONaCHOCTe N I pNInrTa COOTBETCTBYIOUHe MEpbI npeDocTOPOxHOCTN.
B KaueCTBe TaKnx Mep npedocTopoHocTn MoKeT BbICTyNaTb, HApnpMeR, npimeHeHne N3OJIaIOHOHHbIX MaTePnaIOB B ceJIaX yCTpa- HeHnI 3BEHraux ShymOB, BO3HNKaIOUx Ha 3aTOBKe. - IcnoIb3yIte 3aUHTbIe HayuHnKn corlaacHO pON3BOIDCTBEHHbIM IHCTpyKUm HIN B COOTBETCBN C Tpe6oBaHnMn IO OxpaHe Tpyda nTexHnke 6e3ONaCHOCTn.
-ПпсьмнHCTpymENT CJIeDyeET 3KcNlyaTnPoBaTb N O6CJIyKNBaTb B COOTBETCTBUN C ПиВODIMMbIMN B HAcTOIeM pyKOBOdCTBe yKa3aHnA M N BO I36eJHHe HeHyHKHO T NOBbIWeHn YpOBHЯ Shyma.
PacxohbIe MaTepnaJIbI npabOchm HnCTpyMeHT CLeDyET Bbl6HpaTb, O6CnyKuBaTb N3aMeHrTb COJIaCHO yKa3aHnM n3 HaCToJUeRo pyKOBOd-CTBa BO n36eHaHne HeHyHHOro NOBbIWeHnY pOBHry UyMa.
-3anpeaetcyaJdaJIaTb BCTpoEHbI rIyUHTeJIb. OHdoJIKeH HaxOJTbcR B TEXHnueckn NCpapBHom COCTOAHN.
4.9 OnachocTHBcIeDCTBHe Bn6paun
-ДиNTeIbHoe BO3dEInCTBnE Bn6paun MoKeT CTaTb npuHHoH HEPBbIX paCtPoINCTB n HapyUWeHn B cnpKyJIaun KpOBn B KInCTAx n PpeDnLe- ybNx pyK.
-Пи ВьлОнHeHn pa6OT B yCNoBnIx Hn3KoI TempeaTpybl HocNte TeyIyIO OeJy I DePKeIte pyKn B TeIne I cyXIMn.
PYCCHNru
- Ecnn Bbl NOuyBCTByeTe/yBNiNTe, yTO KOJa Ha naIbux nn KnCTx pyK CTaNa HeCyBCTBnTeJbHOn, NOBnInCb «MypaKn», OHa 6oJIIT nn NObeJeLa, npeKpaTne pa6Oy C INHeBMOnHCTpyMeHTOM, yBeDomnte 06 3tOM CBOero pa6OToaTeJr I npOKOHcyNbTnpuYTEcb C BpaUOM.
IHeBMOHnHCTpyMeHT CJIeMyeT 3KcIIyAtnPoBaTb N O6CJyHNBaTb B COOTBeTCTBnC PnHBODnMbIMN B HAcTOAeM pyKOBOdCTBe yKa3aHnA MNO I36eKaHHe HeHyHKHO TOBBIeHn YpOBHn Bn6paun.
Pacxodhie MaTePnaIbI npabOuHnHCTpyMeHT CJeDyET Bbl6HpTaB, 06CnyKINBaTb N3aMeHrTb COJIaCHO yKa3aHnM n3 HAcTOJcero pyKOBOd-CTBa BO n36eKaHHe HeHyKHO NOBblUeHnry yPOBHa Bn6paun.
-ДяудерхангпневmonHCTpymehTa,KOrda3TO BO3MOxH0,HCNoIb3yIteCTOHy,HaTJHXoe npncnoc6JIeHne nIN 6aIahCnpoBOOHoe yCTpOJCTBO. - Hpenko DepeKHTe INHEBMONHCTpyMeHTC yyETOM Heo6xOaMbIX ycNlN peaKcN, HO He 3abblBaITe pni 3TOM O TOM, YTO pNCH Bn6paCNI, KaN npaBnIO, BO3pactaET pni yBeJIuYeHN ycNlN XBAtA.
- HenpaBnIbHO CMOHTnpOBaHHbI INI NOBpeK D'ehHbI INCTpyMeHT MOKeT PpNBecTn K NOBbl WeHHbIM Bn6paCnM.
4.10 DoonHnTeIbHbIe yHa3aHnI NO TexHnHe Ge3OnaCHOCTn
CkaTbI BO3dyx MOKeT CtaTb npuHOn cepb3-Horo TpaBMnpoBaHH.
- Ecnn nHeBMOHnCTpyMeHT He nCnOJb3yeTc, a TaKKe nepeed 3aMeHOI npHaJaJIeHXoCTe Hnnp BbINOJIHeHH peMOHTbIX pa60T Bcerda 6bIOKpyIte NpOaHy BO3dyXa, pa3rpyKaITe OT DaBHeHH BO3dyuHbI WlaHr I OTCoeDnHnTe nHeBMOHnCTpyMeHT OT CnCTembl (NCTOCHNa) NpOaHn CkAToRBO3dyXa.
- HnkOrda He HanpaBnIe BO3dyHbI NOtOK Ha ce6y nn Dpynx Iu.
-OTIetaIOUneBCTOPOHyIJIaHnMOryTCTaTb npuHHoN cepbE3HOrTO TpaBMnPoBaHn. B CBra3n C 3TNM Bcerda IpoBepaTe, He NOBpeKDeHbI JIN IJI WJIaHnI HHe NOBpeKdEhbl/pacfHKcnpoBaHbl JIN IX KpeNekHbIe 3JemeHTbl.
-Пи ИСПОЛБ3OBAHИN yHINBepcaIbHbIX NOBOPOTHbIX (KyIaUKObIx) MyΦT HeO6XoDIMO NcNoJIb3OBaTb CTOnOpHbIe WtNΦTbI N XOMyTbI WhipcheckДЯЗaUHTbI WlaHROB OT BOLOUeHnA (3axIeCTbIBaHnA) B ueJAX OBeCneueHnA 6e3O-NaCHOCTn Ha Clyuay pa3BeDInHeHn A IlaHrObBix COeDInHeHn.
- P03a60bTbTeCb O TOM,чTO6bl He DoIyCTnTb npeBbIiueHnI INHEBMOnHCTpyMeHTOMyKa3aHHOR MaKcImaJIbHOrO DaBHeHn.
- Hateropnueckn 3anpeaetc npehocntb nHEBMOnHCTpymEnT 3a WlaHr.
-ПризклуатушипневmonнстpresHTa, 3aФИКСИРОВАнHOM BДержATEе:HaDEЖHO 3aKpeNTe NHEBMOnHcTpyMeHT. Notepra KOHTPOrIЯ HaID INHcTpymeHTOM MOKeT pRnBecTu K TpaBMnPOBaHNo.
4.11 DOnOHnTeJbHbIe yKa3aHnI NO TexHnKe 6e30NaCHOCTN:
- Pn Heo6xOIMOCTN Co6I0aIte OcO6bIe npednncaHnno 6e3OnacHOCTn Tpyda nI npdeynpexJeHHIO npOH3BOcTBeHHORo TpaBMaTH3Ma npn o6paueHHN C KOMnPecccopamn I NHeBMOHNCTpyMeHTaMn.
- Y6eIITecb B TOM, YTO He IpeBbIaETCyKa3aHHoe B TexHnuecNx XapaKTePncTnKaX MaHC. DOnycTnMOe pa6ooye daBHeHne.
- He neperpykaIte HNCTpyMeHT, NcNoJIb3yIte eRO TOLbKO B TOM DnApa3OHe MOUHOCTN, KOTOpBiy yKa3aH B TexHnuecknx XapaKTepeNCTNKax.
- HcnoIb3yIte donyuIeHHbIe Cma3OuHbIe MaTePnAJI/COJHK. N03a6oTbTeCb O DocTaTOUHOB BeHTnJIaIpyn pa6Oey 3OHbI. PpN NOBbIWeHHOMpacXoJe cKaTOrO Bo3Dyxa: npOBepbTe NHeBMOnHCTpyMeHT, pN Heo6xOdImocTn OTpeMOHTpyIte.
- PpeKpaTHTe pa60Ty C 3TNIM HCTpyMeHToM,ecnBac YTO-JN6O OTBHeKaE! BydTe BHNMaTeJIbHbI, CLeDNTe 3a CBOUMN DeiCTBnA M N cepBe3HO OTHOCHTecb K pa60te C NHEBMOnHCTpyMeHToM. He noJIb3yItecb HCTpyMeHToM,ecn BBlyCTaJIH, HAXODHTecb NOD DeiCTBnEM HapKO-TNKOB, aIKORoJr IIN JIeKapCTB. HeBNMaTeJIb-HOCTb npn pa60te C HCTpyMeHToM MOKeT npNBecTNI K cepBe3HbIM TpaBMam.
- CneInte 3a YnCTOTOn I NOpAikOM Ha CBOEM pa6oem MeCTe. BeCnpAIOK Ha pa6oey MecTe IN PLOXoe OCBeUeHHe MOyT PnIBecTH K HechactThbIM CnyaAM.
-ДеркNTe ПНЕВМОнHCTPyMeHT B HeДОCTуПНOMДЯДTeN MeCTe.
-3anpeuaeTcXpaHHeHnHCTpyMeHTa BHe NOMEueHn Hn BO BlaJHHbIX NOMEueHnX 6e3 COOTBeTCTByIOSe 3aUNTbl.
-3aunuainTe nHeBMOHnCTpymEnT,OCo6eHHo 7Tuuep noaCkAToRO BO3dyXa H opraHbI ynpabLeHnO T nonaHaHn Nblnn Irp3n. INΦopMaunr O6O3NaueHa B daHHom pyKOBODCTBe No 3KcnLyaTaunn CneDyUoUm M o6pa3OM:

Onachoctb! PpeDynpexKdEHe n6 onacHOCTN TpaBMnpoBaHnI NII BpeDe IJIg OkpyKa-yn Cpebl.

BHHMaHHe!PpeDynpEeHneO BO3MOHOM MaTePnaIbHOM yIep6e.
4.12 CnMBoJIHa nHeBMOHnHCTpyMeHTe

IpepeBBODOM B3KcnnyaTaunIO npouTnte pyKOBOdCTBO NO 3KcnNyatauHn.

Icnoj3yTe 3aunTHbIe OCHN

HaedeBaIte 3aunTHbIe HayuHnKIn

HaipablenHe BpaueHn
5.0630p
CM.c.2.
1FaeuHbIKIIOU
2TaNkaZaHROBOrO3aKIMa
3 LaHROBbI 3aJIM
4 DepeKaTeIb ZaHROBO 3aKIMa
5Unnndelb
6 RaeyHbKJIIOU
7 BbIKIOUaTeJIb (BKN/BbIKJ)
8БлokираTopВКлчeyня
9 BnHT perylnpoBkn yactotbI BpaueHna
10 BbIXoB03dyxa
11 甲tyep noaun cKaTOrO Bo3dyxa c nIbTpom
12 CbEMHbI HnIeJIb 1/4"
B 3aBnCHMOCTN OT KOMJIeKTAuIN
6.Зкплуataцья
6.1 Ipeed nepBbIM nCNoJb3ObaHneM
BBePHTe CbEMHbI HnIIeJIb (12).
6.2 YctaHOBbI ZaHROBO 3aHHMa
Dnametp XBOCTOBNka pa6oeryo HnctpyMeHTa D0JIKeH TOUHO COOTBETCTBOBaTbDnametpy OTBepCTnI ZaHROBORO 3axIMA (3)!
EcnB 2aHROBOM 3aKHe yCTaHOBJeH pa6oyn HnCTpyMeHT, He 3aTyrNaTe
3aKIM KIOHOM, a 3aBepHnTe raKy BpyHyIO!
6.3 YctaHOBka pa6oeryo HhctpyMeHa
B cnlyae nCnoJIb3OBAHnA 6pa3NHBbIX roJIOBOK 3anpeucaTcra PpeBbIwTaB
yKa3aHHbI npOn3BODHTeJIeMaKcIMMaJIbHO DOnyCTMbI BblET (L_0)! BCTabJrIte pa6OuH INHCTpyMEHT BcaHROBbI 3aXHM (3) NO BO3MOHXOCTn Ha BCIO dInHy XBOCTOBHa. Y6eINTEcb B TOM, YTO dInHa 3aXImaEMo YacTn (L_g) COCTabJrE T He MeHee 10 MM.

Dnametp XBOCTOBKapabooery HNCTpyMeHTaOJKeH TOHO COOTBETCTBOBaTbDnametpy OTBepCTNAaHROBORo 3aKIma (3)!
-Пиндерхивай Teшпндель (5) raeyнblm Klnquom (6).
- 3aTaNHTe raNky (2) ZaHROBOrO 3aXnMa raeYhbIM KJIouOM (1).
-ObecneYteHaJeKHyIOΦHKcauio pa6oHero HnHCTpyMeHTa.
6.4 IcnoIb3OBaHne nHeBMOHHCTpymeHTa
Дя obecneueHЯ NOIHO MOUHOCHTN CBOE r NHEBMONHCTpyMeHTa BCErda IcNoJIb3yIte NHeBMOUHaHn C BHyTpEHHM dHaMeTpOM MHN. 10 MM. HeIOCTaTOuHbI BHyTpEHHH dHaMeTp MoKeT 3aMeTHO CHN3HTb pOn3BOIDTeJIbHOCTb INHCTpyMeHTa.

BhimaHne! B shaHre noaHn Bo3dyXa He DOJIHHO 6bITb KOHDeHCata.

BhImaHne! YTo6bI 3OTN HCTpyMeHT OCTaBaICr FyHKUHOHaJIbHbIM B TeueHne DOJrOMeHN,ero Heo6XoJMo Cma3bIBaTb DoCTaTOKOLINueCTBOM CMA3Kn. BapnaHTbl CMA3Kn:
- YctaHOBHTe MacNoapCnblnteIb IJIra NODaHINpOMacHeHHoro CKaTOrO BO3dyxa.
-Be3 maclopacblnteIa: eKeHbHO cMa3blBaIte BpyHyIO uTyuep nOaun CKaTOrO BO3Dyxa. PnM. 3-5 kaIeIb Macla IJr nHeBMOnHCtpymeHTOB uee3 KaKdIbe 15 MInHyT pa60TbIB HepepbBHom peKmme.
EcnHnCTpyMeHT He nCNoJIb3OBAJcR B TeueHne HeCKoJIbKHX DHei, Do6aBbTe BpyHyIO B WtUceP NODaCuN CxAToR O3DyXa PnIM. 5 KaneIb MacJa Dlan IINHEBMOnHCTpyMeHTa.

BHHMaHHe! DaIe npa6oTaTb HnCTpy MeHTy B TeueHne KOpOTKOrO BpeMeHN HaOCtOM XOy.
- DG 25 Set: Bb6epnte noDxOJaun caHroBbI 3aKIM (3) (cM. rnaBy 6.2).
- YcTaHOBInTe NOxOJaCmEHbI INHCTpyMeHT (CM. rnaBy 6.3).
- DG 25 Set: Yactoty BpaueHn moHHo n3MeHrTb c NOMOu bOp peryIInpOboHOro BNHTa (9).
- Otperynpyte pa6ooye daBleHne (n3mepenHoe Ha BXOe BO3dyxa npn BkIIOyEHHom nHeBMOHNCTpyMeHTe).MaKc. dOnyctHMoe pa6ooye daBleHne -cm. rIaby "TexHnueckne xapaK-TePnCTnKN".
- Пдкнluчnte пhevьmonнсгрмент К систeme пдачи сда toro BO3dya.
- BkIIOueHHe: cDINbTe 6IoKnPaTOp BkIIOueHn (8) B HanpaBHeHn CTepeKn (CM. pnc., c. 2) n HaKMnTe BblIOuHaTeJb (7).
BbIKIOUeHHe:OTnycTITe BbIKIOUaTeIb (7)
7. TexHHuechoe o6cIyHnBaHne n yXoA

Onachoctb! IpeepIIO6bIMn pa6oTaMn Ha INHCTpyMeHTe OTcoeINHJrTe WtTuEp NODaHr TOTO BO3dyxa.

Onachoctb! OncaHHbIe B HAcToHJcEm pa3- DeJe pa6oTbI NO TexO6CnyKINBaHNIO npety DoJIHHbI BbINOJIHrTbcra TOnlbHO CneuaHnN.
-PyTEmperyIapHoroTexHnueckoroO6cLyJINBaHnObeCneYbTe 6e3OnaCHOCTb INHeBMOnHCTpyMeHTa.
- PpOBepaTe HaJckHocTb pe3b6ObBix CoeHNHeHn, pN Heo6XoDmOCtN 3aTARnBaIte HX.
PYCCKHru
- PkpaHne Mepe pa3 B HeJeIIO OuNuaTe ΦnIbTp B wTuCepe NODaHN CKaTOrO Bo3dyxa.
- Ha BxOe CxAToRo BO3dyxa NHeBMOHnCTpyMeHTa peKOMeHdyeTcra yctaHOBnTBpeDyKUNOHbI KlaNaH C BlaFOOTdJIntTeJEM MAcJIeHky.
-Прии n36bIToHOM BbIXOe Macla ИлвОЗdYxa CJIeДуET ПОВЕрпТь ПНЕBMOnHCTpyMeHTИПрИ Heo6xOДnMOCTN OTpeMOHTnPoBaTb. (CM.ГЛаВу 9.)
PeryIpaHNo n oocLe KaJdoRo IcnoJb30BaHn npOBepeHne YactOTy BpaueHn ypoBHeB Bn6paun.
-He donyckaIte KOHTaKTa C onaChbIMn BeueCTBaMn, KOTOpbIe MOrJN OTIOXHTbcra Ha INHCTpyMeHTe. HcnoJIb3yIte NOxOJaUne CpeCDTba HINDbNduaIbHOI 3aUNTbI yCTpaHITe ONaCHbIE BeueCTBa NytEm pInHrTna NOxOJaUnx Mep NepeD TexHnueckm O6ClyJKNBaHnEM.
8. ПинадлесноCTN
IcnoJb3yIe ToIbHo OpnHnHaJIbHbIe npHaJaEK-HocTn Metabo.
HcnoIb3yIte ToblKo Te npHaJNeJHHOCTN, KOToPbIe IpeDHa3HaueHbI dJa 3TOrO pHeBMOnHCTpyMeHTa H COOTBETCTByIOT Tpe6OBaHNrM n NapamEtPam, npIBODMbIM B HaCTOJsem pyKOBOdCTBE NO 3KcIIyatauN.
Iolnbi accopTmEHT npHaJdxKHOCTe CM. HacaiTe www.metabo.com INN B KaTAlore.
9. PemOH
Onachoctb! PEmOH TINHEBMONHCTpyMeHTOB DOJHHbI NPOBOIDtB TOJIbKO KBaJIHcHIpOBAHHbIE CNEUHaJIHCTbIC NCIOJB3OBAHNEM OPIHnHaJIbHbIX 3anuacte Metabo!
BbIOJIHnIe HaaIOHaJIbHbIe npabIIa yTnIIN3aunn I nepepa6OTHN OTClyJHKUWeI OHeBMOHNCTpyMeHTa, yNaKOBKn I npHaJdJeXHOCTe. B XODe yTnIIN3aunn He DoJIKHo BO3HnKaTb HnKaHXyRp03 dIy IIODeI N OkpyKaIoUe CpeDbI.
11. Texhnueckne xapakTepcntnH
PoncheHnK daHHbIM, yKa3aHHbIM Ha c. 3.
OCTaBJIaEM 3a co6oI npaBO Ha TexHnueckne n3MeHeHn.
V1 =pacxoD Bo3dyxa
PMaKc. = MaKc.ДOnyCTnMoE pa6Ouee daBHeHne
n0 =yactotaBpaueHna
ds =ДиamETp OTBepCTnlaHROBOrO 3aKIma
D MaHC. = MaHC.ДиЯмTe p a6pa3NBHOr rOJOBKN
d=HaMeTpIaHra(BHyTpEHHN)
C = npncoeHnHTeIbHa pa3b6a
A = pa3Mepbl:
ДИИХ XИИРИХ X BBICOTa
m macca
Ha yka3aHHbIe TexHnueckne XapaKTepeNCTHK paCnpocTpaHryOTc DOnyCKN, PpeDyCMOTpeHHbIE DeiCTByIOUIMN CTaHdApTaMn.
3HaueHnIyWmaN Bn6paun
3TN 3NaueHnnaNo3BOJIOToOeHNBaTbNcpaHBaTb Wym N Bn6paIIO, CO3DaBAeMbIe npa6ote pa3nHybIX (NHeBMO)INHCTpyMeHTOB. B3aBNCmOCTn OT yCIOBn 3KcNlyaTaun, COCTOyHnra (NHeBMO)INHCTpyMeHTa nnPa6oynx (CmeHHbIX) INHCTpyMeHTOB fAHTnuechAn Harpy3Ka MoKeT 6bITb BIIWe nHKe. Pn ONpeJeHnnpimepHO rpoBH YAma N Bn6paun yHTbIBaTe nepepbIBbI B p6Ote n faa3bl pa60tbi C NOHNJKeHHo (WymBOB) Harpz3Ko. OnpedeJInte nepeehb OpraHn3aUOnHbIX MEP no 3aUnTe POIb3OBaTeJI C yYeTOM Tex IIn NHBIX 3HaueHn Wyma N Bn6paIIN.
Bn6pauny(ycpeHHeHHoe 3ΦΦeKTHBHOe 3HaueHne yckopeHn; EN 28927):
ah =3NaueHnE Bn6paun
K=KOaΦnueHT norgpeuHocTN (Bn6pauny) YpoBeHb uyma (EN ISO 15744):
LpA =yPOBHeB 3ByKOBOrO daBnEHH
LWA =yPOBEnb 3ByKOBO MOUHOCTH
KpA, KwA = KO3ΦΦnUeHT nOprpeHOCTN
HaedeBaTe 3auntHbIe HayuHHN!


HΦopMaζηДIa nokynatela:
CeptnuHkAT COOTBeTCTBnA:
No TC RU C-DE.BJ08.B.01600, cpoK deiCtBnA C 06.08.2018 no 05.08.2023 r., BbIaH opraHOM no ceptnikauin npoDyKuIN «IBAHOBO-CEPTN-KHKAT» OOO «IBaHOBcKInΦoHd Ceptnikauin»; Adpec(lop.nΦaKT.): 153032, PocchnckaH Aedepaun, IbaHOBcKa o6I., r. IbaHOBO, yI. CtaHocTponTeJe, d. 1; TeI. (4932)77-34-67; E-mail: info@i-f-s.ru; ATTecTaT aKnpeDiTuain No RA.RU.11BJI08 ot 24.03.16 r.
CTpHa n3rOToBJIeHn: TaIbAhb
Пожибовдель: "Metabowerke GmbH",
Metaboallee 1, D-72622 Nuertingen, Германь
Импорту в Росси:
OOO"Meta6oEbpazn
Poccn,127273,MockBa
yI. Bepe3oBaA aIIe, I 5 a, cTp 7, oΦic 106
TeI.: +7 495 980 78 41
IpeepaBaTe BaW nHeBMaTnUHn iHCTpyMeHT TIlbKn pa30M 3 cIMN DOKymeHTaMn.
- Kopnctybaa a6o p60toDaBeueb KOpncTyBaaynoBHnHi npOaHaJI3yBaTH CneuHcHpi n3nK, 10MOKyTB BnHnKHyTu Ha NiDCTaBi 6yDb-8KOBRHKOpnCTaHH.
- PpeH halaWtBuHaHm, ekCnIyatauieIO, pemOHToM, Texo6cLyroBvBaHHMa Ta 3aMiHO KOMNKeTkyOuNX DeTaJe, a TaKoK NpePeD PO6OTAMN NOP4d 3 INHeBMATNuHMM IHCTpyMeHTOM Heo6XiHO npOHTaTN Ta 3pOzMyITn npabNla TeXhIKN eKcnIyatauii. RaIoo cIbORo He BHKoHaTH, TO CE MOKe np3BeCTn Do BAKKnx TpaBM.
- HaIarOJkeHHe, HalaWtYBaHHa6o BHKOpNCTaHHnHEBMAtuHOrO IHCTpyMeHTy NOBHHHO 3dInCHIOBAATNCb BKNIOUHO KBaJIiΦIKOBaHmTaHaBueHmKOPNCTyBaayAMn.
- HeДОЗВОЛЯЕТСВ BHOCHTN 3MiH N B KOHCTpyKciIO nHEBMATNUHOrO iHCTpyMeHTy. 3MiH MOnKyTb 3HnKByaTH eΦeKTNBHcTb 3axoJiB 6e3NeKN Ta nIiDnUyBaTN pN3NKn DЯ KOpNCtYBaYa.
- Hikoln He KopncTyTecb noKoJKeHm NHEBMaTHHIM IHCTpyMeHTOM. Ctapahno DorlaaTe 3a NHeBMaTHHIM IHCTpyMeHTOM. PeryIpaHNo nepeBipRte, uOb pyxomi deTaJI npcTpo16e3dOraHHo npaUobAaN Ta He 3aJaHn, He 6yIi 3lanamHmM a6o HactIbHn NOWKoJKeHMM, Uo6 ce MORIo BnInHyTu Ha fYHKIOHyBaHHra NHeBMaTHHoro IHCTpyMeHTy. IpeBipTe Ta6lnuKn Ta HAnscn Haix NobHOTy Ta YHTaHicTb. NowKOJKeHdi Detani Tpe6a BiDpeMOHTyBaTH a60 3amIHNTn, nepw HiX 3HOBy KOpNCyBaTncs IHCTpyMeHTom. BeINka KInbKicTb HeuacnX BnPaAdKIB CNpUHHReTbcr NOrAHM TexHiHMM DoIgJaDM 3a NHeBMaTHHMM IHCTpyMeHTAmn.
4. CneuiaIbHi npaBnla TexHikn 6e3neKn
4.1 3arpo3n BiD DetaleN, 0o BnIitaIaIb
- Y pa3i NOLOMKN 3aROTOBKN, KOMNJIeKTHUOHN DeTaIe a6o NHEBMaTNUHORIO INCTpyMeHTy, NOLamahi DeTaJI MoKyTB BUNITaTN 3 BeJINKOIO WBNIDKICTHO.
-Пд уас ekcnnyataquii,при 3amini KOMnIeKtTyOuHx DeTaJe, a TaKoJ nId yac peMoHTy abo TexO6cLyroByBaHHn NHeBMaTHuHOro IHCTpyMeHTy cIiD 3aBKnHaIIBaTN npOTNuDapHi 3acObN 3axNCTy Oey. CtyniNb Heo6xIDHoro 3axNCTy cIiD anAJIi3yBaTn OKpeMo DЯKoHOrO OkpeMOrO BnIaNky BHKOpNCTaHHN.
-ПepekoHaITecH,иO DeTaIb HaIiHo 3aKpInIeHa. - Heo6xioHOp epyIaRHO nepeBiprTn, 0o6 KjIbKicTb o6epTIB NHeBMaTHUHorO IHCTpyMeHTy
YKPAIHCBkAuk
He 6yla Bnio IO 3a daHI IPO OeptN, RHI Bka3aHI Ha IIHEBMATNUHOMY IHCTpyMeHTI. IpeBipKa KJIbKOcTI OeptTIB NOBHHa 3dINCHOBaTHCb 6e3 BCTAHOBJIeHOI IHCTpyMeHTaJIbHOI HacaDN. TaKy IpeBipKy MOKe 3dINCHOBaTH cepBicha CnyH6a fipM Metabo.
- IpekeohaTecb, 06 icKpn Ta yIamKn, kI BUNHkaIOb NiD qac pO6OTn, He cTaJI dKepeJOM He6e3neKn.
- Iepsh Hix 3diin 3amHy iHctpymeTaIbHOi HacaKn a6o KOMnEkyuOx DeTaeJe a6o BNKohATn TexO6ClyroByBaHHa 6o OunueHH, C1iD BiE'EdHaTH nHeBMMaTHuHHn iHcTpymeHT BiD CNCTemN NOCTaayAHRe CTNCLOrO NOBITpr.
- IpekehaiTeCra, 0o DnI iHux oci6 TaKoK BiDcyTHi 3arpo3n.
4.2 3arpo3n cnprnHHHei 3axonJIeHHaM/ HamOTyBaHHaM
- BdraTe npdaTnH oJr. He BdraTe npocToPn Ond Ta npKpaN. He Ha6nKaIeC8 BOLOCCM, OJrOM Ta pyKaBnIaMn DO pYXOMNX DeTaJIe NHeBMaTHUHO IHCtpymEHTy. IpocToPn OJr, DObre BOLOcc8 Ta npHKpACN MOKyTB NOTpaNTN B DeTaJI, 90 pyXaIObC8. lChye He6e3neKa TpaBMyBaHHa.
4.3 3arpo3n nid yac ekcnnyataucii
- Lio6 yHnKHyTN nopi3y pyk Ta iHnX qactnTia, yHnKaIte KOHTaKTy 3 WmKOIO, IIO oBeptTaetbcra Ta 3 IHCTpyMeHTaJIbHOIO HacadKOIO.
-ПдчacВИКОнсТаHHЯNHEBMaTHyHOrO IHCTpyMeHTy pyKaM KOpNcTyBaHaMoKHyTb 3aRpoKbYBaTH Nopi3H, CaHN Ta BnCOKa TempepaTypa.ДлЯЗхNcTy pyK NaIiBaITe pyKaBnUKN. - Kopnctybau Ta nepcoHaJI Texo6cIyroByBaHH NOBHHI 6byTu i3HNO 3daTHMn ONaHyBaTn PO3MIPN, Bary Ta NotyKHiCTb INHeBMaTHUHO IHCTpyMeHTy.
-ПраьньноТримаиTe Ппевматчни ИСТурMuEHT:6yДБTe FOROBIMN IpoTnIaRTH ЗИчайнIM abO paNTOBmpyxax -ТримаTe ROTOBIMN 6nDbI pykn. - 36epiraTe ctiKe noLoXeHHa Ta 3aBKn TpMaTe pIBHObary.
-3anobiraTe HeHaBMnCHOMy BMnKaHHIO npncTpoU. Y pa3iinepepmbaHH noaui CTNCLOrO NOBITpy, INHeBMOIHcTpymeHT CIId BmKHyTN KJIaBiueo BMnKaHH/BMnKaHHra.
-BnKOpncToByTe TIlbKn Do3BOJeHi BnPo6HnKOM 3MaUyBaJIbHi MaTepiAn.
BdraTe OcO6nCTe 3axncHe cnpJKeHH Ta 06OB'3KOBO BdraTe 3axnChi OKyIaRn. 3actocyBaHHo OcO6nCTOrO 3axnCHoro CnpJKeHH, JH HApN., 3axnCHnx pyKaBnuOH, 3axnCHoro ODHy, MaCKN, CneuC3yTTT, UO He KOB3aCTbCRA 3aco6IB 3axnCTy Clyxv, 3aJeKHO BiD TtPy Ta XapaKTEpy BHKOpNCTaHH NpNCrPoIO, 3MeHsuE Pn3NK TpaBM N Tomy peKOMeHNyETbcra.
-Дуctma KibKicb OeptiB IHCTpymeHTaIbHOI HacaKn He NOBHHa 6yTu 6ilbwoIO 3a Bka3aHy Ha NHEBMOIHCTpyMeHTI MaKcHMaJIbHy KIBKICb OeptiB. PpHaJra, RaKe OeepTaetbcr WBNIDwe
DOnyCTHMOI WBNIOKCTI, MOKe 3JaMaTnCra Ta P03JIeTIINCR NO CTOpOHAM.
-Прии ВИКОнанни ровит вишие rolobи надягайтзaxисншолOM.
-ПисяВИМКНЕнгпНБМоиHCTpyMeHTy BiH ue neBHH yac npoDobKHy o6eptaTnCb.
-3a6e3neuTe,io6 icKpN,IO BHNHkaOTbB npoueci po60Tu,He cTaIIN dKepeIOM He6e3neKn. PnO o6po6ci MaTePiAJIb MoKe BHNHaTN Bn6yXoHe6e3neuHn a6o 3aMnCTn nn. Tomy icHy e pN3NK Bn6yx y a6o nKeHi.
4.4 3arpo3n BiD pyxIB, 10 NOBTOPOIOTbC
-Пдчасpo6OTnCпнeвmoHCTpyMeHTOMMOKHyTb cnocTepiratncb HenpneMHi BiDyTTY ydoJohx, pykax, nleayax, B oblacti wii abo B iHux qactnHex Tila.
-Дяpo6OTN3ПHEBMOIHCTpyMeHToM npHIMtB KOMΦOpTHE NOLOKHeHH, CJIkyTe 3a HadiiHMM yTpmyBaHHMa Ta yHNKaIe HeCnprnTINBHX NOLOXHeb a60 TaHIX, B JKNX BaHKo yTpmyBaTH pIBHObary.ПID ac TpNbAoIo po6OTN KopnCTyBaH IOBNHEN 3MiHOBaTH NOLOKHeHH TyJy6a, IIO DOnOMOKe yHNKHyTN HENpHEmHnx BiDyTTIB Ta CTOMJeHOCTi.
-ЯкwoуКориctyBaayacnoctepiraioTbcraTaHi CnMTOMN,ЯK TpNBaIe He3dyKaHHa YCKlaadHeHHa,PiBnuIeHce cepue6HTT,60JI, NOKoJIbOHaHHra,IlyxOta,neiia6OohimHH,To ci O3HaKn He MoJHa irHopyBaTu. KopcTByaU NOHNHOBIOMTN npO ceCBORoPo6OTDaBu Ta IpoKoHcylbTyBaTncb y KBaJIiΦIKOBaHOro liKapra.
4.5 3arpo3n cnpnHHeHi KOMnJIeKTyOChMn DeTaIaMn
- Iepw Hix 3akpinTu a6o 3amHInTu IHcTpymeHTaIbHy HacaIky a6o KOMnIeKTyOuy DeTaIb, BiD'edHaIte NHeBMOiHCTpymeHT BiD CnCTeMH NODaHi CTNCLOTO NOBiTPra.
BnKOpncToByTe TlBkTuKaI KOMnKeTyUoyi DeTJI, RNIpN3NaYeHdIaBOro NHeBMOIHCTpyMeHTy Ta BiIDNoBIdaOTb BmOram i XapaKTepnCTnKam 3 uiei HcTpyKuII 3 ekCnLyataii. - YHnKaIte nprMoRO KOHTaKTy C IHCTpyMeHTaJIbHOIO HacaIKOIO NiI YaC BnKOpIcTaHHra NcIe HbOro, TOMy IIO BOHa MOKe 6yTu rapauo a6o roCTpo.
-ДоустimaКькICTbОБeрТВIHCTpyMeHTaNbHoi HacadKN He NOBHHa 6yTN 6JIbWoIO 3a Bka3aHy Ha ПневмоIHCTpyMeHTI MaKcIMaNbHy KьkICTb OeptiB.Пиладя,ЯkeОБeTpAcTbCra WbNdiWe ДоустimaWbNdkOci,MOKe 3JIaMaTnCra Ta po3JetITnCnNo CTOpOHam. - Hikoli Ne BCTaHOBIOHTe WlifyBaIbHN Kpyr, BiDiPI3HN Kpyr a6o 0pe3y. LJIiFyBaIbHN Kpyr RaNn TpickaTbCMAOHe HaHeCTn DyKe BaKHi TpaBMn a6o HabiT npN3BecTn Do Cmepti.
-He BnKOpNCToBvIe DnCKN 3i CJIaAMn ydapiB, TpiChyTi a6o RkIMoKe nJaAIn. - O3BOJRAETbC BHKOpHCTOByBaTH TIIbKN IHCTpyMeHTaJIbHI HacaIKN 3 IpaBUNbHM DiameTpOM XBOCTOBNka.
BpaxoyIte peKOMeHdaqii Bnpo6HnKa MaInx abpa3NBHX HacaIOK. Y MaInx a6pa3NBHX HacaIOK He Do3BOJReTbCnpePBNUyBaTN
3a3HaueHn BnO6HkOM MaKcHmAlbHo
DOnyCTHMn BNlIT XBOCTOBnKa (L_0 = DOBHNHa
XBOCTOBnHa MIX KInCt E m aHrOBO r 3aTnCKaHa i
camoIO abpa3nBHO Hacadko).Y pa3i
36JIbWeHHn BnIbOTy (L_0) Heo6xIDHO 3MeHsHTn
DOnyCTmIo OeptN. IHCTpyMeHTaJIbHa Hacadka
BCTaHOBIIoETbcra BcEIO DOBHNIO XBOCTOBnKa y
UaHROBn 3aTnCKa.ipekeHOaTeCra,io
DOBHNHa 3aTnCKaHHra (L_g) cTaHOBt b MinIMym 10 MM.
ДiametxpXBOCTOBHkaiHCTpymeHTaIbHOHaCaNIOBHHENTOHOBiINOBiAtn3aTnCKHOMyOTBOPYcaHROBORO 3aTnCKaHa!
4.6 3arpo3nHa po6oomy Micci
- OCHOHIMN npuHHaMn TpaBMyBaHH e 3iCKOB3yBaHH, cNOTKahH Ta naDiHH. CJIkyIte 3a NOBepxHmN, aKi uepe3 BHKOpNCtAHN pHEBMOIHCTpyMeHTa MOKyTb CTaN CIn3bHMN, Ta Na'Mra'Te npo 3arpo3y cnITKHHTncaYepe3 NOBITPraHH mHaHr.
-ObepeKHo nepecyBaHTeCb y HeBiOMomy HABKOINHbOMy npocToPi. TaM MOKyTb icHyBaTH npHXOBaHI 3arpo3N BVKInKaHi CnIOBm KaBeIem a6o IHsIMN LiHiMa JKNBHeHH.
-Пневmoистумент He npиЗаун Дд ВИКОРИСТАнгу ВИБУХОЕЗпунх atMOCфepax Ta He i3OЛьовани BiД KOHTaKТу 3 eJIeKTpUHIMn ДжЕрелamn CTpyМy. - Ipekeohntecn, 0B Micui npoBeeHHn po6it He npoxoTb liHii eKeKtpo-, BOIO-i Ra3ONoCTaayHHN (HaepNKlaI, 3a DOnOMOrHO MeTaIoUykaua).
4.7 3arpo3n Chepe3 nll Ta napn
-Пил таnapa,юytBOPIOHtbcn iD qac BHKOPNCTaHHI INeBMOIHCTpyMeHTy MOKytb CnpuHNHTN NORipweHHN CTahy 3dOpOB'(RAH HapnKlaIaPak,BpOJKeHl DeΦeKTH,actMa Ta/ a6o DePMAHTN);TOMY Heo6XiIDHO OOB'3KOBO npOBecTN aHaJIi3 pN3IKiB UOdo cIX 3arPo3 Ta peaJIi3yBaTn BiINOBiHi MexaHI3Mn BpeRyJIIOBaHHI.
- Pn aHaJI3i pn3NkIB Heo6xIDHO BpaxOByBaTn JK NII, 00 yTBOPIOUbCn iIac BVKnOpNCTaHH NHeBMOIHCTpyMeHTy, TaK MoKJINBO BKe IChyUCHN INI, kINu CInPkyJIKe HABKpyrN.
- Ⅲo6 ckopoTHTn yTBOpEHn nIy Ta napIB Do MInHIMMy, INHEMaTHuHN iHCTpymeNT CIId EKcNlyaTyBaTH TaTexHiuHO O6ClyroBvBaTH 3rIHO peKOMeHdaui, IIO MiCTraTbC B YHHOMy KepiBnucTBI.
-BiDnpaBObaHe NOBITpRcLiD BiIDBOINTu TaK,IO6 CKOPOTHTo MoMIMMy 3aBNXpeHHra NnIy y cepeOBnSi, HacNueHOMy NNOM.
- Y pa3i yTbOpEHnHnnIy Ta napiB, roJOBHe 3aBdAnHH nOJIrae y TOMy, IIO6 KOHTpOJIKBaTN iX loKaJIbHe yTbOpEHnH.
-Yci Habichi deTani abo cnopraI IHeBMaTHHOrIO IHCTpyMeHTy, rki nepeIb6aueHi dIra 3bnpaHHB iDCMOKTyBaHHA abo IJIr 3MeHSeHHPO3NOBCIOJKeHHaIeTOO IINly a60 napIB NOBHHI bTu HAJIeXHM YINHOM BCTaHOBJeHI Ta O6CJyROByBaTncb 3rIDHO BKA3IBOK BnPo6HnKa.
BntpaTHi MaTepiAJI Na IInCTpyMeHTaJIbHy HacaIky CnID NiIbIpaTn 3riJHO peKOMeHdaIy YHHORO KepIBHnIcTBA, TexHiHO O6ClyrOByBaTN Ta MiHrTn, Uo6 yHnKHyTn HEnOTpi6HOro NiDnIeHNH yTBOpEHn IINLy Ta napIB.
- KopncTyIeTcB cnopdJKeHHM dIa3axNCTy DnxalbHnX 7IaxiB 3rIdHO iNCTpyKci BaWoRo pO6ToDaBua a6o 3rIdHO BnMOr 3 OxopoHn npaCi Ta 3DopOB'
- Pobota 3 neBHMn MaTePiaIaMn npn3BOdntb do yTBOpEHn NIIy Ta napiB, rki MOKyTb yTBOpIOBaTN NOTeHcIJHO Bn6yXoHe3neueHc cepedOBnIe.
4.8 3arpo3n cnpruHneHi yMOM
-Пи HeIOCTaTHbOMy 3axHcTi opraHIB clyxByBnINB BnCOKOrO pIBH yMy MoKe BnKInKaTH TpNBaIe noripseHHra ClyxMy, BtpaTy clyxMy Ta iHsi npo6JIemN,Ян Hanp.TnHiTyc (ДзВIH,шYM,CBnCT a60 rydiHHy Byxax).
- Heo6xio npoBeCTn aHai3 pn3NKiB 0do TaKnx 3arpo3 Ta peaI3yBaTHn npdaTHi MexaHi3Mn peryIIOBaHH.
- Do mexaH3mib peryIIOBaHHn, rki nIXoJrTb dIy 3HNKeHHn pN3NKIB BiDHOcTbCra Taki 3axOOn, rK BHKOpNCtAHn 3ByKOi3OJauiHnx MaTePiaJIb dIy yHnKHeHHn d3B1HkOrO WMy, Ioo yTBOPHOeTbcn iIq Yac o6p06Kn 3arOTOBKn.
- Kopnctyntecb cnopndHexHm dny 3axncty opraHB cnyx 3riHIO IHCTpyKcii Baaworo po60ToaBua Ta 3riHNO BImOr 3 OxopoHn npaCi Ta 3doPob'ra.
- Ⅲo6 yHnKHyTN HeNoTpi6HOrO iDnueHn pIBHn ⅦMy, nHeBMaTHnHn iHCTpyMeHT cIiD EKCnlyaTyBaTHn TaTexHiuHO o6CnyROByBaTHn 3riHNO peKOMeHdaui, UoMiCTraBcB uHHHomy KepiBnucTbi.
BntpaTHi MaTepiAIn Ta iHCTpyMeHTaIbHy HacaNcIi NIDPi6npatu 3riDHO peKOMeHdaui YHHORO KepIBHuNTBa,TexHiHO O6ClyrOByBaTu Ta MiHrTn, uo6 yHKnHyTu HeNoTpi6HOrO 36IbWeHHp IBH YAMy.
- He Do3BOJRAETbC3HIMaTn B6yOBoAHN rIyUHNi BIn NOBHeH 6yTN y 3aOBoJIbHOMy po6oHOMy CTAHI.
4.9 3arpo3n cnpuHHeni Bi6paicieo
BnInB Bi6paQII MoKe CnpNHyTn NopyuHHe HepBOBoI CNCTeMn Ta NopyuHHeuH CyuHaJI KpOBI y DOIoHx Ta pyKax.
- Ppi pO6Tox y XoIOnHMy cepeIOBnCi HndraTe TepIn OJr Ta TpMaTe DoJIoHi y TeJI Ta cyXIMN.
-ЯкwoBnBnBnH,wo shkipaHa naIbux a60doJohx 3aHimila,pounnye,6oJIHTb a6o cTana6iIoro KoIbOpy, npnnHITb npauOBaTI nHeBMATNCHmIHCTpyMeHTOM, NOBIOMTe npo ce BaWoRo npaueabzra Ta npokoHcyIbTyItecb 3Iikapem.
- Uo6 yHnKHyTN HNoTpi6HOro NiiBnueHHa PiBHa Biopaui, NHeBMaTHuHIn IHCTpyMeHT CIId
YKPAIHCbHAcuk
eKcnnyaTyBaTn TaTexHiyHO 6cIyROByBaTN 3rIHO peKOMeHdaui, IIO MiCTaTBcB YHHOMy KepiBHNuTBI.
-BntpaTHi MaTepiAIn Ta iHCTpyMeHTaIbHy HacaIky CIIID NiIbIpaTn 3riIHO peKOMeHdaIy YHHORO KepIBHNuTBA,TexHlHO O6ClyrOByBaTN Ta MInrN,IO6 yHNkHyTN HeNoTpip6HOrO 36JIbWeHn pIBH B6paIi.
-ДяутmaHHBarnIHeMaTHHOrIOHCTpyMeHTy BnKOpNCTOByTe,KOJIuZeMOJINBO,PiDcTaBHy,HaTJHHa6OKmneHcaiHn npCtpi.
- TpmaTe nHeBMaTHHn IHCTpyMeHT He 3aHaTO MiHO aIe HadiHo 3a pyKoTky 3 DoTpMaHHm Heo6XiDHOi CnII peAkuI pyK, OChIbKn pN3NK BnHnKHeHHB Bi6paQii 36IbWyETbcra pa30m i3 36IbWeHHM 3ycnllr TpmaHHra.
IHCtpymeHTaBHa HacaKa BCTaHOBJeHa He HaJIeKHM YINOM a6o N0UKOHeHa MOKe BKNIKKaTN NiDnueHy Biopaio.
4.10 DoaTHOBi Bha3IBHn 3 TexHHn 6e3neHN
-CTnCle NOBITpMaOHe CnpuHHTn cepNo3Hi TpaBMn.
- HoJIi nHeBMOIHCTpyMeHT He BnKOpNCToByeTbcra, To nepeI 3amHIO KOMNKeKTyOuHX DeTaJIe a6o nepeI npOBeDeHHaM peMOHTHnx po6IT Heo6XiHO 3aBKnI nepeKpNBaTHn NOaHy CTncLOrO NOBITPA, BNdaJIHTN NOBITP3 NOBITPAHORo WlaHry Ta BiD'EDHaTHn nHeBMOIHCTpyMeHT BiD CnCTeMI NODaHi CTncLOrO NOBITPra.
- Hikoli He HanpaBnTe NOBITpHn NOTIK Ha ce6e a6o Ha iHux oci6.
- UlaHn, rki nTcKOM Knae B p3Hi 60Kn, MoKyb cnpuHHaTn cepNo3Hi TpaBMn. Tomy 3aBKnI nepeBipraTe, Hr He nooKoJKeHi UlaHn Taix elementn KpInleHn Ta Hr He npocJa6JIeH BOHN.
-Якwo BnKOpNCTOByIOTbcra yHBepcalbHi NOBOPOTHI 3'EDHyBaJIbHi MyΦTNI (kyJaUKOBI MyΦTN), Heo6xIDHO BnKOpNCTOBvBaTu ΦiKcyuOi StnΦTn a TaKoX IlaHaRoi 3aNo6iJHKnKn Whipcheck, 06 3a6e3neuHTn 3axNCT Ha BnPaOnk, RaKIO 3'EdHaHHr IlaHry 3 NHeBMOIHCTpyMeHTOM a6o 3 iHsIMn IlaHaRamn 6yde npuySeHo.
- Heo6xIDHO 3a6e3neuHTn, 06 Ha nHeBMOiHCTpyMeHTI He nepeBnuSyBaBCr BKa3aHm MaKcImaJIbHn TnCK.
- HikoJH He TpImaTe NHeBMaTnHi iHCTpyMeHTn 3a 7laHr.
-ПиEkCnIyataquII nHEBMOIHcTpymeHTy 3 TpImaYem:HaDiINHO 3aKpinitb nHeBMOIHcTpymeHT. BtpaT a KOHTpoJIIO MOKe npN3BecTN Do TpaBM.
4.11 DoaTKoBI npaBnla Texhikn 6e3neKn
- Ppi nontpe6i doTprmytec cneiaIbHnx npinnicB 3 oxopoHn npaCi a6o npaBnI i3 3anobirHH HeuacHM BnPaIkam npn NOBdoJKeHHi 3 KOMnpecOpam Ta pHeBMaTHHmN IHCTpyMeHTAm.
-
3a6e3neuTe, uo6 He nepeBnUyBaBCR Bka3aHny TexHiHnx XapaHTepnCTnKax MaKcImaJIbHnTnCK.
-
He nepeBaHTaKnyTe iHCTpyMeHT - BHKOpNCTOByTe ue iHCTpyMeHT IInSe y Diana3OHi NOTyKHOCTI Bka3aHOMy Y TexHiHnx XapaKTepnCTnKax.
-He BnKOpNCToBvIte CymHIBHi 3MaUyBaJIbHI MaTepiAII.3a6e3neUte DocTaTHIO BEHTNIAIO pOboOHoro Micu. PnPiDnUSeHIX BVKnIax: NepeBipTN INHEBMAtNUHNI IHCTpyMeHT Ta MOJKNBO BiIDPeMOHTyBaTI.
-HeKOpNCTyIeTcBzHmIHCTpyMeHTOM,HKUoHE MoKeTe CHOHcEHTpyBaTncb.ByDbTe yBaXHHM, CIIdKyIte 3a TnM,IO Bn PO6nte,Ta 6yDbTe OBepeKHMNIq Yac PobOTn 3 NHeBMOHCTpyMeHTOM.He KOpNCTyIeTcR IHCTpyMeHTOM,AIO BV CTOMJIeHI a60 3HaXODNTecrPiDiIeIO HApKOTnKiB,CnIPTHNX HanoiB a6o LiKIB.MtB HeyBaXHoCTi npu KOpNCTyBaHHI IHCTpyMeHTOM MOHe npn3BeCTn Do cepNo3Hnx TpaBM. - TpmaTe CBOe po6oye Micce B uHCTOTi i 3a6e3neute Do6pe oCBiTLeHHra po6oYOro Micr. Be3naI a6o noraHe ocBtTHeHHra Ha po6oOmy Micci MoKyTB npn3BeCTn DO HeuacnX BNpaNkIB.
- TpmaTe nHeMaTnHi iHCTpyMeHTn noaI BiD dTei.
- He 36epiraTe iHCTpymeHT Ha BiDkprTiMiueBOcTi a60 y BOIOrnX npMIMeHNx 6e3BiDNOiDHorO 3axNcty.
-3axnauTe nHeBMOiHCTpymeHT,OC6JIHBO 1Tuuepe CTncIoro NOBITra Ta eIemEnTH KepyBaHHaBID NnLy Ta 6pydy. IHopMaqia No3NaheHa B ciJ IHcTpyKci3 EKnPyataiHaCtynHM YHOM:

He6e3neHa! PonepeJxehn npo He6e3neKy TpaBMyBaHHa 60 uKOOn dJIy iJIy.

Ybara! NonepeJKeHH npo MoKJIbIMatepiJIbHi 36nTKI.
4.12 CnMBoJH Ha nHeBMOiHCTpyMeHTi

Ipeed noaTkompo6OTn npoHTaTH IHCTpyKciO 3 BNKOpNCtAHHa.

BnKOpncTaHHaXmChnxOkyIpaIb

BnKOpncTaHH3axHcTy opraHbCnyx

HanpMOK o6epTaHH
5.Orna
ДиВ.стор.2
1BnKOBN KIOU
23aTnckHa raKa
3 LaHroBm 3aTnckau
4ToJIOBkaZaHROBO3aTnCKaHa
5Unnndelb
6 BnIKOBNI KJIIOU
7 Bmkaay (BMK./BmK.)
8 BIoKipaTop yBimKHeHHA
9 ΓΒΗΝΙ Πρεγυλουναῦνη σόβετιβ*
10 NobitpHn BnXiD
11 3'εdHaHnДnCTncIoro NOBITp3 φiNbTpOM
12 BCTaBnHIneIb 1/4"
*3aJIeKHO BID KOMJIeKHTaJIi
6. EKcnpnyataciia
6.1 Ipeed nepwoo ekcnnyataucieo
BkpyTHTN BCTaBnHn HineIb (12).
6.2 BctaHOBJIeHHI ZaHROBOI 3aTnCHaHa
ДiametxpXBOCTOBINa iHCTpyMeHTa NOBHeH TOUHO BIDNOiDaTn 3aTHCKHOMy OTBOPY ZaHROBORO 3aTHCKaHa (3)!
DG 25 Set:ДocTyNHiцанroBi 3aTnCKaHiДЯ pi3Hnx diametpiB XBOCTOBNka.
BCTaHOBHTN 3aHROBn 3aTNCKaU (3) Ha roJOBky
CaHROBOrO 3aTNCKaU (4) i NotIM BiD pyKn
HaKpyTHTN 3aTNCKHy rAHy (2).
A KU O y UaHROBn 3aTnCnau He BCTaBHeO HCTpyMeHT, He 3aTAYte UaHROBn
3aTnCKaBnKOBm KIOyem, a Nlue HaKpyTiBbpyHy!
6.3 BctaHOBJIeHHIhCTpyMeHTaJIbHOI HacaIKN
ДлmaJnx a6pa3nBnHex HacdoK He 103BOJRAETbCЯpeBnUyBaTHa3HaueHIn Bnpo6HnKOM MaKcHmAlbHO DoynCTHMn BnIIT XBOCTOBnKa (L_0)! !No MoKJIINBOCTi IHCTpyMeHTaJIbHy HacadKy CJIiD BCTaHOBnTu y ZaHROBn 3aTnCKauch (3) Ha BCIO DOBKnHy XBOCTOBnKa. PepeKoHaNTecr, IIO DOBKnHa 3aTnCKaHHa (L_g) cTaHOBnTB MiHIMyM 10 MM.

ДiametxpXBOCTOBNka iHCTpyMeHTaJIbHOI HacaIK NIOBHeH TOHObiDaTn 3aTtCKHOMy OTBOPY ZaHROBOrO 3aTtckCaua (3)!
- YtpnmyTe 5) BNIOBm KIOyem (6).
- 3aTARHITb 3aTNCKHy rAky (2) BnIKOBHM KIOUcEm (1).
- IpepebiTe MiUHy nOcaIky iHCTpyMeHTaIbHOI Hacakn.
6.4 BnKOpNCTaHn IHeBMOIhCTpyMeHTy
IINHEMOHCTpymeHTy BHKOPNCTOBYTe IINHEBMATUHI WLaHn 3 BHyTpiuHIM DiametpOM MImyM 10 MM.3aHaTO MaINBHyTpiuHIM Diametp MOKe CYTTcBO 3MeHsuBaTHNOTyKHiCTb.
Ybara! B trpy6oPbOgi CTncIoro NOBITpHne NOBHHHO 6yTu KOHDeHCaty.
Ybara!ДлЯТOrO,Uo6 ueiHCTpyMeHT TpINBaIyIac3aIIuBaBCnPpaue3daTHIM Ioro Heo6XiIDHO 3MaUyBaTN DOCTaTHbIO
KilbKiCTIO OINBn Ia NHEBMOiHcTpymeHTiB.Le MoKe 3diIChOBaTNCb HAcTyIHm YHOM:
-Ⅰoana 36araueHoro OJINBOO CTNCIORO NOBITPA JIAXOM BCTaHOBJIeHHPO3NINIOBAuO JINBN.
-Бe3 po3nIIOBaua OINBn: ⅢOJENHe 3MaUyBaHH OINBOO Yepe3 3'EDHaHHdIa CTncIoro NOBITp. Pn TpNBaIOMy BnKOpNCTaHHi DoJaBAtN 3-5 KpanJIb OINBn dIa NHeBMOIHCTpyMeHTiB Yepe3 KOxHi 15 XBNHn p6oTn.
IHKUo IHCTpyMeHOM He npaIOBaJI N KJIbKa DHI B NOcIIb, To y 3'EDHaHHn DnA CTNCLOrO NOBITPcIiDdoATn 6Jn5 Kpanelb OINBn DnI INHEBMoiHCTpyMeHTiB.
Ybara! KopnctyBaTncb iHCTpyMeHT Ha XOLOCTNX 06eptax MOHHa JINHe KopoTHn Yac.
1.DG25Set:Bn6paTn zanHROBni 3aTnCnAch (3), 0nPiXoNDtB (nVB. po3di6.2).
2. BCTaHOBHTn npndaTHy iHCTpyMeHTaJIbHy HacaIky (INB. po3dIn 6.3).
3. DG 25 Set: YactOTo yObePtaHH MoKHa 3MiHOBaTH peRyJIbOBAJIbHIM rBnHTOM (9).
4. HanaTbHn pO6Ch (BmipHOETbCn Ha BnyckHOMy OTbopi NOBITp npu yBMKHytomy nHeBMOIHCTymeHTi).MaKcImaJIbHO DO3BOJehn pO6Ch TnCK dNb.yIaBi "TexHiHxapaKTepnCTnKn".
5.Пд' endHaite nHeBMOiHCTpymeHT Do CnCTeMn NOCTaHaHH CTNCLOTO NOBITpI.
6. YbIMKHeHH: nepecyHbTe 6JokipaTop yBIMKHeHH (8) y HanpMy cTpiKn (INB. MaI., CTOp. 2) Ta HATNCHiB BIMNKauch (7). BIMKHeHH: BiDnyctiTB BIMNKauch (7)
7. Texhivhe o6cnyroByBaHHaI DOrJa
He6e3neHa!peA 6yDb-RAHMn po6oTaMn Ha iHCTpyMeHTi BiD'EDHaTN 3'EHaHHa 3i CTNCJIIM NOBITpAM.
He6e3neHa! OncaHb Cbomy po3di npo60Tu 3 TexHiHoro 6cIyroByBaHHa I peMOHTy DO3BOJRAETbcra BIKOHyBaTH TIlbKn faxiBzM.
-3a6e3neuTe HaiiHicThb NHeBMOiHCTpyMeHTa 7Jxom peryIpaHoro Texo6cIyroByBaHH.
- Ipebeipntu miucictb noiokeHHi pi3b60Bnx 3'edHaHb, y pa3i notpe6n 3aTaryHtN.
-Фльту3'eнанндя CTиСLoRo NOBITpy CnID OuNyBaTN UOTNKeHBO.
- PeKOMeHdyETbCBACTaHOBHTNnepei NHeBMaTHHIM IHCTpyMeHTOM peDyKTOp 3 BOIOBIDJIbHNIKOM Ta OJINBHNUO.
-Пи niДВишЕHOMY BKNiDi OJINBn Ta nobITpЯ: npeBipNTn NHEBMaTHnHn IHCTpyMeHT Ta MOKJIInBO BiDpeMOHTyBaTn. (ДИВ. po3di 9.)
- Perylaryno a taKoJn nicJn KOHHoro BnKOpNCtAHn nepeBipRyTe yacTOTy oBeptAHn Ta nepeBipRyTe pIbeH bIbpaui.
- YHnKaIte KOHTaKTiB 3 He6e3NeuHMN cy6TaHcIIMN, Jki OciIN Ha iHCTpyMeNTi. HocItb
YKPAIHcBHAuk
npndaTHi 3acobnIHNDiBiyalbHoro 3axncty Ta BndaIaIte Hebe3neuHi cy6tahui IJnxOM npndaTHnx 3axoDIB nepeTeXo6cnyroByaHHaM.
8. Ппладя
BnKOpncToByTe TIlbKn opnirHaJIbHe npnlaJaMetabo.
BnKOpNCToByTe TlBKn TaKi KOMPJIeKTyUOci
detani, kpi np3Hauehi dIra cboro
nHEBMOiHCTpyMeHTy Ta BiNObIAJb BmOram i
napaMetpam ciEi IHCTpyKci 3 ekCNIyataci.
Повни acoptment npnlaДЯ ДИВ. Ha calTi www.metabo.com a6oВ kaTalO3i.
9. PemoHT

He6e3neHa! PEmoHT nHEBMOiHCTpyMeHTy DO3BOJRAETbCBAKHOHYBaTH TINbKN
Cneuiiictam!
Cnncn 3aapanchnx yactnh MOxHa 3aBaHTaKNTn Ha caTti www.metabo.com.
10. 3axnct doBknla
DotpmyTecaHaiohaIbHnX npaBn 6e3neHoYtIi3aui i nepepoBn BiInpaOBoHnx
PiEBMaTHuHNx IHCTpyMeHTIB, NaKyBaIbHnx
MaTepiAIB i npHaJa. Ira IIOeT a
HaBKOJIuShbOro CepeoBnua He NOBHHO
BHNKATN 3arPo3.
11. Texhichi xapaKtepncnkn
PONCHENHNO daHnX, HabeDeHHx Ha CTOp.3.
3aIHaemO 3a c6oIO npaBO Ha TexHiHi 3MiHN.
V1 =BnTpataHIOBITPA
Pmax. =ДОЗВОЛЕнМаКСИМаЛьну рбочи TnCK
n0 = yactota o6epTaHHa
ds =OTBip 1aHROBO 3aTnCKaHa
Dmax = MaKcImMaJIbHnI dIaMeTp a6pa3NtBHOI HacadKn
d = iaMeTp IaHry (BHyTpiHi)
C = 3'eДнУВаьнha pi3b6a
A = po3mipn:
ДовЖИнha XШИРиha XВиСOTа
m = Bara
Ha Bka3aHi TexHicHi xapaHTepnCTNKn NOINPIOJbCra DOnyckn, nepe6aueHi YHHMM CTahdapTaMn.

3haeHHa emicii wymy
Li 3NaueHnI Da03BOLJbT bOciHOBaTI n I nopIBHOBaTI emiciu wymy pi3Hx iHCTpyMeHTiB. 3aJeHHo BiD yMOB eKcnlyataui, CTaHy IHCTpyMeHTa abo pobOuyx iHCTpyMeHTiB fakTNHe HabaHTaKeHH MoKe 6yTu Bnue a6o HnKHe. JIra OuzHKN 3pa3KOBO rPiBHa emicii BpaxOByTe nepePBn Bpo6OTi Ta fa3n po6OTn 3i 3HNKeHM
(умови) HabaHTaKeHHaM. Bn3HaTe nepeiK opraHiauiHnx 3axoIDIB zuOIO 3axNCTy KOpNCtYBaHa 3 ypaXyBaHHaM Tnx YI INxu XHaueHb emicii wMy.
Bibpaia (cepeHne efeKTHBHe 3NaueHH npickopHH; EN 28927):
ah =3HaueHnB i6paui Kh =KoephiicHT IOXn6Kn BnMipIOBaHHa (bi6paiz)
Pibehb wymy (EN ISO 15744):
LDA =piBHeH 3ByKOBOrTOuCKy
LwA =piBHeb 3ByKOBoI NOTyHHOCTi
KpA, KwA= KOephiieHT noxN6KN BmipOBaHH

BHKOpNCToByTe 3axnChi HabyuHnHn!

- Original instructions
- Declaration of Conformity
- For UK only:
- Specified Use
- General safety instructions
- Special Safety Instructions
- Risks associated with ejected parts
- Risks associated with items catching/getting entwined
- Risks during operation
- Risks associated with recurring movements
- Risks associated with accessory parts
- Risks in the workplace
- Risks associated with dust and vapours
- ENGLISHen
- Risks associated with noise
- Risks associated with vibration
- Additional safety instructions
- Additional Safety Instructions
- Symbols on the pneumatic tool
- Overview
- Operation
- Before using the tool for the first time Insert plug-in nipple (12).
- Inserting the collet chuck
- Attaching the accessory
- Using the pneumatic tool
- Care And Maintenance
- Accessories
- Repairs
- Environmental Protection
- Technical specifications
- Emission values
- Wear ear protectors!
- Risques inherents aux accessoires
- Reparación
- Farer under drift
- Sette inn spenttang
- Onachoctn BCJeCDTBHe 3aXBaTa/HamaTbIBAHN
- Onachoctn B xode 3Kcnnyatauhi
- Onachoctn BCJeCDTBHe NOBTOHuxxCa DeIcTBn
- OnacHOCTN OT HcNoJIb3yEmoJ OCHACTHn (npHaJIeHHOCTeI)
- Onachoctn Ha pa6ooyem MecTe
- Onachoctb BCleDCTBne nbIIN napOB
- Onachoctb BCJeCDTBne wyma
- OnachocTHBcIeDCTBHe Bn6paun
- PYCCHNru
- DoonHnTeIbHbIe yHa3aHnI NO TexHnHe Ge3OnaCHOCTn
- DOnOHnTeJbHbIe yKa3aHnI NO TexHnKe 6e30NaCHOCTN:
- CnMBoJIHa nHeBMOHnHCTpyMeHTe
- 5.0630p
- 6.Зкплуataцья
- Ipeed nepBbIM nCNoJb3ObaHneM
- YctaHOBbI ZaHROBO 3aHHMa
- YctaHOBka pa6oeryo HhctpyMeHa
- IcnoIb3OBaHne nHeBMOHHCTpymeHTa
- TexHHuechoe o6cIyHnBaHne n yXoA
- PYCCKHru
- ПинадлесноCTN
- PemOH
- Texhnueckne xapakTepcntnH
- 3HaueHnIyWmaN Bn6paun
- HΦopMaζηДIa nokynatela:
- CneuiaIbHi npaBnla TexHikn 6e3neKn
- 3arpo3n BiD DetaleN, 0o BnIitaIaIb
- YKPAIHCBkAuk
- 3arpo3n cnprnHHHei 3axonJIeHHaM/ HamOTyBaHHaM
- 3arpo3n nid yac ekcnnyataucii
- 3arpo3n BiD pyxIB, 10 NOBTOPOIOTbC
- 3arpo3n cnpnHHeHi KOMnJIeKTyOChMn DeTaIaMn
- 3arpo3nHa po6oomy Micci
- 3arpo3n Chepe3 nll Ta napn
- 3arpo3n cnpruHneHi yMOM
- 3arpo3n cnpuHHeni Bi6paicieo
- YKPAIHCbHAcuk
- DoaTHOBi Bha3IBHn 3 TexHHn 6e3neHN
- DoaTKoBI npaBnla Texhikn 6e3neKn
- CnMBoJH Ha nHeBMOiHCTpyMeHTi
- 5.Orna
- EKcnpnyataciia
- Ipeed nepwoo ekcnnyataucieo
- BctaHOBJIeHHI ZaHROBOI 3aTnCHaHa
- BctaHOBJIeHHIhCTpyMeHTaJIbHOI HacaIKN
- BnKOpNCTaHn IHeBMOIhCTpyMeHTy
- Texhivhe o6cnyroByBaHHaI DOrJa
- YKPAIHcBHAuk
- Ппладя
- PemoHT
- 3axnct doBknla
- Texhichi xapaKtepncnkn
- 3haeHHa emicii wymy
Brand : METABO
Model : DG 700
Category : Grinder