USER MANUAL DEEBOT MINI ECOVACS
Brugsanvising. DK P153
Käytöopas FI P178
Kullanim Kilavuzu TR P203
For the Instruction Manual in further languages, visit: https://www.ecovacs.com
IMPORTANT SAFETY INSTRUCTIONS
IMPORTANT SAFETY INSTRUCTIONS
When using an electrical Appliance, basic precautions should always be followed, including the following:
READ ALL INSTRUCTIONS BEFORE USING THIS APPLIANCE SAVE THESE INSTRUCTIONS
- This Appliance can be used by children aged from 8 years and above and persons with reduced physical, sensory or mental capabilities or lack of experience and knowledge if they have been given supervision or instruction concerning use of the Appliance in a safe way and understand the hazards involved. Children shall not play with the Appliance. Cleaning and user maintenance shall not be made by children without supervision.
- Clear the area to be cleaned. Remove power cords and small objects from the floor that could entangle the Appliance.
- Tuck rug fringe under the rug base, and lift items such as curtains and tablecloths off the
floor.
- If there is a drop off in the cleaning area due to a step or stairs, you should operate the Appliance to ensure that it can detect the step without falling over the edge. It may become necessary to place a physical barrier at the edge to keep the unit from falling. Make sure the physical barrier is not a trip hazard.
- Only use as described in this manual. Only use attachments recommended or sold by the manufacturer.
- For INDOOR household use ONLY. Do not use the Appliance in outdoor, commercial or industrial environments.
- Do not use without dust box and/or filters in place.
- Turn OFF the Power Switch before removing the Dust Box.
- Do not operate the Appliance in an area where there are lit candles or fragile objects.
- Keep hair, loose clothing, fingers, and all parts of body away from any openings and moving parts.
-
Do not operate the Appliance in a room where an infant or child is sleeping.
-
Do not use Appliance on wet surfaces or surfaces with standing water.
- Do not allow the Appliance to pick up large objects like stones, large pieces of paper or any item that may clog the Appliance.
- Do not use Appliance to pick up flammable or combustible materials such as gasoline, printer or copier toner, or use in areas where they may be present.
- Do not use Appliance to pick up anything that is burning or smoking, such as cigarettes, matches, hot ashes, or anything that could cause a fire.
- Do not put objects into the suction intake. Do not use if the suction intake is blocked. Keep the intake clear of dust, lint, hair, or anything that may reduce air flow.
- If the power cord is damaged, it must be replaced by the manufacturer or its service agent in order to avoid a hazard.
- Turn OFF the power switch before cleaning or maintaining the Appliance.
- The lithium battery type suitable for CH24B7 is Max. 4 cells, max. nominal voltage DC 14.4V, rated capacity 3,200mAh.The battery must be
removed and discarded according to local laws and regulations before disposal of the Appliance.
- Please dispose of used batteries according to local laws and regulations.
- Do not incinerate the Appliance even if it is severely damaged. The batteries can explode in a fire.
- The Appliance must be used in accordance with the directions in this Instruction Manual. Ecovacs Home Service Robotics cannot be held liable or responsible for any damages or injuries caused by improper use.
- The robot contains batteries that are only replaceable by skilled persons. To replace the robot's battery, please contact Customer Service.
- Please make sure your power supply source voltage matches the power voltage marked on the OMNI Station.
- Use only the original rechargeable battery and OMNI Station provided with the Appliance from the manufacturer. Non-rechargeable batteries are prohibited.
- Take care not to damage the power cord. Do not pull on or carry the Appliance or OMNI Station by the power cord, use the power cord as a
handle, close a door on the power cord, or pull power cord around sharp edges or corners. Do not run Appliance over the power cord. Keep power cord away from hot surfaces.
- Do not use the OMNI Station if it is damaged. The power supply is not to be repaired and not to be used any longer if it is damaged or defective.
- Do not use with a damaged power cord or receptacle. Do not use the Appliance or OMNI Station if it is not working properly, has been dropped, damaged, left outdoors, or come in contact with water. It must be repaired by the manufacturer or its service agent in order to avoid a hazard.
- The plug must be removed from the receptacle before cleaning or maintaining the OMNI Station.
- Remove the Appliance from the OMNI Station, and turn OFF the power switch to the Appliance before removing the battery for disposal of the Appliance.
- When not using the OMNI Station for a long period of time, please unplug it.
- If the robot will not be used for a long time, power OFF the robot for storage and unplug
the OMNI Station.
- WARNING-Add clean water into the clean tank only.
- WARNING: For the purposes of recharging the battery, only use the detachable supply unit CH24B7 provided with the Appliance.
To satisfy RF exposure requirements, a separation distance of 20cm or more should be maintained between this device and persons during device operation.
To ensure compliance, operations at closer than this distance is not recommended. The antenna used for this transmitter must not be co-located in conjunction with any other antenna or transmitter.
Device Update
Typically, some devices are updated bi-monthly, but not always so specific.
Some devices, especially those that went on sale more than three years ago, will only be updated if a critical vulnerability is found and fixed.
Ensure the robot is always connected to a network, for smart features to function properly.
| Class II |
| Short-circuit-proof safety isolating transformer |
| Switch mode power supply |
| For indoor use only |
| Direct current |
| Alternating current |
| Before charging, read the instructions. |
| Polarity of the charging port |
| Time-lag miniature fuse-link |
The remote surveillance is for the absolute private use of non-public, private owned places for the pure self-protection and single control intended only. Please be aware of the local data protection based legal obligations in case of use. No surveillance of public places, especially with clandestine intent and/or on the part of the employer without justified reasons. Such not justified use is in the risk and responsibility of the user only.
This symbol on the product or on its packaging indicates that used electrical and electronic products should not be mixed with assorted municipal waste.
For proper treatment, it is your responsibility to dispose of your waste equipment by arranging to return it to designated collection points.
Disposing of this product correctly will help save valuable resources and prevent any potential negative effects on human health and the environment, which could otherwise arise from inappropriate waste handling.
To return your used device, please use the return and collection systems or contact the retailer where the product was purchased, which is free of charge, please contact your local authority for further details of your nearest designated collection point.
Penalties may be applicable for incorrect disposal of this waste, in accordance with your national legislation.

This symbol means that batteries and accumulators, at their end-of-life, should not be mixed with unsorted municipal waste. Your participation is an important part of the effort to minimize the impact of batteries and accumulators on the environment and on human health. For proper recycling you can return this product or the batteries or accumulators it contains to your supplier or to a designated collection point, which is free of charge.
Disposing of this product correctly will help save valuable resources and prevent any potential negative effects on human health and the environment, which could otherwise arise from inappropriate waste handling.
Penalties may be applicable for incorrect disposal of this waste, in accordance with your national .legislation. there are separate collection systems for used batteries and accumulators.
Please, dispose of batteries and accumulators correctly at your local community waste collection/recycling center.
Restriction of the use of certain hazardous substances (RoHS) Directive
Ecovacs Home Service Robotics Co., Ltd. hereby declares the whole product including parts (cables, cords, and so on) meets the requirements of RoHS Directive 2011/65/EU and amendment Commission Delegated Directive (EU) 2015/863 on the restriction of the use of certain hazardous substances in electrical and electronic equipment ("RoHS recast" or "RoHS 2.0").
Radio Equipment Directive
Ecovacs Home Service Robotics Co., Ltd. hereby declares that the product listed in this section comply with the essential requirements and other relevant provisions of the Radio Equipment Directive 2014/53/EU.
Europe Authorised Representative:

Ecovacs Home Service Robotics Co., Ltd. hereby declares that the product comply with the essential requirements and other relevant provisions of the RoHS Directive 2011/65/EU and amendment Commission Delegated Directive (EU) 2015/863, the Radio Equipment Directive 2014/53/EU.
The declaration of conformity can be viewed at the following address: https://www.ecovacs.com/global/compliance.
PACKAGE COMPONENTS
Package Contents

Robot OMNI Station Base


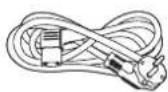
Side Brush Power Cord
Instruction Manual
Note: Figures in this manual are for reference only and may differ from the appliance. Product design and specifications are subject to changes without notice.
Product Diagram

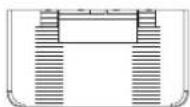
Buttons on the robot:
Press: Exit/Return to the Station
Press and hold: Station Self-Cleaning (only available when the robot is inside the station)
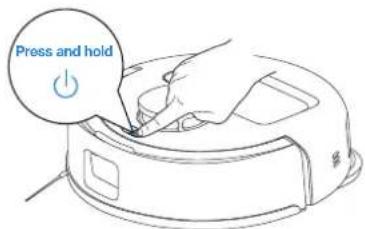
(1) Press: Toggle Start/Pause/Continue Press and hold: Power on/Power off
3 + Press and hold: Child Lock
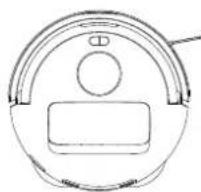
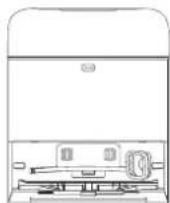
2. Bottom Back View
Anti-drop Sensors

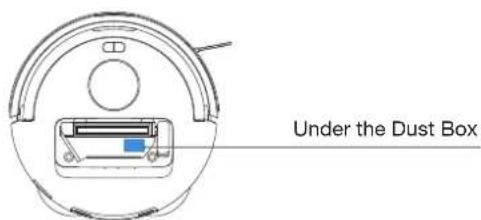
3. Inside the Robot (Under the Dust Box Cover)
RESET Button
Press: Network setup Press and hold: Reset
Network Setup: Press the RESET Button, and you will hear a voice prompt to connect the robot with the APP.
Restore default settings: Press the RESET button and hold. After you hear the voice prompt, the startup music will play, and the robot will be restored to the default setting.

4. Mopping Pad Assembly

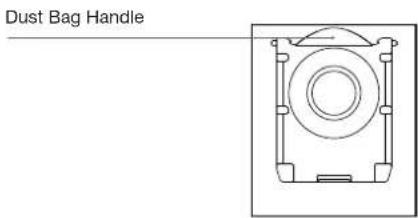
5. Dust Box

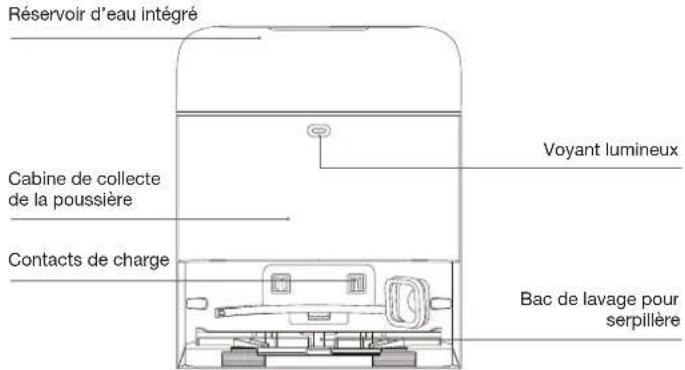
6. OMNI Station (Front)

Note:
- Flashing Red: Please check the ECOVACS HOME App for the reason.
- If the robot fails to charge, please wipe charging contacts with a clean and dry cloth.
7. Dust Bag
8. OMNI Station (Back)
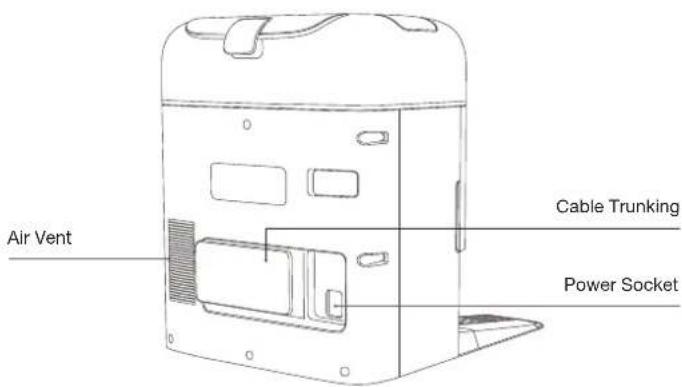
9. Indicator Light
| Indicator Light Effect State | |
| Robot | Breathing White Charging |
| Solid White Fully Charged/Running/Pause |
| Solid Red Low Battery |
| Flashing Red Alarm |
| Station | Solid White Standby/Running |
| Flashing Red Malfunction |
| Goes Out Power Outage/ Deep Sleep Mode |
10. Sensors Overview
| Name Function | Description |
| Navigation Module | Based on the triangulation formed through the emitted laser and the received laser reflected from surrounding objects, Navigation Module calculates the precise distance between the robot and nearby objects algorithms. When the robot moves, the positions of surrounding objects are determined to create a spatial map of its surroundings. The measurement range is 6 m. |
| Line Laser Sensor | Laser Ranging is applied to measure the distance between the robot and surrounding objects within 0.3 m by emitting lasers and detecting reflected light. When the sensor recognizes an object nearby that exceeds the maximum height, the robot turns automatically to avoid it. |
| Anti-drop Sensors | With Infrared Ranging, the distance between the robot's bottom and the ground is detected by the infrared sensors at the bottom. The robot will not move forward when there are stairs in front (such as when the height of the white surface is 70 mm or more, or the height of the black surface is 55 mm or more) and the identified height exceeds the preset one, realizing the anti-drop feature. |
| Carpet Detection Sensor | The sensor emits 300 kHz ultrasound, which energy will be absorbed by the carpet, causing the echoed energy to be lower than the threshold. The robot thereby detects the carpet's presence. In the ECOVACS laboratory, more than 50 types of carpets available on the market are identified. |
| Anti-collision Sensor | With the principle of the Optocoupler Switch, the robot will avoid obstacles when they are about to collide. |
| Edge Sensor | With Infrared Ranging, the edge sensor detects the distance between the robot and objects on the side. When there is a wall or obstacles on the right, the robot performs edge cleaning to avoid missing any spots and prevent collisions. |
INITIAL SETUP AND USE
Notes before Cleaning
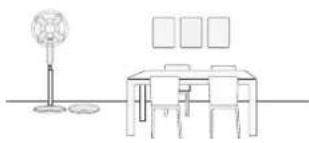
Tidy up the Area to be Cleaned
For the maximum cleaning area possible, put furniture, such as tables, chairs, and pedestal fans, in their proper place and put away low-lying items, such as weight scales, before using the robot.
Prevent DEEBOT from Falling
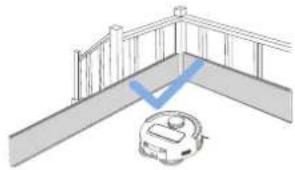
Place a physical barrier at the edge of a drop, such as staircases and steps, to stop the robot from falling over the edge.

Open Doors and Help DEEBOT Explore
Open all room doors to help the robot fully explore your house during the first use. Besides, remove the mopping pad assembly and the robot will be automatically switched to the vacuum-only mode.

Remove objects, including cables, clothes, and slippers, from the floor to improve cleaning efficiency.

Before using the product on a carpet with tasseled edges, please fold the tassels under the carpet.

Please do not stand in narrow spaces, such as hallways, to avoid blocking Navigation Module.
Quick Start
Remove all protective materials before using the appliance.
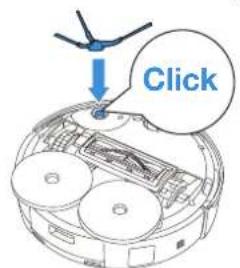
1. Installation
The sound of "click" indicates proper installation.

2. Assemble and Place the Station
Place the OMNI station against the wall on a flat, hard surface. Do not place items within 0.05m on either side and 0.8m in front.

Note:
- If there are reflective objects such as mirrors and reflective skirting lines near the station, the bottom 14cm of such objects should be covered.
- Do not place the station under direct sunlight.
- Place the station in a location with a strong Wi-Fi signal for better user experience.
- Do not use the appliance on wet surfaces or surfaces with standing water.
- Do not wipe the robot and the station with a damp cloth or use any liquid.
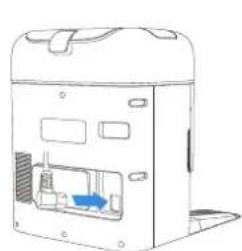
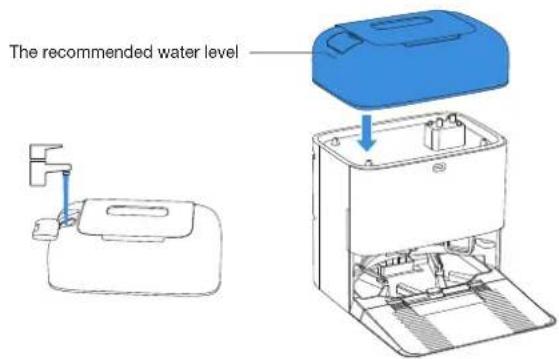
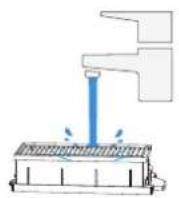
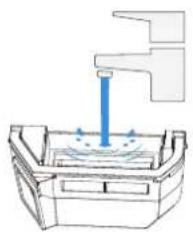
Fill the Integrated Water Tank
Take out the integrated water tank, remove the tank plug, and fill the tank with water up to the recommended water level. Insert the plug and reinstall the clean water tank.
Note:
It is recommended that ECOVACS DEEBOT cleaning solution (sold separately) be used. If you wish to purchase it, please go to the ECOVACS HOME App or visit https://www.ecovacs.com.
- Use only ECOVACS DEEBOT cleaning solution to avoid malfunctions.
- Use a clean, dry cloth to wipe off any water on the surface of the tank before placing it in position.
- Ensure the tank plug in the clean water inlet is securely closed, and the waste water outlet cover is properly sealed before use.
- Any water marks in the water tanks are from function testing. Please use it with confidence.
4 Download the ECOVACS HOME APP
To enjoy all available features, it is recommended that you control your robot via the ECOVACS HOME App.
- Scan the QR code under the top cover to download the App.
- Search "ECOVACS HOME" on the App Store or Google Play to download the App.

Note: Follow the instructions on the App to complete the registration, login, and connection.
5 Power on Robot
Press and hold then place the robot in front of the station that is connected to power supply.

6 Connect DEEBOT with APP
Wi-Fi Network Requirements:
- You are using a 2.4 GHz or 2.4/5 GHz mixed network.
- Your router supports 802.11b/g/n and IPv4 protocol.
- Do not use a VPN (Virtual Private Network) or Proxy Server.
- Do not use a hidden network.
WPA and WPA2 using TKIP, PSK, AES/CCMP encryption.
- WEP EAP (Enterprise Authentication Protocol) is not supported.
- Use Wi-Fi channels 1-11 in North America and channels 1-13 outside North America (refer to local regulatory agency).
- If you are using a network extender/repeater, the network name (SSID) and password are the same as that of your primary network.
- Please enable the WPA2 on your router.
Wi-Fi Indicator Light (on/off button)
| Slow flashing white light Disconnected from Wi-Fi |
| Fast flashing white light Connecting |
| Steady white light Connected to Wi-Fi |
Please be aware that intelligent features such as remote startup, voice interaction, 2D map display and control settings, and personalized cleaning (depending on the Appliance) require the ECOVACS HOME App, which is constantly updated. You need to agree to our Privacy Policy and User Agreement so that we can process some of your essential and necessary information before you can use certain features of the ECOVACS HOME App to control the Appliance. If you disagree with our Privacy Policy and User Agreement, such features will be unavailable. However, you can still use the basic features of this appliance for manual operation.
Network Interface Information
| Name Description | |
| WI-FI* | Facilitate data transfer between the app and the robot, enabling control of the robot through the app. |
| ECOVACS HOME App | ECOVACS products offer smart functions such as network setup, mapping, and cleaning mode selection (specific to each product). To utilize these features, users need to download and use the official ECOVACS HOME App. |
- The DEEBOT series robotic vacuums are designed for domestic cleaning scenarios. A home Wi-Fi network is required for operation, and anti-DDOS protection needs to be configured by users through route settings.
Power on and Charge DEEBOT
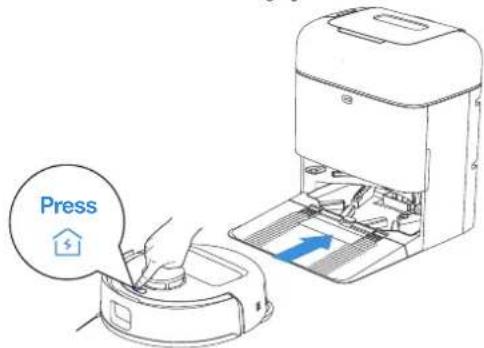
Use the ECOVACS HOME App or press on the robot, to allow the robot to dock for charging.

Note:
The robot cannot charge when it is powered off.
- When the robot is not in use, keep it powered on and charging.
It is recommended to start cleaning from the station. Do not move the station while cleaning.
Operate DEEBOT
1. Start Mapping
When creating a map for the first time, please follow the robot to help with some minor issues.
The robot may get stuck under furniture. Please refer to the following solutions:
① Raise the low-sitting furniture if possible;
② Cover the bottom of the furniture;
③ Set up a virtual boundary via the App.
The robot may struggle with carpets, preventing entry for mapping purposes. Address this issue as follows:
Before mapping, remove the mopping pad assembly to allow the robot to enter carpeted rooms for mapping.
2. Start Cleaning
- The robot automatically returns to the station for dust collection and mop washing, requiring no manual intervention.
- The robot detects floor types during cleaning and automatically avoids carpets. For optimal results, do not use the robot on carpets. It is recommended that carpets be folded up during cleaning.
Please ensure that the robot is in the station and is fully charged before cleaning for the first time. Press on the robot to start. You can also use the ECOVACS HOME App to start.

Note:
- Do not frequently remove washable mopping pads.
- Do not scratch the mopping pad plates with a rag or other objects.
- Replace the mopping pads in time as prompted by the App. Explore more accessories in the ECOVACS HOME App or at https://www.ecovacs.com.
3. Pause
Press on the robot to pause it while it is working. You can also use the ECOVACS HOME App to pause the robot.
4. Wake Up
After pausing for a while, all indicator lights on the robot will go out. To wake up the robot, press
5. Back to Station
Use the ECOVACS HOME App to recall the robot or press the button on the robot to allow the robot to dock for charging.
6. Deep Sleep Mode
The robot will enter deep sleep mode if it stays outside the station for about 5h to protect the battery. Try restarting the robot to reactivate it.

REGULAR MAINTENANCE
1 Maintenance Frequency
To keep the robot running at peak performance, perform maintenance and replace parts at the following frequencies:
| Robot Part | Maintenance Frequency | Replacement Frequency |
| Washable Mopping Pad / Every | 1-2 months | |
| Dust Bag / When App prompts | |
| Side Brush | Every 2 weeks | Every 3-6 months |
| Main Brush Every week | Every 6-12 months | |
| Filter Every week Every 3-6 months | |
| Line Laser Sensor Universal Wheel Anti-drop Sensors Bumper Charging Contacts on DEEBOT Charging Contacts on OMNI Station Navigation Module | Approx. every month | / |
| Integrated Water Tank Every month / | |
| Dust Collection Cabin Every month / | |
| Body and Bottom of the Station | Every month / | |
Note: Explore more accessories at ECOVACS HOME App or at https://www.ecovacs.com.
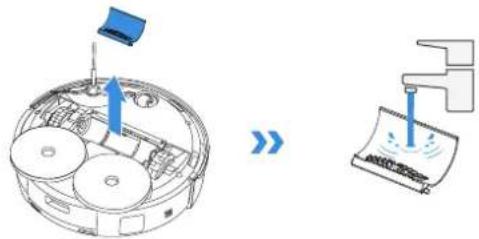
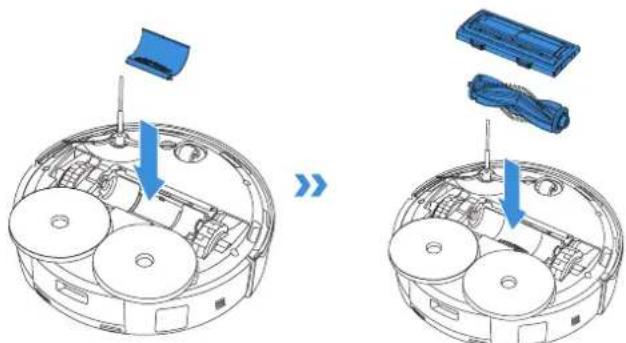
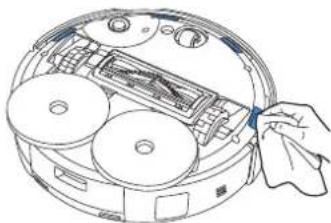
2 Maintain Dust Box and Filter
- Open the dust box cover and empty the box.
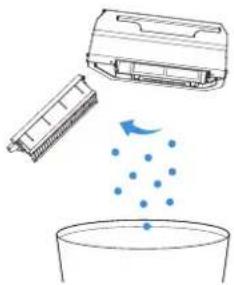
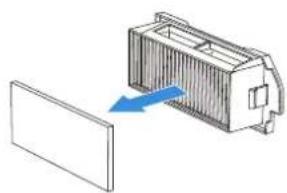
- Open the filter net and remove the filter
- Clean the dust from both sides of the filter net.

- Rinse the dust box and filter with water and shake off the water droplets.
Note:
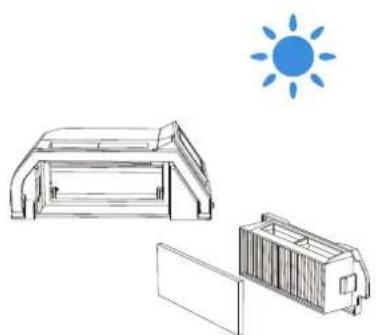
Note: Completely dry the filter before use.
3 Maintain Main Brush and Side Brush
Clean the Main Brush
- Open the cover.

- Remove and clean the main brush.
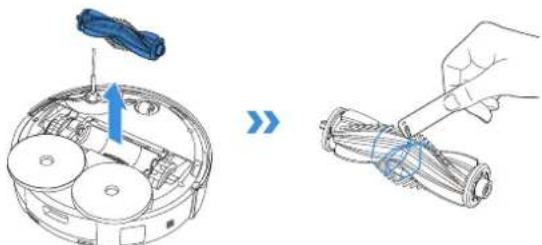
- Remove the brush comb, clean it, then wipe it dry.
- Install the brush comb, the main brush and the main brush cover.
Clean the Side Brush
Remove and clean the side brush.

Note: Explore more accessories at ECOVACS HOME App or at https://www.ecovacs.com.
4 Maintain Other Components
Clean the sensor window

Clean the bumper

Clean the charging contacts
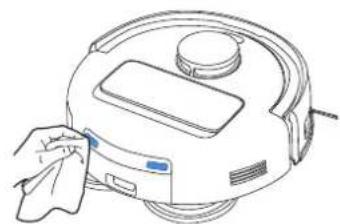
Clean the edge sensor
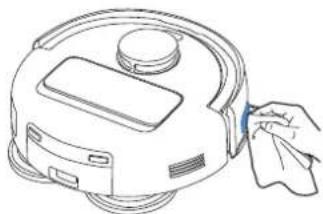
Clean the anti-drop sensor
Clean the universal wheel

Clean the driving wheels

Note:
Explore more accessories at ECOVACS HOME App or at https://www.ecovacs.com.
- Wipe the components with a clean, dry cloth. Never use a wet cloth. Do not use cleaning sprays or detergents.
- Charging contacts contain sensitive electronic components. Clean them with a dry cloth. Do not use a wet cloth to prevent water damage.
5 Maintain Dust Box
- Discard the dust bag.
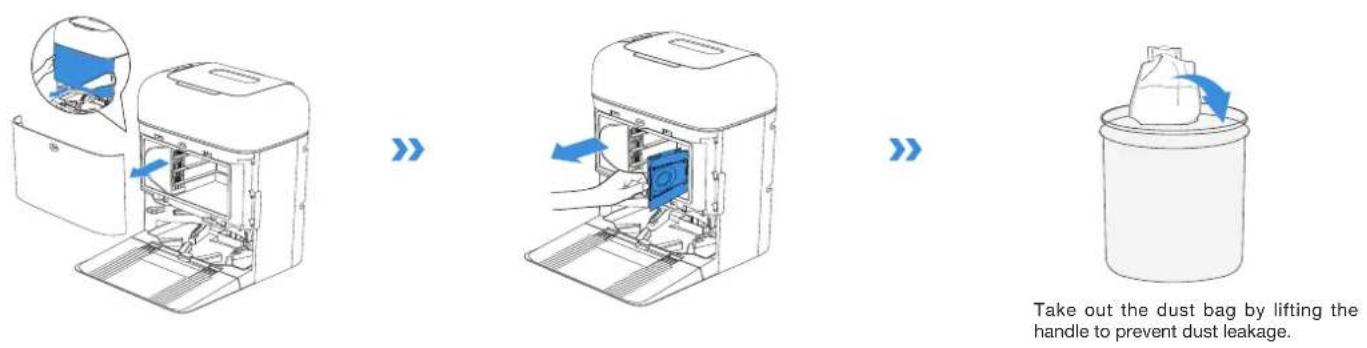
- Clean the dust collection cabin with a dry cloth and put a new dust bag in.

- Insert the top of the dust collection cabin cover into the groove, and press it down to ensure it is closed.

6 Maintain Mop Washing Tray
- Take off the base and the mop washing tray and clean them.

- Install the cleaned base and mop washing tray.

Note: Please install the mop washing tray properly for smooth operation.

Storage
Please fully charge and power off the robot before storage. Place the robot back at the station before pressing and holding to power off the robot. Please recharge it every 1.5 months to prevent the battery from over-discharging.

The robot cannot be charged when it is powered off.
- When the robot is not working, it is recommended to keep it powered on and charging.
- If the battery is over-discharged or not used for a long time, the robot may not be able to be charged. Please contact Customer Care for help. Do not disassemble it by yourself.
TROUBLESHOOTING
If you encounter the following during appliance use, please refer to the table below for solutions.
| No. | Malfunction Possible Causes | Solutions | |
| 1 | The robot cannot connect with the ECOVACS HOME App. | Incorrect Wi-Fi name or password entered. Enter the correct Wi-Fi username and password. | Make sure the robot is within range of your home Wi-Fi signal. Try to stay as close to the router as possible. |
| The robot is not within Wi-Fi signal coverage. |
| The robot is not in the configuration state. | Make sure the robot is connected to the power supply and turned on. Open the cover, and press the RESET button. The robot will enter the configuration state when you hear a voice prompt. |
| There is no home Wi-Fi on the Wi-Fi list. | 1. Check if the Wi-Fi name contains special characters. Please do not use special characters like ! @#& %^.2. Do not use a 5 Ghz network. |
| Incorrect App installed. Please download and install the ECOVACS HOME App. |
| Not using a 2.4 GHz or 2.4/5 GHz mixed network. | The robot does not support 5 GHz networks. Please use a 2.4GHz or 2.4/5 GHz mixed network. |
| 2 | The map is lost. | The map may be lost if you move the robot when it is cleaning. | Move the robot to the front of the station to restore the map.Find the stored map in Map Management and tap "Use This Map" to restore it.If this problem persists, please restart mapping. |
| Moving the robot when it is cleaning might cause the map to be lost. | During cleaning, try not to move the robot. |
| Auto cleaning is not complete. Make sure the robot automatically returns to the station after cleaning. |
| 3 | Unable to create the furniture map in the App. | Moving the robot when cleaning might cause the map to be lost. | During cleaning, do not move the robot. |
| Auto cleaning is not finished. | Make sure that the robot automatically returns to the station after cleaning. |
| 4 | The side brush fell off. The side brush is not properly installed. | For proper installation, make sure you hear a "click" when installing the side brush. |
| No. | Malfunction Possible Causes Solutions | |
| 5 | No signal found. The robot cannot return to the station. | The station is not properly placed. Place the station properly according to the instructions in the [Power on and Charge DEEBOT] section. |
| The station is out of power or moved. Check whether the station is connected to a power supply. Do not move the station. |
| The robot did not start cleaning from the station. It is recommended that the robot start cleaning from the station. |
| The charging route is blocked. For example, the door of the room the station is in is closed. Keep the charging route clear of obstructions. |
| 6 | The robot returns to the station before finishing cleaning. | The room is too large and the robot needs to return to the station for recharge. Please enable Auto Resume. For more details, please follow the instructions on the app. |
| The robot is unable to reach certain areas blocked by furniture or barriers. Tidy up the area to be cleaned by putting furniture and small objects in proper places. |
| 7 | The robot cannot charge. | The robot is not switched ON. Press and hold the on the robot to activate it before charging. |
| Charging contacts on the robot are not connected to those on the station. Ensure the robot's charging contacts are connected to the station and flashing. Check whether the charging contacts on the robot and the station are dirty. Please clean them according to the [REGULAR MAINTENANCE] sections. |
| The station is not connected to a power supply. Make sure the station is connected to a power supply. |
| The base is not properly installed. Please refer to the [Quick Start] section to install it properly. |
| The battery will be over-discharged if the robot is not used for a long time. It is recommended to regularly use the robot. If the battery cannot be charged because it has not been used for a long time, please contact customer care for help. |
| 8 | Loud noises during cleaning. | The main brush/side brush is entangled, or the dust box/filter is blocked. It is recommended to clean the main brush, side brush, dust box, filter, etc. regularly. |
| The robot is in max mode. Switch to standard mode. |
| 9 | The robot gets stuck while working and stops. | The robot is tangled with objects on the floor (electrical wires, curtains, carpet fringing, etc.). The robot might be stuck under furniture with an entrance of similar height. Please set a physical barrier, or set a virtual boundary via the ECOVACS HOME App. |
| The robot is stuck in a narrow area. Tidy up your home, set a physical barrier, or set a virtual boundary via the ECOVACS HOME App. |
| No. | Malfunction Possible Causes Soluions | |
| 10 | The robot encounters issues like a disorderly route, biased movement, repeated passes over the same spots, and missing small areas. (However, if the robot temporarily misses a large area, it automatically returns to make sure it is thoroughly cleaned.) | Objects such as wires and slippers on the ground affect the robot's normal operation. |
| The driving wheels may slip on the ground when the robot climbs steps, thresholds, and door bars, affecting its ability to navigate the entire house environment. |
| On freshly waxed or polished floors, as well as smooth tiles, there may be less friction between the driving wheels and the floor. |
| Due to variations in home environments, some areas cannot be cleaned. |
| 11 | Remote control is delayed. | Weak Wi-Fi signal, slowing down video loading. |
| 12 | The robot does not empty the dust box after returning to the station. | The dust collection cabin is not closed. Please close the dust collection cabin. |
| The Auto-Empty function has not been turned on in the ECOVACS HOME App. |
| The dust bag is not installed in the station. Install the dust bag, and close the dust collection cabin. |
| Manually moving the robot back to the station might not trigger the auto-empty feature. |
| In Do Not Disturb mode, the robot will not empty the dust box after returning to the station. |
| If the above causes have been ruled out, it may be due to an abnormality in station components. |
| 13 | The robot fails to empty the dust box | The OMNI station detects a decrease in empty efficiency. |
| The dust disposal port is blocked by foreign objects. |
| No. | Malfunction Possible Causes | Solutions | |
| 14 | The inner side of the dust collection cabin is dirty. | Fine particles are absorbed in the inner side of the dust collection cabin through the dust bag. | Clean the inner side of the dust collection cabin. |
| The dust bag is broken. Check and replace the dust bag. | |
| 15 | Dust leaks when the robot is working. | The dust disposal port is blocked by foreign objects. | Take out the dust box and remove foreign objects from the dust disposal port. |
| 16 | The mopping pad plates cannot rotate. | The mopping pad plates are not properly installed. | Install the mopping pad plates properly. Press the mopping pad assembly into the mounting slots for mopping pad assembly until you hear a "click". |
| The mopping pad plates are blocked by foreign objects. Please remove foreign objects. | |
| 17 | The driving wheels are jammed. | The driving wheels are entangled or jammed by foreign objects. | Please rotate and press the driving wheels to check for and remove any foreign objects that are entangled or jammed. If this problem persists, please contact customer care for help. |
| 18 | The water in the mop washing tray is full and cannot be drained. A voice prompts that the mop washing tray is full. | The integrated water tank is not properly installed. | Gently press the integrated water tank down to ensure it is properly installed. |
| The dirty water tank's cover is not tightly sealed. Ensure the dirty water tank's cover is tightly sealed. | water tank's cover is tightly sealed. |
| The station cannot drain water normally. | Press and hold to see if the station drains water normally. If the problem occurs during the cleaning process for mopping pads, end the task via the App, and then press and hold to see whether the station drains water properly. If water is successfully drained, wipe the water overflow sensor of the mop washing tray dry. If the Station fails to drain water, check between the dirty water tank and the station for foreign objects and remove them. |
| The suction port of the mop washing tray is blocked by foreign objects. | Ensure that there is no foreign object in the suction port of the mop washing tray. |
| The mop washing tray is dirty. Take out the mop washing tray and rinse it clean with water. | |
| If there is no water in the detachable tray, check if the float is stuck and fails to lower it to its correct position. | Take out the mop washing tray and place the float in its correct position. |
| The voice prompt still exists after trying the above solutions. | Unplug the station and plug it in again. If this problem persists, please contact customer care for help. |
| 19 | The mopping pad plates are malfunctioning. | The mopping pad plates are entangled or jammed by foreign objects. | Please remove foreign objects. |
| The mopping pad plates fell off. | Reinstall the mopping pad plates and make sure you hear a "click" indicating the mopping pad plates are properly installed. |
TECHNICAL SPECIFICATIONS
| Model DJX11 | |
| Rated Input 20 V 2 A | --- |
| Charging Time | About 4 h |
| Station Model CH24B7 | |
| Rated Input 220-240 V | ~ 50-60 Hz |
| Rated Output 20 V 2 A | --- |
| Rated Input Current (Charging) 0.5 A | |
| Power (Emptying) 400 W | |
| Power (Washing Mopping Pads) 35 W | |
| Power(Drying) 90 W | |
| Frequency bands 2400-2483.5 MHz | |
| Networked Standby Power Less than | 2.00 W |
Output power of the wireless module is less than 100mW.
Note: Technical and design specifications may be changed for continuous
product improvement.
Explore more accessories at https://www.ecovacs.com.
Based on product requirements (functionality and user experience), our products use a non-ultra-low power appliance architecture, so there is no off mode and no standby mode. After the machine is fully charged, it will enter the network standby mode within 20 minutes. Networked standby mode power is 1.6 W

Please use the mobile camera to scan the QR code and obtain the user guide.

Robot Station OMNI Base

6. Station OMNI (vue de face)
Remarque :
Voyant Wi-Fi (bouton marche/arret)
Robot OMNI-station Bas


Sidoborste Stromsladd
Bruksanvisning

Robot OMNI-station Base
Sideborste Stromledning
Brugsanvisining
6. OMNI-station (forside)

Bemerk:
8. OMNI-station (bagside)

9. Indikatorlys
- Scan QR-koden under topdaekslet for at downloade appen.

- Sog after "ECOVACS HOME" i App Store eller Google Play for at downloade appen.

No.518 Songwei Road, Wusongjiang Industry Park, Guoxiang Street, Wuzhong District, Suzhou, Jiangsu, China.