
GCS 91013A2S - Tumble drier CANDY - Free user manual and instructions
Find the device manual for free GCS 91013A2S CANDY in PDF.
| Brand | Candy |
| Model | GCS 91013A2S |
| Product Type | Condenser dryer |
| Drum capacity | 115 L |
| Maximum load (cotton) | 10 kg |
| Maximum load (synthetics) | 4 kg |
| Dimensions (H × W × D) | 85 cm × 60 cm × 60 cm |
| Power supply | 220-240 V, 50 Hz, 6 A minimum |
| Drying programs | Perfect Home, Dry, Ready to Store, Ready to Iron, Refresh, Wool, Mix & Dry, Shirts, Quick 40', Time, Jeans |
| Special functions | Delayed start (1-24 h), Delicates, Refresh, Auto stop |
| Drying type | Automatic with humidity sensor |
| Cleaning | Lint filter, condenser, water tank (6 L) |
| Safety | Door lock, cooling cycle before opening, overheat protection |
| Included accessories | Water drain kit (hose and bracket) |
| Spare parts and repairability | Genuine parts available via GIAS customer service |
| General information | Net weight: not specified; energy class: see label |
Frequently Asked Questions - GCS 91013A2S CANDY
User questions about GCS 91013A2S CANDY
0 question about this device. Answer the ones you know or ask your own.
Ask a new question about this device
Download the instructions for your Tumble drier in PDF format for free! Find your manual GCS 91013A2S - CANDY and take your electronic device back in hand. On this page are published all the documents necessary for the use of your device. GCS 91013A2S by CANDY.
USER MANUAL GCS 91013A2S CANDY
Heat Pump Tumble Dryer
English 2
Espanol 16
François 30
Deutsch 44
Italiano 58
Polski 72
Suomi 86
Dansk 100
Norsk 114
Svenska 128
Porteguese 142
Slovensko 156
Eλληικα 170
Dutch 184
INDEX
| Safety Reminders | 3 |
| Drain Hose Kit: Fitting Instructions | 8 |
| Preparing the Load | 9 |
| Controls and Indicators | 10 |
| Selecting the Programme | 11 |
| Door and Filter | 12 |
| Water Container | 13 |
| Operation | 14 |
| Cleaning and Routine Maintenance | 14 |
| Troubleshooting | 15 |
| Customer Service | 15 |
Please read and follow these instructions carefully and operate the machine accordingly. This booklet provides important guidelines for safe use, installation, maintenance and some useful advice for best results when using your machine.
Keep all documentation in a safe place for future reference or for any future owners.
SAFETY REMINDS
Use
- This appliance can be used by children aged from 8 years and above and persons with reduced physical, sensory or mental capabilities or lack of experience and knowledge if they have been given supervision or instruction concerning use of the appliance in a safe way and understand the hazards involved. Children shall not play with the appliance. Cleaning and user maintenance shall not be made by children without supervision. Children of less than 3 years should be kept away unless continuously supervised.
-WARNING Misuse of a tumble dryer may create a fire hazard. - This appliances is intended to be used in household and similar applications such as:
- Staff kitchen areas in shops, offices and other working environments;
-Farm houses - By clients in hotels, motels and other residential type environments;
Bed and breakfast type environments
A different use of this appliance from household environment or from typical housekeeping functions, as commercial use by expert or trained users, is excluded even in the above applications.
If the appliance is used in a manner inconsistent with this it may reduce
- WARNING Do not use the product if the fluff filter is not in position or is damaged; fluff could be ignited.
- WARNING Where the hot surface symbol is located the temperature rise during operation of the tumble dryer may be in excess of 60 degrees C.
- Remove the plug from the electricity supply. Always remove the plug before cleaning the appliance.
- Do not continue to use this machine if it appears to be faulty.
- Lint and fluff must not be allowed to collect on the floor around the outside of the machine.
- The final part of a tumble dryer cycle occurs without heat (cool down cycle) to ensure that the items are left at a temperature that ensures that the items will not be damaged.
The tumble dryer is not to be used if industrial chemicals have been used for cleaning. - WARNING: Never stop a tumble dryer before the end of the drying cycle unless all items are quickly removed and spread out so that the heat is dissipated.
Maximum load drying weight: see energy label.
The Laundry
- Do not dry unwashed items in the tumble dryer.
- WARNING Do not tumble dry fabrics treated with dry cleaning fluids.
- WARNING Foam rubber materials can, under certain circumstances, when heated become ignited by spontaneous combustion. Items such as foam rubber (latex foam), shower caps, waterproof textiles, rubber backed articles and clothes or pillows fitted with foam rubber pads MUST NOT be dried in the tumble dryer.
- Always refer to the laundry care labels for directions on suitability for drying.
- Clothes should be spin dried or thoroughly wrung before they are put into the tumble dryer. Clothes that are dripping wet should not be put into the dryer.
- Lighters and matches must not be left in pockets and NEVER use flammable liquids near the machine.
- Glass fibre curtains should NEVER be put in this machine. Skin irritation may occur if other garments are contaminated with the glass fibres.
- Items that have been soiled with substances such as cooking oil, acetone, alcohol, petrol, kerosene, spot removers, turpentine, waxes and wax removers should be washed in hot water with an extra amount of detergent before being dried in the tumble dryer.
- Fabric softeners, or similar products, should be used as specified by the fabric softener instructions.
Ventilation
- Adequate ventilation must be provided in the room where the tumble dryer is located to prevent gases from appliances burning other fuels, including open fires, being drawn into the room during operation of the tumble dryer.
- Installing the rear of the appliance close to a wall or vertical surface.
- There should be a gap of at least 12mm between the machine and any obstructions. The inlet and outlet should be kept clear of obstruction. To ensure adequate ventilation the space between the bottom of the machine and the floor must not be obstructed.
- Check regularly that the air flowing through the dryer is not restricted.
- Check frequently the fluff filter after use, and clean, if necessary.
- Prevent items from falling or collecting behind the dryer as these may obstruct the air inlet and outlet
- NEVER install the dryer up against curtains.
-
In cases where the dryer is installed on top of a washing machine, a suitable stacking kit must be used according to the follow configuration.
-
Stacking kit Mod 35100019: for minimum washing machine depth 49 cm
- Stacking kit Mod 35900120: for minimum washing machine depth 51 cm
The stacking kit shall be one of that above, obtainable from our spa service.
The stacking kit shall be one of that above, obtainable from our spare service.
The instructions for installation and any fixing attachments, are provided with the staking kit.
Do not install the product in a low temperature room or in a room where there is a risk of frost occurring. At temperature around freezing point the product may not be able to operate properly: there is a risk of damage if the water is allowed to freeze in the hydraulic circuit (valves, hoses, pumps). For a better product performance the ambient room temperature must be between +2^ and +35^ . Please note that operating in cold condition (between +2 and +15^ ) might simply some water condensation and water drops on floor.
Environmental Issues
- All packaging materials used are environmentally-friendly and recyclable. Please help dispose of the packaging via environmentally-friendly means. Your local council will be able to give you details of current means of disposal.
To ensure safety when disposing of an old tumble dryer disconnect the mains plug from the socket, cut the mains power cable and destroy this together with the plug. To prevent children shutting themselves in the machine break the door hinges or the doorlock.
European Directive 2012/19/EU
This appliance is marked according to the European directive 2012/19/EU on Waste Electrical and Electronic Equipment (WEEE).

WEEE contains both polluting substances (which can cause negative consequences for the environment) and basic components (which can be re-used). It is important to have WEEE subjected to specific treatments, in order to remove and dispose properly all pollutants, and recover and recycle all materials. Individuals can play an important role in ensuring that WEEE does not become an environmental issue; it is essential to follow some basic rules:
- WEEE should not be treated as household assets.
Electrical Requirements
Tumble dryers are supplied to operate at a voltage of 220-240V, 50 Hz single phase. Check that the supply circuit is rated to at least 6A.
Electricity can be extremely dangerous.
This appliance must be earthed.
The socket outlet and the plug on the appliance must be of the same type.
Do not use multiple adapters and/or extension leads.
The plug should be accessible for disconnection after the appliance has been installed.
CE Appliance complies with European Directive 2004/108/EC, 2006/95/EC and subsequent amendments.
You may be charged for a service call if a problem with your machine is caused by incorrect installation.
If the mains cord on this appliance is damaged, it must be replaced by a special cord which is ONLY obtainable from the spares service. It must be installed by a competent person.
A Do not replace the machine in and switch it
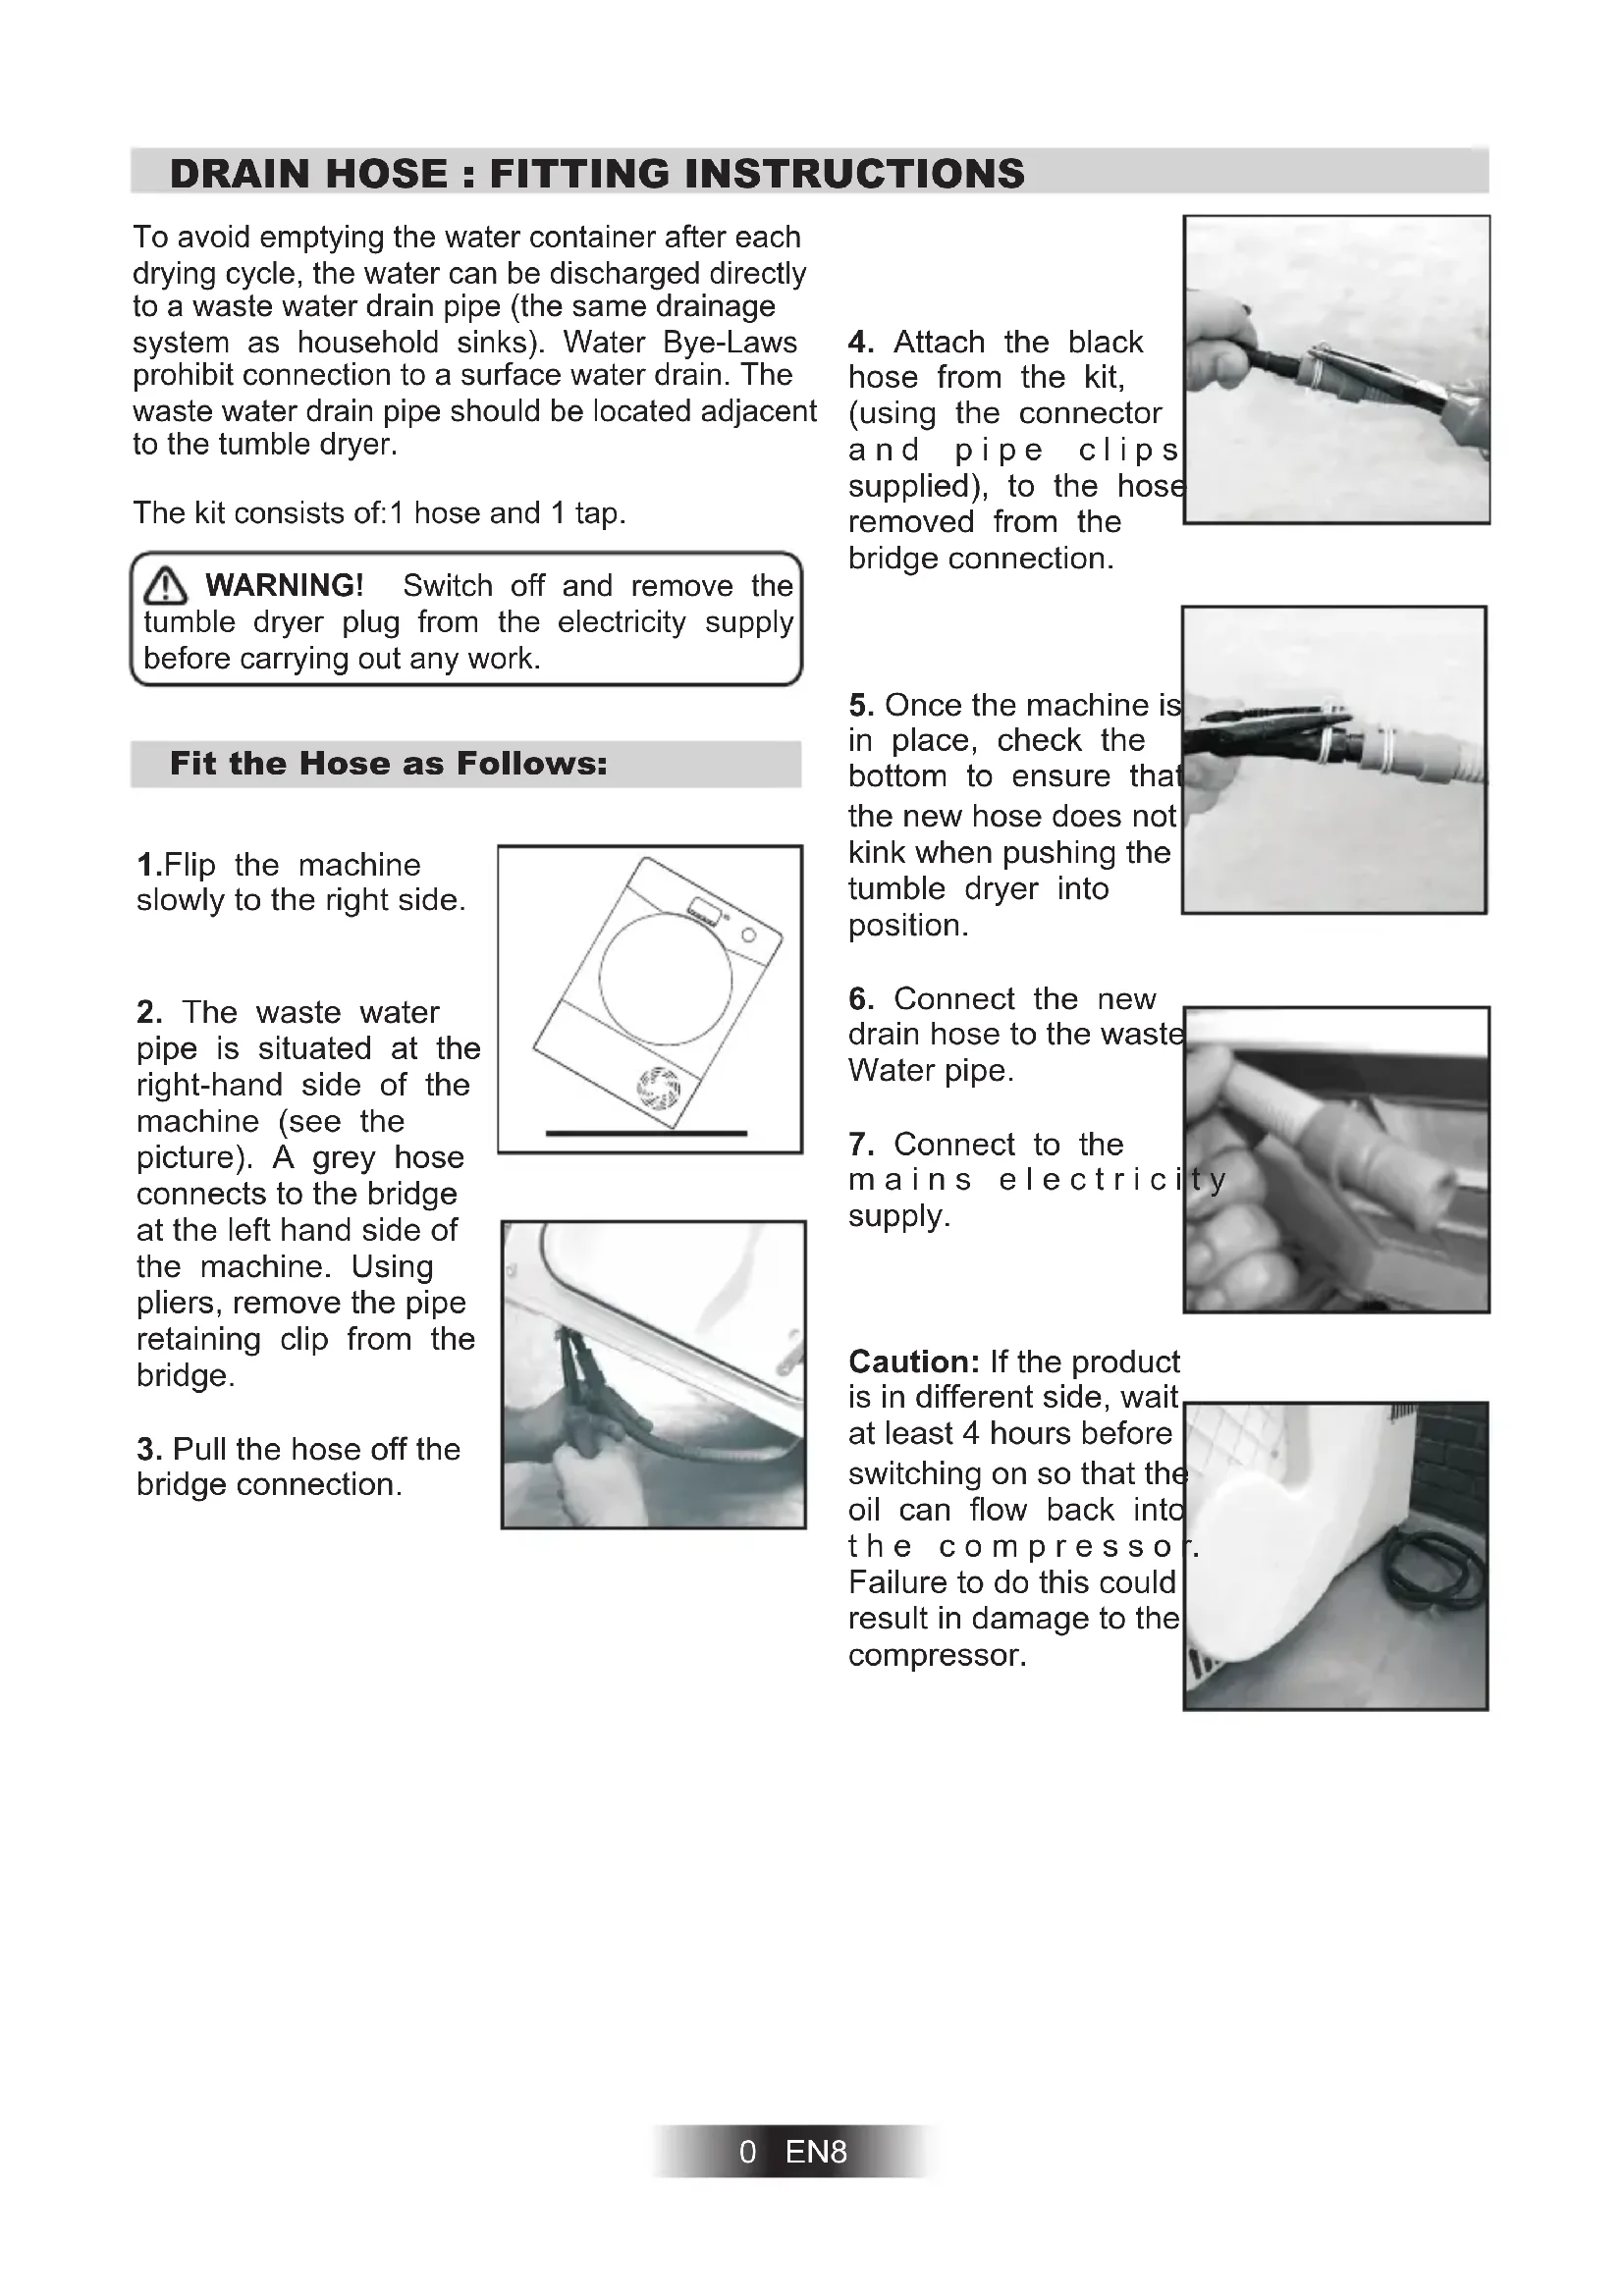
DRAIN HOSE : FITTING INSTRUCTIONS
To avoid emptying the water container after each drying cycle, the water can be discharged directly to a waste water drain pipe (the same drainage system as household sinks). Water Bye-Laws prohibit connection to a surface water drain. The waste water drain pipe should be located adjacent to the tumble dryer.
The kit consists of: 1 hose and 1 tap.

WARNING! Switch off and remove the flexible dryer plug from the electricity supply before carrying out any work.
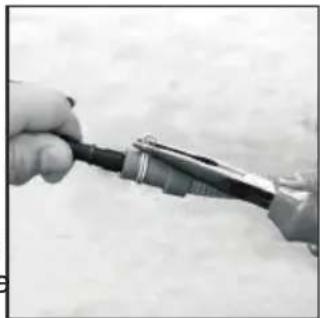
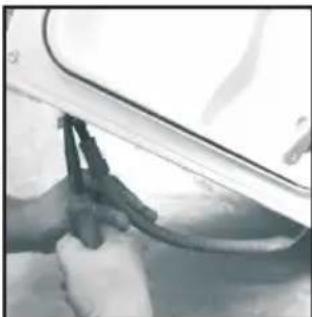
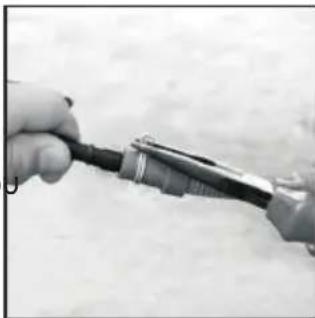
Fit the Hose as Follows:
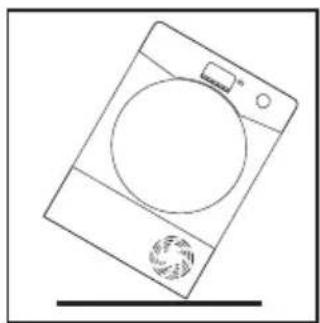
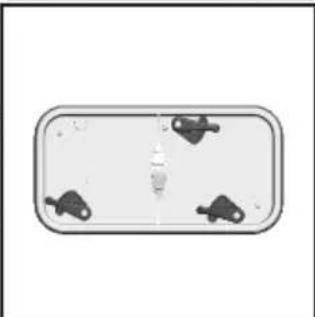
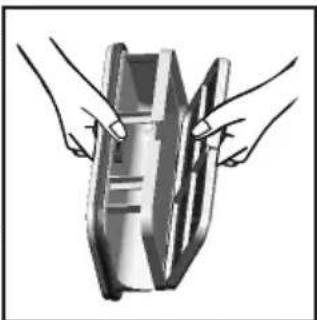
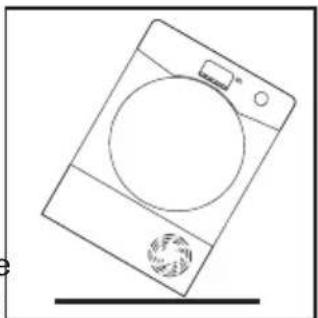
1.Flip the machine slowly to the right side.
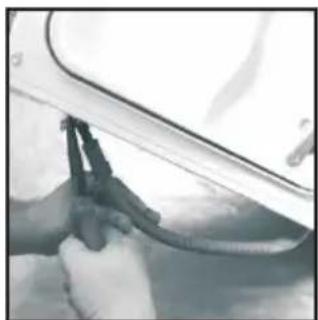
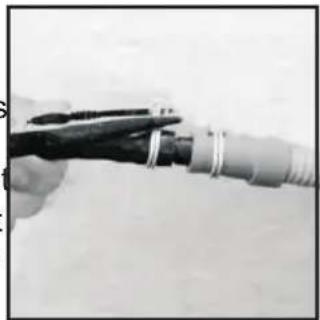
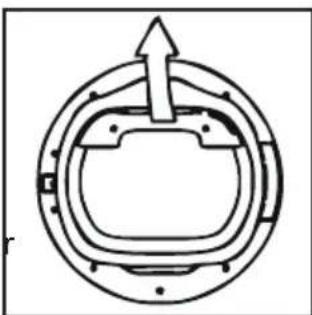
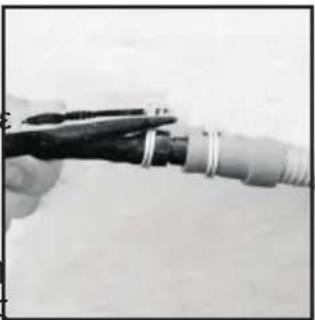
2. The waste water pipe is situated at the right-hand side of the machine (see the picture). A grey hose connects to the bridge at the left hand side of the machine. Using pliers, remove the pipe retaining clip from the bridge.
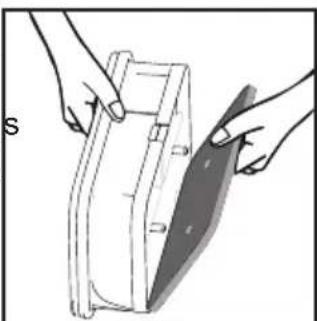
3.Pull the hose off the bridge connection.
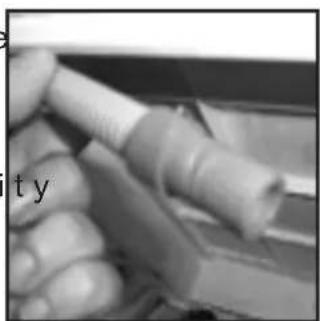
- Attach the black hose from the kit, (using the connector and pipe clips supplied), to the hose removed from the bridge connection.
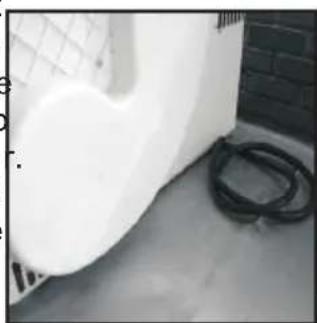
- Once the machine is in place, check the bottom to ensure that the new hose does not kink when pushing the tumble dryer into position.
- Connect the new drain hose to the waste Water pipe.
- Connect to the mains electric supply.
Caution: If the product is in different side, wait at least 4 hours before switching on so that the oil can flow back into the compressor. Failure to do this could result in damage to the compressor.
PREPARED THE LOAD
Before using the tumble dryer for the first time:
- Please read this instruction book thoroughly.
- Remove all items packed inside drum.
- Wipe the inside of the drum and door with a damp cloth to remove any dust which may have settled in transit.
Clothes Preparation
Make sure that the laundry you are going to dry is suitable for drying in a tumble dryer, as shown by the care symbols on each item.
Check that all fastenings are closed and that pockets are empty. Turn the articles inside out. Place clothes loosely in the drum to make sure that they don't get tangled.
Do Not Tumble Dry:
Woollens, silk, delicate fabrics, nylon stockings, delicate embroidery, fabrics with metallic decorations, garments with PVC or leather trimmings, training shoes, bulky items such as sleeping bags, etc.
IMPORTANT: Do not dry articles which have been treated with a dry cleaning fluid or rubber clothes (danger of fire or explosion).
During the last 15 minutes the load is always tumbled in cool air.
Energy Saving
Only put into the tumble dryer laundry which has been thoroughly wrung or spin-dried. The drier the laundry the shorter the drying time thus saving electricity.
ALWAYS
- Try to dry the maximum weight of laundry, this will save time and electricity.
- Check that the filter is clean before every drying cycle.
NEVER
- Exceed the maximum weight, this will waste time and electricity.
- Put dripping wet items into the tumble dryer, this may damage the appliance.
Do not overload the drum, large items when wet can exceed the maximum admissible clothes load (for example: sleeping bags, duvets).
Cottons
Max. 10Kg
9 Kg
8 Kg
7 Kg
6 Kg
Synthetics
Max. 4Kg
4 Kg
4 Kg
3,5 Kg
3 Kg
Sort the Load as Follows
- By care symbols
These can be found on the collar or inside seam:
Suitable for tumble drying.
Tumble drying at high temperature.
Tumble drying at low temperature only.
Do not tumble dry.
If the item does not have a care label it must be assumed that it is not suitable for tumble drying.
- By amount and thickness
Whenever the load is bigger than the dryer capacity, separate clothes according to thickness (e.g. towels from thin underwear).
-By type of fabric
Cottons/linen: Towels, cotton jersey, bed and table linen.
Synthetics: Blouses, shirts, overalls, etc. made of polyester or polyamid, as well as for cotton/synthetic mixes.
- By drying level
Sort into: iron dry, cupboard dry, etc. For delicate articles press the Delicates button to select low drying temperature.
CONTROLS AND INDICATORS
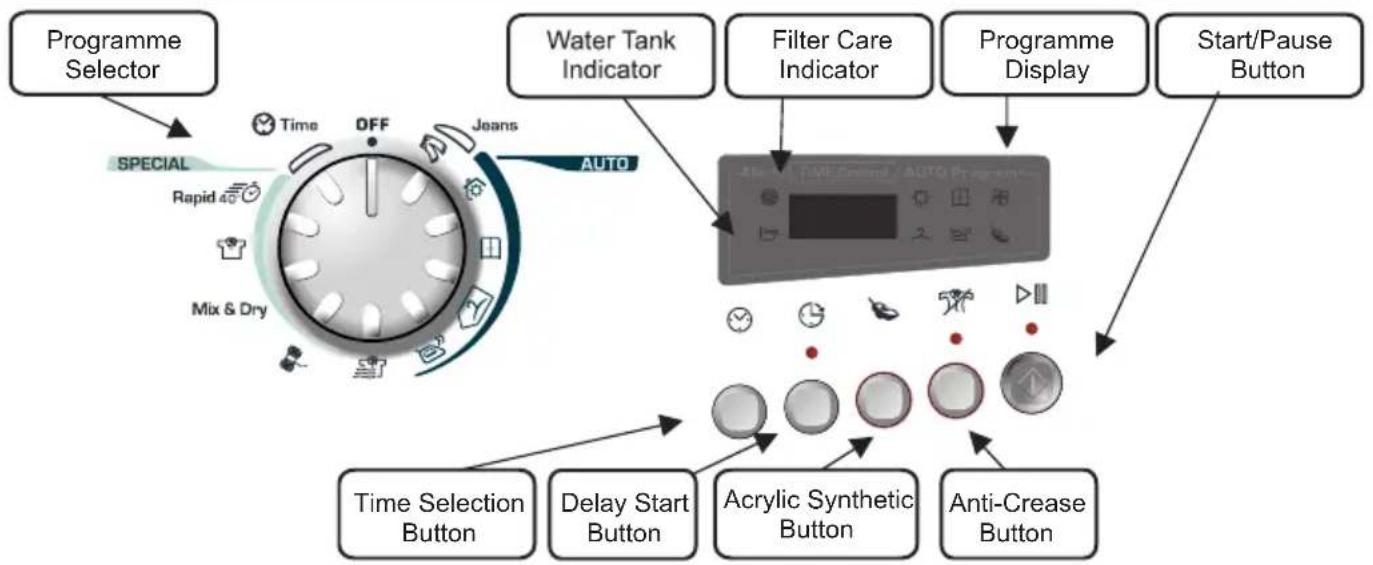
Control Panel and Indicator Lights
Knob: You can turn it in both directions to choose the required programme.
Time selection :To modify the drying timing of required programme; it works only with certain programmes.
Delay start: To delay the start of the drying cycle and to dry your laundry when electricity costs less (please see dedicated section)
Delicate fabrics : When pulled, this indicator turns off and this new one turns on; with this special function, the drying temperature is lower to better protect your delicate clothes.
Anti- Crease Button - Select the anti-crease function at the end of drying cycle. The drum keeps moving at regular phases to refresh the laundry.
Cool down : This indicator turns on during the final cool phase of the cycle.
Start/Pause : To start the programme required or to pause the cycle.
Automatic programmes: Depending on desired programme, specific indicators turn on (please see "programme list")
Filter care : When on, please clean the filters.
Full water tank : When on, please empty the water tank.
SELECTING THE PROGRAMME
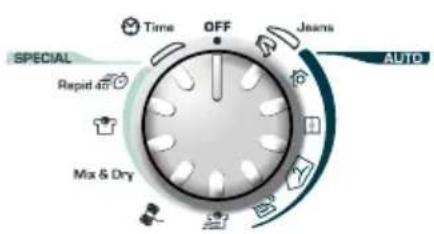
The Candy Sensor Dry machine gives many options for drying the laundry to suit all circumstances. The table on the next page lists the programmes and the function of each programme.
Note:
The sensor may not detect a small load of small articles. For small loads and separate items or pre-dried fabrics with low moisture content, use the timed programmes.
If the sensor does not detect the item the dryer will only operate for 10 minutes before going into cooldown.
If the load is too large or too wet to tumble dry the dryer will
automatically go into cooldown after approximately 3 hours. In these cases we advise to use a time cycles between 30 and 75 minutes depending on the load size and dryness required, and select high or low heat depending upon the fabric type.
SELECTING THE PROGRAMME
| PROGRAMME | IDEAL FOR |
| Perfect Home | Clothes you want completely dryed, e.g. towels, bathrobes, table clothes or sheet. Time: around 3h. |
| Store Dry | Clothes you want to fold and store without ironing, e.g. shirts in mixed fabrics, socks, baby clothes. Time: around 2h and 45 min. |
| Hang Dry | Clothes you don't need to iron, but just hang after the drying cycle. Time: around 2h and 30 min. |
| Iron Dry | Leave clothes slightly damp to allow easier ironing. Time: around 1h and 50 min. |
| No Crease | Clothes you just need to refresh. Good for items of clothing which have been left prior to ironing or if they have been dried outside or on radiators. This programme has a specific Anti-Createase function that relaxes fibres and makes easier ironing. Time: 9 min + 3 min cool down. |
| Wool | To soften your woolen clothes or to simply refresh them after a long time in the wardrobe. Time: 12 min. |
| Mix & Dry | To dry mixed cotton and synthetic clothes: save time and no need to separate the washing and dry them in different cycles. Time: around 2h (max 4 kg). |
| Shirts | To dry shirts both cotton and synthetic fabrics. Time: 1h for 2kg of synthetic shirts (around 10 shirts); 1h and 20 min for 3 kg of cotton shirts (around 10 shirts). |
| Rapid 40' | For dry, refreshed and ready to dress clothes in onyl 40 minutes. Sensor system keeps under control the temperature to have always the best result. Max 2 kg. |
| Time | If you want to choose drying times, from 30 to 180 minutes. By selecting "20 min" you choose a "cool programme", ideal to refresh clothes and to remove eventual smells. |
| Jeans | To dry up to 4 kg of Jeans (around 5 pairs). The programme works for around 2h, but timing can change according to the load and washing spin speed. Jeans programme can only be used for 100% cotton items, please do not mix colours nor dry jeans with embroideries or accessories. |
DOOR and FILTER
Pull on handle to open the door.
To restart the dryer, close the door and press Start / Pause button

WARNING! When the tumble dryer is in use, a drum and door may be VERY HOT. Never go to a tumble dryer before the end of the drying time unless all items are quickly removed and read out so that the heat is dissipated.
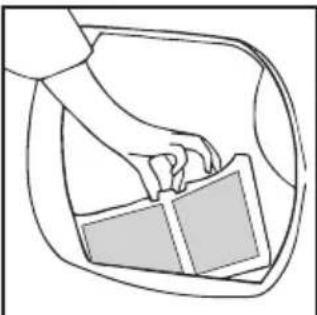
Filter
IMPORTANT: To maintain the efficiency of the dryer check that the fluff filter is clean before each drying cycle.
1.Pull the filter upwards.
2. Open filter as shown.
3. Gently remove lint using a soft brush or your fingertips.
4. Snap the filter together and push back into place.
Filter Care Indicator

Lights when the eeds cleaning.
If the laundry is not drying check that the filter is not clogged.


DO NOT USE WATER TO CLEAN THE FILTER

WARNING! If you open the door mid cycle, are the cool-down cycle has completed, the title may be hot. Please use extreme caution in attempting to empty the water reservoir along the cycle.
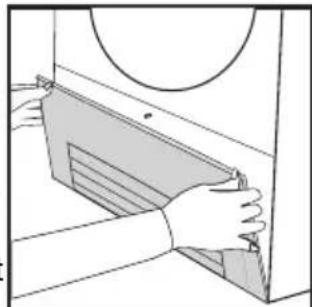
To Clean the Condenser Filter
- Remove the kickplate.
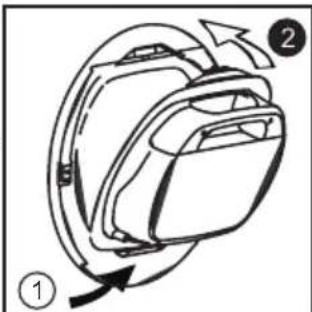
- Turn the two locking levers anti-clockwise and pull out the front cover.
- Gently remove the filter frame and clean any dust or fluff with a cloth from the filter. Do not use water to clean the filter.
- Remove the sponge gently from its place and then wash the sponge by holding it under a running tap turning it so to remove any dust or fluff.
- Refit the front cover ensuring it is in the correct way (a indicated by the arrow) and pushed firmly into place. Lock the two levers by turning them clockwise.
- Refit the kickplate.
WATER CONTAINER
The water removed from the laundry during the drying cycle is collected in a container inside the door of the dryer. When the container is full the indicator on the control panel will light, and the container MUST be emptied. However, we recommend that the container is emptied after each drying cycle.
NOTE: Very little water will collect during the first few cycles of a new machine as an internal reservoir is filled first.
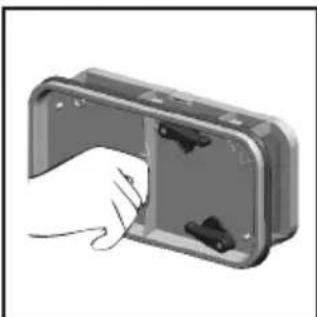
To Remove the Container
- Gently pull out the water container holding the handle.
When it is full the water container will weigh about 6kg
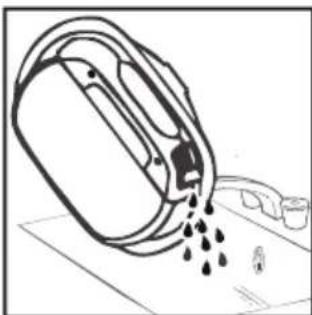
- Tilt the water container to empty the water out through the spout.
When empty, replace the water container back as shown; first insert the base of the container into position as shown then gentle push the top into position.
- Press Button to restart the cycle.
NOTE: If you have the option of drainage near to the dryer you can use
the discharge kit to provide a permanent drainage for the water collected in the container of the dryer. This means that you don't have to empty the water container.
OPERATION
-
Open the door and load the drum with laundry. Ensure that garments do not hinder closure of the door.
-
Gently close the door pushing it slowly until you hear the door 'click' shut.
-
Turn the Programme Selector dial to select the required drying programme (see Programme Guide).
-
If drying synthetics, acrylics or delicate items, press the button to reduce the heat level.
The indicator will light up when the machine is in low heat setting. To deselect in the first few minutes of the programme, press the button, after this time reset the machine to change the setting.
-
Press the button. The dryer will start automatically and the indicator above the button will be continuously lit.
-
If the door is opened during the programme to check the laundry, it is necessary to press III to recommence drying after the door has been closed.
-
When the cycle is nearing completion the machine will enter the cool down phase, the clothes will be tumbled in cool air allowing the load to cool down.
-
Following the completion of the cycle the drum will rotate intermittently to minimize creasing. This will continue until the machine is switched OFF or the door is opened.
Do not open the door during the automatic programs in order to obtain a proper drying.
OPERATION
Delay Start Function
The Delay Start Function allows the user to delay the start of the drying cycle by 1 to 24 hours.
When the function is first selected the display will show a delay of 1 hour, subsequent presses of the button will increase the delay with 1 hour steps.
To commence the programme press and the appliance will complete the drying cycle at the end of this time. The indicator light will flash to indicate that the start delay is in progress.
Cancelling and Resetting the Programme
To cancel a programme press the button for 3 seconds. In the TIME CONTROL display 0:00 Light will flash to indicate that it has been reset.
CLEANING AND ROUTINE MAINTENANCE
Cleaning the Dryer
- Clean the filter and empty the water container after every drying cycle.
Regularly clean the condenser.
After each period of use, wipe the inside of the drum and leave the door open for a while to allow circulation of air to dry it. - Wipe the outside of the machine and the door with a soft cloth.
DO NOT use abrasive pads or cleaning agents. - To prevent the door sticking or the build up of fluff clean the inner door and gasket with a damp cloth after every drying cycle.
WARNING! The Drum, door and load may be very hot.
IMPORTANT Always switch off and remove the plug from the electricity supply before cleaning this appliance.
For electrical data refer to the rating label on the front of the dryer cabinet (with the door open).
WARNING! The Drum, door and load may be very hot.
Drying Guide
The standard cycle HANG DRY ( ) is the most energy efficient and best suited for drying normal wet cotton laundry.
The table in last page shows the approximate times and energy consumption of the main drying programmes.
Power consumption of off-mode 0,20 W
Power consumption of on-mode 0,75 W
Information for Test Laboratory
EN 61121 Programme Programme To Use
-DRY COTTON -HANG DRY
-IRON DRY COTTON -IRON DRY
-EASY-CARE TEXTILE -HANG DRY ^+ SYNTHETIC
Technical Specifications
Drum capacity 115
Maximum load See energy label
Height 85 cm
Width 60 cm
Depth 60 cm
Energy class See energy label
TROUBLESHOOTING
What Might be the Cause of...
Defects you can remedy yourself
Before calling GIAS Service for technical advice please run through the following checklist. A charge will be made if the machine is found to be working or has been installed incorrectly or used incorrectly.
If the problem persists after completing the recommended checks, please call GIAS Service, they may be able to assist you over the telephone.
Time display to end could change during drying cycle. The time to end is continuously checked during the drying cycle and the time is adjusted to give the best estimation time. The displayed time may increase or decrease during the cycle and this is normal.
Drying time is too long/clothes are not dry enough...
- Have you selected the correct drying time/programme?
- Were the clothes too wet? Were the clothes thoroughly wrung or spindried?
- Does the filter need cleaning?
Is the dryer overloaded? - Has the option been selected from a previous cycle?
The dryer does not operate...
- Is there a working electricity supply to the dryer? Check using another appliance such as a table lamp.
- Is the plug properly connected to the mains supply?
- Is there a power failure?
- Has the fuse blown?
Is the door fully closed? - Is the dryer switched on, both at the mains supply and at the machine?
- Has the drying time or the programme been selected?
- Has the machine been switched on again after opening the door?
The dryer is noisy...
- Switch off the dryer and contact GIAS Service for advice.
The Indicator is on... - Does the filter need cleaning?
The Indicator is on... - Does the water container need emptying?
CUSTOMER SERVICE
Should there still be a problem with your dryer after completing all the recommended checks, please call GIAS Service for advice. They may be able to assist you over the telephone or arrange for a suitable appointment for an engineer to call under the terms of your guarantee. However, a charge may be made if any of the following applies to your machine:
Is found to be in working order.
- Has not been installed in accordance with the installation instructions.
- Has been used incorrectly.
Spares
Always use genuine spares, available direct from GIAS Service.
GIAS Service
For service and repairs call your local GIAS Service engineer.
The manufacturer declines all responsibility in the event of any printing mistakes in this booklet. The manufacturer also reserves the right to make appropriate modifications to its products without changing the essential characteristics.
INDICE
Caa aalalalalalalalalalalalalalalalalalalalalalal
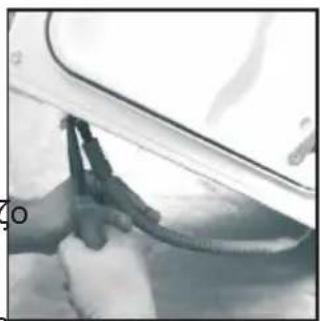
1.Flip the machine slowly to the right side.
-
The waste water pipe is situated at the right-hand side of the machine (see the picture). A grey hose connects to the bridge at the left hand side of the machine. Using pliers, remove the pipe retaining clip from the bridge.
-
Pull the hose off the bridge connection.
[Durante gli ultimi 15 minuti (approximativamente)] I can also sometimes refer to this book.
| Passo Massimo di Azugatori | ||||||
| Capi in ottofo | Max. | 10 Kg | 9 Kg | 8 Kg | 7 Kg | 6 Kg |
| Capi astraticl | Max. | 4 Kg | 4 Kg | 4 Kg | 3.5 Kg | 3 Kg |
Technical Specifications
This appliance is marked according to the European directive 2012/19/EU on Waste Electrical and Electronic Equipment (WEEE).
WEEE contains both polluting substances (which can cause negative consequences for the environment) and basic components (which can be re-used). It is important to have WEEE subjected to specific treatments, in order to remove and dispose properly all pollutants, and recover and recycle all materials.
Individuals can play an important role in ensuring that WEEE does not become an environmental issue; it is essential to follow some basic rules:
- WEEE should not be treated as household waste.
Elektriske Krav
Torretumbiere kan kare pa 220-240V, 50 Hz enfaset. Kontrolier at stromkredsen er klassificerettilmindst 6A.
Elektricitkani vare megetfarligt.
WARNING! When the tumble dryer is in use, a drum and door may be VERY HOT. Never go to a tumble dryer before the end of the drying time unless all items are quickly removed and read out so that the heat is dissipated.
Filter
VIGTIGT: For at bevare torretumblerens effektivitet skal det kontrolleres, at fnugfiltret er rent for hver torrecyklus.
EN 11121 Program Dprogram ill at houa
FEJLFINDING
Sikkerhetspaminnelser 115
Avlopsslange:Monteringsveiledning 120
Gjoreklarttoyet 121
Kontrollpanel og indicatorlamper 122
Velge program 123
Dor og filter 124
Vannbeholder 125
Drift 126
SIKKERHETSPAMINNELSER
Bruk
EN 61121 Program Program at anvanda
FELSÖKNING
Electrical Requirements
Ta Tepaipopka ateywni pia npabiovra daoppuivya ia tauovpyia je yovpaoik raan 220-240V,50Hz EMyE on to kua naopocp epuatoc xoyovaatai taepuatoctouayot6A.
To nAekpko pua mapei va yive eapenk d
Houkeunautnpptnwyaewoe6.
Hnpia kai to qic mcs oukeunnc npertin va avai biou tumou.
Mxpanpmaeimokmpka kai kai aemktaang.
MetivyekataaTao,ToqicnsoukeuNtpeinvaivinaopoattelaiao yaaatovaean.
O ayuoi o kaiuio npaooia c eva CE-H uukuiu uupapvivat u Tc Eupuainlc Odyic 2004/108/EC
2006/95/EC KAI UAYEVLOTEPS PONTANOUK
Avn ouakeun fev leoupyi ouata n unoate
Bai, aenepeyantane my kai ataoovaleto 10
qcs arno my npka. Tia evxoyues emkueus
aeneuveire annupeia EepismsGIsA.
SET EYKAMITOY ΣΩAHNA ANOETPAIIEH Σ NEPOY OΔHRIE Σ SYNAPMOΛΟΓH Σ
Tia va aTaaayeite aTnTv Epyaia abiaaatoC Tou doxieou vepou uet aTto kKe Kuklo,TOVEPO TOU MAZEUEaIuTopei VA bIOXETeutei oTo biktuo aTOXETeUOnc Tou vepou (TO biktuo TOU PAEITo VEPo aTTOVITnpa) H IOXUOEC VMOEAEc aTAYOPeuov TN bIOXETeUOn Tou vepou eTTiPaveiaKO biktuo aTTOATpayyionc vepwv. To ouatma e To OWAhva aTOXETeUOnc Tou vepou OTeyWmuToC PPETeVA TOIOETNkovTa OTo OTeyVWTnpio OUMUKWONC.
To KIT TEPiAaBavE1: 1 EukamTTO OwAnva,Eva pakop yia oWAnvEc.
ENIISHMANsH: PIV EKIVnoTe TIG epyaiec ouvapouoynoc aToouvdeote tn oukeun aTo to biKTuo nEeKpiKns npoxns.
Odbnyiecs yia Tnv ouvapmoIoynon Tou KIT:
1.εipεTE πpOεKTiKa tN OUOKεUn TpOc TnV δεξia πλεuρa.
2.H O W A n v a
aTIOXETEuaOg Tou Vepou
Bpioketai OTn DExia
T A U P a T O U
OTeyVWtnpiou (BLeTT
EIKova)Evag ykpi
Ouvoosmuoc AeiTOUPyEi
WC OUVoETIKn YeQupa
OTNV apiotepn PEAUPa
TNG OoKEUnc. Me Tnv
Bontheia mias TRevoac
ByaLT To yavT
OTnpiGns Tng OwAnvac
ATTOV DOKO OTnPiGns.
3.Aaipεστocuovδεμo aπo TnVouvδεση.
- TEPWTo aUPO pAKOp TO UoT (uTv BOnTeia Tou OuvEoKai TwV YAVTcWv Tou OuvOe UoUv To oTforniti) oTO pAKOp Tou aTELeuThepwoate aTTo Tn ouVDoN .
- TOnTo 0 ETeioTe To
DiaKoTTn Vla Va KLeioTe
TO paKOp Tnou
aTHeuEVE.
Now try to obtain the answer by using the following method.
- △aβαατινροακτίασιντο τοραν γεγαρβαδοδηγαλν.
Apapant oka ta ebn mou dov avonuaa t jao aorumava.
KoMTTOE TO EWTPOI TO TUMAVU KAI TYMOTPA
uippoTAYU aotmukovtue TUGVAKOVNI TU
muopai va kafot OTN TAPOPA.
Ppoetoipaia tuw pouxw
BepaWBeTe on ta pouxa Tou npoknai va atywaeTt cvi katoA yia atryuwa a erpiatpapko ateywnipio. atwo auto umoekvxtar ora ta oujba apovriagac Kbe6 50e. EExTe on dka ra kauimia vai kauumwueva ka oirtec eivai abies. Tupiar ta pouya to jda eew. Tomoeiare ta pouya atro tufnaovxupicva ra mtdic, ya va unmupeurou.
Mn OTEYWUVETE OTO OTEYWHTIPO:
palaiva, peraefura, euaiaotra upaayata, valav kaiarz, euaiaotra gavirek, upaayata ueta aekic biakaoyntc, evuayata uie biakaoyminka ato PVC nepua, nanoura yuvvattn, oynan agnamusunovakouk.
Egoikovopon evpycias
TanoBencir a t mpiatpapko atyuvmppo maovaua mou yauv atuupre kala ie to xepi n atn auynnpo. Oao mio atnyd evai ra pouya, rado upepatpc ovai a xpvos atyvuaiparoc kai ttr ecaikovujitarnkxprh evpyia.
NANTA
| Baujouane | Méy | 10 Kg | 9 Kg | 8 Kg | 7 Kg | 6 Kg |
| Zuoritino | Méy | 4 Kg | 4 Kg | 4 Kg | 3.5 Kg | 3 Kg |
TaivopnoTe to poptio wS ehs
Kardaojulalapovr8a
Auro ytopeire va to Bpite oto kaloapoi e cawtepkip pap:

KarAnko yia otynu aotn ppoqk otnyvam po.

Etynwua at reepopokk atynwnpio at npnkepckpaia.

Tnyuoyo or ppoqko atynwto yor o yunhepxopda.

Mny to orcyvovete o nepioppok oryuvnpo.
Ev eva 6oCevexe xeta apovlac,mpte va thawpnd on dcv cai katalno yia mcpotpokdo attnyua.
Kardmoaormaaiaayos
OTo a qopio dai yucuIepo amT dyuvakimra tou ateywntpo. uipic ta poqa anya je to mao (mX, mTeic cmo Actnacawpaa).
Kata turoupoog
BaoBaxpo/ Aucu: nntotoc, ba@kaepa cipoi.
Zuvetika: Mmokc, mokauo, apuuc knt. at o mukatopn n mukupio, kooa ka pktcs hlaqba/avtnetk.
·