
VC11 - Vacuum packaging machines CASO - Free user manual and instructions
Find the device manual for free VC11 CASO in PDF.
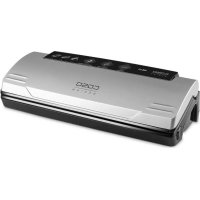



| Product type | Vacuum packaging machine |
| Brand | Caso |
| Model | VC11 |
| Dimensions (L x H x D) | 355 x 85 x 145 mm |
| Net weight | 1.16 kg |
| Power supply | 220-240 V, 50 Hz |
| Power consumption | 120 W |
| Main functions | Automatic vacuum sealing, sealing without vacuum, sealing time adjustment (dry/moist), emergency stop, external suction via hose |
| Bag type | Special vacuum bags and rolls, compatible with sous vide cooking |
| Included accessories | 10 high-quality bags, vacuum hose, instruction manual |
| Maintenance and cleaning | Clean the exterior with a damp cloth and mild dish soap; wipe the interior with paper towel; removable rubber gasket, washable with soapy water; do not immerse or put in dishwasher |
| Safety | Hot sealing strip – do not touch after use; unplug before cleaning; do not use with damaged cord; keep out of reach of children under 8 |
| Spare parts and repairability | Rubber gasket, Teflon sealing strip, hose; repairs only by authorized service center; use of original parts recommended |
| Warranty | 24 months from purchase date for manufacturing or material defects |
| Intended use | Indoor domestic use, for preserving food under vacuum |
Frequently Asked Questions - VC11 CASO
User questions about VC11 CASO
0 question about this device. Answer the ones you know or ask your own.
Ask a new question about this device
Download the instructions for your Vacuum packaging machines in PDF format for free! Find your manual VC11 - CASO and take your electronic device back in hand. On this page are published all the documents necessary for the use of your device. VC11 by CASO.
USER MANUAL VC11 CASO
13.3.1 Danger of burns 32 13.3.2 Danger of fire 33 13.3.3 Dangers due to electrical power 33 13.4 Food storage safety information 34 14 Commissioning 34 14.1 Safety information 34 14.2 Delivery scope and transport inspection 34 14.3 Functions 35 14.4 Unpacking 35 14.5 Disposal of the packaging 35 14.6 Setup 35 14.6.1 Setup location requirements: 35 14.7 Electrical connection 36 15 Design and Function 36 15.1 Complete overview 37 15.2 Rating plate 38 16 Operation and Handling 38 16.1 Operating Instructions 38 16.2 Bags and rolls 38 16.3 Making a bag using the bag roll 39 16.4 Preserve food with vacuum: 39 16.5 Open a sealed bag 40 16.6 Vacuum sealing in the vacuum container 41 16.7 Storing your vacuum sealing system 41 17 Cleaning and Maintenance 41 17.1 Safety information 41 17.2 Cleaning 42 18 Troubleshooting 42 18.1 Safety notices 43 18.2 Cause and Action 43 19 Disposal of the Old Device 44 20 Guarantee 44 21 Technical Data 44 22 Mode d'emploi 46 22.1 Généralités 46 22.2 Informations relatives à ce manuel 46
Original Operating Manual
Vacuum Sealer System VC11
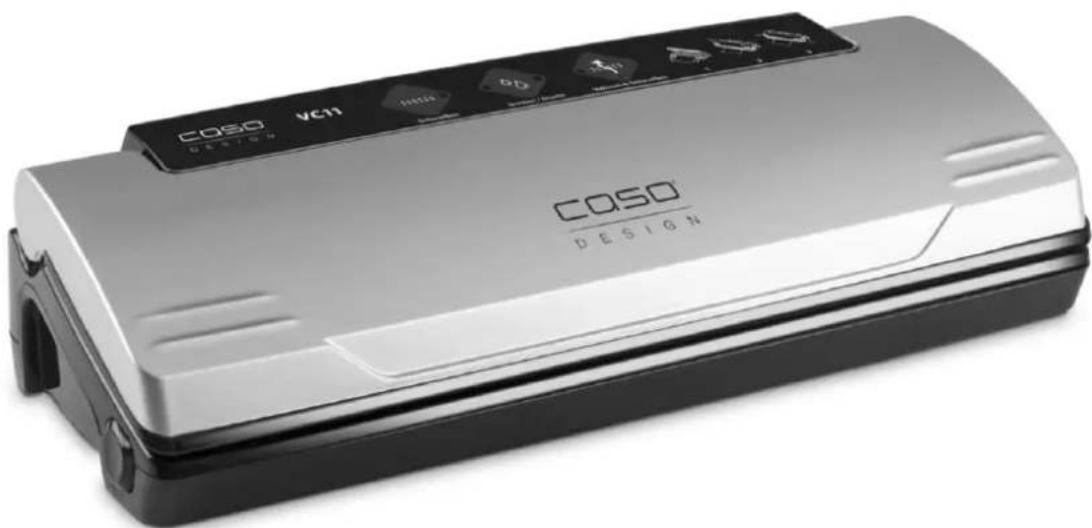

Item No. 1369
12 Operating Manual
12.1 General
Please read the information contained herein so that you can become familiar with your device quickly and take advantage of the full scope of its functions.
Your vacuum sealer system will serve you for many years if you handle it and care for it properly.
We wish you a lot of pleasure in using it!
12.2 Information on this manual
These Operating Instructions are a component of the vacuum sealer system (referred to hereafter as the Device) and provide you with important information for the initial commissioning, safety, intended use and care of the device.
The Operating Instructions must be available at all times at the device. This Operating Manual must be read and applied by every person who is instructed to work with the device:
Commissioning Operation - Troubleshooting and/or - Cleaning
Keep the Operating Manual in a safe place and pass it on to the subsequent owner along with the device.
12.3 Warning notices
The following warning notices are used in the Operating Manual concerned here.
▲DANGER
DANGER
A warning notice of this level of danger indicates a potentially dangerous situation.
If the dangerous situation is not avoided, this can lead to death or serious injuries.
Observe the instructions in this warning notice in order to avoid the danger of death or serious personal injuries.
WARNING
WARNING
A warning notice of this level of danger indicates a possible dangerous situation.
If the dangerous situation is not avoided, this can lead to serious injuries.
Observe the instructions in this warning notice in order to avoid the personal injuries.
CAUTION
A warning notice of this level of danger indicates a possible dangerous situation.
If the dangerous situation is not avoided, this can lead to slight or moderate injuries.
Observe the instructions in this warning notice in order to avoid the personal injuries.
NOTE
A notice of this kind indicates additional information, which will simplify the handling of the machine.
12.4 Limitation of liability
All the technical information, data and notices with regard to the installation, operation and care are completely up-to-date at the time of printing and are compiled to the best of our knowledge and belief, taking our past experience and findings into consideration.
No claims can be derived from the information provided, the illustrations or descriptions in this manual. The manufacturer does not assume any liability for damages arising as a result of the following:
Non-observation of the manual; Uses for non-intended purposes; Improper repairs; Technical alterations, modifications of the device; Use of unauthorized spare parts
Modifications of the device are not recommended and are not covered by the guarantee.
All translations are carried out to the best of our knowledge. We do not assume any liability for translation errors, not even if the translation was carried out by us or on our instructions. The original German text remains solely binding.
12.5 Copyright protection
This document is copyright protected.
Braukmann GmbH reserves all the rights, including those for photomechanical reproduction, duplication and distribution using special processes (e.g. data processing, data carriers, data networks), even partially.
Subject to content and technical changes.
13 Safety
This chapter provides you with important safety notices when handling the device.
The device corresponds with the required safety regulations. Improper use can result in personal or property damages.
13.1 Intended use
This device is only intended for use in households in enclosed spaces for vacuuming and sealing bags. Uses for a different purpose or for a purpose which exceeds this description are considered incompatible with the intended or designated use.
WARNING Warning
Danger due to unintended use! Dangers can emanate from the device if it is used for an unintended use and/or a different kind of use.
Use the device exclusively for its intended use. Observe the procedural methods described in this Operating Manual.
Claims of all kinds due to damages resulting from unintended uses are excluded.
The User bears the sole risk.
13.2 General Safety information
NOTE Please note
Please observe the following general safety notices with regard to the safe handling of the device.
- Examine the device for any visible external damages prior to using it. Never put a damaged device into operation. If the power cable or plug are damaged, then they must be replaced by the manufacturer or its service agent in order to avoid a hazard. This device may be used by children aged 8 and above, if they are supervised or have been instructed at to the safe use of the device and have understood the resulting hazards.
- Cleaning and maintenance by the user must not be performed by children unless they are at least 8 years old and are supervised. Children are not allowed to play with the device. The device and its connecting cable must be kept away from children who are less than 8 years old. The device may be used by individuals with reduced physical, sensory or mental capabilities or a lack of experience and / or knowledge of their use if they are supervised or have been instructed at to the safe use of the device and have understood the resulting hazards.
NOTE Please note
- Only customer service departments authorized by the manufacturer may carry out repairs on the device, as otherwise the guarantee entitlements will be null and void in the event of any subsequent damages. Improperly performed repairs can cause considerable dangers for the user. Defective components must always be replaced with original replacement parts. Only such parts will guarantee that the safety requirements are fulfilled. Do not leave the device unsupervised when it is in operation.
- When disconnecting, please unplug by grasping the plug and not the cord, to avoid any injury. Never immerse the device in water or other liquids and do not place it in the dishwasher. For correct storage, please slightly close the cover, do not lock, as it will deform the gaskets and affect the machine function.
13.3 Sources of danger
13.3.1 Danger of burns
WARNING
The sealing bar gets very hot. Please observe the following safety notice in order not to burn yourself or others.
To avoid getting burned, never touch the sealing bar directly after the sealing process.
13.3.2 Danger of fire
WARNING
There is a danger of fire if the device is not used properly.
Observe the following safety notices to avoid dangers of fire:
Do not set up the device near flammable material. Keep this appliance away from sources of heat (gas, electric, burner, heated oven).
13.3.3 Dangers due to electrical power
DANGER
Mortal danger due to electrical power!
Mortal danger exists when coming into contact with live wires or subassemblies!
Observe the following safety notices to avoid dangers due to electrical power:
- Do not operate this device if it has a damaged cable or plug, if it is not working properly, or if it has been damaged or dropped. If the power cable or plug are damaged, they must be replaced by the manufacturer or its service agent in order to avoid a hazard.
- Do not open the housing on the device under any circumstances. There is a danger of an electrical shock if live connections are touched and the electrical or mechanical structure is altered. In addition, functional faults on the device can also occur. Before plugging the appliance in or when you operate it, make sure your hands are dry. Do not insert objects into the openings of the device.
13.4 Food storage safety information
This vacuum preservation system will change the way you purchase and store foods. Once you are accustomed to vacuum packing, it will become an indispensable part of your food preparation. Please follow certain procedures when using this appliance to ensure food quality and safety.
Please note
If perishable foods have been heated, defrosted, or un-refrigerated, consume them immediately. Before vacuum sealing, it's necessary to clean your hands, and all utensils and surfaces to be used for cutting and vacuum sealing foods. - Refrigerate or freeze the perishable foods immediately, if you have vacuum-sealed them, and do not leave them sitting at room temperature. The shelf life of dry foods such as nuts, coconut, or cereals will be extended in vacuum-sealed packages, while storing them in a dark place. Oxygen and warm temperature will cause high-fat content foods to become rancid. Before vacuum sealing some fruit and vegetables, such as apples, bananas, potatoes, and root vegetables, peel them; this will extend their shelf lives. - When vacuum sealing some vegetables such as broccoli, cauliflower, and cabbage fresh for refrigeration, they will emit gases, so it's necessary to blanch and freeze these foods before vacuum sealing.
14 Commissioning
This chapter provides you with important safety notices during the initial commissioning of the device. Observe the following notices to avoid dangers and damages:
14.1 Safety information
WARNING Warning
- Packaging materials may not be used for playing. There is a danger of suffocation.
14.2 Delivery scope and transport inspection
As a rule, the vacuum sealer system is delivered with the following components:
Vacuum sealer system VC11 silver, 10 top-quality bags, vacuum hose (A), operating instructions
Please note
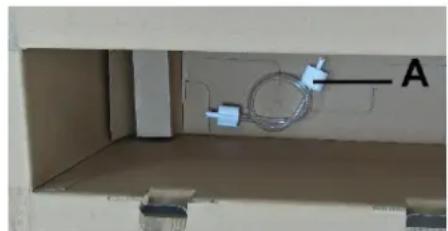
Examine the shipment for completeness and any visible damages. Immediately notify the carrier, the insurance, and the supplier about any incomplete shipment or damages resulting from inadequate packaging or transportation.
14.3 Functions
The main function of this appliance is to store a wide variety of foods to maintain freshness, extend shelf life, preserve flavor, and provide convenience. In general, vacuum packaging keeps food fresh up to eight times longer than traditional food storage methods. Once this appliance becomes an indispensable part of your life, you will experience less food spoilage and save money.
Cook in advance to vacuum seal and store individual portions or entire meals. Prepare foods in advance for picnics, camping trips, or barbecues. Eliminate freezer burn. Package foods such as meat, fish, poultry, seafood, and vegetables to freeze or refrigerate. Package dry foods such as beans, nuts, and cereals to store longer. There are many non-food uses for vacuum packing. Keep camping supplies such as matches, first aid kits, and clothing clean and dry. Keep flares for auto emergencies ready. Keep silver and collectibles untarnished.
14.4 Unpacking
To unpack the device, proceed as follows:
- Remove the device from the carton and remove the packaging material.
14.5 Disposal of the packaging

The packaging protects the device against damage during transit. The packaging materials are selected in accordance with environmentally compatible and recycling-related points of view and can therefore be recycled.
Returning the packaging to the material loop saves raw materials and reduces the quantity of accumulated waste. Take any packaging materials that are no longer required to "Green Dot" recycling collection points for disposal.
NOTE Please note
If possible, keep the original packaging for the device for the duration of the guarantee period, so that the device can be re-packaged properly in the event of a guarantee claim.
14.6 Setup
14.6.1 Setup location requirements:
In order to ensure the safe and trouble-free operation of the device, the setup location must fulfill the following prerequisites:
- The device must be set up on a firm, flat and horizontal surface with sufficient load-bearing capacity for the vacuum sealer system and the maximum weight of the food that should be vacuum-sealed.
- Choose the setup location in such a way that children cannot reach the hot sealing strip of the device.
- Do not set up the device in a hot, wet or extremely damp environment or near flammable material.
- The device requires an adequate flow of air in order to operate correctly. Leave a clearance of 10 cm around the device.
- Do not move the vacuum sealer system when it is in operation.
- The electrical socket must be easily accessible so that the power lead can be disconnected easily, in the case of an emergency.
- The installation and assembly of this device in non-stationary setup locations (e.g. on ships) must be carried out by specialist companies / electricians, provided they guarantee the prerequisites for the safe use of this device.
14.7 Electrical connection
In order to ensure the safe and trouble-free operation of the device, the following instructions must be observed for the electrical connection:
- Before plugging in the unit, compare the voltage and frequency data on the vacuum sealer's rating plate (found on the bottom of the unit) with that of your electrical network. This data must be compatible. If in doubt consult a qualified electrician.
- Inspect the power cord for damage and ensure it doesn't run under the unit or over hot or sharp surfaces.
- The electrical safety of the unit is only guaranteed if it is connected to a properly installed protective conductor system. If in doubt, consult a qualified electrician. The manufacturer cannot be made responsible for damages due to a missing or damaged protective conductor.
15 Design and Function
This chapter provides you with important safety notices on the design and function of the device.
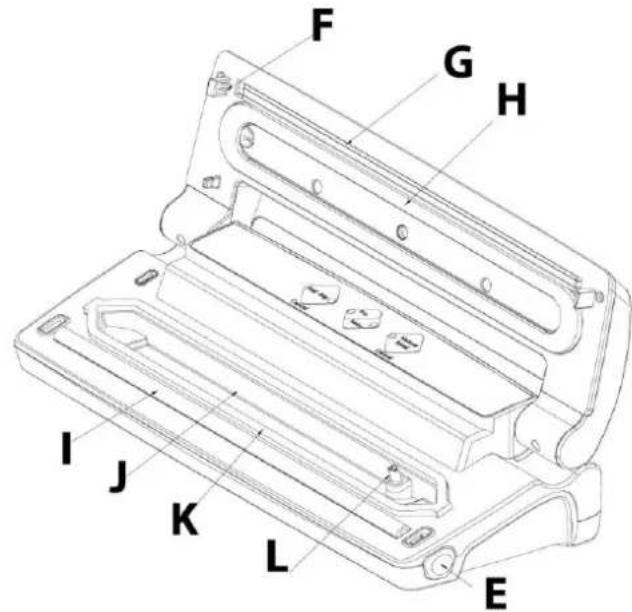
15.1 Complete overview
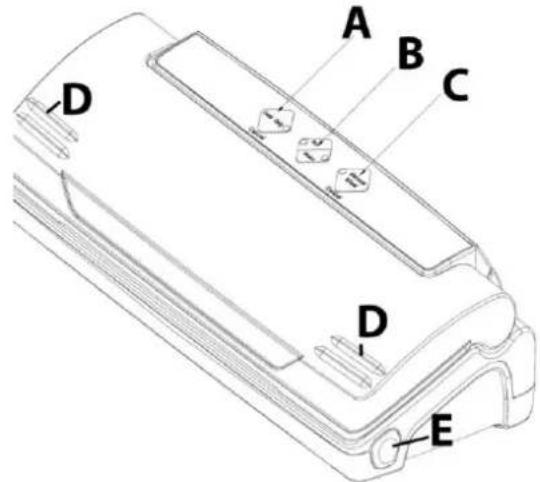
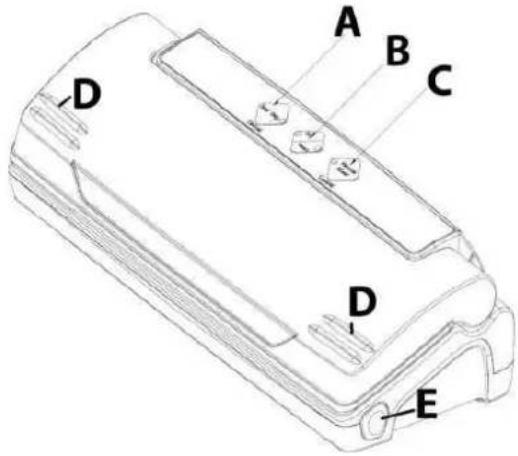
A Seal (Schweißen)
3 functions:
To seal the open end of a bag without vacuuming air function
When the "Vac & Seal" (Vakuum & Schweißen) function is in operation, this button stops the motor pump and immediately starts to seal the bag so that less vacuum pressure inside the bag can be controlled by the operator to avoid crushing for delicate items.

When the welding function is in operation, this button stops the motor pump and immediately starts to seal the bag, so that the operator can control the lower vacuum pressure inside the bag to avoid crushing delicate items.
When the "Seal" (Schweißen) function is in operation, this button stops the heating immediately.
B Sealing time (Schweißzeit): 2 buttons for choosing the best bag seal time
"moist" button (feucht): for wet bags or foods with moisture, with normal heat sealing time.
"moist" button (feucht): for wet bags or foods with moisture, with normal heat sealing time.
Default setting is for dry bags and shorter sealing time.
C Vacuum & Seal/Cancel (Vacuum & Seal / Cancel):
This button has two functions depending on the machine status: In stand-by condition, it starts the automatic operation of vacuuming the bag and then automatically seals the bag when vacuum is complete;
At working
(vacuuming or sealing
operations) condition, it stops the machine.
D Cover-lock: To lock the cover. On the left side and right side of the cover there is a keypress.
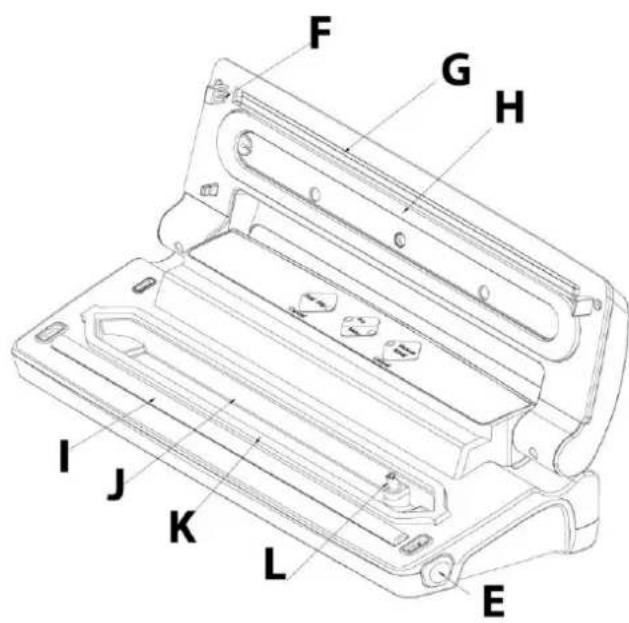
E Cover-unlock: Press to unlock the cover.
F Hook: Locks the cover.
G Sealing profile: Presses the bag against the sealing strip.
H + K Upper gasket / Lower gasket.
If you open the cover, you see the
I Sealing strip: Contains a heating wire covered with Teflon which allows the bag to seal but not to stick to the strip.
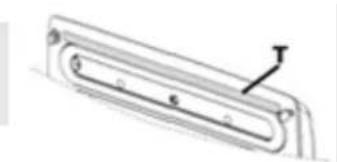
WARNING: Please observe the following safety notices in order not to burn or scald yourself or others. To avoid getting burned, never touch the sealing bar while the unit is operating. J Vacuum chamber: Position the open end of the bag inside the chamber. L Air intake: Air intake connects with vacuum chamber and pump. Do not cover this air intake when placing bag for Vacuum & Seal operations. NOTE: Please note: Do not remove the Teflon tape (T).
15.2 Rating plate
The rating plate with the connection and performance data can be found on the back of the device.
16 Operation and Handling
This chapter provides you with important notices with regard to operating the device. Observe the following notices to avoid dangers and damages:
16.1 Operating Instructions
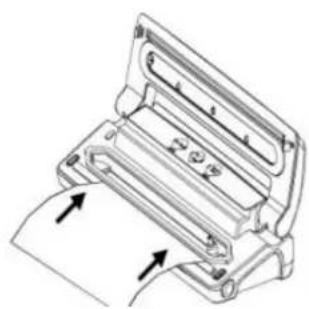
After each sealing session and before starting up, check to make sure the unit and all accessories that come in contact with the foodstuff are thoroughly clean. Follow the cleaning instructions on the description page.
Step 1: Open the lid and place an open side of the bag in the chamber.
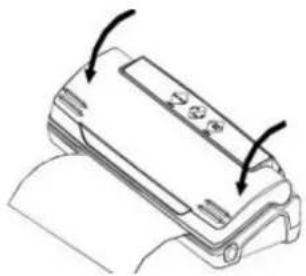
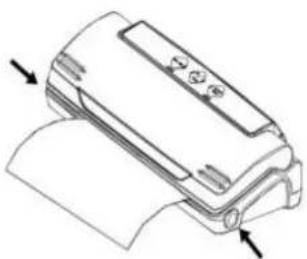
Step 2: Press the cover down.
Step 3: Press for release (E) (after sealing process)
16.2 Bags and rolls
Please only use specified bags and rolls designed for vacuum sealing. Do not use other materials such as plastic wrap. All vacuum rolls and bags delivered by CASO are appropriate for cooking under vacuum (sous vide).
Please make sure when vacuum rolls and bags of other producers are used, whether they are also microwaveable and suitable for cooking under vacuum. Please note that a bar vacuum sealer as this device can only be used with structured bags. You can buy a wide range of different bags and rolls from CASO.
16.3 Making a bag using the bag roll
Place the unit on a dry place. Make sure the working area in front of the unit is free of obstacles and wide enough to accommodate the food bags.
- Unroll the bag to the desired length and cut the bag to the appropriate length with precise and clear cut.
- Open the lid and put one end of the bag on top of
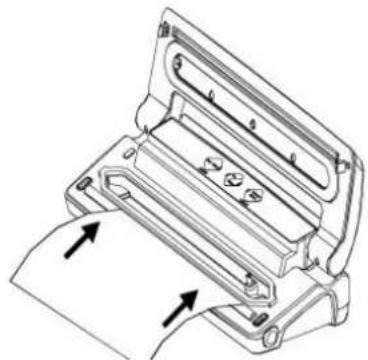
the black rubber strip, then close the cover (see Step 1).
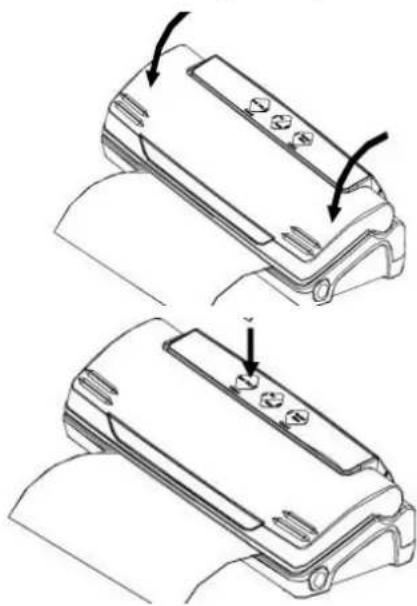
- Press the cover down heavily on both sides by the areas (D) using two hands until two click sounds heard (see Step 2).
- Press the "SchweiBen"-Button and the red LED control light starts flashing.
- When the LED light turns off, the bag is sealed.
- Now you have a custom-sized bag.
NOTE Please note
Make sure that the bag you want to use is at least 8cm/3.1in. longer than the food. Add another 2 cm/0.8in. each time the bag is re-used.
16.4 Preserve food with vacuum:
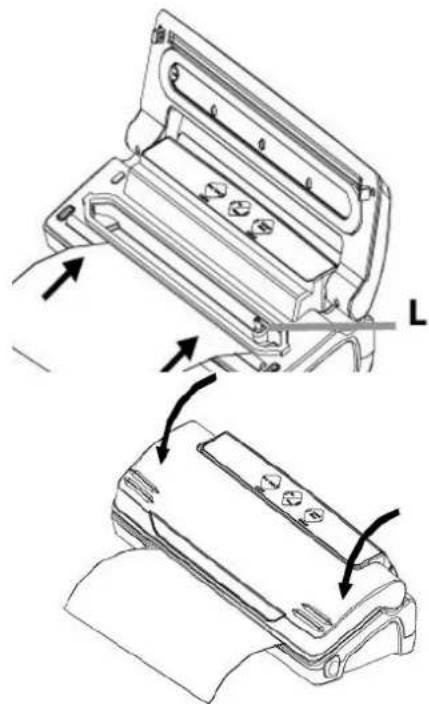
- Put the food that you want to preserve inside the bag.
- Clean and straighten the open end of the bag, make sure that there are no wrinkles or ripples on the panels of the open ends.
- Place the bag as shown on the picture in the device. Do not place the bag over the intake (L), otherwise the vacuum can not be generated correctly.
- Close the cover and then press heavily on both sides (D) of the cover until two click sounds heard.
- Choose desired sealing time.
- Press the "Vacuum & Seal" button then the bag will be automatically vacuumed and sealed.
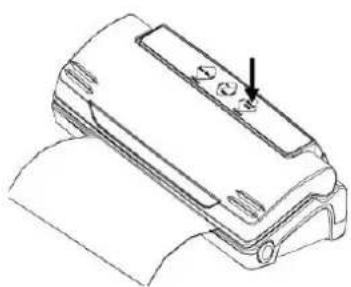
- After that press the two "Cover Lock" buttons and the process is completed (see Step 3).
- Check the appearance of the sealed bag; it should have a stripe across the seal and no wrinkles otherwise the seal may not be complete.
- If you need to interrupt the vacuum operation (e.g. the bag is incorrectly positioned) first press the "Vacuum & Seal" button again and then the "Cover-Unlock" buttons (E).
Note
Do not put too much food inside the bag; leave enough empty length in the open end of the bag so that the bag can be placed in the vacuuming plate more positively. Do not wet the open end of the bag. Wet bags may be difficult to seal tightly. Clean and straighten the open end of the bag before sealing the bag. Make sure nothing is leaving on the open area of the bag. Foreign objects or creased bags may cause difficulty to seal tightly. Do not leave too much air inside the bag. Press the bag to allow extra air to escape from the bag before vacuuming it. Too much air inside the bag increases the vacuum pump loading and may cause that the motor works insufficient to draw away all the air out of the bag. If the foods you're sealing have sharp edges, such as bones, spaghetti or shellfish, pack the edges with kitchen paper to avoid tearing the bag - Suggest to vacuum seal one bag within 1 minute to let the appliance cool down enough. In order to vacuum seal liquid-based foods, such as soups, casseroles or stew, freeze them first in a baking pan or tempered dish, vacuum seal them, label and stack them in your freezer as soon as they are in frozen solid. - Blanch the vegetables by cooking briefly in boiling water or microwave oven, cool them down, then vacuum seal them in convenient portions. To vacuum seal the foods not frozen, two extra inches are required for bag length to allow for expansion while freezing. Place the meat or fish on a paper towel and vacuum seal with the paper towel in the bag, this way will help to absorb moisture from the foods. Before storing the foods such as tortillas, crepes or hamburger, use wax or parchment paper between them to stack the pieces, this will be easier to remove some of the food, reseal the rest and immediately replace in the freezer. The vacuum preservation system can't be directly used for the vacuum sealing of canisters or canning jars.
16.5 Open a sealed bag
Cut the bag straight across with scissors, just inside the seal.
16.6 Vacuum sealing in the vacuum container
- Open the device and connect the vacuum hose to the connection on the device.
- Attach the other end to the container lid. Depending on the container, use an adapter if necessary (see operating instructions for your vacuum container).
Note
Please note
Make sure that both ends of the hose connection (with use of an adapter if necessary) are correctly connected to the device and to the container lid.
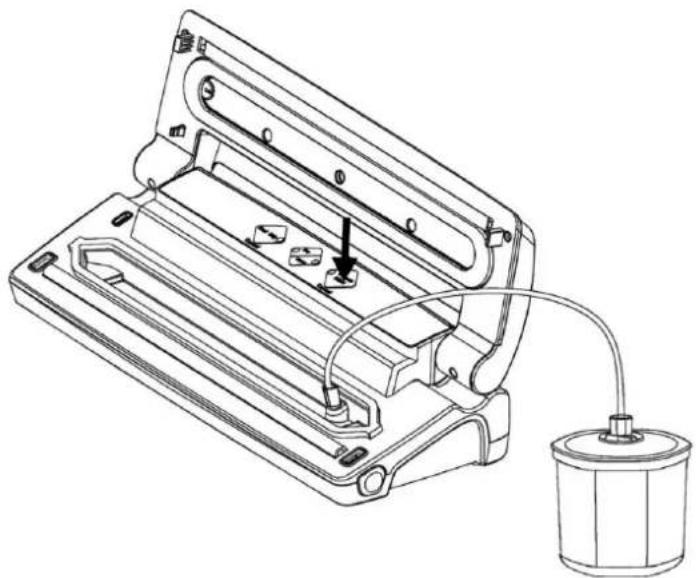
- Press the "Vacuum & Seal" button. Briefly press the lid of the container at the beginning. The device stops automatically when the vacuum is reached. The vacuum hose and, if necessary, the adapter can then be removed.
16.7 Storing your vacuum sealing system
Keep the unit in a flat and safe place, out of the reach of children.
Note
Please note
For correct storage, slightly close the cover but do not lock it, as locking will deform the gaskets and affect the machine's function. To disconnect, remove the plug from the outlet. Always unplug this device from the electrical outlet immediately after use and before cleaning.
17 Cleaning and Maintenance
This chapter provides you with important notices regarding cleaning and maintaining the device. Please observe the notices to prevent damage due to incorrect cleaning and to ensure trouble-free operation.
17.1 Safety information
CAUTION
Attention
Please observe the following safety notices before you commence cleaning the device:
The device must be cleaned and food residues must be removed at regular intervals. If the device is not maintained in a clean condition, this will have a detrimental effect on the service life of the device and can also result in a dangerous condition in the device as well as the growth of fungus and bacteria. Unplug the device prior to cleaning it.
CAUTION Attention
The sealing bar is hot after use. There is a danger of burns! Wait until the device has cooled down. Clean the device after use as soon as it has cooled down. Extended waiting unnecessarily complicates cleaning and can make it impossible in extreme cases. Excessive accumulations of dirt can even damage the device under certain circumstances. Never immerse the device in water or other liquids and do not place it in the dishwasher. If dampness penetrates into the device, this can damage the electronic components. Please ensure that no liquid can enter the interior of the device. Do not use any aggressive or abrasive cleaning agents or solvents. Do not scrape off stubborn dirt with hard items. Dry thoroughly before using again.
17.2 Cleaning
Outside of the unit
Wipe the outside of the unit with a damp cloth or sponge and mild dish soap.
Inside of the device
To clean the inside of the unit, wipe away any food or liquids with a paper towel.
Preservation bags
Wash the bagging material in warm water with a mild dishwashing soap, then rinse the bags well and allow them to dry thoroughly before reusing.
CAUTION Attention
Bags used to store raw meats, fish, or greasy foods cannot be reused.
Sealing profile (which presses the bag against the sealing bar)
Remove the sealing profile and clean it in warm soapy water.
NOTE Please note
The sealing profile should be cleaned thoroughly before installing it again. Be careful during re-installation, so that nothing will be damaged and the sealing profile is placed well so that the device can work properly.
18 Troubleshooting
This chapter provides you with important notices with regard to operating the device.
Observe the following notices to avoid dangers and damages:
18.1 Safety notices
CAUTION Attention
- Only qualified electricians, who have been trained by the manufacturer, may carry out any repairs on electrical equipment.
- Improperly performed repairs can cause considerable dangers for the user and damages to the device.
18.2 Cause and Action
In the event of a fault, an error code will appear in the display; it describes the cause of the fault.
| Error | Possible cause | Rectification |
| Device is not functioning | Power plug is not plugged in | Plug in mains plug! |
| Defective power cable or plug | Send device to Customer Service | |
| Defective electrical socket | Select another electrical socket | |
| The first weld on the cut off piece of the roll is not being carried out. | Roll is not positioned correctly | Follow the steps in the chapter “Vacuum packaging in a bag originating on the roll” |
| A complete vacuum is not being created in the bag. | The open end of the bag is not completely inside the vacuum chamber | Position the bag correctly |
| The bag is defective | Select another bag | |
| There is dirt on the welding and the normal seals | Clean the seals and retry correctly once they are dry | |
| The bag is not being welded correctly | The welding bar is overheating so that the bag melts | Open the cover on the unit and let it cool down for a few minutes |
| The bag does not hold the vacuum after it has been welded shut | The bag is defective | Select another bag; wrap paper serviettes around any sharp edges on the content |
| There are leaks along the welding seam as a result of creases, crumbs, grease or liquids. | Open the bag again and clean the upper internal part of the bag and remove any foreign matter that might be on the welding bar before you weld the bag shut again. |
NOTE Please note
If you are unable to solve the problem with the steps shown above, please contact Customer Service.
19 Disposal of the Old Device
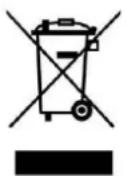
Old electric and electronic devices frequently still contain valuable materials. However, they also contain damaging substances, which were necessary for their functionality and safety. If these were put in the non-recyclable waste or were handled incorrectly, they could be detrimental to human health and the environment. Therefore, do not put your old device into the non-recyclable waste under any circumstances.
NOTE Please note
Utilise the collection point, established in your town, to return and recycle old electric and electronic devices. If necessary, contact your town hall, local refuse collection service or your dealer for information. Ensure that your old device is stored safely away from children until it is taken away.
20 Guarantee
We provide a 24 month guarantee for this product, commencing from the date of sale, for faults which are attributable to production or material faults. Your legal guarantee entitlements in accordance with § 439 ff. BGB-E remain unaffected by this.
The guarantee does not include damages, which were incurred as a result of improper handling or use, as well as malfunctions which only have a minor effect on the function or the value of the device. Consumables, transit damages, inasmuch as we are not responsible for these, as well as damages, which were incurred as a result of any repairs that were not performed by us, are also excluded from the guarantee entitlements.
This device is designed for use in domestic situations and has the appropriate performance levels. Any use in commercial situations is only covered under the guarantee to the extent that it would be comparable with the stresses of being used in a domestic situation. It is not intended for any additional, commercial use. In the event of justified complaints, we will repair the faulty device at our discretion or replace it with a trouble-free device. Any pending faults must be reported within 14 days of delivery.
All further claims are excluded. To enforce a guarantee claim, please contact us prior to returning the device (always provide us with proof of purchase).
21 Technical Data
| Device | Vacuum sealer system |
| Name | VC11 |
| Item No.: | 1369 |
| Mains data | 220 V - 240 V; 50 Hz |
| Power consumption | 120 W |
| External measurements (W x H x D): | 355 x 85 x 145mm |
| Net weight | 1,16 kg |
WARNING
WARNING
WARNING
WARNING
- Packaging material must not be used as a toy. There is a risk of suffocation.
WARNING
64.4 Limitation of liability
The technical information, all data and instructions for installation, operation and maintenance contained in these instructions correspond to the current state at the time of printing and are provided taking into account our previous experience and knowledge. The information, illustrations and descriptions contained in these instructions cannot be used as a basis for any claims.
The manufacturer assumes no liability for damage arising from:
Non-compliance with the instructions - Use other than intended - Unqualified repairs - Technical modifications or modifications to the device - Use of spare parts not approved for use.
Modifications to the device are not recommended, and the warranty does not extend to them.
Claims for damages due to non-compliance with the instructions are excluded. We assume no liability for damages, even if the instructions were followed according to our order. The binding instruction text remains the German version.
64.5 Copyright protection
The copyright to this documentation is protected.
All rights, including the right to copy by mechanical means, reproduction and distribution using special methods (e.g., data processing, data carriers and data networks), even in part, are reserved by the company BRAukmann GmbH. We reserve the right to make changes to the content and technical modifications.
65 Safety
This chapter contains important safety instructions for handling the device. This device complies with established safety standards. However, improper use may cause damage to the device and injury to persons.
Never touch the welding torch immediately after the sealing process.
65.3.2 Fire safety
▲WARNING Caution
The indicator light shows which setting is selected.
C Vacuum & Fill / Interrupt:
This button has two functions depending on the state of the device.
When the button is pressed briefly, automatic vacuum filling is activated.
In operating mode, the button stops any running process.
D Closing the lid: Close the lid. On the right and left sides of the lid there is a button.
E Unlocking: Removes the lock from the lid.
F Locking hook: Locks the lid.
G Rubber seal: Presses the bag against the filling plate.
H + K Upper seal / Lower seal
The device is a heating device that performs
the specified function: it contains a heating element with a Teflon coating; it allows you to seal the package so that it does not stick.
▲WARNING Caution
Please follow the safety rules below to avoid burning yourself or others.
► To avoid possible burns, never touch the sealing plate while the device is operating. Vacuum chamber: Place the open side of the package in the chamber. Suction nozzles: The air inlet is connected to the vacuum chamber and the pump. When vacuuming and sealing the package, do not block the air inlet.
NOTE Indication
Do not remove the sealing plate (T).
67.2 Rating plate
The rating plate with connection parameters is located on the underside of the device.
68 Operation and use
This chapter contains important instructions for operating the device. Follow the instructions to avoid danger and damage:
68.1 Commissioning
Before each use and after each sealing process, carefully clean both the device itself and all accessories that come into contact with food products. Follow the instructions in the chapter "Cleaning and maintenance".
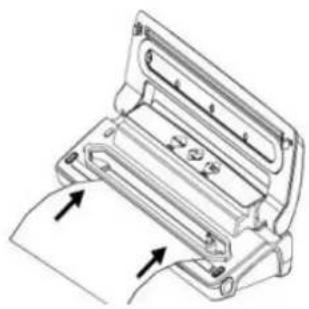
Step 1: Open the lid and place the open side of the package in the vacuum chamber.
Step 2: Press the lid.
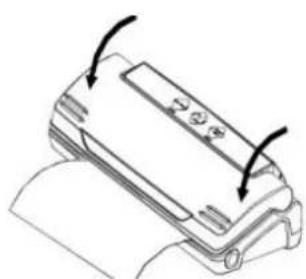
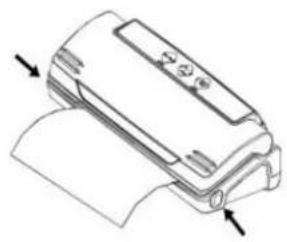
Fig. 3: Place the bag in the vacuum chamber (end of the sealing process).
68.2 Vacuum bags
Use exclusively vacuum bags intended for vacuum packaging.
Their film differs in its characteristics from the film usually used to package products.
All vacuum bags supplied by the German company CASO are intended for cooking in a bag (Sous Vide).
Before using the bags, make sure that they are intended for microwave cooking and preparation of food in a vacuum.
You can buy a wide range of different bags and rolls from CASO.
68.3 Vacuum packaging in a bag made from a roll
Place the appliance in a dry place and ensure that the work area in front of the appliance is free of other objects and large enough to place the bag with the product to be packaged.
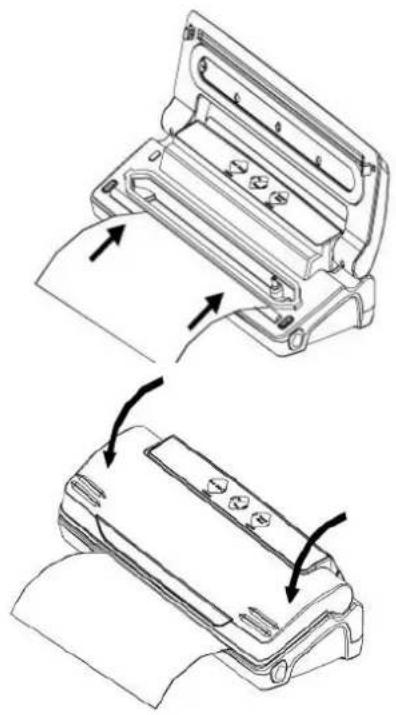
- Unroll the film from the lower roll and cut it to the required length, making an even cut.
- Open the lid and place the edge of the bag on the gray rubber seal, then close the lid (see Fig. 1).
- Press the lid down firmly on both sides (D) until you hear a click. Use both hands (see Fig. 2).
- Press the button, the red control lamp lights up.
- If the control lamp goes out, sealing the package is complete.
- Now you have a template of the required size.
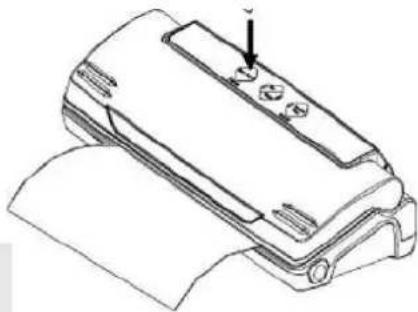
NOTE:
Make sure that the length of the bag used is at least 8 cm longer than the length of the product to be preserved. Add another 2 cm if the bag will be sealed again after opening.
68.4 Vacuum packaging in a bag:
- Place the products you want to preserve in the bag.
- Clean and straighten the top end of the bag, and make sure that the surfaces of the open end have no folds or wrinkles.
3.
- Insert the bag into the appliance as shown in the figure. The bag must not be placed on the suction nozzle (L), because otherwise the vacuum will be created incorrectly.
- Close the lid and press it firmly on both sides (D) until you hear a click.
- Select the lower sealing time.
- Press the "Vacuum & Seal" button, and after vacuuming, the bag will be automatically and completely hermetically sealed.
- After the process is complete, press both unlock buttons; the process is finished (see step 3).
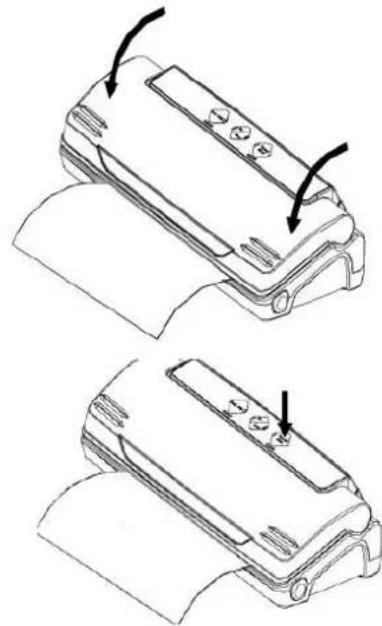
- Turn the sealed bag over; it should have a strip along the sealing seam and should not have any folds, otherwise the sealing seam will not be airtight.
- If you want to interrupt the process (for example, because the bag is positioned incorrectly), first press the "Vacuum & Seal" button again, then press both unlock buttons (E).
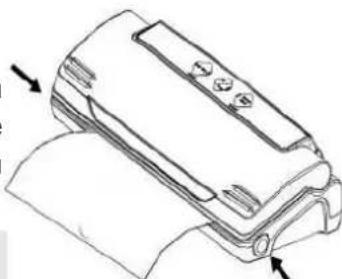
NOTE: instruction
Do not put too many food products in the bag. Leave enough free space at the open side of the bag. It should be enough to freely insert the bag into the vacuum sealing machine. Do not moisten the open side of the bag. Moistened bags do not seal well.
NOTE: Before welding, clean and straighten the open sides of the bags. Make sure that the open side of the bags is free of food residues or crumbs. Sharp objects or crumbs can cause difficulties during welding. Do not leave too much air in the bag before sealing it. It is recommended to remove the air from the bag in advance by pressing it down. If you start with a large amount of air in the bag, the load on the vacuum pump may increase to such an extent that the motor may not have enough power to remove all the air from the bag. In case the products to be vacuum-packed have sharp edges, such as bones, cutlets, or fish, they should be wrapped in paper towels. This way, you will avoid damaging the bag. The manufacturer does not recommend sealing more than one bag per minute. At this speed, the device will have enough time to cool down. For guaranteed airtight packaging of food products containing moisture, such as casseroles or goose, it is initially recommended to freeze them in a mold or bowl. After that, they can be vacuum-packed and re-frozen. Briefly blanch vegetables or fruits in boiling water or in a microwave oven, cool them, and vacuum-pack them in portions suitable for consumption. For vacuum packaging of frozen food products, it is necessary that the bag be approximately five centimeters larger. This is because during subsequent freezing, the products may increase in volume. Wrap meat or fish in a paper towel and vacuum-pack them in this state. The advantage of using a paper towel is that it can absorb the moisture released by the food products. Before placing food products such as cakes, French pancakes, hamburgers, or puff pastry snacks into storage, wrap them in wax paper or parchment. In this form, the aforementioned products will be easier to stack. Also, in the future, it will be easier to take a portion from the frozen products, re-seal the bag, and freeze the products for subsequent storage. The vacuum storage system cannot be used for sealing jars for preservation.
68.5 Opening a sealed bag
Cut the bag with scissors along the welded seam.
68.6 Vacuuming in a container
Connect the hose for vacuuming to the device 2. Attach the other end to the container lid. Depending on the container, use an adapter if necessary (for more detailed information, refer to the operating instructions for your vacuum container).
- NOTE: Make sure that both connection ends of the hose (use the adapter for connection if necessary) are correctly connected to the device and the lid.
NOTE: Make sure that both connection ends of the hose (use the adapter for connection if necessary) are correctly connected to the device and the lid.
Y6eHNTecb, YTO o6a coeHNHTeNbHbIX KOHca 7JnAHra (pnu Heo6xOIMOCtN nCNoB3yIte dIa COeHNHeHn IepexoDnK) npaBnBHO NOcOeHNHeHbIK npnbOpny NKpbIwke K
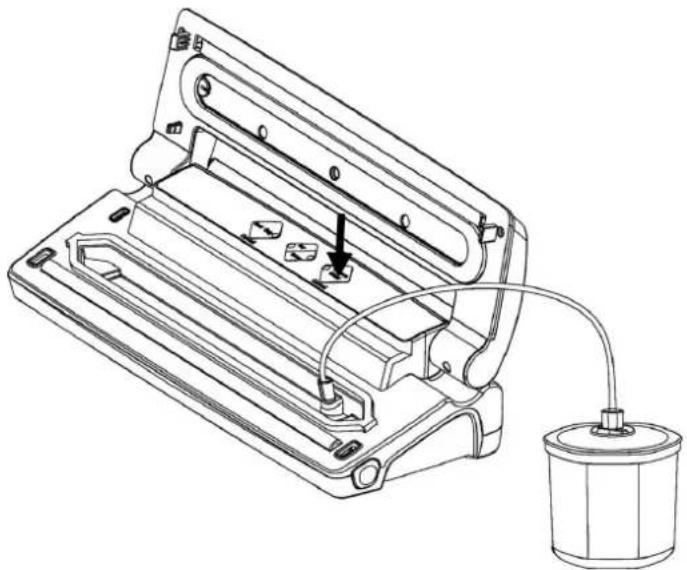
- Press the button "Vacuum/Seal". First, gently press the container lid. The appliance stops automatically when the vacuum is reached. After that, the vacuum hose and adapter (if used) can be removed.
68.7 Storing the vacuum sealer
Store the appliance on a flat and stable surface, out of reach of children.
NOTE
For proper storage, please do not close the lid completely; it may deform and affect the appliance's operation. Always unplug the appliance from the outlet. Always disconnect this device from the electrical outlet immediately after use.
69 Cleaning and care
This chapter contains important instructions for cleaning and caring for the appliance. Follow the instructions to avoid damaging the appliance due to improper cleaning.
Safety instructions
CAUTION
Pay attention to the following safety instructions before you start cleaning the appliance:
The appliance should be cleaned regularly and food residues should be removed constantly. If the appliance is not kept clean, this negatively affects its service life and may lead to a hazardous condition.
CAUTION
Before cleaning, switch off the appliance and unplug it from the outlet. The sealing plate may be hot after the vacuuming process. There is a risk of burns! Wait until the appliance has cooled down. Clean the appliance after use as soon as it has cooled down. Waiting too long makes cleaning more difficult and in extreme cases impossible. Under certain circumstances, heavy soiling can damage the appliance. If moisture enters the appliance, the electronic components may be damaged. Ensure that liquid does not enter the appliance through the vacuum pump. Do not immerse the appliance in water or other liquids, nor place it in a dishwasher. Do not use aggressive or abrasive cleaning agents or solvents. Do not attempt to remove stubborn dirt with hard objects. Dry the appliance thoroughly before using it again.
69.1 Cleaning
Exterior of the appliance
The appliance is intended for use with a moist, non-abrasive cleaning cloth.
Interior of the appliance
Clean the interior of the appliance with a damp cloth and a little washing-up liquid or cleaning agent.
70.2 Minor malfunctions and their rectification
The following table helps you to locate and rectify minor malfunctions.
Do not throw your old appliance in the rubbish.
NOTE
Use the collection points organized in your municipality for the disposal of old electrical and electronic appliances. If necessary, obtain information from your local council, waste disposal service or the dealer.
NOTE
Make sure that your old appliance is stored out of the reach of children until it is disposed of.
72 Warranty
We provide a warranty on this product for 24 months, starting from the date of purchase, for malfunctions that are attributable to manufacturing or material defects. The warranty does not include damage resulting from incorrect handling or use, as well as malfunctions that only insignificantly affect the operation or value of the appliance. Consumable parts, transport damage, for which we accept no liability, as well as damage resulting from any repair that was not carried out by us, are also excluded from the warranty claims.
This appliance is intended for use in domestic conditions and has the corresponding levels of performance. Any use in commercial situations is covered by the warranty only to the extent that it would be comparable to the conditions arising from domestic use. It is not intended for any additional, commercial use.
In the case of justified complaints, we will repair the faulty appliance at our discretion or replace it with a working appliance. Any malfunctions must be reported within 14 days of delivery. All further claims are excluded. To ensure warranty claims, please contact us before returning the appliance (always provide us with proof of purchase).
73 Technical specifications


- ORIGINAL OPERATING MANUAL
- VACUUM SEALER SYSTEM VC
- OPERATING MANUAL
- GENERAL
- INFORMATION ON THIS MANUAL
- WARNING NOTICES
- ▲DANGER
- DANGER
- WARNING
- CAUTION
- NOTE
- LIMITATION OF LIABILITY
- COPYRIGHT PROTECTION
- SAFETY
- INTENDED USE
- WARNING WARNING
- GENERAL SAFETY INFORMATION
- NOTE PLEASE NOTE
- PLEASE OBSERVE THE FOLLOWING GENERAL SAFETY NOTICES WITH REGARD TO THE SAFE HANDLING OF THE DEVICE
- SOURCES OF DANGER
- DANGER OF BURNS
- DANGER OF FIRE
- THERE IS A DANGER OF FIRE IF THE DEVICE IS NOT USED PROPERLY
- DANGERS DUE TO ELECTRICAL POWER
- MORTAL DANGER DUE TO ELECTRICAL POWER
- FOOD STORAGE SAFETY INFORMATION
- PLEASE NOTE
- COMMISSIONING
- SAFETY INFORMATION
- DELIVERY SCOPE AND TRANSPORT INSPECTION
- FUNCTIONS
- UNPACKING
- DISPOSAL OF THE PACKAGING
- SETUP
- SETUP LOCATION REQUIREMENTS
- ELECTRICAL CONNECTION
- DESIGN AND FUNCTION
- COMPLETE OVERVIEW
- A SEAL (SCHWEISSEN)
- C VACUUM & SEAL/CANCEL (VACUUM & SEAL / CANCEL)
- AT WORKING
- RATING PLATE
- OPERATION AND HANDLING
- OPERATING INSTRUCTIONS
- BAGS AND ROLLS
- MAKING A BAG USING THE BAG ROLL
- PRESERVE FOOD WITH VACUUM
- OPEN A SEALED BAG
- VACUUM SEALING IN THE VACUUM CONTAINER
- STORING YOUR VACUUM SEALING SYSTEM
- CLEANING AND MAINTENANCE
- ATTENTION
- CAUTION ATTENTION
- CLEANING
- OUTSIDE OF THE UNIT
- INSIDE OF THE DEVICE
- PRESERVATION BAGS
- SEALING PROFILE (WHICH PRESSES THE BAG AGAINST THE SEALING BAR)
- TROUBLESHOOTING
- SAFETY NOTICES
- CAUSE AND ACTION
- DISPOSAL OF THE OLD DEVICE
- GUARANTEE
- TECHNICAL DATA
- FIRE SAFETY
- ▲WARNING CAUTION
- NOTE INDICATION
- OPERATION AND USE
- VACUUM BAGS
- VACUUM PACKAGING IN A BAG MADE FROM A ROLL
- VACUUM PACKAGING IN A BAG
- NOTE: INSTRUCTION
- NOTE: BEFORE WELDING, CLEAN AND STRAIGHTEN THE OPEN SIDES OF THE BAGS. MAKE SURE THAT THE OPEN SIDE OF THE BAGS IS FREE OF FOOD RESIDUES OR CRUMBS. SHARP OBJECTS OR CRUMBS CAN CAUSE DIFFICULTIES DURING WELDING. DO NOT LEAVE TOO MUCH AIR IN THE BAG BEFORE SEALING IT. IT IS RECOMMENDED TO REMOVE THE AIR FROM THE BAG IN ADVANCE BY PRESSING IT DOWN. IF YOU START WITH A LARGE AMOUNT OF AIR IN THE BAG, THE LOAD ON THE VACUUM PUMP MAY INCREASE TO SUCH AN EXTENT THAT THE MOTOR MAY NOT HAVE ENOUGH POWER TO REMOVE ALL THE AIR FROM THE BAG. IN CASE THE PRODUCTS TO BE VACUUM-PACKED HAVE SHARP EDGES, SUCH AS BONES, CUTLETS, OR FISH, THEY SHOULD BE WRAPPED IN PAPER TOWELS. THIS WAY, YOU WILL AVOID DAMAGING THE BAG. THE MANUFACTURER DOES NOT RECOMMEND SEALING MORE THAN ONE BAG PER MINUTE. AT THIS SPEED, THE DEVICE WILL HAVE ENOUGH TIME TO COOL DOWN. FOR GUARANTEED AIRTIGHT PACKAGING OF FOOD PRODUCTS CONTAINING MOISTURE, SUCH AS CASSEROLES OR GOOSE, IT IS INITIALLY RECOMMENDED TO FREEZE THEM IN A MOLD OR BOWL. AFTER THAT, THEY CAN BE VACUUM-PACKED AND RE-FROZEN. BRIEFLY BLANCH VEGETABLES OR FRUITS IN BOILING WATER OR IN A MICROWAVE OVEN, COOL THEM, AND VACUUM-PACK THEM IN PORTIONS SUITABLE FOR CONSUMPTION. FOR VACUUM PACKAGING OF FROZEN FOOD PRODUCTS, IT IS NECESSARY THAT THE BAG BE APPROXIMATELY FIVE CENTIMETERS LARGER. THIS IS BECAUSE DURING SUBSEQUENT FREEZING, THE PRODUCTS MAY INCREASE IN VOLUME. WRAP MEAT OR FISH IN A PAPER TOWEL AND VACUUM-PACK THEM IN THIS STATE. THE ADVANTAGE OF USING A PAPER TOWEL IS THAT IT CAN ABSORB THE MOISTURE RELEASED BY THE FOOD PRODUCTS. BEFORE PLACING FOOD PRODUCTS SUCH AS CAKES, FRENCH PANCAKES, HAMBURGERS, OR PUFF PASTRY SNACKS INTO STORAGE, WRAP THEM IN WAX PAPER OR PARCHMENT. IN THIS FORM, THE AFOREMENTIONED PRODUCTS WILL BE EASIER TO STACK. ALSO, IN THE FUTURE, IT WILL BE EASIER TO TAKE A PORTION FROM THE FROZEN PRODUCTS, RE-SEAL THE BAG, AND FREEZE THE PRODUCTS FOR SUBSEQUENT STORAGE. THE VACUUM STORAGE SYSTEM CANNOT BE USED FOR SEALING JARS FOR PRESERVATION
- CUT THE BAG WITH SCISSORS ALONG THE WELDED SEAM
- CONNECT THE HOSE FOR VACUUMING TO THE DEVICE 2. ATTACH THE OTHER END TO THE CONTAINER LID. DEPENDING ON THE CONTAINER, USE AN ADAPTER IF NECESSARY (FOR MORE DETAILED INFORMATION, REFER TO THE OPERATING INSTRUCTIONS FOR YOUR VACUUM CONTAINER)
- NOTE: MAKE SURE THAT BOTH CONNECTION ENDS OF THE HOSE (USE THE ADAPTER FOR CONNECTION IF NECESSARY) ARE CORRECTLY CONNECTED TO THE DEVICE AND THE LID
- STORING THE VACUUM SEALER
- CLEANING AND CARE
- EXTERIOR OF THE APPLIANCE
- INTERIOR OF THE APPLIANCE
- MINOR MALFUNCTIONS AND THEIR RECTIFICATION
- WARRANTY
- TECHNICAL SPECIFICATIONS
Brand : CASO
Model : VC11
Category : Vacuum packaging machines