
29PT9020 - TV PHILIPS - Free user manual and instructions
Find the device manual for free 29PT9020 PHILIPS in PDF.



User questions about 29PT9020 PHILIPS
0 question about this device. Answer the ones you know or ask your own.
Ask a new question about this device
Download the instructions for your TV in PDF format for free! Find your manual 29PT9020 - PHILIPS and take your electronic device back in hand. On this page are published all the documents necessary for the use of your device. 29PT9020 by PHILIPS.
USER MANUAL 29PT9020 PHILIPS
If this instruction manual does not give an answer or if 'Tips' do not solve your TV problem, you can call your Local Philips Customer or Service Centre. See the supplied World-wide guarantee booklet. Please, have the Model and Product number which you can find at the back of your television set or on the packaging, ready, before calling the Philips helpline.
Model: Product No:
Due to continuous product improvements this manual is subject to change without notice.

End of life directives
Philips is paying a lot of attention to producing environmentally-friendly in green focal areas. Your new TV contains materials which can be recycled and reused. At the end of its life specialised companies can dismantle the discarded TV to concentrate the reusable materials and to minimise the amount of materials to be disposed of. Please ensure you dispose of your old TV according to local regulations.
Installation
Preparation 2
Keys on top of the TV 2
Your remote control 3-4
To use the menus.... 5
Select the menu language and country 5
Store TV channels 6
Automatic installation 6
Manual installation 6
Give name 6
Reshuffle the programme list.... 7
Select favourite TV channels 7
TV setup 7
General 7
Source 8
Decoder 8
Demo 9
Operation
TV menu Picture menu 9-10
Sound menu 10
Features menu.... 11
Teletext guide 12
Teletext 13-14
Connect peripheral equipment
Connecting and selecting equipment 15-16
Audio- and video equipment keys 17
Tips 18

EasyLink features are based on the “one touch operation” approach. This means that a sequence of actions are executed at the same time in both the television and the video cassette recorder, provided both are fitted with the EasyLink function and connected with the eurocable supplied with your video recorder.
Preparation
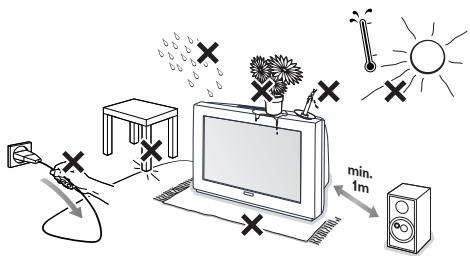
① Place the TV on a solid surface.
text_image
Diagram illustrating household air pollution and heating conditions around a TV, with icons for lighting, sun, and temperature.For ventilation, leave at least 5 cm free all around the TV. Do not place the TV on a carpet. To prevent any unsafe situations, do not place any objects on top of the TV. Avoid heat, direct sunlight and exposure to rain or water.
② Insert the aerial plug firmly into the aerial socket at the back of the TV.
③ Insert the mains plug of the TV in the wall socket having a mains voltage of 220V-240V.
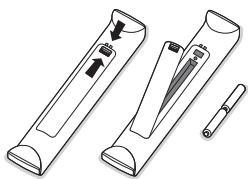
4 Remote control: Insert the 2 batteries supplied (Type R6-1,5V).
natural_image
Illustration of two types of medical or cosmetic devices with arrows indicating movement, no text or symbols present.The batteries supplied do not contain the heavy metals mercury and cadmium. Please check on how to dispose of exhausted batteries according to local regulations.
⑤ Switch the TV on: Press the power switch ① on the front of your TV.
A blue indicator on the front of the TV lights up and the screen comes on. If the TV is in standby mode (red indicator), press the -P+ keys or the red ⏻ key on the remote control.
Keys on top of the TV
flowchart
graph TD
    A["Setup"] --> B["TV"]
    C["Demo"] --> B
    D["Install"] --> B
    E["Exit"] --> B
    B --> F["Picture"]
    B --> G["Sound"]
    B --> H["Features"]
    I["VOLUME"] --> J["MENU"]
    K["PROGRAM"] --> L["-PROGRAM"]
    J --> M["->"]
    L --> N["->"]
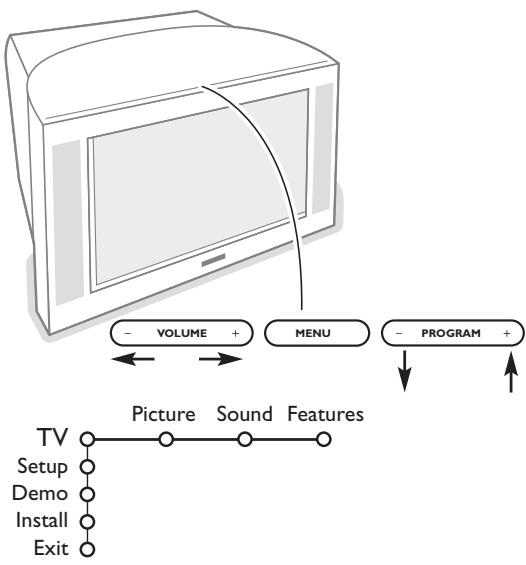
Should your remote be lost or broken you can still change some of the basic settings with the keys on top of your TV.
Press:
- the VOLUME - or + key to adjust the volume;
- the PROGRAM - or + key to select the TV channels or sources.
Press the MENU key to summon the main menu without the remote control.
Use:
- the VOLUME - or + key and the PROGRAM - or + key to select menu items in the directions as shown;
- the MENU key to confirm your selection.
Note:
When activated via the MENU key on top of the TV, only Exit lets you dismiss the menu.
Navigate to Exit and press the MENU key.
Use of the remote control
Note: For most keys pressing a key once will activate the function. Pressing a second time will de-activate it. When a key enables multiple options, a small list will be shown. Press repeatedly to select the next item in the list. The list will be removed automatically after 4 seconds or press OK to remove immediately.
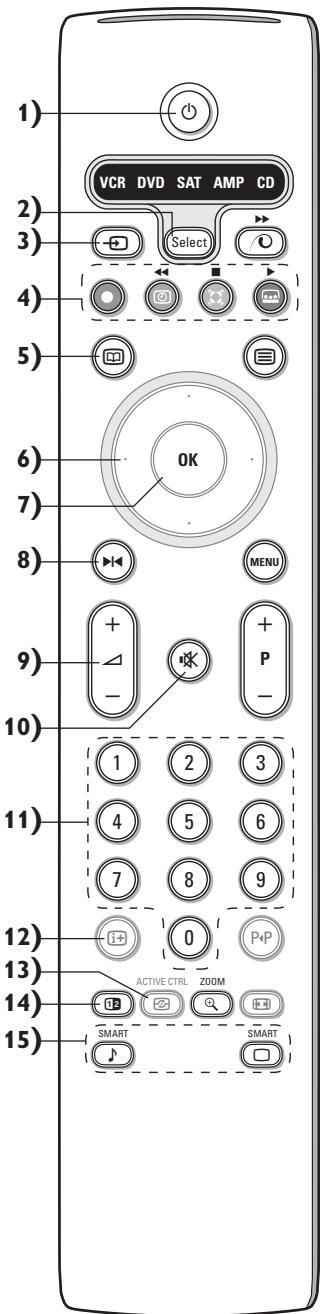
Press to switch the TV on or off.
When switched off, a red indicator on the TV lights up.
2) VCR DVD SAT AMP CD
Audio and Video equipment keys (p. 17)
3) Select peripherals (p. 16)
4) ●◀◀ □▶▶▶
Audio- and Video equipment keys (p. 17)
- Instant record
See Record with your recorder with EasyLink, p. 17.
5) 📄 Teletext Guide on/off (only available on certain versions) p. 12
Press the 12 key to show Teletext Guide on the right half of the screen.
6) Cursor
Used to move around the menus and select adjustments.
7) OK Press this key
• to activate your choice, when in the menus.
• to display the programme list.
8) Freeze
To freeze the picture.
9) -VOL+ (Volume)
To adjust the volume.
10) Interrupt the sound or restore it.
11)0/9 Digit keys
To select a TV channel.
For a two digit programme number, enter the second digit before the dash disappears. To switch immediately to a selected one digit TV channel, keep the digit key pressed a bit longer.
12) i+ On Screen information
Press to display information about the selected TV channel and programme.
Menu/Remote control info
When a menu is on screen, press ⓘ+ to display info on the selected menu item. For information on the remote control functions, while the menu info is displayed, press any key on the remote control.
The normal function of the key is not executed.
13) Active control (only available on certain versions) see p. 10
14) 12 Dual screen (only available on certain versions)
① Press the ☐ or ☐ key.
Press the 12 key to show Teletext or Teletext Guide on the right of the screen.
② • Picture/Teletext Guide:
- Press the cursor left/right to select a TV channel.
- Press the cursor down to move the puck to the blue ball in the left screen.
- Press +P- to select another TV channel.
- Picture/Teletext:
See Active screen selection, p. 13.
3 Press the 12 key to switch off dual screen.
15) ♩ □ Smart keys
To select predefined picture and sound settings. Personal refers to the personal preference settings selected in the sound and picture menu.
Use of the remote control
text_image
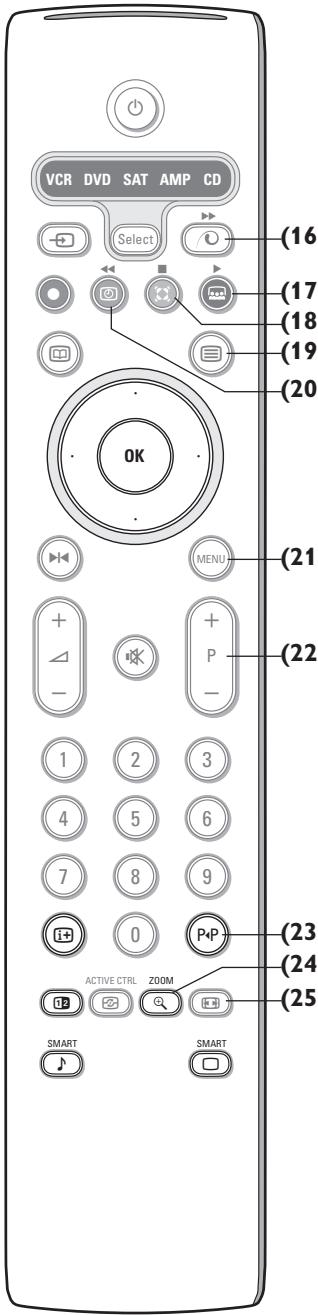
VCR DVD SAT AMP CD Select (16) (17) (18) (19) (20) OK MENU (21) + - P (22) 1 2 3 4 5 6 7 8 9 0 P+P ACTIVE CTRL ZOOM SMART SMART (23) (24) (25)16) 📄 Pixel Plus 2 demo on/off
In the right part Pixel Plus 2 and Digital Natural Motion are switched on.
17) Cinema Go: See separate Cinema Link booklet supplied.
18) Surround mode
Incredible surround
With stereo transmission, and when Incredible surround is selected, it seems as though the loudspeakers are spread further apart from one another.
Virtual Dolby Surround
Optimal with Dolby surround signals. Enables you to experience the effect of Dolby surround Pro Logic, reproducing a rear sound effect. See Sound menu, 3D effect, p. 10.
Note: You can make the same selection in the Sound menu, surround mode, p. 10.
19) ☐ Teletext on/off (only available on certain versions) p. 13
Press the 12 key to show teletext on the right half of the screen.
20) ☑ Time display: The time is displayed on the screen.
21) MENU: Main menu on/off see p. 5
22)-P+ Programme selection
To browse through the TV channels and sources stored in the favourite list.
23) P◀P Smart surf
With this key you can easily switch between 2 up to 9 different TV channels or sources. See General, Smart surf, p. 7.
Press the OK key or wait for the time out to dismiss the Smart surf display.
24) ☑ Zoom on/off
Press the zoom key to activate/ deactivate the zoom function.
Press the OK key repeatedly to select one of the zoom magnifications (x1, x4, x9, x16).
Use the cursor up/down, left/right to shift the selected zoom window over the screen with the cursor.
The zoom window is reset after: selecting another TV channel, another picture format or when another picture format is selected automatically.
25) Picture format
Press this key repeatedly or press the cursor up/down to select another picture format:
If your television is equipped with a 16:9 screen: Auto format, Super zoom, 4:3, Movie Expand 14:9, Movie Expand 16:9, Subtitle zoom or Wide screen.
If your television is equipped with a 4:3 screen: Auto format, 4:3 or Vertical Squeeze.
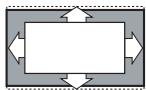
Auto format
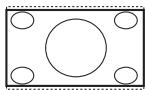
Super zoom
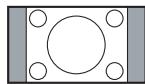
4:3
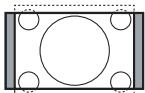
Movie Expand 14:9
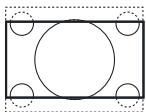
Movie Expand 16:9
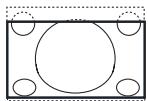
Subtitle zoom
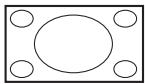
Wide screen
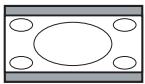
Vertical Squeeze
Auto format makes the picture fill the screen as much as possible.
In case of subtitles in the bottom black bar, Auto format makes the subtitles visible. If subtitles are only partly visible, press cursor up.
In case of a broadcaster logo in the corner of the top black bar, the logo disappears from the screen.
Super zoom removes the black bars on the sides of 4:3 programs with minimal distortion.
When in Movie Expand 14:9, 16:9, Super zoom or Subtitle zoom picture format, you can make subtitles visible with the cursor up/down.
To use the menus
text_image
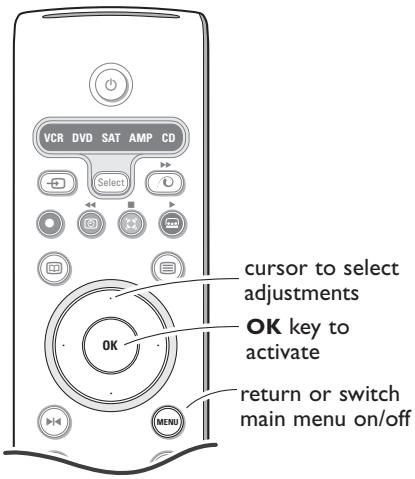
VCR DVD SAT AMP CD Select OK cursor to select adjustments OK key to activate return or switch main menu on/off MENUPress the ⓘ+ key on the remote control to get information about the selected menu item.
① Press the MENU key on the remote control to summon the main menu. At any moment you can exit the menu by pressing the MENU key again.
Note: If you have connected equipment with Cinema Link, more menu items are present.
flowchart
graph TD
    TV["TV"] --> Setup["Setup"]
    Setup --> Demo["Demo"]
    Demo --> Install["Install"]
    Picture["Picture"] --> Sound["Sound"]
    Sound --> Features["Features"]
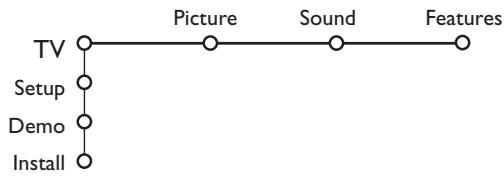
② Use the cursor in the up/down direction to select the TV, Setup, Demo or Install menu.
Use the cursor left/right to select Picture, Sound or Features.
Note: Sometimes not all the menu items are visible on the screen (indicated by a cluster of blue balls). Use the cursor down or right to reveal all items.
③ Use the cursor in the left/right direction to select the menu item.
4 Use the cursor up/down again to select the control you want to select or to adjust.
Note: Items temporary not available or not relevant are displayed in a light grey colour and cannot be selected.
Installation
The installation menu contains the following items:

flowchart
graph LR
    A["Install"] --> B["Language"]
    B --> C["Country"]
    C --> D["Automatic install"]
    D --> E["Manual install"]
    E --> F["Give name"]
    F --> G["Reshuffle"]
    G --> H["Favourite programmes"]
EasyLink
If your video recorder has an EasyLink function, during installation, the language, country and available channels are automatically transmitted to the video recorder.
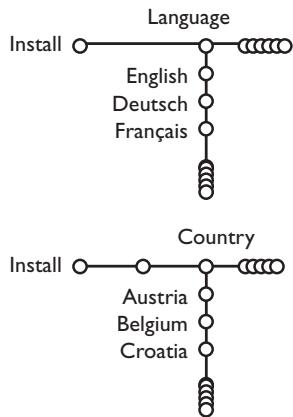
Select the menu language and country
flowchart
graph TD
    A["Language"] --> B["English Deutsch Français"]
    C["Country"] --> D["Austria Belgium Croatia"]
① Press the MENU key on the remote control.
② Use the cursor down to select Install.
③ Use the cursor right to select Language. Follow the instructions on screen.
4 Use the cursor up/down to select your preferred language and press the OK key to confirm your selection.
⑤ Use the cursor right to select Country.
⑥ Select the country where you are now located and press the OK key.
Select Other when none of the countries applies.
⑦ Proceed with the Install menu.
Store TV channels
After language and country are set correctly, you can now search for and store the TV channels in two different ways: using Automatic Installation or Manual Installation (tuning-in channel by channel). Select your choice with the cursor right.
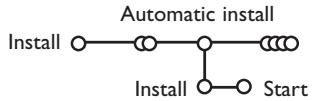
Automatic installation
flowchart
graph TD
    A["Install"] --> B["Automatic install"]
    B --> C["Install"]
    C --> D["Start"]
① Select Automatic install in the Install menu.
Note: All channels must be unlocked in order to autoprogram. If requested, enter your code to unlock all channels. (See TV, Features menu, Childlock, p. 11.)
② Press the cursor down. The autoprogramming option label Start appears.
③ Press the cursor right.
④ The message Searching appears and the progress of autoprogramming is displayed.
If a cable system or a TV channel which broadcasts ACI (Automatic Channel Installation) is detected, a programme list appears. Without ACI broadcast, the channels are numbered according your language and country selection. You can use Reshuffle to renumber them. See p. 7.
It is possible that the cable company or the TV channel displays a broadcast selection menu. Layout and items are defined by the cable company or the TV channel. Make your choice with the cursor and press the OK key.
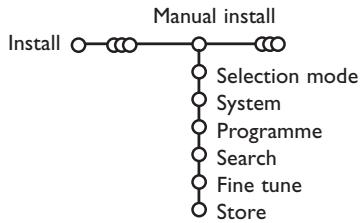
Manual installation
flowchart
graph TD
    A["Install"] --> B["Manual install"]
    B --> C["Selection mode"]
    B --> D["System"]
    B --> E["Programme"]
    B --> F["Search"]
    B --> G["Fine tune"]
    B --> H["Store"]
Searching for and storing TV channels is done channel by channel. You must go through every step of the Manual Installation menu.
① Select Manual install in the Install menu.
② Press the cursor down. Follow the instructions on screen.
Note: Search or direct selection of a TV channel.
If you know the frequency, the C- or S-channel number, enter the 3 or 2 digits of the frequency or the channel number directly with the digit keys 0 to 9 (e.g. 048). Press the cursor down to proceed.
Repeat to search for another TV channel.
Give name
flowchart
graph TD
    A["Install"] --> B["Give name"]
    B --> C["VCR1"]
    B --> D["BBC1"]
    B --> E["BBC2"]
    B --> F["CNN"]
    B --> G["TVE"]
    B --> H["......"]
    C --> I["Space"]
    D --> J["Delete"]
    E --> K["A B C D E F G 1 23"]
    F --> L["H I J K L M N 4 56"]
    G --> M["O P Q R S T U 7 89"]
    H --> N["V W X Y Z 0"]
    I --> O["Shift"]
    J --> P["Special"]
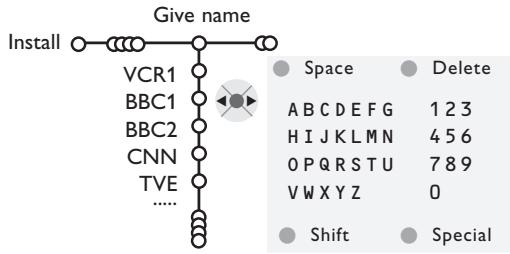
It is possible to change the name stored in the memory or to assign a name to a TV channel for which a name has not yet been entered. A name with up to 5 letters or numbers can be given to the programme numbers 0 to 99.
① Select Give Name in the Install menu and press the cursor down.
② Select the programme number.
Note: keep the cursor up/down pressed to scroll through the programme list quickly.
③ Press the cursor right.
A keyboard appears on the screen.
Press the cursor right to enter the keyboard. Press the cursor up/down, left/right to select the first character and press OK. Repeat for every character you want to enter.
Select Space to enter a space; Delete to erase the highlighted character in the name entered; Shift to display upper- or lowercase characters on the keyboard; Special to display special characters on the keyboard. Press OK to confirm.
4 Press the cursor left repeatedly when you have finished the name giving.
⑤ Select another programme number and repeat steps ③ to ④.
Reshuffle the programme list
You can change the order of the stored TV channels.
1 Select Reshuffle in the Installation menu.
② Follow the instructions on screen.
Select Favourite TV channels
① Select Favourite programmes in the Install menu.
② Select your programme number with the cursor up/down.
③ Select Yes or No with the cursor right.
④ Repeat ② and ③ for every TV channel or external you want to make a favourite or a non-favourite TV channel or external.
TV Setup
flowchart
graph TD
    A["Setup"] --> B["General"]
    B --> C["Source"]
    C --> D["Decoder"]
    A --> E["Menu background"]
    A --> F["Smart surf"]
    A --> G["Factory settings"]
    A --> H["Tilt adjust"]
    A --> I["OSD"]
    A --> J["Programme title"]
    A --> K["Teletext level 2.5"]
    A --> L["Auto surround"]
    A --> M["Set/Change code"]
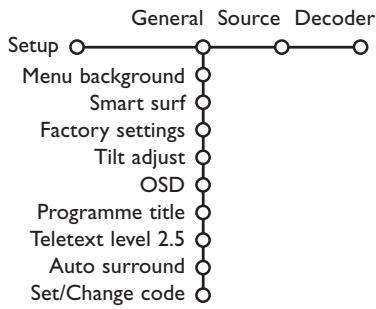
The Setup menu contains items that control the settings of the TV's functions, features, services and peripherals you may have connected.
The General menu allows you to change various settings that are presumably adjusted less frequently than most other settings.
The Source menu allows you to select a source.
The Decoder menu allows you to define one or more programme numbers as decoder programme numbers.
Press the ⓘ+ key on the remote control to get information about the selected menu item.
General
Smart surf
① Select Smart surf.
② With the cursor left/right, select
- 2 programmes if you want the P4P key to toggle between the current and the previously selected channel,
- 9 programmes if you want the P&P key to summon a list of up to 9 channels which can be selected,
To add/remove a channel or source:
Tune to the channel or source you wish to add or remove. Press the P◀P key and press the cursor right to add or remove.
Note: If there are already 9 channels/sources in the list, the one at the bottom of the list will be removed.
Factory settings
This resets the picture and sound settings to their predefined factory values, but maintains the channel installation settings.
OSD (On Screen Display)
See Use of the remote control, p. 3, ⓘ+ On screen information.
① Select OSD.
② Select Normal to activate the continuous display of the programme number. Also TV channel and programme information are extended. Minimum will display reduced channel information.
Note: When subtitles is switched on, see Features, p.11, continuous display of the programme number is not possible.
Teletext 2.5
Some broadcasters offer the opportunity to see more colours, other background colours and nicer pictures in the teletext pages.
① Select Teletext 2.5.
② Press the cursor right to select Teletext 2.5 On to take advantage of this feature.
3 Press the cursor right again to select Teletext 2.5 Off if you like the more neutral teletext layout.
The selection made is valid for all channels which broadcast teletext 2.5.
Note: It may take a few seconds before teletext broadcast switches over to Teletext 2.5.
Auto Surround
Sometimes the broadcaster transmits special signals for Surround Sound encoded programmes. The TV automatically switches to the best surround sound mode when Auto Surround is switched On.
Set/Change code
The Child lock feature (see TV, Features, p. 11) allows you to lock channels to prevent others from watching certain programmes. To watch locked channels, a 4-digit code must be entered. The Set/Change code menu item allows you to create or change a Personal Identification Number (PIN).
① Select Set/Change code.
② If no code exists yet, the menu item is set to Set code.
If a code has previously been entered, the menu item is set to Change code. Follow the instructions on screen.
Source
flowchart
graph TD
    A["Setup"] --> B["Source"]
    B --> C["EXT1"]
    B --> D["EXT2"]
    B --> E["EXT3"]
    B --> F["SIDE"]
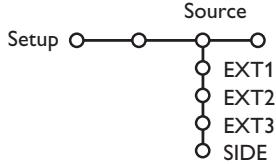
This menu allows you to indicate the peripheral you connected to one of the external inputs.
Important: You have forgotten your code!
① Select Change code in the General menu and press OK.
② Press the cursor right and enter the overriding code 8-8-8-8.
3 Press the cursor again and enter a new personal 4-digit code. The previous code is erased and the new code is stored.
① Press the cursor right to enter the list of types of peripherals attached to the selected input.
② Select the peripheral device with the cursor up/down.
Once you have selected the source type, e.g. DVD, this source will automatically be selected when your remote control is in DVD mode, see p. 3, and when you press the → key on the remote control.
Decoder
flowchart
graph LR
    A["Setup"] --> B["Decoder"]
    B --> C["Programme"]
    B --> D["Status"]
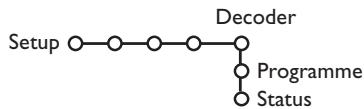
If a decoder or a descrambler is connected, see p. 15, you can define one or more programme numbers as decoder programme numbers.
① Select Decoder with the cursor right.
② Select Programme.
3 Select the programme number under which you have stored the programme coming from your decoder.
4 Select Status.
- Select the input used to connect your decoder: None, EXT1 or EXT2.
- Select None if you do not want the selected programme number being activated as a decoder programme number.
Note: Select EXT2 when the decoder is connected to your EasyLink video recorder.
Demo
flowchart
graph TD
    A["Setup"] --> B["Demo"]
    B --> C["Auto demo"]
    C --> D["Dealer demo"]
    style A fill:#fff,stroke:#000
    style B fill:#fff,stroke:#000
    style C fill:#fff,stroke:#000
    style D fill:#fff,stroke:#000
    note1["Dealer demo - Digital options"]
    note2["Light sensor"]
    note3["Comb filter"]
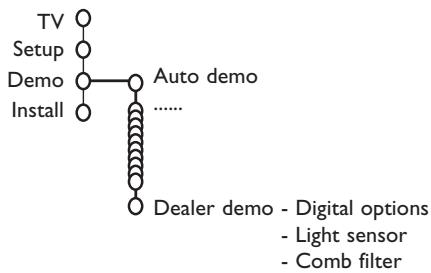
The Demo menu allows to demonstrate the TV features separately or in a continuous loop.
If Auto demo has been selected the demo will automatically present the features sequentially in a loop. Press one of the cursor keys to stop the Auto demo. If one of the features has been selected, this particular feature demo will run only once, and the Demo menu will reappear.
Note: The Dealer demo is not part of the automatic sequence and can only be activated separately.
TV menu
Press the MENU key on the remote control to summon the main menu.
Press the i+ key on the remote control to get information about the selected menu item.
Picture menu
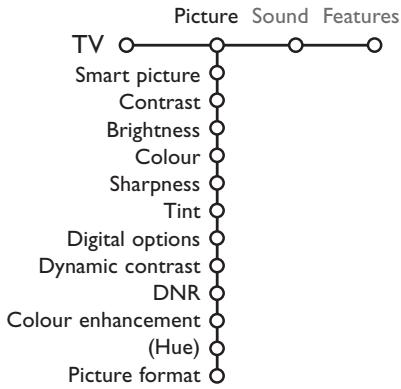
flowchart
graph TD
    TV["TV"] -->|Picture| Sound["Sound Features"]
    TV -->|Smart picture| Sound
    TV -->|Contrast| Sound
    TV -->|Brightness| Sound
    TV -->|Colour| Sound
    TV -->|Sharpness| Sound
    TV -->|Tint| Sound
    TV -->|Digital options| Sound
    TV -->|Dynamic contrast| Sound
    TV --> DNR["DNR"]
    TV --> Colour_enhancement["Colour enhancement"]
    TV --> (Hue)(Hue)
    TV --> Picture_format["Picture format"]
① Press the cursor right to select Picture.
② Select the menu items in the Picture menu with the cursor up/down.
③ Adjust the settings with the cursor left/right or enter the list of submenu items with the cursor right. Select a submenu item with the cursor up/down.
Note: To remove the menu background before adjusting the picture settings, see Select TV setup, General, p. 7.
Smart picture
Select Smart picture to display a list of predefined picture settings, each corresponding with specific factory settings.
Personal refers to the personal preference settings of picture in the picture menu.
Digital options
Pixel Plus 2 is the most ideal setting, doubles the horizontal resolution and increases the number of lines with 33%. You may consider to select Movie Plus in case a halo effect should disturb you. Dependent on your own preference, select Double lines, or 100 Hz Digital Scan.
Note: When 60 Hz NTSC material is used, the options are changed to Pixel Plus 2, Movie Plus or Progressive, progressive scan without motion compensation.
Active Control
The TV continuously measures and corrects all incoming signals in order to provide the best picture possible.
① Press the 🔒 key on the remote control.
② The Active Control menu appears.
③ Press the cursor up/down to select the Active Control values Off, Minimum, Medium (recommended) or Maximum.
The picture settings are being optimised continuously and automatically which is displayed by bars. The menu items can not be selected.
4 Press the cursor right to select Smart Picture.
5 Press the cursor up/down to select one of the predefined picture settings.
6 Press the cursor right to select Active Display.
7 Press the cursor up/down to select Show bars, one of the Dual screen demos or Off. When you select Dynamic contrast, Pixel Plus 2, Digital Noise Reduction or Digital Natural Motion, the TV screen is divided into two parts: in the left part the selected picture quality setting is switched off; in the right part it is switched on.
8 Press the 🔒 key again to switch off the Active Control menu.
Sound menu
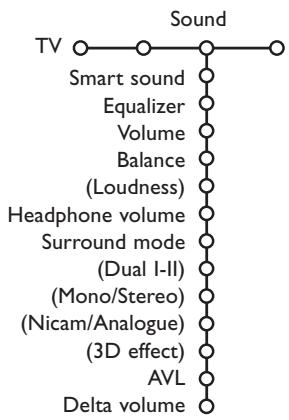
flowchart
graph TD
    TV["TV"] --> Sound["Sound"]
    Sound --> SmartSound["Smart sound"]
    Sound --> Equalizer["Equalizer"]
    Sound --> Volume["Volume"]
    Sound --> Balance["Balance"]
    Balance --> (Loudness)[(Loudness)]
    Balance --> HeadphoneVolume["Headphone volume"]
    Balance --> SurroundMode["Surround mode"]
    SurroundMode --> (Dual I-II)(Dual I-II)
    SurroundMode --> (Mono/Stereo)(Mono/Stereo)
    SurroundMode --> (Nicam/Analogue)(Nicam/Analogue)
    OutsideMode --> (3D effect)(3D effect)
    OutsideMode --> AVL["AVL"]
    OutsideMode --> DeltaVolume["Delta volume"]
① Press the cursor right to select Sound.
② Select the menu items in the Sound menu with the cursor up/down and adjust the settings with the cursor left/right. Remember, control settings are at normal mid-range levels when the bar scale is centred.
Smart sound
Select Smart sound to display a list of predefined sound settings, each corresponding with specific factory settings of Treble and Bass.
Personal refers to the personal preference settings of sound in the sound menu.
Notes:
- Some menu items are only available in case of a Cinema Link configuration and when the Cinema Link is activated. Others are steered by the audio receiver instead of by the TV. See the separate Cinema Link booklet supplied.
- Dual I-II is only available with dual sound transmission.
- Mono/Stereo is only selectable in case of analogue stereo transmission.
- Nicam/Analogue is only selectable in case of Nicam transmission.
Features menu
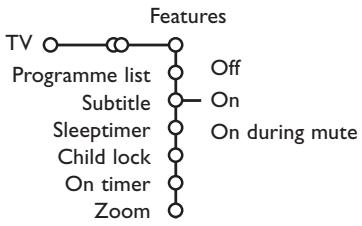
flowchart
graph TD
    A["TV"] --> B["Programme list"]
    B --> C["Subtitle"]
    C --> D["Sleeptimer"]
    D --> E["Child lock"]
    E --> F["On timer"]
    F --> G["Zoom"]
    B --> H["Off"]
    C --> I["On"]
    D --> J["On during mute"]
    G --> K["Features"]
Programme list
Press the OK key to switch over to the selected TV channel or external.
Select subtitles
The subtitle page must be stored for each TV channel:
Switch on teletext and select the proper subtitle page from the index. Switch off teletext.
Subtitle On will automatically display them on the selected TV channels if subtitles are in the transmission. A symbol will indicate that the mode is on.
Select On during mute when you want to have the subtitles automatically displayed only when the sound has been muted with the OK key on the remote control.
Child lock
① Select Child lock.

text_image
Child lock ○—Lock Custom lock — Lock after Unlock Programme lock2 Press the cursor right to enter the Child lock menu. You're summoned to enter your code.
Note: You have to re-enter your code each time you enter the child lock menu.
Important: You have forgotten your code! See p. 8.
3 Select one of the menu items of the child lock menu:
- Lock if you want to lock all channels and externals.
- Custom lock and press the cursor right. Select:
- Lock after if you want to lock all channels and externals from a certain time onwards. Press the cursor right and enter the time with the cursor up/down and right. Press the OK key to validate.
- Programme lock if you want to lock a certain TV channel or external;
- Select Unlock to disable all locks you have set.
① Press the cursor right to select Features.
② Select the menu items with the cursor up/down and adjust the settings with the cursor left/right.
On timer
① Select On timer with the cursor down.
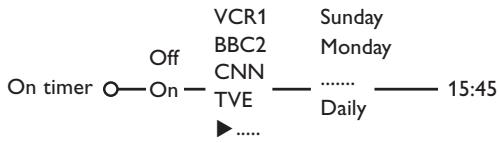
text_image
On timer O—O—VCR1 Sunday Off BBC2 Monday CNN ...... TVE Daily ▶...... 15:45② Select On with the cursor right.
③ Press the cursor right again to enter the programme list.
4 Select the TV channel or external you want your TV to switch to on a selected time and day.
5 Press the cursor right again to select a day of the week or to select Daily.
6 Press the cursor right once again to enter the time with the digit keys or with the cursor up/down and press the OK key to activate.
⑦ Press the MENU key to turn off the menu.
Note: To check your timer settings, press the i+ key.
Zoom
① Select Zoom with the cursor down and press the OK key.
② Press the OK key to select one of the zoom magnifications (x1, x4, x9, x16).
③ Additionally you can shift the selected zoom window over the screen with the cursor keys up/down, left/right.
④ Press the MENU key to turn off the zoom function.
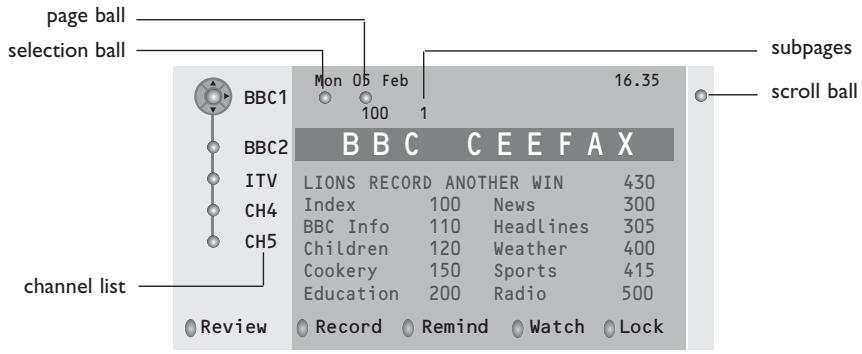
Teletext guide
TV channels which broadcast teletext also transmit a page with the programme guide of the day. If the displayed teletext programme guide page satisfies the Video Programming via Teletext (VPT) requirements, it will be possible to record, remind, watch or lock programmes.
text_image
page ball selection ball BBC1 Mon 05 Feb 16.35 BBC2 ITV CH4 CH5 BBC C EEFAX LIONS RECORD ANOTHER WIN 430 Index 100 News 300 BBC Info 110 Headlines 305 Children 120 Weather 400 Cookery 150 Sports 415 Education 200 Radio 500 Review Record Remind Watch Lock subpages scroll ball① Press the 📄 key.
② Select a TV channel with the cursor up/down and press OK.
③ Move the cursor up to the top of the channel list where the name of the selected TV channel reappears.
4 Press the cursor right to move the puck over the selection ball.
⑤ In the teletext index page, look for the programme guide page of the day or the following day.
6 Enter with the digit keys, the programme guide page number.
Press the cursor right twice to move the puck to the right to choose one of the subpages if available.
If the selected programme satisfies the VPT requirements, the TV will remember the last selected teletext page number of that channel that contains programme guide information and indicates which programme starts at what time.
Every time you press the ☐ key, the teletext programme guide page of the selected TV channel will be available.
Note: The broadcaster is responsible for the content of the information.
Basic functions
Press one of the grey, red, green, yellow or blue keys to activate a Teletext Guide function. The keys appear in grey if the function is not available.
Review: this menu provides a list of programmes that are marked as reminders, those that have to be recorded and those that are locked. This menu can be used to change or remove marked programmes.
Record: to programme the recording of the video recorder (if it has a NEXTVIEWLink function and is connected to EXT. 2).
Remind: to automatically switch on the TV if it is in standby or to display a message if the TV is on.
Lock: to lock certain programmes to prevent recording or watching.
For the functions Record, Remind or Lock, a small menu pops up in which you can choose the interval: once, daily or weekly, or clear an earlier made record, remind or lock setting. The default interval is set to Once. To confirm the frequency, press the OK key.
Watch: to watch the selected and currently broadcast programme.
Teletext
Most TV channels broadcast information via teletext. This TV has a 1200 pages memory that will store most broadcasted pages and subpages to reduce waiting time. After each programme change, the memory is refreshed.
Switch Teletext on and off
Press ☐ to switch the teletext on.
| 102 «03 04 05 06 07 08 09 10 11 12»BBC CEEFAX 102 Mon 05 Feb 16.35.22 | |||
| BBC CEEFAX | |||
| LIONS RECORD ANOTHER WIN 430 | |||
| Index | 100 | News | 300 |
| BBC Info | 110 | Headlines | 305 |
| Children | 120 | Weather | 400 |
| Cookery | 150 | Sports | 415 |
| Education | 200 | Radio | 500 |
| Lottery | 230 | Travel | 550 |
| Finance | 240 | Subtitling | 888 |
| Music | 280 | TV Listings | 600 |
| Red | Green | Yellow | Blue |
Select a Teletext page
- Enter the desired page number with the digit keys, the cursor keys up/down or with the -P+ key.
- Select the options at the bottom of the screen with the colour keys.
Previously selected teletext page
(Only possible in case there is no list of favourite teletext pages available. See p. 14.) Press the P◀P key.
Select the index teletext page
Press the grey colour key ▶▶ to display the main index (usually p.100).
Only for T.O.P teletext broadcasts:
Press i+. A T.O.P. overview of the teletext subjects available is displayed. Select with the cursor up/down, left/right the desired subject and press the OK key. Not all TV channels broadcast T.O.P. teletext.
Select subpages
When a selected teletext page consists of different subpages, a list of available subpages appears on the screen. Press the cursor left or right to select the next or previous subpage.
Enlarge a Teletext page
Press 📂 repeatedly to display the upper teletext part, the lower teletext part and then to return to the normal teletext page size. When the teletext page is enlarged, you can scroll the text, line by line using the cursor up/down.
Picture/Teletext
① Press the ☐ key. Press the 12 key to show Teletext on the right of the screen.
② Use the cursor keys to select a TV channel.
③ Press the 12 key to switch off dual screen.
Active screen selection
When in dual screen picture/teletext (12 key), enter the desired page number with the -P+ key, then press the MENU key, then select the left screen (with the blue ball at the top). You can now select a compressed or full screen view of picture/teletext with the H key.
Hypertext
With hypertext you can quickly jump to a pagenumber or search for a specific word shown on the current teletext page.
① Press the OK key to highlight the first word or a number on the page.
② Use the cursor up/down, left/right to select any other word or number you want to search for.
③ Press the OK key to confirm. The search starts. A message appears at the bottom of the screen to indicate the searching, or that the word or page is not found.
④ Use the cursor up to exit hypertext.
Teletext menu
(only available in full screen teletext mode)
1 Press the MENU key to activate the menu.
② Press the cursor up/down to select the menu items.
③ Press the cursor right to activate.
Reveal
Reveals/conceals hidden information on a page, such as solutions to riddles and puzzles.
Press the cursor right to activate.
Favourite
You may create a list of eight favourite teletext pages in total, selected from various TV channels.
To add a favourite page to the list:
① Select a favourite teletext page.
② Select Favourite in the teletext menu and press the cursor right to enter the list.
③ Press the cursor right again to add the page.
4 Press the MENU key to watch the current page.
To watch a favourite page from the list:
When in Teletext, use the P◀P key to browse through the favourite pages of the TV channel actually selected.
Note: Only the pages of the current channel can be selected.
Search
Selecting a word
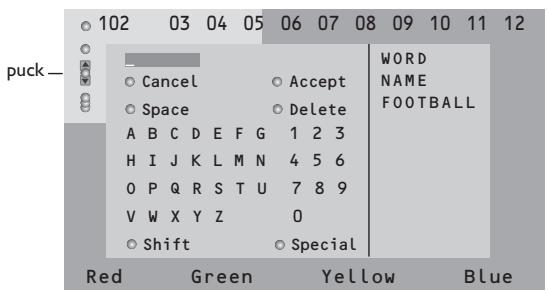
On the keyboard on screen you can type in a random word you want to search for in the teletext pages. Whether upper- or lowercase is used has no influence.
text_image
puck— 102 03 04 05 06 07 08 09 10 11 12 ○ Cancel ○ Accept WORD ○ Space ○ Delete NAME A B C D E F G 1 2 3 FOOTBALL H I J K L M N 4 5 6 O P Q R S T U 7 8 9 V W X Y Z 0 ○ Shift ○ Special Red Green Yellow Blue① Press the cursor right to enter the keyboard.
② Press the cursor left/right, up/down to select the characters, words or functions.
③ Press the OK key to confirm each character selected.
4 Select Cancel to cancel the word; Space to enter a space; Delete to delete the last character selected; Shift to switch between lowercase or capital characters; Special to display special characters on the keyboard and press the OK key.
5 Press the cursor left repeatedly to return to the Teletext menu again.
Searching a word
① Type in the word on screen or select a word from the history list on the right and press OK.
② Select Accept and press OK again. The message Searching appears.
③ To cancel the searching or to search for a new word, select Keyboard and press OK.
4 When a word is not found, a message appears. When the word is found, it is highlighted in the teletext page. To continue the search, press the OK key.
Cycle subpages (if available)
Makes the subpages cycle automatically. Press the cursor right to activate and to deactivate again.
Timed page
To display a specific page from a selected TV channel at a certain time.
① Press the cursor right and select Yes or No.
② Enter the time and pagenumber with the cursor keys or the digit keys.
Note: Teletext does not have to remain switched on, but you should watch the TV channel you have selected the specific page from.
③ Press the cursor left to return to the TV menu again.
Language
If the displayed characters on screen do not correspond with the characters used by the teletext broadcaster, you can change the language group here.
Select Group 1 or 2 with the cursor right.
Press the MENU key to leave the Teletext menu.
Connect Peripheral Equipment
There is a wide range of audio and video equipment that can be connected to your TV.
The following connection diagrams show you how to connect them.
Depending on the versions, the TV set is equipped with 2 or 3 SCART connectors EXT1, EXT2 and EXT3 located on the rear.
Note: EXT. 1 can handle CVBS and RGB, EXT. 2 CVBS and Y/C, EXT. 3 CVBS and RGB. It is preferred to connect peripherals with RGB output to EXT. 1 or EXT. 3 as RGB provides a better picture quality.
If your recorder is provided with the Easylink function, it should be connected to EXT.2 to benefit from the EasyLink functionality.
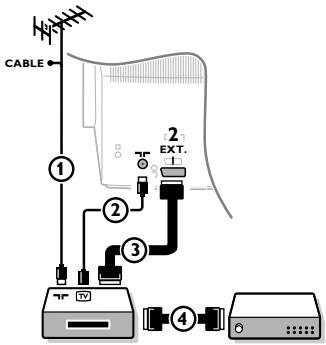
Recorder (VCR-DVD+RW)
text_image
CABLE ① ② ③ ④ EXT.Connect the aerial cables ①, ② and, to obtain the optimum picture quality, eurocable ③ as shown.
If your recorder does not have a euroconnector, the only possible connection is via the aerial cable. You will therefore need to tune in your recorder's test signal and assign it programme number 0 or store the test signal under a programme number between 90 and 99, see Manual installation, p. 6. See the handbook of your recorder.
Decoder and Recorder
Connect a eurocable ④ to your decoder and to the special euroconnector of your recorder. See also the recorder handbook. See Decoder, p. 8. You can also connect your decoder directly to EXT. 1 or 2 with a eurocable.
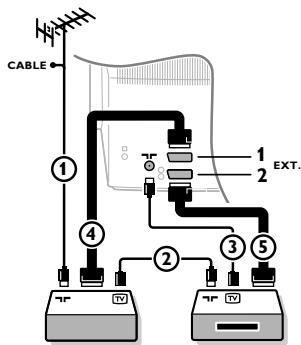
Other equipment (satellite receiver, decoder, DVD, games, etc.)
text_image
CABLE ① ② ③ ④ ⑤ 1 2 EXT.① Connect the aerial cables ①, ② and ③ as shown (only if your peripheral has TV aerial in-/output).
Connect your equipment with a eurocable ④ or ⑤ to one of the euroconnectors EXT.1, 2 or 3 to obtain a better picture quality.
② Look for the test signal of your peripheral in the same way as you do for a recorder.
③ Make a selection in the Setup, Source menu, p. 8.
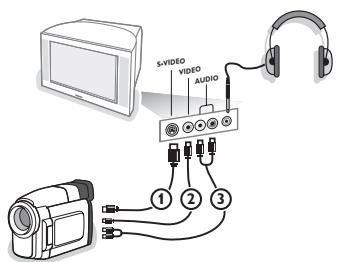
Side connections
text_image
S-VIDEO VIDEO AUDIO 1 2 3Camera or Camcorder
① Connect your camera or camcorder as shown.
② Connect to VIDEO ② and AUDIO L ③ for mono equipment. For stereo equipment also connect AUDIO R ③. S-VHS quality with an S-VHS camcorder is obtained by connecting the S-VHS cables with the S-VIDEO input ① and AUDIO inputs ③.
Do not connect cable ① and ② at the same time. This may cause picture distortion!
Headphone
① Insert the plug into the headphone socket ⏻ as shown.
2 Press 📁 on the remote control to switch off the internal loudspeakers of the TV.
The headphone impedance must be between 8 and 4000 Ohm. The headphone socket has a 3.5 mm jack.
In the Sound menu select Headphone volume to adjust the headphone volume.
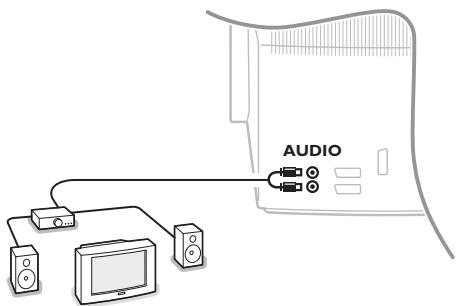
Stereo amplifier and two extra front speakers
text_image
AUDIO1 Connect the audio cables to the AUDIO input of your amplifier and to AUDIO L and R at the back of your TV.
② The output level is controlled by the volume control of the amplifier.
Note: Switch off the TV and your audio amplifier before connecting them. Set the audio amplifier's volume to minimum.
To select connected equipment
Press the → key on the remote control repeatedly to select EXT1, EXT2, EXT3* or SIDE according to where you connected your equipment at the back or the right side of your TV.
Remark : Most equipment (decoder, recorder) carries out the switching itself, when it is switched on.
* Only available on certain versions.
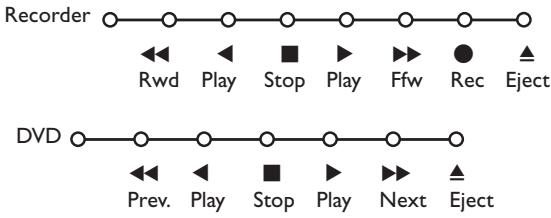
Recorder or DVD with EasyLink
The recorder (VCR or DVD+RW) or DVD can be operated with the remote control via the Recorder or DVD menu on screen.
flowchart
graph LR
    subgraph Recording
        A1["○"] --> B1["◀◀"]
        B1 --> C1["◀"]
        C1 --> D1["■"]
        D1 --> E1["▶"]
        E1 --> F1["▶▶"]
        F1 --> G1["●"]
        G1 --> H1["▲"]
        H1 --> I1["○"]
        J1 --> K1["◀◀"]
        K1 --> L1["Play"]
        L1 --> M1["■"]
        M1 --> N1["▶"]
        N1 --> O1["▶▶"]
        O1 --> P1["Ffw"]
        P1 --> Q1["●"]
        Q1 --> R1["Rec"]
        R1 --> S1["▲"]
        S1 --> T1["○"]
        U1 --> V1["◀◀"]
        V1 --> W1["Play"]
        W1 --> X1["■"]
        X1 --> Y1["▶"]
        Y1 --> Z1["▶▶"]
        Z1 --> AA1["▶▶"]
        AA1 --> AB1["▲"]
        AB1 --> AC1["○"]
        AD1["○"] --> AE1["◀◀"]
        AE1 --> AF1["◀"]
        AF1 --> AG1["Play"]
        AG1 --> AH1["■"]
        AH1 --> AI1["▶"]
        AI1 --> AJ1["▶▶"]
        AJ1 --> AK1["▶▶"]
        AK1 --> AL1["▲"]
        AL1 --> AM1["○"]
        AN["DVD"] --> AO["○"] --> AP["◀◀"]
        AP --> AQ["◀"]
        AQ --> AR["Play"]
        AR --> AS["Stop"]
        AS --> AT["Play"]
        AT --> AU["Next"]
        AU --> AV["▲"]
        AW["DVD"] --> AX["○"] --> AY["◀◀"]
        AY --> AZ["Play"]
        AZ --> BA["■"]
        BA --> BB["▶"]
        BB --> BC["▶▶"]
        BC --> BD["▲"]
        BD --> BE["○"]
        BF["DVD"] --> BG["○"] --> BH["◀◀"]
        BH --> BI["Play"]
        BI --> BJ["Stop"]
        BJ --> BK["Play"]
        BK --> BL["Next"]
        BL --> BM["▲"]
        BN["DVD"] --> BO["○"] --> BP["◀◀"]
        BP --> BQ["Play"]
        BQ --> BR["Stop"]
        BR --> BS["Play"]
        BS --> BT["Next"]
        BT --> BU["▲"]
        BV["DVD"] --> BW["○"] --> BX["◀◀"]
        BX --> BY["Play"]
        BY --> BZ["Stop"]
        BZ --> CA["Play"]
        CA --> CB["Next"]
        CB --> CC["▲"]
        CC --> CD["○"]
        CE["DVD"] --> CF["○"] --> CG["◀◀"]
        CG --> CH["Play"]
        CH --> CI["Stop"]
        CI --> CJ["Play"]
        CJ --> CK["Next"]
        CK --> CL["▲"]
        CM["DVD"] --> CN["○"] --> CO["◀◀"]
        CO --> CP["Play"]
        CP --> CQ["Stop"]
        CQ --> CR["Play"]
        CR --> CS["Next"]
        CS --> CT["▲"]
        CU["DVD"] --> CV["○"] --> CW["◀◀"]
        CW --> CX["Play"]
        CX --> CY["Stop"]
        CY --> CZ["Play"]
        CZ --> DA["Next"]
        DA --> DB["▲"]
    end
① Press the MENU key on the remote control.
② Select the Recorder or DVD menu with the cursor up/down.
③ Press the cursor left/right, up/down to select one of the recorder or DVD functions.
The key ● for recording can be operated in the TV mode.
If your EasyLink recorder has the system standby function, when you press the ⏻ key for 3 seconds, both TV and the recorder are switched to standby.
Audio- and video equipment keys
text_image
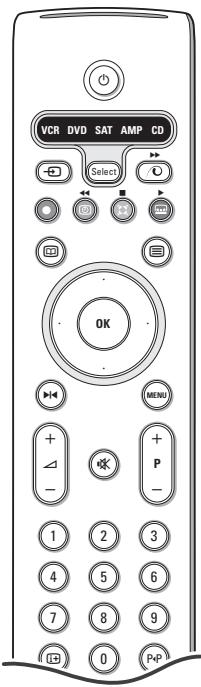
VCR DVD SAT AMP CD Select OK MENU + - 1 2 3 4 5 6 7 8 9 ID 0 P+PThis system remote control operates the following Philips equipment: TV, VCR, DVD, SAT (RC5), AMP (+TUNER), CD;
Press the Select key to operate any of the equipment indicated in the display. Another device can be selected by pressing Select repeatedly within 2 seconds. The led will blink slowly to indicate the device. Press one of the keys on the remote control to operate the peripheral equipment. To return to TV mode press Select while the led is blinking. When no action is taken within 60 seconds, the remote goes back to TV mode.
Note: When the Select key is pressed and held for more than 2 seconds, the RC5/RC6 system select command is transmitted.
to switch to standby
for pause (VCR, DVD, CD)
● for record,
◀◀ for rewind (VCR, CD); search down (DVD, AMP)
for stop
for play
for fast forward (VCR, CD); search up (DVD/AMP)
to select your choice of subtitle language (DVD); RDS news/TA (AMP); to shuffle play (CD)
to select a dvd title; RDS display (AMP); info on screen (CD)
i+ display information
MENU to switch the menu on or off -P+ for chapter, channel, track selection
0 to 9 digit entry
P◀P tape index (VCR), select a DVD chapter, select a frequency (AMP)
VCR timer
surround on/off (AMP, CD)
cursor up/down to select the next or the previous disc (CD)
cursor left/right to select the previous or following track (CD) search up/down (AMP)
Additionally the DVD, SAT and CD indicator can be programmed to operate the DVD-R, SAT (RC6), CD-R instead.
① Press the Select key repeatedly until no LED is lit.
2 To program DVD-R, press the OK key + digit 2. To program SAT (RC6), press the OK key + digit 4. To program CD-R, press the OK key + digit 6.
From now on, when the corresponding (DVD, SAT, CD) indicator is selected, the remote control will operate your DVD-R, SAT (RC6) or CD-R.
Note: To return to the modes programmed in the factory, either remove the batteries for a few minutes, or press the OK key + digit 1 (DVD mode); or + digit 3 (SAT-RC5) or + digit 5 (CD mode).
Record with your recorder with EasyLink
In TV mode, it is possible to start a direct recording of the programme which is being displayed on the TV screen. Continue to press the ● record key on the remote control for more than 2 seconds.
Note:
Switching programme numbers on your TV does not disturb recording! When recording a programme from a peripheral connected to EXT. 1, EXT. 3 or SIDE, you can not select another TV programme on the screen.
Tips
| Care of the screen | Do not touch, push or rub or strike the screen with anything hard as this may scratch, mar or damage the screen permanently. And please do not rub with dust clothes with chemical treatment. Do not touch the surface with bare hands or greasy cloth (some cosmetics are detrimental to the screen). Unplug the TV before cleaning the screen. When the surface becomes dusty, please wipe gently with absorbent cotton or other soft materials like chamois soaks. Do not use acetone, toluene and alcohol because they cause chemical damage. Do not use liquid cleaners or aerosol cleaners. Wipe off saliva or water drops as soon as possible. Their long time contact with the screen causes deformations and colour fading. |
| Poor Picture | Have you selected the correct TV system in the manual installation menu?Is your TV or house aerial located too close to loudspeakers, non-earthed audio equipment or neon lights, etc.?Mountains or high buildings can cause double pictures or ghost images. Sometimes you can improve the picture quality by changing the direction of the aerial.Is the picture or teletext unrecognisable? Check if you have entered the correct frequency. See Installation, p. 6.Are brightness, sharpness and contrast out of adjustment? Select Factory settings in the Setup, General menu, p. 7.Sometimes poor picture quality is possible when having activated an S-VHS camera or camcorder connected to the right side of your TV and another peripheral is connected to one of the peripherals at the same time. In this case switch off one of the other peripherals. |
| No picture | Is the aerial connected properly?Are the plugs tightly connected in the aerial socket?Is the aerial cable in good condition and does it have suitable plugs? |
| No sound | No sound on any channel? Check the volume isn't at minimum.Is the sound interrupted with the mute key? |
| No solution found for your picture or sound problem? | Switch your TV off and then on again once. Never attempt to repair a defective TV yourself. Check with your dealer or call a TV technician. |
| Remote control | If your TV no longer responds to the remote control, the batteries may be dead or the wrong mode (TV or other peripheral, see p. 3) is selected.You can still use theMENUkey and the -/+ keys at the top of your TV. |
| Menu | Have you selected the wrong menu? Press theMENUkey again to exit from the menu. |
| Standby | Your TV consumes energy in the standby mode. Energy consumption contributes to air and water pollution.Power consumption: 1 W. |
Information for users in the UK
(Not applicable outside the UK)
Positioning the TV
For the best results, choose a position where light does not fall directly on the screen, and at some distance away from radiators or other sources of heat. Leave a space of at least 5 cm all around the TV for ventilation, making sure that curtains, cupboards etc. cannot obstruct the air flow through the ventilation apertures.
The TV is intended for use in a domestic environment only and should never be operated or stored in excessively hot or humid atmospheres.
General Points
Please take note of the section 'Tips' at the end of this booklet.
Interference
The Department of Trade and Industry operates a Radio Interference Investigation Service to help TV license holders improve reception of BBC and IBA programmes where they are being spoilt by interference.
If your dealer cannot help, ask at a main Post Office for the booklet "How to improve Television and Radio Reception".
Mains connection
Before connecting the TV to the mains, check that the mains supply voltage corresponds to the voltage printed on the type plate on the rear panel of the TV. If the mains voltage is different, consult your dealer.
Important
This apparatus is fitted with an approved moulded 13 Amp plug.
To change a fuse in this type of plug proceed as follows :
- Remove fuse cover and fuse.
- Fit new fuse which should be a BS1362 5A, A.S.T.A. or BSI approved type.
- Refit the fuse cover.
In order to maintain conformity to the EMC directive, the mains plug on this product must not be removed.
Connecting the aerial
The aerial should be connected to the socket marked x at the back of the set. An inferior aerial is likely to result in a poor, perhaps unstable picture with ghost images and lack of contrast. Make-shift or set-top aerials are unlikely to give adequate results.
Your dealer will know from experience the most suitable type for your locality.
Should you wish to use the set in conjunction with other equipment, which connects to the aerial socket such as TV games, or a video camera, it is recommended that you consult your dealer on the best method of connection.
Stand (if provided)
Use only the stand provided with the set, making sure that the fixings are properly tightened. A diagram showing how to assemble the stand is packed with the stand. Never use a make-shift stand, or legs fixed with woodscrews.
Aide ?
text_image
Diagram illustrating household air pollution and heating conditions around a TV, with icons for sun, thermometer, lamp, and speaker.natural_image
Illustration of two types of medical or dental devices with arrows indicating movement, no text or symbols present.18) Son Surround Incredible surround
text_image
Diagram illustrating household air pollution and heating conditions around a TV, with icons for sun, thermometer, lamp, and speaker.natural_image
Illustration of two medical or laboratory devices with arrows indicating movement or force (no text or symbols)NL
1 Selecteer Kinderslot.
Kinderslot ○—Vergrendelen Vergrendeling —— Vergrendel na Ontgrendelen Programmavergr.
text_image
Diagram illustrating household air pollution and heating conditions around a TV, with icons for sun, thermometer, lamp, and speaker.natural_image
Illustration of two handheld devices with arrows indicating motion, one with a handle and the other with a clip (no text or symbols)text_image
Diagram illustrating household air pollution and heating conditions around a TV, with icons for sun, thermometer, lamp, and speaker.natural_image
Illustration of three different types of medical or laboratory devices with directional arrows indicating movement (no text or symbols present)OSD (On Screen Display)
text_image
tubbi— ○ Annulla ○ Accetta ○ Spazio ○ Elimina A B C D E F G 1 2 3 H I J K L M N 4 5 6 O P Q R S T U 7 8 9 V W X Y Z 0 ○ Shift ○ Special WORD NAME FOOTBALL Rosso Verde Giallo Azzurrotext_image
Diagram illustrating household air pollution and heating conditions with labeled symbols for sun, thermometer, lamp, and power outletnatural_image
Illustration of a handheld device with a clip and a separate cylindrical component (no text or symbols)OSD (On Screen Display)
text_image
Diagram illustrating household air pollution and heating conditions around a TV, with icons for lighting, sun, and temperature.natural_image
Illustration of three different medical or laboratory devices with arrows indicating motion or force (no text or symbols present)OSD (On Screen Display)
Manuell installation 6
Lagra programnamn 6
text_image
Diagram illustrating household air pollution and heating conditions, showing a TV with sun, thermometer, and speaker connected to a lamp and water source.natural_image
Illustration of two types of medical or cosmetic devices with arrows indicating movement, no text or symbols present.Manuell installation
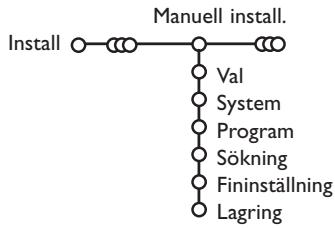
flowchart
graph TD
    A["Install"] --> B["Manuell install."]
    B --> C["Val"]
    C --> D["System"]
    D --> E["Program"]
    E --> F["Sökning"]
    F --> G["Fininställning"]
    G --> H["Lagring"]
OSD (On Screen Display)
text_image
Diagram illustrating household air pollution and heating conditions, showing a TV with sun, thermometer, and speaker connected to a lamp.natural_image
Illustration of a handheld device with three different parts, one showing internal components and arrows indicating motion (no text or symbols)OSD (On Screen Display)
text_image
Diagram illustrating household air pollution and heating conditions with icons for sun, thermometer, lamp, and speakernatural_image
Illustration of three different handheld devices with arrows indicating movement or force (no text or symbols)text_image
Diagram illustrating household air pollution and heating conditions, showing a TV with sun, thermometer, and speaker connected to a lamp.natural_image
Illustration of a medical device with three views: top, side, and bottom (no text or symbols)20) ☐ Time display: The time is displayed on the screen.
OSD (On Screen Display)
surround encender/apagar (AMP, CD)
text_image
Diagram illustrating household air pollution and heating conditions around a TV, with icons for sun, thermometer, lamp, and speaker.natural_image
Illustration of a handheld device with three different parts, one showing a button and arrow, the other a pen-like object (no text or symbols)OSD (On Screen Display)
text_image
puck— ○ Cancelar ○ Aceitar ○ Espaço ○ Apagar A B C D E F G 1 2 3 H I J K L M N 4 5 6 O P Q R S T U 7 8 9 V W X Y Z 0 ○ Trocar ○ Espec. WORD NAME FOOTBALL Vermelho Verde Amarelo Azulsurround ligado/desligado (AMP, CD)