
ERi 2 510x42 - Binoculars LEICA - Free user manual and instructions
Find the device manual for free ERi 2 510x42 LEICA in PDF.
| Product type | Rifle scope |
| Brand | Leica |
| Model | ERi 2.5-10x42 |
| Magnification | 2.5x – 10x |
| Objective diameter | 42 mm |
| Exit pupil | 14.9 – 4.2 mm |
| Field of view (at 100 m) | 3.9 – 14.5 m |
| Parallax | 100 m |
| Diopter compensation | -4 to +3 dpt |
| Adjustment (per click) | 1 cm at 100 m |
| Main tube diameter | 30 mm |
| Filter thread (objective side) | M46 x 0.75 mm |
| Waterproof | Up to 4 m |
| Reticle illumination | Red dot, 9 brightness levels, automatic shut-off at ±70° |
| Housing material | High-strength aluminum |
| Length | 325 mm |
| Weight (without/with rail) | 480 g / 520 g |
| Power supply | Battery (type not specified) |
| Anti-reflective coating | Aqua Dura™ |
| Transmission factor | TD/TN ≥ 90% |
| Eye relief | 100 mm |
Frequently Asked Questions - ERi 2 510x42 LEICA
User questions about ERi 2 510x42 LEICA
0 question about this device. Answer the ones you know or ask your own.
Ask a new question about this device
Download the instructions for your Binoculars in PDF format for free! Find your manual ERi 2 510x42 - LEICA and take your electronic device back in hand. On this page are published all the documents necessary for the use of your device. ERi 2 510x42 by LEICA.
USER MANUAL ERi 2 510x42 LEICA
A. 100 percent B. 95 percent C. 92 percent
- 1
4.1.16
a. a+1b.
-
-
-
- 5.
-
-
一、点拨: OA = OB x + 2y = 2
B
Wen
nntnnnne nne nee
2.100%
2013年1月1日
NO.107 NO.108
Theorem 2.1. Let be a closed set in ^n . Then, for any x , there exists a unique y such that
N°7 "Sister, please, when you are going to the museum, please go to the museum and take the bus from us to the museum."
The following theorem can be used to calculate the value of E(X) with the basis functions, giving a similar result as before. We will use the same notation for the two-dimensional case.
e . 1 . 2 . 3 . 4 . 5 . 6 . 7 . 8 . 9 . 10 . 11 . 12 . 13 . 14 . 15 . 16 . 17 . 18 . 19 . 20 . 21 . 22 . 23 . 24 . 25 . 26 . 27 . 28 . 29 . 30 . 31 . 32 . 33 . 34 . 35 . 36 . 37 . 38 . 39 . 40 . 41 . 42 . 43 . 44 . 45 . 46 . 47 . 48 . 49 . 50 . 51 . 52 . 53 . 54 . 55 . 56 . 57 . 58 . 59 .
A. a and b are integers, c is a prime number,and d is a prime number. A. a and b are integers, c is a prime number,and d is a prime number.
because the intersection between the hyperplane and the line x = 1 is a point of D .
102
NC
Fonse Fosco and Marcelo A. Alfonso
Universitat de Barcelona, Spain
In 2017, 2018, and 2019, the average annual rate of return on assets in U.S. equity securities is 3.5% and 4.6% for U.S. debt and U.S. real estate, respectively.
The analysis of the parameters can be performed by using the response function for one-phase current of order the current's magnitude, i.e.,
Tae 100-1072
000000000000000000000000000000000000000000000000
Cn=0.01
F=4.0+1.2+1.3
1.2017年8月2日
10202020202020202020202020202020202020202020202020
1
From the code, this is a judge's skill (T) The rules may be either (1) or (2).
mngnag, 1hnnnne nnnnne nnnnne
Designation of parts.. U2
Items supplied .U2
Foreword 11
Inserting the battery. 12
Assembly 13
Diopter compensation. 13
Elevation and lateral adjustment. 14
"Zeroing" the tower scales. 15
Changing the magnification. 15
Illuminated reticle adjustment 16
Maintenance / cleaning. 17
Spare parts. 18
Technical data 19
Leica Info Service 20
Leica Customer Service 20
foreworD
Dear Customer,
Throughout the world, the name Leica stands for premium quality, accurate precision mechanics, optimum reliability and long service life. We wish you a great deal of enjoyment and every success with your new Leica riflescope.
Your Leica riflescope is equipped with an outstanding optical system and an illuminated dot reticle. This delivers a clear, bright image even in difficult conditions and lighting situations, providing a reliable reticle and a reliable shot every time. It is also easy to operate and functional.
To enable you to make the best possible use of this high performance riflescope features, we recommend that you read these instructions before use.
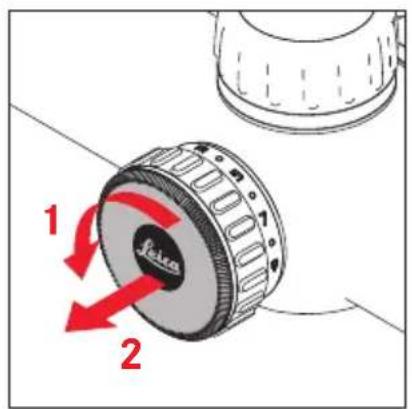
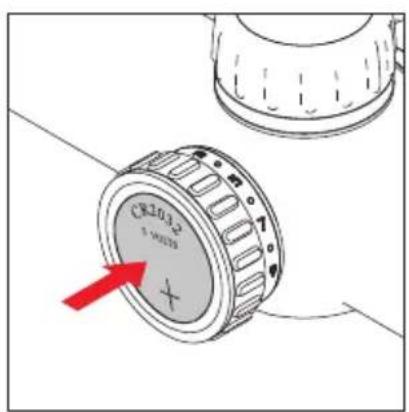
Inserting the Battery
Mounting
The first requirement for a stable point of impact is proper mounting of the riflescope on the weapon. There are a variety of different fittings available in specialist retailers for this purpose.
We recommending using only high quality components from well-known manufacturers for mounting, which offer the same quality as your Leica riflescope itself.
You can mount the sight yourself, making sure that it is flush and free of tension, but Leica recommends using a specialist workshop.
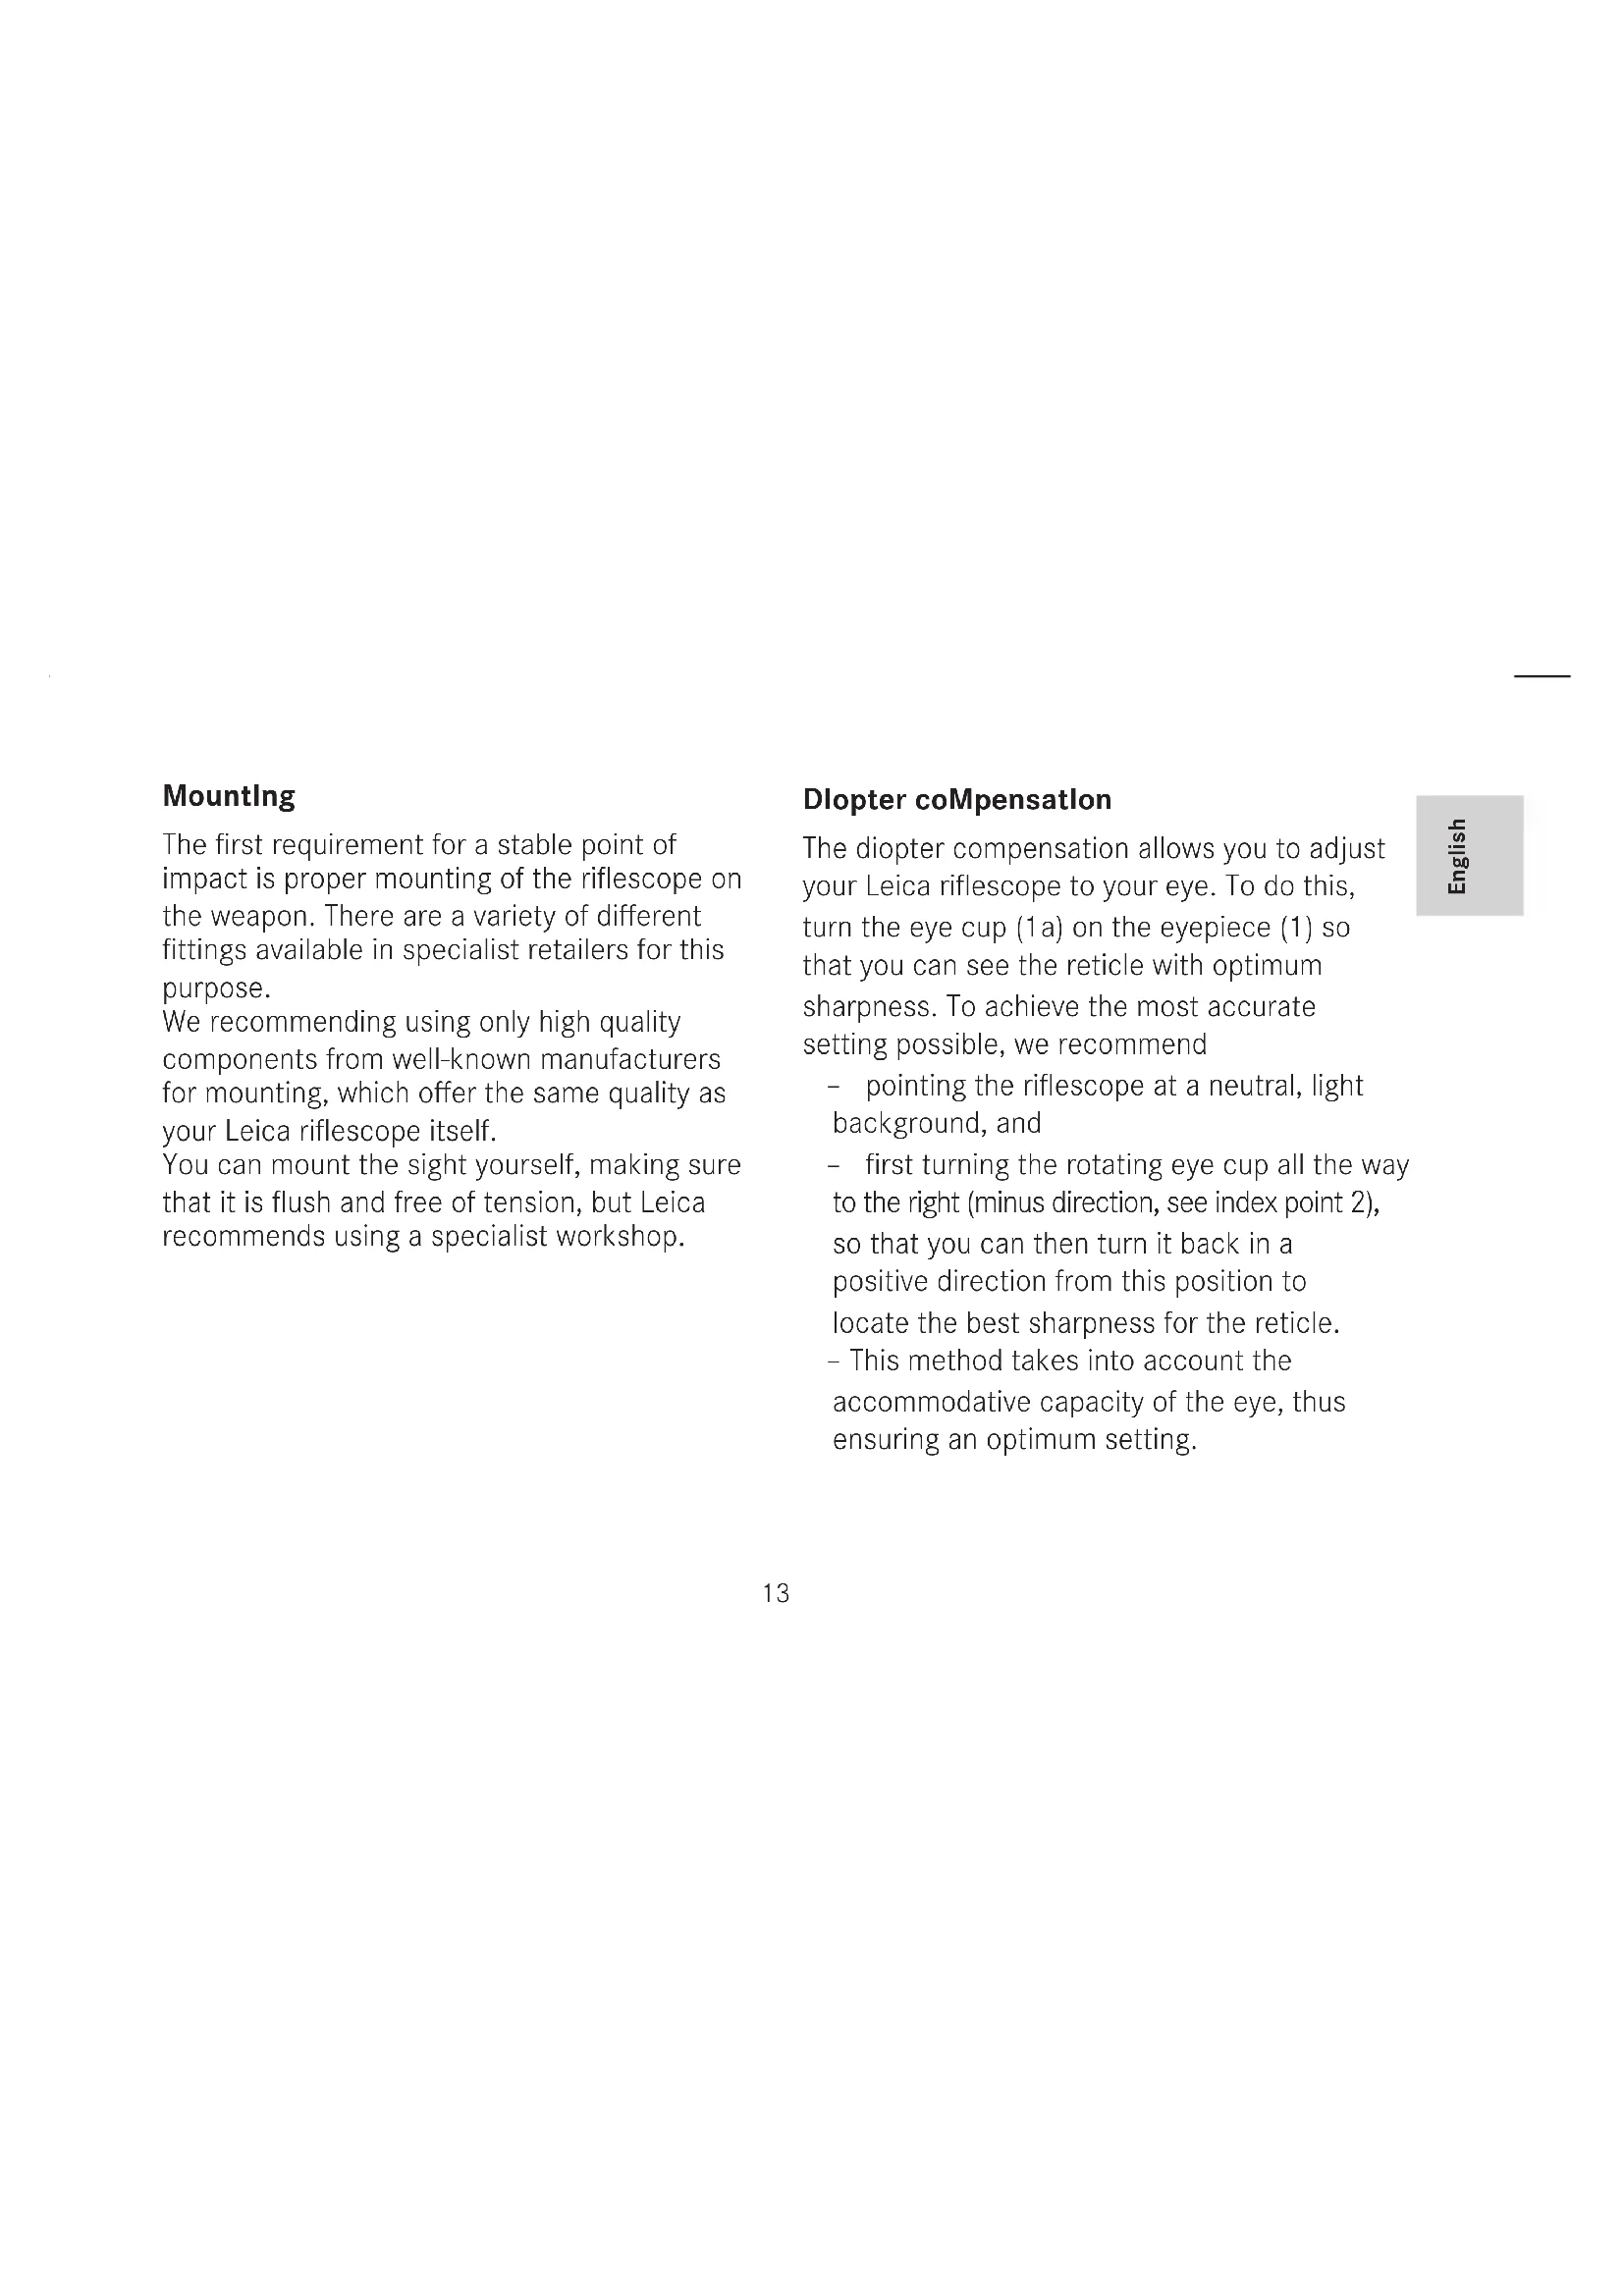
Dlopter coMpensation
The diopter compensation allows you to adjust your Leica riflescope to your eye. To do this, turn the eye cup (1a) on the eyepiece (1) so that you can see the reticle with optimum sharpness. To achieve the most accurate setting possible, we recommend
pointing the riflescope at a neutral, light background, and
- first turning the rotating eye cup all the way to the right (minus direction, see index point 2), so that you can then turn it back in a positive direction from this position to locate the best sharpness for the reticle.
- This method takes into account the accommodative capacity of the eye, thus ensuring an optimum setting.
elevation anD lateral aDjustMent
In case of variations in the point of impact, adjustment of the reticle to the weapon is required. This is done using the two adjusting towers - (5) for the elevation, (6) for lateral, with both adjusted in the same way:
First unscrew the cap (5.a/6.a) counter clockwise. Once the cap is removed, the knurled dial 5.b/6.b is visible, along with the associated scale 5.c/6.c and the corresponding index point 5.d/6.d. The knurled dials are very precisely graduated, with one click corresponding to 1cm at 100m .
If the point of impact is high, requiring downward correction, turn the knurled dial 5.b counter clockwise, or clockwise to correct upwards if the point of impact is low.
Make the lateral adjustments in the same way: If the point of impact is right, requiring correction to the left, turn the knurled dial 6.b counter clockwise, or clockwise to correct to the right if the point of impact is left.
"zeroling" the tower scales
(same procedure for both towers)
The process is initially the same as that described in the previous section.
Then,
-
unscrew the clamping screw with a Phillips head screwdriver (size PH 00), and
-
hold the knurled dial 5b / 6b in the relevant position while simultaneously turning the scale 5c / 6c so that the zero is aligned with the index point 5d / 6d .
- Finally, this setting is fixed by tightening the clamping screw.
Once you have done this for both scale dials, you can reliably make the initial setting at the zeroing range after any kind of adjustment by returning to the 0 positions, without the need to remember or make a note of anything.
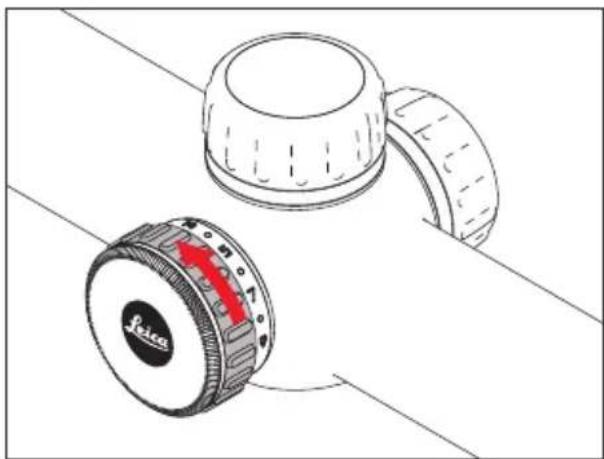
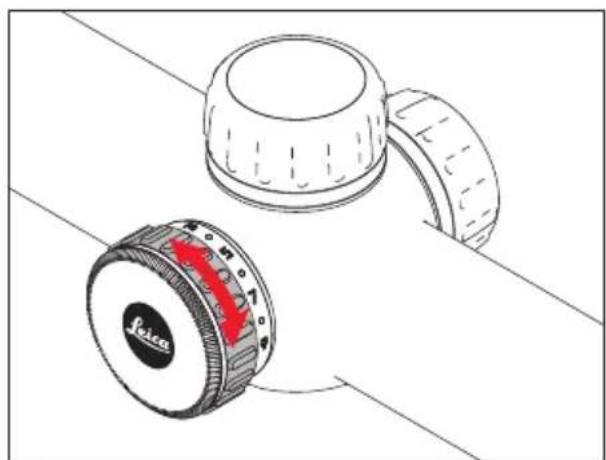
changing the Magnificatlon
To change the magnification, turn the dial (4) - to the right to reduce the magnification and to the left to increase it. The cam 4.1 improves orientation in darkness: If it is pointing upwards, the middle magnification is set, e.g. on the Leica ER 3 - 12 × 50 this is 6.
IIIuMInateD retIcle aDjustMent
The illumination of the reticle is turned on or off using the setting dial (7):
The same dial can be used to change the brightness of the illuminated dot to 9 levels to avoid any impairment when aiming with different ambient light levels:
MAINTENANCE / CLEANING
Your Leica riflescope does not require any special maintenance. Coarse dirt particles, e.g. sand should be removed with a hairbrush or blown off. Marks such as fingerprints on the front lens and eyepiece lenses can be cleaned with a damp cloth and then wiped off with a soft, clean leather or dust-free cloth (recommend: Leica Anti Fog Solution).
Important:
- Make sure your riflescope is protected from impacts not caused by the weapon.
- Do not exert heavy pressure when wiping highly soiled lens surfaces. Although the coating is highly abrasion resistant, it can be damaged by sand or salt crystals.
- The housing should only be cleaned with a moist leather cloth. Using dry cloths brings a risk of static charge.
- Alcohol and other chemical solutions must not be used to clean the optical system or the housing.
-
In addition to the type designation, every Leica rifle scope has its "personal" serial number. Note this number in your documentation for security.
-
Do not attempt to dismantle the product. Repairs may only be carried out by authorized workshops.
- Store your riflescope in a well ventilated, dry and cool location, particularly to prevent the formation of fungus in humid climates.
spare parts
If you ever require spare parts for your Leica riflescope, e. e. screw-on covers, seals or caps, contact our Customer Care department (see p. 20 for address) or the Leica agent in your country (see Warranty Card for addresses).
TECHNICAL DATA
LEICAERi2.5-10x42LEICAERi3-12x50
| Magnification | 2.5 - 10x 3-12 | |
| Lens diameter | 42mm 50mm | |
| Exit pupil | 14.9-4.2mm 14.9-4,1mm | |
| Visual field at max/min magnification (m/100m) | 3.9/14,5m 3.2-11,5m | |
| Parallax | 100m | |
| Exit pupil longitudinal distance | 100mm | |
| Coating | Aqua Dura™ | |
| Transmission factor | TD/TN ≥90% | |
| Diopter compensation (dpt.) | -4/+3 | |
| Adjustment 1/4 | 1cm per click / 100m | |
| Center tube diameter | 30mm | |
| Filter thread, lens side | M46x0.75mm M52 x 0,75 | |
| Water tightness | to 4m | |
| Reticle illumination | Illuminated dot, low light capability thanks to 9-level brightness adjustment, automatic shut-off at ± 70° inclination of telescopic sight. | |
| Housing material | High strength aluminum | |
| Length | 325mm 346mm | |
| Weight | \( {480}/{520}{\mathrm{\;g}}^{1} \) | \( {620}/{660}{\mathrm{\;g}}^{1} \) |
without/with rail
Ielca Info service
The Leica information service can provide you with an answer to any technical application questions relating to the Leica range either in writing, on the telephone or by e-mail.
Leica Camera AG
Information Service
PO Box 1180
D-35599 Solms
Ielca custoMer service
For servicing your Leica equipment or in the event of damage, the Leica Camera AG Customer Care department or the repair service provided by authorized Leica agents in your country are available (see the Warranty Card for a list of addresses).
Leica Camera AG
Customer Care
TEXHNUECKHEXAPAKTEPHCTNIK
LEICAERi2,5-10x42LEICAERi3-12x50

- Wen
- NO.107 NO.108
- Tae 100-1072
- foreworD
- Mounting
- Dlopter coMpensation
- elevation anD lateral aDjustMent
- "zeroling" the tower scales
- changing the Magnificatlon
- IIIuMInateD retIcle aDjustMent
- MAINTENANCE / CLEANING
- Important:
- spare parts
- TECHNICAL DATA
- Ielca Info service
- Ielca custoMer service
- TEXHNUECKHEXAPAKTEPHCTNIK
Brand : LEICA
Model : ERi 2 510x42
Category : Binoculars