
SkyStar S2 - Electronic board TECHNISAT - Free user manual and instructions
Find the device manual for free SkyStar S2 TECHNISAT in PDF.
| Product Type | DVB-S/S2 Satellite TV Card for PC |
| Model | SkyStar S2 |
| Brand | TechniSat |
| Interface | PCI Express (PCIe) |
| Dimensions (approx.) | 17.3 cm × 10.7 cm |
| Weight (approx.) | 50 g |
| Power Supply | Via PCI Express bus (PCIe card requires connection to PC power supply) |
| Antenna Connector | F connector (female, 75 Ω) |
| DVB Standard | DVB-S/DVB-S2 |
| Supported Codec | MPEG-2, MPEG-4 H.264 |
| Supported Operating System | Windows 7 and later, Linux (via V4L) |
| Main Functions | Satellite TV reception, recording, timeshift, hardware decoding |
| Maintenance and Cleaning | Disconnect before cleaning. Use a soft, dry cloth. |
| Safety | Discharge static electricity before handling. Do not touch the contacts. |
| Spare Parts and Repairability | Card not user-repairable. No spare parts available. |
| General Information | Manufactured by TechniSat GmbH, Germany. Manual downloadable in multiple languages. |
Frequently Asked Questions - SkyStar S2 TECHNISAT
User questions about SkyStar S2 TECHNISAT
0 question about this device. Answer the ones you know or ask your own.
Ask a new question about this device
Download the instructions for your Electronic board in PDF format for free! Find your manual SkyStar S2 - TECHNISAT and take your electronic device back in hand. On this page are published all the documents necessary for the use of your device. SkyStar S2 by TECHNISAT.
USER MANUAL SkyStar S2 TECHNISAT
Quick Installation Instructions
for all TechniSat PCI/PCIe/USB 2.0 products from TechniSat

I. Introduction 15
1.Description of the TechniSat DVB-PC TV product range 15
1.1 PCI cards 15
1.2 PCI Express cards 15
1.3 USB 2.0 boxes/sticks 15
- Latest software and instructions 15
- Conventions used in this user manual 15
II. Installing the DVB-PC TV device 15
- Installing the PCI/PCIe card 15
2.Installing the USB box/stick 17
III. Installing the driver and software components 17
- Summary 17
2.Installing the driver and software package 17 - Installing the DVB-PC TV Stars applications 18
4.Installing the driver manually 22 - Updating the driver 23
- Linux 23
I. Introduction
1. Description of the TechniSat DVB-PC TV product range
1.1 PCI cards
PCI cards are expansion cards which are inserted into a PCI slot on a PC's motherboard.
1.2 PCI Express cards
PCI Express cards are expansion cards which are inserted into PCIe slots on a PC's motherboard.
1.3 USB 2.0 boxes/sticks
USB 2.0 boxes are external PC devices that are connected to a USB port on a PC via a USB cable. USB sticks are inserted directly into a USB port.
2. Latest software and instructions
You can download the latest versions of drivers, software and instruction manuals from our website: http://www.technisat.com.
3. Conventions used in this manual
This user manual uses the following conventions for clarity:
Navigation paths are shown as follows:
"Start" => "Program Files" => "TechniSat DVB" => "Setup4PC"
The path shown in this example starts Setup4PC.
II. Installing the DVB-PC TV device
Please follow these step-by-step installation instructions.
You will also find the installation instructions on the installation CD and FAQs are provided on the TechniSat website at www.technisat.com to give additional help in the event of a problem.
The software installation process requires you to restart the system. Please ensure that the installation CD is not removed from the CD drive until the installation process has been completed. If the CD does not start automatically, please use the "Start.exe" file on the CD.
1. Installing the PCI/PCIe card
Before you start: Before you install the PCI/PCIe card, please ensure that the computer is switched off and disconnected from the mains. A computer that is connected to the mains during installation can cause damage to your PC or DVB-PC TV product.

1.1 Open the computer housing as per the manufacturer's instructions.
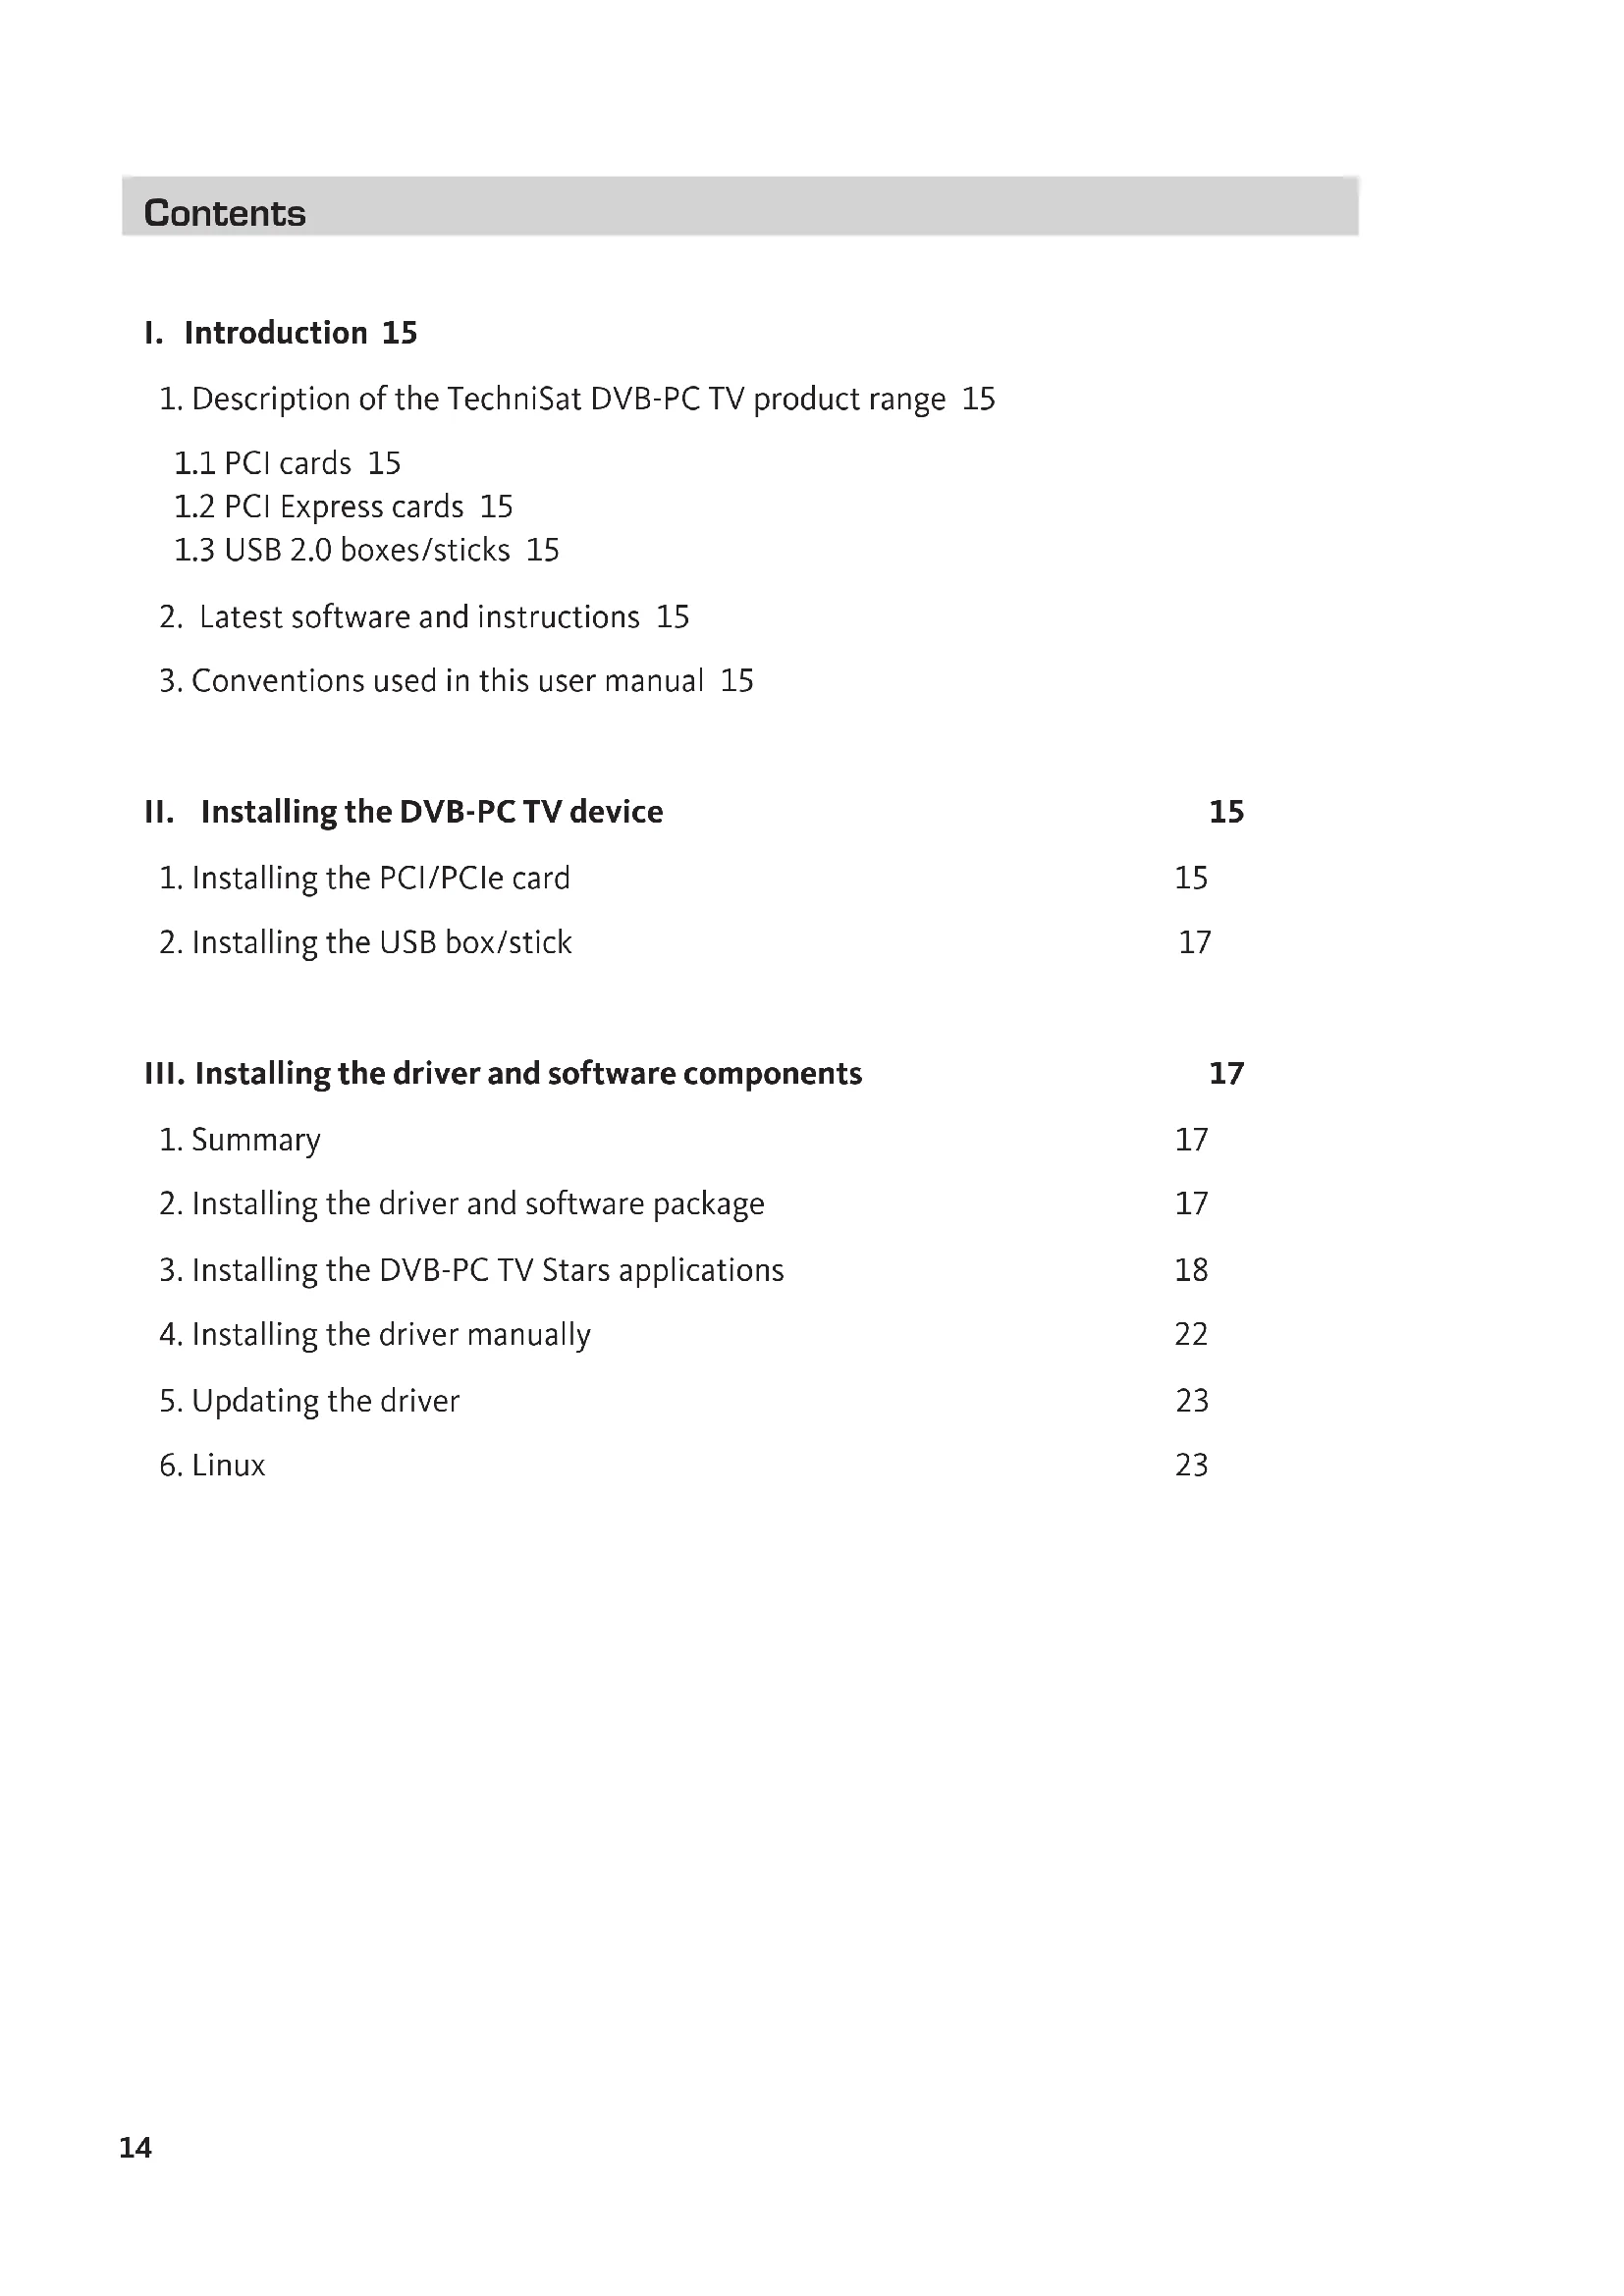
1.2 Locate a free PCI / PCIe slot for your PCI/PCIe card and remove the cover plate. (Fig. 1)
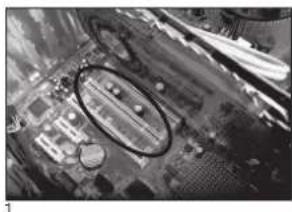
1.3 Before touching the PCI/PCIe card, discharge any static electricity from your body by touching an appropriate earth point. (Fig. 2)
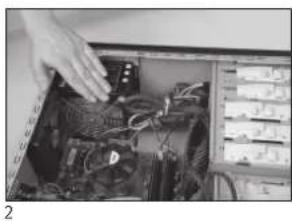
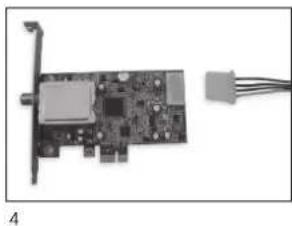
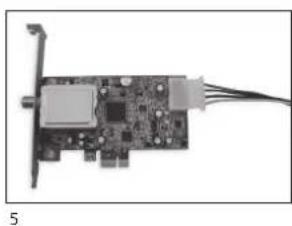
1.4 Only hold the PCI/PCIe card by its outside edges. Insert it firmly but carefully into the slot until it engages in the correct position. TechniSat does not accept any liability for damage caused by incorrect installation. (Fig. 3)
1.5 PCIe card: PCIe card require a separate power source supplied via cable from the PC power supply and fitted to the connector on the PCIe card. If this connection is not made, the operating system will not recognise the card.
Therefore the software and drivers will not be installed. (Fig. 4 and 5)
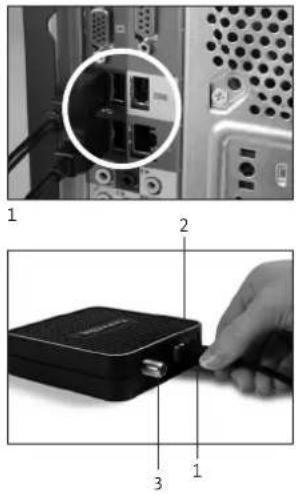
1.6 After you have closed up the computer housing, connect up your TV cable (satellite, cable or aerial), power cable and any other cables that were previously disconnected. (Fig. 6)
1.7 Switch on your computer. Windows will recognise the new hardware and ask for a driver for the PCI/PCIe card. Insert the installation CD provided and start the installation process.
2. Installing the USB box/stick
2.1 a Connect the USB box to your PC using the USB cable.
2.1 b The USB stick should be inserted directly into a USB port on your PC.
2.2 Connect the supplied power supply to the USB box. The USB stick does not require a separate power supply as it is powered via the USB port.
2.3 Connect your TV cable (satellite, cable or aerial) to the USB box or USB stick. Please note that there is a UHF adaptor supplied with the USB stick for connection to a household aerial.
2.4 Windows will recognise the new hardware and ask you for a driver for the PCI/PCIe card. Insert the installation CD that has been provided and start the installation process.
III. Installing the driver and software components
1. Summary
As an example, this chapter describes how to install a SkyStar USB HD on a Windows 7 Ultimate x86 operating system. The installation process is similar for other operating systems supported by this product.
The latest operating manuals in multiple languages can be accessed by clicking "Manuals" in the installation screen.
2. Installing the driver and software package
Insert the installation CD. Autostart should open the installation screen (Fig.1)
If the installation screen does not appear, it can be started manually by using "Start.exe" on the Installation CD.
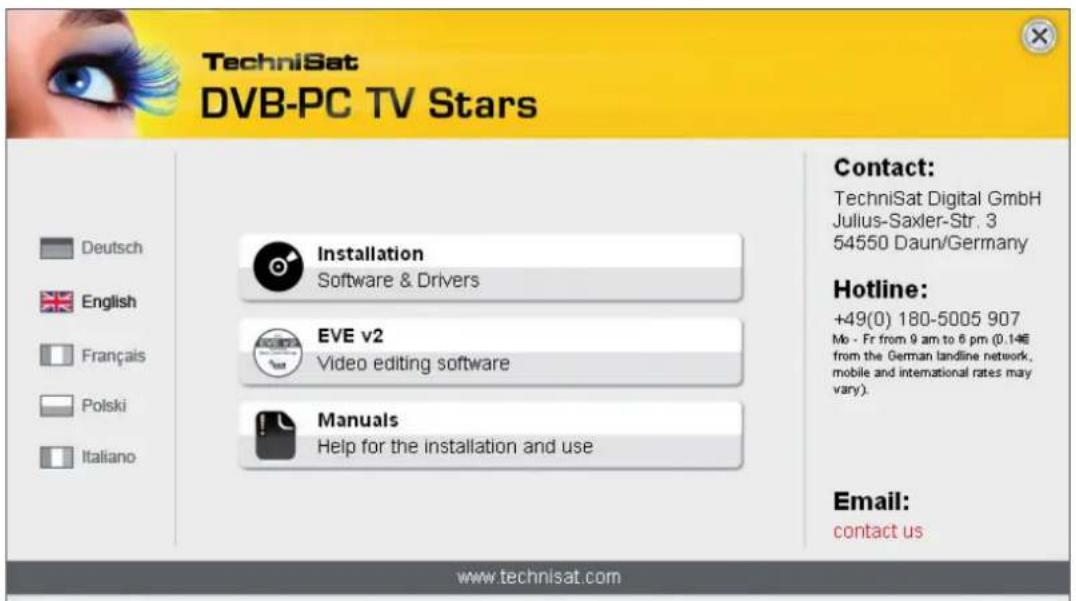
Figure 1: DVB-PC TV installation screen
3. Installing the DVB-PC TV Stars applications
When you start the setup procedure in Windows Vista or Windows 7, the "User Account Control" window will appear (Fig.2):
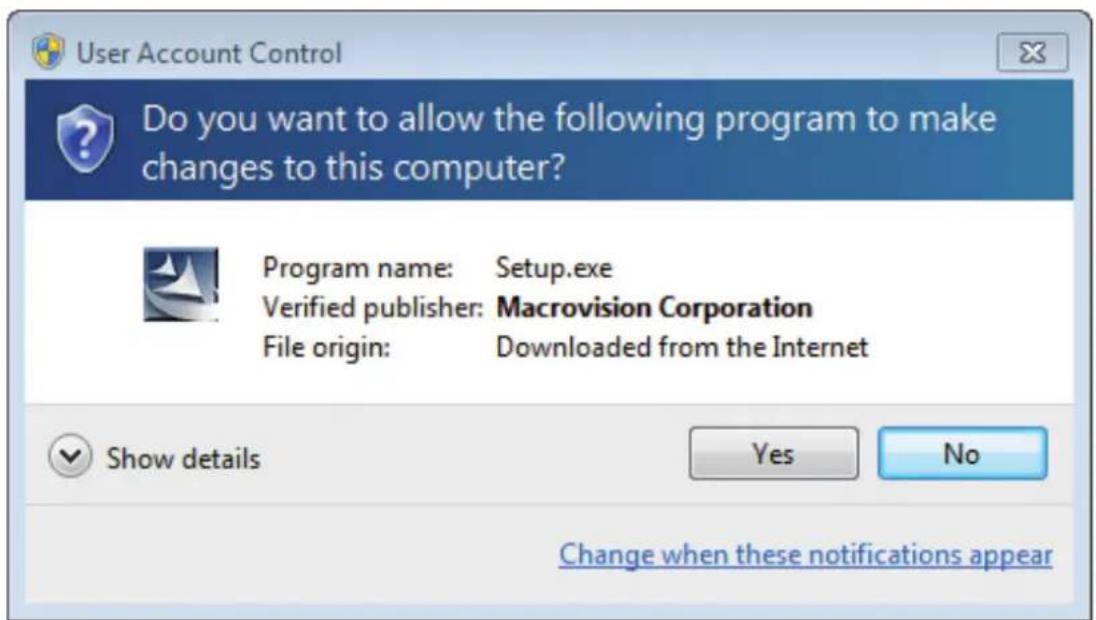
Figure 2: User account control in Windows 7
Confirm this message by clicking on "Yes". The setup process will be halted if you click on "No" and the installation of the drivers and software will be discontinued.
The language menu is displayed first. Select your preferred language (e.g. English) and click "Next" to continue. (Fig. 3)
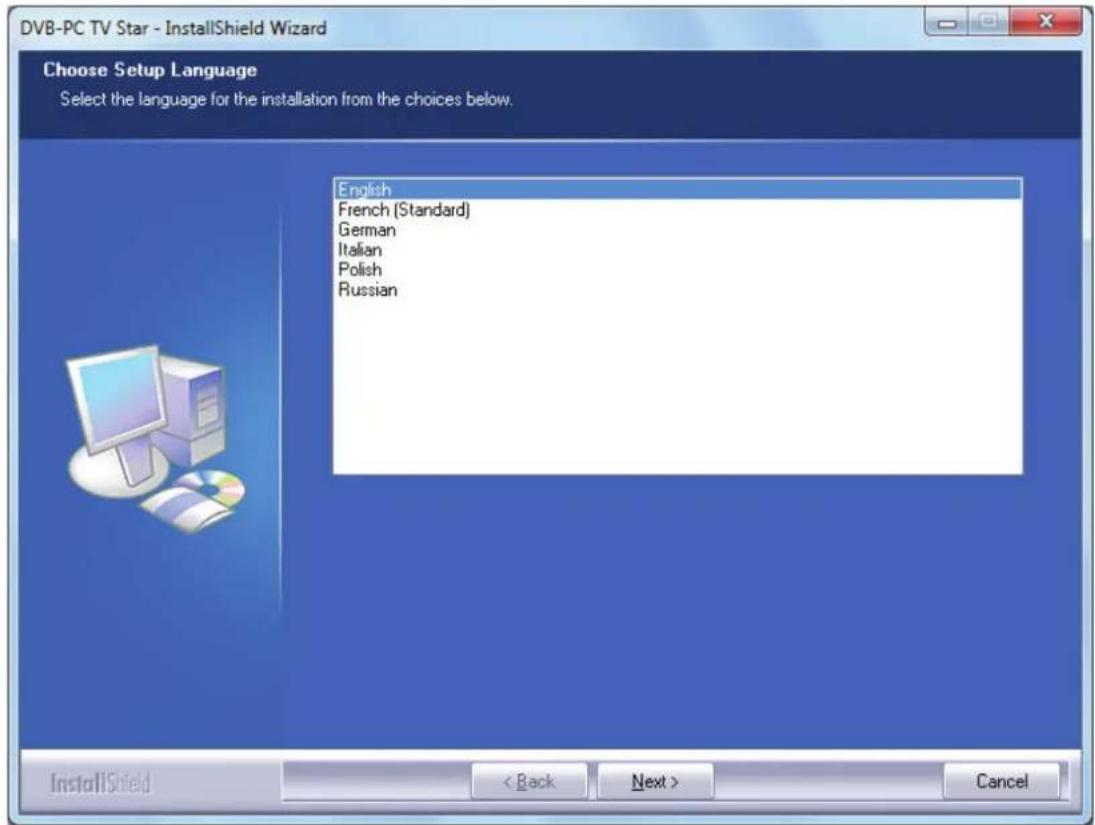
Figure 3: Selecting the setup language
The drivers for your TechniSat DVB-PC TV Star device will now be automatically installed. If you have already installed older versions of the TechniSat DVB-PC TV Star driver and software, setup will deinstall the old driver and software and then reboot. After reboot the installation process of the new driver and software will resume automatically.
During installation of the driver, the "Windows Security" window opens as illustrated below (Fig 4).
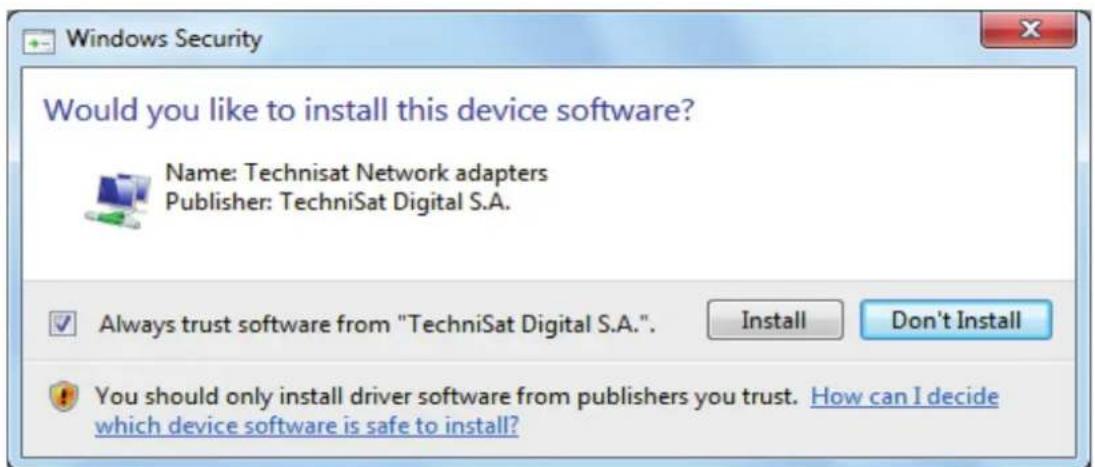
Figure 4: Windows Security
Click on "Install" to run the driver installation.
Installation of the software components is now carried out. Click "Next" to continue. (Fig.5)
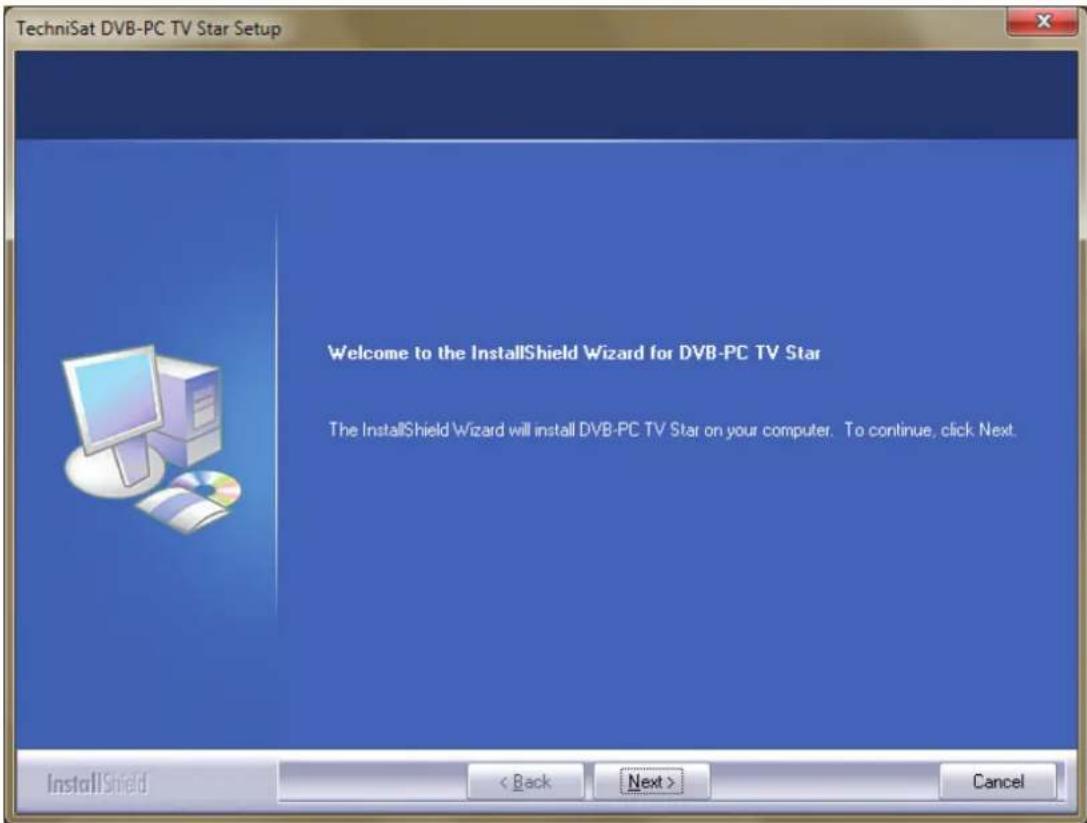
Figure 5: Welcome
Read the licence agreement for the TechniSat DVB-PC TV Star and click "Yes" to accept. (Fig.6)
Use the pre-defined folder or click on "Browse" to specify a destination location for the software files. Click "Next" to continue. (Fig. 7)
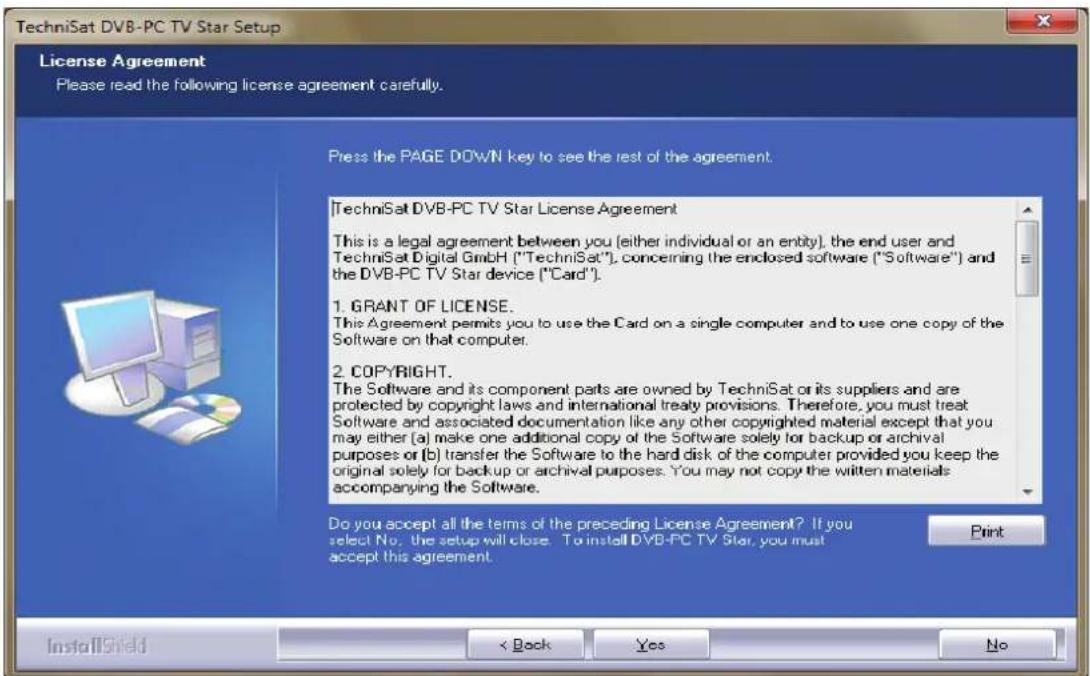
Figure 6: Software Licence Agreement
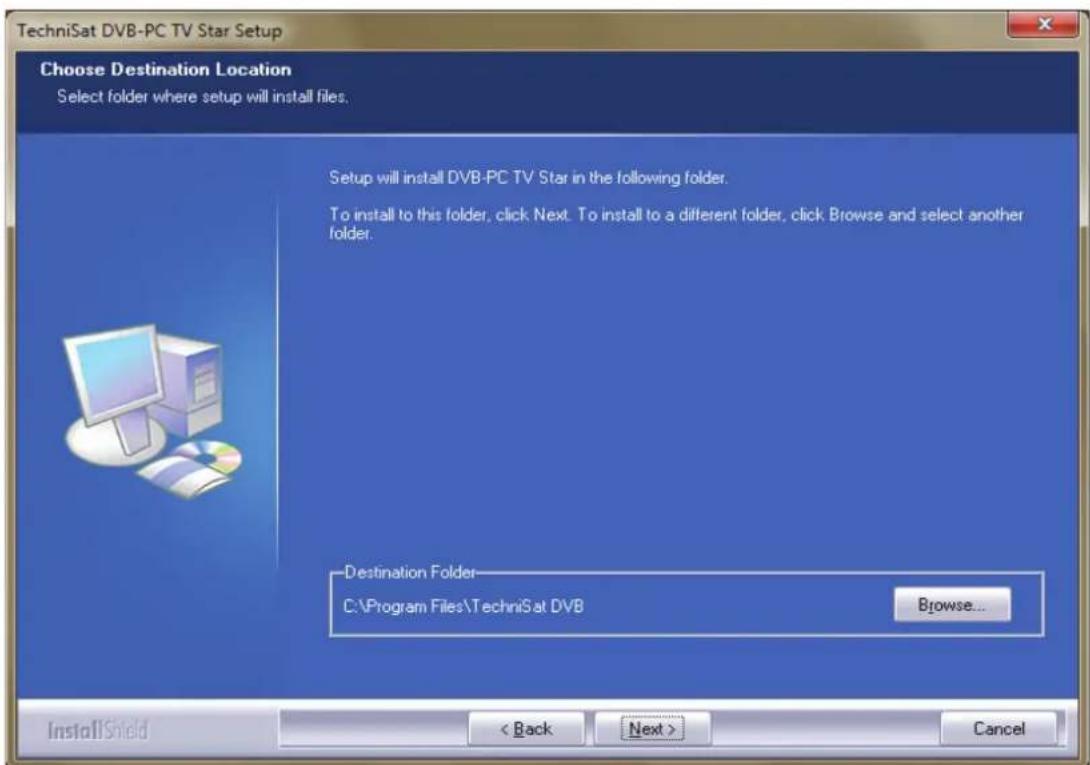
Figure 7: Choosing the target path
Click "Next" to continue. The setup programme now installs the software. Complete the software and device driver installation by clicking "Finish" and restarting your computer.
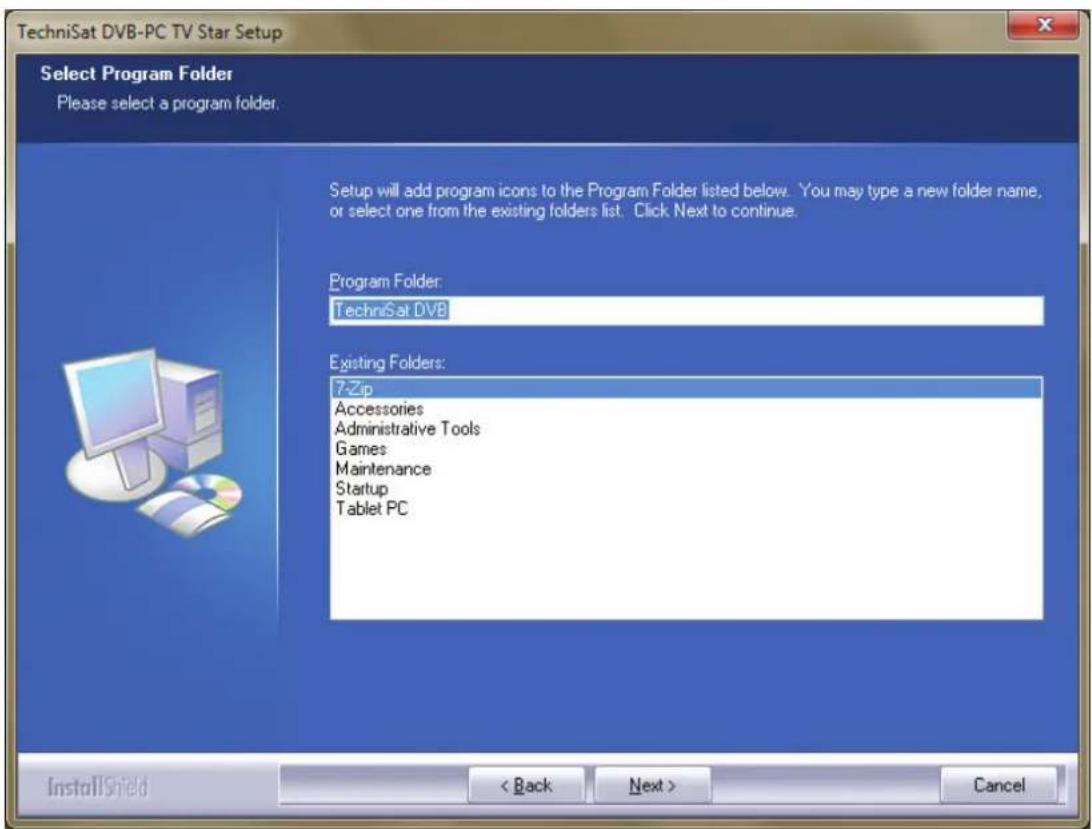
Figure 8: Selecting the program folder
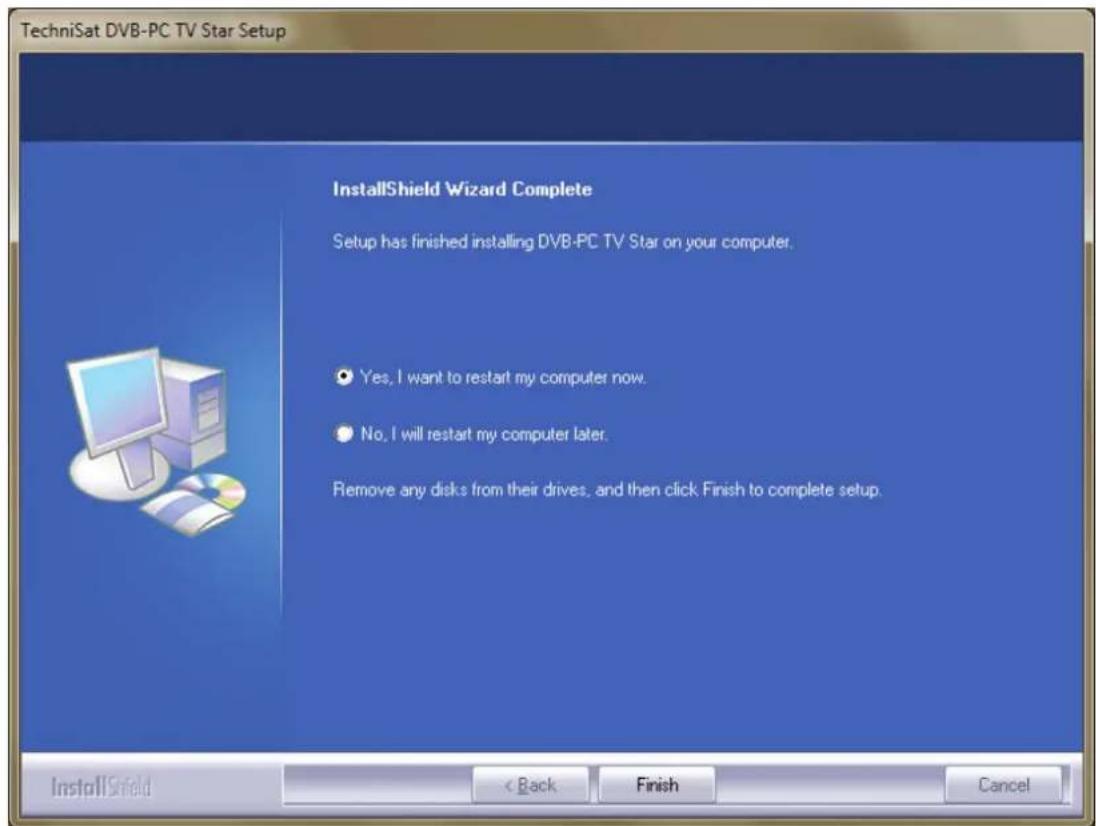
Figure 9: Setup completed
Click on "Install" to run the driver installation.
Installation of the software components is now carried out.
Click on "Next" to continue. (Fig.5)
4. Installing the driver manually
If you have already installed a previous version of the driver or software for your TechniSat DVB-PC TV Stars device, please refer to Section III.3.
The Hardware Installation wizard will only start-up if Windows recognises a new device for which no driver has yet been installed. If there are multiple DVB-PC TV Stars devices connected to your system, the "Found New Hardware" wizard opens for each device. You will need to install a separate driver for each device. As soon as the last device driver has been installed, you can begin installing the software.

Figure 10: Found New Hardware
You need administrator rights to install the software packages for your products. Check the "User Accounts" to ensure that you have administrator rights.
You can either manually install the device drivers first and then the software or let the drivers be set up automatically by the software installation process. For less experienced users we recommend installing the drivers automatically via the software installation process.
For DVB-PC TV Stars that are Compatible with Windows 7®, the operating system searches online for the correct device driver so it is important to ensure that there is a broadband connection. The drivers are then installed automatically and driver updates are received via Automatic Updates.
If a problem occurs with this process, please refer to the FAQ (frequently asked questions) section on our website.
5. Updating the driver
If you have installed several TechniSat PCI, PCI Express or USB devices, you will need to update the drivers for each device separately.
If you have installed the Server4PC data reception application, you will need to close it after starting the system before you update your software. The Server4PC program icon is located in the Windows task bar.
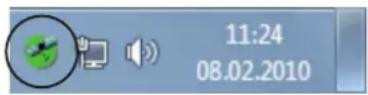
Figure 11: Server4PC on the system display
Now start the software installation. The Software Installation wizard automatically updates the drivers for all installed devices and the software package.
The software installation routine will now execute the next step.
6. Linux
TechniSat supports the efforts of the Linux Developer Community and the majority of our products are supported within the Linux Video-4 framework (www.linuxtv.org).
Please note that TechniSat cannot offer any support or warranty for this software and that you use it at your own risk.
TechniSat
KpaTKaI NHCTpyKcIy IIO yCTaHOBKe
Для BCex yctpoиCTB PCI/PCIe/USB 2.0\ празьодства Компани TechniSat

I. BBeDeHne 111
- Onicahne cepn uippoBbIX TB-THHePOB DVB nI K KompaHn TechniSat11
1.1 KapTbI PCI
1.2 KapTbi PCI Express 111
1.3 BHeuHn TB-THOep c nHTeppeiCOM USB 2.0 111
2. NocneHnBepn nporpaMMHOro o6ecneueHn nHcTpyKcN 111
3.YcnoBhIe 6o3HaueHnI, nCNoJIb3yeMbIe B DaHHOM pyKOBoIDCTBe 111
II. YctaHOBka uΦpOBoTb-TIOhepa DVB nI K 111
1.YctaHOBka KapTbI PCI/PCIe 111
2. YctaHOBka BHeuHero TB-THHepa/KoMnakTHoro TB-THHepa c nHTeppeiCOM USB 113
III. UctaHOBka dpaBepa N KOMnoHETOB nporpaMMHoro o6ecneueHn 113
1.Obuie cBeHn 113
2.YctaHOBkaIpaBepOBn nporpaMMHOro naKeTa 113
3.YcTaHOBKa npInoJxKeHn IJIy DVB-PC TV Star 114
4.PyuHa yCTaHOBka dpaBepa 118
5.O6HOBneneIpaBepa 119
6.Операцноная систema Linux 119
I. BBeDHeHne
1. Onincahne cepnn uΦpoBbIX TB-TIOhepOB DVB nI K KomnaHn TechniSat
1.1 KapTbl PCI
KapTbI PCI - ΑTO ДОПОНнITeNBHbI e yCTpoIcTbA, BCTaBnЯEmbI e B PCI-cnot MaTePnHcKoI nPaTbI KOMNbIOTepa.
1.2 KapTbl PCI Express
KaptbyPCI Express - 3TO dOnonHntbHbIe yCTpoNCTBa, BCTabnReMbIe B cnot PCIe MaTeepHHCKOJI PJIaTbI KOMNbHTepa.
1.3 Bheunn TB-TIOHep c HHTepeoucom USB 2.0
BHeuHn TB-TIOHeP c INTepecOM USB 2.0 - To BHeUHee ycTpoiCTBO nIa PIK, KToOpoe NoDKJIouaEcTcK npTy USB 2.0 KOMNbHTepa c NOMOuBu USB-Ka6eIa.
2. Последnia Версану nporpaMMHoro o6ecneueHЯ и Иструки

Pnc.10:HaHJeHo HOBoe o6bpyoBaHne
Document Release Date:
Februar 2011
Created by:

- Quick Installation Instructions
- Introduction 15
- Installing the DVB-PC TV device 15
- Installing the driver and software components 17
- Introduction
- Description of the TechniSat DVB-PC TV product range
- PCI cards
- PCI Express cards
- USB 2.0 boxes/sticks
- Latest software and instructions
- Conventions used in this manual
- Installing the DVB-PC TV device
- Installing the PCI/PCIe card
- Installing the USB box/stick
- Installing the driver and software components
- Summary
- Installing the driver and software package
- Installing the DVB-PC TV Stars applications
- Installing the driver manually
- Updating the driver
- Linux
- TechniSat
- KpaTKaI NHCTpyKcIy IIO yCTaHOBKe
- BBeDeHne 111
- YctaHOBka uΦpOBoTb-TIOhepa DVB nI K 111
- UctaHOBka dpaBepa N KOMnoHETOB nporpaMMHoro o6ecneueHn 113
- BBeDHeHne
- Onincahne cepnn uΦpoBbIX TB-TIOhepOB DVB nI K KomnaHn TechniSat
- KapTbl PCI
- KapTbl PCI Express
- Bheunn TB-TIOHep c HHTepeoucom USB 2.0
- Последnia Версану nporpaMMHoro o6ecneueHЯ и Иструки
Brand : TECHNISAT
Model : SkyStar S2
Category : Electronic board