Maxi t.u - Media player TrekStor - Free user manual and instructions
Find the device manual for free Maxi t.u TrekStor in PDF.
Frequently Asked Questions - Maxi t.u TrekStor
User questions about Maxi t.u TrekStor
0 question about this device. Answer the ones you know or ask your own.
Ask a new question about this device
Download the instructions for your Media player in PDF format for free! Find your manual Maxi t.u - TrekStor and take your electronic device back in hand. On this page are published all the documents necessary for the use of your device. Maxi t.u by TrekStor.
USER MANUAL Maxi t.u TrekStor
Audio / Video settings:
Thank you for buying the TrekStor MovieStation. We are confident that this product will be the source of much enjoyment.
With the MovieStation, you have the opportunity to display pictures and play films and music. As described in the operating instructions, they must first be copied to the MovieStation. In addition, the MovieStation can also be used as a traditional external hard disk.
The MovieStation supports a multitude of different video and audio formats. Due to the very large number of different video formats, TrekStor cannot guarantee the compatibility of the MovieStation with every available video format.
The MovieStation supports the following formats:
Video: MPEG-1 (VCD), MPEG-2 (SVCD/KVCD), DVD (IFO/VOB), DivX 3 (to 720 × 400 ), DivX 5 (to 720 × 400 ), XviD
Audio: MP3 (32 - 320 kbps), WMA (32 - 320 kbps), OGG (45 - 500 kbps), WAV (16 - 48 kHz)
Pictures: JPEG
If you encounter problems while playing your video files, please check the utilized audio and video formats. You may, for example, use the free software GSpot (http://gspot.headbands.com/).
1) Included in delivery
TrekStor • MovieStation maxi t.u
2 stands
Power supply (100V - 240V)
USB 2.0 cable
Remote control
2 AAA batteries
AV adapter cable (3.5 jack on 3 x cinch)
YUV adapter cable (3.5 jack on 3 x cinch)
Driver CD
Operating instructions
2) System requirements
Computer:
Windows® 2000 / XP / Vista, Mac® OS X 10.3 and up, Linux®
- USB 1.1 connection (Hi-Speed USB 2.0 connection recommended)
Television / HiFi system:
- Cinch input for audio / video
or - Cinch input for video components + cinch input for audio
or - Cinch input for video components + optical audio input (Toslink)
3) Controls of the TrekStor MovieStation
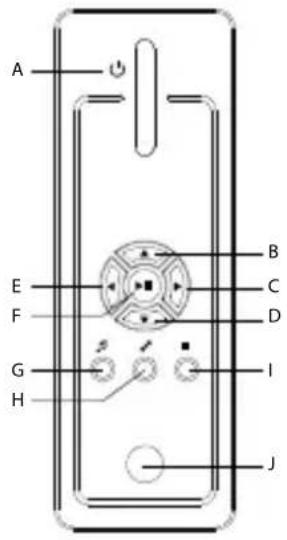

On/off switchA)
included in delivery)
Video components M)
output
Audio / video outputN)
Power connectionO)
4) Connecting the TrekStor MovieStation to a PC
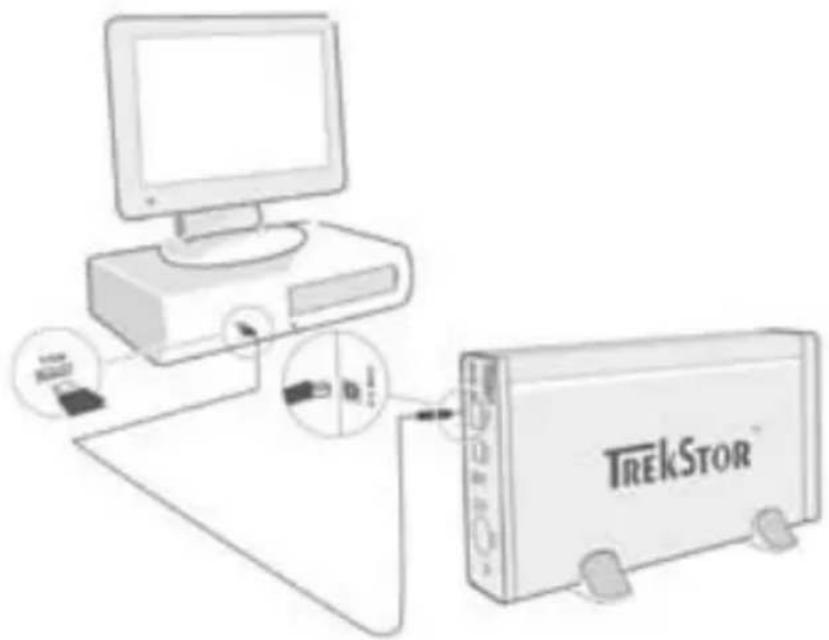
a) Insert the provided power supply into an electrical outlet, and connect the cable to the "PQ" connection of the MovieStation.
b) Use the provided USB connection cable to connect the MovieStation to a USB port in your PC.
c) Turn on the MovieStation by briefly pressing the on / off switch. Hold down the on / off switch to turn off the MovieStation.
Note for users of Windows® 2000, XP, Vista, and Mac OS X: Drivers are not necessary for these operating systems. If you use Windows® 2000, make sure that you have installed at least service pack 4, and Windows® XP requires Service Pack 2 or above.
5) Data exchange with the TrekStor MovieStation
a) Select the desired files or folders with your mouse.
b) Position the mouse pointer over the selected files or folders, and press the right mouse button. Select "C" from the context menu that appears.
c) Under "MY Computer", select the local disk "TREKSTOR".
d) Click it with your right mouse button, and select "Paste" to start copying. After copying is over, the data will be available on the MovieStation.
6) Logging off and disconnecting the TrekStor MovieStation from the PC
Windows® 2000/XP/Vista: At the bottom right on the task bar, click the left mouse button on the symbol "SAFELY REMOVE HARDWARE". In the context menu that appears, click the left mouse button on "SAFELY REMOVE MASS STORAGE DEVICE - DRIVE" to select it. This removes the MovieStation from the operating system of your computer. You can now disconnect the MovieStation from your PC.
Mac® OS X: You need to remove the drive from the Desktop before you disconnect it or turn it off. Click on the relevant drive symbol, and drag it to the trash symbol.
Note: Please follow the recommended logoff procedure to prevent damage to the device or data loss.
7) Formatting the hard disk
Important: Back up all the data on your hard disk before formatting it.
Note: ALL the data on the disk will be deleted when you format it.
The MovieStation can be formatted like any other hard disk in Windows®.
a) Under My Computer, right-click on the local disk "TSTQ".
b) Select "F(RA)." from the context menu that appears.
c) Left click on the "S" button, and confirm that you want to format by clicking the "OK" button.
8) Connecting the TrekStor MovieStation to a home entertainment system.
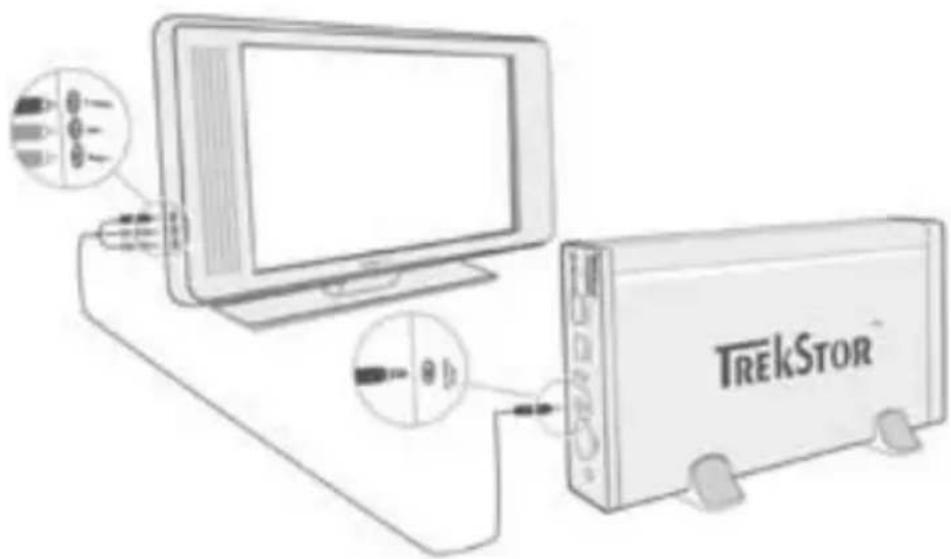
Note: You can connect the MovieStation with either the PC or with your home entertainment system. A simultaneous connection with both systems is not possible.
a) Insert the provided power supply into an electrical outlet, and connect the cable to the "PQ" connection of the MovieStation.
b) The following connection possibilities are available on your home entertainment system with the MovieStation:
AVadapter cable
Use the provided AV adapter cable and connect the AV OUT output of the MovieStation with the audio / video input of your television set to transmit the sound and picture signal.
YUV adapter cable
Use the provided YUV adapter cable and connect the YPbPr Out output of the MovieStation with the video component input of your television set to transmit the picture signal. You have the following 2 options for transmitting the sound signal:
- Connect the optical audio output of the MovieStation with the optical audio input of your HiFi system.
or
- Connect the stereo jack of the provided audio / video adapter cable with the AV Out output of the MovieStation and the red or white phono plug with the audio cinch input of your HiFi system or your television set.
c) Turn on the MovieStation by briefly pressing the on / off switch on the MovieStation or the power button on the remote control. Hold down the on / off switch off the MovieStation or briefly press the power button on the remote control to turn off the MovieStation.
Note: The MovieStation may be in a different video mode even though it is correctly connected. This can distort the picture and the color displayed on your TV. To switch modes:
- Briefly press the die "TVeO" button on the remote control for the MovieStation.
- Repeat this process until the picture on your TV is correct. The corrected setting is automatically stored.
9) Using the TrekStor MovieStation
You can operate the MovieStation with the aid of the remote control or via the integrated control panel (basic functions) on the front side.
With the MovieStation, you can play or display video files, audio files, and pictures.
Folder navigation
After turning on the MovieStation, you will be in the main directory of the folder navigation.
Press the or button to select the next or previous file. To play the selected file, press the button or the button. To change to a sub folder, likewise press the button or the button when the folder is selected. To return to the main directory, press the button.
Depending on the type of file you open with the MovieStation, various functions are at your disposal.
Video playback
If you select video files, you will play videos.
Playback
Press the l button to start the playback of a video file.
Pause
Press the button to pause playback. Re-press the button to continue playback.
Stop
Press the button to stop playback.
Change title
Press the button to select the next title. Press the button to select the previous title.
Rewind / fast-forward within a title
You can navigate within a video file by pressing the or button. Press the or button to fast-forward or rewind.
Note: If you press the or button multiple times in succession, the fastforwarding or rewinding speed increases.
Gradually rewind / fast-forward within a title
By pressing the "INRA" button, you adjust the increments by which you fast-forward or rewind within a video file. You can set increments of 1, 3, 5, or 10 minutes.
By pressing the + or - button, you can jump forward or backward within a title.
Jump to a particular position within a title
By pressing the "Go To" button, you open an input box. With the aid of the numerical fields (0 - 9) of the remote control, you can now enter a position to which the current title should jump. Press the button to finish the procedure.
Save the current position of the title (Bookmark)
Press the "B" button to set a bookmark in the current title.
To retrieve the bookmark and continue the playback of the title at the saved position, press the "Back" button in the folder navigation.
Increase / lower volume
Briefly press the + or - button to raise or lower the volume.
Note: If you hold down the + or - button, the volume changes continually.
Changing the picture settings
Press the "SCHN" button to adjust the brightness, contrast, or color saturation settings. Change the corresponding setting by pressing the l or button.
Showing / hiding subtitles
Press the "SUBTITLE" button to activate or deactivate the display of subtitles. If different subtitles are available, you can browse through them by pressing the "SUBTITLE" button repeatedly.
Adjusting size and synchronicity of the subtitle to the picture
Press the "CAPTION" button to adjust the size of the subtitle. Use the or button to enlarge or reduce the font of the subtitle.
If the subtitle is displayed too soon or too late and therefore not synchronously with the picture, this can be corrected. Press the "S" button and use the or button to adjust the timeline of the subtitle. The modification of the timeline is displayed in the upper right edge of the screen in intervals of 0.5 seconds.
Note: The adjustment of the subtitle only works when using external subtitle files (SRT files). For subtitles that are already integrated in the video file (e.g., DVD (VOB) files), an adjustment is not possible.
Changing the picture position
Press the "S" button to change the position of the picture on the screen. Use the 4 , 5 , 6 or 7 button to shift the picture left, right, up, or down. Confirm your selection by pressing the 8 button.
Changing the picture size
Press the "ZOOM" button to stretch or compress the picture horizontally and / or vertically. Use the or button to stretch the picture horizontally or vertically. Use the or button to compress the picture horizontally or vertically. Confirm your selection by pressing the button.
Music playback
If you select audio files, you will play music.
Playback
Press the >> button to start the playback of an audio file.
Pause
Press the button to pause playback. Re-press the button to continue playback.
Stop
Press the button to stop playback.
Change title
Briefly press the button to select the next title. Press the button to select the previous title.
Gradually rewind / fast-forward within a title
You can navigate within the current title in 10-second steps by pressing the + or - button.
Increase / lower volume
Briefly press the + or - button to raise or lower the volume.
Note: If you hold down the + or - button, the volume changes continually.
Changing the playmode
Press the "PAYMODE" button to change the playmode. You can choose from the following playmodes: Normal, Repeat one, Repeat all, Shuffle.
Image viewer
If you select picture files they will be shown with the image viewer.
Starting the slideshow
Press the "S" button to start a slideshow. Stop the slideshow by pressing the "S" button again.
Changing the picture settings
Press the "SCHN" button to adjust the brightness, contrast, or color saturation settings. Change the corresponding setting by pressing the or button.
Changing the picture position
Press the "S" button to change the position of the picture on the television. Use the 4 , 6 , 8 or 7 button to shift the picture left, right, up, or down. Confirm your selection by pressing the button.
Rotating the picture
Press the "Rotate" button to rotate the picture 90^ clockwise.
Changing the picture size
Press the "Z" button to stretch or compress the picture horizontally and / or vertically. Use the or button to stretch the picture horizontally or vertically. Use the or button to compress the picture horizontally or vertically. Confirm your selection by pressing the button.
Playlist
In a playlist, you can compile a list of video / music files or pictures that you want to play or display.
For this purpose, only the names of the individual files and their storage location are noted, similar to an address book. If you now desire to play or display them, you open the playlist and the titles in the playlist are automatically played or displayed in succession. Another advantage of a playlist is that the different files do not have to be copied into a shared folder, i.e. no change in the storage location is necessary.
The playback functions in the playlist are analogous to the functions in the respective playback modes.
Press the "PLAYLIST" button to open your personal playlist.
Adding files to the playlist
Press the "LIST EDIT" button. Then select the desired files and add them to the playlist by pressing the button. By pressing the "Add/Delete" button, you add all of the files found in the current folder to the playlist. A check mark next to the files indicates that these are in the playlist. By pressing the button once more, you remove the files from the playlist. After you have added all of the desired files to the playlist, press the "LIST EDIT" button. Now only the added files appear in your playlist.
Removing files from the playlist
Select the file that you want to remove from the playlist and press the "A/D/ DDELETE" button.
Changing the position of the files in the playlist
Press the "M" button to mark the files for moving. Now you can move the marked file up or down in the playlist by pressing the or 口 button. Press the "M" button again to finish the moving of files in the playlist.
10) Configuration of the TrekStor MovieStation
To open the configuration mode of the MovieStation, press the "SETUP" button. Re-press the "S" button to exit the configuration
In this mode, you can undertake audio / video settings (Audio / Video settings) and general system settings (General settings).
Press the or button to change to the next or previous menu item. To go to a submenu, press the button. To exit a submenu, press the button. If you would like to change a setting, press the button when the corresponding menu item is selected.
Audio / Video settings:
TV mode: Under the menu item "TV M#, you can select NTSC or PAL as the color transfer system.
Screen: Under the menu item "Sne", you can select from 4 presentation modes (4:3 Letter box, 4:3 Pan&Scan, 16:9 Letterbox, 16:9 Pan&Scan).
TV out: Under the menu item "TV", you can set the video output signal of the MovieStation. You have the choice between a composite video signal and HDTV video signals of differing qualities.
General settings:
Language: Under the menu item "LANG", you can select the menu language of the MovieStation.
Skip interval: Under the menu item "SKIP INTERVAL", you can select the increment for the gradual fast-forwarding of videos.
Slide show: Under the menu item "SLIDE SHOW", you can set how long a picture is displayed during a slide show.
Factory setup: Under the menu item "FACTORY SETUP", you can restore the original settings of the MovieStation. The files saved on your hard disk are not deleted when you do this.
Firmware update: Under the menu item "FIRMWARE UPDATE", you can update the MovieStation with the most current firmware from the internet. Please follow the following steps:
a) Download the firmware (*.zip-file) from the TekStor website www.trekstor.de and unzip it in the folder of your choice.
b) Copy the unzipped BIN file in the main directory of the MovieStation.
c) Connect the MovieStation with the home entertainment system and while in configuration mode select the menu item "FIRMWARE UPDATE".
d) Confirm the question "START THE FIRMWARE UPDATE?" with "YES".
e) Subsequently follow the instructions of the MovieStation.
11) Troubleshooting
I have connected the MovieStation to my television or my HiFi system. Why is no picture showing on my television or no sound coming from my HiFi system?
This problem may have several causes. Please check the following items:
1) Please check that you have connected the correct cable for the output of the video and audio signals. Information on the correct connection of the MovieStation to your home entertainment system can be found in section "8) CONNECTING THE TREKSTOR MOVIESTATION WITH THE HOME ENTERTAINMENT SYSTEM."
2) If you have correctly connected the MovieStation, it is possible that it may be in an incorrect video mode. To select a different mode, press the "TV-Ω" button until the picture is correctly displayed on your television. Please be patient during the search for the correct video mode.
3) Please ensure that you have selected the correct AV source on your television set.
I have changed the settings of the MovieStation in "Audio / Video Settings" or "GENERAL SETTINGS", and would like to restore the factory settings.
Select the menu item "FACTORY SETUP" as described in section "10) CONFIGURATION OF THE TREKSTOR MOVIESATION". This will restore the factory settings of the MovieStation. The saved files are not deleted when you do this.
While using the MovieStation, it no longer responds to my commands.
This problem may have several causes. Please check the following items:
1) Please aim the remote control in the direction of the MovieStation so that direct visual contact between these two devices exists and ensure that the infrared receiver of the remote control or the MovieStation is not covered.
2) Check the capacity of the batteries in the remote control and, if necessary, replace them with new ones.
I would like to display picture files with the MovieStation. Some files take a very long time to load.
Depending on the resolution, the pictures have varying file sizes. The larger the picture, the longer the resizing of the pictures takes. Solution: Reduce the pictures with your photo processing program to a resolution of approx. 800 × 600 pixels.
Some picture files that I previously copied to the MovieStation, are not listed in the folder navigation.
You can only display picture files in JPEG format with the MovieStation. Files of other file types are not listed in the folder navigation.
I start a video file, but no correct picture or no correct sound is played.
Please note that only video files from the following formats can be played: MPEG-1 (VCD), MPEG-2 (SVCD/KVCD), DVD (IFO/VOB), DivX 3 (to 720 × 400 ), DivX 5 (to 720 × 400 ), XviD
If you encounter problems while playing your video files, please check the utilized audio and video formats. You may, for example, use the free software GSpot (http://gspot.headbands.com/).
In the folder navigation, it takes a very long time until the contents of a folder are displayed.
Every time you open a folder, its entire contents are analyzed in the directory. As a result, it takes a longer time to open a folder with many files than it does to open a folder with few files.
We recommend that you sort your files in subFolders. On the one hand, the loading times of the folders are reduced; on the other hand, this simplifies the overview and retrieval of particular contents.
Notes:
- In certain circumstances, exposing the device to an electrostatic discharge may interrupt the data transfer between the device and the computer and impair the functions of the device. If this occurs, the device should be unplugged from the USB port and then plugged in again.
Do not use USB cables longer than 3 meters.
The manufacturer retains the right to continually improve the product. These changes may be made without being directly described in these operating instructions. For this reason, the information provided in these operating instructions may not reflect the current state of the art.
The manufacturer only guarantees suitability for the product's actual intended purpose. In addition, the manufacturer is not responsible for damages or loss of data and subsequent consequences.
Copyright © 2007 TrekStor GmbH & Co. KG. All rights reserved. Other cited product or company names may be trademarks or brand names of the respective owner.
NOTICE D'UTILISATION
Audio / Video settings:
TV mode (Modo TV): no item de menu "TV (Modo TV) pode選擇ar NTSC ou PAL comoSYSTEMA para transmissao de cores.
Audio / Video settings:
Spellista ( Playlist)
Audio / Video settings:
TV mode (TV-format): Under menypunktten "TV" (TV-format) kan du valja NTSC aller PAL som fargatergivningsystem.
Audio: MP3 (32-320 kb/s), WMA (32-320 kb/s), OGG (45-500 kb/s), WAV (16-48 kHz)
Zdjecia:JPEG
Audio / Video settings:
(Toslink) (to kaωδio
ONTIKOWIVWV8EV
περιαμβάνεται στόν
KaIomega npoogapouya AV
Suvodote tvv eoo AV OUT tou MovieStation tvv eoo nou / bivteo Tnc tnleopaoc, xpoaioiwvtac to kaawio npoaapoyea AV nou ouvodeu To npoiov, yia va uetaepete To onua nou kalikovac.
Kaawdiopooapoya YUV