Maxi t.uc - Media player TrekStor - Free user manual and instructions
Find the device manual for free Maxi t.uc TrekStor in PDF.
| Product Type | Portable multimedia player with hard drive (MovieStation) |
| Supported video formats | MPEG-1 (VCD), MPEG-2 (SVCD/KVCD), DVD (VOB), DivX3 (up to 720x400), DivX5 (up to 720x400), Xvid |
| Supported audio formats | MP3 (32-320 kbps), WMA (32-320 kbps), WAV (16-48 kHz) |
| Supported image formats | JPEG (.jpg, .jpeg) |
| Connectivity | USB 2.0 Hi-Speed, composite AV output (3.5 mm jack to 3x RCA), component YUV output (3.5 mm jack to 3x RCA), SCART adapter, optical audio output Toslink |
| Memory card reader | CompactFlash (type I/II), Secure Digital (SD), MultiMediaCard (MMC), xD-Picture Card (up to 2 GB) |
| Direct copy | Copy entire memory card with one button; copy individual files via remote control |
| Playback functions | Folder navigation, playlist, bookmarks, repeat (title/folder/random), zoom, subtitles (SRT, SUB, SSA, SMI, TXT), slideshow, image rotation |
| Audio outputs | Stereo audio (RCA), optical audio (Toslink) |
| Remote control | Infrared with buttons: On/Off, Mute, Bookmark, Mode, Repeat, Playlist, Zoom, Subtitle, Setup, TV-OUT, Info, DVD, navigation, volume, playback |
| Power supply | External power adapter 100-240 V, 50-60 Hz |
| Compatible operating systems | Windows 2000/XP/Vista, Mac OS X 10.3+, Linux kernel 2.6+ |
| Firmware update | Via .rom file downloaded from TrekStor website, copied to device then installed at next power-on |
| Formatting | FAT32 (max file size 4 GB); instructions on software CD |
| Operating temperature | 10°C to 40°C |
| Included accessories | USB 2.0 cable, AV adapter cable, YUV adapter cable, SCART adapter, power supply, remote control with 2 AAA batteries, 2 feet, software CD, manual |
Frequently Asked Questions - Maxi t.uc TrekStor
User questions about Maxi t.uc TrekStor
0 question about this device. Answer the ones you know or ask your own.
Ask a new question about this device
Download the instructions for your Media player in PDF format for free! Find your manual Maxi t.uc - TrekStor and take your electronic device back in hand. On this page are published all the documents necessary for the use of your device. Maxi t.uc by TrekStor.
USER MANUAL Maxi t.uc TrekStor
natural_image
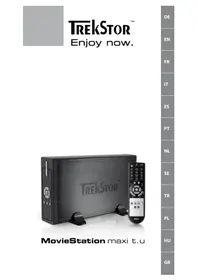
Exterior view of a retro television studio with a sleek silver TV and a remote control (no visible text or symbols)MovieStation maxi t.uc
INHALTSvERzEIcHNIS
Lieferumfang 4
2)


Included in delivery 21
System requirements 22
1) Controls and connections ...... 22
1.1) Controls of the TrekStor MovieStation 22
1.2) Connections on the back side of the TrekStor MovieStation 22
1.3) The remote control of the TrekStor MovieStation 23
2) Connecting the TrekStor MovieStation to the computer 24
3) Data exchange with the TrekStor MovieStation 24
4) Logging off and disconnecting the TrekStor MovieStation from the computer ... 2 5
5) Connecting the TrekStor MovieStation to the home entertainment system ..... 25
6) Operating the TrekStor MovieStation 26
6.1) Folder navigation 27
6.2) Video playback 27
7) Inserting/removing memory cards 30
8) Copy function 31
9) Firmware update .... 31
10) Formatting the TrekStor MovieStation .... 32
11) Configuration of the TrekStor MovieStation .... 32
12) FAQ 32
1)
2)


If you have problems with this product, you can quickly get assistance. Only in extremely rare cases will you need to return this product to your dealer. You can find answers to the most frequently asked questions at our website, www.trekstor.de, under "SERVICE" → "SUPPORT". You can of course also contact our award-winning support team by filling out the support form on our website, or by e-mail or telephone (see the back of these instructions). You will be surprised at how quickly we can help you.
Thank you for buying the TrekStor MovieStation. We are confident that this product will be the source of much enjoyment. Please read the following chapters carefully so that you can become acquainted with the advantages of this product and its use.
With the MovieStation, you can enjoy your previously stored media files comfortably and easily on your television and HiFi system. Using the integrated memory card reader, you can copy files directly from the memory card to the MovieStation at the press of a button without using a computer. The portable MovieStation can also be used as a conventional external hard disk, thus making it the perfect memory expansion for your computer.
The MovieStation supports a multitude of various video and audio formats. Due to the very large number of different video formats, TrekStor cannot guarantee the compatibility of the MovieStation with every available video format.
At the time of printing, the following file formats are supported:
Video: MPEG-1 (VCD), MPEG-2 (SVCD/KVCD), DVD (VOB), DivX3 (up to 720 x 400), DivX5 (up to 720 x 400), Xvid
Audio: MP3 (32 - 320 kbps), WMA (32 - 320 kbps), WAV (16 - 48 kHz)
Pictures: JPEG

If you encounter problems while playing your video files, please check the utilized audio and video formats. You may, for example, use the free software GSpot (http://gspot.headbands.com/).
Current product information and a list of the file formats supported by the MovieStation can be found at the TrekStor Website (www.trekstor.de).
If you have difficulties with this product or its operation, please read the section "FAQ". There you will find answers to the most frequently asked questions.
Included in delivery
TrekStor MovieStation maxi t.uc•
USB 2.0 cable·
AV adapter cable (3.5 mm jack on 3 x cinch)
YUV adapter cable (3.5 mm jack on 3 x cinch)
SCART adapter•
Power supply (100V - 240V)
Remote control•
• 2 AAA batteries
• 2 stands
- Software CD
• Operating instructions
System requirements
Computer:
Windows® 2000/XP/Vista, Mac® OS X from version 10.3, Linux® from kernel 2.6•
USB 1.1 port (high-speed USB 2.0 port recommended)
Television/HiFi system:
Cinch/SCART input for audio/video•
or
Cinch input for video components + cinch/SCART input for audio•
or
Cinch input for video components + optical audio input (Toslink)
1) Controls and connections
Please look at the illustrations on the inside of the unfolding cover.
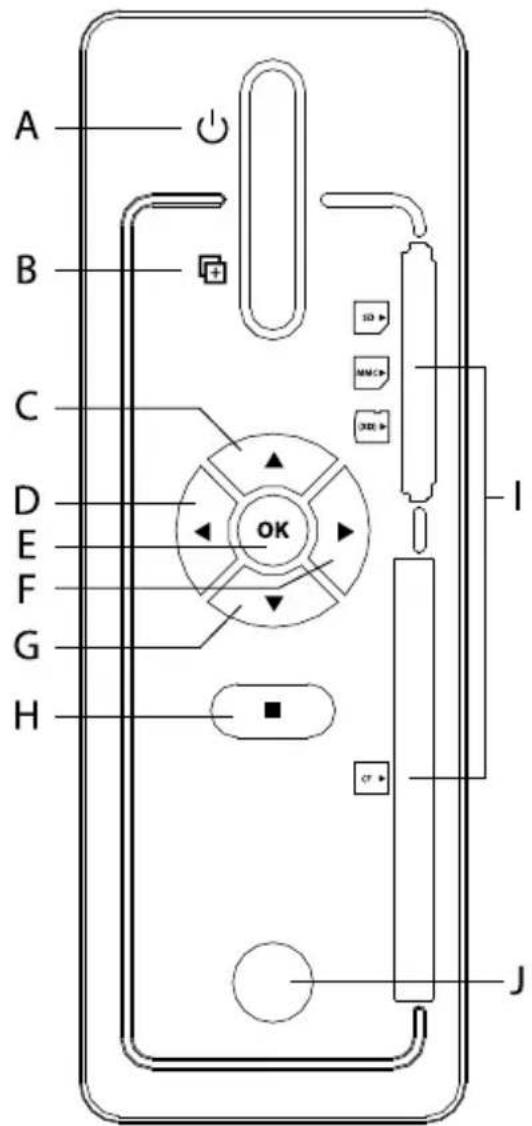
1.1) Controls of the TrekStor MovieStation
A) On/off switch: Switches the device on or off.
B) ☑ button: All files located on the memory card are copied to the hard disk of the MovieStation.
C) ▲ button: Used for navigation and raises the volume.
D) button: Used for navigation.
E) OK button: This button makes a selection.
F) ▶ button: Used for navigation.
G) ▼ button: Used for navigation and lowers the volume.
H) ☐ button: Stops the playback or switches to a higher menu level.
I) Card reader
J) Infrared connection
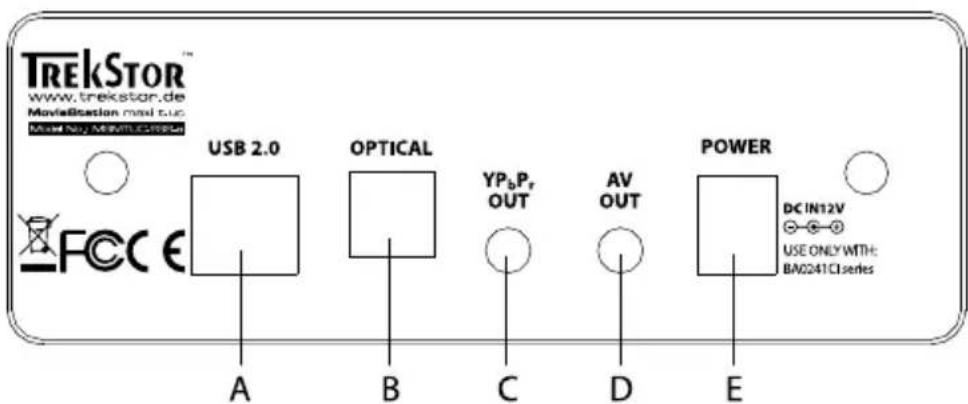
1.2) Connections on the back side of the TrekStor MovieStation
A) USB port
B) Optical audio output (Toslink) (optical fiber cable not included in delivery)
C) Video components output
D) Audio/video output: Video output for connection to the television.
E) DC IN: Power connection
1.3) The remote control of the TrekStor MovieStation
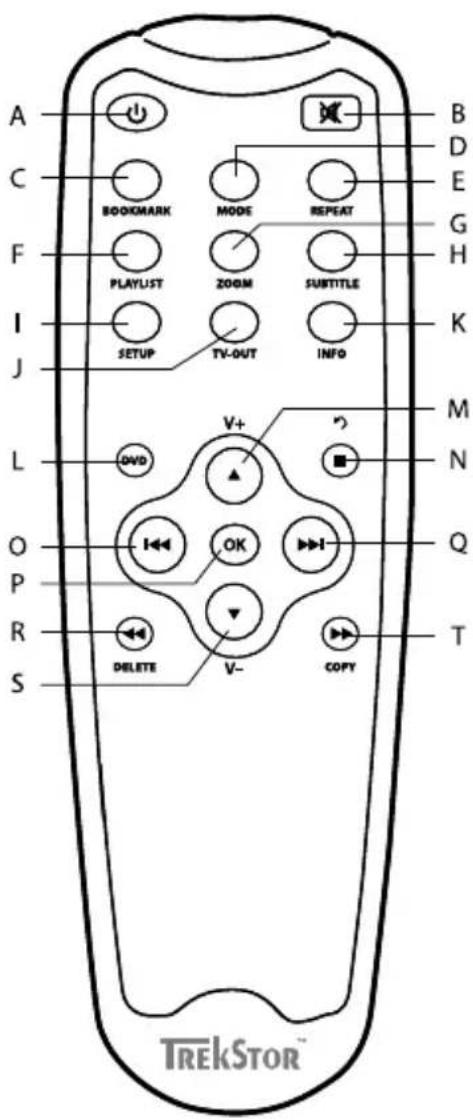
A) ⏻ button: Switches the device on or off.
B) ☒ button: Turns the mute function on and off.
"C) BOOKMARK" button: Creates a bookmark in the modes "Music" and "VIDEO".
"D) MODE" button: Controls various functions depending on the current mode.
"E' REPEAT" button: Changes the repeat option in the modes "MUSIC," "VIDEO," and "PICTURES".
"F) PLAYLIST" button: Opens and closes the playlist mode.
"G) ZOOM" button: Enlarges the picture in the modes "PICTURES" and "VIDEO".
"H) SUBTITLE" button: Used to select the subtitles of films.
"I) SETUP" button: Opens or closes the settings menu.
"J) TV-OUT" button: Selects the TV mode.
"K) INFO" button: Displays additional information.
L) DVD button: Opens the DVD menu of a DVD file being played.
M) ▲ button/√+ button: Used for navigation or raises the volume.
N) ☐ button/☑ button: Stops the playback or switches to a higher menu level.
O) button: Controls various functions depending on the current mode.
P) OK button: This button makes a selection.
Q) button: Controls various functions depending on the current mode.
R) ← key: Rewinds a music or video title or returns to the previous image./"DELETE" button: Deletes a selected file.
S) ▼ button/▼ button: Used for navigation or lowers the volume.
T) ➤ button: Fast-forwards a music or video title or returns to the next image./"COPY" button: Copies a selected file.
2) Connecting the TrekStor MovieStation to the computer
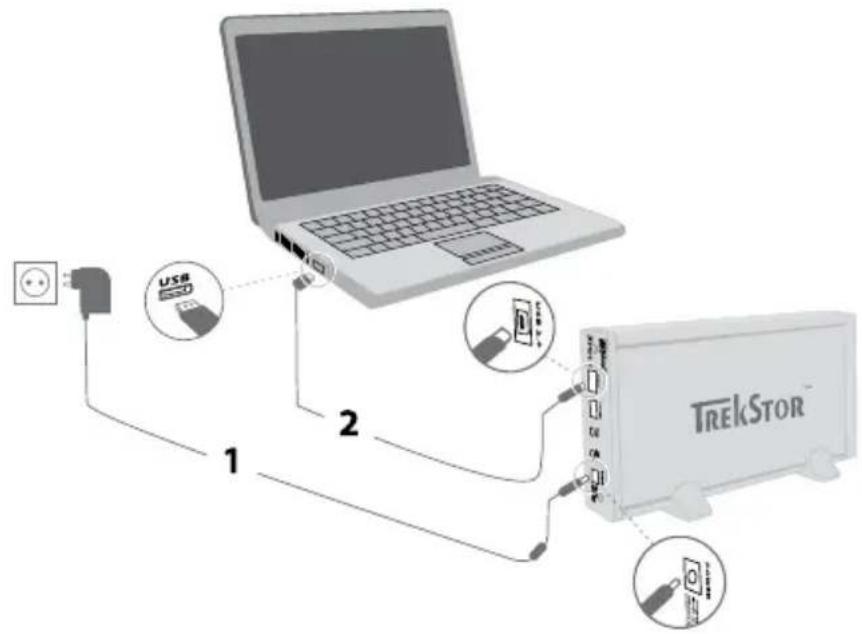
Caution: To prevent damage to your MovieStation, you must make sure you always observe the following order when connecting the MovieStation to your computer.
a) First connect the power supply included in delivery to the "DC IN" port of the MovieStation. Then plug the power supply into a socket.
b) After the power has been connected, connect the USB port of the MovieStation to a USB port on your computer.
Only use the provided USB connection cable to connect the device to a USB port on your computer.
c) Turn on the MovieStation by briefly pressing the on/off switch ⏻. Your operating system automatically recognizes the MovieStation and adds the MovieStation as a "LOCAL DISK" (or "LOCAL DRIVE") to "MY COMPUTER"/"COMPUTER" (Microsoft® Windows) or "DESKTOP" (Mac® OS X and Linux®).
d) If you want to turn off the MovieStation, briefly press the on/off switch ⏻.
3) Data exchange with the TrekStor MovieStation
After successful startup of the device, a local disk called "TREKSTOR" appears under "MY COMPUTER"/"COMPUTER" (Windows®) or on your "DESKTOP" (Mac® OS X and Linux®). You can also access the MovieStation like a normal hard disk.
Windows® 2000/XP/Vista
a) Select the desired files or folders with your mouse.
b) Position the mouse pointer over the selected files or folders, and press the right mouse button. Select "Co" from the context menu that appears.
c) Under "M Y COMPUTER"/"COMPUTER," select the desired target (such as the "TREKSTOR" drive).
d) Click it with your right mouse button, and select "P AE" to start copying. After copying is over, the data will be available on the MovieStation.
Mac® OS X from 10.3
Select the desired files with your mouse. Drag and drop the files in the "FINDLR" to the drive symbol of your MovieStation.
4) Logging off and disconnecting the TrekStor MovieStation from the computer
Caution: Please follow the recommended logoff procedure to prevent damage to the device or data loss!
Windows® Vista/XP/2000: At the bottom right on the task bar, click the left mouse button on the symbol "SAFELY REMOVE HARDWARE". In the context menu that appears, click the left mouse button on "SAFFELY REMOVE MASS STORAGE DEVICE - DRIVE" to select it. This removes the MovieStation from the operating system of your computer. You can now disconnect the MovieStation from your PC.
Mac® OS X: You need to remove the drive from the Desktop before you disconnect it or turn it off. Click the relevant drive icon and drag it to the Trash icon.
5) Connecting the TrekStor MovieStation to the home entertainment system
You can connect the MovieStation to either the computer or your home entertainment system, that is, your television or HiFi system. You cannot connect the MovieStation to both the computer and the home entertainment system at the same time.
a) First connect the power supply included in delivery to the "DC IN" port of the MovieStation. Then plug the power supply into a socket.
b) The following possibilities are available for connecting the MovieStation to your home entertainment system:
Connection via the AV adapter cable
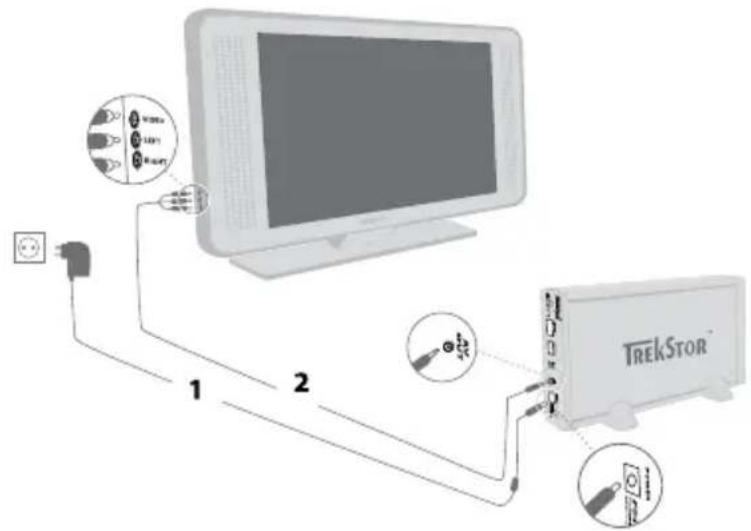
Use the provided AV adapter cable and connect the "AV OUT" output of the MovieStation with the audio/video input of your television set to transmit the sound and picture signal. For this purpose, connect the red and white cinch plug to the audio cinch input of your television and the yellow cinch plug to the yellow composite video input port of your television.
You can also use the SCART adapter to connect your MovieStation to a SCART port on your television.
Connection via the YUV adapter cable
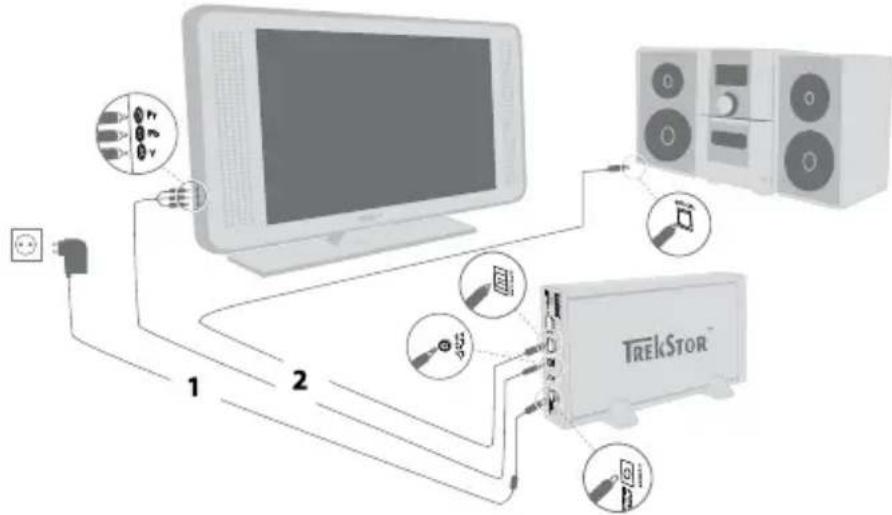
Use the provided YUV adapter cable and connect the "YPBPR OUT" output of the MovieStation with the video component input of your television set to transmit the picture signal.
For the transmission of the sound signal, two possibilities are available to you:
1) Connect the optical audio output of the MovieStation to the optical audio input of your HiFi system.
2) Connect the stereo jack of the provided audio/video adapter cable to the "AV OUT" output of the MovieStation and the red ans white cinch plugs to the audio cinch input of your HiFi system or your television set.
You can also use the SCART adapter to connect your MovieStation to a SCART port on your television.
c) Now you can switch on your MovieStation as described in these operating instructions.

Caution: The MovieStation may be in a different video mode even though it is correctly connected. This can distort the picture and color on your television. Please change the TV mode to remedy this problem.

Operating the TrekStor MovieStation
You can operate your MovieStation comfortably using the remote control and the integrated control panel.
Activation/deactivation of the MovieStation
Turn on the MovieStation by briefly pressing the on/off switch ⏻ on the MovieStation or the ⏻ button on the remote control.
To turn off the MovieStation after use, briefly press the on/off switch ☐ on the MovieStation or the ⏻ button on the remote control.
Adjusting the volume
Press the v+ or v- button in music and video mode to raise or lower the volume. When you press the × button, you can turn the sound of your MovieStation on and off.

If you hold down the v^+ or v^- button, the volume changes gradually.
Saving the current position of the title (bookmark)
During the playback of a video or music file, you can save the current position in the title being played.
Press the "BOOKMARK" button to set a digital bookmark for the file currently being played. To retrieve the bookmark and thus continue the playback of the file at the saved position, press the "BOOKMARK" button in the folder navigation. This bookmark remains until a new bookmark is set.
Changing the TV mode
The MovieStation may be in a different video mode even though it is correctly connected. This can distort the picture and color on your television. To switch modes:
a) Briefly press the "TV-OUT" button on the remote control of the MovieStation.
b) Repeat this process until the picture on your television is displayed correctly. The corrected setting is automatically saved.
6.1) Folder navigation
After turning on the MovieStation, you will be in the top level or main directory of the folder navigation. Here, the files in the formats supported by the MovieStation are displayed. In addition, you can access the setting menu from the folder navigation, open the playlist mode, and load a saved bookmark. Read the corresponding sections to obtain more information on these functions.
Only the file formats supported by the MovieStation are shown on your television. Other unsupported files are not shown.
Handling folders
To switch to a subfolder, press the OK button or the ➤ button if the folder is selected. To return to the main directory, briefly press the ≡ or ⏻ button.
Selecting and playing files
Press the ▼ or ▲ button to select the next or previous file. To play the selected file, press the OK button.
Deleting files
To delete selected files, briefly press the "DELETE" button and confirm the subsequent query by pressing the OK button.
Depending on the type of file you open with the MovieStation, various functions are at your disposal.
6.2) Video playback
When selecting a video file, you enter the video playback mode.
Playback
To play a file, select it in the folder navigation with the ▼ or ▲ button and start the playback by pressing the OK button. The playback can be controlled using the following buttons:
■ button: Ends the playback and returns to the folder navigation.
OK button: Pauses and continues the playback.
or button: Switches to the next or previous title.
or button: Fast-forwards or rewinds the current title.
If you press the ▶ or ◀ button several times in succession, the fast-forwarding or rewinding speed increases.
Fading in/fading out subtitles
Press the "SUBTITLE" button to activate or deactivate the display of subtitles. If different subtitles are available, you can browse through them by pressing the "SUBTITLE" button repeatedly.
The following external subtitle formats are supported by the MovieStation: SRT, SUB, SSA, SMI, and TXT.
Changing the picture size
Press the "ZOOM" button in order to enlarge the displayed picture. The available magnification depends on the picture resolution.
Changing the audio channel
Press the "MODE" button to switch between the existing audio channels for the video file being played.
Changing the playback mode
Press the "REPEAT" button to change the playback mode. You can choose from the following playback modes:
Normal: All titles are played once.
Repeat one: The current title is repeated an unlimited number of times.
Folder repeat: Folder repeatAll titles of the current folder are repeated an unlimited number of times.
Shuffle: The playback order of the titles is selected randomly.
DVD playback
The folder structure of the DVD files must remain intact during copying to the MovieStation so that the DVD file can be correctly played by your MovieStation.
Starting the DVD playback•
In the folder navigation, select the folder in which the DVD files are located. Press the DVD button of your remote control or keep the DVD button on the front side of your MovieStation pressed to start the playback of the DVD.
Calling the DVD menu•
During the DVD playback, press the DVD button to call the DVD menu. Press the DVD button again to continue the playback of the movie at the same point where it was interrupted.
Briefly press the ◀◀ or ▶▶ button to switch between the available menu items in the DVD menu.
Switching the DVD chapter•
During the DVD playback, briefly press the ▶ or ◀ button to go to the next or previous chapter.
Playback functions•
The playback functions during the DVD playback are operated analogously to those of the video mode.
6.3) Music playback
When selecting a music file, you enter the music playback mode.
Playback
To play a file, select it in the folder navigation with the ▼ or ▲ button and start the playback by pressing the OK button. The playback can be controlled using the following buttons:
■ button: Ends the playback and returns to the folder navigation.
OK button: Pauses and continues the playback.
or button: Switches to the next or previous title.
or ◀ button: Fast-forwards or rewinds the current title.
If you press the ◀ or ▶ button several times in succession, the fast-forwarding or rewinding speed increases.
Changing the playback mode
Press the "REPEAT" button to change the playback mode. You can choose from the following playback modes:
Normal: All titles are played once.
Repeat one: The current title is repeated an unlimited number of times.
Folder repeat: All titles of the current folder are repeated an unlimited number of times.
Shuffle: The playback order of the titles is selected randomly.
6.4) Picture viewer
When selecting a picture file, you enter the picture viewing mode. Here, the following basic functions are available to you:
Starting the slide show
Press the OK button to start a slide show of the pictures in the current folder. Pressing the OK button again pauses the slide show. To end the slide show and return to the folder navigation, press the ■ button.
To be able to start a slide show, this option must first be activated in the settings menu. For more information, read the "CONFIGURATION OF THE TREKSTOR MOVILSTATION" section in these operating instructions.
Picture change
Press the ▶/▶ button or ◀/◀ button to open the next or previous picture.
Adapting the picture transition
Press the "MODE" button to adapt the transition for the picture change. A number of transition variants are available to you.
Rotating the picture
Press the ▲ or ▼ button to rotate the picture to the right or left.
Changing the picture size
Press the "ZOOM" button in order to enlarge the displayed picture. The available magnification depends on the picture resolution.
Changing the playback mode
Press the "REPEAT" button to change the playback mode. You can choose from the following playback modes:
Normal: All pictures are shown once.
Repeat one: The current picture is repeated an unlimited number of times.
Folder repeat: All pictures in the current folder are repeated an unlimited number of times.
Shuffle: The playback order of the pictures is selected randomly.
6.5) Playlist
In a playlist, you can assemble a group of video/music files or pictures that you can play or display. Different than in the case of copying, only the name of the title and its memory locations are stored for this purpose. If you now desire to play these or display them in combination, open the playlist and the titles in the playlist are automatically played or displayed in succession. Another advantage of a playlist is that the different files do not have to be copied in a shared folder, thereby not necessitating a change in the storage location.
The playback functions in the playlist are analogous to the functions in the respective playback modes.
The playlist is created as a virtual folder on the MovieStation. This folder is not displayed on the computer.
In the playlist mode, the following basic functions are available to you:
Adding files to the playlist•
a) In the folder navigation, press the "PLAYLIST" button on your remote control to open the playlist mode.
b) In the folder navigation, select the desired files and press the Ⓞ button to add them to your playlist. A check mark next to the files indicates that they are in the playlist.
c) After you have added all desired files to the playlist, press the "PLAYLIST" button to exit the playlist mode. Now only the selected files appear in your playlist.
The created playlist is saved in the virtual "PLAYLIST" folder.
Removing files from the playlist•
In the playlist mode, select the desired file that you want to remove from the playlist and press the OK button to do so.
Opening the playlist•
To use your personal playlist, select the virtual "PLAYLIST" folder in the folder navigation and start the playback of a file.
changing the position of the files in the playlist•
To change the position of files in the playlist, the playlist mode must be deactivated.
a) In the folder navigation, open the folder "PLAYLIST".
b) Press the "MODE" button to select the file you want to move.
c) Now you can move the selected file up or down in the playlist by pressing the ▼ or ▲ button.
d) When the file is at the desired position in the playlist, press the "MODE" button to save this position.
7) Inserting/removing memory cards
The card reader of your MovieStation lets you copy the content of the memory card onto the MovieStation. With your computer, you cannot directly access the card reader.
Push the memory card slowly into the card reader. To remove the memory card from the reader again, pull it slowly and carefully from the slot.
Caution: Memory cards can be removed from the slot without being logged off beforehand. To prevent data loss or damage, wait until no more data is being transferred before the removal of the memory card.
The following memory cards are supported up to a maximum of 2 GB:
CF - Compact Flash Card Type I/II
SD - Secure Digital Card
MMC - Multimedia Card
xD Picture Card
8) Copy function
Direct copying of the entire memory card content
To copy the complete content of the memory card, insert the memory card into the corresponding memory card slot as described in these operating instructions. Keep the button on your MovieStation pressed for approximately 1 second to start the copy procedure.
The copied files are saved in the "TRANSFER" folder in the folder navigation.
Copying of individual files
a) In the folder navigation, select the file to be copied.
b) Press the "COPY" button on your remote control. The copy mode is started and the available storage media appear in the right side of your television screen for selection.
c) By pressing the ▶ button, switch to the right side of the screen and select the target folder for the file to be copied. By pressing the ◀ button, you can return to the left side of the screen.
d) To start the copy procedure, press the "COPY" button to copy the file into the selected target folder.
Caution: If you cancel the started copy procedure by pressing the ☐ button, the incompletely copied file might not be able to be executed.
e) To leave the copy mode, press the ⏻ button.
9) Firmware update
The firmware is the program responsible for the control of your MovieStation. A firmware update serves to transfer firmware upgrades to your MovieStation. If you should encounter any problems with your MovieStation, please make sure that you have installed the latest firmware version.
a) Download the firmware (*.zip file) from the TrekStor website (www.trekstor.de) and unzip it in the folder of your choice.
b) For the firmware update, please observe the update instructions supplied with the firmware.
c) Connect the MovieStation to your computer. Insert the provided power supply into an electrical outlet, and connect the cable to the "DC IN" connection of the MovieStation.
d) Use the provided USB connection cable to connect the MovieStation to a USB port on your computer.
e) Turn on the MovieStation by briefly pressing the on/off switch ☐.
f) Copy the unzipped software (*.rom file) to the main directory of the MovieStation.
g) Switch off the MovieStation by pressing the on/off switch ⏻ and keeping it pressed. After that, disconnect the MovieStation from your computer.
h) Connect the TrekStor MovieStation to the home entertainment system.
i) Turn on the MovieStation by briefly pressing the on/off switch ☐.
j) Confirm the query about the firmware update with "OK".
k) Please wait until the update is complete.
Caution: The software copied into the main directory of the MovieStation must be deleted when the firmware update is complete. Otherwise, a firmware update will start at the next start-up of the MovieStation with the home entertainment system.
10) Formatting the TrekStor MovieStation
Caution: During formatting, ALL data on the hard disk are deleted! Before formatting, make backup copies of your data!
i Please note that only files with a maximum file size of 4 GB are supported for a hard disk formatted with FAT32.
On the CD included in delivery, you will find instructions for the formatting of your MovieStation under Windows® 2000/XP/Vista and Mac OS® X from version 10.3.
11) Configuration of the TrekStor MovieStation
To open the configuration mode of the MovieStation, press the "SETUP" button in the folder navigation. Press the "SETUP" button again to exit the configuration
In this mode, you can make general and system settings.
Press the ▼ or ▲ button to change to the next or previous menu item. To go to a submenu, press the ➕ button. To exit a submenu, press the ➕ button. If you would like to carry out a setting, press the OK button when the corresponding menu item is selected. To leave the settings menu, press the "SETUP" button or the ➕ button.
General settings
Preview function: Here you can select whether a preview of a file is displayed when you select it in the folder navigation.
Subtitle size: Under the menu item "SUBTITLE SIZE", you can change the size of subtitles.
Slide show: Under the menu item "SLIDE SHOW", you can set the display duration of a picture during a slide show.
Screen saver: Here you can activate the screen saver and define after which period of time it should start.
System settings
TV mode
Under the menu item "TV MODE," you can select NTSC or PAL as the color transmission system. With "MULTISYNC", the MovieStation automatically selects the appropriate color transmission system.
Video output
Under the menu item "TV" you can set the video output signal of the MovieStation. You can choose between a composite and component video signal (YPbPr).
Language selection
Under the menu item "LAGAE", you can select the menu language of the MovieStation.
Factory defaults
Under the menu item "FACTORY SETUP", you can restore the original settings of the MovieStation. The files saved on your hard disk are not deleted when you do this.
12) FAQ
I have connected the MovieStation to my television or my HiFi system. Why is no picture showing on my television or no sound coming from my HiFi system?
This problem may have several causes. Please check the following items:
1) Please ensure that you have selected the correct AV source on your television set.
2) Please check that you have connected the correct cable for the output of the video and audio signals. Information on the correct connection of the MovieStation to your home entertainment system can be found in the "CONNECTING THE TRESSTOR MOVIESTATION TO THE HOME ENTERTAINMENT SYSTEM" section in these operating instructions.
3) Even if you have correctly connected the MovieStation, it is possible that it may be in the incorrect video mode. To select different modes, press the "TV OUT" button until the picture is correctly presented on your television. Please be patient during the search for the correct video mode.
I have adjusted the settings of the MovieStation in "SYSTEM" or "SETTINGS" and would like to restore the factory defaults.
As described in the "CONFIGURATION OF THE TREKSTOR MOVIESTATION" section, execute the menu item "FACTORY SETUP". The MovieStation will thereby be set to the delivery state. The saved files are not deleted when you do this.
While using the MovieStation, it no longer responds to my entries.
This problem may have several causes. Please check the following items:
1) Please aim the remote control in the direction of the MovieStation so that direct visual contact between these two devices exists and ensure that the infrared receiver of the remote control or the MovieStation is not covered.
2) Check the batteries in the remote control and, if necessary, replace them with new ones.
I would like to display picture files with the MovieStation. Some files take a very long time to load.
Depending on the resolution, the pictures have varying file sizes. The larger the picture, the longer the image display takes.
Reduce the pictures with your photo processing program to a resolution of approx. 800 x 600 pixels.
Some picture files that I previously copied to the MovieStation are not listed in the folder navigation.
You can only display picture files in JPEG format (*.jpg or *.jpeg files) with the MovieStation. Files of other file types are not listed in the folder navigation.
I start a video file, but no correct picture or no correct sound is played.
Please note that only video files in the following formats can be played: MPEG-1 (VCD), MPEG-2 (SVCD/KVCD), DVD (VOB), DivX3 (up to 720 x 400), DivX5 (up to 720 x 400), Xvid
If you encounter problems while playing your video files, please check the utilized audio and video formats. You may, for example, use the free software GSpot (http://gspot.headbands.com/).
In the folder navigation, it takes a very long time until the contents of a folder are displayed.
Every time you open a folder, its entire contents are analyzed in the directory. As a result, it takes a longer time to open a folder with many files as it does a folder with a few files. We recommend that you sort your files in subfolders. On the one hand, the loading times of the folders are reduced; on the other hand, this simplifies the overview and retrieval of particular contents.
Copying from the memory card lasts a long time.
When the button is pressed, the copying of the entire memory card content onto your MovieStation is started. This may take some time in the case of memory cards that contain a lot of files.
The started copying procedure can be canceled by pressing the ☐ button. Please observe, however, that the incompletely copied file might not be able to be executed.
Instructions for safety and use:

Only qualified persons may perform technical work on the product. The product may not be opened or changed. The components cannot be serviced by the user.

Never expose the device to moisture, condensation and liquids.

Protect the device from extremely high and low temperatures and temperature fluctuations. Use the device within an ambient temperature of 10^ C to 40^ C.

Never place the device close to a source of heat, and protect it from direct sunlight.

Make sure that the surroundings are as dust-free as possible when you use and store the device.

Never clean the surface of the device with solvents, paint thinners, cleansers or other chemical products. Instead, use a soft, dry cloth or soft brush.
Note:
Do not use USB cables longer than 3 meters.
• In certain circumstances, exposing the device to an electrostatic discharge may interrupt the data transfer between the device and the computer and impair the functions of the device. If this occurs, the device should be unplugged from the USB port and then plugged in again.
- The memory capacity of your external hard disk displayed by the operating system may deviate from its actual capacity. Like most other hardware manufacturers, TrekStor uses the unit prefixes (e.g. 1 GB = 1,000,000,000 bytes) suggested by the International System of Units (SI) for indicating the memory capacity. Many operating systems, however, do not yet follow these suggestions and thus indicate a lower memory capacity since they base their calculations on 1 GB = 2^30 bytes = 1,073,741,824 bytes.
The manufacturer retains the right to continually improve the product. These changes may be made without being directly described in these operating instructions. For this reason, the information provided in these operating instructions may not reflect the current state of the art.
The manufacturer only guarantees suitability for the product's intended purpose. In addition, the manufacturer is not responsible for damages or loss of data and subsequent consequences.
Copyright © 2009 TrekStor GmbH & Co. KG. All rights reserved. Other cited product or company names may be trademarks or brand names of the respective owner.
SOMMAIRE
2)

2)

2)

2)

Tecla A) ⏻: Liga ou desliga o aparelho.
2)

INNEHåLLSFÖRTEcKNING
2)

2)

2)

2)

όΔΗΓιεΣ χειριΣμόΥ
2)


As manufacturer and importer respectively:
D-64653 Lorsch, Germany
herewith declares that the products
Type: MovieStation maxi t.uc
comply with the following directive(s):
• 2004/108/EC EMC Directive: Electromagnetic Compatibility
• 2006/95/EC Low Voltage Directive
The following norms were consulted to assess conformity:
-EN 55013:2001 + A1:2003
EMC: Sound and television broadcast receivers and associated equipment – Radio disturbance characteristics – Limits and methods of measurement
- EN 55020:2002 + Corrigendum 2005-02 + A1:2003 + A2:2005
EMC: Sound and television broadcast receivers and associated equipment – Immunity characteristics – Limits and methods of measurement
-EN 61000-3-2:2006
EMC: Part 3-2: Limits – Limits for harmonic current emissions (equipment input current 16 A per phase)
-EN 61000-3-3:1995 + A1:2001 + A2:2005
EMC: Part 3-3: Limits – Limitation of voltage changes, voltage fluctuations and flicker in public low-voltage supply systems, for equipment with rated current 16 A per phase and not subjected to conditional connection
-EN 60065:2002 + A1:2006 + Corrigendum:2006
Audio, video and similar electronic apparatus – Safety requirements
The CE symbol confirms that this product conforms with the above mentioned norms and regulations.
The manufacturer also declares the conformity of the product according to the following directives:
• 2001/95/EC General Product Safety
• 2002/95/EC RoHS: Hazardous substances in electrical and electronic equipment
Lorsch, 09.07.2008
Aaron Taylor, SPM
Support
| Hotline E-Mail Language | |||
| AT | +49 431 - 24 89 45 70** | support.at@trekstor.de German | |
| BE | +49 431 - 24 89 45 80** | support.en@trekstor.de English | |
| cH | +49 431 - 24 89 45 73** | support.ch@trekstor.de German | |
| DE | 01805 - TREKSTOR* | ||
| 01805 - 87 35 78 67* | support.de@trekstor.de German | ||
| ES | +49 431 - 24 89 45 76** | support.es@trekstor.de Spanish | |
| FR | +49 431 - 24 89 45 74** | support.fr@trekstor.de French | |
| HU | +49 431 - 24 89 45 79** | support.en@trekstor.de English | |
| IT | +49 431 - 24 89 45 75** | support.it@trekstor.de Italian | |
| LU | +49 431 - 24 89 45 72** | support.lu@trekstor.de German, French | |
| NL | +49 431 - 24 89 45 81** | support.en@trekstor.de English | |
| PL | +49 431 - 24 89 45 77** | support.pl@trekstor.de Polish | |
| PT | +49 431 - 24 89 45 78** | support.en@trekstor.de English | |
| UK | +49 431 - 24 89 45 71** | support.uk@trekstor.de English | |
| GR | +49 431 - 24 89 45 82** | support.en@trekstor.de English | |
| TR | +49 431 - 24 89 45 83** | support.en@trekstor.de English | |
| RU | +49 431 - 24 89 45 84** | support.en@trekstor.de English | |
| SE | +49 431 - 24 89 45 92** | support.en@trekstor.de English | |
| UA | +49 431 - 24 89 45 93** | support.en@trekstor.de English | |
| SI | +49 431 - 24 89 45 94** | support.en@trekstor.de | English |
| cA | +49 431 - 24 89 45 95** | support.en@trekstor.de English | |
| +49 431 - 24 89 45 96** | support.fr@trekstor.de French | ||
| Other countries | +49 431 - 24 89 45 99** | support.en@trekstor.de English | |