USER MANUAL Aqueena Pro WT100 Zepter
AqueenaPro Aquapura, Vita longa

AqueenaPro Aquapura, Vita longa
Instruction Manual
pag. 02
EN
Bedienungsanleitung
Seite 27
DE
Thank you for choosing ZEPTER AqueenaPro water purifying system and your trust in Zepter International. Your AqueenaPro will reliably provide clean, healthy and great-tasting water for you and your family. Place Zepter AqueenaPro in your home and enjoy an endless source of pure spring water, every day. Zepter International is a global specialist in health and lifestyle.
This guideline will help you get the best out of your water filtration system. Please go through this user instruction manual to familiarise with its operation and maintenance.
To make sure the warranty is effective, follow all instructions provided in this user manual. For further information or support, please contact your Zepter sales representative*.
For any questions regarding AqueenaPro installation, maintenance or fi iter replacement, please contact your service technician/Zepter Service Centre*.
*All contact details can be found in the Warranty card.
INTRODUCTION 02
CONTENT 03
| SAFETY INFORMATION |
| AQUEENAPRO TECHNOLOGY |
| AQUEENAPRO FEATURES |
| AQUEENAPRO OVERVIEW |
| ITEMS IN THE BOX 12 |
| AQUEENAPRO INSTALLATION |
| - Installation Instructions |
| OPERATING INSTRUCTION |
| - Before first use | 13 |
| - RO Membrane Installation | 14 |
| - Display functions | 15 |
| MAINTENANCE AND FILTER REPLACEMENT METHOD |
| - Flushing the RO Membrane | 16 |
| - Filter Replacement Method | 16 |
| - Filters replacement procedure | 16 |
| - Restoring leakage sensor | 17 |
| - After filter replacement | 18 |
| - The RO replacement procedure | 19 |
| - Filter Replacement Time | 19 |
| - RO membrane replacement time | 20 |
| TECHNICAL INFORMATION |
| OPERATING INFORMATION |
| TROUBLESHOOTING GUIDELINE |
| DISPOSAL INFORMATION |
| WARRANTY CARD |
| WARRANTY STATEMENT |
| AQUEENAPRO PERFORMANCE DATA SHEET 26 |
The manual uses specific cations to draw your attention to some details

Warning! Failure to observe a warning may result in severe physical injury or property damage

Caution! For safety reasons, be careful! Failure to observe a caution sign may result in minor physical injury or property damage

Note! It contains additional information and useful advice for the proper use of the water fi ltration unit.

Caution!
- This user manual is an integral part of the appliance. Read all the instructions and safety precautions contained in this manual carefully, as they provide important information on the use and maintenance of the device. Keep the manual for future reference.
- After removing the packaging, make sure that the water fi ltration unit is intact, carefully inspect the device body and the accessory box.
-
This appliance should only be used for its intended purpose. The manufacturer shall not be held liable for any damages caused by improper, incorrect or unreasonable use.
-
This appliance is not intended for use by persons (including children) with reduced physical, sensory or mental capabilities, or lack of experience and knowledge, unless they are supervised or have been instructed on the use of the appliance by a person responsible for their safety.
- Children should be supervised to ensure that they do not to play with the appliance.
- At the end of its lifetime, the appliance should be disposed of separately from ordinary waste, leaving it with operators who are qualified to collect this kind of material. In this way it will be properly disposed of and recycled, helping to safeguard the environment!
! Note!
- AqueenaPro is a water filtration system for household use. Any use outside your home and for purposes other than purifying water for household use will automatically void your warranty.
-
The AqueenaPro should not be used on feed water that is microbiologically unsafe or has unknown microbiological quality without disinfecting the water before using the device.
-
Cold water plumbing – AqueenaPro must be connected to a cold water pipe. Using hot water (>38°C) as a water source will cause permanent damage to the RO membrane and severely degrade the performance of the product.
!
Warning!
This appliance can be used by children aged over 8 years and persons with reduced physical, sensory or mental capabilities or lack of experience and knowledge if they are supervised or have been instructed on the safe use of the appliance and understand the hazards involved. Children shall not play with the appliance. Cleaning and user maintenance shall not be carried out by children without supervision
Warning for Non-European markets:
This appliance is not intended for use by persons (including children) with reduced physical, sensory or mental capabilities, or lack of experience and knowledge, unless they are supervised or have been instructed on the use of the appliance by a person responsible for their safety.
Children should be supervised to ensure that they do not play with the appliance. The new hose-sets supplied with the appliance are to be used and old hose-sets should not be reused.
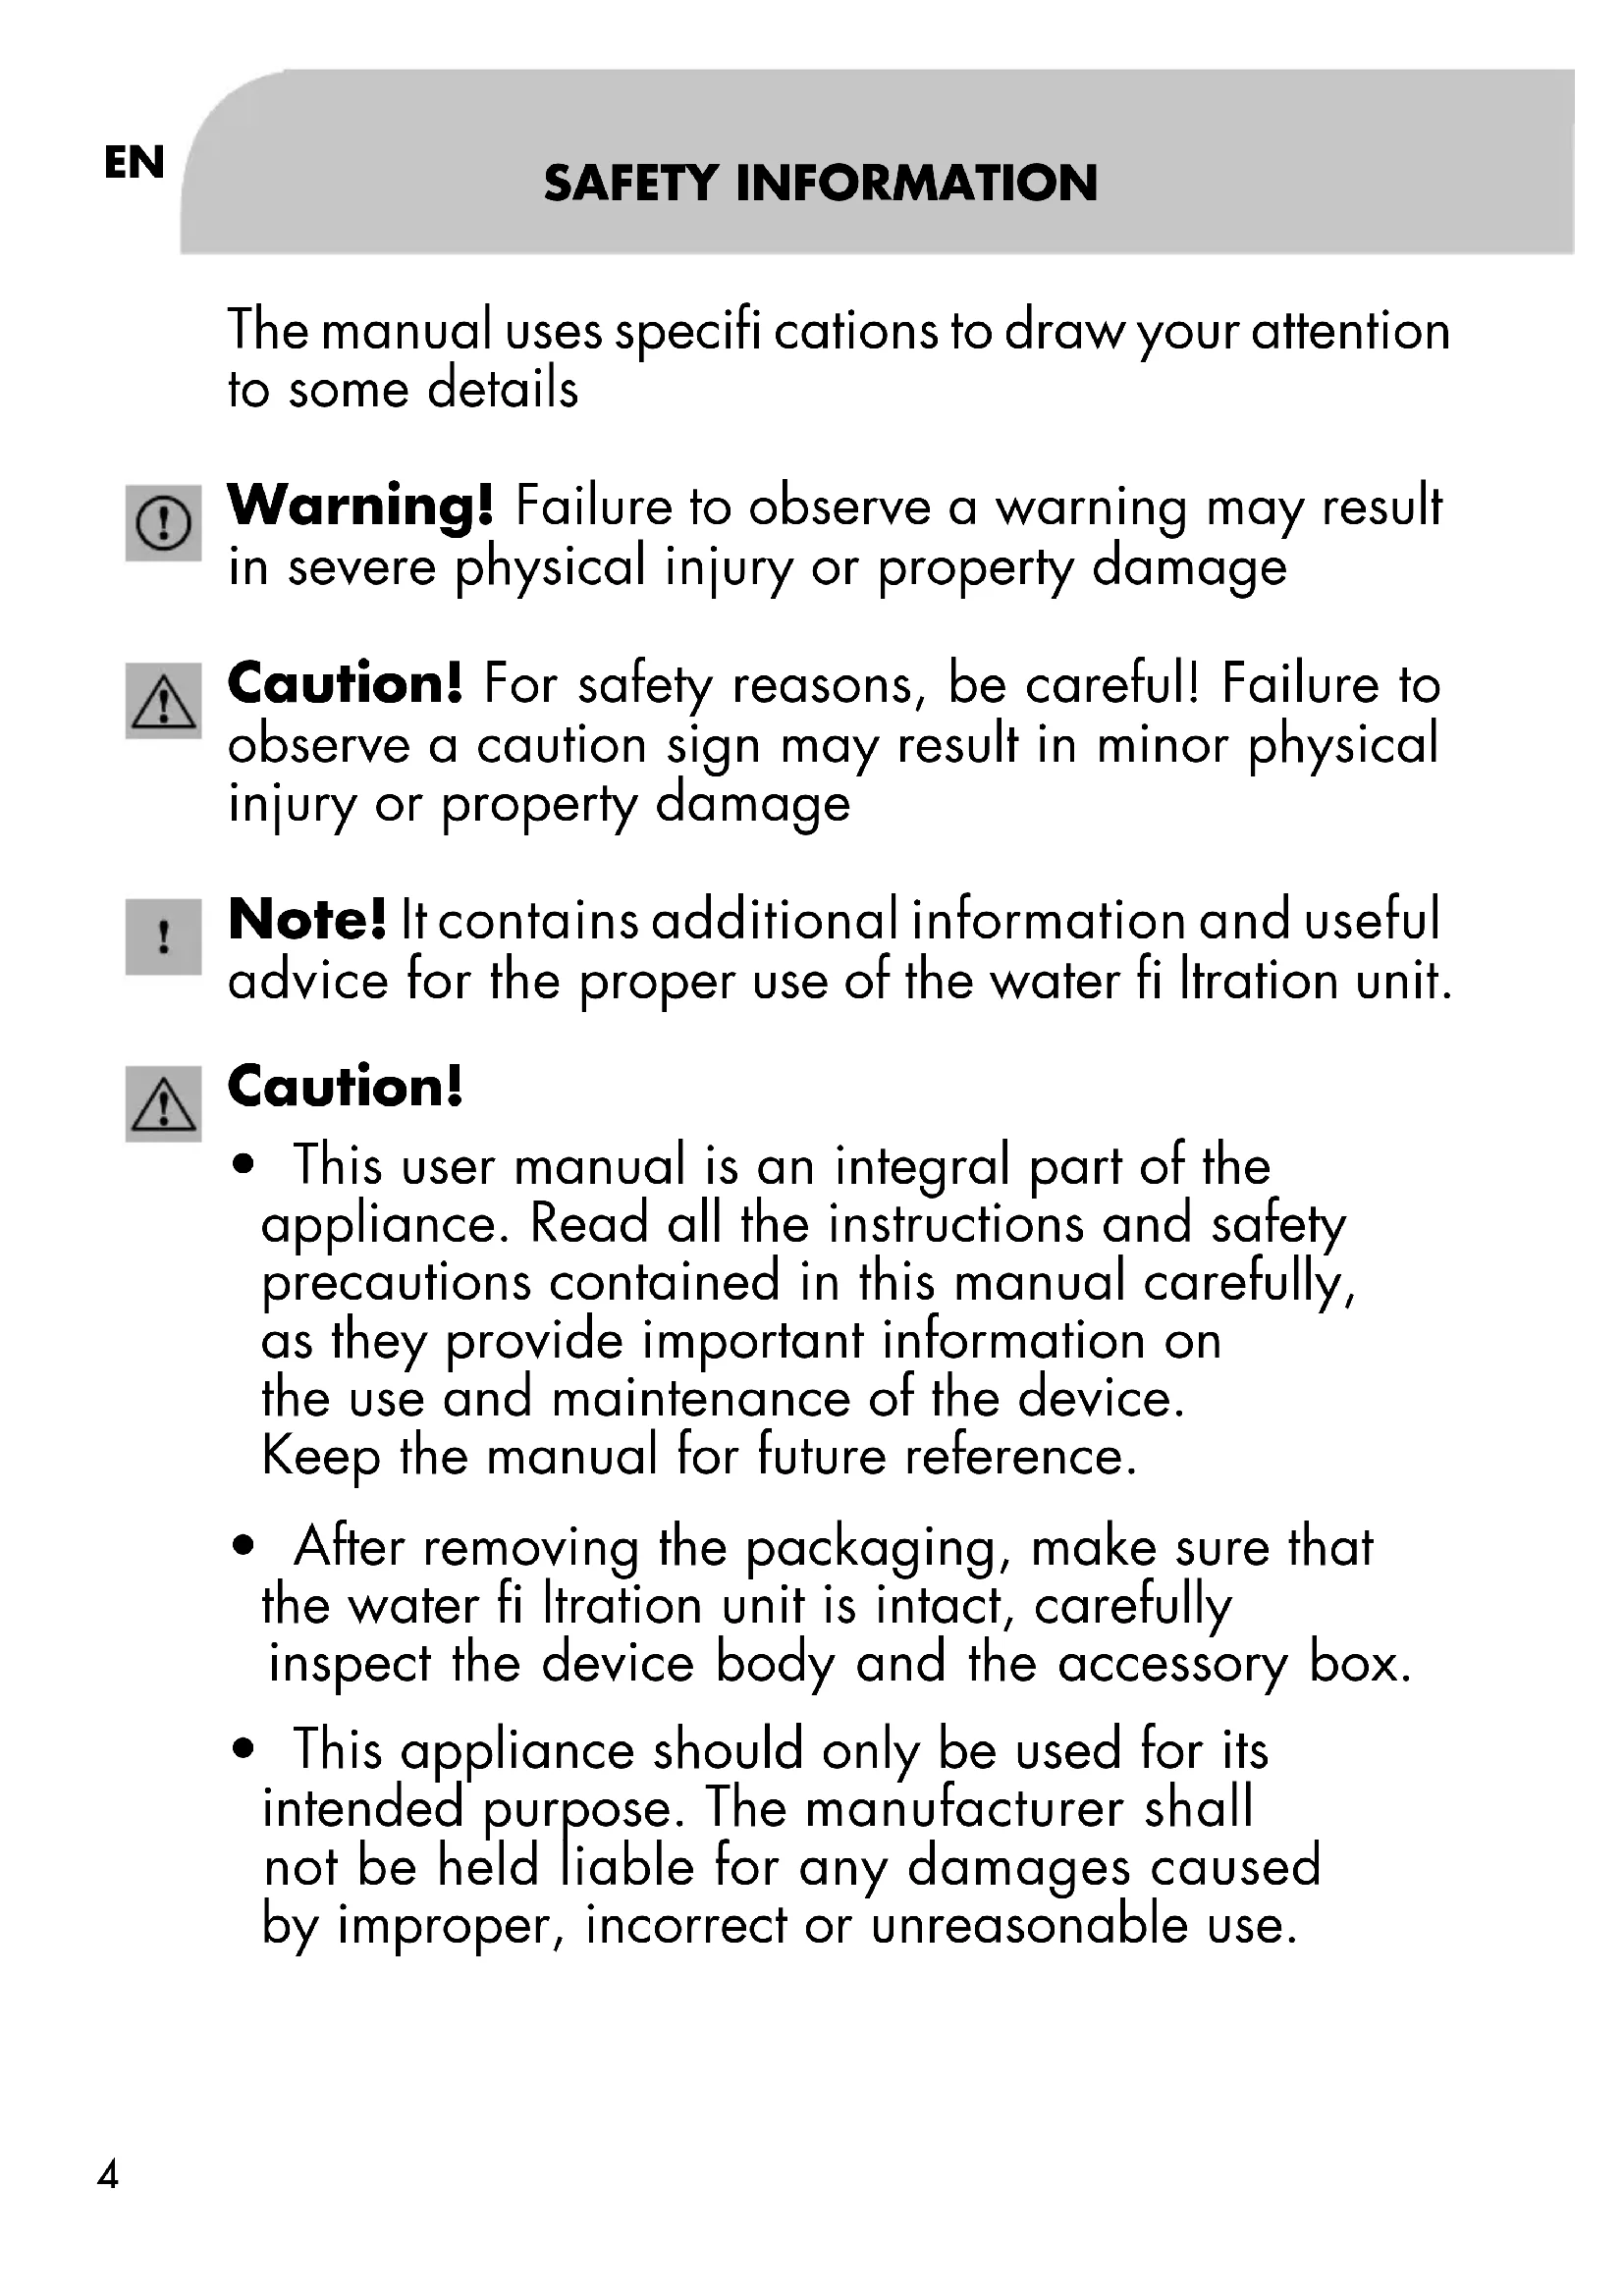
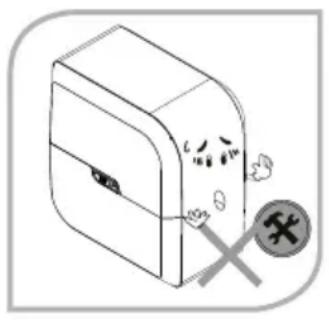
- Do not disassemble or modify AqueenaPro on your own!
Never attempt to repair or change any internal part of AqueenaPro, as it may compromise the efficiency and safe operation of your water purifi er. Any unauthorised change will automatically void the warranty. If you find that a repair is needed, please contact your Zepter service technician for support.
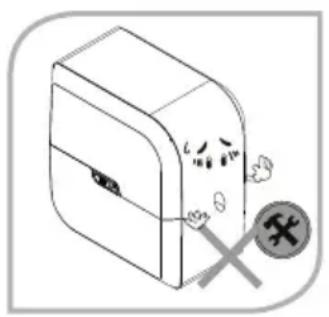
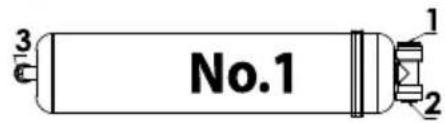
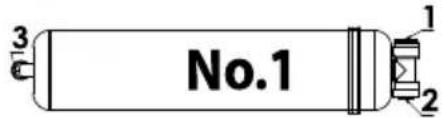
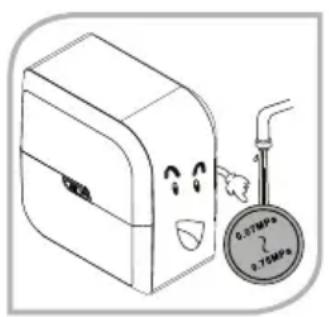
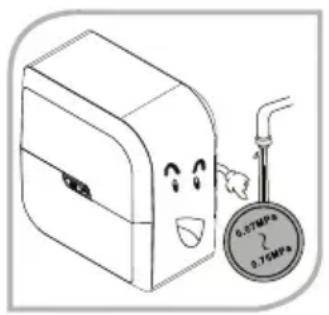
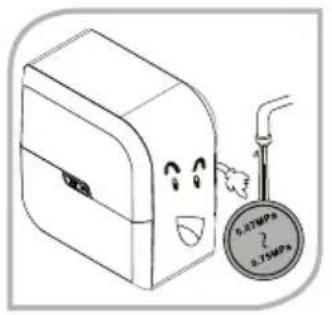
- Do not use AqueenaPro under high water pressure!
Operating under high pressure conditions may result in rupture of the water purifier pipes and a consequent water leakage. Recommended inlet pressure is 0.1MPa to 0.35MPa . (14.5 - 50.8 psi).
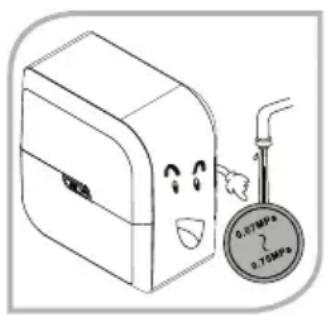
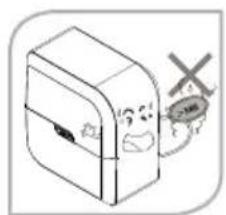
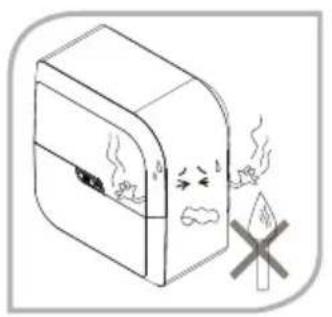
- Do not use AqueenaPro near gas, naked fl ames, explosive or highly fl ammable materials.
Do not leave the water purifi er near fi replaces or other high temperature heat sources (stove, oven), as it can result in deformation or melting of the housing.
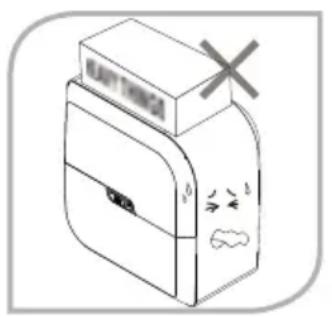


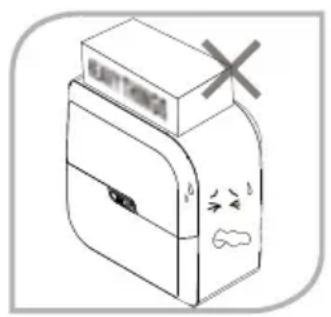
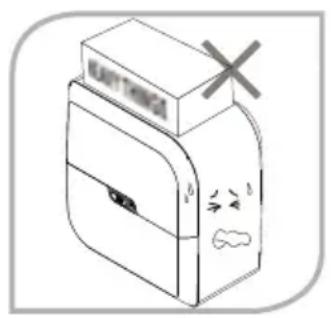
- AqueenaPro is a free-standing unit.
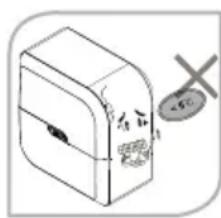
Do not place or keep anything on top of the unit.
- Before connecting the unit to the mains, make sure the information found on the data plate matches that of your electricity mains.
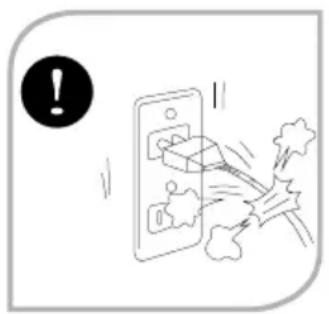
- Do not use the appliance if the power cord or plug are damaged.
If the supply cord is damaged, it must be replaced by the manufacturer, its service agent or similarly qualified persons in order to avoid a hazard. The appliance is only to be used with the power supply unit provided with the water dispenser.
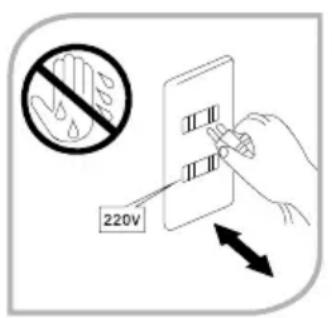
- Do not touch the power plug with wet hands!
It may lead to electric shock.

Caution!
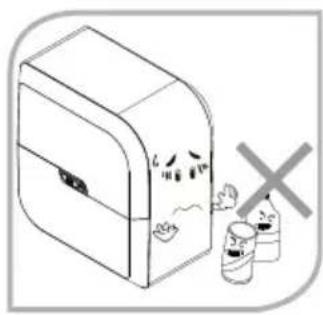
- Do not use any chemicals when cleaning the outside casing of AqueenaPro.
Alcohol, petrol, organic and inorganic acids and strong basic chemicals like concentrated dishwashing detergents will irreparably damage the plastic housing of your AqueenaPro.
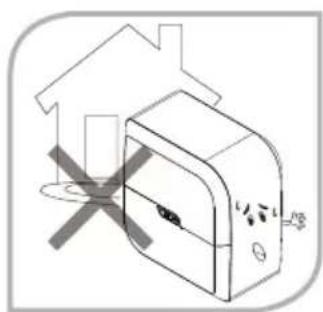
- Do not use your AqueenaPro outdoors!
Using AqueenaPro outdoors can accelerate the corrosion of pipes and parts, which can result in leaks or damage to the device.
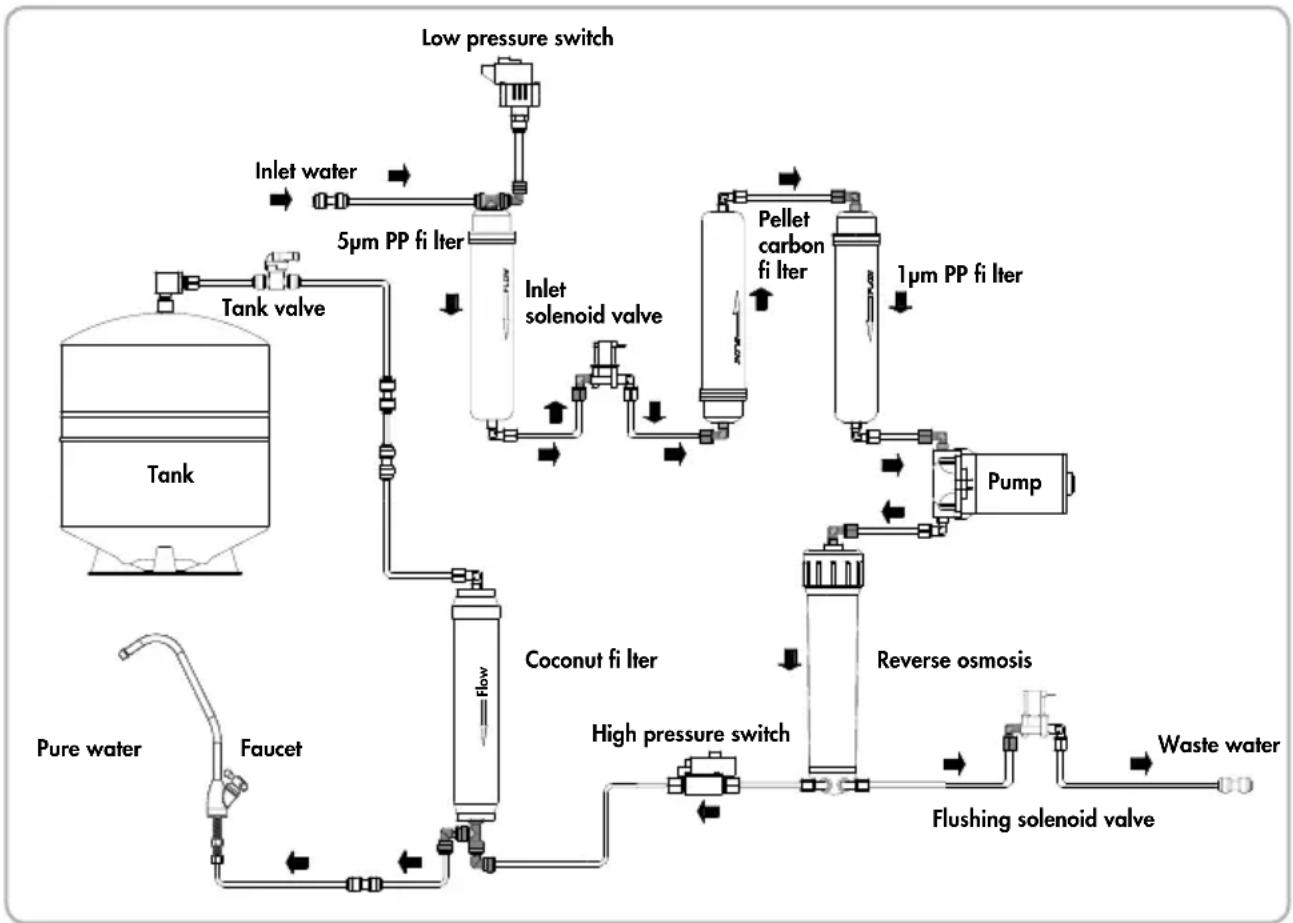
AqueenaPro is a low-noise 5-stage fi ltration system which uses the most advanced international RO (reverse osmosis) technology currently available.
The heart of the AqueenaPro water fi ltration system is a RO membrane with 0.0001-micron small pores designed to remove even dissolved impurities (heavy metals), pesticide residues as well as harmful micro organisms (bacteria and viruses). AqueenaPro signifi cantly reduces bacteria and infectious viruses.
AQUEENAPRO FEATURES
- Built-in water tank, theoretical volume 2.5 Gallon (9.5 l).
- Computer control box, which automatically adjusts AqueenaPro's working status.
- Filter change alarm, which indicates when the filter needs to be replaced.
- RO membrane integrated with the membrane housing to prevent tampering.
- Leakage sensor, to detect device leakage; it secures the user's property and avoids damages caused by leaks.
- High pressure pump, which creates a stable environment for the RO membrane.
- Flushing solenoid valve, to flush the RO membrane automatically and control waste water flow.
- Inlet solenoid valve, which by definition opens or shuts inlet water pressure in a range between 0.03 and 0.6MPa( 4.35 - 87psi) .
- Checking flow valve, to prevent water backflow.
- Safe feature, pressure switch.
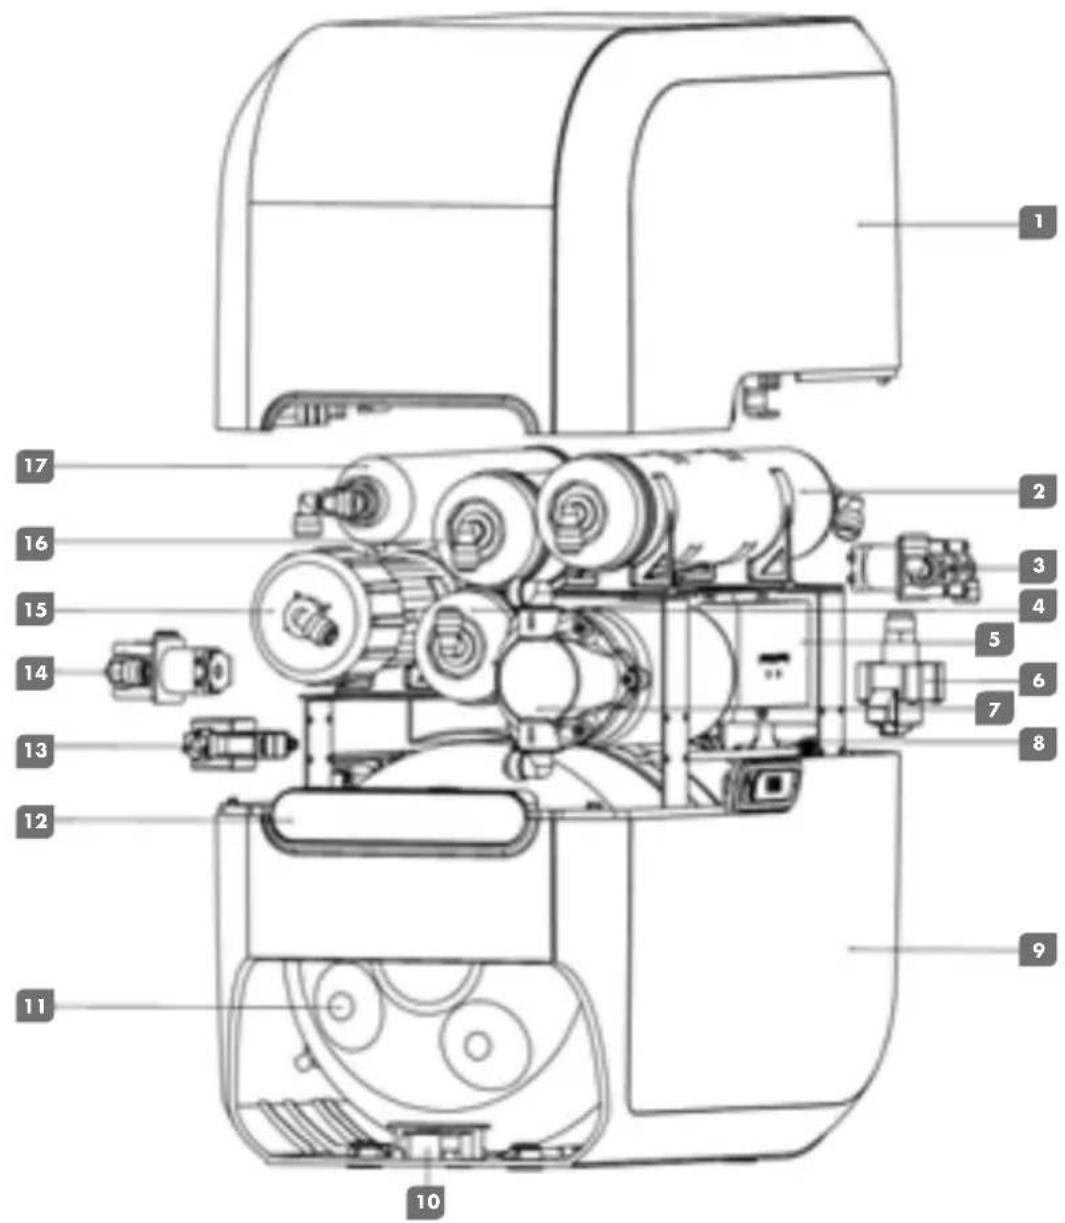
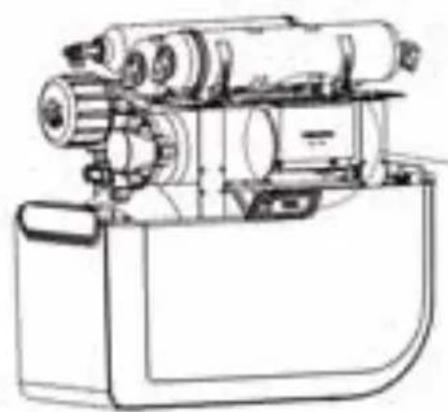
- Upper cover
- 5 micron PP Filter
- Inlet Solenoid Valve
- Pellet Carbon Filter
- Computer control box
- Low Pressure Switch
- Pump
- Bracket for inlet/outlet water
-
Lower cover
-
Leakage sensor
- 2.5G water tank
- Display
- High pressure switch
- Flushing Solenoid Valve
- Reverse Osmosis
- 1 micron PP Filter
-
Coconut Filter
-
AqueenaPro water filtration system 1 piece
- RO membrane in protective fi lm 1 piece
- Power supply adaptor 1 piece
- User manual
- Drinking water faucet 1 piece
- Tube
- Drainage clamp
- Wrench for membrane housing 1 piece
- Accessory bag
a) Inline feed water connector 1 piece
b) Clip for quick connectors 2 pieces
c)Faucetfixture 1 piece
1 piece
5 m
1
F
1
pi
AQUEENAPRO INSTALLATION
Installation, servicing, maintenance and repairs should only be performed by Zepter authorised staff.
All maintenance should be performed using original Zepter replacement cartridges and spare parts.

Warning!
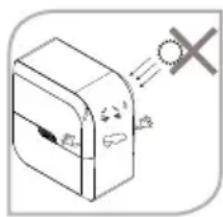
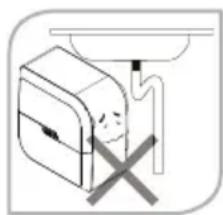
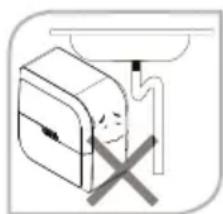
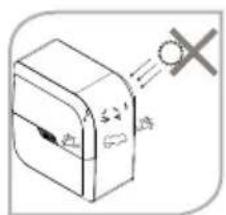
- Avoid exposure to direct sunlight and installation in damp areas
It may create a breeding ground for microorganisms resulting in reduced purifi ed water quality, as the internal components of the water purifi er can be polluted

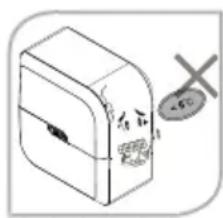
- Inlet water cannot exceed 38^
Using a hot water source (>38^) will cause permanent damages to the RO membrane and severely degrade the performance of the product.
Make sure that AqueenaPro is connected to a cold water supply only.
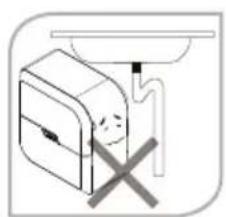
- The maximum distance between the water source and the purifi er should not be more than 3m
- Avoid sharp bends in the pipe. Do not bend or block the reject water tube.
- Do not confine your AqueenaPro in a tight cabinet.
- Do not use the AqueenaPro when the drain is clogged up.
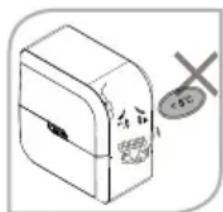
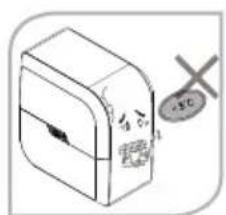
- Do not use AqueenaPro at temperatures below 5^
If the room temperature is below 5^ , it can result in pipes cracking due to water freezing inside the machine.
Installation Instruction

Note!
Aqueena Pro water purifi er has been designed to be installed under the sink. The initial installation requires carpentry and plumbing works.
Installation, servicing, maintenance and repairs should only be performed by Zepter authorised staff.
Recommended side preparation
- Mains connection no more than 1.5m from the point of installation of AqueenaPro
Water supply no more than 3m away
- Drain for rejected water no more than 3m away
Space as per the size of AqueenaPro
- It is preferable to install AqueenaPro near a sink so that inlet and reject water lines are easily available.

Important notes!
- If you are not using your AqueenaPro for more than two days (48 hrs), switch off the device and drain the storage tank.
- To keep the storage tank clean, it should be drained once every 2 days.
- The buzzer will sound to indicate a fault in the purifier. If you hear an audible alarm, take action as reported in the "Display function" section and/or the "Troubleshooting guideline" or call a service technician for support.
- Do not try to service the AqueenaPro on your own. Call a service technician/Zepter Service centre for help.
OPERATING INSTRUCTIONS
Before first use
- Install the RO membrane according to the section RO Membrane Installation
- Make sure that all connections are secure.
- Connect the water purifier to the mains. Make sure the power connector plug can plug into the local power socket.
- Bypass the water tank, close the water tank valve.
- Open water inlet valve and water faucet
- Switch on your AqueenaPro. As a start up audio signal will be activated 1 buzz.
- Let water run through the system for approx. 5-10 min (system stabilisation) and check all connections.

Caution! If you find any leaks, do not proceed further until the leaks are fixed.
- Turn off the water faucet and check if the flow of waste water stops (approx. after 30 s).
- If no deviation or leak is found, open the water tank valve and let the system fi ll with water.
- Drain the first two water tanks before use.

Note! The fi rst two tanks can contain black residues. These are carbon particles washing away from the carbon fi lter and will not affect future system performance nor the quality of purifi ed water.
- Measure TDS level and record it on your Product Warranty Card.
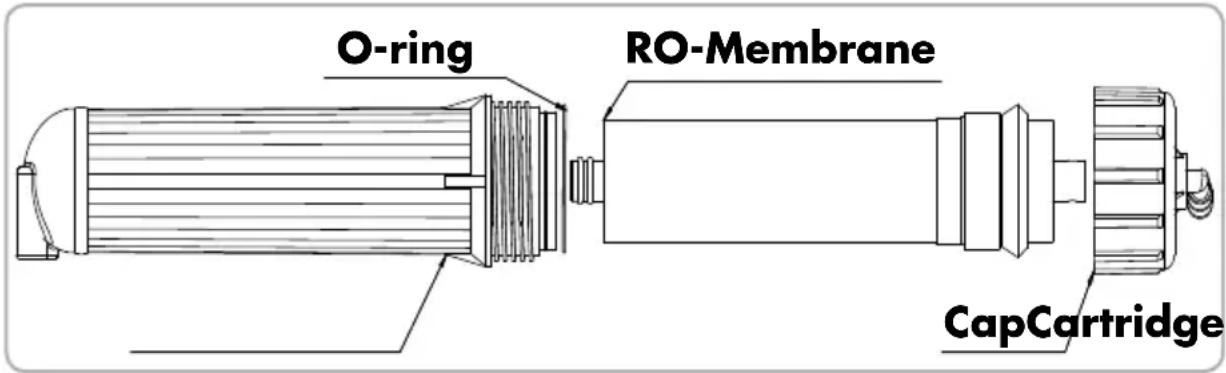
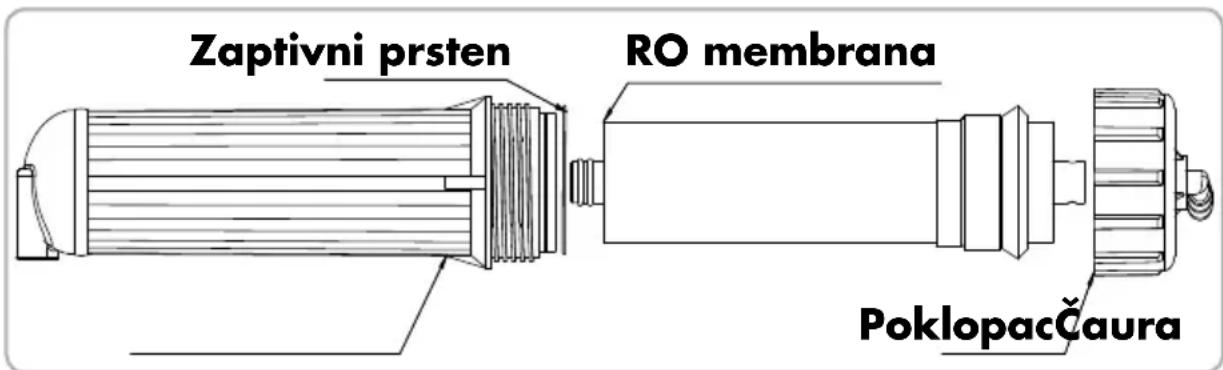
RO Membrane Installation

Note!
- The AqueenaPro water purifi er is delivered with the RO membrane uninstalled and packed separately with protective fi lm.
- In order to prevent microbial contamination of membrane components during storage and transportation, the RO membrane package contains a small amount of protective solution.
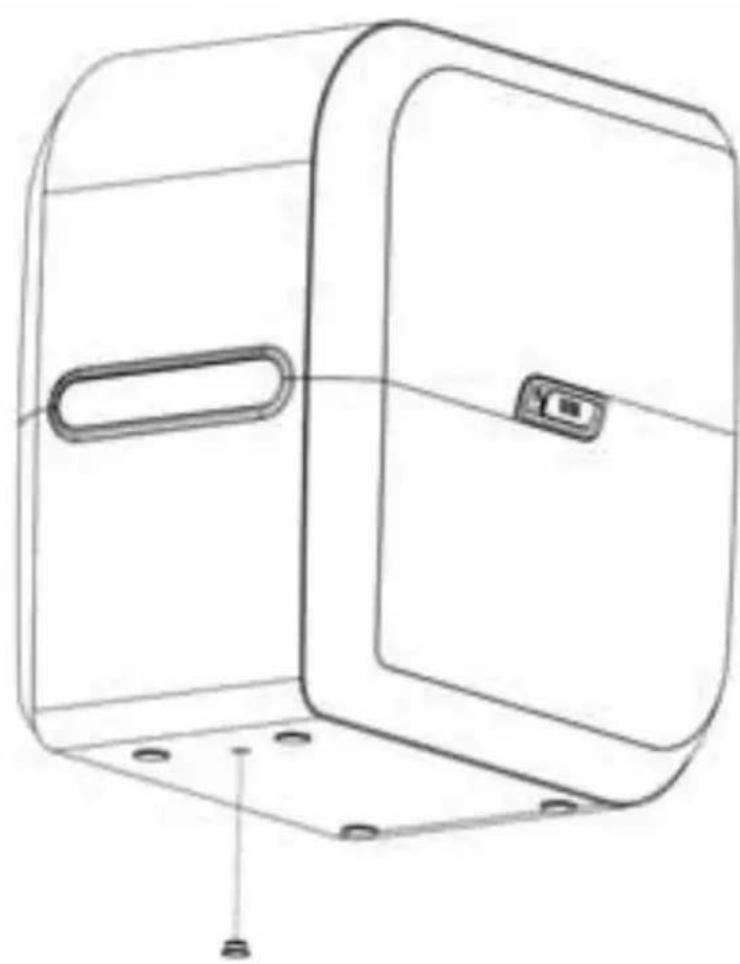
- Remove the AqueenaPro top cover.
- Unscrew the cap's nut from the membrane housing and remove inlet water pipe.
- Disassemble membrane cap with the enclosed wrench.
- Remove RO membrane from its protective film.
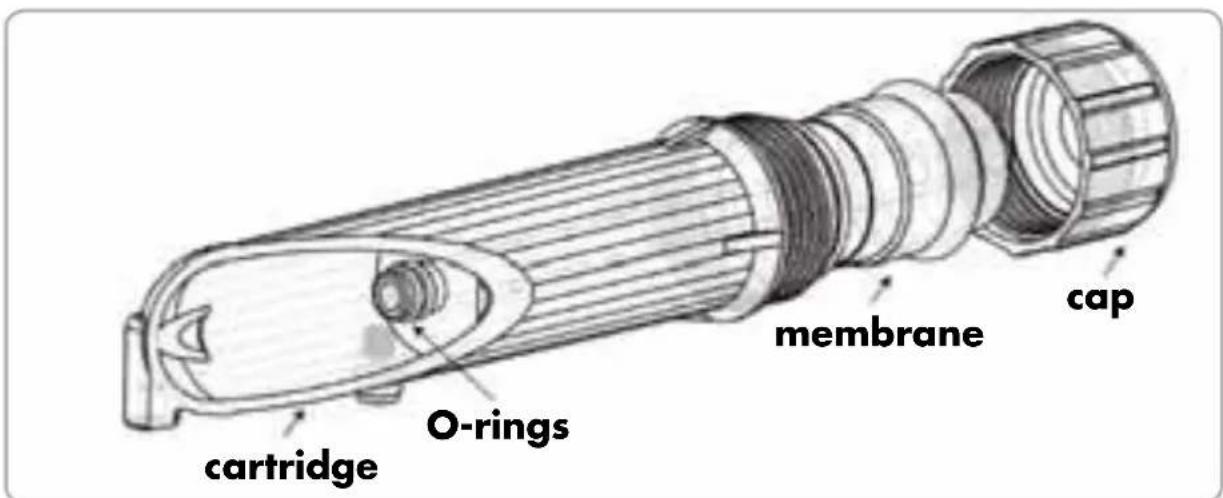
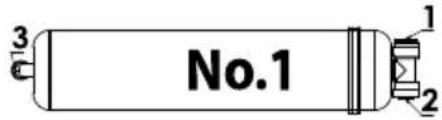
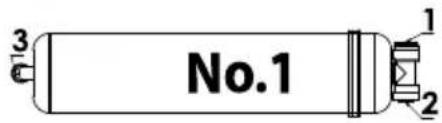
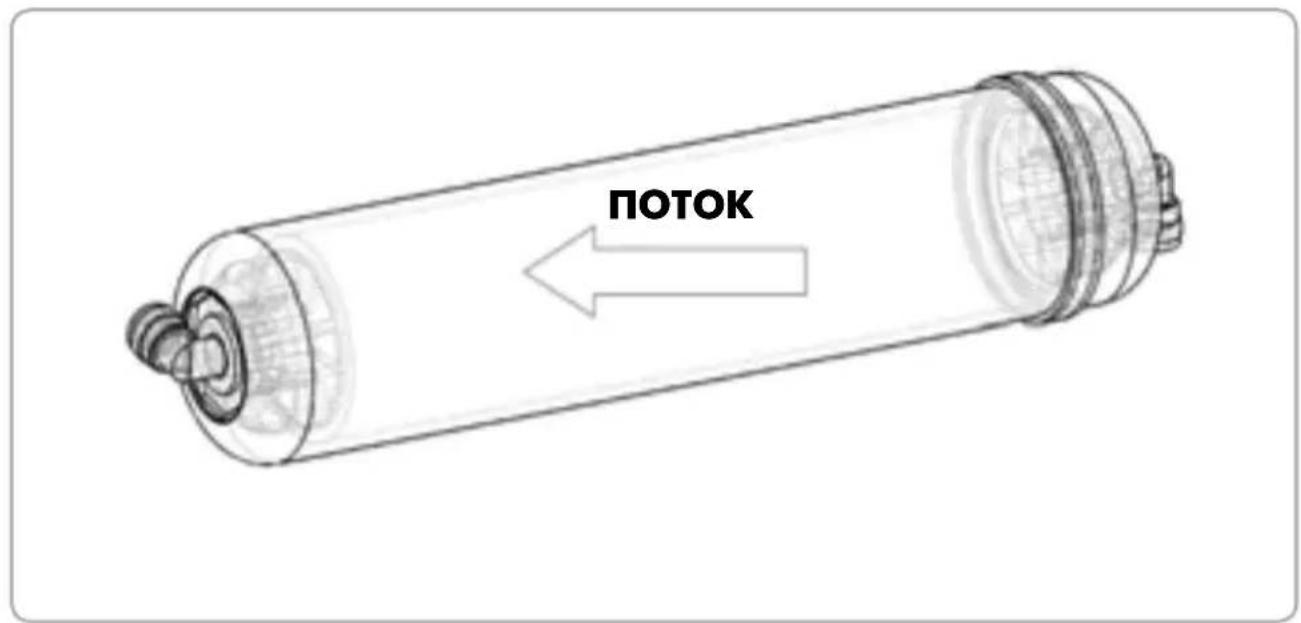
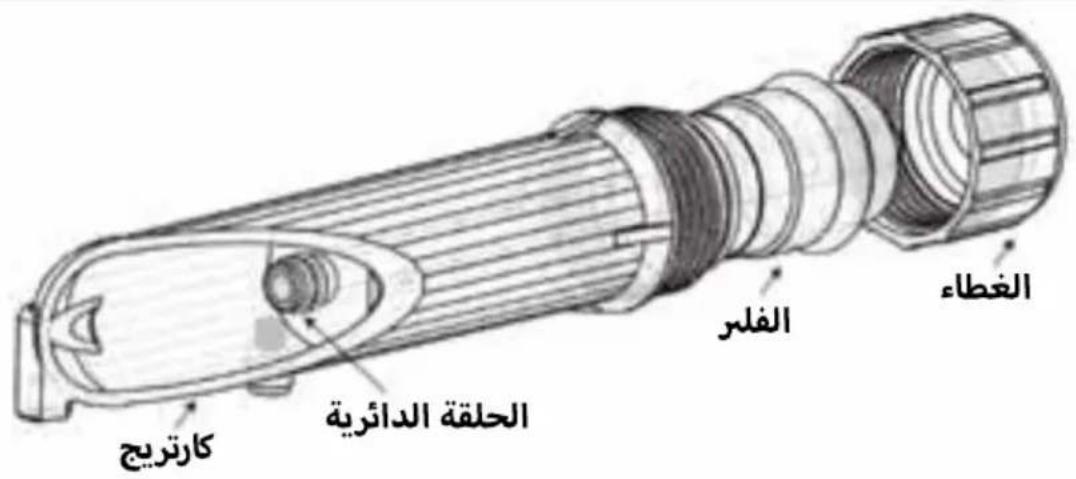
- Insert RO membrane into membrane housing. The membrane end with O-ring must be placed on the bottom of the housing. (see picture below)
- Close the membrane casing with the cap. Use the wrench to tighten the cap properly.
- Connect the inlet water pipe and secure it with the cap's nut.
- Place the RO membrane cartridge in the correct position.
- Check all connections and make sure that there are no leaks.
- Close the AqueenaPro top cover.

Warning!
Pay attention to the direction of the membrane; the membrane ending with an O-ring must be placed in the bottom part of the housing.
- Do not force the RO membrane into the membrane casing; it may cause permanent damage to the membrane shell or membrane components.
- If the RO membrane is installed correctly in the membrane housing, there is no need to force it.
Display functions


If a display icon lights up:

Working: Water purification is in the progress, the device is in working mode.

Water Flashing light - missing inlet water source or low inlet water pressure. Source: The "Water source" icon will light up with an audible alarm (7 buzzes).

Standby: The water purifi er is in standby mode.

Flush: The flushing function is activated.

Note! If any leaks occur, all icons ("Working", "Water source", "Standby" and "Flush" icons) will flash at the same time along with an audible alarm.
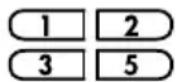
Status Display: It shows the actual filter status.
Green light - the fi Iter works at its optimum level.
Orange light - the fi lter will soon need replacing. Please contact Zepter Service for maintenance support.
A red light along with an audible alarm (4 buzzes) means that the fi ler must be changed immediately. Further use of the fi ler is not recommended.
- micron PP fi Iter WT-100-72
pellet carbon fi Iter WT-100-73
3 - micron PP fi Iter WT-100-74
5 Coconut fi Iter WT-100-75
Flushing the RO Membrane
The RO membrane is automatically fl ushed for 18 seconds when the device is turned on. When the water tank is full, the RO membrane is automatically fl ushed for 10 seconds.
!
Filter Replacement Method
Note! Filters and membranes are consumables. Their replacement time depends on the quality of raw water and water consumption. They are not covered by the warranty.
Filter Replacement procedure
- Turn off the power supply.
- Close the inlet water valve.
- Remove the top cover.
- Unplug the "old" filter - disconnect filter from quick connectors (memorise filter orientation).
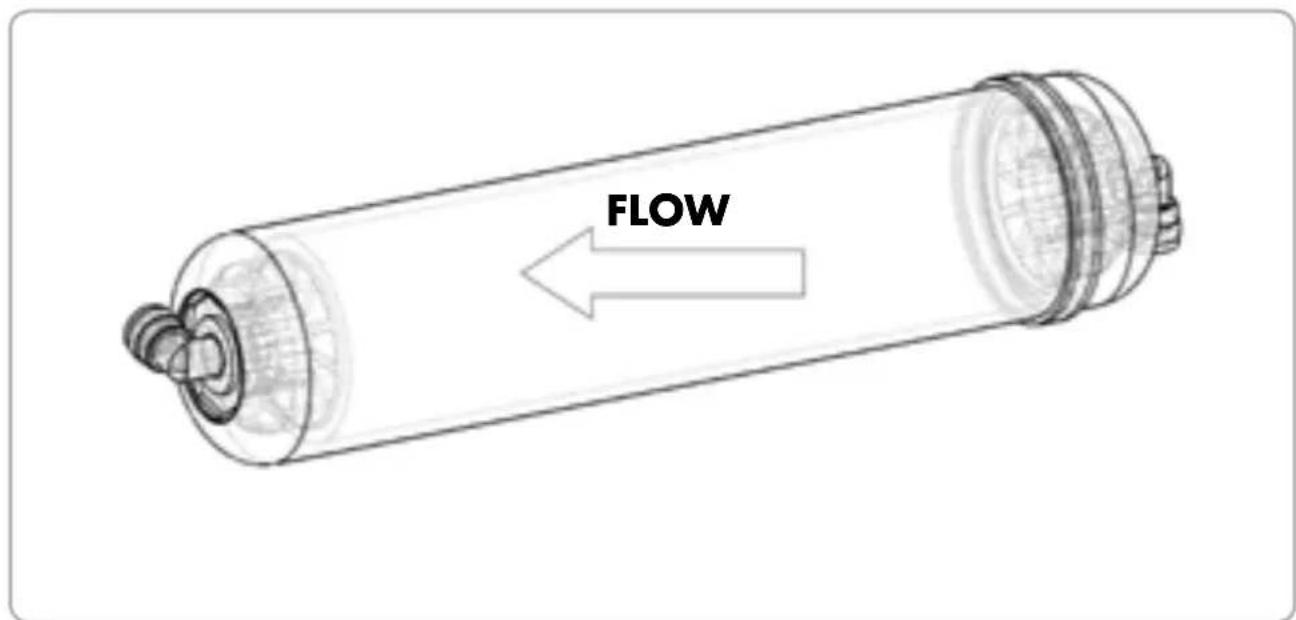
- Replace the filter - Pay attention to correct water flow direction!
- Check all connections and make sure there are no water leaks.
- Close the top cover.
- Open the inlet water valve and turn on the power supply.
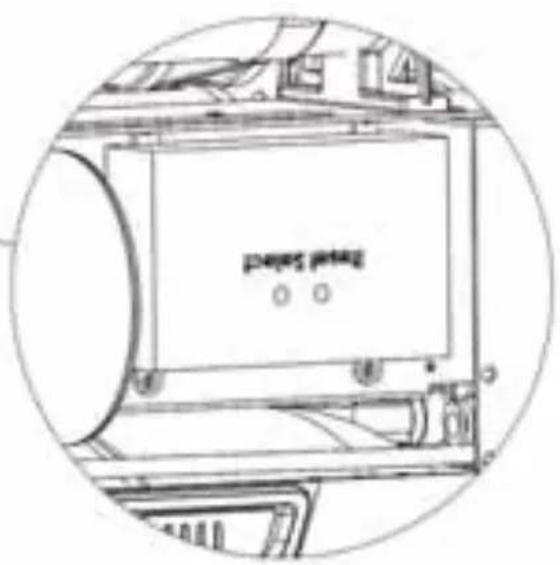
Restoring Leakage sensor:
- Turn off the power supply
- Close the inlet water valve
- Remove the top cover
- Repair the leakage
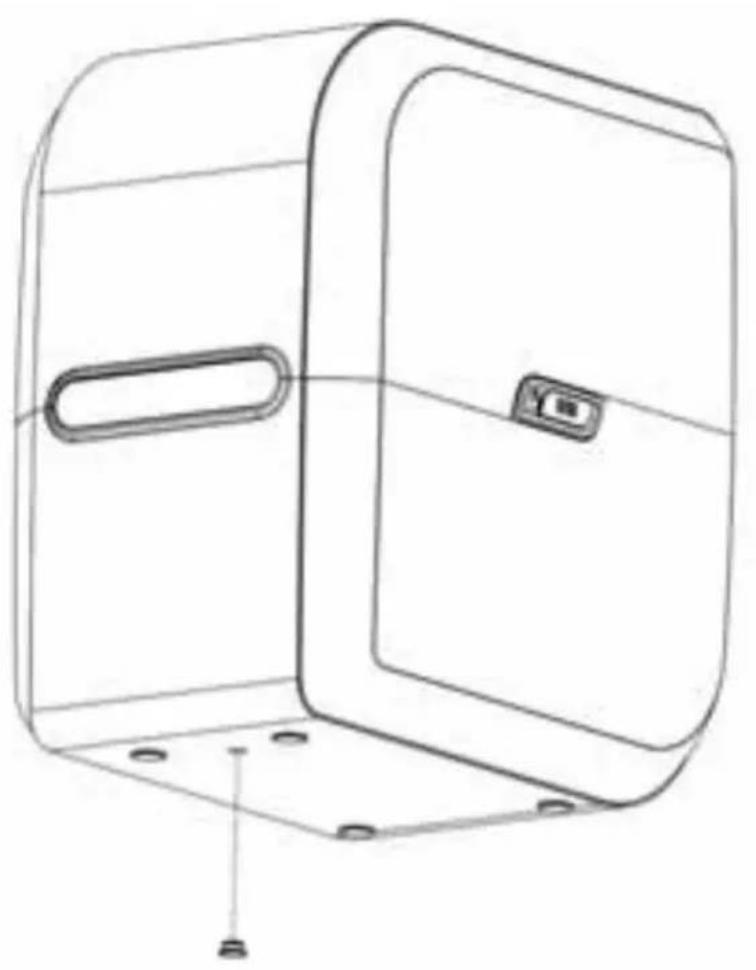
- Drain the water out of the housing by removing the rubber cap at the bottom of the housing.
- Dry the sensor

Warning!
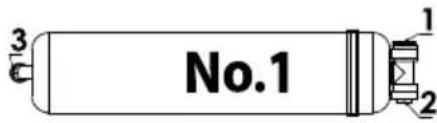
When installing a new filter, pay special attention to water flow direction - the arrow on the filter label shows the correct water flow direction.
The fi ler cannot be installed upside down.
PP Filter
PP Filter (5 micron)

- Life time approx. 6months
- Max flow: 0.75 GPM
- Max pressure: 125 PSI
- Max temp. 38^
- Install the filter in the same direction as water flow
Lot:
YYYY-WXY
Item Code:
WT-100-72
Country of Origin:
Made in China
FLOW
No.1
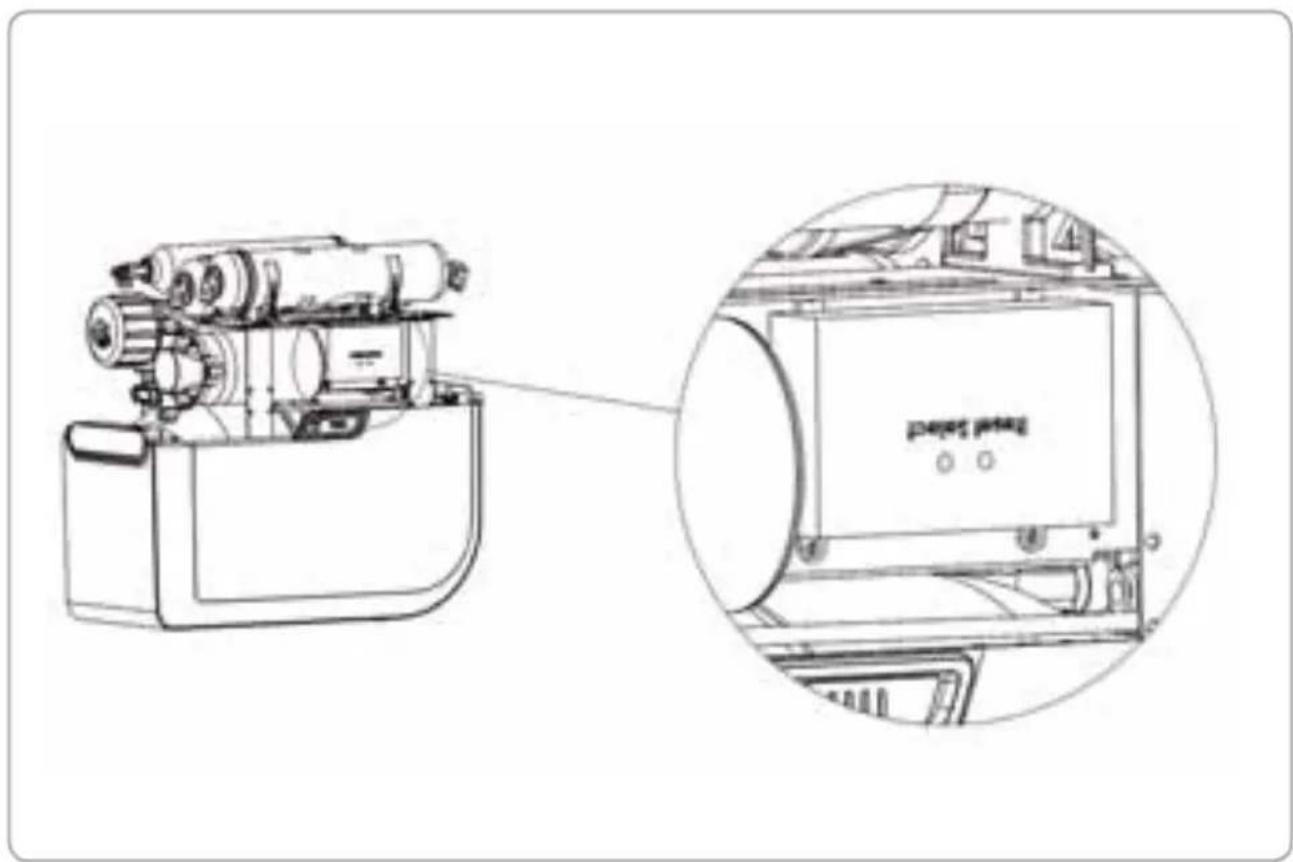
After fi iter replacement
"Select" button: After the filters are replaced, press the "Select" button to select the corresponding fi lter icon. Icon will start to blink.
"Reset" button: Select the corresponding filter and press the "Reset" button, hold for more than 3 seconds until the function is effective. After resetting, the red light will turn green.

The RO replacement procedure
- Turn off the power supply.
- Close the inlet water valve.
- Remove the top cover.
- Unplug the "old" fi iter - disconnect fi iter from quick connectors
- Replace the fi lter - Pay attention to correct water flow direction!
- Check all connections and make sure there are no water leaks.
- Close the top cover.
- Open the inlet water valve and turn on the power supply.
Filter Replacement Time
The AqueenaPro water purifying system is equipped with a special system to monitor fi iter life time. The system automatically monitors filter conditions and the current status is shown on the Filter Status Display.
Green light - the fi tter works at its optimum level.
Orange light - the filter will soon need replacing. Please contact Zepter Service for maintenance support.
A red light along with an audible alarm (4 buzzes) means that the fi liter must be changed immediately. Further use of the fi liter is not recommended.

Attention!
Max. recommended filter replacement cycle represents time equivalent of AqueenaPro engaged in the process of filtration.
Theoretical model used in the calculation of max. recommended filter replacement cycle is based on 10L per day of purified water consumption. For demand exceeding the model assumptions, replacement cycle may vary.
The fi iter replacement cycle is not the fi iter quality warranty period, but the expected cycle (lifetime) when the fi iter shows its original performance. The lifetime of the fi iter is affected by the daily water consumption and inlet water condition, therefore, the fi iter replacement cycle may be shorter for the areas where the water contains high level of suspended solids (particles, sediments, etc.)
| Filter type | Max. recommended fi iter replacement cycle (months) |
| WT-100-72 | 5-micron PP fi lter | 6 |
| WT-100-73 | Pellet carbon fi lter | 6 |
| WT-100-74 | 1-micron PP fi lter | 6 |
| WT-100-75 | Coconut fi lter | 12 |
RO Membrane Replacement Time
| Membrane | Max. recommended fi iter replacement cycle (months) |
| WT-100-15 RO membrane | 12 |
The manufacturer recommends changing the RO membrane WT-100-15 with the Coconut fi iter WT-100-75; therefore refer to Coconut filter replacement period as shown on the Filter Status Display (No. 5)
Tips!
If you are unsure about the right time for changing your fi I ter,
- Is the TDS level signifi cantly higher than at the beginning of the purifi cation process? (Please refer to your record in the Warranty Card).
- Does it take longer to completely fill the water tank compared to the beginning of the purifi cation process?
- Is the amount of waste water greater than at the beginning of the purification process?
If you have answered YES to at least one of these 3 questions, please change your fi lter(s).
PRODUCT NAME: ZEPTER AQUEENAPRO
| Model | WT-100 |
| Voltage | AC100-240V, 50-60HZ |
| Power Rating | 25W |
| Size (mm) | 408wx265dx420h |
| Suitable Inlet Water Pressure | 0.07-0.75MPa |
| Operating Pressure | 0.6MPa-0.8MPa |
| Inlet Water Temperature | 5-38°C |
| Maximum Inlet Water TDS Value | < 2000 PPM |
| Maximum Daily Water Production Volume | 100 Gallons, approximately 378.5 Litres |
| Self-flushing system | YES |
| Electric Shock Protection Type | Type II |
| Tank Capacity | 9.5 l (usable capacity 6 l)
2.5 Gallons (usable capacity 1.6G) |
| Suitable Water Quality | Primly designed for municipal tap water. |
| Country of Origin | China |
| General Operating Information Value Unit | |
| Rated Capacity* <378 [L/day] | | |
| Min-Max Feed Water Pressure | 0.69MPa - 0.75MPa10-110 | [MPa][psi] |
| Min-Max Feed Water Temperature 5-38 [°C] | | |
| Product Recovery Rate** 42 [%] | | |
| Maximum Feed Water Hardness <1000 [mg/L] | | |
| Maximum Feed Water TDS <2000 [ppm] | | |
| Maximum Feed Water Dissolved Iron <2 [mg/L] | | |
| Suitable Feed Water pH 6-8 [-] | | |
| Turbidity <3 [NTU] | | |
| * at 5 bar feed water pressure and 25°C feed water temperature** at 3.5 bar feed water pressure and 25°C feed water temperature; TDS <750ppm.Measured with closed tank |
| Failure Reason Possible cause | |
| The machine will not start | • Power source not connected | • Check power source or power source plug |
| • Low inlet water pressure or no water • Check inlet water pressure |
| • Low-pressure switch failure, cannot connect the power source | • After connecting the inlet water, measure the resistance and replace if needed |
| • High-pressure switch cannot be restored | • After easing pressure, measure the resistance and replace if needed |
| • Transformer is burned out | • Measure output voltage and replace if needed |
| The high pressure pump is working properly, but no water is being produced | • High-pressure pump has lost pressure | • Measure water pump pressure and replace if needed |
| • Inlet water solenoid valve is faulty, no water can get in (no pure water) | • Replace solenoid valve |
| • A pre-fi liter is clogged | • Check pure water and waste water and replace the pre-fi liter |
| • Non return valve is blocked (waste water, no pure water) | • Replace the non return valve |
| • RO Membrane is clogged | • Clean or replace the RO membrane |
| The storage tank is full but no pure water is flowing out | • Storage tank doesn't have enough pressure | • Infl ate the storage vessel and empty tank; pressure should be between 0.05 and 0.07MPa |
| • Post-activated carbon fi liter is clogged | • Replace the post-activated carbon fi liter |
| The machine is turned off but waste water has not stopped | • Inlet solenoid valve failed, cannot effectively cut off water supply | • Check waste water, replace the inlet solenoid valve |
| • Non return valve has lost pressure (low waste water flow rate) | • Check waste water, replace the non return valve |
| After the machine is filled with water, the machine starts repeatedly | • Non return valve has lost pressure • Replace the non return valve |
| • High-pressure switch failure • Replace the high pressure switch |
| • Loss of pressure in the system | • After checking the non return valve, check for any water leaks in the pipelines |
| Pure water flows slowly or is not flowing | • Pre-fi liter is clogged • Replace the pre-fi liter |
| • RO membrane is clogged • Wash or replace the RO membrane |
| • Inlet solenoid valve failure • Replace the inlet solenoid valve |
| • Non return valve is clogged • Replace the non return valve |
| • Post-carbon fi liter is clogged • Replace the post-carbon fi liter |
| • High-pressure pump pressure is not enough | • Measure high-pressure pump water pressure, replace if needed |
In accordance with art. 13 of Legislative Decree no. 151 dated 25 July 2005, the implementation of European Directives 2002/95/EC, 2002/96/EC and 2003/108/ EC on the reduced use of hazardous substances in electrical and electronic equipment and their disposal, the barred bin symbol means that used electrical and electronic products should not be mixed with general household waste. For proper treatment, recovery and recycling, please take this product to designated collection points at the end of its useful life.

Disposing of this product correctly will help save valuable resources and prevent any potential negative effects on human health and the environment, which could otherwise arise from inappropriate waste handling.
Product: AqueenaPro, WT-100
Warranty period: months
Serial No.:
Lot No.:
CUSTOMER DETAILS
| Customer's name: | |
| Customer's address: | |
| Phone number: | e-mail: |
| Invoice number: | Invoice date: |
INSTALLATION DETAILS
| Name and stamp of installation service provider: |
| Date of installation: |
| TDS of raw water: TDS of purifi ed water |
| Customer signature: |
| Service technician signature: |
| Name: |
| Address: |
| Phone number e-mail: |
All our appliances have been thoroughly tested following strict procedures and are guaranteed against manufacturing defects. The Warranty is valid from the date of purchase, as indicated on the invoice issued by the dealer upon delivery of the appliance. The manufacturer undertakes to repair or replace, free of charge, any parts that are found to be defective within the Warranty period. Defects that are not clearly attributable to either faulty materials or manufacturing processes will be examined at one of our Zepter Service Centres or our headquarters and charged according to the outcome.
The warranty is only valid if:
- The machine has faulty materials or manufacturing defects.
- There are no signs of tampering by the customer or original parts having been fitted by unauthorised personnel.
- Original accessories have been used.
- The machine has not been overloaded or caused to crash.
- The device has been maintained in line with the manufacturer' recommendations.
- All filters and membrane have been changed regularly and the recommended filter replacement period has not been exceeded.
The Warranty does not apply to:
- Components subject to wear and tear.
- Damage caused by transport, incorrect use, negligence or faulty installation, as per the warnings set out in the product catalogue.
- Consumables (including fi iters and membranes, which have to be replaced regularly).
This Warranty does not affect the consumer's statutory rights applicable under the national legislation in force, or consumers' rights to claim against the retailer as set out in the sales/purchase agreement.
In the absence of applicable national laws, this Warranty will be the consumer's sole and exclusive remedy. In this case, the manufacturer will not be liable for any accidental or consequential damage arising from the breach of any express or implied guarantees of this product. The manufacturer's liability will be limited to and will not exceed the product purchase price paid by the consumer.
This Warranty does not cover damage to the product resulting from abuse or misuse, inappropriate packaging, accidents, or maintenance and repair operations carried out by unauthorised service centres.
The manufacturer reserves the right to withdraw this Warranty if the label containing the product serial number has been removed or rendered illegible after purchase.
AqueenaPro has been tested by an authorised Drinking Water Laboratory for the substances and conditions shown in the following table.
| Substance Unit Feed Water | | | Reduction Rate [%] (effluent drinking water) |
| Chemical composition |
| Field parameters |
| Pressure bar 3.5 | | |
| Water Temp °C 25 | | |
| Feed Water - Sample Volume L 100 | | |
| Physiochemical parameters Unit Feed Water Reduction Rate [%] | |
| Turbidity NTU >1 | >85% | |
| pH 11 | pH | 7+10% | neutral |
| Hardness and cations | Unit Feed | Water Reduction Rate [%] |
| Total hardness ppm | mgCaCO3/L | 270±20% | >96% |
| Calcium (dissolved) | mgCa/L | 90±20% | >98% |
| Magnesium (dissolved) | mgMg/L | 20±20% | >86% |
| Anions | Unit Feed | Water Reduction Rate [%] |
| Chloride | mgCl/L | 40±20% | >97% |
| Nitrate | mgNO3/L | 120±20% | >91% |
| N- and P- compounds | Unit Feed | Water Reduction Rate [%] |
| Nitrite | mgNO2/L | 0.50±10% | >93% |
| Ammonium | mgNH4/L | 0.1±20% | >80% |
| Elements and heavy metals | Unit Feed | Water Reduction Rate [%] |
| Arsenic (V) (dissolved) | mgAs/L | 0.5±20% | >99% |
| Lead (dissolved) | mgPb/L | 0.5±20% | >95% |
| Cadmium (dissolved) | mgCd/L | 0.5±20% | >98% |
| Iron (dissolved) | mgFe/L | 0.5±20% | >96% |
| Manganese (dissolved) | mgMn/L | 0.5±20% | >99% |
| Mercury (dissolved) | mgHg/L | 0.5±20% | >98% |
| Microbiological | Unit Feed | Water Reduction Rate [%] |
| Total Germs (72h@22°C) | [CFU/ml] | 6000-8000 | >99.999% |
| Total Germs (24h@37°C) | [CFU/ml] | 4000-6000 | >99.999% |
| E.Coli | [CFU/100ml] | 600±20% | Not detectable |
| Enterococcus | [CFU/100ml] | 600±20% | Not detectable |
11 Final pH value depends on concentrate of dissolved gaseous fraction of carbon dioxide. High concentrations have tendency to lower pH.
*Tested under laboratory conditions, actual performance may vary
- Life time approx. 6months
- Max flow: 0.75 GPM
- Max pressure: 125 PSI
- Max temp. 38^
- Install the filter in the same direction as water flow
Lot:
YYYY-WXY
Item Code:
WT-100-72
Country of Origin:
Made in China
FLOW
Nach Filterwechsel
- Life time approx. 6months
- Max flow: 0.75 GPM
- Max pressure: 125 PSI
- Max temp. 38^
- Install the filter in the same direction as water flow
Lot:
YYYY-WXY
Item Code:
WT-100-72
Country of Origin:
Made in China
FLOW
No.1
- Life time approx. 6months
- Max flow: 0.75 GPM
- Max pressure: 125 PSI
- Max temp. 38^
- Install the filter in the same direction as water flow
Lot:
YYYY-WXY
Item Code:
WT-100-72
Country of Origin:
Made in China
FLOW
No.1
INFORMATIONS RELATIVES AU FONCTIONNEMENT
Nom du client :
Adresse du client :
Tel.: e-mail:
- Life time approx. 6months
- Max flow: 0.75 GPM
- Max pressure: 125 PSI
- Max temp. 38^
- Install the filter in the same direction as water flow

Lot:
YYYY-WXY
Item Code:
WT-100-72
Country of Origin:
Made in China
- Life time approx. 6months
- Max flow: 0.75 GPM
- Max pressure: 125 PSI
- Max temp. 38^
- Install the filter in the same direction as water flow
Lot:
YYYY-WXY
Item Code:
WT-100-72
Country of Origin:
Made in China
FLOW
Szürcsere után
- Life time approx. 6months
- Max flow: 0.75 GPM
- Max pressure: 125 PSI
- Max temp. 38^
- Install the filter in the same direction as water flow
Lot:
YYYY-WXY
Item Code:
WT-100-72
Country of Origin:
Made in China
FLOW
Po wymianie fi ltra
COIDEPJKMoe YNAKOBKN
YCTAHOBKA AQUEENAPRO
NHCTPYKlIg IIO 3KcJIyATAUIN
-Nepea nepBbIM nCnoJb3ObaHnem 188
-YctahOBka Mem6paHbI 6paTHoro OCMoca 189
-3NauchnHaIncnnee 190
OBCLYXINBAHNE INIOPRAOK IPEYCTAHOBKN FJIbTPA 191
-
Ppombibahne Mem6paHbO6paTHoro OCMoca 191
-
Popraok nepeyctaHOBKn 191
-
PpoceDpya nepeyctaHOBKn 191
-BkIIOueHHe DaTnHa 3auntbI ot npoteueK 192
He pa36npaIte n He n3MeHnIte yCTpOcTBO cAmocToTeJbHo!
HnkOrda He nbItaItec b NouHnTb Hnn 3aMeHnTb IIO6yIO BHyTpEHHIO OTeAIB, HNaue Bbl NODBeprHete pNCKy YHKUHOHaJIbHOCTb N 6e3OpaCHOCtB CNCTeMbI OUnCTKN BOdbI. JIO6oe HEABTOpN3OBaHHoe H3MeHeHne LIIaET Bac rapaHTn. EcIn Bbl CHTaete, yTo Heo6xOdIm peMOHT, O6paTntecb B TexHnueckyIO cIyX6By Zepter.
He nCnoJb3yIte cnCTeMy AqueenaPro noB BbICOKm dAbJIeHnem BoI!
3Kcnpaataa B yCIOBnaX BbICOKOTo DABJIeHnMAoKeT npNBecTN K pa3pby Tpy6 n, KaK cIeIcTBHe, YTeUKe BObl. PeKOMeHNIOBaHHOe BXODHOe IaBJIeHne ot 0,1 do 0,35 mPa.

He nCloB3yIte cNCTeMy AqueenaPro pIOM cra30M, OTKpbITbIM ORHEM, B3PbIB4aTbIMn IJI NJIERKOBOcPJIaMeHЯIOUmmncBBeIeCTBAMN.
He octabJIte cHCTeMy OUHCTKN BODbl OKOJIO KAMHHOB HIN dpyrHX NCTOCHNKOB BbICOKoI TeMnepaTpybl (nHTbl, neu). 3TO MoKET npHBecTH K DeΦOpMaun HIN paCnJIaBJIeHNIO cyTJaPa.
- Temnepatypa Bnnaemoy BoI He doJXHa npeBbIwatah 38°C!
NcnoB3OBAHnne NCTouHnka ropaei BObl (>38^) , npNBeTeK Heo6paTmblM NOBpeXdHnM Mem6paHbI o6paTHOrO OCMoca n cepbe3HO yxuDHT pa6OTy yctpoiCTBa. YDOCTOBepbTEcb, yTO CNCTema IJRA OHnCTKn AqueenaPro coeHNHeHa TOnbKO C XJOIOHBIM NCTOCHNKOM BObl.
- MakcmaJIbHoe pacCToHHe MEKdy HCTOCHKOM BOIy N CNTeMOJ dIra OUHCTKN He IOnxHO npBeBbIwAtb 3 MeTpa.
- H36eraTe ocTpoyroIbHbIX H3rH6OB Tpy6bl. He crH6aIe n He 6NoKpyTe Tpy6y dIOTBODa BObl.
He ctabte cnctemy AqueenaPro b tecbni ka.
He nCnoB3yIte cnCTemy Ia Ounctkn AqueenaPro, KOrda BoOoctok 3acopen.
He nCnoJIb3yIte cnCTemy IaOuNcTKn BODbl AqueenaPro npH temnepatype Hnxke 5^!
Ecn TEmnepaTpa B KOMHate Hxke 5^ , Tpy6bl MOryt noIOnatbca, TaK KAK BOda BHyTpN np6opa HauHET 3aMep3aTb.

Hnctpykncn no yctahOBke
Приимechан!
CnCTema Iy ouHCTKN BOIa AqueenaPro 6bla pa3pa6oTHa Iy yCTAHOBKn nOpaKOBHO.HaayalbHa YCTAHOBKa Tpe6yET HABIKOB NIOTHNka INBOONPOBODNYka.
YctahOBka, cepBnCHoe 06cIyXHBaHne, texHNueCKoe 06cIyXHBaHne n peMOHTdoJXHbI npON3BOAnTbcra ABTOpN3OBAHHbIMn CneuJaHCTamn Zepter.
PekomehdoBHaHn npEeBapntbHa nOtroBka:
- PoiKIIIOUHTb K 3JIeKTPocEtH He 6OJee Yem 3a 1,5 Metpa OT TOUKN YCTAHOBKN CnCTEmbl AqueenaPro.
- NCTOUHNIK BOIDI paCNOJIOXHTb He daJe, YEM 3 MeTp aOT CNTeMbI.
BodoctokIgnoctatoHOBoBJI-He daJeepem3 Metpa oT cnCTeMbI.
- Oprahn3OBaBc Bc06OdHoe npocpHaCTBO B COOTBeTCTBHN C pa3MePam cIcTeMb AqueenaPro.
- PpeNoHTeBHO yCTaHABJIHbATb CnCTEmy OuICTKN BOdbI AqueenaPro OKOLO paKOBHHbl, YTO6bl BXoJaAra N BbIXoJaAra BOda npoxoJna JERko.

Baxhble npmeeaHna!
- EcnBbI He nCnoNb3yTe CnCTeMy OunCTKn BODbl AqueenaPro 6OJee DByx dHei (48 qacOB), BblKnIOuHTe yctpoNCTBO H onOpoxHnTe pe3epByap.
- 4to6bpe3epByap octabancra yHCTbIM,ero cneJeYer onopoxHaTb KaXdbie 2 dHa.
- 3Byk onoBeaTeY kA3bIBaET Ha HeNoJAKn B OuchCTHeBHO CHCTeMe. EcnBblCnblIte 3BykoBOH CnHAn TpeBOH, PpeDnPmNTe DeHCTBn, ONHCANHbE B pa3dene «3NaUKN H dnCnnee》/nNn «YcTpaHHeHne HenoJADK» nn Xe Bbl3OBHTe ABTOH3OBAHHoro cepBNC-Mactepa.
- He nbitaTeCb YHHHTb CnCTemy OunchKu BODbl AqueenaPro camocToTebHo. BbiObite cepBnc-Mactepa Hnn 6paTntecb B cepBnchHyIO cnxy6y Zepter.
NHCTPYKUNIPO 3KcPIYATAUIN
Ipeed nepBbIM nCIOJb3OBaHHeM
- YCTAHOBITE Mem6paHy o6paTHORO OCMoca, B COOTBETCTBHN C pa3dEnOM «YCTAHOBKA Mem6paHbI o6paTHORO OCMoca».
- YIOCTOBepebTeCb, YTO BCE COeINHeHn npOuHO 3aKpeIJIeHbI.
- ΠΟικοεπηνιθε ΣΝΥΤΕΜΥ ΜΥΝΥΤΑΚ ΚΑλεκτροετη. Ψιθιδότουβερβετες, τυτι Φιτέπειν ΠΟχοιπιτ K MecTHΟι έροετKE.
4.Подундente к pe3eрвуару c3aДи 3akpoIte kpan.
- OtkpoTe Klanan nphemnka n KpaH noaH BOdoPBOOHOBIObl.
- BkIIOHTe CNTEmy OUHCTKN BObI AqueenaPro. Ipn Hauane pa6Otb npo3ByuHt 13bykoBn CnHaJ.
- OctabbTe BDOy TeYb Yepe3 CnCTeMy npHmepHO 5-10 MmHyT (cTa6HnH3aunr CnCTeMbI) n npOBepbTe BCE COeHNHeHH.

IpeynpeKdHne! EcnBbO6hApxknn KaKHe-ni6o npTeuKn, He nepexoHnte K cNeDyUoJeMy 8ary, noka He yctpaHnte npOblemy.
- BbIKIOUHTe BOy u npOBepbTe, npeKpatINcra nn notok octatoOH BODbl (npHmepHO no nCTeueHH 30 cekynd).
- EcnBbHe O6HapxKnnn OTKIOHEHm OT HopMbI INyTeek, OTKpoTc KpaH N IO3BOJIbTe CnCTeMe HAnOJIHITbcB BOIOH.
10.Двжды onopoxhnte nonHbIe pe3epByapbl nepeI nCnoJb3ObaHneM.

IpnmeaHne! B nepBbix dByx cInbax BoI b MoXe T coepKatbc qepHbN OcAodK. 3TO BBIMbIBAOCTCACTNu b H3 yroIbHorO fIbTpa. 3TO He Bnraet Hn Ha cyHKUHOHaNbHOCTb CnCTEmbl, Hn HA KaueCTBO OOnuHHO BOnbl.
- Onpeennte ypoBEnb TDS* n 3aФнкCpyTe 3TO B rapaHTHnHOM TaIOHe.
YCTAHOBKa Mem6paHbI 06pathoro OCMoca

Приимechан![ ]
- CnCTema Ouyntkn BoDi AqueenaPro noctabIaTeC T Mem6paHoi 06pato HorO OCMoca. Mem6pHa He yctAHOBHe H yNAKObHa OTdJIbHO B 3aunTHyIO nneKy.
- 4to6b npedotbpaTb 6aktepeaJbHoe 3apaxehne KOMnoHeTOB Me6paHb BO BpeMa xpaHeHHN I TpaHCnOpTnpOBKn, ynaKOBKa OchaueHa HeKOTOpbIM KOJIInyeCTBOM 3auTHOH INeHKN.
*TDS - Total Dissolved Solids, (PactbopeHHbIe TBepdbIe qactnbl) - konHueCTBO Bcex coneJ,metaIIOB nnn IIO6bIX npYnx INHOPOdNbIX BeueCTB, pACTbOpEHbIX B OBe.
- CHHMMTE BEPXHIOO 3aunTHyIO KpbIshky C cHCTeMbI OunchKb BOdbI AqueenaPro.
- OTBnHTnte raKy KOJINaUka C cyTJpa MaM6paHb I ydaJIte Tpy6y nIaNoCTynaIOuSe BODI.
- OToeHHTe KOJIaOHK Mem6paHbI o6paTHORO OCMOCA C NOMOJIIO pINJraEMORA raeHORO KIOUa.
- 13BnEKeHTe Mem6paHy 06paTHoO OCMoCA H3 3aunTHoN PHeHKn.
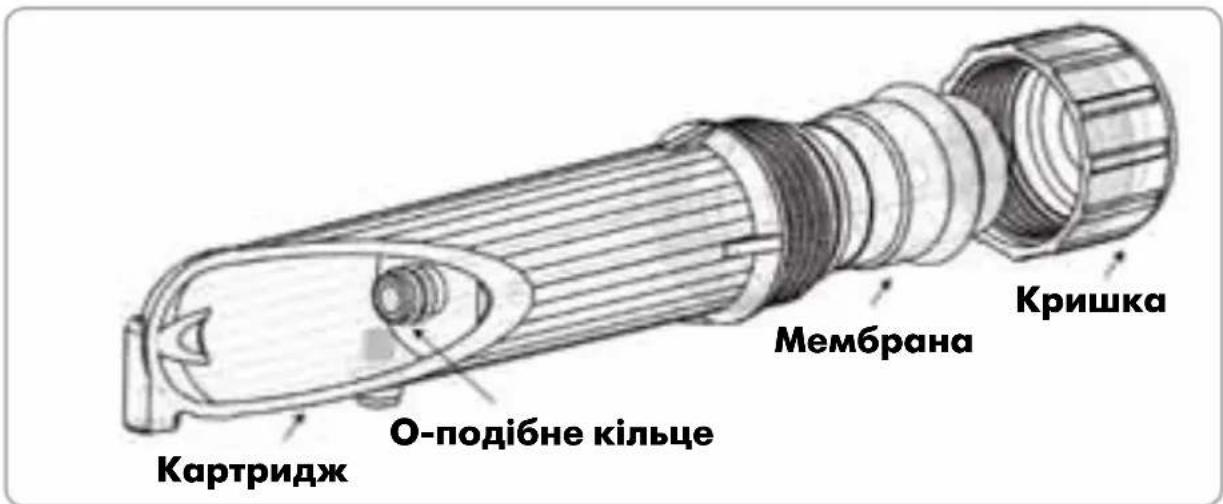
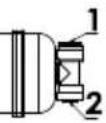
- BCTaBbTe Mem6paHy o6paTHoro OCMoca B cyTnAp. KoHeu Mem6paHbI C yNIOHTnHbHbIM KOnbUOM Kpyrnoo ceueHraDOnXeH paCnOlaRaTbcraB HxKHe Yactn cyTnPa (cM. pncyHOK Hxke).
![Zepter Aqueena Pro WT100 - Приимechан![ ] - 1](/content/2026/03/428303/images/7dfad601f23cd2dc6fdfa35f944d8e7275b87052e3907715e8d0f17a7af189ee.jpg)
- 3akpoTe Kopnyc Mem6paHbI KpbIkwOi. NcnoB3yIte RaeyhN KIOU, YTO6bI NIOHTHO ABHNTb KpbIwky.
- POncoeHNHtpy6y IINI NOCTyNIOUSeI BOBbI 3aΦHKcnpYte ee C NOMOsbIg RaIKK KpbIshK.
- YctahOBHTe KApTnK Mem6paHbI 6paTHO OCMoca HA MecTo.
- PpOBePbTe Bce CoeINHeHHn yIOCTOBepbTecb, YTO HET npoTeueK.
- YCTAHOBITE BEPXHOIO 3aunTHyIO HAKJaKy.
![Zepter Aqueena Pro WT100 - Приимechан![ ] - 2](/content/2026/03/428303/images/0d9dc9244863cbc3a7b951c8b6fd29f8e527cb5ea4ebdf737dc415295ca8cb0b.jpg)
OctopoxHo!
O6paTne BHNMaHHe Ha HnPaBHeHne Mem6paHb; KOHeu MeM6paHb C yNIOTHHTeIbHbIM KOnbOm KpyrIoro CeHHeN dONKeH paCNoJaratbcra B HxKHe Yactn OyTJra.
He nItaTeCb BCTaBnTb Mem6paHy B cyTnp Cno -3TO MOxET npNBecTH K Heo6paTMbIM NOBpeKdEHNrM O6OJoucKn Nn KOMNoHEHTOB Mem6paHbl.
- EcH N Mem6paHa o6paTHo OCMoCa npabnIbHO BCTABJeHa B cyTJrP, npHMeHrB cHny HET Heo6xOAnMoCTn.
3nauKnHa dncnnee


EcnHa dncnnee 3aropaetca:

Pa6otaet: ouhctka BODbI B npocce, yctpoiCTBO B pa6oem coctoHHn.

NCTOuHbK BOdbl:
Mnraounn HndNKATOp - OTCyTCTByet NCTOuHKn BnnaBEmoB BoDbI nn Hn3Kn HAnop BoDbI. 3NaQOK «NctOuHKn BoDbI» 3aRopaetc CO3ByKOBbIM CNrHaIOM (7 3ByKObIX CnHaIob).

Pexm Oxndn:
CNCTEMA OYHCTKN BODbl HAXOHTCBAPEKIME OXNDAHNA.

PpombbKa: kTNBn3HPOBaHa fYHKcIg PpombbKn.

PpombibkmaM6paHbIO6pathoroOCMOCA
MembpHa o6paTHoO OCMoCA aBOMaTHueCKn npombIaETcB TeueHne 18 ckyH, pRn BkIOueHn yCTpoiCTBa. Korda pe3epByap Ira BoIbI 3aONHeH, Me6paHa o6paTHoO OCMoCA aBOMaTHueCKn npombIaETcB TeueHne 10 ckyH.
Popraok nepeyctahOBKn hnIbTpca
!
PpmeaHne! Hbtpbl N Me6paHb I ABJIOCTc pacxOHNbIM MATEPHaIOM. BpeMnx nepeyctaHOBKn 3abnCt OT KaueCTBa Cbpoi BObl N KOJIueCTBa Notpe6JIeHHoB Bobl.
3TN DeTAN He NOKpbBAOTcraPaHTnei
PpoeDypa nepeyctahOBKn fNJIbTpOB
- OTKIOHTNE 3NEKTPONNTAHNE.
- 3akpoTe BXoHoi KJanaH.
- CHHMMTE BEPXHHIO KpbIiKy.
- BbIaunTe HcNoB3OBaHHbI NbTp -OTcoeHNHTe NbTp OT 6bICTpopa3beMHORO coeHNHeHn (3anOMHte pacnoNIOXeHne NbTp).
- 3aMeHInTe ΦnIbTp Ha HObbl. - O6paTne BHHMaHHe Ha npabHbHoe HAnpabJeHne NOTOKa BObl!
- PpOBeBpTe Bce CoeINHeHn H yIOCTOBepbTEcB, yTO HET pPoteueK.
- YCTAHOBHTe BEPXHIO 3aunTHyIO HAKnQky.
- OtkpoTe BXoHoi KJIanaH N BkIIOHTe YcTPOCTBO B po3eTKy.

Вкlioочи датчнka 3аuntbl OT npoteuek:
- OTKIOUHTe nHTaHHe.
- 3akpoTe BXoHoi KJanaH.
- CHIMMTE BEPXHIOKpbliKy.
- YctpaHnTe npoteky.
- CneIte BOy H3 Kopnyca, ydaJIbpe3HOBBI KONNAOK, paCNOJIOKeHHB B OCHOBAHNE Kopnyca.
- BbicywHte DaTHK.

OctopoxHo!
Pn yctahOBke HOBOO fHbtpa, o6paTne Oc06oe BHMaHne Ha HAnpabIeHne NToKa BoIb - cTeKka Ha 3tuketke fHbtpa yka3bBaet npabHbHOe HAnpabIeHne.
ΦHbTp He MoXeT 6bItb yCTaHOBJeH nepeBepHyTbIM.
PP Filter
PP Filter (5 micron)

- Life time approx. 6months
- Max flow: 0.75 GPM
- Max pressure: 125 PSI
- Max temp. 38^
- Install the filter in the same direction as water flow
FLOW
Lot:
YYYY-WXY
Item Code:
WT-100-72
Country of Origin:
Made in China
Pocne nepeycaHOBKn HnIbTpα
KhONka «BbI6Op»: Nocne yCTaHOBKn C NOMOuBIO KHONKn «BbI6Op» aKTINBn3npyNe COOTBeTCTByUoN 3Haouk ΦnIbTpα. INHnKATOp HauHET MIRatb.
KhoNka «C6poc»: BbI6epHte cooTBETCTBouu m n HaxmTe KhoNky «C6poc», yedxmbaTe 60nee 3 cekynd, noka ycTpoiCTBO He nepe3arpy3ntc. Nocne nepe3arpy3kn KpaChb icBt dTuHa CtaHet 3eJeHbIM.

Cpok 3aMeHbI Mem6paHbI 06paTHoro OCMoca
- Life time approx. 6months
- Max flow: 0.75 GPM
- Max pressure: 125 PSI
- Max temp. 38^
- Install the filter in the same direction as water flow
Lot:
YYYY-WXY
Item Code:
WT-100-72
Country of Origin:
Made in China
FLOW

Posle zamene fi Itera
Dugme „Izaberi": Posle zamene filtera, pritisnite dugme „Izaberi" da bisite izabrali odgovarajuću ikonicu fi ltera. Ikonica ce početi da trepće.
Dugme „Resetovanje": Izaberite odgovarajuci filter i pritisnite dugme „Resetovanje"; zadržite više od 3 sekunde dok se ne aktivira funkcija resetovanja. Nakon resetovanja, crveno svetlo prelazi u zeleno.
Postupak zamene RO membrane
- Iskligcitodovod struje.
- Zatvorite ventil za dovod vode.
- Skinite gornjiPoklopac.
- Izvadite stari fi Iter - odvojite ga od konektora.
- Zamenite fi Iter - Obratite paznju na pravilan smer toka vode!
- Proverite sve priključke i da li ima curenja vode.
- Zatvorite gornjiPoklopac.
- Otvorite ventil za dovod vode i uključite aparat u struju.
Period zamene fi Itera
AqueenaPro system za precišcavanje vode poseduje specijalan system za praćenje roka trajanja filtera. Sistem automatski prati stanje filtera i prikazuje trenutno stanje na displeju stanja filtera.
Zeleno svetlo - fi lter optimalno radi
-ФункцiinfoopmauiHoro duCnner 240
TEXHlYHE OBCIyROBYAHHr TA 3AMIHA FJIbTPIB 241
-Помьання Мбраи 241
-Metod 3amHn fIbTpib 241
- Popraok 3amHn fInbtpiB 241
-BiINHOBnEHnHaTHNky npOTiKaHHBOH 242
-ПиязаминфлгпВ 243
-Topraok 3amHm Mem6paHn 244
-PerioaHictb3amHHiibtpiB 244
- PepioDnHictb 3amHH Mem6paH 245
TEXHICHA IHΦOPMALIJA
IHΦOPMAUJI ΣΟΙΟ TEXHIVHO OBCJYROBYAHH 246
BNPIIeHHIPOCTNX IPOEJIEM 247
YTNJI3AUJ 248
TAPAHIIHH TAJOH
TAPAHTIHI 306OB'3AHH 250
CNEUΦIKALJI CNTTEMN OUYIeHHRA BODN AQUEENAPRO 251
B daHin iNCTpyKciBnKOpNCTOBYOTbcr CneuiabHi TepmiH, 3BeptaEmo Bauy yBary Ha Hnx.

NonepeJxHn! HeIOToPMaHnI nonepeJxHn MoXe np3BeCTn Do cepNo3Hnx oI3NuHnx TpaBM a6o N0sKOJxHn MaHa.

3aTepeXeHn! 3 MipkyBaHb 6e3neKn, 6yIbTe oBepeXhi! HeIoTpmaHn7 3aTepeXeHb MoKe npN3BecTn Do f3NuHOITpabMn a6o noShKOJxehn MaHa.

Ybara! MICTHTb IODaTKOBy iHΦopMaciIO i KOpNCI NopaDN IJr IpaBnIbHO BnKOpNCTaHHcNCTeMH OuNueHHa BOHN.

3actepexkHn!
- Дана Incструкця 3 ekсплуataцii e
HeViD'EmHOU qaCTnHOU npilady. Прочтайte
yBaJxHo Bci IncstpyKzii Ta Nam'ЯТКи 3 6e3neKn, lo
MICTaTbCS y DaHIn IncstpyKzii, OCKiIbKn BOHn
MICTaTb BaxJIbBy iHΦOpMaCIIO ΜOДО ВИКОРИCTAHнЯ
npilady Ta NOrO ekCnLyataцii. 36epiraYte
IncstpyKzIO 3 MeTOIO OTPIMaHNЯ ДODATKOBOi
iHΦOpMaZII y MaIbTyNbOMy.
-ПисяЗнгТУпAKOBKN, Heo6xIDHO BnEBHNTNcB, ьо систema OunшeHHЯ BODи He NOшКODжeha. YвaxHo npeBipTe KOpnyc npinCTpoTo Ta Kopo6ky 3 akcecyapamn.
- Данн пплад сдд 3actocobvatn tiькn 3a пямnm пи3naueHЯm. Вробнк He Hece BiINOBiJaIbHocti 3a 6ydb-яК i NOsKOJxehnry, kKi BHNKJIH 3прчHHn HeBIDNOBIDHOrO, HeKopeKTHorO a6o Hepo3BaJNBOrO 3actocyBAHnY.
-Даннnpилад He npn3naueHn Дя
NKOPNCTAHNЯ JIOdbMn (BKNIOUOauN DiTee) 3
pO3ymOBHMn a6o φi3nHmN BaIaMn, a6o TmMn,
Izo He MAOTb IOCBiDy KOpNCTYBAHnR, NOKN BOHN
He H6yDyTB DOCTaTHbOro IOCBiDy TA OTPMaOTb
IHCTpyKzii BiD Oco6n, BiINOBiJaIbHoI 3a 6e3neky,
a6o 6yDyTB 3HAXODHTncB NiIbHm HArJydom.
Heo6xio HarIaTH 3a iTbMn, OOBHOHn He rpaIncs 3 npHaIaOM.
BkiHci cBOTo XHTeBOTo zHKny npilaad cIid yTHJI3yBATn OKpeMo BiD 3BVuaHnx BIXOdiB. Heo6xIDNo nepeaTn Ioro y pyKn KBaIiΦiKOBaHO nepcoHany, kN 3bnpae nOdi6Hm MaTepiA1. TaKIM YINOM, Bin 6ynde npabNbHO yTHJI3OBAHn Ta DOJOMOKe y 3axHCTi HABKOJIshHbOro cepeoBnla!
!
Ybara!
1.AqueenaPro - систema очшени вордя DOMAshbOrO BHKOpHCTAHn. Byd-ЯкЕ BHKOpHCTAHня систем He B DOMaShhIX yMOBAX Ta Дя iHxN x iIe, HIX OCHSeHnRA BODn Дя DOMAshbOrO BxHTKY, ABTOMATNUHO prHHRe DIO rapaHTiHnx 3o6OB'raHb 5ODo zuoi cHsTeMn.
2.AqueenaPro He NOBHHa BHKOpNCToBYBaTncb IJI OUnIeHnRA BODn, JKA E MIKPO6IOJOriHo He6e3peuHO a6o HeBIDOMi II MIKPO6IOJOriHi JKOCTI (BOJa He npoiSha nonepedNboi De3iHΦekci).
He Do3BOJRAETbCBAKOPHCTOBYBATN CTapn IJIaHr IOBTOPOHO.
He po36npaIte i He 3mHIOyte MoiNphiiaio cnCTeMn OunuHnBODn AqueenaPro Ha cBi pO3cyd!
Hikoln He hAmaraTeCb camocTiHNOpeMOHTyBAtn a6o 3MiHIOBATN KOHCTpyKciIO 6yNb-RAkX BHyTpipHIX eIemEnTIB cnCTeMn AqueenaPro a6o ix yHNKciIO Ta BTPyCatncs B CNCTeMy 6e3neuHOi poBOTn BaWOi CNCTeMn OunUeHHa BOIN. ByNb-RAKa HecAHKciOHOBAHa 3amHa ABTomATNuHO anJIoE rapaHTIO. Jkso Heo6xIDHO 3diInCHNTn peMOHT, 3BeptaHTeCry Do CepBichoro zentpy Zepter.
He BnKOpncToBvIte CnCTeMy AqueenaPro pId BnCokm TnCKOM BODn!
Po6Ota B yMOBAX BnCOKO TnCKy MoKe np3BeCTn Do po3pNBy Tpy6 CnCTeMn i, k HacIiOk, BiD6yJeTbcR BNTiK BoDi. PekomeHIOBaHn TnCK BoNi Ha BXoDi Bi 1 - 3.5 6ap. (1 - 3.5 aTM).

He BnKOpncToBvIte CnCTemy AqueenaPro 3a HaNbHocTi ra3y, Dxkepei BiDkPntoro BOrHIO, Bn6yXOBnx a6o JERKO3aIMnCTNX MaTepiJIIB nopuy.
He 3aIIuIaIte cNCTeMy OUnIeHnBODn IO6JIIN3y KAMiHIB a6o iHNx IJKepeI TeIIa 3 BnCOKOIO TempePATOIO (IINTa ,DyXOBKa),TAK JK Ue MoKe pN3BeCTn Do DeΦOpMaciA a6o IIaBLeHnKopNycy.
He cTabe i He 36epiraTe HiYoro Ha BepxHiJ qactnHi npncToIO.
YHnKaIte BpJIbBy npaMx coHyaHnx npomeHIB Ha npnai i He BCTaHOBIIoIte Horo B BOJOrNX MiczX.
LcMoKe cnpnHHTN cnpraJIbI yMOBn Ira po3BHTKY MIKPOoPraHI3MIB, 0o npn3BeDe Io 3HHKeHHa KocTI OunueHOI BOH, TAK Jk BHyTpIiHi KOMNoHEHTN CnCTeMn MOKyTB 6yTH 3a6pydHeHIMN.
Boda Ha Bxodi He MoKe nepeBnCyBaTn 38°!
BnKOpHCTaHHraPauOBoHN (>38^) npu3BOAnTb Do cepno3Hx NowkoJKeHb Mem6paHn 3BOPOTHO OCMOCy i cToTHo 3Hnxye npOdyKTNBHcTb npNJady.
IpekeohaTeca, 0o cnctema AqueenaPro niKluOeHa Do XoJIoHOI BoHn.
- MakcmaJIbHa BiIctaHb mix JxkepenOM BoIN i CnCTeMO He NOBnHa nepeBnUyBaTH 3 M.
- YHnkaTe pi3kNx BUNHIB Tpy6i. He 3rHaIte i He 6NoKyIe Tpy6n.
- He Trpmaite CBOIO AqueenaPro B uiNbHi wa fi.
He BnKOpHCTOByIte cnCTemy AqueenaPro, KOn 3a6bTu n CnVB.
He BHKOpHCTOByTe cHcTeMy AqueenaPro npu temnepaTypi HxKue +5^!
KIO TeMnepaTpya B npmiueHnHexe +5^ , ce MoKe np3BecTN Do po3TpickyBaHH Tpy6 uepe3 3aMeP3aHnB Bodn BCEpeDnHi npCTpO.

Ihctpykci3 niKloueHHa
Ybara!
CnCTema OunuHn BOn Aqueena Pro po3po6IeHa Ira BCTaHOBHeHH na pAKOBHOIO. IepBUNHa yCTaHOBA Bmarae cToJIrpHnx ta caHTexHiHnx po6it.
BctahOBJIeHHa,TexHicHe 06cIyROByBaHHa Ta peMOHT NOBHHi BnKOHyBaTHca TINbKn yNobHOBAxKeHHm nepcoHaJOM Komnaii Zepter.
PekomehdoBaHa nIdroTOBka nepey uCTAHOBKOIO cnCTeMn:
- PiiKIOUeHHa Do eJekTpOmepeXi Ha BiIcTahi He 6Inbue 1,5 M BiI ToUKN yCTAHOBKn CnCTemN AqueenaPro.
BodonocayHnHa BicTaHb He 6inbwe 3M.
Bntik 6pydHoi BOHN Ha BiDCTaHb He 6inbwe 3 M.
- OoctaTHbo MicuДЯ po3MiueHnH ChcTeMn AqueenaPro.
BaxaHO BCTAHOBIOBATn CnCTeMy AqueenaPro npuy 3 paKOBHIO TO TAKIM YHHOM, Oo6 6yB JERKNI DOCTyn Do BXOy/BHXOy BOIN.

BaxknBa iHΦopmaia!
- RaKIO Bn He BnKOpHcTObYeTe CBOIO AqueenaPro 6inbwe DBox dHIB (48 roDINH), BnMKHITb npncTpii i 3nnIte BOy 3 6aKy.
- Lio6 36epertn 6ak uicTm, Ioro Heo6xioHO 3nHBaTH Koxhi 2 dHI.
- 3ymepeonobictb Bac npo hncnpabHicb b cnctemi . JaKuo Bu yyeTe 3BykoBn cnhran, Heo6xioHO BXHTN Bci 3axoNi, zo Bka3aHi B po3dini "Функii infoopmauiHoro dncnner i / a6o " BnpiueHH npocTHx npo6Iem" a6o BnKlnkATn cepbc-maHcTpa.
- He hamaraTecra 6cbnyroByaTH AqueenaPro Ha cbi BbAchHn po3cyd. 3BepHITbcra 3a donomoroIO do cepbic - Maictpa / Cepbichoro uehtpy Zepter.
IHCTPYKIZI3 BVKOPNCTAHH
Ipeed nepuIM BnKOpncTaHHaM:
- BctaHObitb Mem6paHy 3BOpOTHorO OCMOCy BiINOBiINO do po3diny BcTaHOJIeHHa Mem6paHn 3BOPOTHorO OCMOCy.
- IpekeohaIteca, 0c Bci 3'edHnHa HadiiHi.
3.Плкючснчtemуоишьвдпdo ekeTpomepeхi.ПepekoHaiTecra,io BnIky MoxHa JERKO yBtKHyTN Bpo3ety.
- 3akpnTe 6ak DnB OND KnaHOM.
- BiikpnTe BxIDHn Klanan Dna BoDn i KpaH.
- Ybimkhitb cnctemy AqueenaPro. Picj 3anycky Bn nouyete 3bykoBn cnHan (1 ryoK).
- Heo6xio, 06 B0da npotekna chepe3 cnctemy npotraom 5-10 XB (cnctema cta6ini3aui). O6OB'3KOBO nepebipte Bci 3'eHaHH.

3actepexeH! KxO Bn BnBnIb 6yIb-akn Bntik BoN, He BnkOpncToByte cnCTemy, DOKn He nepebiTe i He nolarOnTe ii.
- BmKnHb Kpani npekoHaTcra, 0o notik 6pydno BoDyNHHbC (6In3bKO uepe3 30 c).
- Jkso hix Bixnle Hb a6o npotikah He BnBneHo, BiKpnTe Klanan 3 6aKy Ido3BOIbTe CnCTeMi HorO 3aONBHHTN.
- 3nne nepwi Dba 6aKn BOnn nepeD BnKOpncTahnM.

Ybara! Nepi Iba 6aKMOxytb MiCTHn OOpHi 3annuK.
Lc yactkn akTHBOBaHOro Byrinnra, kki 3mnnncr 3 fInbtpy. BOHN He BnHHytb, kHa MaN6yTHIO npOdyKTNBHICTb cnCTemn, taki Kaicb ouuiehoBODi
11.BmipraTe pBeHb BOnIaONOMoro TDS-Metpa i 3aHnWitb pe3yntbT b Cbi IapantHH TaIOH.
BctahOBJIeHHaMe6paHn

Ybara!
CnCTema OunuHHeB OAn AqueenaPro DoctabTbC3 Mem6paHO 3BOPOTHO OCMOCY, Ra He BCTaHOBNEHO B CNTcEMy I yNkoBaHa B 3axxCHy NIBKY.
- Ynakobka Mem6paHn 3BOPoTHOrO OCMcy MICTNb HeBeHHky KInbKictb 3axCHoro po3HHy dIra 3an06iraHHaMikpo6Horo 3a6pydHeHHa MEM6paHHx KomNoHeTIB npn 36epirAHHi I TpAHCnoPTyBAHHi.
- 3Himits BepxHIO KPNKy CNCTeMn AqueenaPro .
- BiDrBnHItb raHy 3 KpnuKs 3 Kopnyc MEm6paHn i BIn'eHaHe Te BnyCkHy Tpy6ky Ira BOHN
- BiKpnTe KpNkY Mem6paHn 3a DonOMrOIO DoaTkoBOrTo TaKOBOrO KIOHa.
- BnIMtB Mem6paHy 3bOpOTHO OCMOcy i3 axnchoi nibKn.
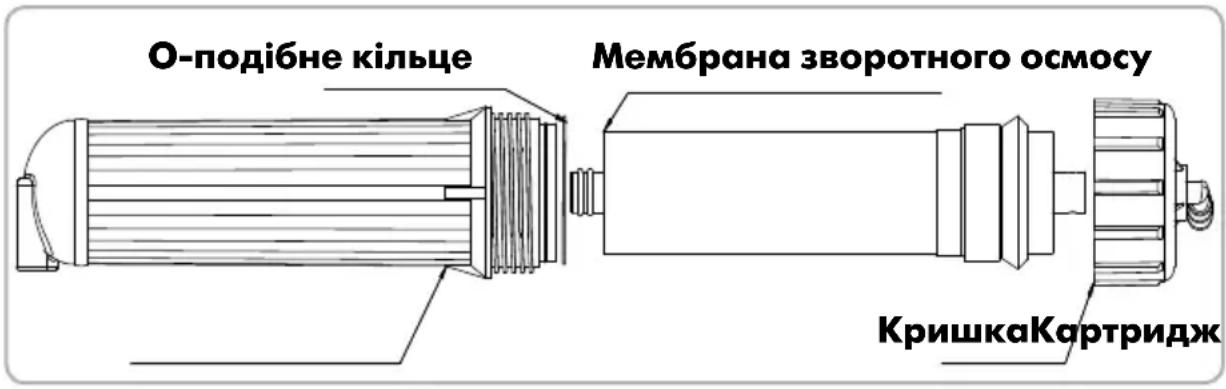
- BCTABTe Mem6paHy 3BOPOTHO OCMOCy B KOpNyc. KHeuB Mem6paHa 3 O-noi6Hm KInbueM Heo6xioH oNOMICTHT Ha HxKHO qACTHMy KOpNcy. (INB. ManIOHOK HxKye)
- 3akpnite Kopnyc Mem6paHn KpnuKoHO. BnkopncToByte raKOBn KIOU, 06 3aTyrHyTN KPNKHY HAnexHHM YHOM.
7.Пдкночь Bnucky Tpy6ky DЯ BOДI 3akpinitb II 3a donomoroIO raIGN Ha Kpnuoi.
- Nomicitb KaptpnJx Ha CBOE NOJIOXeHHA.
- Nepebipte Bci 3'eHaHH i nepeKoHauTeCra, Ho HMaE HiKoro BuTOKy.
- 3akpnTe BepxHIO KPNsKy CNCTeMn AqueenaPro.

PonepeJxehnHa!
3BepHb yBar Ha nooXeHHa Mem6paH; KHeuB Mem6paHn 3 O-noi6Hm KInbueM Heo6xio H o3TaWyBaTH B HxKiH yactHi Kopnycy.
He 3aWTOBxyIte CnIOIO Mem6paHy B Kopnyc; ue MoXe npH3BeCTn Do NOuKOxEHHr O6ONoHKn Mem6paHn a6o II KOMNOHEHTIB.
- RaKuO Mem6paHa 3BOpOTHO OCMOCy npabnIbHO BCTaHOBNeHa B Kopnyci, Hemae HiKaOI Heo6xIHocTi DABNTHa Hei.
Функцi iHΦopmaizHOrO nCnJIeA


KuO CBITbc3 HAOK Ha DCnnei:

Po6ota (Working): OuHueHHB ODN B npoueci, npncpi 3haoDHTbC B pexnmi po6oTH.

Jxepeno Boa (Water Source): cBtno 6nmae - BiCyTHe Jxepeno BOn a6o H3bKn TnCK BOH hXOJI. 3HaQOK "Jxepeno BoH" 3aOpHTbcra 3 BYKOBm CNrHAnOM (7 rydkib)

OuykyBaHHa (Standby): CNTema OUYueHHB OoN 3HAXOHTbC B peXMI OuykBAHH.

- Life time approx. 6months
- Max flow: 0.75 GPM
- Max pressure: 125 PSI
- Max temp. 38^
- Install the filter in the same direction as water flow
Lot:
YYYY-WXY
Item Code:
WT-100-72
Country of Origin:
Made in China
FLOW
No.1
Picna 3amHn pfIbtpa
Khonka "Select": Iicra 3amHH fInbtpib, HATNCHTb KHONky " Select" Ta Bn6epitb BiNobiHm 3HaOK dIaIbtpy. IKOHKA NOHHe 6JIMMATn.
Khonka "Reset": Bn6epitb BiinobiHm φijbtp i HATNCiB KHONky "Reset". YtpmyTe KNONky He 6iNbwe 3 cekyHa, nokn dana foHKia He 3anpaioe. Bkniu cepBOHe CBITNO 3MiHntbcra Ha 3enehe.

Порадok замин мемрани
- BmKHiB Ixpepeo XnBJIeHHra.
- 3akpnTe BxidHn KnaanHnnBODn.
- 3HimiTb BepxHIO KpnIky.
- BiKIOHITb "CTapn" pInbTp - Bi'EDHaHTe pInbTp Bi3 3'EDHyBaUIB.
- 3aminitbphi-btp - 3Bephitb ybary Ha HanpmaKoNtOKy BoH!
- IpepeBipTe Bci 3' eHdHaHH i nepekoHaHTec, 0e Hemae BnTOKy BoiN.
- 3aKpHnTe BepxHIO KpnIky.
- BjdkpnTe BxidHnn Knaan HnBnIO i BkIIOHT bJKepeNo XNBneHHa.
PepioaHicb 3amHH fIbtpiB
CnCTema OunuHn BODn AqueenaPro ochaueHa cneuaIbHOIO CnCTeMoIO KOHTPOIO CTPOky Cnyx6n fInbtpa.
CnCTema aBtOMaTHNO KOHTPOIOE yMOBn fInbTpaui, a notoUHn CTah fInbTpY BiO6paxaETbcra Ha Dncnnei
ctatycy fInbtpib .
3eJeHe cBtIto - fInbTp npaioe Ha onTmarnbHomy pibHi.
Помаранчеви CBITNO - Фльтскopo Heobxidno 6уde 3amHHTN. Byb lacka, 3B'jXitbcr 3 cepbic-MAIcTpOM KOMnaii Zepter.
YepeBoHe Cbitno pa3oM 3 3ByKOBm CnHaNo (4 rya) O3Hauaε, oO fIbTp Heo6xio H eraiHo 3amHHTN. Iodanbe BnKOpncTahnHa fIbtpa He peKomeHdyetbcra.

Ybara!
IpeaTabneH MaKcMaJIbHn TepMin 3aMHn fInbTp aBIO6paJaE MaKcMaJIbHn DOnyCTHMn Yac, B nepioJAKoro AqueenaPro 3aHa H b npoueci fInbTpaui 3 daHmN fInbTpom.
TeopeTnHa Moenb, kA BnKOpNCTOByBaJacr npn po3paxyHky MAKcHMaIbHoro peKomeHdoBaHoro TepmiHy 3amHn fInbTpib, nepe6aana 0oJeHHy BHTpAty OunuEHOI BOHN B o6c3i 10 ntpib. Pn cnoXnbHHi 6inbwoi KINbKOctI OunuEHOI BOHN TepMn 3AmHm MoKe 3MiHOBaTHCn.
Bka3aHn nepioD pO6OTn fInbtpiB He e rapaHTINHM TepmiHOM, a E oukyBaHm TepmiHOM cIyX6N, nID qac koro 0fip efeKTHBHO OOnuAe BDOy. Tepmin Cnyx6n fInbtpa 3anExkntb BiJ RKOCTI BOH, 10 NOCTynae B CNTEmy, a TAKOX BiD INTEHCNBHOCTI BHKOPNCtAHN CNTEmN. TaKIM YHOM, Tepmin Cnyx6n fInbtpa MoKe CKOPOTINrCRA, kKIO BOHa H BxOJI MtTtB BeNKy KInbKicTB 3BaXeHNx TBepdIX qactHNOK (BikKnadeHb i T.I.)
Jr Jn 10000000000000000000000000000000000000000000000
:JlJgBbVJalal
.1
J 2
jglg jg 00 gssrjjn
()
g>gl, aieoal lueyrae o 0dy f qabll algaiol ggeaill j
gll jss glo 111j 111
g 11111111111111111111111
Jll Jll lalil jc gil glg
aagaaal joo 1jgajl aao oogdo gaoaal aolg
gabll yag aill gdlal, wiai jai lgl alw yiy gws jc iil Jawy Jaa
.45jll jiloo jyo j0 Jgfo n oos
Jusssssssssssssssssssssssssssssssssssssssssssssssssssssssssss
1
WT-100 w
196
美
...
Jusll
美
如果
3995 < u < 4005
a a a a a a a a a a a a a a a a a a a a a a a a a a a a
.
j11 10 10 10
yixiy jjxlj yss
Jus lae (jell yac) aeggall o jll g jlll ogs jn Jao 00
a a Sji ai jll kJy jilal
gssu w g y bgsj jc alldolall aasbg ojdaalolll gogg ydall yoc
gol gllggln no sI y Ie 1y gss aas gall jkll joc
PP Filter
PP Filter (5 micron)

- Life time approx. 6months
- Max flow: 0.75 GPM
- Max pressure: 125 PSI
- Max temp. 38^
- Install the filter in the same direction as water flow
Lot:
YYYY-WXY
Item Code:
WT-100-72
Country of Origin:
Made in China
FLOW

Jlll
l. j
aagglgai
3 3 3 3 3 3 3 3 3 3 3 3 3 3 3 3 3 3 3 3 3 3 3 3 3 3 3 3 3 3 3 3 3 3 3 3 3 3 3 3 3 3 3
a 11 jglll yag aag ggl, bglal aac Jg
:U
ailll jao aaggl ab1.1
J111 111 1100 2
1boll 1b0j1.3
.4
0gollll lalll lalil j qirj bc abol 0d gogol olall
abololos
wull 6
1
Jll Jl Jg gll aal 11 o j 11 o aai y 11 bcl - jd j
"slw 1
m = 311 ;
:
a.o.g.
:1
:


"slssyll aag "olll jdoo "(alolll) jgoll goo wsi sJd Jd 1
gllldo gaoa aagaaaegaaeaaagglg 1
1 2
3 5
sgwao JcJc Jcs Jce Jdell- 1gai
g 111111111111111111111111111
y 4
aaii joo jol ooiw
WT-100-72 5 PP
1
2
3
5
5
WT-100-73"
WT-100-74 1 PP
WT-100-75 s
!
alsslll lssss s 1s g w b a jg jn jg jn jg jn jg jn jg jn jg jn jg jn jg jn jg jn jg jn jg jn jg jn jg
olll jaiil 1aio aalb y lc alwug TDS ayll alall slgall sgsn .11
ROJI

1ab > xa
Jg 1000000000000000000000000000000000000000000000000000000
.1
.2
.3
.1gJl JIO ROJI jj4
e 00000000000000000000000000000000000000000000000000000000000000000000
- 6
.011 4.23 J- do wulj logf.7
. 10000000000000000000000000000000000000000000
19
.10
sill
1.4ab > 3
aIg jll lal 1y
Jn Jn Jn Jn Jn Jn Jn Jn Jn Jn Jn Jn Jn Jn Jn Jn Jn Jn Jn Jn Jn Jn Jn Jn Jn Jn Jn Jn Jn Jn Jn Jn Jn Jn Jn Jn Jn Jn Jn Jn Jn Jn Jn
4.8ogall 1
- 15 15
3 0y yolall
.0dcllal jgaoa J 1000000000000000000000000000000000000000
J
Jg
.1
.
JUULI 10000000000000000000000000000000000000000000000
ololljzolao glc4
aaiololjdoao 5
Jusill Jc dyls ago oJalj Jauill 1g yLgSll jge Jau.6
()5-10JdOaIbIaIbIyolal
y
(30) aolll ooll ggi jgcl 8
111 111 111 111 111 111 111 111 111 111 111
olduwlll 10

126
1.2.6 (gglj)JLJ)ROJI JI 2
1.2.3
1.2.6
1.2.2 以 n 将 o 个 a 盒 0.5
> 0
12.6 olal jrao 7
(RO) jdlb y cia.8
cLalall a.9
12.4 0aijia jog oog (i
2.2.6
1.2.2 由 an + 1 = 2an 知 an + 1 > 0 ,故 an + 1 = 2a_n
1
J 1 J
1

a blll l l l l l l l l l l l l l l l l l l l l l l l l l l l l l l l l l l l l l l l l l l l l l l l l l l l l l l l l l l l l l l
38 38 38 38 38 38 38 38 38 38 38 38 38 38 38 38 38 38 38 38 38 38 38 38 38 38 38 38 38 38 38 38 38
3 j 1 j g jg jg jg jg jg jg jg jg jg jg jg jg jg jg jg jg jg jg jg jg jg jg jg jg jg jg jg jg jg jg jg jg jg jg jg jg jg jg jg jg jg jg jg jg jg jg jg jg jg jg j
J 1 J
J 1 J
J 1 J
J 1 J
J 1 J
J 1 J
y
olaljbc
Jg Jbc b0000000000000000000000000000000000000000000000000000000000000000000000000000000000000000000000000
y
y j 100000000000000000000000000000000000000000000000000000000000000000000
.3
JrJl Jd yds (38°C<)) dJLl OJl
.
RO JI Jd
!
: 40xuU aogo loglso
:JgJ
8 8 a l a l l l l l l l l l l l l l l l l l l l l l l l l l l l l l l l l l l l l l l l l l l l l l l l l l l l l l l l l l l l l l l l l l l l l l l l l l l l l l l l l l l l l l l l l
: gg
(1) 100000000000000000000000000000000000000000000000000000000000000000000000000000
)j 1J L J 1J 1J 1J 1J 1J 1J 1J 1J 1J 1J 1J 1J 1J 1J 1J 1J 1J 1J 1J 1J 1J 1J 1J 1J 1J 1J 1J 1J 1J 1J 1J 1J 1J 1J
jJy jy y aij no sll JlabJc JrW
Jc Jiaio k jzjll no saa Jg jzj g 10
no gill ldo goc Jgolall go Lg, yddy dalld
d aee bgyaoa o aee pbl Oo Jx
!dll Ilae Jc JcL Loo Lg Dsclg
- a > b > 0
!
alj.1 jll ooll aag yg lgl .1 1 jll oll aag g r g jll jll jll
Igogxoo ooloo oo yu yy Igsl.2
Jlalll l 1s
J 1
aoc 0cfo 1! jjll g gao yu wyy uayy
oJoo oJoo aol oI ooglo 1g 10
1JrJ 1J. JIJI JI JI JI JI JI JI JI JI JI JI JI JI JI JI JI JI JI JI JI JI JI JI JI JI JI JI JI JI JI JI JI JI JI JI JI JI JI JI JI JI JI JI JI JI JI JI JI JI JI JI J
g 10000000000000000000000000000000000000
.
g w 11 11 11 11 11 11 11
aagllgssall no dolalsswll s 3dolalglll aalalal alalal
J 1
/1y j 11111111111111111111111
.
Jaaal aIbby 3 IaLc gai jil Jauyll Jaoe
AqueenaPro Aquapura, Vita longa