
XULT - Bike accessory IXS - Free user manual and instructions
Find the device manual for free XULT IXS in PDF.

| Brand | IXS |
| Model | XULT |
| Product Type | Full-face helmet for cycling, skateboarding, and inline skating |
| Category | Bicycle accessory |
| Safety standards | EN 1078 (Europe), CPSC (United States) |
| Shell material | FRP (fiber reinforced polymer) |
| Inner material | Extruded polystyrene with Xmatter multi-impact inserts |
| Padding | Moisture-wicking Coolmax, removable cheek pads (EPR) |
| Ventilation | Vortex system: >20 vents, 4 air intakes, 11 outlets, 2 mask vents |
| Retention system | Double D-rings |
| Visor | Height adjustable, removable |
| Weight | Approx. 1100 g (depending on size) |
| Available sizes | XS to XXL (refer to size chart) |
| Maintenance | Hand-washable inner liner, removable cheek pads |
| Warranty | 2 years |
| Spare parts | Padding kit, inner liner, visor and screws |
| Included accessories | Helmet, visor, 2 sets of cheek pads, inner liner, booklet |
| Use | Cycling, skateboarding, inline skating (not for motorized vehicles) |
Frequently Asked Questions - XULT IXS
User questions about XULT IXS
0 question about this device. Answer the ones you know or ask your own.
Ask a new question about this device
Download the instructions for your Bike accessory in PDF format for free! Find your manual XULT - IXS and take your electronic device back in hand. On this page are published all the documents necessary for the use of your device. XULT by IXS.
USER MANUAL XULT IXS
text_image
xult CROSS OVER FULL FACE iCS CYCLING HELMET OWNER'S MANUAL • FAHRRADHELM BENUTZERHANDBUCH • MANUEL DE L'UTILISATEUR POUR CASQUE DE VÉLO • MANUALE D'USO DEL CASCO DA CICLISMO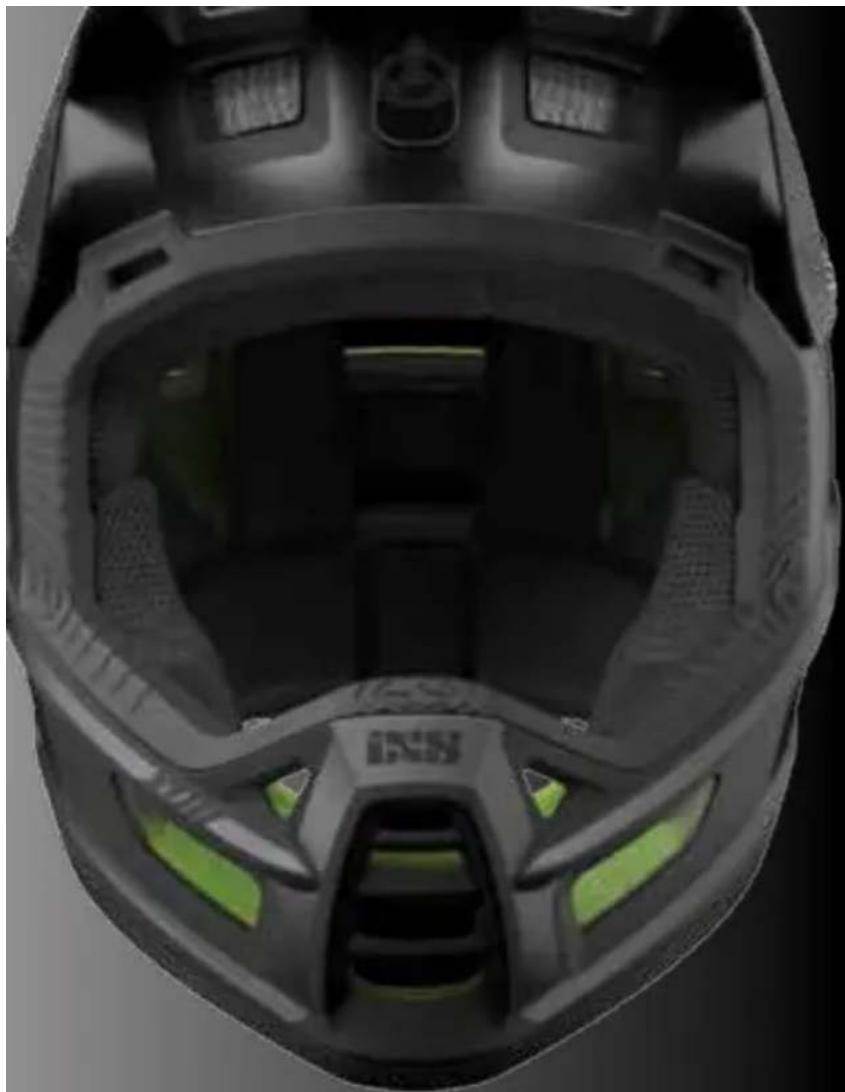
natural_image
Front view of a helmet with green-lit visor and black plastic head (no text or symbols visible)xult
CROSS OVER FULL FACE
Presenting the Xult
A cross over Full Face helmet designed and developed to race and compete.
Superior ventilation combined with advanced impact absorption allow for full protection over a wide range of conditions and riding styles. The Xult Helmet series meet and exceed both European EN1078 and US CPSC standards.
Xult- the perfect cross over full face solution!
natural_image
Close-up of a transparent plastic container with internal compartments and green highlights (no text or symbols visible)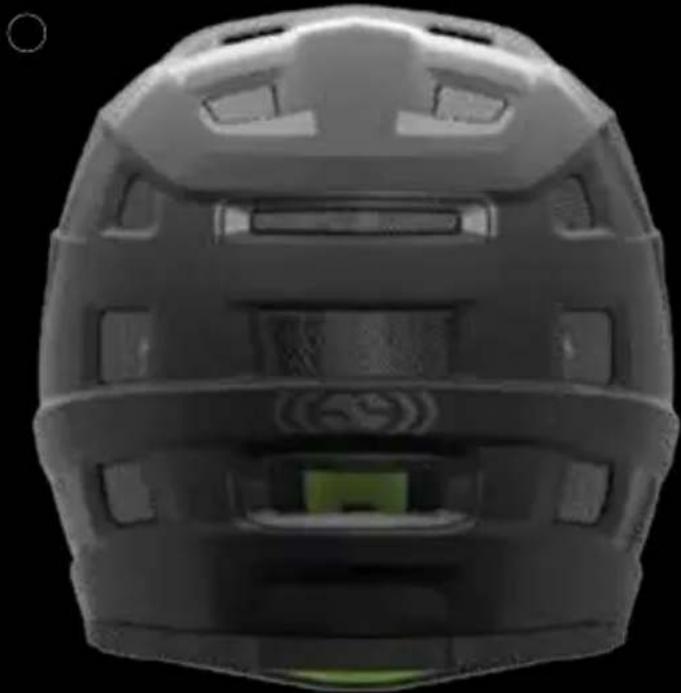
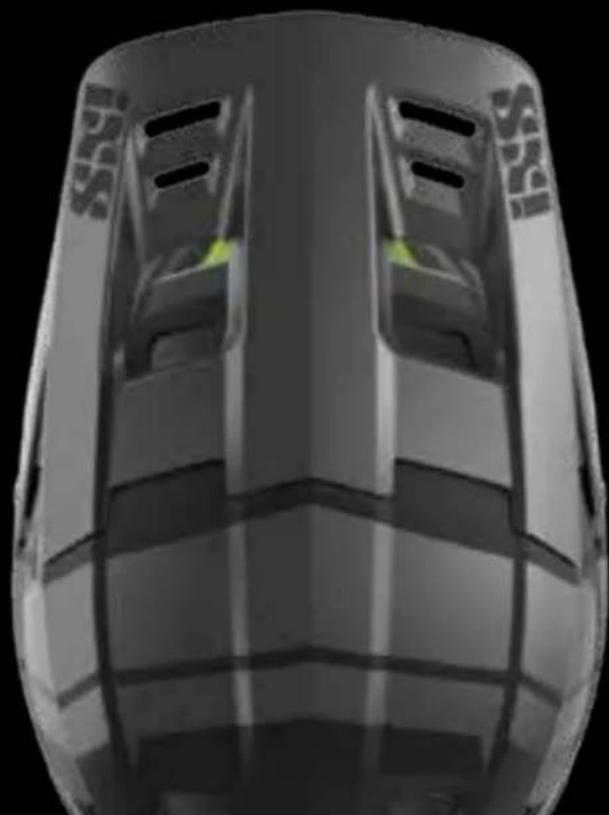
natural_image
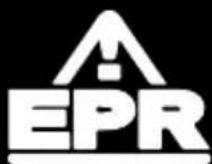
Top-down view of a helmet with visible structural details and a green accent (no text or symbols)Included with this iXS Xult helmet:
(1) Xult Helmet
(1) Visor (assembled to helmet)
(2) Sets of left and right cheek pads
(1) Comfort Interior Lining
(1) Instruction Booklet
If any of the above parts are missing please consult the iXS dealer where helmet was originally purchased.
Xult Replacement parts:
- Xult pad kit
- Xult comfort Interior lining
- Xult visor & bolt kit
To order replacement parts contact your iXS dealer.
Thank you for purchasing the iXS Xult helmet!
Your safety is top priority to iXS. To ensure maximum protection and enable years of use from this iXS product, please read the instructions in this manual carefully before use. Do not use your iXS Xult helmet until you have read and fully understand the contents of this manual. If you have any questions or comments concerning this helmet, please contact your nearest iXS dealer or send us your request by e-mail. Visit our website at iXS.com/sports
Please note that these specifications are subject to change without notice, as we continually strive to improve our products.
Exceeds bicycle certifications: EN1078 & U.S. CPSC
natural_image
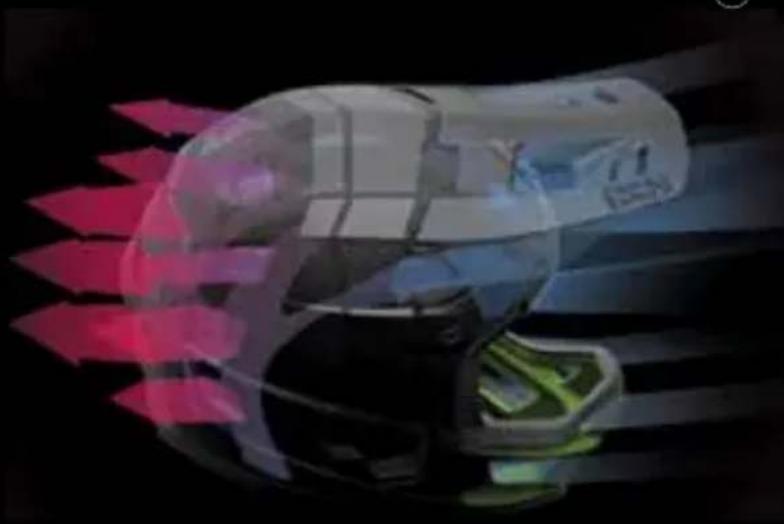
3D rendered model of a helmet with transparent casing and green accent highlights (no text or symbols)VORTEX
VORTEX VENTILATION SYSTEM
• Over 20 vents in total make up the Xult's superior ventilation system
• 4 intake vents (2 frontal and 2 side) force cool air into the helmet
- Molded channels direct cool air through the entire EPS
• 11 exhaust vents ensure an exit for warm air
• 2 eye-port vents inhibit goggle fogging
- Jaw-guard vents and molded padding allow air to flow freely around the rider's face
- Reinforced stainless steel mesh guards protect against projectiles without inhibiting air flow
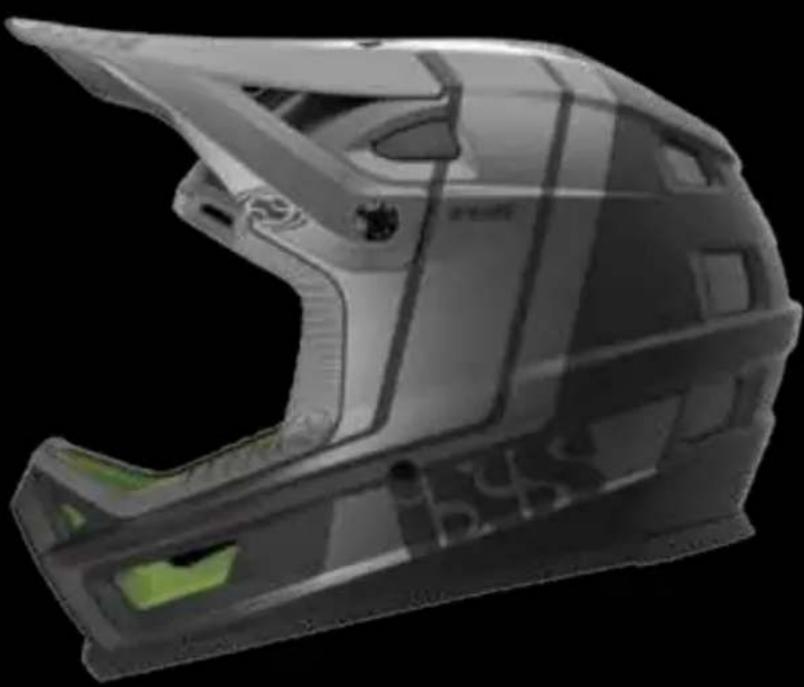
natural_image
Illustration of a robotic hand with motion arrows indicating airflow or movement (no text or symbols)FRP
FRP SHELL
- FRP (fiber reinforced polymer) shell increases strength while reducing overall weight.
- Rail based design increases structural integrity without adding unnecessary volume.

text_image
shell increases weight. structural integrity lume.XRAIL
X-RAIL IMPACT ABSORPTION CRADLE
- "Xmatter" inserts strategically positioned at major impact zones absorb more force than traditional EPS alone
- Multi-impact “Xmatter” formula increases longevity of helmet by reducing damage to the EPS during minor impacts
- Allows for EPS movement within the shell and aids in dissipation of rotational forces.
- Molded mouth guard integration reduces frontal impact forces
COMFORT INTERIOR
- Highly vented ergonomic design enables a secure and comfortable fit without inhibiting air-flow
• Coolmax material wicks away moisture to keep you dry - removable for washing
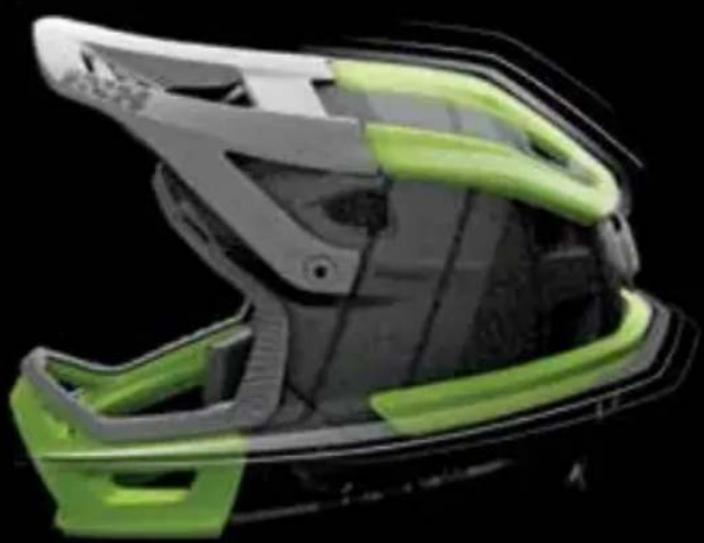
EPR (Emergency Padding Release)
- Cheek padding can be easily removed in the event of an emergency
- Ergonomic shape and optional sizes ensure a perfect fit
• Coolmax material wicks away moisture to keep you dry
PROTECTION SCOPE
natural_image
3D rendered helmet with green and gray accents, no visible text or symbols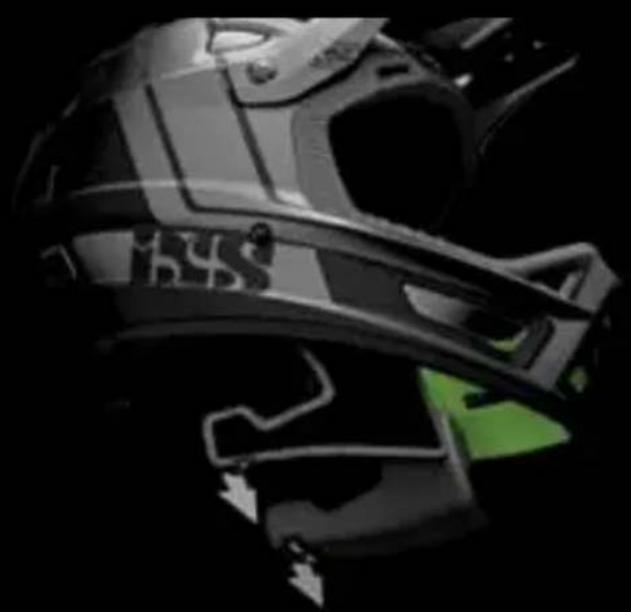
natural_image
Close-up of a black and white helmet with visible branding and green accents (no readable text or symbols)EN
WARNING
No helmet can protect against all possible impacts or injuries. The function of this helmet is to reduce the chance or severity of a head injury in an accident. The helmet will not protect any area which is not covered by the helmet including the neck or spine. Serious injury or death can occur even if the helmet is properly used. To ensure maximum protection, the helmet must fit properly with retention straps securely fastened under the chin. See (FIG. B) for proper positioning and (FIG. E-G) for strap fastening instructions. The Xult helmet should not be used by children while climbing or doing other activities when there is a risk of the child hanging him/herself. This helmet is designed for cyclists and for users of skateboards or roller skates. This Helmet is not intended for use with motorized vehicles including motorcycles, ATV's or motor scooters. Modifications or changes which do not correspond with the original product can result in severe injury or death. Do not modify or remove any original components of the helmet unless replacing with approved iXS parts. Helmets should not be adapted for the purpose of fitting accessories in any way not recommended by the manufacturer. This helmet has been designed to absorb impacts by partial destruction of its components. After a violent impact, this helmet should be discarded and replaced even if it looks undamaged. Always check your helmet before use. If there is visible damage, stop using the helmet immediately. If you find deterioration in any component, either replace that component or get a new helmet. Check the security of the retention straps and always make sure that the interior lining and the cheek pads are attached before use.
SIZING
To be effective, the helmet must fit properly. Refer to the helmet's size range and try on different sizes to determine which size feels most secure and comfortable.
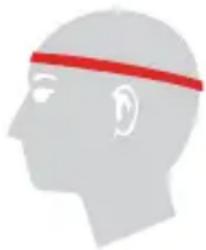
To determine your helmet size:
- Wrap a tape measure around the head horizontally about 2.5cm or about 1 inch above the eyebrows to obtain the largest head circumference measurement. See (FIG. A)
- Use the size chart to select a helmet which is closest to your head size.
- Note that the size chart is intended to be used as a guide and not a substitute for trying the helmet on.
natural_image
Silhouette of a human head in profile with a red headband (no text or symbols)FIG. A
HELMET SUGGESTED SIZE CHART (ADULT)
SIZE S/M M/L L/XL
HEAD CIRCUMFERENCE
53-56cm 57-59cm 60-62cm

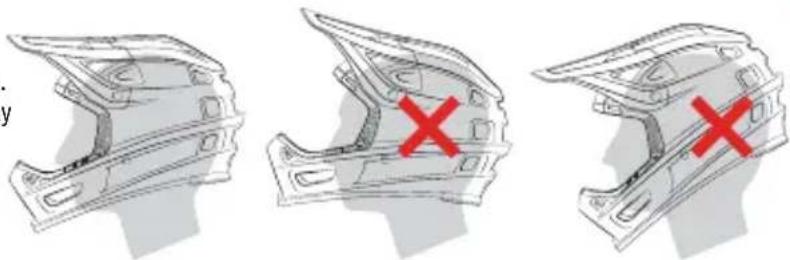
WARNING
Always wear your helmet in the correct position. See (FIG. B). Wearing your helmet incorrectly, see (FIG. C/D), may lead to serious injury or death.
natural_image
Three technical line drawings of a car body component with red X marks indicating failure or inspection points (no text or symbols present)
FITTING
- Remove cheek pads from the helmet.
- Firmly grip one retention strap in each hand and expand the helmet opening by pulling the straps outward and then slide the helmet onto your head.
- The helmet should fit snugly around your head even without the cheek pads.
- Check the fit by rotating the helmet from left to right on your head. If correct, your skin should move with the helmet lining.
- If the helmet slips easily in any direction, then try using the next size down.
- If the helmet is too tight, then try the next size up.
- Next, remove the helmet and attach the cheek pads that were previously assembled with the helmet and put the helmet on following the previous method.
- Make sure the cheek pads are in contact with your cheeks, and that the cheek pads are compressed.
- If the helmet is too tight remove the helmet and insert the thinner set of cheek pads.
- If the helmet is too loose, insert the thicker set of cheek pads.
FIG. B FIG. C FIG. D
The helmet should be adjusted to fit the user, e.g. the straps positioned so that they do not cover the ears, the buckle positioned away from the jawbone and the straps and buckle adjusted to be both comfortable and firm.
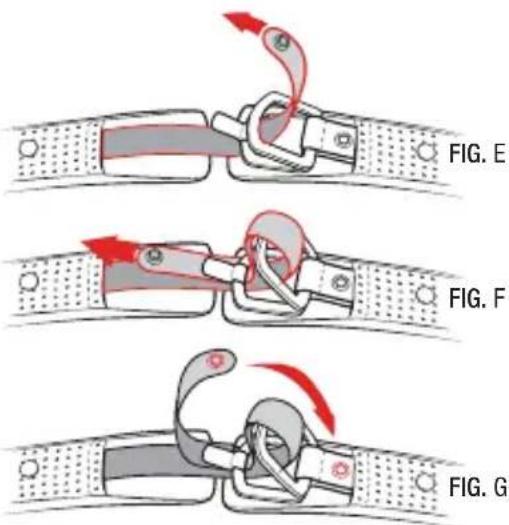
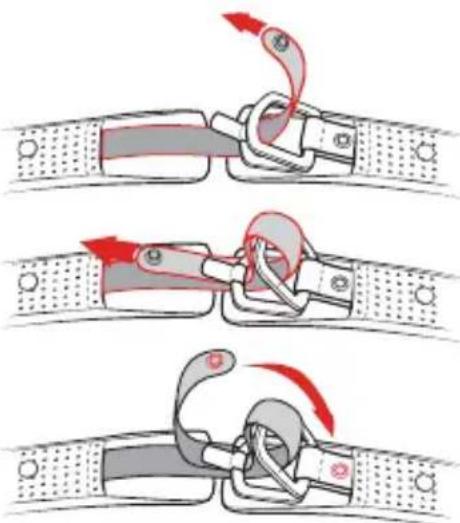
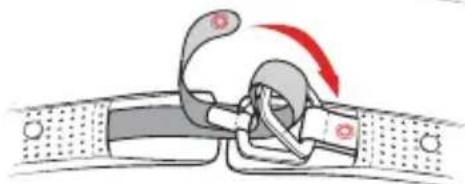
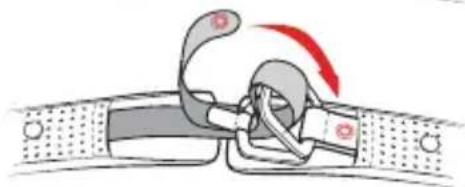
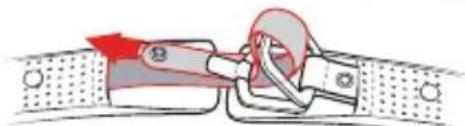
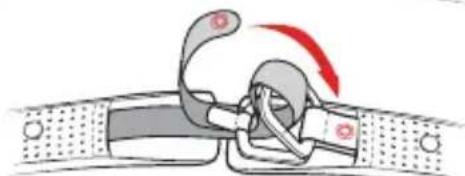
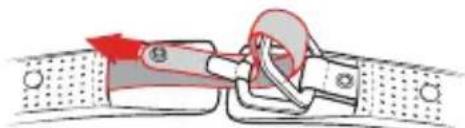
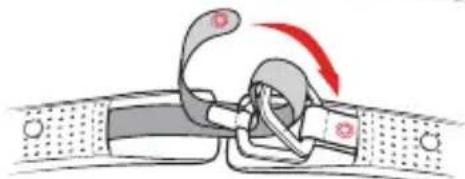
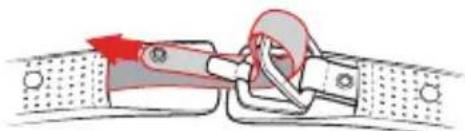
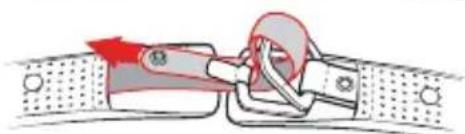
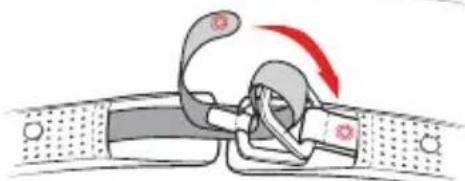
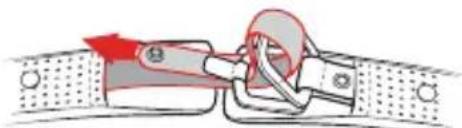
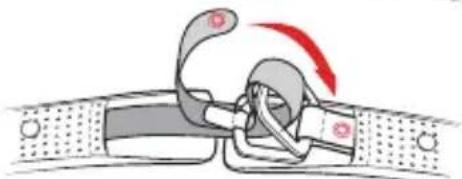
SECURING RETENTION STRAPS (DOUBLE-D LOOP)
Retention straps must be secured to ensure proper function. Loose straps may allow the helmet to come off during an impact and result in serious injury or death. If fastened properly, the helmet should remain in position when pulled or rotated in any direction. Do not use a helmet that can be removed with the retention straps fastened.
- Fasten the D ring retention system by threading the end of the strap through both D rings as shown in (FIG. E)
- Tighten the strap by feeding it between the D loops as shown in (FIG. F)
- Fasten the strap end snap on the D ring side as shown in (FIG. G) to secure the loose end.
text_image
FIG. E FIG. F FIG. GEN
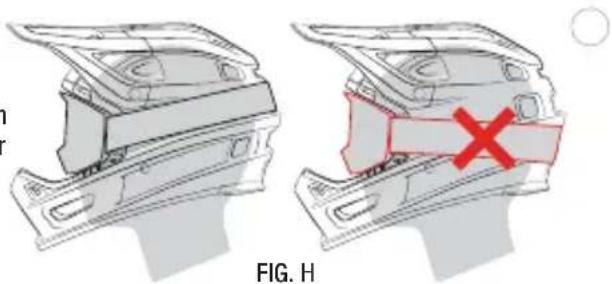
EYE PROTECTION
All iXS helmets are designed for use with eye protection. The Xult helmet has been specifically designed for use with goggles. See (FIG. H) for proper goggle fit. It is your responsibility to obtain and use eye protection.
natural_image
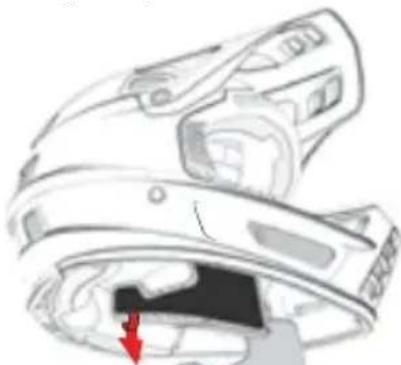
Technical illustration of a car body panel with a red X mark indicating a defect or damage (no text or symbols present)EPR (EMERGENCY PADDING RELEASE)
WARNING
- The following illustrates the functionality of the Xult EPR system, but should not necessarily be implemented for all types of injuries and conditions. Consult medical or emergency staff before removing the helmet of an injured person.
- Xult cheek pads are secured to the helmet using Hook and Loop Velcro fasteners which can be removed by pulling on the release tabs located on the bottom of the cheek pads away from the helmet as shown in (FIG. I)
- Reverse order for reinstalling cheek pads

natural_image
Technical line drawing of a car interior showing structural components and red arrows indicating features (no text or symbols)COMFORT INTERIOR LINING REMOVAL/INSTALLATION
The Comfort Interior Lining is attached to the helmet EPS via snap buttons and tabs at the front and rear of the helmet and may be removed for cleaning or replacement.
To Remove:
- Gently pull on the liner at the back corners until left and right rear snaps disengage
- Repeat this process for the front snap located at the center brim
- Slide the front and rear side tabs of the liner between the shell and EPS
- Align Center and rear snaps to their corresponding fixtures on the EPS and press firmly until engaged
- Make sure the liner fits securely underneath the Eye-port Lining and rear EPS protector.
To Install:

natural_image
Technical line drawing of a car interior showing internal components and airflow direction (no text or symbols)
natural_image
Technical line drawing of a car helmet showing internal components and red directional arrows indicating movement (no text or symbols)

WARNING
Improper placement of the interior comfort lining will compromise the function of the helmet and could result in serious injury or death. Always make sure the padding correctly positioned and securely fastened before use. Do not use any pads that are not specifically designed for this helmet and sold by iXS. Aftermarket pads/liners may not fit properly and could cause serious injury or death.
STRAP COVER REMOVAL/INSTALLATION
- Strap Covers are held in place via snap buttons located on the top and bottom of the strap and may be removed for cleaning.
- When reinstalling carefully align snap button and press firmly until snap is engaged.
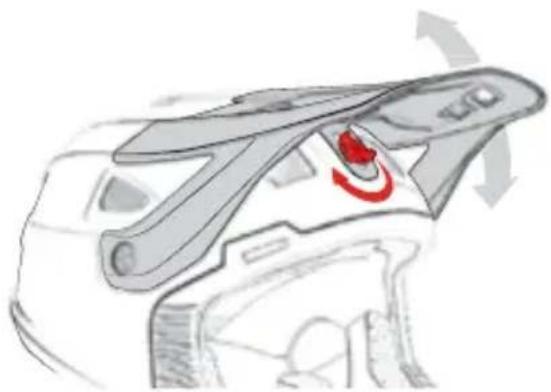
VISOR ADJUSTMENT/REPLACEMENT
To Adjust:
- Loosen the adjustment bolt located under the center of the visor and pivot the visor either up or down depending on the desired position.
- Hand tighten the adjustment bolt to secure the position.
To Remove:
- Remove the central adjustment bolt by hand and the side screws with either with a coin or flat head screwdriver.
To Replace:
- Position the replacement visor on the helmet and secure in place by hand tightening the central adjustment bolt and side screws with coin or screwdriver.
natural_image
Diagram of a car's front and side views showing engine, dashboard, and wheel (no text or labels)WARRANTY
iXS products is offering a two year warranty. Bring or send your iXS Xult Helmet and the retail seller's original receipt as a proof of the date of purchase to the retailer where you purchased the item. Any postage, insurance or shipping costs incurred in sending your iXS product for service under either option above is your responsibility. iXS will not be responsible for products lost or damaged in shipping.
WARRANTY EXCLUSIONS
- Helmets that have been involved in accidents, modified, poorly maintained or used for commercial purposes.
- Damage occurring during shipment of the products (such claims must be presented directly to the shipper).
- Damage to products resulting from improper assembly or repair, the use or installation of parts or accessories not compatible with the original intended use of the product, or the failure to follow the product warnings and usage instructions.
- Damage or deterioration to the surface finish, aesthetics or appearance of the product.
- Any products for which the consumer does not follow the warranty procedures outlined above.
DE
natural_image
Top-down view of a black helmet with visible front and side panels (no text or symbols)natural_image
Silhouette of a human head in profile with a red headband, no text or symbols presentA
GRÖSSENTABELLE HELME (ERWACHSENE)
HELMGRÖSSE S/M M/L L/XL
53-56cm 57-59cm 60-62cm

SO SITZT IHR HELM RICHTIG
ACHTUNG!
natural_image
Three technical illustrations of a car body panel with red X marks indicating failure or damage (no text or symbols present)BCD
ANPASSUNG DES HELMS
natural_image
Technical illustration of a car body panel with a red X mark indicating a defect or damage (no text or symbols present)EPR (Emergency Padding Release) - Wangenpolster-Notfallsystem
ACHTUNG!
natural_image
Technical line drawing of a car interior showing a door and seat, with red arrows indicating movement or force points (no text or symbols present)natural_image
Technical line drawing of a car interior showing dashboard, vent, and doorways with red arrows indicating flow or movement (no text or symbols)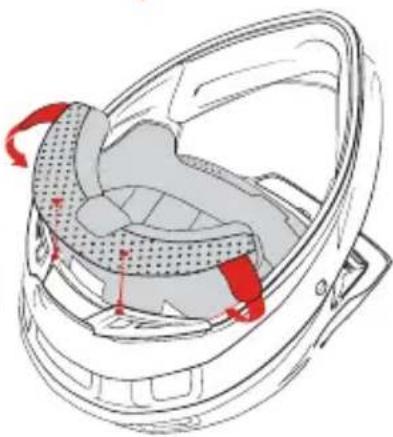
natural_image
Technical line drawing of a helmet with red arrows indicating movement or force (no text or symbols)

ACHTUNG!
natural_image
Diagram of a mechanical component with a red circular feature and directional arrows indicating motion (no text or symbols)GARANTIE
natural_image
Top-down view of a black and white helmet with visible front and back profiles (no text or symbols)natural_image
Silhouette of a human head in profile with a red headband, no text or symbols presentFIG. A
TABLEAU DE SUGGESTION DES TAILLES DE CASQUE (ADULTES)
TAILLE S/M M/L L/XL
53-56cm 57-59cm 60-62cm

MISE EN PLACE
AVERTISSEMENT
natural_image
Three technical line drawings of a mechanical bracket component with red X marks indicating failure or inspection points (no text or symbols present)FIG. B FIG. C FIG. D
TENUE
natural_image
Three-step illustration of a rope buckle being lifted, showing how to lift the knot (no text or symbols present)FIG. E
FIG. F
FIG. G

PROTECTION OCULAIRE
natural_image
Technical illustration of a mechanical component with crosshair marking (no text or symbols)EPR (EMERGENCY PADDING RELEASE pour REMBOURRAGE AMOVIBLE EN CAS D'URGENCE)
AVERTISSEMENT
natural_image
Diagram of a mechanical component with a red circular feature and directional arrows indicating motion (no text or symbols)Remplacement :
EXCLUSIONS DE GARANTIE
natural_image
Top-down view of a black helmet with visible front and back profiles (no text or symbols)natural_image
Silhouette of a human head in profile with a red headband (no text or symbols)FIG. A
MISURE S/M M/L L/XL
53-56cm 57-59cm 60-62cm

POSIZIONAMENTO
AVVERTENZA
natural_image
Three technical line drawings of a mechanical bracket component with red X marks indicating failure or inspection points (no text or symbols present)FIG. B FIG. C FIG. D
natural_image
Three-step illustration of a rope buckle being lifted, showing the knot and angle (no text or symbols)
FIG. E
FIG. F
FIG. G
IT
PROTEZIONE OCCHI
natural_image
Technical illustration of a mechanical component with a red X mark indicating a defect or failure (no text or symbols present)natural_image
Technical line drawing of a mechanical component with internal channels and mounting holes (no text or symbols)FIG. I
natural_image
Technical line drawing of a car interior showing a highlighted component with a red arrow (no text or symbols)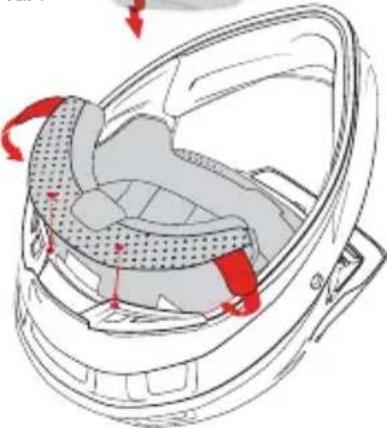
natural_image
Technical line drawing of a car interior showing seat, dashboard, and seatbelt components (no text or symbols)

AVVERTENZA
natural_image
Diagram of a mechanical component with a red circular feature and directional arrows indicating motion (no text or symbols)GARANZIA
natural_image
Front view of a black and white helmet with visible visor, grille, and front-mounted sensor (no text or symbols)natural_image
Silhouette of a human head in profile with a red headband, showing ear and teeth (no text or symbols)FIG. A
TABLA DE TALLAS SUGERIDAS PARA EL CASCO (ADULTOS)
TALLAS S/M M/L L/XL
53-56cm 57-59cm 60-62cm
COLOCACIÓN
ADVERTENCIA
natural_image
Three technical line drawings of a car body panel with red X marks indicating failure or inspection points (no text or symbols present)ES
COLOCACIÓN
text_image
FIG. E FIG. F FIG. G
natural_image
Technical illustration of a mechanical component with a red X mark indicating a defect or failure (no text or symbols present)RETIRADA DE EMERGENCIA DE LAS ALMOHADILLAS
ADVERTENCIA
natural_image
Diagram of a car interior showing a highlighted section with red arrows, labeled 'FIG. 1' (no text or symbols on the diagram itself)natural_image
Technical line drawing of a car interior showing internal compartments and structural elements (no text or symbols)
natural_image
Technical line drawing of a helmet with highlighted seat area and red directional arrows indicating movement (no text or symbols)

ADVERTENCIA
natural_image
Diagram of a car's intake manifold with a red circular arrow indicating a specific component (no text or symbols present)GARANTÍA
natural_image
Top-down view of a black and white helmet with visible front and back profiles (no text or symbols)natural_image
Silhouette of a human head in profile with a red headband (no text or symbols)FIG. A
TABELL FÖR FÖRSLAG PÅ HJÄLMSTORLEKAR (VUXNA)
STORLEK S/M M/L L/XL
53-56cm 57-59cm 60-62cm
PLACERING
WARNING
natural_image
Three technical line drawings of a car body panel with red X marks indicating defect or damage points (no text or symbols present)FIG. B FIG. C FIG. D
PASSFORM
FÄSTA HAKREMMARNA (DUBBEL-D ÖGLA)
text_image
FIG. E FIG. F FIG. GSE
ÖGONSKYDD
natural_image
Technical illustration of a mechanical component with a red X mark indicating a defect or failure (no text or symbols present)EPR (FRIGÖRANDE AV VADDERING VID OLYCKA)
WARNING
natural_image
Technical line drawing of a car interior showing a highlighted component and red arrows indicating direction (no text or symbols)MONTERING/DEMONTERING AV INNERFODER
natural_image
Technical line drawing of a car interior showing internal components and airflow direction (no text or symbols)
natural_image
Technical line drawing of a helmet component with red arrows indicating movement or force (no text or symbols)

WARNING
natural_image
Diagram of a car's front and side views showing steering wheel and dashboard (no text or labels)GARANTI
natural_image
Top-down view of a black helmet with visible front and back profiles (no text or symbols)natural_image
Side profile of a human head in profile view with a red headband (no text or symbols)FIG. A
VEILEDENDE ST∅RRELSESOVERSIKT FOR HJELM (VOKSNE)
DIMENSJONER S/M M/L L/XL
53-56cm 57-59cm 60-62cm
PLASSERING
ADVARSEL
natural_image
Three technical illustrations of a car body panel with red X marks indicating failure or damage (no text or symbols present)FIG. B FIG. C FIG. D
TILPASSING
natural_image
Illustration of a belt buckle being adjusted with a red motion arrow (no text or symbols)FIG. E

natural_image
Illustration of a cable being inserted into a socket (no text or symbols)FIG. F
natural_image
Diagram of a mechanical clamp or buckle with red motion arrows indicating rotation (no text or symbols)FIG. G
NO
∅YEVERN
natural_image
Technical illustration of a mechanical component with crosshair marking (no text or symbols)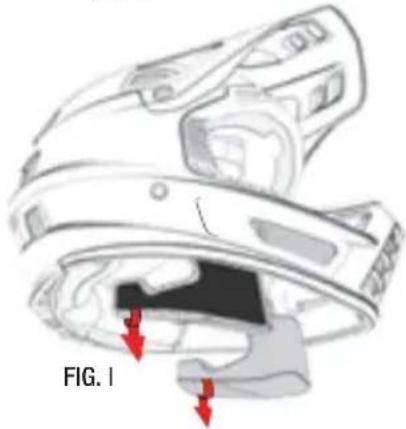
natural_image
Technical line drawing of a car interior component with red arrows indicating features (no text or symbols)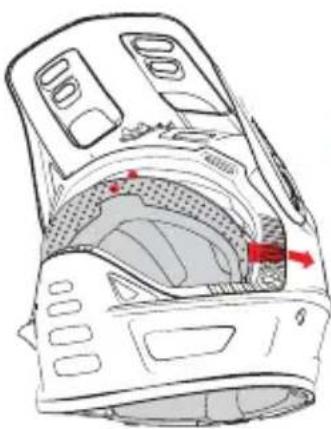
natural_image
Technical line drawing of a car interior showing dashboard, vent, and seat area with red arrows indicating flow or movement (no text or symbols)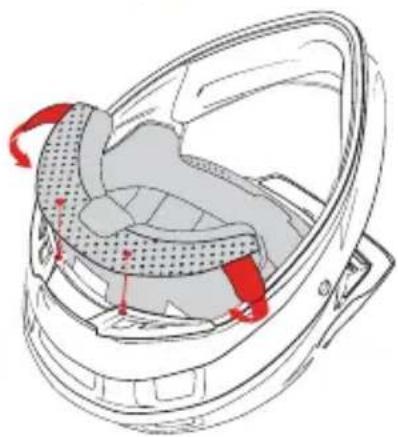
natural_image
Technical line drawing of a helmet component with red arrows indicating movement or force (no text or symbols)
NO
ADVARSEL
natural_image
Diagram of a car's front and side views showing steering wheel and dashboard (no text or labels)GARANTI
natural_image
Top-down view of a black and white helmet with visible front and back panels (no text or symbols)natural_image
Side profile of a human head in profile with a red headband (no text or symbols)FIG. A
EHDOTETTU KYPÄRÄN KOKOTAULUKKO (AIKUISET)
KOON S/M M/L L/XL
53-56cm 57-59cm 60-62cm
ASEMOINTI
VAROITUKSET
natural_image
Three technical illustrations of a car body frame with red X marks indicating failure or damage (no text or symbols present)FIG. B FIG. C FIG. D
SOVITUS
natural_image
Diagram of a belt buckle being adjusted with a red curved arrow indicating motion (no text or symbols present)FIG. E

natural_image
Illustration of a cable being inserted into a socket (no text or symbols)FIG. F
natural_image
Diagram of a cable harness with a handle and belt, showing motion direction (no text or symbols)FIG. G
FL
SILMIEN SUOJAUS
natural_image
Technical illustration of two mechanical components with a red X mark indicating a defect or failure (no text or symbols present)natural_image
Technical line drawing of a car interior component with red arrows indicating features (no text or symbols)COMFORT SISÄVUOREN IRROTTAMINEN/ASENTAMINEN
natural_image
Technical line drawing of a mechanical component with internal channels and highlighted areas (no text or symbols)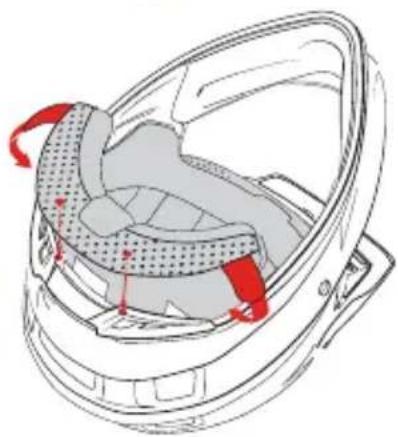
natural_image
Technical line drawing of a helmet component with red arrows indicating movement or force (no text or symbols)

VAROITUKSET
natural_image
Diagram of a car's front and side views showing steering wheel and dashboard (no text or symbols)TAKUU
natural_image
Top-down view of a black and white helmet with visible front and back profiles (no text or symbols)natural_image
Side profile of a human head in profile with a red headband (no text or symbols)FIG. A
natural_image
Three technical line drawings of a mechanical bracket component with red X marks indicating failure or inspection (no text or symbols present)PT
FIG. B FIG. C FIG. D
AJUSTE DO CAPACETE
natural_image
Illustration of a rope buckle being twisted with a red curved arrow indicating motion (no text or symbols)FIG. E
natural_image
Illustration of a cable being inserted into a socket (no text or symbols)FIG. F
natural_image
Diagram of a cable harness with a handle and belt, showing motion direction (no text or symbols)FIG. G
PT
PROTECÇÃO DOS OLHOS
natural_image
Technical illustration of a mechanical component with crosshair marking (no text or symbols)natural_image
Diagram of a car interior showing a highlighted component and red arrows indicating direction (no text or symbols)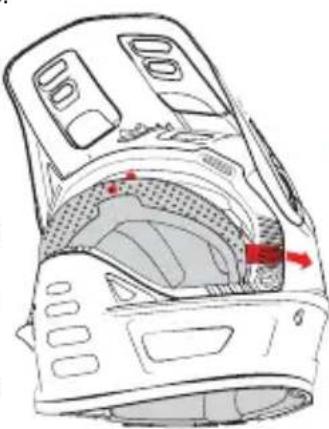
natural_image
Technical line drawing of a car interior showing dashboard, seats, and seatbelt components (no text or labels)
natural_image
Technical line drawing of a helmet component with red arrows indicating movement or force (no text or symbols)

ATENÇÃO!
natural_image
Technical line drawing of a mechanical component with red circular feature and directional arrows (no text or symbols)GARANTIA
natural_image
Front view of a black helmet with visible gear and front grille (no text or symbols)natural_image
Side profile of a human head in profile view with a red headband (no text or symbols)FIG. A
VELIKOSTI S/M M/L L/XL
53-56cm 57-59cm 60-62cm
UMÍSTĚNÍ
VAROVÁNÍ
natural_image
Three technical line drawings of a car body component with red X marks indicating failure or inspection (no text or symbols present)FIG. B FIG. C FIG. D
NASTAVENÍ
natural_image
Illustration of a belt buckle being lifted, showing rope insertion and angle marking (no text or symbols)FIG. E
natural_image
Illustration of a cable being inserted into a socket (no text or symbols)FIG. F
natural_image
Diagram of a belt buckle being lifted, showing rope and belt (no text or symbols)FIG. G
OCHRANA OČÍ
natural_image
Technical illustration of a car body panel with a red X mark indicating a defect or damage (no text or symbols present)EPR (NOUZOVÉ UVOLNĚNÍ VYCPÁVEK)
VAROVÁNÍ
natural_image
Technical line drawing of a car interior showing a door and seat, with red arrows indicating features (no text or symbols)KOMFORTNÍ VNITŘNÍ OBLOŽENÍ DEMONTÁŽ/MONTÁŽ
natural_image
Technical line drawing of a car interior showing dashboard, vent, and exhaust components (no text or labels)
natural_image
Technical line drawing of a helmet with red arrows indicating movement or force points (no text or symbols)

VAROVÁNÍ
natural_image
Technical line drawing of a mechanical component with red annotation arrows indicating rotation or movement (no text or symbols present)ZÁRUKA
natural_image
Top-down view of a black and white helmet with visible front and back profiles (no text or symbols)natural_image
Silhouette of a human head in profile with a red headband, showing ear and white eyes (no text or symbols)FIG. A
TABELA SUGEROWANYCH ROZMIARÓW KASKÓW (DOROŚLI)
ROZMIARY S/M M/L L/XL
53-56cm 57-59cm 60-62cm
USTAWIANIE
OSTRZEŻENIE
natural_image
Three technical line drawings of a car body component with red X marks indicating failure or inspection (no text or symbols present)FIG. B FIG. C FIG. D
DOPASOWYWANIE
natural_image
Illustration of a belt buckle being lifted, showing rope and belt (no text or symbols)FIG. E
natural_image
Diagram of a cable or connector being inserted into a socket, showing red motion direction (no text or symbols)FIG. F

natural_image
Illustration of a mechanical clamp or grip mechanism with red motion arrows indicating movement (no text or symbols)FIG. G
PL
OCHRONA OCZU
text_image
sk FIG. HEPR - AWARYJNE WYJMOWANIE PODUSZEK)
OSTRZEŻENIE
natural_image
Technical line drawing of a car interior component with red arrows indicating features (no text or symbols)ZAKŁADANIE/WYJMOWANIE WYGODNEJ WKŁADKI WEWNETRZNEJ
natural_image
Technical line drawing of a washing machine head with internal components and red arrows indicating motion (no text or symbols)
natural_image
Technical line drawing of a helmet with red arrows indicating movement or force points (no text or symbols present)

OSTRZEŻENIE
natural_image
Top-down view of a black and white helmet with visible front and side panels (no text or symbols)natural_image
Silhouette of a human head in profile with a red headband (no text or symbols)FIG. A
MATENTABEL HELMEN (VOLWASSENEN)
MAAT S/M M/L L/XL
53-56cm 57-59cm 60-62cm
ZO ZIT UW HELM GOED
LET OP!
natural_image
Three technical line drawings of a car body component with red X marks indicating failure or inspection (no text or symbols present)NL
FIG. B FIG. C FIG. D
PASSEN VAN DE HELM
natural_image
Technical illustration of a vehicle chassis with a red X mark indicating a defect or damage (no text or symbols present)EPR (Emergency Padding Release) – wangkussen noodsysteem LET OP!
natural_image
Technical line drawing of a car interior showing a highlighted component and red arrows indicating features (no text or symbols present)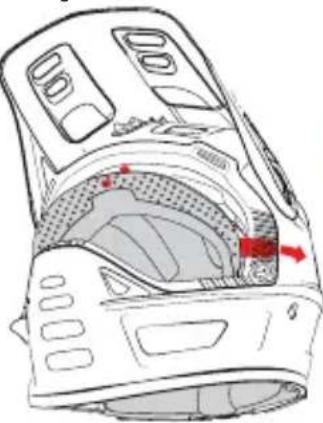
natural_image
Technical line drawing of a car interior showing dashboard, vent, and doorways with red arrows indicating movement or flow (no text or symbols)
natural_image
Technical line drawing of a car seat assembly with highlighted components (no text or symbols)

LET OP!
natural_image
Technical line drawing of a mechanical component with red annotation arrows indicating rotation or movement (no text or symbols present)GARANTIEUITSLUITING
natural_image
Top-down view of a black helmet with visible front and side panels (no text or symbols)natural_image
Silhouette of a human head in profile with a red headband (no text or symbols)FIG. A
ST∅RRELSESTABEL HJELME (VOKSNE)
HJELMST∅RRELSE S/M M/L L/XL
53-56cm 57-59cm 60-62cm
SÅDAN SIDDER DIN HJELM RIGTIGT
OBS!
HAGEREMME MED DOBBELT-D-LUKNING
natural_image
Technical illustration of a car body component with a red X mark indicating a defect or damage (no text or symbols present)natural_image
Technical line drawing of a car interior showing a highlighted component and red arrows indicating direction (no text or symbols)UDTAGNING / INDSÄETNING AF KOMFORT HJELMFOR
natural_image
Technical line drawing of a car interior showing structural components and airflow direction (no text or symbols)
natural_image
Technical line drawing of a helmet component with red arrows indicating movement or force (no text or symbols)

OBS!
natural_image
Diagram of a car's front and side views showing steering wheel and dashboard (no text or labels)GARANTIFRASKRIVELSE
natural_image
Top-down view of a black and white helmet with visible front and side profiles (no text or symbols)natural_image
Illustration of a cable fastening device with red motion arrow indicating speed (no text or symbols)FIG. F

natural_image
Illustration of a cable buckle being lifted with a red arrow indicating motion (no text or symbols)FIG. G
JP
目の保護
natural_image
Technical line drawing of a car interior showing engine, dashboard, and exhaust components (no text or labels)
natural_image
Technical line drawing of a helmet component with red arrows indicating parts of the seat (no text or symbols present)
JP
警告
natural_image
Top-down view of a black helmet with visible front and side panels (no text or symbols)natural_image
Silhouette of a human head in profile with a red headband (no text or symbols)FIG. A
위치
경고
natural_image
Three technical illustrations of a car body panel with red X marks indicating failure or inspection (no text or symbols present)FIG. B FIG. C FIG. D
피팅
natural_image
Illustration of a rope buckle being lifted with a red arrow indicating motion (no text or symbols)FIG. E
natural_image
Illustration of a cable being inserted into a socket (no text or symbols)FIG. F
natural_image
Diagram of a cable harness with a belt and handle, showing motion direction (no text or symbols)FIG. G
KOR
눈 보호
natural_image
Technical line drawing of a car interior with red arrows indicating features, labeled 'FIG. 1' (no text or symbols on the diagram itself)안락한 내부 안감 제거와 설치
natural_image
Technical line drawing of a car interior showing dashboard, seats, and seatbelt components (no text or labels)
natural_image
Technical line drawing of a helmet component with red arrows indicating movement or force (no text or symbols)경고
natural_image
Technical line drawing of a mechanical component with red annotation arrows indicating rotation (no text or symbols)품질보증 안내 (WARRANTY)
natural_image
Top-down view of a black helmet with visible front and side panels (no text or symbols)感謝您購買 iXS Xult 安全帽
natural_image
Side profile of a human head in profile with a red headband and white ear (no text or symbols)FIG. A
安全帽建議尺寸表
natural_image
Three technical line drawings of a mechanical component with red X marks indicating failure or inspection (no text or symbols present)FIG. B FIG. C FIG. D
試戴
natural_image
Illustration of a belt buckle being lifted, showing rope insertion and angle marking (no text or symbols)FIG. E
natural_image
Illustration of a belt drive mechanism with red motion arrow (no text or symbols)FIG. F
natural_image
Illustration of a rope buckle being lifted, showing rope routing and red motion arrows (no text or symbols)FIG. G
CN
眼部防護
natural_image
Technical illustration of a mechanical component with a red X mark indicating a defect or failure (no text or symbols present)EPR 緊急耳襯鬆脫系統
警告
natural_image
Technical line drawing of a car interior showing a highlighted component and red arrows indicating direction (no text or symbols)舒適內襯拆裝方式
natural_image
Technical diagram of a car interior showing internal components and airflow direction (no text or symbols)
natural_image
Technical line drawing of a helmet seat assembly with red arrows indicating components (no text or symbols)
