
SHFR 1450 A1 - Deep fryer SILVERCREST - Free user manual and instructions
Find the device manual for free SHFR 1450 A1 SILVERCREST in PDF.
| Product type | Air fryer |
| Brand | SilverCrest |
| Model | SHFR 1450 A1 |
| Rated power | 1450 W |
| Mains voltage | 220-240 V ~, 50 Hz |
| Protection class | I (earthed plug) |
| Container capacity | Approx. 4 L (MAX mark) |
| Cooking programs | 8 preset programs (including 3 manual) |
| Temperature range | 60-240 °C depending on program |
| Timer | Up to 60 minutes depending on program |
| Mixing function | Yes, with removable stirrer |
| Container material | Non-stick coating |
| Included accessories | Container, grid, stirrer, support, measuring spoon |
| Cleaning | Container, grid, stirrer and measuring spoon dishwasher safe |
| Safety | Automatic shut-off at end of program, cooling ventilation |
| Warranty | 3 years |
| After-sales service | Hotline: 0800 919270 (France) |
| Intended use | Household use only |
| Weight | Approx. 5 kg (estimated) |
| Dimensions (W×D×H) | Approx. 30×30×30 cm (estimated) |
Frequently Asked Questions - SHFR 1450 A1 SILVERCREST
User questions about SHFR 1450 A1 SILVERCREST
0 question about this device. Answer the ones you know or ask your own.
Ask a new question about this device
Download the instructions for your Deep fryer in PDF format for free! Find your manual SHFR 1450 A1 - SILVERCREST and take your electronic device back in hand. On this page are published all the documents necessary for the use of your device. SHFR 1450 A1 by SILVERCREST.
USER MANUAL SHFR 1450 A1 SILVERCREST
natural_image
Black-and-white photo of a modern air fryer with open lid, accompanied by food ingredients and a digital display (no text or symbols on main objects)HEISSLUFTFRITTEUSE
AIR FRYER
FRITEUSE À AIR CHAUD SHFR 1450 A1
DE AT CH
HEISSLUFTFRITTEUSE
Bedienungsanleitung
FR BE
FRITEUSE À AIR CHAUD
Mode d'emploi
CZ
HORKOVZDUŠNÁ FRITÉZA
Návod k obsluze
PT
FRITADEIRA DE AR QUENTE
Operating instructions
NL BE
HETELUCHT FRITEUSE
Gebruiksaanwijzing
ES
FREIDORA DE AIRE CALIENTE
Before reading, unfold the page containing the illustrations and familiarise yourself with all functions of the device.
FR BE
GB/IE Operating instructions Page 25
Inhaltsverzeichnis
Einleitung 2
KOMPERNASS HANDELS GMBH
BURGSTRASSE 21
DE-44867 BOCHUM
DEUTSCHLAND
www.kompernass.com
Rezepte
HINWEIS
Disposal of the packaging 27
Appliance description 28
Technical data 28
Safety information....29
Before first use ....32
Preparing food 33
Programmes 35
Table of cooking times 37
Cleaning and maintenance 38
Storage 39
Troubleshooting 40
Appendix 40
Disposal of the device 40
Kompernass Handels GmbH warranty 41
Service 42
Importer 42
Recipes 43
Chips 43
Potato wedges 43
Sweet potato chips 44
Fruity chicken breast salad....44
Gyros 45
Chicken wings 46
Pork medallions au gratin 46
Marinated sesame salmon 47
Scrambled egg 47
Herb croutons 48
Introduction
Congratulations on the purchase of your new appliance!
You have chosen a modern, high-quality product. These operating instructions are part of the product. They contain important information about safety, usage and disposal. Before using the product, please familiarise yourself with all operating and safety instructions. This appliance may only be used as described and for the purposes indicated. Please pass all product documentation on to any future owner.
Intended use
This appliance is intended exclusively for cooking foods in domestic households. Not for commercial use.
Use the appliance only in dry places, and never use it outdoors.
This appliance is not intended for use...
- in staff kitchens in shops, offices and other commercial areas;
- by customers in hotels, motels or other residential facilities;
-in bed & breakfast accommodation.
WARNING
Danger if not used as intended!
The appliance can be hazardous if used for any other purpose and/or in any other manner than the one intended.
▶ Use the appliance only for its intended purpose.
▶ Observe the procedures described in these operating instructions.
NOTE
- Claims of any kind for damage resulting from misuse, incompetent repairs, unauthorised modification or the use of unauthorised spare parts will not be accepted. The risk shall be borne solely by the user.
Package contents
The appliance is supplied with the following components as standard:
- Air Fryer
- Cooking container
- Cooking grill
• Stirrer - Stand
- Measuring cup
- Operating instructions
1) Remove all parts of the appliance and the operating instructions from the box.
2) Remove all packaging materials and any protective film from the device.
NOTE
▶ Check the package for completeness and signs of visible damage.
▶ If the delivery is incomplete or damage has occurred as a result of defective packaging or during transport, contact the Service hotline (see section Service).
Disposal of the packaging
The packaging protects the appliance from damage during transport. The packaging materials have been selected for their environmental friendliness and ease of disposal, and are therefore recyclable.

Returning the packaging to the material cycle conserves raw materials and reduces the amount of waste that is generated. Dispose of packaging materials that are no longer needed in accordance with applicable local regulations.
NOTE
If possible, keep the original packaging during the warranty period so that the appliance can be properly packed for returning in the event of a warranty claim.
Appliance description
Figure A:
① Lid (outer rim removable)
② Cooking container
③ Removable stirrer
4 Hotplate
⑤ Lid release button
6 SET √ button
⑦ ON/OFF button
8 Display
9 Arrow buttons ▲▼ (increase/reduce time or temperature)
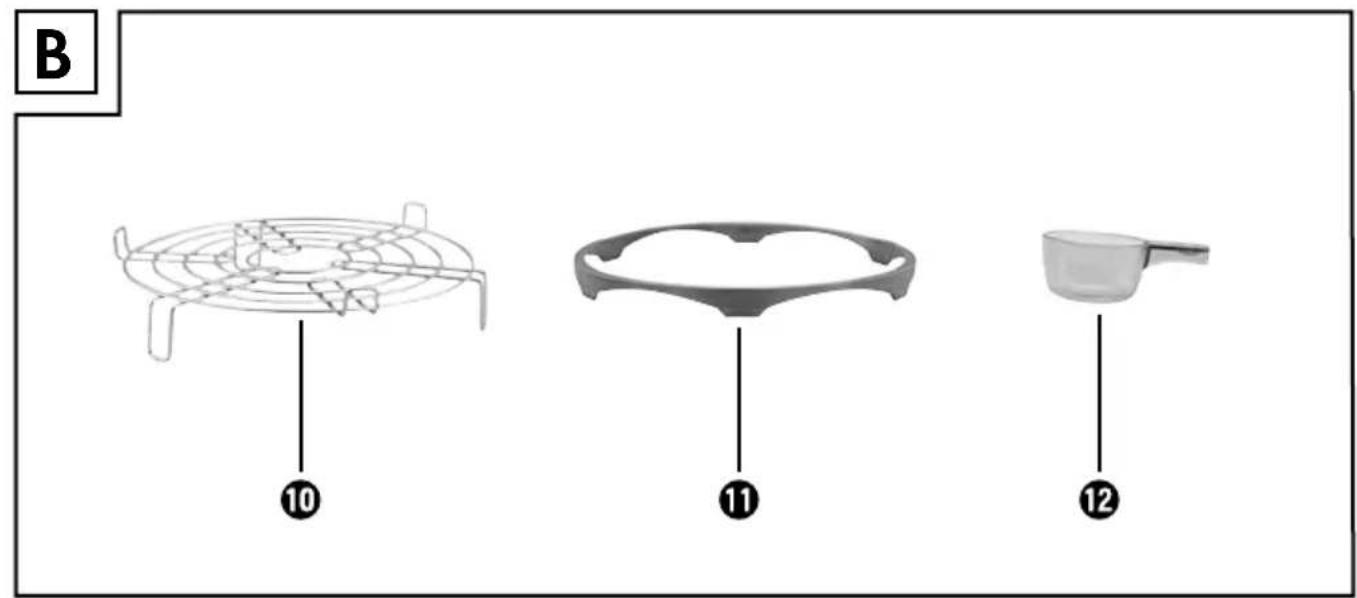
Figure B:
10 Cooking grill
11 Stand
12 Measuring cup
Technical data
| Power supply 220–240 V | ~, 50 Hz |
| Rated power 1450 W | |
| Protection class | I (⊥ protective earth) |
| All of the parts of this appliance that come into contact with food are food-safe. |
Safety information

RISK OF ELECTRIC SHOCK
Before using the appliance, check whether the mains voltage corresponds to the voltage given on the type/rating plate.
- Route the power cable in such a way that it cannot become trapped or damaged in any other way.
▶ Use the appliance only in dry indoor areas, not outdoors.

Never immerse the appliance, mains cable or plug in water or any other liquid! This could lead to a potentially fatal electric shock!
▶ Always disconnect the plug from the mains power socket after use, before cleaning or before moving the appliance.
▶ Do not operate the appliance if it has been dropped or is damaged in any way. Have the appliance checked and/or repaired by qualified technicians if necessary.
To prevent accidents, have defective plugs and/or power cables replaced immediately by an authorised specialist technician or our Customer Service department.
▶ Always use the removable cooking container to prepare food!

WARNING! RISK OF INJURY!
▶ Never use the appliance for purposes other than those described in these instructions. Risk of injury if appliance is misused.
▶ Provide a stable location for the appliance.
- Route the power cable in such a way that no one can tread on it or trip over it.
▶ Install the appliance as close as possible to an electrical power socket. Ensure that the power plug is quickly reachable in case of danger, and also that there is no danger of tripping over the cable.
⚠ WARNING! RISK OF INJURY!
This appliance may be used by children aged 8 and upwards if constantly supervised. This appliance may be used by persons with limited physical, sensory or mental capabilities or lack of experience and knowledge, provided that they are under supervision or have been told how to use the appliance safely and are aware of the potential risks.
- Cleaning and user maintenance must not be performed by children unless they are older than eight years of age and are supervised.
▶ Children younger than 8 years of age must be kept away from the appliance and the power cable.
▶ Do not allow children to use the appliance as a toy.
Hot steam is released during the cooking process, especially when the lid is opened. Keep a safe distance away from the steam.
▶ Parts of the appliance get very hot during use. Touching these may cause serious burns. Therefore, only touch the operating elements and the handle of the cooking container.
- Do not move the appliance while it is in use. There is a risk of being burnt!
- Allow the appliance to cool down before cleaning it or changing the accessories.
▶ Never lift the cooking container out of the housing during use.
⚠ WARNING! RISK OF FIRE!
- Do not use an external timing switch or a separate remote control system to operate the appliance.
- Do not use the appliance near hot surfaces or flammable materials.
▶ Never leave the appliance unattended while it is being used.
▶ Never set up the appliance close to or underneath flammable objects, especially not under curtains or suspended cupboards.
Caution! Hot surface!
CAUTION - APPLIANCE DAMAGE!
- Do not insert anything into or cover the ventilation slits in the appliance lid.
- Do not allow any liquids to get into the ventilation slits in the appliance lid.
▶ To protect the non-stick coating, do not use metallic tools such as knives, forks, etc. If the non-stick coating is damaged, stop using the appliance.
▶ Do not use the appliance without the cooking container inserted! - Hold the appliance from underneath at the side to move it. Do not use the handle on the cooking container.
▶ Use only the accessories recommended by the manufacturer.
Before first use
Before you use the hot air fryer for the first time, please proceed as follows to remove any remaining production residue:

RISK OF ELECTRIC SHOCK
▶ Do not allow the mains cable to come into contact with the hot parts of the hot air fryer. Risk of electric shock!

WARNING - RISK OF INJURY!
Parts of the appliance, especially the hotplate ④, accessories and lid ① get very hot during use. Do not touch these parts. Only touch the operating elements and the handle of the cooking container ②. When removing the food, use oven gloves to prevent burns.
1) Place the appliance on a horizontal, level, stable and heat resistant surface.
NOTE
▶ If you wish to place the hot air fryer below the cooker extraction hood, ensure that the cooker is switched off.
2) Insert the plug into a mains power socket. The time display flashes, there will be a beep and the display ⑧ lights up blue. The appliance is now in standby mode.
3) Press the lid release button ⑤. The appliance lid ① flips open.
4) Remove the cooking grill ⑩, the measuring cup ⑫ and the stand ⑪.
5) Add about 300–500 ml of water to the cooking container ② and close the lid ① by pushing it down until it clicks into place.
6) Press the SET button ⑥ and select the Ⓜ1 programme using the arrow buttons ▲▼⑨. Use the ▲arrow button to navigate clockwise and the ▼arrow button to navigate anticlockwise through the menu. Keep the button pressed down to move quickly through the menu.
7) Press the SET button ⑥ again and the time display flashes. Use the arrow buttons ▲▼⑨ to set a time of 20 minutes. Keep the button pressed down to run through the digits quickly.
8) Press the ON/OFF button ⑦ to start the programme. The display ⑧ lights up orange during operation. When the programme is completed, you will hear ten beeps and the display ⑧ lights up blue. The appliance is back in standby mode. The ventilation in the lid ① runs on for a while to cool down the appliance.
9) Open the lid ①, remove the cooking container ② carefully and pour out the water. Allow the cooking container ② and the appliance to cool down completely.
NOTE
During first use, you may notice a small amount of smoke and a slight odour. This is due to production residue. This is completely normal and harmless. Ensure sufficient ventilation; for example, by opening a window.
▶ Use the supplied stand ⑪ when you put down the hot cooking container ②.
10) Now proceed as described in the section Cleaning and care.
Preparing food
You can prepare foods such as chips, meat, stir-fried vegetables, stews and many more using no more than one measuring cup ⑫ of cooking oil. Adding a suitable cooking oil, makes the food crisper and the taste more intensive. The best oils are neutral-tasting cooking oils such as sunflower or rapeseed oil. You can also use clarified butter (ghee) for frying. Normal butter, margarine or olive oil are not suitable as they not sufficiently heat-resistant.
The hot air circulation ensures that the food is evenly cooked.
WARNING - RISK OF INJURY!
Parts of the appliance, especially the hotplate ④, accessories and lid ① get very hot during use. Do not touch these parts. Only touch the operating elements and the handle of the cooking container ②. When removing the food, use oven gloves to prevent burns.
1) Prepare the foods according to the recipe.
2) Insert the plug into a mains power socket. The numbers flash, you will hear a beep and the display ⑧ lights up blue. The appliance is now in standby mode.
3) Open the lid ①.
4) Remove the accessories that you don't need and add the prepared food:
If you want to use the cooking container ② together with the stirrer ③:
- Remove the cooking grill ⑩ and the stand ⑪ from the cooking container ② if necessary.
- Check whether the stirrer ③ is firmly fitted to the fixture in the cooking container ②. This mixes the food evenly during the cooking process.
- Fill the cooking container ② with the food you want to cook. Do not exceed the MAX marking in the cooking container ②.
- If required, sprinkle a suitable cooking oil evenly over the food. To do this, use the measuring cup 12 and do not exceed the MAX marking on the measuring cup 12 (35 ml).
If you want to use the cooking grill ⑩:
- Remove the stirrer ③ and the stand ⑪ (if present) from the cooking container ②.
- Place the cooking grill ⑩ centrally in the cooking container ② and place the food on the cooking grill ⑩.
-Select the programme "Manual 3" M3: this uses the upper heating element only and not the stirring function.
5) Close the lid ①.
6) Choose a suitable programme, as described in the section Before first use. Press the ON/OFF button ⑦ to start immediately or adjust the time and temperature according to your needs:
- Press the SET button ⑥; the time display flashes.
- Use the arrow buttons ▲▼⑨ to set a suitable time.
- Press the SET button ⑥ again and the temperature display 🔊 flashes.
- Use the arrow buttons ▲▼⑨ to set a suitable temperature.
NOTE
The possible setting range for temperature and time varies depending on the programme. See the table in the section Programmes.
7) Press the ON/OFF button ⑦ to start the cooking process. The display ⑧ lights up orange during operation. Depending on the programme, the heating elements, the stirrer ③ and ventilation start working.
NOTE
The upper heating element may switch off occasionally during use. This means that the temperature required for the cooking processing has been reached. After a short time, the heating element switches back on and resumes heating.
8) When the programme is completed, you will hear ten beeps and the display lights up blue. The appliance is back in standby mode. The ventilation in the lid ① runs on for a while to cool down the appliance.
NOTE
▶ Check the cooking process regularly. The times given in the table and the preprogrammed values in the appliance are orientation guides. The actual cooking times can vary depending on the characteristics of the food.
▶ You can open the lid ① during cooking to check on the cooking progress or to add ingredients. When you open the lid ①, the heating element switches off until the lid ① is closed again.
▶ You can manually adjust the time and temperature while cooking by pressing the SET button ⑥ and continuing as described above.
To stop cooking at any time, press and hold the ON/OFF button ⑦ button for approx. 3 seconds. The appliance will switch back to standby mode; the display ⑧ lights up blue.
▶ Use the supplied stand ⑪ when you put down the hot cooking container ②.
Programmes
The appliance has eight preset cooking programmes. If you select one of the following programmes, the preset cooking times and temperatures will be shown on the display ⑧. These settings can be adjusted to certain degree depending on the recipe you are using or your personal taste.
The three manual programmes offer further customisable presets for those times when none of the other programmes are suitable. You can use them for your own recipes, for example, or for keeping food warm.
NOTE
The possible setting range for temperature and time varies depending on the programme. See the following table.
How to set a programme:
1) Choose a suitable programme, as described in the section Before first use. You will find all the settings of the preset programmes in the following table.
2) Press the ON/OFF button ⑦ to start immediately or adjust the time and temperature according to your needs, as described in the section Preparing food.
| Programme Default setting | Possible adjustment range | |||
 | Chips, frozen◆With stirring function◆Heating element top + bottom | Temperature:240°C200-240°C | ||
| Time: 30 mins. | 25-35 mins. | |||
 | Chips, fresh◆With stirring function◆Heating element top + bottom | Temperature:240°C200-240°C | ||
| Time: 35 mins. | 25-45 mins. | |||
 | Chicken thighs/wings◆With stirring function◆Heating element top + bottom | Temperature:220°C200-240°C | ||
| Time: 20 mins. | 15-35 mins. | |||
 | Fish◆No stirring function◆Heating element top + bottom | Temperature:200°C150-230°C | ||
| Time: 15 mins. | 8-25 mins. | |||
 | Meat◆With stirring function◆Heating element top + bottom | Temperature:230°C200-240°C | ||
| Time: 10 mins. | 10-30 mins. | |||
 | Manual 3◆No stirring function◆Heating element top | Temperature:100°C100-220°C | ||
| Time: 30 mins. | 5-60 mins. | |||
 | Manual 2◆No stirring function◆Heating element top + bottom | Temperature:200°C100-220°C | ||
| Time: 30 mins. | 5-60 mins. | |||
 | Manual 1◆With stirring function◆Heating element top + bottom | Temperature:100°C60-240°C | ||
| Time: 5 mins. | 5-60 mins. | |||
TIP
Waxy potatoes are best-suited for making potato dishes in the hot air fryer. Rinse the sliced potato pieces in fresh water to prevent them sticking to each other during cooking. Dry the potato pieces off carefully before putting them in the hot air fryer.
Table of cooking times
This table provides examples of the temperatures at which specific foods must be cooked and how much time is required. If these details differ from those shown on the packaging of the food, please observe the instructions provided on the packaging.
| Food Weight (g) Addition | Tempera-ture | Time | ||
| Vegetables | ||||
| Chips (frozen) 400 - 200-240°C 25-35 mins. | ||||
| Chips (fresh) 400 5 ml oil 200-240°C 25-45 mins. | ||||
| Potatoes, diced 750 5 ml oil 200-240°C 30-40 mins. | ||||
| Courgettes 500 | 160 ml cold water + 5 ml oil | 240°C 10-15 mins. | ||
| Bell pepper 400 | 160 ml cold water + 5 ml oil | 240°C 8-15 mins. | ||
| Mushrooms 400 5 ml oil | 240°C 10-15 mins. | |||
| Onions | 450 5 ml oil | 240°C 12-15 mins. | ||
| Meat | ||||
| Chicken nuggets (fresh) | 500(30x50 mm) | - | 230°C 20-25 mins. | |
| Pork chops | 350(30x50 mm) | 5 ml oil | 230°C 16-25 mins. | |
| Beef | 400 5 ml oil | 230°C 8-12 mins. | ||
| Chilli con carne | 350 5 ml oil | 230°C 6-12 mins. | ||
| Sausages | 300 - | 230°C 8-12 mins. | ||
| Chicken thigh | 700 - | 230°C 22-28 mins. | ||
| Chicken breast | 350 - | 230°C 10-15 mins. | ||
| Lamb chops | 2-3 pieces(2.5 cm thick) | 5 ml oil | 230°C 20-25 mins. | |
| Fillet of pork (thin) | 250 | 5 ml oil | 230°C | 6-10 min. |
| Food Weight (g) Addition | Temperature | Time | |
| Fish | |||
| Prawns in breadcrumbs 14 pcs. - 200°C 10-15 mins. | |||
| Tilapia 350 - 200°C 12-18 mins. | |||
| Jumbo king shrimp 300 - 200°C 20-25 mins. | |||
| Shrimp 250 - 200°C 15-20 mins. | |||
NOTE
The values given are guidelines. The cooking time and temperature can vary depending on the characteristics of the ingredients and your personal taste.
The values provided refer to the use of the cooking container ② without the cooking grill ⑩. If you want to use the cooking grill ⑩ to cook the food more gently, the cooking times increase.
Use the "Manual 3" programme M3 for cooking with the cooking grill.
Cleaning and maintenance
⚠ WARNING – RISK OF ELECTRIC SHOCK!
▶ Always remove the plug from the mains power socket before cleaning the appliance.
Under no circumstances should the appliance be immersed in liquids! This could result in a potentially fatal electric shock, and the appliance could be damaged.
WARNING - RISK OF BURNS!
▶ Allow the appliance to cool fully before cleaning it.
CAUTION - PROPERTY DAMAGE!
▶ Do not use aggressive or abrasive cleaning agents or materials such as scouring milk or steel wool. These could damage the upper surfaces of the appliance!
Take the hot air fryer apart to make cleaning easier:
1) Hold the rim of the lid firmly in both hands and turn it anticlockwise until it comes out of the mounting.
2) If required, remove the cooking container ② from the appliance and remover the stirrer ③ from the cooking container ② by pulling it upwards.
3) Cleaning the appliance and accessories:
- Clean the cooking container ②, the removed lid rim and the stand ⑪ in warm water with a little washing-up liquid. If required, you can remove the handle of the cooking container ② by pressing the button on the underside of the handle and pulling it off horizontally. Rinse off all parts afterwards with plenty of fresh water.
- Clean the cooking grill ⑩, the stirrer ③ and the measuring cup ⑫ in warm water with some mild washing-up liquid. Afterwards, rinse everything off with fresh water. You can also put these parts in the dishwasher.
■ Clean the appliance with a moist cloth. If required, use a mild washing-up liquid on the cloth. Afterwards, wipe it off with a cloth moistened only with water. Ensure that no liquids penetrate the appliance lid ①!
■ Use a non-scouring sponge and a mild washing-up liquid to remove stubborn dirt residues. Afterwards, wipe with a damp cloth to remove any detergent residue.
■ Dry all parts well before assembly.
4) Hold the lid rim with both hands and push it back onto the lid. Note the corresponding notches. Turn the lid rim clockwise, until you hear it click into place.
5) Push the handle of the cooking container ② back onto the fixture until it clicks into place or place it in the cooking container ② for storage.
6) Place the cooking container ② back in the hot air fryer. Note the handle notch on the housing.
NOTE
Any other servicing should be performed only by an authorized service representative or Customer Service.
Storage
1) To lift or carry the appliance, place both hands under the appliance from the side. Never use the handle on the cooking container ②!
2) The handle of the cooking container ② can be removed for storage and placed in the cooking container ②.
3) Place the stirrer ③ onto the fixture in the middle of the cooking container ②. Place the the cooking grill ⑩ onto this and add the stand ⑪ and the measuring cup ⑫.
4) Store the appliance with the lid ① closed. This ensures that the interior of the appliance and the accessories remain clean and free of dust.
Troubleshooting
| PROBLEM POSSIBLE | CAUSE | POSSIBLE SOLUTIONS |
| The appliance is not working. | The appliance is not connected to a mains power socket. | Connect the appliance to a mains power socket. |
| The appliance is damaged. | Contact the Customer Service department. | |
| The appliance is switched off. | Switch the appliance on by pressing the ON/OFF button 7. | |
| E1 is shown on the display 8. | There is a short circuit in the system. | Pull the plug from the mains socket and contact Customer Service. |
| E2 is shown on the display 8. | There is a short circuit in the system. | Pull the plug from the mains socket and contact Customer Service. |
If the malfunction cannot be corrected using one of the suggestions above, or if you have found some other kind of malfunction, please contact our Customer Service department.
Appendix
Disposal of the device
Never dispose of the appliance in your normal domestic waste. This product is subject to the provisions of European Directive 2012/19/EU.
Dispose of the appliance through an approved disposal facility or your municipal waste facility. Please observe the currently applicable regulations. Please contact your waste disposal centre if you are in any doubt.
This appliance has a 3-year warranty valid from the date of purchase. If this product has any faults, you, the buyer, have certain statutory rights. Your statutory rights are not restricted in any way by the warranty described below.
Warranty conditions
The validity period of the warranty starts from the date of purchase. Please keep your original receipt in a safe place. This document will be required as proof of purchase.
If any material or production fault occurs within three years of the date of purchase of the product, we will either repair or replace the product for you at our discretion. This warranty service is dependent on you presenting the defective appliance and the proof of purchase (receipt) and a short written description of the fault and its time of occurrence.
If the defect is covered by the warranty, your product will either be repaired or replaced by us. The repair or replacement of a product does not signify the beginning of a new warranty period.
Warranty period and statutory claims for defects
The warranty period is not prolonged by repairs effected under the warranty. This also applies to replaced and repaired components. Any damage and defects present at the time of purchase must be reported immediately after unpacking. Repairs carried out after expiry of the warranty period shall be subject to a fee.
Scope of the warranty
This appliance has been manufactured in accordance with strict quality guidelines and inspected meticulously prior to delivery.
The warranty covers material faults or production faults. The warranty does not extend to product parts subject to normal wear and tear or fragile parts such as switches, batteries, baking moulds or parts made of glass.
The warranty does not apply if the product has been damaged, improperly used or improperly maintained. The directions in the operating instructions for the product regarding proper use of the product are to be strictly followed. Uses and actions that are discouraged in the operating instructions or which are warned against must be avoided.
This product is intended solely for private use and not for commercial purposes. The warranty shall be deemed void in cases of misuse or improper handling, use of force and modifications / repairs which have not been carried out by one of our authorised Service centres.
Warranty claim procedure
To ensure quick processing of your case, please observe the following instructions:
■ Please have the till receipt and the item number (e.g. IAN 12345) available as proof of purchase.
■ You will find the item number on the type plate, an engraving on the front page of the instructions (bottom left), or as a sticker on the rear or bottom of the appliance.
If functional or other defects occur, please contact the service department listed either by telephone or by e-mail.
■ You can return a defective product to us free of charge to the service address that will be provided to you. Ensure that you enclose the proof of purchase (till receipt) and information about what the defect is and when it occurred.

You can download these instructions along with many other manuals, product videos and software on www.lidl-service.com.
Service
GB Service Great Britain
Tel.: 0871 5000 720 (£ 0.10/Min.)
E-Mail: kompernass@lidl.co.uk
IE Service Ireland
Tel.: 1890 930 034
(0,08 EUR/Min., (peak))
(0,06 EUR/Min., (off peak))
E-Mail: kompernass@lidl.ie
IAN 292881
Importer
Please note that the following address is not the service address. Please use the service address provided in the operating instructions.
KOMPERNASS HANDELS GMBH
BURGSTRASSE 21
DE-44867 BOCHUM
GERMANY
www.kompernass.com
Recipes
NOTE
The cooking times and temperature settings given in the recipes are recommendations only. They can vary depending on the characteristics of the ingredients and your personal taste!
Chips
Ingredients for 2 people
• 400 g frozen chips
- Salt
Preparation:
1) Place the frozen chips into the hot air fryer and spread a pinch of salt evenly over them.
2) Select the "Chips, frozen" programme ⚙ and cook the chips at 220^ C for around 35 minutes. Adjust the time and temperature manually, as described in the section Preparing food.
Potato wedges
Ingredients for 2 people
• 400 g potatoes (with thin skin)
• 10 ml olive oil
• 2 tbsp. paprika (sweet)
• 1 tsp. chilli powder
• 1 pinch of sugar
- Sea salt
- Pepper
Preparation:
1) Wash the potatoes and cut them into wedges that are not too thick.
2) Mix the potato wedges with the rest of the ingredients in a sufficiently large bowl.
3) Put the mixture into the hot air fryer and cook for about 30-40 minutes at 220^ C until golden brown. Select the "Chips, fresh" programme 📋 and adjust the time and temperature as required.
4) Remove the potato wedges from the hot air fryer and serve immediately.
Sweet potato chips
Ingredients for 2 people
• 400 g sweet potatoes
• 1 tbsp. sesame
• 1 pinch of sea salt
- 5 ml oil
Preparation:
1) Peel the sweet potatoes and cut them into 1 x 1 cm thick fingers.
2) Roast the sesame seeds for about 10 minutes at 170^ C . Select the "Manual 2" programme and adjust the time and temperature accordingly. Stir the sesame occasionally with a suitable tool.
3) Allow the roasted sesame seeds to cool down a little and then crush them together with the sea salt.
4) Add the raw sweet potato chips and the oil to the hot air fryer and cook them for around 20-25 minutes at 220^ C . Select the "Chips, fresh" programme 🌐 and adjust the time and temperature as required.
5) Add the sesame salt mixture to the sweet potato chips and serve immediately.
NOTE
▶ To achieve a crisper result, soak the sweet potato chips in water for 60 minutes before cooking. Dry them thoroughly afterwards and sprinkle them evenly with corn starch.
Fruity chicken breast salad
Ingredients for 4 people
- 500 g chicken
• 1 orange or 1 mango
• 200 g tartar sauce or Miracle Whip - Salt & pepper
• A little fresh lemon juice
• A little Worcestershire sauce
Preparation:
1) Season the chicken with salt and pepper.
2) Place the cooking grill ⑩ together with the cooking container ② into the hot air fryer, arrange the chicken breasts evenly on it and cook at 220^ C for 25–35 minutes. Select the "Manual 3" programme and adjust the time and temperature accordingly. Turn the chicken breast after 10–15 minutes.
3) Allow the chicken breast to cool down and then shred it with your fingers or using 2 forks.
4) Peel the orange or mango and cut it into pieces.
5) Mix the tartar sauce with a couple of dashes of Worcestershire sauce and lemon juice.
6) Now mix the chicken breast, the fruit and the tartar sauce and leave in the refrigerator for a few hours to marinate before serving.
Gyros
Ingredients for 2 people
• 500 g pork (sliced into strips)
• 2 tbsp. gyros spice
- 10 ml oil
- 60 ml cream
• 2 tsp. crème fraîche
- Salt
Preparation:
1) Mix the oil and the gyros spices and then combine with the meat. If possible, leave in the refrigerator for a few hours to marinate.
2) Put the meat into the hot air fryer and cook for about 15 minutes at 200^ C . Select the "Meat" programme and adjust the time and temperature as required. If the gyros starts to stick, mix occasionally with a suitable tool to ensure that it cooks evenly.
3) Add the cream and the crème fraîche and cook for another 2 minutes.
Chicken wings
Ingredients for 2 people
- 6 chicken wings
• 10 ml wine vinegar
• A couple of dashes of Tabasco - Sweet paprika
• A little brown sugar or honey
• 2 tsp. herbs - Salt & pepper
- 5 ml oil
Preparation:
1) Mix the vinegar, Tabasco, sugar or honey, the herbs and spices together in a bowl.
2) Place the chicken wings in a bowl and mix evenly with the marinade. Preferably, leave overnight in the refrigerator to steep.
3) Select the "Chicken thighs/wings" programme ☐ on the hot air fryer and set to 25-35 minutes at 220°C.
4) Add the oil to the hot air fryer and heat for a short time.
5) Add the marinated chicken thighs and cook to the end of the programme. Check the progress occasionally.
Pork medallions au gratin
Ingredients for 4 people
• 400 g pork fillet
- 1-2 tomatoes
- Mozzarella
- Salt & pepper
Preparation:
1) Cut the pork into medallions around 2 cm thick and season with salt and pepper.
2) Cut the tomatoes and the mozzarella into thin slices.
3) Place the cooking grill ⑩ together with the cooking container ② into the hot air fryer, arrange the medallions evenly on it and cook at 220°C for around 12 minutes. Select the "Manual 3" programme (M3) and adjust the time and temperature accordingly.
4) After 12 minutes place one tomato slice and one mozzarella slice onto each of the medallions and cook for another 7 minutes at around 150°C. To do this, reselect the "Manual 3" programme (M3).
Marinated sesame salmon
Ingredients for 4 people
- 500 g salmon
- 1 tbsp. sesame
• 25 ml soya sauce
• 25 ml lemon juice
• 1 tbsp. honey
• 1 tsp. paprika powder - Salt & pepper
Preparation:
1) Stir together the soya sauce with the sesame seeds, lemon juice, honey, paprika and salt and pepper to make a marinade.
2) Cut the salmon into cubes and mix with the marinade.
3) Take the stirrer ③ out of the cooking container ② (if necessary) and cook the marinated salmon at 200°C for about 5 minutes. Select the "Fish" programme 🌐 and adjust the time and temperature accordingly.
4) Check the progress after half of the time and give the food a stir if necessary.
5) Serve immediately.
Scrambled egg
Ingredients for 2 people
• 3 eggs
• 20 g diced ham
• 10 g spring onions
- 50 ml cream
- 1 tomato
- 5 ml oil
- Salt & pepper
• 1 tbsp. mixed frozen herbs
Preparation:
1) Whisk the eggs and milk.
2) Cut the spring onions into rings, chop the tomatoes.
3) Mix the egg mixture with the ham cubes, the vegetables and the herbs and season with a little salt and pepper.
4) Select the "Manual 1" programme Ⓜ on the hot air fryer and set to 8-10 minutes at 150°C.
5) Add the oil to the hot air fryer and heat for a short time.
6) Add the egg mixture and cook for about 8-10 minutes. If necessary, stir occasionally with a suitable tool.
7) Serve immediately.
Herb croutons
Ingredients for 4 people
• 4 slices of bread
• 15 ml melted butter
- 10 ml oil
• 2 tsp. of herbs of your choice
Preparation:
1) Cut the toast into equally sized cubes and add it to the hot air fryer.
2) Mix the oil and the butter with the herbs and spread equally over the bread cubes.
3) Cook at 180°C for about 6-8 minutes in the hot air fryer (depending on the desired degree of browning). Select the "Manual 1" programme and adjust the time and temperature accordingly.
The herb croutons taste really good in salad or as a small snack between meals.
Table des matières
Introduction 50
Utilisation conforme .... 50
KOMPERNASS HANDELS GMBH
BURGSTRASSE 21
DE-44867 BOCHUM
ALLEMAGNE
www.kompernass.com
Recettes
REMARQUE
WAARSCHUWING! GEVAAR VOOR LETSEL!
⚠ WAARSCHUWING! GEVAAR VOOR LETSEL!
⚠ WAARSCHUWING! BRANDGEVAAR!
VAARSCHUWING - GEVAAR VOOR LETSEL!
⚠ WAARSCHUWING - GEVAAR VOOR LETSEL!
⚠ WAARSCHUWING - GEVAAR VOOR VERBRANDING!
KOMPERNASS HANDELS GMBH
BURGSTRASSE 21
DE-44867 BOCHUM
DUITSLAND
www.kompernass.com
Recepten
OPMERKING
• 400 g patat (diepvries)
• Zout
Bereiding:
POZOR - HMOTNÉ ŠKODY!
KOMPERNASS HANDELS GMBH
BURGSTRASSE 21
DE-44867 BOCHUM
NĚMECKO
www.kompernass.com
Recepty
UPOZORNĚNÍ
KOMPERNASS HANDELS GMBH
BURGSTRASSE 21
DE-44867 BOCHUM
ALEMANIA
www.kompernass.com
Recetas
INDICACIÓN
KOMPERNASS HANDELS GMBH
BURGSTRASSE 21
DE-44867 BOCHUM
ALEMANHA
www.kompernass.com
Receitas
NOTA
KOMPERNASS HANDELS GMBH
BURGSTRASSE 21
DE-44867 BOCHUM
GERMANY
www.kompernass.com
Stand der Informationen · Last Information Update · Version des informations
Stand van de informatie · Stav informací · Estado de las informaciones · Estado das informações:
10 / 2017 · Ident.-No.: SHFR1450A1-092017-2