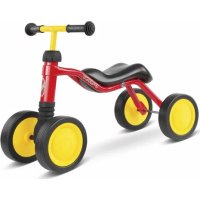
Skyride 247 Alu - Bike Puky - Free user manual and instructions
Find the device manual for free Skyride 247 Alu Puky in PDF.
| Brand | Puky |
| Model | Skyride 247 Alu |
| Product type | Children's bike |
| Category | Bike |
| Wheel size | 24 inches |
| Frame material | Aluminum |
| Minimum saddle height | 65 cm |
| Maximum saddle height | 81 cm |
| Maximum authorized load | 100 kg (rider, bike, and luggage) |
| Bike weight | Approximately 14 kg |
| Braking system | Front and rear rim brakes (V-brakes), rear coaster brake |
| Transmission | Derailleur (depending on version) |
| Chain type | Link chain, adjustable tension |
| Tires | 24 inches, pressure indicated on sidewall |
| Lighting | LED, powered by dynamo (depending on equipment) |
| Included accessories | Bell, reflectors, kickstand |
| Intended use | Paved roads, road, bike path. Not suitable for jumps or rough terrain. |
| Recommended age | From 8 years for public roads (sidewalk allowed up to 10 years) |
| Safety standards | Complies with German Road Traffic Regulations (StVZO). Helmet recommended (DIN EN 1078). |
| Maintenance | Chain lubrication, tire pressure check, pad and rim wear |
| Warranty | Legal warranty for hidden defects |
| Wear parts | Tires, inner tubes, rims, cables, brake pads, chain, chainrings, grips |
Frequently Asked Questions - Skyride 247 Alu Puky
User questions about Skyride 247 Alu Puky
0 question about this device. Answer the ones you know or ask your own.
Ask a new question about this device
Download the instructions for your Bike in PDF format for free! Find your manual Skyride 247 Alu - Puky and take your electronic device back in hand. On this page are published all the documents necessary for the use of your device. Skyride 247 Alu by Puky.
USER MANUAL Skyride 247 Alu Puky
Please read carefully before using the bike for the first time and keep in a safe place for future reference!
IpeaHaayalomNcNoB3ObaHnJeTeTCKoR0 BEnocnPeBa BHMaTeNbHO IpOHTne N 063aTeJbHo COxpaHnTe pykoBOCTBO.
Contents
Inhoudsopgave
Table des matieres
Indhold
Contenuo
SPISTRESCI
Obsah
Indices
Copepkanhe
DE Bedienungsanleitung 4
GB User Manual 13
NL Gebruiksaanwijzing 21
FR Mode d'emploi 30
DK Betjeningsvejledning 39
Istruzioni per I'uso 48
PL Instrukcja obstugi 57
CZ Návod k obsluze 66
ES Manual de instructiones 75
RU RykoBoDCTBO NO 3KcPnyaTauN . . 84

★★
Jahre
years
Congratulations on the purchase of this PUKY road bike. You have acquired a quality product. This User Manual contains information regarding the safe operation and maintenance of this new bicycle.
Should you have any questions, please contact your dealer or contact us via our website: www.puky.de.
The first journey
The initial contact between your child and the public road traffic system makes high requirements of your child and of your supervision obligations. We recommend ensuring that you do not ask too much of your child. The following safety notes must be taken into account if the child does not have a well-founded sense of balance developed by way of early training with a scooter, balance bike or play bike.
First practice cycling with your child in a suitable safe place, before allowing them to ride independently on public roads.
Avoiding risks
Only when your child is capable of riding safely, may you permit them to use the public roads. In order for your child to conduct themselves correctly on the road, it is important that they are familiar with the key basic principles of the highway code. Do not ask too much of your child. Other road users, especially cars, will unsettle a new, inexperienced road user.
Cycling techniques
Before starting your first journey, explain the operation of the bicycle to your child. The child must be allowed time to familiarise themselves with the various components of the bicycle before starting out. This applies, in particular, to the way the brake works. In a safe place (e.g. on a street with no traffic), practice braking with your child. Braking too hard with the brake on the front wheel may cause the front wheel to block resulting in a fall. Take care when wet or on gravel! If bike paths are available, these should be used. Adults should set a good example.
Legal notes:
Your new children's road bike meets all the requirements of the German Road Traffic Licensing Regulations (StVZO) and may thus be used on the roads. The prerequisite for this is that the child is 8, otherwise they must use the pavement. Using the pavement is permitted until they reach the age of 10.
Using the bike
The overall load permitted for this bike (rider plus bicycle and any luggage) is 20^ max. 60kg;24^ max. 100kg . The load that may be placed on the luggage rack will depend on the version of the rack (see the embossing on the rack). Models that are supplied without luggage rack may subsequently be fitted with a suitable rack. For road safety reasons, we do not recommend using the rack for carrying loads.
The bicycle may only be used on paved paths and roads without obstacles. The bicycle is not suitable for jumps, tricks or cross-country use.
The bicycle is not suitable for mounting child seats, trailers or tag along bikes. Pay attention to potential hazards when using and maintaining.
Cycle helmet and clothing
Make sure that your child can be seen in good time. To do this, ensure that the child wears bright, attention-grabbing clothing (if possible, including reflective materials). PUKY recommends wearing a well-fitted helmet in accordance with DIN EN 1078, with CE mark (see PUKY accessories).
Unpacking and scope of delivery
Do not use any sharp objects when opening the packaging and removing protective material. By doing so, you may damage the paint or parts of the bike.
Keep all packaging material out of reach of children.
Remove all parts from the packaging.
Remove the protective material.
Examine the package for completeness and proper condition. If anything is missing, please contact your dealer before you continue to assemble the bike.
Assembly and first use
Prepare the bicycle for use by adjusting it to the height of the child. The saddle is to be set so that at least the toes, but preferably the ball of the foot, reach the ground in order to ensure balance can be achieved when at a standstill. In doing so, the marking showing the minimum insertion depth on the saddle post into the frame tube must be observed. For more information, see below.
When mounting the pedals, observe the right and left threads (labelled on the pedal axis with a R or L in the vicinity of the thread).
After assembly, please conduct a safety check in accordance with the safety checklist!
You will require the following tools for assembly:
Allen key 4 mm, 5 mm and 6 mm
Open-jawed spanner 15mm
Cross-headed screwdriver
Setting the seating position
Setting the height of the saddle:
Figure 1: The saddle can be pulled out after releasing the saddle clamp with the aid of an Allen key, sized 5mm . Set the saddle so that at least the toes, preferably the ball of the foot, reach the ground in order to ensure balance can be achieved when at a standstill.
The minimum insertion depth of the saddle post is labelled with a mark. The saddle post may not be extended out of the frame tube beyond this mark. Then retighten the saddle clamp (torque 5-8 Nm).
Please observe the following principles:
Minimum height of the saddle as follows:
20" Crusader / Skyride: 59 cm
24" Crusader: 67 cm
24" Skyride: 65 cm
Maximum height of the saddle:
20" Crusader: 68 cm Skyride: 71 cm
24" Crusader: 82 cm
24" Skyride: 81 cm
Setting the handlebar height for models with shaft stem:
Figure 2: Please, adjust the seating position so that the child is seated upright and a good overview is ensured. The handlebar, hand brake lever and bell must be easy for the child to reach. The minimum insertion depth of the stem is marked on the stem shaft. The stem may not be extended out of the steerer tube (forked) beyond this mark.
The torque for the clamping of the stem in the steerer tube shaft: 15 Nm.
The torque for the clamping of the handlebar in the stem: 10 Nm.
Setting the handlebar height for models with ahead stem:
The handlebar has been set at the factory to the highest position, thus, all spacers are located under the stem. If required, remove the stem and adjust the spacers to lower the handlebar height.
Figure 3: First undo and remove the ahead cap (1). Then undo the two steerer tube clamping screws (2). Now the stem can be removed from the steerer tube (3). Now set the handlebar height according to requirement.
Possible positions are:
All spacers located under the stem (highest handlebar position, set at the factory)
Spacers over the stem and under (medium handlebar position)
All spacers above the stem (lowest handlebar position)
No spacers may be removed!
Figure 4: After rearranging the spacers, fit the ahead cap again, align the handlebars to be straight in the direction of travel and set the play of the control bearing correctly. To do this, use the setting screw in the ahead cap (1).
Correct setting: The handlebars must be easy to turn without play in the control bearing.
Now tighten up the steerer tube clamping screws of the stem with the correct torque (2).
The torque for the clamping of the stem on the steerer tube shaft: 5-6 Nm. Make sure that the stem is firmly mounted to the steerer tube and cannot rotate.
Adjusting the brakes:
The bicycle has two calliper brakes. The left brake lever operates the brake on the front wheel, the right brake lever operates the brake on the rear wheel. Depending on the model, the bicycle may also have a back pedal brake for the rear wheel.
Figure 5: Centre the brake arms (1) by turning the adjusting screw. The gap between the brake pad < - > rim should be identical on both right and left and the contact between brake pad/rim should be applied simultaneously on both sides when you brake. You will need a cross-headed screwdriver. By turning the screw in, you move the appropriate brake arm away from the rim, turning the screw out moves the screw towards the rim.
It is important that the brake levers are actuated several times so that the tension of the brake arms is evenly distributed to both sides and the settings take effect.
Figure 6: The handle distance (distance of brake lever to handlebar) can be adjusted individually using an Allen key on the brake handle. Please remember that braking must take effect before the brake lever reaches the handlebar!
Figure 7: The tension can be set on the brake handle using the knurled screw.
The brake is set correctly if the brake pads are all approximately 1.5mm from the rims.
Replacing the brake pads
Figure 8: Undo the fastening nut of the brake pad using an Allen key sized 5mm (1) and replace the brake pads.
This means that the brake pads should rest 1 mm below the top edge of the rim (2). If these settings are not correct, loosen the fastening nut of the brake pad (1) with a 5 mm Allen key and align as described above. To do so, pull the brake lever and re-tighten the fastening nut (5-8 Nm).
The tension is to be set so that the brake pads are all approximately 1.5mm from the rims. If subsequent adjustment is necessary, undo the tensioning screw (3) and adjust the tension (tighten the tensioning screw back up using 6-8 Nm!) or carry out the step described in Figure 7.
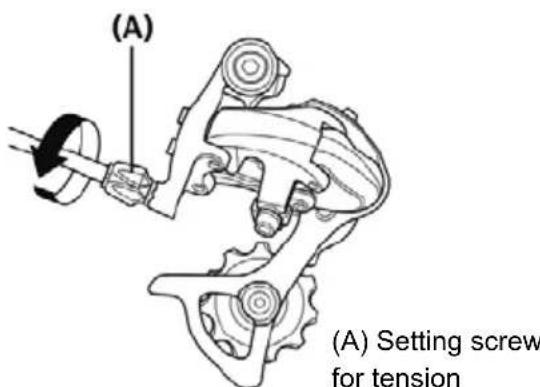
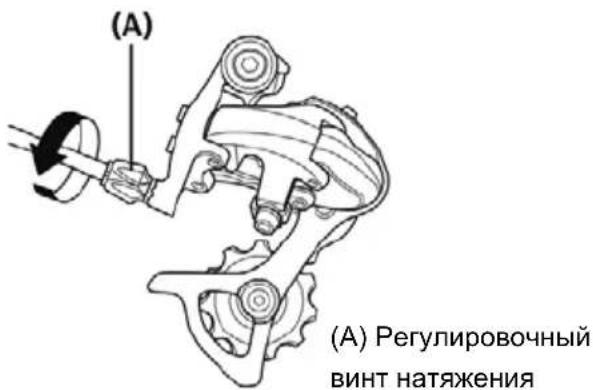
Setting the chain tension (models with gear hub)
The chain should have a vertical play of approximately 1.5cm . The setting of the chain tension is carried out as follows:
Figure 9: Undo both wheel nuts of the rear wheel. Adjust the chain tension by sliding the rear wheel at the dropout. Then tighten the wheel nuts back up again (torque 20Nm ). For models with derailleur gears, the chain tension is regulated via the gears.
Attention should be paid to ensure that the correct chain length is selected when replacing the chain.
Setting the gears (model with 3-gear hub)
Installation of gear stick
Figure 10: Take the gear stick out of the poly bag and insert it into the right side of the rear axle (in driving direction) until it stops at the black spring.
Figure 11: Then you can mount the gearbox onto the rear axle and tighten it with a 5mm Allen key (3-5 Nm.)
No further settings need to be made to the gearbox.
- Setting the limiter for the hardest gear
Rotate the upper setting screw in such a way that, looking from the rear, the guide roller is parallel to the contour line of the smallest gear.
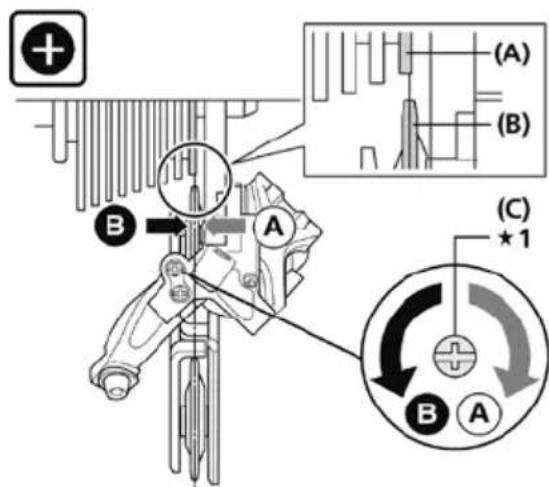
(A) Contour line of the smallest gear
(B) Guide roller
(C) Upper setting screw
- Setting the limiter for the easiest gear
Rotate the lower setting screw in such a way that the guide roller is in position along the largest gear.
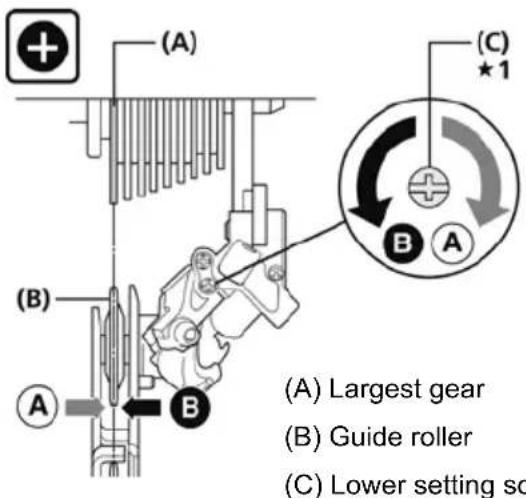
- Setting the tension
Carry out fine adjustments of the gear positions by turning the tension setting screw. Rotating anti-clockwise eases switching to the next largest gear. Rotating clockwise eases switching to the next smallest gear.
You should only carry out setting of the chain gears if you are capable of doing so. If in doubt, have this carried out by a specialist.
Maintenance and care
For reasons of safety, the first check of the bicycle should be carried out after the first few hours of cycling. All maintenance work requires specialist knowledge. Please consult your specialist dealer if you are not sure whether you are able to carry it out yourself.
Cleanliness and corrosion protection
All painted and metallic surfaces can be cleaned and protected using ordinary car care products. Only use environmentally friendly products and never use any aggressive detergents.
Regularly oil the chain (chain or universal oil) and clean when necessary.
The flanks of the rims (braking surfaces) must be grease-free!
The vehicle is to be protected from winter salt and long periods of storage in damp spaces (e.g. garage) are to be avoided. If you do store the bicycle in a damp environment, protect the surfaces of unpainted metal parts (screws, nuts etc.) with a suitable surface seal (e.g. spray wax).
Hub and ball bearing should be checked from time to time by a specialist, adjusted and lubricated as required. Do not use a pressure washer/steam cleaner to clean.
Lights
The lights are based on LED technology which is characterised by its low consumption and long lifetime.
To check the lighting system, raise the front wheel and spin it.
Brakes
Please pay attention to the reduced effect of the brakes on the front wheel when it is wet. Sudden, forceful braking with the rim brake should be avoided (V-brakes in particular have very high braking performance) since the behaviour of the vehicle may suddenly change as a result, which may end in a fall.
On long slopes, long periods of braking with the back pedal back are to be avoided (this results in excess heat to the back pedal brake nave).
If the handbrake lever can be pulled more than half-way to the handlebar, the brake must be adjusted. The braking surfaces must be clean, grease-free and the brake pads must be parallel to one another. This means that the brake pads should rest 1mm below the top edge of the rim and be mounted at a slight angle to rim.
Worn pads must be replaced immediately!
When replacing, make sure you use original pads or ensure that they match the material of the rim at least (e.g. see the label: "Alloy / Alu" for aluminium rims).
Caution in the event of rim wear
Regularly check the state of the rims and pay special attention to the wear groove which surrounds the rim. Consult your specialist workshop in good time (when the groove is almost worn away). Breakage and accident risks!
Check the chain tension and adjust as necessary (if required, by loosening the rear wheel, aligning and tightening again).
Pay attention to the correct air pressure (the prescribed pressure is indicated on the sides of the tyres). Do not repair damaged or deformed parts. Damaged or deformed parts must be replaced. Original replacement parts can be obtained from your PUKY dealer.
Spare parts: Tyres (including tubes), rims, brake cable, brake pads, chain, chain rings, handle covers.
The bicycle is, like all mechanical components, exposed to wear and high loads. Different materials and components may react in different ways to wear or use due to loads. If the intended lifetime of a component is exceeded, it may suddenly fail and this may cause injury to the rider. Any type of crack, groove or change in colour in highly-demanding areas will indicate the expiry of the lifetime of a component and the component should then be replaced.
Practical tip:
Components that are subject to relatively high wear are, in particular: Tyres (including inner tubes), rims in conjunction with rim brakes, brake pads, brake cables, shift cables, chain, chain rings, bearing, handle covers, bulbs of the lighting system.
Subsequent additions or modifications to the bicycle (especially the braking systems) will change the behaviour of the vehicle and may pose a risk. Before replacing components that may affect road-worthiness (in accordance with German StVZO), make sure that the road-worthiness is not affected by the replacement.
Statutory warranty
Statutory warranty covers defects. Damage resulting from improper use, use of force, lack of maintenance, or normal wear and tear, is excluded from such a statutory defect warranty. In accordance with the German StVZO, the following important functions are to be checked prior to each journey!
Saddle
Saddle cannot be rotated (12Nm)^ Saddle post cannot be rotated (5 - 8Nm)^ Minimum insertion depth marking observed Balls of feet reach the ground
Handlebars/stem (models with shaft stem)
Handlebar shaft tube secured and cannot be rotated (15Nm)^ Minimum insertion depth marking observed Handlebars cannot be rotated in stem (10Nm)^ Handles cannot be rotated, upright seating position
Handlebars/stem (models with ahead stem)
Stem cannot be rotated on steerer tube (5 - 6Nm)^ Handlebars cannot be rotated in stem (5 - 6Nm)^ Handles cannot be rotated, upright seating position
Handbrakes
Brake lever cannot be rotated (5Nm)^* easily accessible Functions perfectly Brake pad clean, grease-free, positioned correctly
Back pedal brake
Function checked
Chain
Chain tension is OK (play approximately 1.5cm
Sufficient lubrication Chain guard is complete
Tyres
Sufficient tread/air pressure (air pressure to be maintained is on the tyre)
Wheels
Axle nuts firmly tightened (VR 15 Nm, HR 20 Nm)*
Aligned
Spokes evenly tightened
Pedals
Securely and correctly mounted (check L/R) Rotate easily
Bell
Clear ring, easy to reach
Headlamps
Securely mounted and correctly set/ correctly functioning
Dynamo
Assembly: Direction of operation, easy to operate, play-free/moves easily Good ground contact, connection clean and firm
Rear light
Securely mounted and correctly set/correctly functioning
^(*) Torques of screws in Newton metres
Inleiding
(VR 15 Nm, HR 20 Nm)*

Slavgrij

(VR 15 Nm, HR 20 Nm)*
slagfri
Eger strammet ensartet

Pedaler
(A)cama 6oJIbwa3Bc3OuKa
(B) Haprablaiouoi poJik
(C) HnKnH peRyInpOBOHyB BnHT
- PerynipoBka HataKeHna
BbINOJIHnTe ToHyIO peryInpOBky NIOJOKeHNCTynHeN, NOBOPaUHBa TAnuun peRyInpo
BOUHbBnHT. BpaueHne npOTNB YacOBoN CTpeKKn O6IeRyaeT nepeKIOueHne Ha cNeDyIOuOyO 3Be3DOuy 60JIbSeRo pa3Mepa, BpaueHne NO YACOBoN CTpeIKe - nepeKIOueHne Ha CNeDyIOuOy 3Be3DOuy MehBSeRo pa3Mepa.
PerynpoBky BHeuHero MexaHn3Ma nepeKIOUeHn IpepaI npOn3BOAnTb camocToTeNbHO MOXHO TOnbKO B TOM cnyuae,ecn BBI yBepeHNO BnaDeeTe npoedypoB. B cnyuae comHenry o6paHTtecb K pernoHaJIbHOMy dInepy.
Texo6cnykubahne nyxoid
B ueJx 6e3oNaChOCTn nepByu npOBepKy BeIocnneJa CneDyET npOn3BOaNTb NOcNe HeCKoJIbKnx YacOB OkaTKn. IЯ BbINOJIHeHnaJIb6bIX pa6OT nToTexHnueckOMy o6CnyXnBaHNIO Tpe6YIOTCr CneuaJIbHbIe 3HaHnra. EcnnBbl He yBepeHb I Bco6CTBeHHbIX CnIax, ObaaIaITeCb K perNoHaJIbHOMy dInepy.
UcToa n 3aunTa ot Koppo3nn
Для ounctkn 3aunntb BCex NaKIpOBAHHbIX MeTaNJIuecknx NOBepxHocTe moXHO nC- noIb3OBaTb O6bUHbIe CpeDCTBa dЯ yXoJa 3a aBTOMO6nJAMN. IcNoJIb3yIte TOnbKO ekOJIoRnueckn 6e3oNaChbIe, HearpeCCNBbIe YnCTra- uine CpeDCTBa.
LcIb Heo6xOIMo peyIpaHcMaa3bIbAtb (cMa3OuHbIMMacIaMn IJa cIeIeN nn yHInBepcaJIbHbIM MacIaMn), npH Heo6xOIMocTn YnCTNTb.
Бokobbie NOBepxHocTn 6oObeB (TopMo3HbIX HaKJaIOK) DOJIKNbI 6bITb 6e3KInpeHbI!
TpaHcnpTHoe cpeDCTBO HUxH0 3aunuatab OT COIN DnI NOcbInKu yInu N He DOnyckaTb DIn-TeJbHoro XpaHeHn B cbIpbx NOMeueHnax (Ha npImep, B rapaxe). EcnB eNoCunneB BCE XpaHntcB cbIpOi CpeDe, Ha NobepXHOCTN HeOKpaWeHHbIX MtaJIInuecknx DeTaIeN (BHTbl, raIKN i T.d.) CNe dyet HaheCTN NOxOJaI IN NOBepXHOCTHbIK KOHcepBaHT (Ha npImep, cnpE C BOCKOM).
CneuajnCTdoJKeH BpemO T BpeMeHN npoBepaTb CTyNcbl N 7apNKoONdUHHNKn Ha npabINbHOCTb peYInpOBKN n HaNJIue CMA3K. 3anpeaetcN cNoJIb3OBA Tb JnCTKn TpaHCnOpTHOro CpeCDtBa OUnCTnTeNb BBICOKO To DaBHeHn IIN napocTyHb INHexkTOp
OcBeueHne
Дя OCBeueHnI npIMeHЯETc CBETOJNOHaT EHXOLOrN,OTnUaHOuAraC MaOn IOTpe6JrE MoI MOUHOCTbIO N DInTeJIbHbIM CPOKOM CnyXkbl.
Для поверки CBETOBOE obopydobAHne cIe- dyet npinnoHЯт b nepedHee KOleco n PokpyTNTb erO.
TopMo3a
UyTnte, yTo Ha BnaJHoI DOpore 3ΦΦeKTHB-HOCTb TOPMOKeHnA TopMo3a NpeEhro KOLe-CA CHNJaEtC. CNeDuYET N36BaTb pe3KOrO, CNbHOrTO TOPMOKeHnA C NOMoUsbIO TopMo3a, DeiCTByIoUeRo Ha o6oD (OueHb BbICOKyIO MOuHOCtB TOPMOKeHnA IMeIOT TopMo3a V-Brake), TAK KAc ATo MoKeT npNBecTn K pe3-KOMy N3MeHEnIO XapaKTepNCtNK DVBKeHnB ENoCInPeDa I K NaDeHIO.
Ha dInHHbIX cnYckax cIeDyET n36eRaTb dInTeJIbHOrO TOPMOKeHnC NOMOUsbTOrTOPMo3a, DeIcTBuOJcero npn ObaTHOM HaxKaTn Ha neJaB (ToIgA npoNcxOJNT CINbHbI HarpeB CTUINCbI TOPMO3a).
Ecni pykoTky puHoro TopMo3a MoXHO noTMyTb K pyIIO 6OJIbIe Yem Ha NOJOBHy erO XoJa, TopMO3 Heo6xOIMO NopeRyInpOBaTb. IObepXHOCTn TopMO3HbIX HaKJaOK DoJXHbI 6bITb YNCTbIMN OBe3XInpeHHbIMN, a TopMO3HbIe HaKJaKn DOJXHbI paCNoIaratbcrnapJIeNbHO dpyr dpyry. TopMO3HbIe HaKJaKn DoJXHbI npINeratb
Ha 1 MM HIXe BepxHero Kpaar o6oJa N MOHTNPOBaTbcra C He6oJbUIM HaKIOHOM OTHOCHTeNbHO o6oJa.
N3HOUeHHbIe TOPMO3HbIe HAKJaKn IOpJexKaT HEmeJIeHHoN 3aMeHe!
CneiTe 3a TeM, yTo6bI dIy 3aMeHbI NcNoJIb-3OBaJIncb TOnbKO OpiRnHaJIbHbIe HaKJaAdKn IIN, no KpaHNe Mpe, COOTBETCTByIOUne MaTePnAly o6Oda (HaNPmEp, c MapKnIpOB-Ko: "Alloy / Alu" ("aIbOMnHeBbI cPnaB") dIy aIbOMnHHeBbIX o6OdbE).
Ppeynpexdene o6 n3noce 6oDa
PeyraHno npOBepaIte coCToHne o6oDbE,
Obaaagocoboe BnMaHne Ha o6pa3yUooCra no nepumetpy BCJeCDTBue H3HOca KaHaBky. CBoeBpeMeHHo (noka kaHaBka eue He cnJIbHo 3aMeTHa) ObaaaiTeCb B CBOIO CNEuaJIN3NpOBAHHyo MaTepcKyo. OnaCHOCTb NOLOMKn I HeecactHOrO clyuay!
IpoBepbTe HataJxHHe cenn n noDpepynpyTe ee (pni Heo6XoDMocTn DeMOHTnpOBaTb3aHHee KOJECO, BbIPOBHrTb n CHOba 3aTMyTb).
CJIeIte 3a NOIDepKjaHnem HxHOro daBHeHnBaO3dyxa (OHO yKa3aHo Ha 6OKOBbIX noBepXHOCTx uHH).IOBpeKdEHHbIe nIN deΦopMnPOBaHHbIe dEtAn Tpe6yOT He pEmOH-Ta, a O6raTeNbHO 3aMeHbI. OpiuHaJIbHbIe 3aIpaTm MoJHo npNo6peCTn y pernoHaJIbHoRo DInlepa PUKY.
Быстюнз haиваошпессдетали:шнbl (Вклоча камер),обдь, troc Topmo3a, TOpMo3HbI He KaJadKn, ZeNb, nepeHne WeCTepHn,ObTЯЖka pyueK.
Befocne, KaB CeMexaHnueckne KOHcTpyKuN, POBepKeH N3HOCy N BbICOKM Harpy3- Kam. Pa3hble MaTePnaJIbI y3JIb MoYr T NOHarpy3KOJ no-pa3HOMy pearnpoBaTb Ha N3HOCnn INCTnpanHe. EcN 3aPnAHHPOBAHbI cPoK NcNoJIb3OBAHnJe DeTaJI INpeBbIWeH, OHa MOXeT HeOxNdaHHO BbIIn Ix CTpoR N, BO3MOXHO, pNpUHNt b UsePb BeLoCnneDnCTy. BcKaKOr PoJa TpeUINbI, ZapAnHbI INI IN3MeHENy CBeTa Ha BbICOKHarpyKeHHbIX yAcTkax CBNDeTeJIbCTByOT o6 nCTeueHn CpOK NcNoJIb3OBAHnJe DeTaN, TOrDa DeTaJIb NODLeKHT 3aMeHe.
Ppaktnueckn coBeT:
DeTajMn, NOBepXeHHbIMN cpaBHNTelbHO CINbHOMy N3HOCy, YBJIaHTcR, B YaCTHOCTN: UINHbI (BKNIOUaY KAMepb), OoOdbY BMeCTe TOPMO3AmN, DeiCTByIOUmm Ha o6oD, TOPMO3- HbIE NaK, TPOcbI TOPMO3a, NepeKIOUaIOU- Iue TPOcbI, ZENb, NpeEDHne WeCTepHn, NODuINHNK, O6TJkka pyueK, OCBETJIbHbI ep6obpCbETOBORO 06OpuyOBAHNA.
YctaHOBka DOnOJIHnTeJIbHOrO O6OpyDoBaHnI BHeceHne I3MeHEnB KOHCTpyKcNIO BeNoCInpeDa (npexJe BCero, B TopMO3HbIe YcTpoiCTBa) I3MeHЯIOT erO XODOBbie KaueCTBa N MoTyr CO3dAbATb OnaChbIe CHTyaUHN. Ppr 3ameHne DeTaIeN, KacaIoUxxCsI PaBnI DoNycka TpaHCnOpTHbIX CpeIcTB K DBHXeHnIO (StVZO), CNeIInTe 3a TEM, YTO6bl BCNEIcTBnE 3aMeHbI He 6blIO HApUWeHn COOTBeTCTBnI PpaBnIam DoNYCKa TpaHCnOpTHbIX CpeIcTB K DBHXeHnIO (StVZO).
OTBeTCTBHeHocTb npoDaBa 3a DeΦeKtbl n3dEJIy
DeiCTByeT npedyCMOTpeHHa 3aKoHOdaTeJIbCTBOM OTBeTCTBEHHOCTb IpOdaBuca 3a DepeKtbl N3deJnA. OTBeTCTBeHHOCTb IpOdaBuCA HepacnpocTpapanEeTcHa NoBpeXdEHNBAI3BaHNbIE HeHaJnxJaUeH HApY3KO, CINOBbIM BO3DeICTBnEM, HeIOCTaTOUHbIM TexO6CnyKnBAHNem INI eCTeTBHbIM I3HOCOM. CorlaCHo IpaBnAm Donycka TpaHCnOpTHbIX cpeCTKB K DvHexnIO (StVZO) 3TN BaXhBiE fynKcunnCneDyET npOBeprTb Nepe KaKdoN noe3dko!
CeNo
Cedno c 3aunToI OT npOBopaHbHa (12 Hm)*
CednoepkaTeIb c 3aunToI OT npOBopaHnBaHn (5-8 Hm)*
OTMeTka MInHmAlbHoI rIy6nHbI nOcaKn yUTeHa
CTonbldoctnraot3emn
PyrB/BbIHoc pyra (Moden C BbIHOCOM pyra)
Tpy6a KOnoHKn pyIaunueHa ot npOBopaunBaHn (15 Hm)*
OTMeTka MInHmAlbHoI rIy6nHbI nOcaKn yUTeHa
PyrB BByHocepyraC3aunToOnOT npOBopaUbaHna (10 Hm)*
PnncbI C 3aunToI OT npOBopauBaHna, BepTkaJIbHOe nIOXeHne cnDeHnA
PyrB/BbIHoc pyra (Moden C BbIHOCOM pyra Ahead)
BbHoc pyna Ha pyneBOM cTepxHe c 3aunToIOT npOBopauHBnA (5-6 Hm)
PyrB B BbIHOce pyra C 3aunTOI OT npOBopaUNBaHna (5-6 Hm)*
Pnncblc3aunToOnOTnpOBopaHbHna, BepTKkaIbHoe nOIOKeHne cndehn
PyuHOn TopMo3
PykoTka Topmo3a c 3aunToI OT npOBopaunBaHnra (5HM)^* , xopoio doctynha
Please complete the identification plate on the cycle passport page. The PUKY identification plate is fitted to the vehicles as shown in the drawings below and must be noted down for ordering replacement parts from your dealer.