
Revolution - Baby products JANE - Free user manual and instructions
Find the device manual for free Revolution JANE in PDF.
Frequently Asked Questions - Revolution JANE
User questions about Revolution JANE
0 question about this device. Answer the ones you know or ask your own.
Ask a new question about this device
Download the instructions for your Baby products in PDF format for free! Find your manual Revolution - JANE and take your electronic device back in hand. On this page are published all the documents necessary for the use of your device. Revolution by JANE.
USER MANUAL Revolution JANE
Wide padded straps with the vertical straps inside.
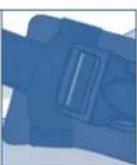
Buckle with side fastening.
Body of the baby carrier that is ergonomically nice and wise. It hugs the wearer's stomach like a second skin.
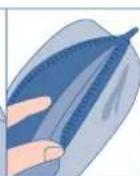
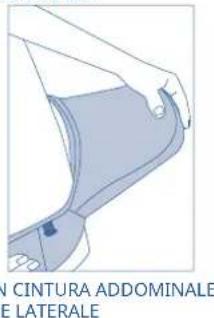
Abdominal belt that can be separated by the zip on the top.
Abdominal belt strap with a large open and close buckle. It has a band to tick any surplat strap in.
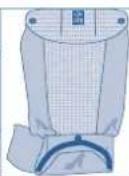
Large front storage pocket. Pocket that turns into the seat of the baby carrier.
Rear central connection strap that balances and joins the straps.
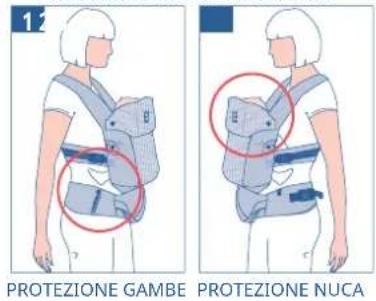
B. Leg insert for use in the central interior part (for the baby's first few months).
- Pocket: mobile holder / card holder, etc. and winter cover of the baby carrier.
Headrest that converts into a neck pad.
Seat side adjustment flaps.
Grey mould insert to turn the pocket into a seat.
Adjustment buttons for using the neck p Adjustable and removable winter cover
(1)Examine the wearer's hands from the cold.
Also , you can also see the video of this game . It ’ s a very good game and it ’ s a great way to get your mind off the problem of playing in the real world . The game is a simple and easy game that you can enjoy while you are on the computer . You can also use the keyboard to play the game . This is a great way to get your mind off the problem of playing in the real world . The game is a simple and easy game that you can enjoy while you are on the computer . You can also use the keyboard to play the game . This is a great way to get your mind off the problem of playing in the real world . The game is a simple and easy game that you can enjoy while you are on the computer . You can also use the keyboard to play the game . This is a
NEWBORN: UP TO 4 MONTHS - 9 KG.
+4 MONTHS - UP TO 15 KG.
WITH OR WITHOUT SEAT (AS REQUIRED) +6 MONTHS - UP TO 18 KG.
WITHOUT SEAT FRONT CARRYING
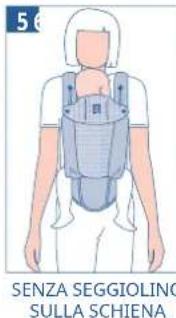
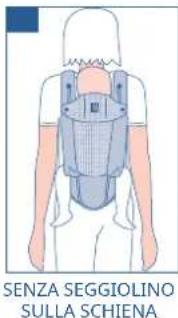
WITHOUT SEAT BACK CARRYING
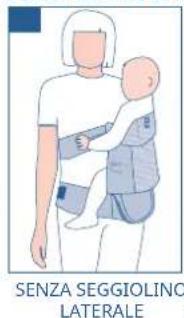
WITHOUT SEAT HIP CARRYING
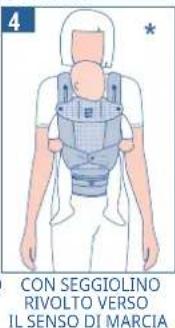
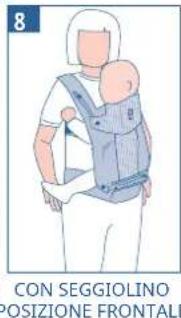
WITH SEAT FRONT CARRYING
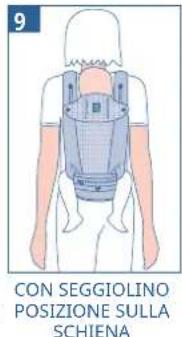
WITH SEAT BACK CARRYING
JUST THE SEAT WITH THE BELT 18 MONTHS - UP TO 22 KG
JUST THE SEAT WITH ABDOMINAL BELT HIP POSITION
ERGONOMIC BABY CARRIER
USER MANUAL
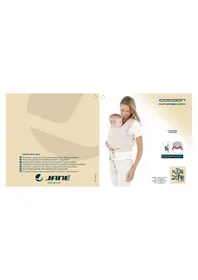
REVOLUTiON is the new baby carrier sling from JANE that includes the latest technology applied to ergonomie baby carriers and guarantees optimal freedom of movement for the weer carrying the baby. This generation of baby carriers "hug" the wearer's body like a second skin and form a comfortable cocoon-nest for the baby strenghtening the bond between mother/ father and child.
Revolution let you carry your child using it as a sling or as a baby carrier as it includes all the parts necessary to use it for all stages, in all positions, from birth until the baby is 18 months old. It is also the only one that has a seat offering the child greater comfort and the best position for the wearer's back.
This baby carrier complies with safety standard UNE EN 13209-2: 2016 (Baby Carriers) and also with the documentation regulating the use of "Children's slings" CEN/TR 16512.
BABY WITH CUSHION INSERT / NECK PAD / WITHOUT RIGID SEAT - UP TO 9 KG.

STRAIGHT STRAPS

EN
BABY WITH CUSHION INSERT / NECK PAD / WITHOUT RIGID SEAT - UP TO 9 KG.
CROSSOVER STRAPS

BABY IN FORWARD FACING POSITION (WITH OR WITHOUT SEAT) - UP TO 15 KG.
EN
BABY IN BACK POSITION WITH OR WITHOUT SEAT - UP TO 18 KG.

POSITION JUST WITH SEAT - UP TO 22 KG.
SUMMER/WINTER OPTION
EN
BABY IN FRONT POSITION WITH OR WITHOUT RIGID SEAT - UP TO 18 KG.


BABY IN HIP POSITION WITH OR WITHOUT RIGID SEAT – UP TO 18 KG.


Features of your new REVOLUTION baby carrier
-
- Safe baby carrier for your child: If you want extra safety in a baby carrier that can be used to carry your child from birth up to walking age, REVOLUTION is part of the kit that your child needs as it is laboratory certified in terms of safety for carrying a child weighing up to 25 kg.
-
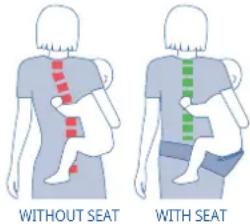
- Comfortable baby carrier for the wearer: If you are looking for a baby carrier that spreads the weight evenly and prevents tiredness when carrying the baby, REVOLUTION has a design that provides comfort for the wearer by spreading the child's weight evenly thanks to the extensive abdominal fabric and its wide dorsal belt, which prevents the all the weight from being concentrated on your back as a conventional baby carrier would do.
In addition, this innovative baby carrier turns into a rigid seat placed on the wearer's hip as the child starts to get heavier. Even though your child is still little and likes to be carried, you can place him in the seat without twisting your spine to keep him in a position that is safe for him and comfortable for you.
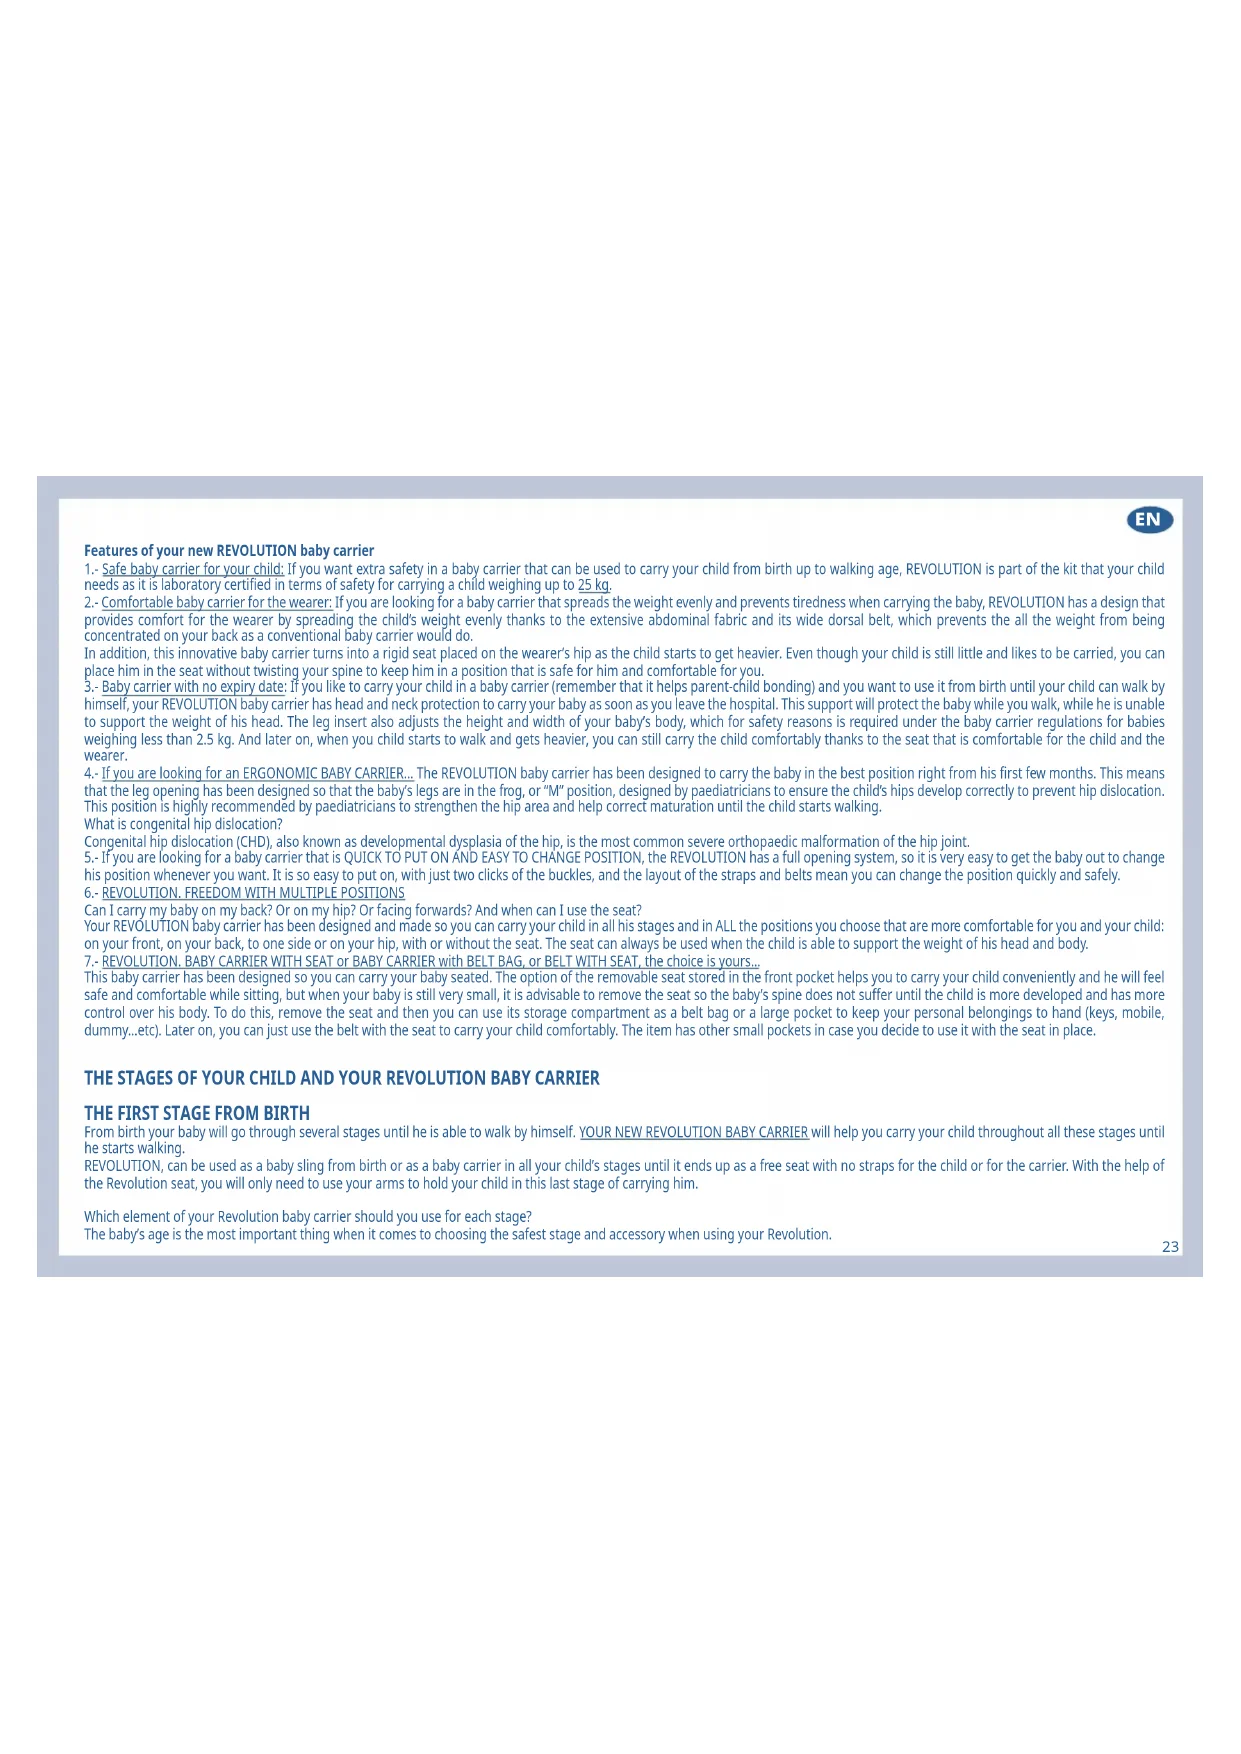
- Baby carrier with no expiry date: If you like to carry your child in a baby carrier (remember that it helps parent-child bonding) and you want to use it from birth until your child can walk by himself, your REVOLUTION baby carrier has head and neck protection to carry your baby as soon as you leave the hospital. This support will protect the baby while you walk, while he is unable to support the weight of his head. The leg insert also adjusts the height and width of your baby's body, which for safety reasons is required under the baby carrier regulations for babies weighing less than 2.5 kg. And later on, when you child starts to walk and gets heavier, you can still carry the child comfortably thanks to the seat that is comfortable for the child and the wearer.
4- If you are looking for an ERGONOMIC BABY CARRIER... The REVOLUTION baby carrier has been designed to carry the baby in the best position right from his first few months. This means that the leg opening has been designed so that the baby's legs are in the frog, or "M" position, designed by paediatricians to ensure the child's hips develop correctly to prevent hip dislocation. This position is highly recommended by paediatricians to strengthen the hip area and help correct maturation until the child starts walking.
What is congenital hip dislocation?
Congenital hip dislocation (CHD), also known as developmental dysplasia of the hip, is the most common severe orthopaedic malformation of the hip joint.
5.- If you are looking for a baby carrier that is QUICK TO PUT ON AND EASY TO CHANGE POSITION, the REVOLUTION has a full opening system, so it is very easy to get the baby out to change his position whenever you want. It is so easy to put on, with just two clicks of the buckles, and the layout of the straps and belts mean you can change the position quickly and safely.
6.- REVOLUTION. FREEDOM WITH MULTIPLE POSITIONS
Can I carry my baby on my back? Or on my hip? Or facing forwards? And when can I use the seat?
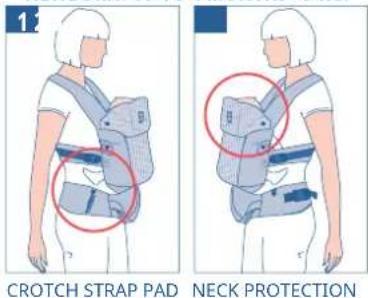
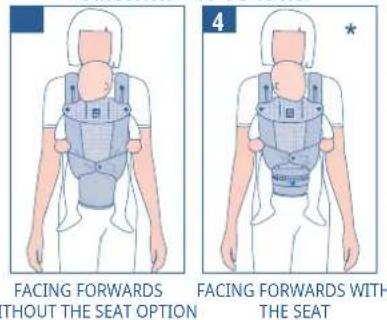
Your REVOLUTION baby carrier has been designed and made so you can carry your child in all his stages and in ALL the positions you choose that are more comfortable for you and your child: on your front, on your back, to one side or on your hip, with or without the seat. The seat can always be used when the child is able to support the weight of his head and body.
7.- REVOLUTION. BABY CARRIER WITH SEAT or BABY CARRIER with BELT BAG, or BELT WITH SEAT, the choice is yours...
This baby carrier has been designed so you can carry your baby seated. The option of the removable seat stored in the front pocket helps you to carry your child conveniently and he will feel safe and comfortable while sitting, but when your baby is still very small, it is advisable to remove the seat so the baby's spine does not suffer until the child is more developed and has more control over his body. To do this, remove the seat and then you can use its storage compartment as a belt bag or a large pocket to keep your personal belongings to hand (keys, mobile, dummy...etc). Later on, you can just use the belt with the seat to carry your child comfortably. The item has other small pockets in case you decide to use it with the seat in place.
From birth your baby will go through several stages until he is able to walk by himself. YOUR NEW REVOLUTION BABY CARRIER will help you carry your child throughout all these stages until he starts walking.
REVOLUTON, can be used as a baby sling from birth or as a baby carrier in all your child's stages until it ends up as a free seat with no straps for the child or for the carier. With the help of the Revolution seat, you will only need to use your arms to hold your child in this last stage of carrying him.
Which element of your Revolution baby carrier should you use for each stage?
The baby's age is the most important thing when it comes to choosing the safest stage and accessory when using your Revolution.
EN
Your REVOLUTION baby carrier includes a completely innovative accessory that is a rigid seat built into the front waist belt. This type of baby carrier will be more comfortable for your child as it will support his bottom and his back in a seat that will make the carrier more relaxed and balanced. It will also be beneficial for you as well, because it means you won't have to bend your back or waist (which normally happens) at all to settle the child's weight at your waist. This version is safe for your child from the age of six months or when your baby is able to sit up unaided without falling.
+0 MONTHS.- FRONT POSITION WITH INSERT + NECK AND HEAD PAD
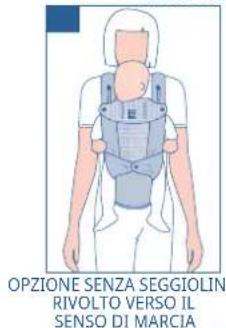
When the baby is newborn up until approximately 412 months old, it is advisable to use the product as a baby carrier with the leg insert option (see page 4 letter H for the close-up of the parts) because the baby will still be very small and his body and legs need to be protected inside the baby carrier. The leg insert will prevent the child from falling through any of the side openings while helping to protect his body and keeping his bottom firmly in the baby carrier, to ensure he is correctly seated inside the REVOLUTION.
During your baby's first stage he should only be carried on your front (facing you). This will strengthen the bond between you while providing maximum protection and warmth.
During this first stage the straps of your REVOLUTION play a very important role. The straps can be worn vertically straight or can be crossed over, but your baby should always be in the front carrying position until he can fully support the weight of his head.
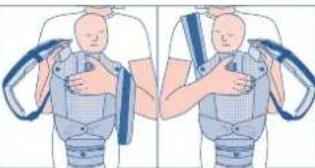
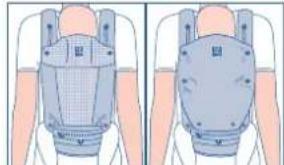
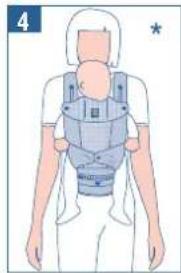
A - WITH VERTICAL STRAPS PARALLEL TO THE WEARER'S ARMS AND WITHOUT THE RIGID SEAT AND WITH THE INNER INSERT
To position the baby in the insert, look at the drawings of the parts on page 4 and follow the steps shown in the drawings on page 6 for support:
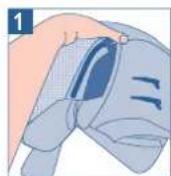
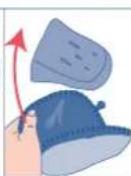
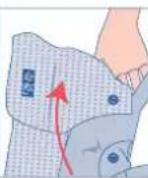
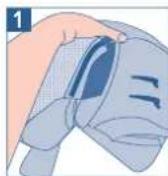
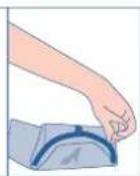
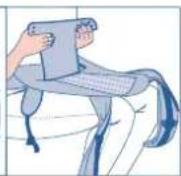
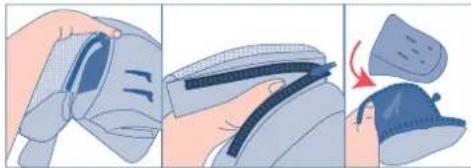
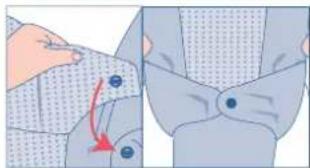
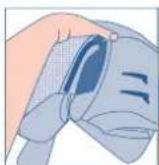
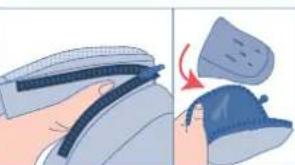
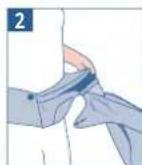
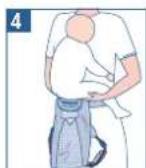
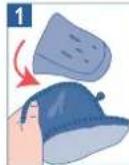
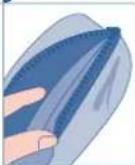
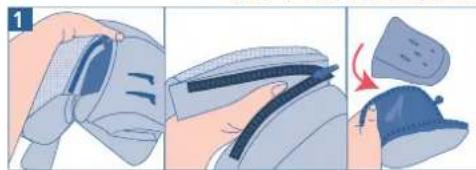
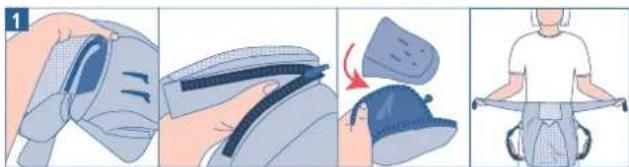
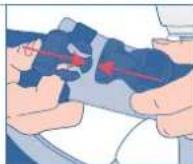
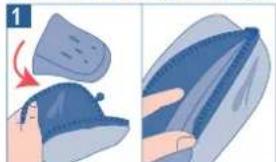
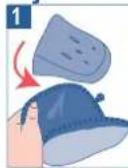
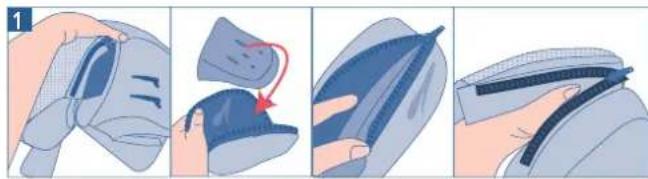
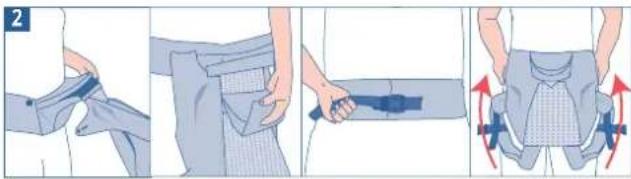
STEP 1. Separate the body of the baby carrier using the zip and remove the seat option included inside the baby carrier as standard when you buy it in the shop. Take the seat out of the front pocket and store it in the box with the instructions for use later on. Fold the pocket in half and close the zip on the pocket that is left when the seat is removed. Fasten the button to fold it completely. You can now use this pocket to hold your personal belongings.
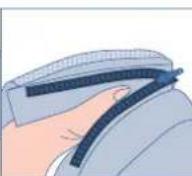
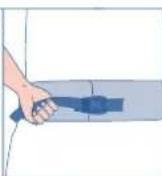
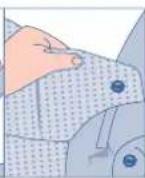
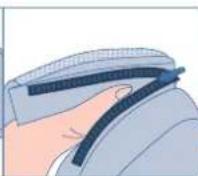
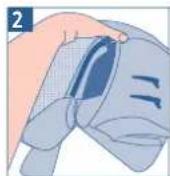
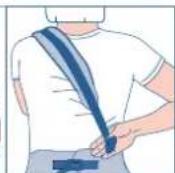
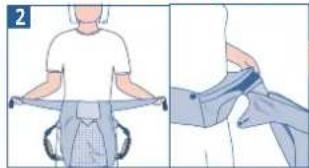
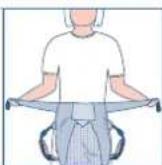
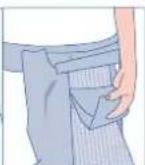
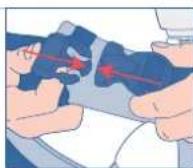
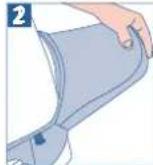
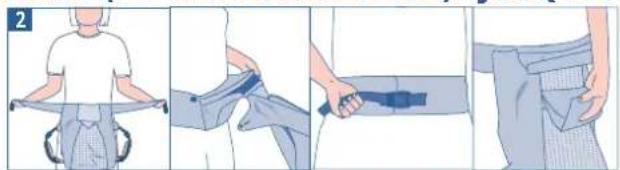
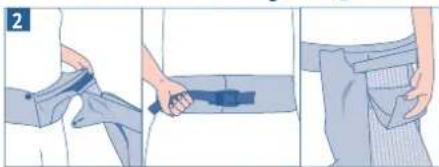
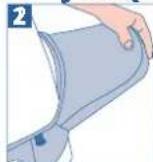
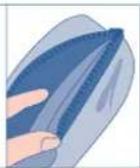
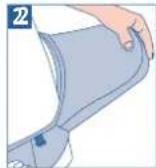
STEP 2. Reattach the body of your baby carrier to the band or abdominal belt this time using the zip along the top. Then, put the baby carrier on using the belt and fasten it at the waist using the buckles. Pull the straps to make sure the belt is the right size for you. The buckle will click when fastened properly. Make sure the buckles are securely fastened and roll up any surplus strap and secure it with the elastic band at the end, so it does not hang down and trip you up. Now attach the straps vertically and fit them (page 4 A) with the fastening buckles (page 4 B). Check that they are parallel to your arms.
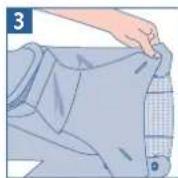
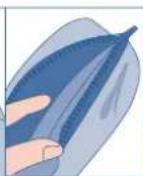
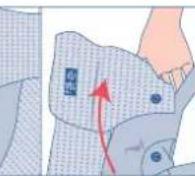
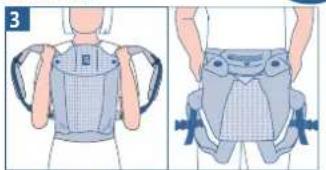
STEP 3. Take the leg insert of your REVOLUTION (see page 4 M) out of the inner pocket where it is kept and pull it towards you so it comes out.
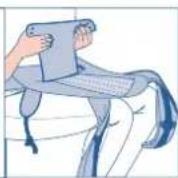
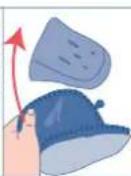
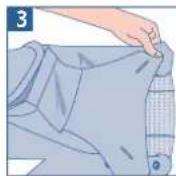
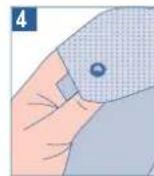
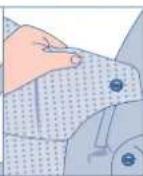
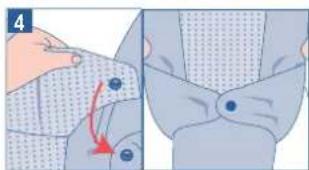
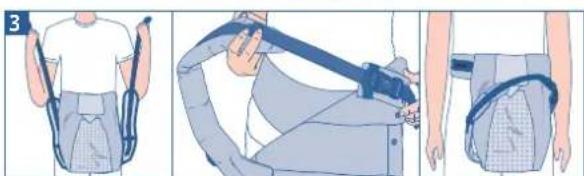
STEP 4. Unfasten the buttons on the flap or head pad attached to the top front part of the baby carrier (page 4 J). Pull the flap up and attach it to each side button of the shoulder straps. The buttons that remain free lower down are now used to fasten the leg insert.
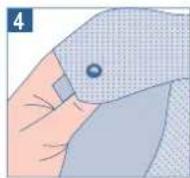
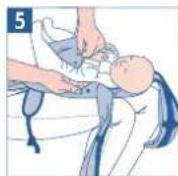
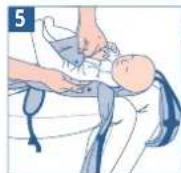
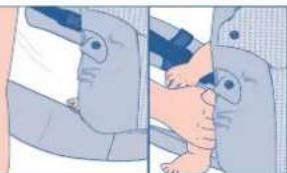
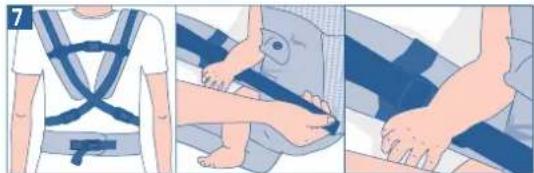
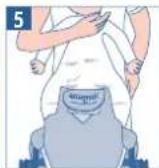
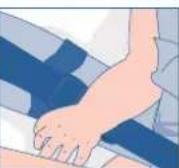
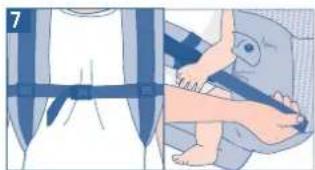
STEP 5. Hold your baby in your arms and sit down. Spread the baby carrier out and lie your baby on his back as if you were going to change his nappy. Then stretch the insert out and pass it between the baby's legs. Fasten the insert by attaching the buttonholes to the buttons on the front. The insert will prevent the baby from slipping through the leg opening of the baby carrier while he is very small. Make sure that these buttons are fastened securely. As your baby grows you will notice that you no longer need to use the leg insert. Gradually his feet will come out through the opening, then his legs up to his knees. That will be the time to forget about using the leg insert and store it in the inner pocket inside the Revolution baby carrier.
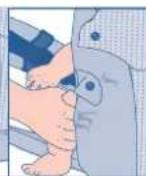
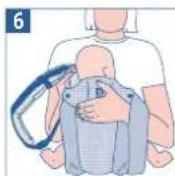
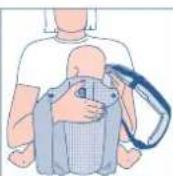
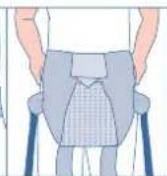
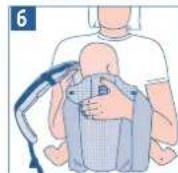
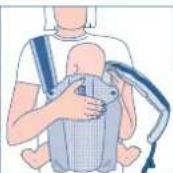
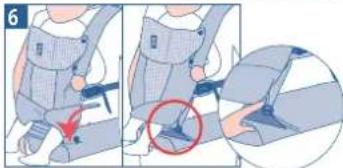
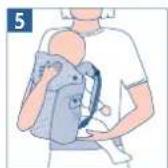
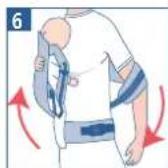
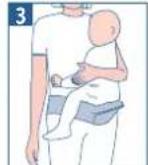
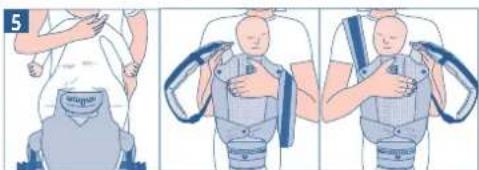
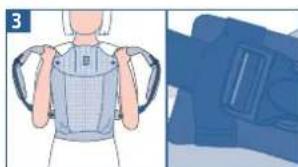
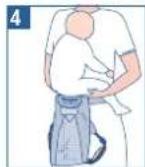
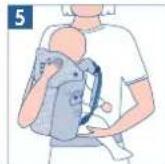
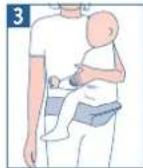
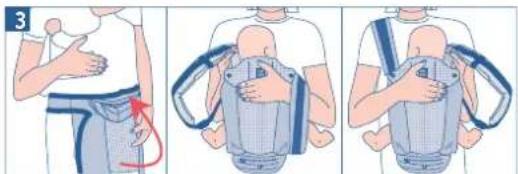
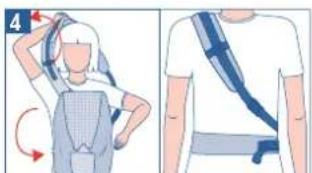
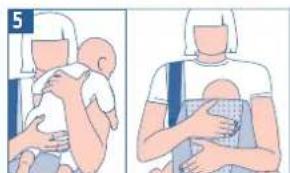
STEP 6. Insert your arm through one of the straps while holding the child against your chest with your other hand. Now change hands and put the second strap on still while holding your child securely against your chest.
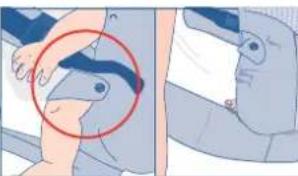
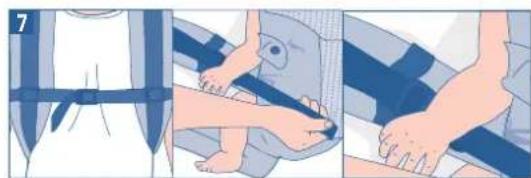
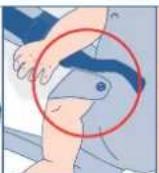
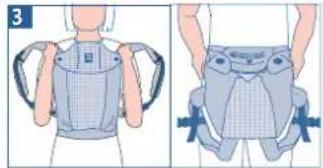
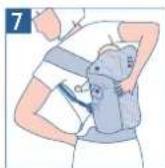
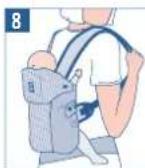
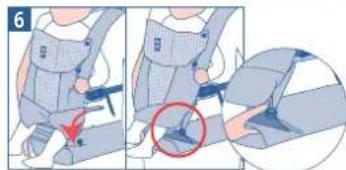
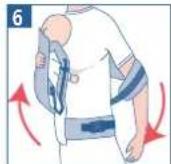
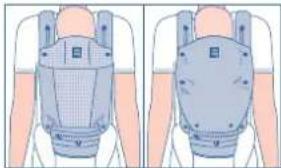
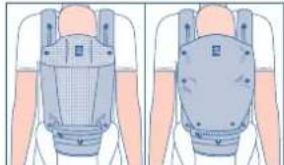
STEP 7. Lastly, fasten the buckle on your back so the straps do not slip off your shoulders and remain perfectly balanced. Check that your shoulders are at the same height and that the central straps are not too close to your neck, they should be in the middle of your back, just at the bottom of your shoulder blades. Adjust the height and width of the straps by pulling them. Notice the comfort of your baby carrier and the protection it gives your child. Be especially careful that none of your child's extremities get caught between the abdominal belt and your waist, or between the side straps. Check your child's mobility constantly.
In a few months you will notice that your child is no longer a newborn and has become a baby with more control over his body, but he still won't be able to support the weight of his head (this will happen when the child is around five or six months old), and your baby may have grown so much that you no longer need the leg insert. However, you should still use the head support element at this stage. That's why it is a good idea to make sure that the head support pad is always well fitted and firm enough to be used as a headrest support.
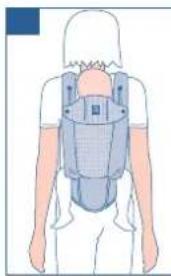
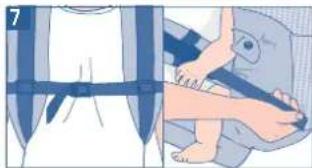
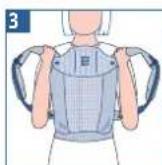
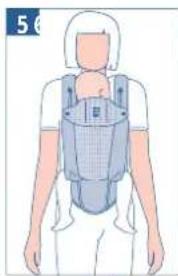
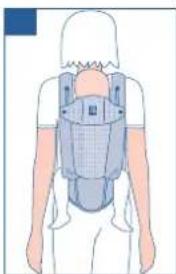
B - WITH STRAPS CROSSED OVER ON THE WEARER'S BACK WITHOUT RIGID SEAT, WITH INTERNAL INSERT
The straps can also be worn crossed over on your back if you find this more comfortable, to do this follow the steps shown in the drawings on page (7) for support:
STEP 1. Separate the body of the baby carrier using the zip and remove the seat option included inside the baby carrier as standard when you buy it in the shop. Take the seat out of the front pocket and store it in the box with the instructions for use later on. Fold the pocket in half and close the zip on the pocket that is left when the seat is removed. Fasten the button to fold it completely. You can now use this pocket to hold your personal belongings.
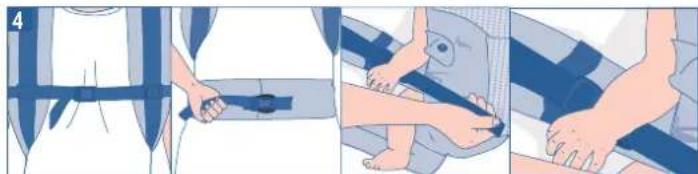
STEP 2. Reattach the body of your baby carrier to the band or abdominal belt this time using the zip along the top. Then, put the baby carrier on using the belt and fasten it at the waist using the buckles. Pull the straps to make sure the belt is the right size for you. The buckle will click when fastened properly. Make sure the buckles are securely fastened and roll up any surplus strap and secure it with the elastic band at the end, so it does not hang down and trip you up. Unfasten the buckles that joint the shoulder straps with the fastening flaps. See page 4 B.
STEP 3. Take the leg insert of your REVOLUTION (see page 4 H) out of the inner pocket where it is kept and pull it towards you so it comes out
STEP 4. Unfasten the buttons on the flap or head pad that was attached to the middle front part of the baby carrier and fasten them to the sides buttons of the straps on your shoulders. The buttons that have become free (higher up) are now used to fasten the leg insert.
STEP 5. Hold your baby in your arms and sit down. Spread the baby carrier out and lie your baby on his back as if you were going to change his nappy. Then stretch the insert out and pass it between the baby's legs. Fasten the insert by attaching the buttonholes to the buttons on the front. The insert will prevent the baby from slipping through the leg opening of the baby carrier while he is very small. Make sure that these buttons are fastened securely. As your baby grows you will notice that you no longer need to use the leg insert. Gradually his feet will come out through the opening, then his legs up to his knees. That will be the time to forget about using the leg insert and store it in the inner pocket inside the Revolution baby carrier.
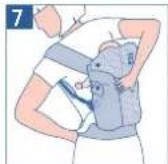
STEP 6. Now holding your baby in your arms, raise the body of the baby carrier without letting go of the baby. Put one of the straps over your shoulder and pass it to the strap buckle on the other side of your body and fasten it while holding the child against your chest with your other hand. Repeat the same action with your other arm.
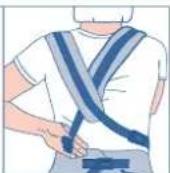
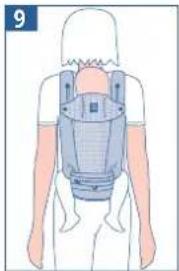
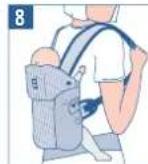
STEP 7. Check that the straps are crossed over on your back and are not twisted and do not slip off your shoulders. Fasten the buckle holding the straps together on your back so they can't slip down your shoulders. Adjust the height and width of the straps by pulling them. Notice the comfort of your baby carrier and the protection it gives your child. Be especially careful that none of your child's extremities get caught between the abdominal belt and your waist, or between the side straps. Check your child's mobility constantly.
In a few months you will notice that your child is no longer a newborn and has become a baby with more control over his body, but he still won't be able to support the weight of his head (this will happen when the child is around five or six months old), and your baby may have grown so much that you no longer need the leg insert. However, you should still use the head support element at this stage. That's why it is a good idea to make sure that the head support pad is always well fitted and firm enough to be used as a headrest support.
SECOND STAGE: WHEN YOUR CHILD CAN SUPPORT THE WEIGHT OF HIS HEAD BY HIMSELF AND NO LONGER NEEDS THE LEG INSERT
At around five or six months old you child will be able to support the weight of his head by himself and will be more eager than ever to discover your world. Now is the time to put the leg insert away inside the baby carier. The baby's bottom will be well positioned in the baby carrier, and you will be able to carry him in all the positions offered by your REVOLUTION and you will also be able to use the rigid seat fitted inside the front pocket of the baby carrier.
To do this, simply open the zip of your baby carrier on the front at the bottom and place the seat mould inside the pocket. Remember that this option means you can no longer use the front packet to carry objects as it is now used as a comfortable and safe seat for your child.
Always make sure that your child is able to support the weight of his head by himself. And that when your child is sitting unaided he does not fall or swing from side to side.
At this stage of your child's growth, you can carry him in the position you choose.
WHAT POSITION SHOULD I CARRY MY CHILD IN TODAY??
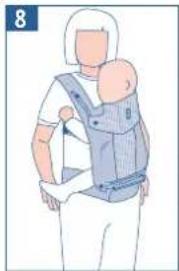
1.- FRONT CARRYING POSITION WITH THE RIGID SUPPORT SEAT
Remember that your baby will go in the front carrying position (on your chest) mainly when he is newborn or when he is under three months old. Follow the steps below that are shown in the diagrams on page 8:
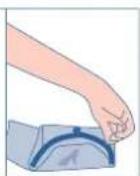
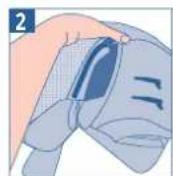
STEP 1. Separate the body of the baby carrier from the abdominal belt and open the storage pocket (page 4 F) to insert the seat mould. Remember that this mould is not a toy, do not let the child play with it or fiddle with it. Once the mould is positioned inside the pocket, check that it is rigid enough to support your baby's weight and that the mould is in perfect condition. Reattach the body of the baby carrier by the zip on the outside edge of the seat.
STEP 2. Put the waist belt or band on. Keep the leg insert inside the inner pocket to keep it out of the way now you no longer need it. Check that your waist belt fits snugly by pulling the straps. Now also fasten the buckles of the shoulder straps to the side straps. Check that they are straight and parallel to your arms.
se secure it with the elastic band at the end, so it does not hang down and trip you up.
STEP 3. Hold your baby in your arms and sit him on the rigid Seat of the baby carrier while keeping one hand on his back to hold him against your chest. With your other hand raise the central part of the body of the baby carrier towards your child's Back. Insert your arm through one of the straps without letting go of your baby and then do the same with the other arm.
STP 4. t o t t t t t t t t t t t t t t t t t t t t t t t t t t t t t t t t t t t t t t t t t t
Be especially careful that none of your child's extremities get caught between the abdominal belt and your waist, or between the side straps.
To place your child in the same position without the seat, follow the same steps above missing out step 1 when the mould is fitted into the central pocket.
EN
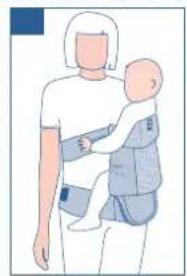
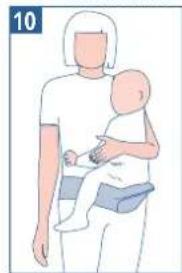
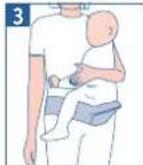
2.- HIP CARRYING POSITION SUPPORTED ON YOUR WAIST WITH THE RIGID SEAT
Remember that for this position your child must be able to support the weight of his head unaided and must no longer need the leg insert. Therefore, he should be over five or six months old. Follow the steps below that are shown in the diagrams on page 8.
STEP 1. If you are going to use the seat for the baby's comfort insert the seat into the front pocket as you did for the previous position.
se
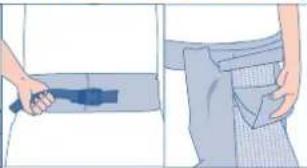
STEP 2. Put the waist belt or band on. Make sure the buckle clicks to indicate it is securely fastened. Make sure the belt is snug and roll up any surplus strap and secure it with the elastic band. Keep the leg insert inside the inner pocket to keep it out of the way now you no longer need it.
Now undo the buckles on the shoulder straps of your baby carrier. The straps should hang down parallel to your arms.
STEP 3. Decide which side you want to carry your child on as you will have to put on the strap on the opposite side first to fasten it to the opposite buckle at your waist. For example, if you want to carry your child on your left hip, fasten the right strap with the buckle on the left side of your waist and vice versa.
STEP 4. Move the baby carrier turning it gently to the hip where you want to carry the child, and pass the strap over your head and shoulders. Now you will have a strap going diagonally across your back.
STEP 5. Carefully pick your child up and hold him on your free shoulder. Slowly position your child inside the baby carrier facing you and raise the child up to the upper part of your body until you child is positioned in the middle of the baby carrier, his forehead should be at the height of your chin. Raise the body part of the baby carrier and hold it against your child's back. Warning: Do not let go of your child and always make sure that he is held safely in your arms.
STEP 6. While holding your child with one hand, (remember that one strap is in place), put the other strap on and pass it to the opposite buckle. Fasten the buckle while your arm holding the baby slides the child into place on the side of your hip. Check that your child is supported on your hip opposite the side that has the shoulder strap on.
NOTE: Bear in mind that the flap or head pad will offer your child greater comfort. Check that none of your child's extremities have got trapped between the abdominal belt and your waist, or between the side or shoulder straps.
To place your child in the same position without the seat, follow the same steps above missing out step 1 when the mould is fitted into the central pocket.
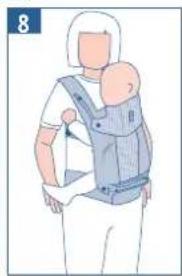
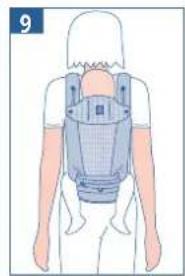
3.- BACK CARRYING POSITION WITH THE RIGID SUPPORT SEAT
Remember that for this position your child must be able to support the weight of his head unaided and must no longer need the leg insert. Therefore, he should be over five or six months old. Follow the steps below that are shown in the diagrams on page 9:
STEP 1. First think about whether it will be more comfortable for your child to use the seat in the front pocket, and if so, follow the steps above to insert the mould into the pocket.
STEP 2. Fasten the abdominal belt and check that the strap buckles of the baby carrier are securely fastened and are parallel to your arms. Loosen the short end of the belt so you can turn it more easily. For this position leave the straps a little bit longer.
STEP 3. Raise the child up to the upper part of your body so your chin touches his forehead and then gradually position his bottom in the seat making sure that your child is well positioned in the middle of the seat.
STEP 4. Raise the whole front part of the body of your baby carrier and hold it against your child's back.
STEP 5. Gently turn the whole baby carrier passing it to your back holding onto the baby carrier and your child's body.
STEP 6. With your free hand hold the child while moving your elbow up over the child's head and putting the strap on. Always keep the straps taut so the child remains safely in contact with the top part of your arm.
STEP 7. Gently push your child a little while using your other hand to gently turn the abdominal belt around. Make sure you keep the straps taut.
STEP 8. Bend down a little keeping your back straight so you can put your other arm through the strap and fasten the buckle on the strap to join them across the front on your chest. And now you can tighten the short end of the belt.
NOTE: If you do not feel confident or are not sure you are able to put your child in this position by yourself, ask another adult to help you to put your child in the seat of the baby carrier and hold the carrier while you put the straps on your back and finally fasten the belt across your chest.
To place your child in the same position without the seat, follow the same steps above missing out step 1 when the mould is fitted into the central pocket.

4.- FORWARD FACING FRONT POSITION WITH THE RIGID SEAT
Your child wants to investigate things more than ever, he wants to see the world exactly how you see it.
Now is the time to change his position and let both of you enjoy your trips out.
Follow the steps below that are shown in the diagrams on page 9
STEP 1.- Make sure that the baby carrier has the seat fitted in the pocket of the front part of your Revolution. If it doesn't, insert the rigid mould into the pocket. Check that the seat is in perfect condition (like when you bought it from the shop) and has not suffered any wear and tear.
STEP 2. Store the leg insert option in its interior pocket and put the abdominal belt around your waist, fasten it with the buckles and adjust it to the right size for you.
STEP 3.- Fasten the buckles of the shoulder straps to the buckles at your waist. They will click when securely fastened. Tighten the abdominal belt by pulling the short end. Roll any surplus strap up and secure it with the elastic band so you do not trip over it. Now you can put your shoulder straps on whenever you need simply by putting your arms through the straps.
STEP 4.- Make sure that the flap or head pad is not in the headrest position. Check that it is fastened down by the buttons on each of your straps (page 4 letter O).
Your child's chin should rest on the top part of the flap or pad. Unfasten the side flaps that fit the seat and join them together so your child can move his legs freely and you are not forcing him into an uncomfortable position (page 4, letter M).
STEP 5. Pick your child up with his back to you and place him in the seat without letting go of him and pressing him against your chest with one hand, use your other hand to hold the base of the baby carrier or the seat.
Rie t i t t t t t t t t t t t t t t t t t t t t t t t t t t t t t t t t t t t t t t t t t t t t t t t t
STEP 6.- If your baby does not weigh enough to be carried in this position, (the child's weight may vary depending on his age, approximately +15 Kilos) you will need to fasten the safety strap, see (P) (page 4 PARTS), to the button found on the abdominal belt to reduce the side space and provide greater side protection.
STEP 7. Reach behind you with your arms and fasten the buckle on your back that holds the straps together so they remain perfectly balanced and do not slip down your arms.
Lastly, make sure that the buckles are securely fastened, and adjust the height and width of the straps by pulling them.
Note: If you want to use this option without the rigid seat, follow the same steps without inserting the grey seat mould into the pocket.
To place your child in the same position without the seat, follow the same steps above missing out step 1 when the mould is fitted into the central pocket.
Your REVOLUTION baby carrier includes a completely innovative accessory that is a rigid seat built into the front waist belt. This type of baby carrier will be more comfortable for your child as it will support his bottom and his back in a seat that will make the carrier more relaxed and balanced. It will also be beneficial for your back and waist as well, because it means you won't have to bend (which normally happens) at all to settle the child's weight at your waist. This version is safe for your child from the age of six months or when your baby is able to sit up unaided without falling.
SUMMER/WINTER OPTION
Your multifunctional, dynamic REVOLUTION baby carrier is designed to be used all year round. Thanks to its removable cover (page 4 N), that can be stored in the pocket of the wide abdominal belt, you will always have the option of wrapping your baby up warmly whenever you need to. It is easily fitted with its 4 buttons on the top part and 2 press studs on the bottom part. See page 9.
EN
SAFETY CHECKS
CHECK THAT YOUR CHILD IS SAFE
1. Check that your child has enough air to breathe properly
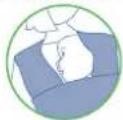
This issue can worry the person carrying the baby, and to make sure your child is getting enough oxygen when in the baby carrier you need to keep checking on him and you also need to check his position regularly. In terms of height, you should be able to kiss the top of his head easily. In terms of width, check that you fit two fingers between your child's chin and your chest or back, and that his nose and mouth are not covered up by any material (See diagram 1).
2. Check that the hood is fitted correctly
If you are using the hood, either because the child is asleep or it is cold...etc, always check that his nose and mouth are not covered up by the hood material or by any other garment that could prevent the child from breathing freely. If you are not using the hood put it away in the front pocket and zip it up so the hood doesn't come out (See diagram 2).
3. Check that the baby's legs are in the correct ergonomic position
It is important to remember that the REVOLUTION is an ergonomic baby carrier, therefore the baby's legs should NEVER hang down like they would in a traditional baby carrier, but you shouldn't force them to be fully open either. The ergonomic position of this baby carrier is for the baby's legs to be in the "M" position. Remember that when the child is small his legs will be inside the baby carrier. As he grows his legs will start to stick out but make sure that your child's feet never get caught between the belt and your body (See diagram 3).
4. Check the diameter of your baby's legs in the insert
Remember that the seat insert is used to prevent the child from slipping out by reducing the diameter of the leg holes at two heights. Make sure that the child's feet never get caught between the abdominal belt and your body (See diagram 4).
5. Check the height of the back straps
All the straps and belts should be fitted at the right height and width for your child's age and weight and for the applicable stage. You also need to make sure that if you lean forward your child is still held securely against your body, in whichever position you are using. Check that the back strap never rides up to the bottom of your neck, it must ALWAYS be in the middle of your upper back, between your shoulder blades (See diagram 5).
6. Check the height of the baby carrier and the headrest
To check that the baby carrier is fitted at the right height and the headrest is used correctly, make sure that the top part, where the headrest of your REVOLUTION begins, comes up to the middle of your baby's ear (See diagram 6)
IMPORTANT! READ CAREFULLY AND KEEP FOR FUTURE REFERENCE

WARNING!!!
-Read the instructions carefully before using this product and keep for future reference.
FOR BABIES WITH LOW BIRTH WEIGHT AND CHILDREN WITH SPECIFIC MEDICAL PROBLEMS, WE RECOMMEND YOU SEEK ADVICE FROM HEALTHCARE PROFESSIONALS BEFORE USING THIS PRODUCT.
The child may be injured if these instructions are not followed.
-Never leave the child unattended.
-Do not use this product if any of the parts are missing, broken or in bad condition.
-Keep away from fire or any source of flames or heat (electric or gas heaters etc...).
-Only use the baby carrier when the adult is standing up or walking.
- Remember that the baby will feel any changes in temperature before an adult will notice.
-Check that all the parts of the baby carrier are correctly in place before positioning the child in it.
- Intended for babies: +0 m. in age and up to 18 kilos. Weight categories: up to 9 Kg. (with leg insert and neck pad); up to 15 Kg. (with leg insert with or without seat, forward facing position); up to 18 Kg. (all other positions with or without seat); up to 22 Kg. just seat with the carrier holding the child.
-WARNING - Your balance may be upset by your movement and that of your child.
-WARNING - Be careful when bending down or leaning forward or to the side.
-WARNING - This baby carrier is not suitable for use while taking part in sports.
Take care when putting the baby carrier on or taking it off. Make sure that none of the parts are missing or broken and/or worn out.
- Avoid any serious injuries caused by the baby falling or slipping. You are responsible for your child's safety. We cannot guarantee the safety of the baby carrier unless these instructions are followed.
-WARNING! Check on your child constantly and make sure that his nose and mouth are not obstructed.
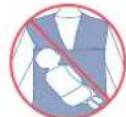
-WARNING! Make sure that the baby's chin is not resting on your chest, as this could impede his breathing and cause suffocation.
IMPORTANT SAFETY INFORMATION
DO NOT use the baby carrier as a fastening device for the child in a motor vehicle or as a car seat.
DO NOT use the baby carrier while taking part in strenuous activities, such as physical exercise or sport.
DO NOT bend over from the waist when bending down; bend your knees to make sur the baby stays safe in the baby carrier. Always keep your trunk upright.
DO NOT clean, run, ski, cook, cycle, ride a horse or use any type of motorised vehicle, etc. while using this baby carrier.
DO NOT drink hot liquid or eat hot food while using this baby carrier.
WARNING ABOUT PRODUCT WEAR AND TEAR:
This product is subject to normal wear and tear over time. The user should inspect this product before each use to check for signs of wear and tear, like rips or loose parts.
DO NOT USE THIS BABY CARRIER IF YOU NOTICE ANY PROBLEMS OR SIGNS OF WEAR AND TEAR.
ALWAYS check that the seams are not torn, the straps are not broken, the fabric is not worn out and the physical support is not damaged before each use.
DO NOT ASSEMBLE OR USE THE BABY CARRIER UNTIL YOU HAVE READ AND UNDERSTOOD THESE INSTRUCTIONS. DO NOT ALTER THE BABY CARRIER IN ANY WAY.
Keep the product out of the reach of children when not in use.
WARNING'S-RISK OF FALLING
Lying down, leaning or tripping up may cause the baby to fall. I important! Keep this information for future reference. Read all the manufacturer's instructions and follow them carefully before using this article. Not following the instructions may cause your baby serious harm or even death.
WARNING! To prevent the risk of falling, make sure that the child is positioned safely in the baby carrier (when not using the leg adjustment option). The carer must be aware that the more active their movements are the greater the risk of the baby falling out of the sling.
EN
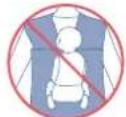
Make sure that this baby carrier is fitted correctly and securely tied as instructed in the product information. Only for use with babies weighing between 5-35 pounds (2.5-18 Kgs). Maximum weight of the baby when using the insert is 9 Kgs. Never carry the baby facing forwards.
YES
Chin up, face visible, nose and mouth free
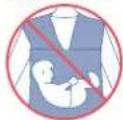
NO
Baby bent forwards with his chin against your chest.
NO
Baby's nose pressed firmly against the carrier.
NO
Baby's face covered
NO
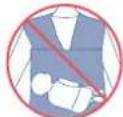
The baby is too low.
HOW TO KEEP YOUR BABY SAFE WHILE USING THIS BABY CARRIER
1) This baby carrier is designed to be used by adults only when they are walking. Check that all the buckles, clips, straps and fasteners are secure before each use.
2) Always check that the baby's nose and mouth are not obstructed by the baby carrier or any clothes to ensure he can always breathe easily.
3) The baby should be facing you until he can hold his head upright by himself.
4) Hold your baby securely until all the buckles and fasteners are closed and the straps have been fastened around the wearer's body.
5) Make sure that the baby's body and skin does not get caught or pinched when closing the buckles or fasteners.
6) Check on the baby regularly to make sure he is not too hot, that the straps are snug but not too tight and that he is held securely.
7) If the baby falls asleep, turn his head to the side so his airway is clear with no obstructions. Fig. A
8) There should always be enough space between your baby's face and your chest to ensure correct ventilation. Follow these instructions to make sure that all the parts of the baby carrier are in the correct position before putting the child in the carrier.
9) Always make sure there is enough space around the baby's face for him to get enough air. Check that his nose and mouth are always clear and not obstructed by the baby carrier or any clothes to make sure he can always breathe easily.
If using the baby carrier while breastfeeding, always move the baby's face away from the breast after feeding.
10) If the child weighs less than 4.5Kg , you need to fasten the leg insert J (shown in the parts list on page 6) to one of the two press studs intended for this as shown on page 6 under letter G. Small children may slip through one of the leg openings. To prevent any falls or strangulation, ALWAYS adjust the leg openings to the smallest size to fit the child.
Check that the baby's extremities are not trapped and that his arms and legs are free.
DO NOT use this baby carrier if it has been exposed to chemical substances or substances that are harmful to health.
DO NOT use this baby carrier is the seams are loose, torn or if the baby carrier is damaged.
DO NOT put sharp objects in the pockets of the baby carrier.
NEVER leave a baby in a baby carrier that is not in use.
NEVER use this baby carrier if the wearer is under the influence of alcohol or drugs or if the wearer is tired or in pain.
NEVER use this baby carrier if the wearer has experienced back problems or physical problems.
NEVER place more than one child in the baby carrier at any time.
NEVER use/wear more than one baby carrier at any time.
DO NOT put anything else in the baby carrier when the child is in it.
DO NOT drink hot liquids or eat hot food while using the baby carrier.
DO NOT lend the baby carrier unless it has been inspected by the manufacturer.
Washing instructions:
e necessary. Machine wash in cold water, on its own, on a delicate wash cycle. Simply hang it out to dry.
Do not use bleach or fabric softener. Do not tumble dry. Do not iron. Composition: 100% cotton twill.
Made in China - Designed in Spain.
USO DEL TUO PORTABEBBE A SECONDA DEL PESO DI TUO FIGLIO
NEONATO:FINOA4MESI-9KG
+4 MESI-FINO A 15 KG
CON O SENZA SEGGIOLINO (A SCELTA) +6 MESI -FINO A 18 KG.
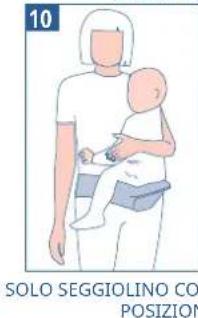
SOLO SEGGIOLINO CON ADULTO CHE SOSTIENE IL BAMBINO 18 MESI - FINO A 22 KG.
ZAINETTO PORTABEBE ERGONOMICO
MANUALE D'USO
AVEC LE SIEGE
FACE AU MONDE
SANS SIEGE
DEVANT
SANS SIEGE
DANSLEDOS

SANS SIEGE
SUR LE COTÉ
AVEC SIEGE
DEVANT
AVEC SIEGE
DANSLE DOS

SIEGSEUELETPORTEUR
18 MOIS - JUSQU'À 22 KG
SIEGE SEUL AVEC CEINTURE ABDOMINALE
SUR LE COTÉ
PORTE-BÉBÉ ERGONOMIQUE
MODE D'EMPLOI
BÉBÉ FACE AU MONDE (AVEC OU SANS SIÈGE) - JUSQU'A 15 KG.
FR
BEBÉ DANS LE DOS AVEC OU SANS SIÈGE - JUSQU'À 18 KG.
AVEC LE SIÈGE SEUL - JUSQU'À 22 KG.
OPTION ÉTÉ / HIVER

FR
BEBÉ DEVANT AVEC OU SANS SIÉGE RIGIDE - JUSQU'À 18 KG.


BEBÉ SUR LE CÔTE AVEC OU SANS SIÈGE RIGIDE - JUSQU'À 18 KG.


FR
POSICAO APENAS COM ASSENTO - ATÉ 22 KG.
OPCAOVERAO/INVERNO
OPTION SOMMER/WINTER
DE
BABY FRONTPOSITION MIT ODER OHNE FESTEN SITZ - BIS 18 KG.
BABY SEITENPOSITION MIT ODER OHNE FESTEN SITZ - BIS 18 KG.


OPTION SOMMER/WINTER
Wide padded straps with the vertical straps inside.
Buckie with side fastening.
Body of the baby carrier that is economically nice and wise. It hugs the wearer's stomach like a second skin.
Abdominal belt that can be separated by the zip on the top.
Abdominal belt strap with a large open and close buckle. It has a band to tuck any surplus strap in.
Large front storage pocket. Pocket that turns into the seat of the baby carrier.
Rear central connection strap that balances and joins the straps.
Leg insert for use in the central interior part (for baby's first few months).
- Pocket: mobile holder / card holder, etc. and winter cover of the baby carrier.
Headrest that converts into a neck pad.
Seat side adjustment flaps.
Grey mould insert to turn the pocket into a seat.
Adjustment buttons for using the neck pad. Adjustable and removable winter cover.
Becarethe wearer's hands from the cold.

- ERGONOMIC BABY CARRIER
- USER MANUAL
- BABY WITH CUSHION INSERT / NECK PAD / WITHOUT RIGID SEAT - UP TO 9 KG.
- STRAIGHT STRAPS
- EN
- CROSSOVER STRAPS
- BABY IN FORWARD FACING POSITION (WITH OR WITHOUT SEAT) - UP TO 15 KG.
- BABY IN BACK POSITION WITH OR WITHOUT SEAT - UP TO 18 KG.
- POSITION JUST WITH SEAT - UP TO 22 KG.
- SUMMER/WINTER OPTION
- Features of your new REVOLUTION baby carrier
- +0 MONTHS.- FRONT POSITION WITH INSERT + NECK AND HEAD PAD
- A - WITH VERTICAL STRAPS PARALLEL TO THE WEARER'S ARMS AND WITHOUT THE RIGID SEAT AND WITH THE INNER INSERT
- B - WITH STRAPS CROSSED OVER ON THE WEARER'S BACK WITHOUT RIGID SEAT, WITH INTERNAL INSERT
- SECOND STAGE: WHEN YOUR CHILD CAN SUPPORT THE WEIGHT OF HIS HEAD BY HIMSELF AND NO LONGER NEEDS THE LEG INSERT
- WHAT POSITION SHOULD I CARRY MY CHILD IN TODAY??
- 1.- FRONT CARRYING POSITION WITH THE RIGID SUPPORT SEAT
- 2.- HIP CARRYING POSITION SUPPORTED ON YOUR WAIST WITH THE RIGID SEAT
- 3.- BACK CARRYING POSITION WITH THE RIGID SUPPORT SEAT
- 4.- FORWARD FACING FRONT POSITION WITH THE RIGID SEAT
- SAFETY CHECKS
- CHECK THAT YOUR CHILD IS SAFE
- Check that your child has enough air to breathe properly
- Check that the hood is fitted correctly
- Check that the baby's legs are in the correct ergonomic position
- Check the diameter of your baby's legs in the insert
- Check the height of the back straps
- Check the height of the baby carrier and the headrest
- IMPORTANT! READ CAREFULLY AND KEEP FOR FUTURE REFERENCE
- WARNING!!!
- IMPORTANT SAFETY INFORMATION
- WARNING ABOUT PRODUCT WEAR AND TEAR:
- WARNING'S-RISK OF FALLING
- HOW TO KEEP YOUR BABY SAFE WHILE USING THIS BABY CARRIER
- Washing instructions:
- USO DEL TUO PORTABEBBE A SECONDA DEL PESO DI TUO FIGLIO
- ZAINETTO PORTABEBE ERGONOMICO
- MANUALE D'USO
- PORTE-BÉBÉ ERGONOMIQUE
- MODE D'EMPLOI
- BÉBÉ FACE AU MONDE (AVEC OU SANS SIÈGE) - JUSQU'A 15 KG.
- BEBÉ DANS LE DOS AVEC OU SANS SIÈGE - JUSQU'À 18 KG.
- AVEC LE SIÈGE SEUL - JUSQU'À 22 KG.
- OPTION ÉTÉ / HIVER
- FR
- BEBÉ DEVANT AVEC OU SANS SIÉGE RIGIDE - JUSQU'À 18 KG.
- BEBÉ SUR LE CÔTE AVEC OU SANS SIÈGE RIGIDE - JUSQU'À 18 KG.
- POSICAO APENAS COM ASSENTO - ATÉ 22 KG.
- OPCAOVERAO/INVERNO
- OPTION SOMMER/WINTER
- DE
- BABY FRONTPOSITION MIT ODER OHNE FESTEN SITZ - BIS 18 KG.
- BABY SEITENPOSITION MIT ODER OHNE FESTEN SITZ - BIS 18 KG.
Brand : JANE
Model : Revolution
Category : Baby products