
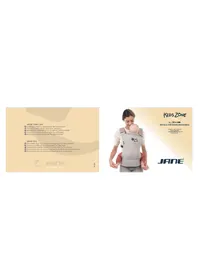
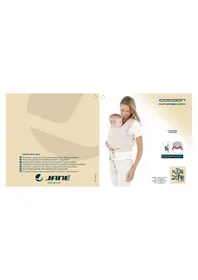
Auto Sport - Baby products JANE - Free user manual and instructions
Find the device manual for free Auto Sport JANE in PDF.
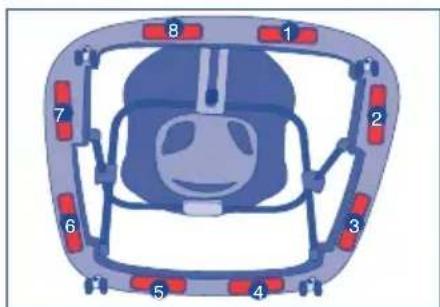
| Product type | Baby walker with activity tray |
| Recommended age | From 6 months (when the child can sit up independently) |
| Maximum supported weight | 12 kg |
| Tray power supply | 2 AA batteries (1.5 V) (not included) |
| Main materials | Plastic |
| Adjustable height | Yes, via safety push button |
| Number of wheels | 4 upper wheels |
| Safety stoppers | 8 lower stoppers |
| Rearview mirror | Yes, removable |
| Activity tray | Removable, with electronic games (sounds/lights) |
| Type of use | Indoor, on flat surfaces |
| Maintenance | Clean plastic parts with a damp cloth and mild soap |
| Seat washing | By hand, drying at room temperature |
| Safety | Never leave child unsupervised; avoid stairs, uneven surfaces, heat sources |
| Warranty | Compliant with Legislative Royal Decree 1/2007 of November 16; keep the receipt |
Frequently Asked Questions - Auto Sport JANE
User questions about Auto Sport JANE
0 question about this device. Answer the ones you know or ask your own.
Ask a new question about this device
Download the instructions for your Baby products in PDF format for free! Find your manual Auto Sport - JANE and take your electronic device back in hand. On this page are published all the documents necessary for the use of your device. Auto Sport by JANE.
USER MANUAL Auto Sport JANE
IMPORTANT! READ CAREFULLY AND KEEP FOR FUTURE REFERENCE
Your child may be hurt if you do not follow the instructions.
WARNING
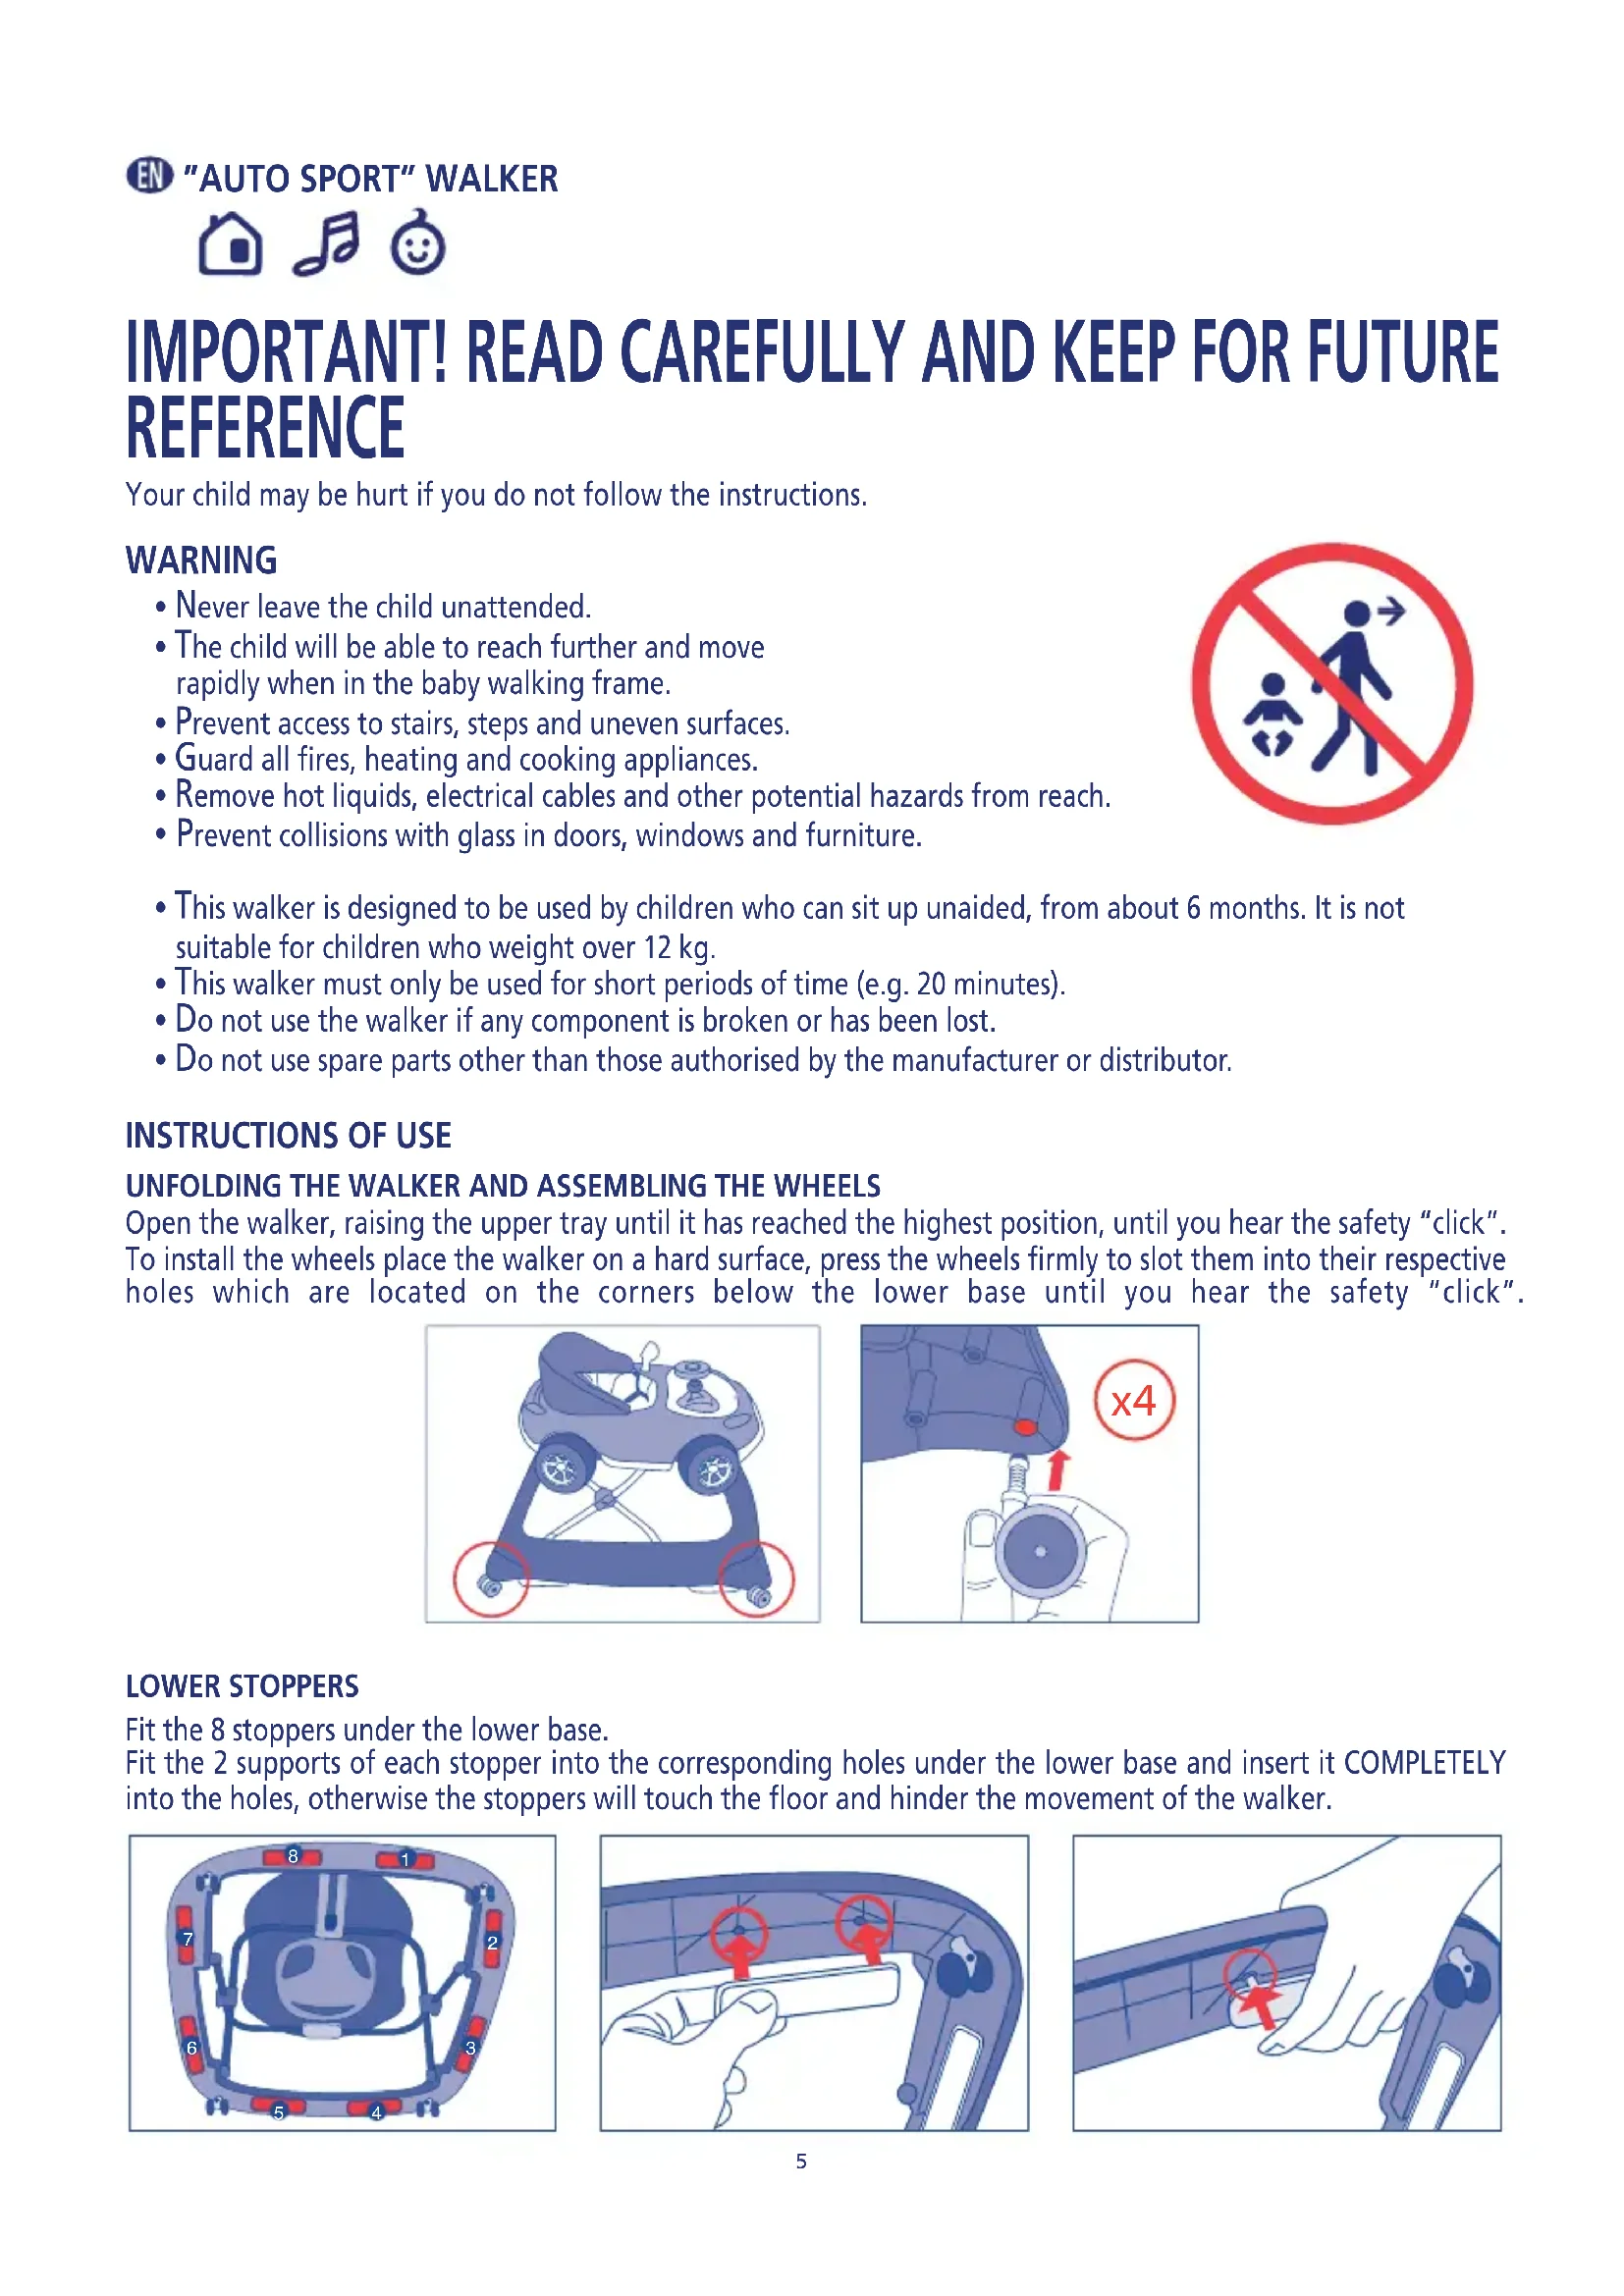
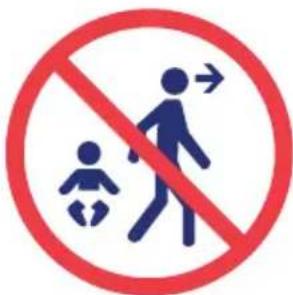
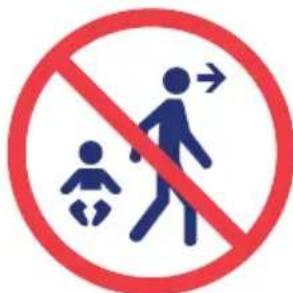
- Never leave the child unattended.
The child will be able to reach further and move rapidly when in the baby walking frame. - Prevent access to stairs, steps and uneven surfaces.
- Guard all fires, heating and cooking appliances.
- Remove hot liquids, electrical cables and other potential hazards from reach.
- Prevent collisions with glass in doors, windows and furniture.
- This walker is designed to be used by children who can sit up unaided, from about 6 months. It is not suitable for children who weight over 12kg .
- This walker must only be used for short periods of time (e.g. 20 minutes).
- Do not use the walker if any component is broken or has been lost.
- Do not use spare parts other than those authorised by the manufacturer or distributor.
INSTRUCTIONS OF USE
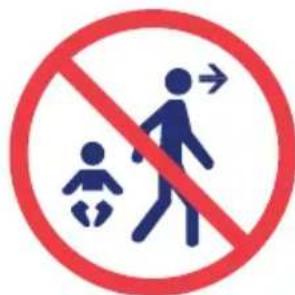
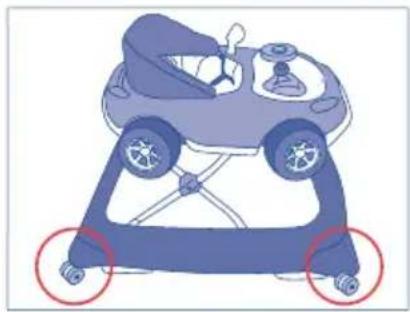
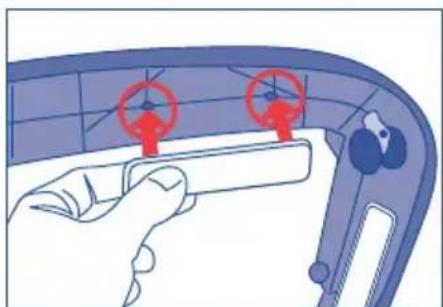
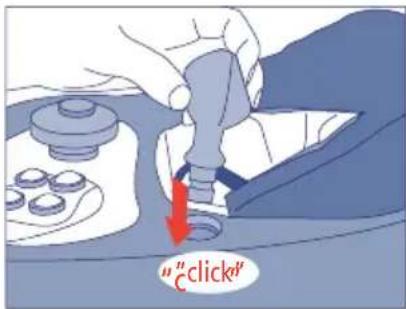
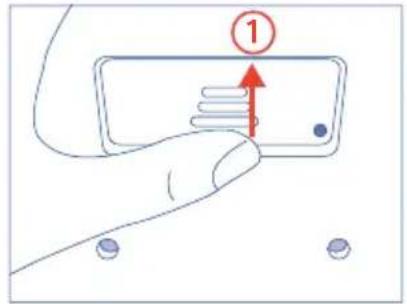
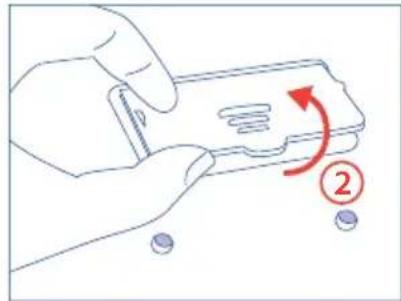
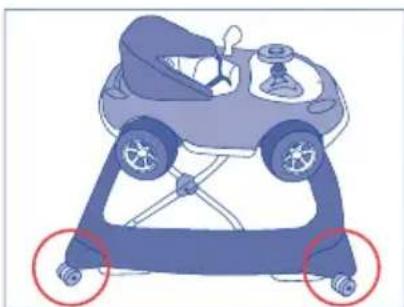
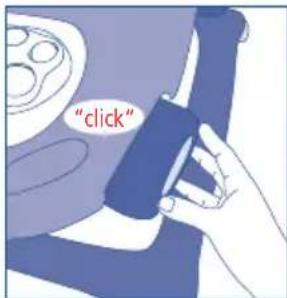
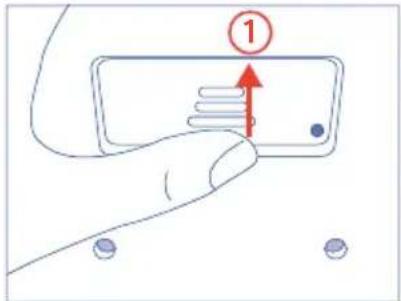
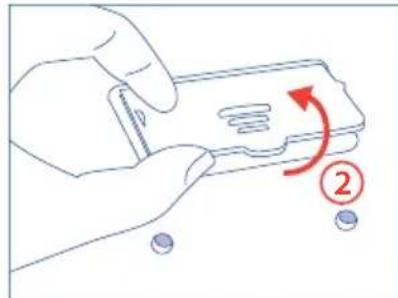
UNFOLDING THE WALKER AND ASSEMBLING THE WHEELS
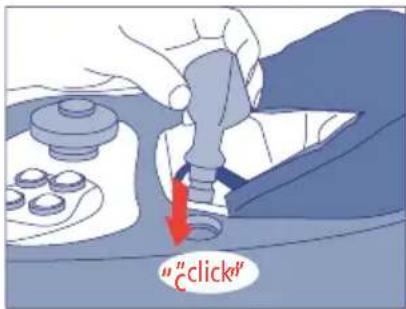
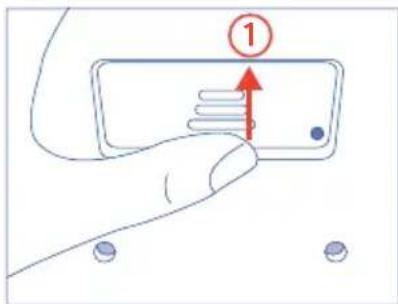
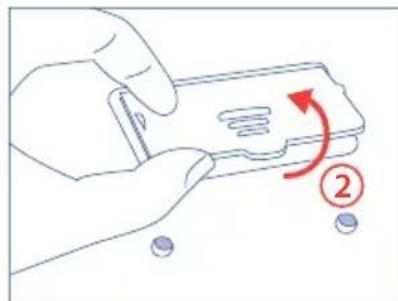
Open the walker, raising the upper tray until it has reached the highest position, until you hear the safety "click". To install the wheels place the walker on a hard surface, press the wheels firmly to slot them into their respective holes which are located on the corners below the lower base until you hear the safety "click".
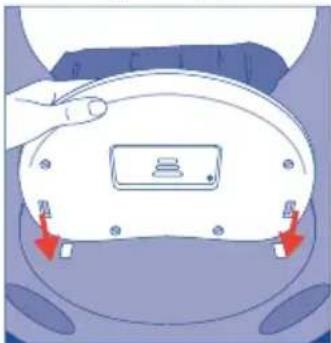
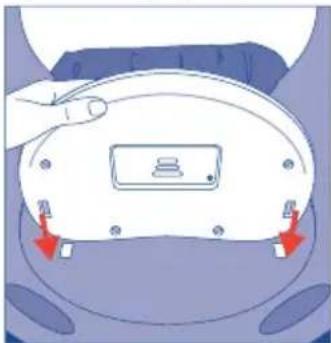
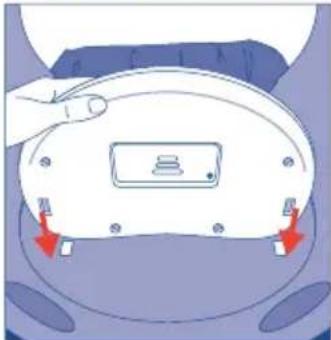
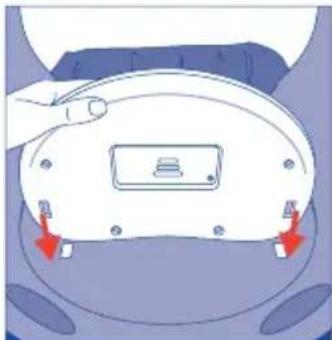
LOWER STOPPERS
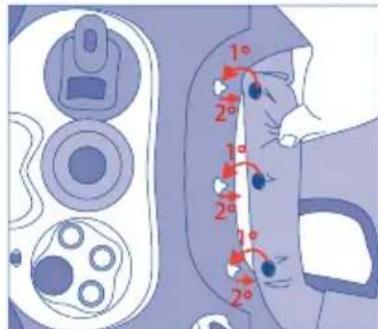
Fit the 8 stoppers under the lower base.
Fit the 2 supports of each stopper into the corresponding holes under the lower base and insert it COMPLETELY into the holes, otherwise the stoppers will touch the floor and hinder the movement of the walker.
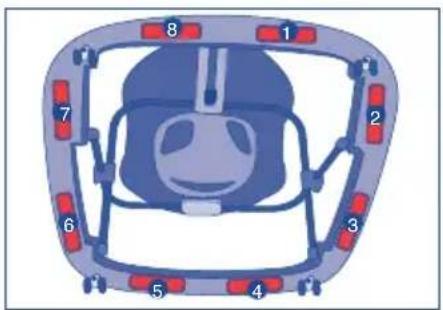
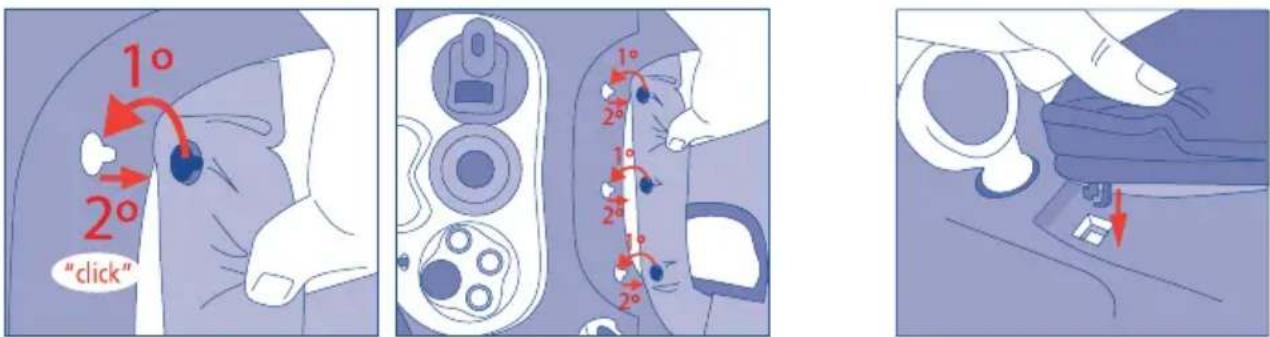
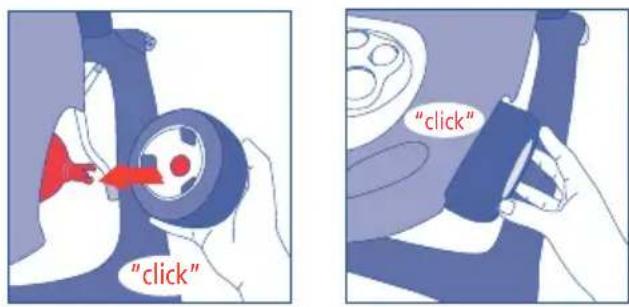
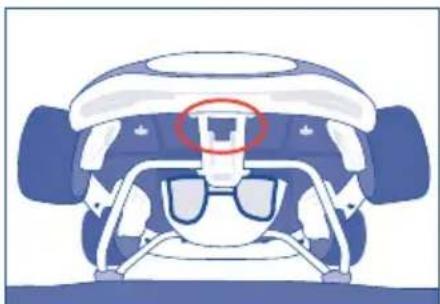
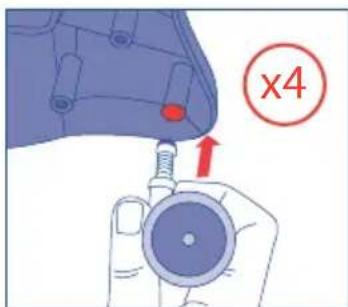
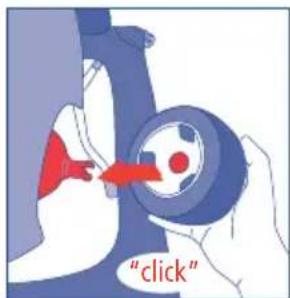
FITTING THE 4 UPPER WHEELS
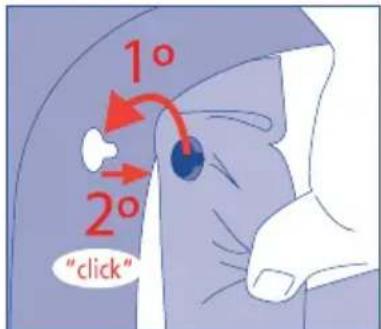
Fit the inner hole of each of the 4 upper wheels onto the supports of the upper base and press inwards until fully inserted (you will hear the safety CLICK when they are locked into place).
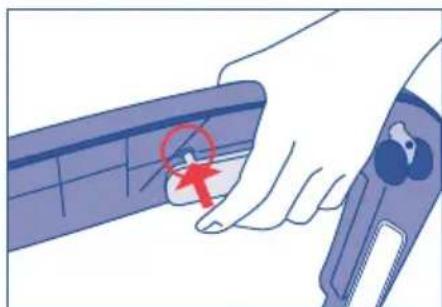
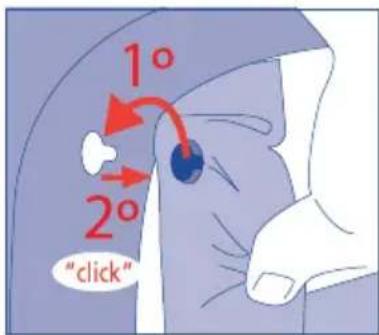
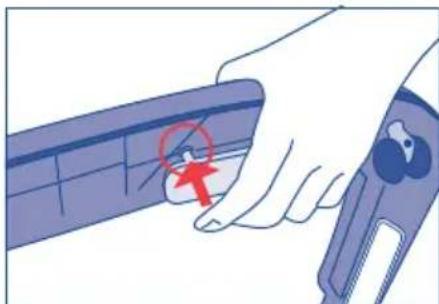
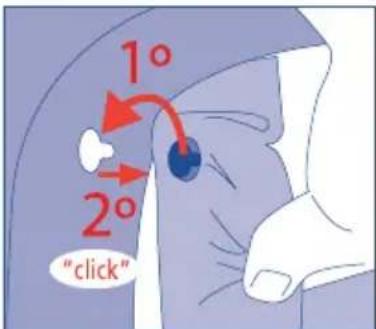
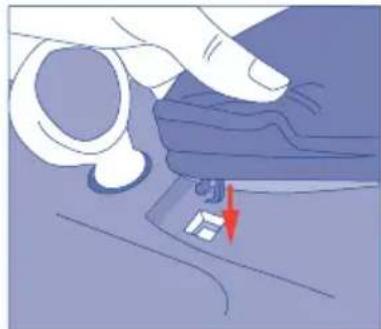
FITTING THE WING MIRROR
Slot the wing mirror into the hole and press downwards until fully inserted (you will hear the safety CLICK when it is locked into place).
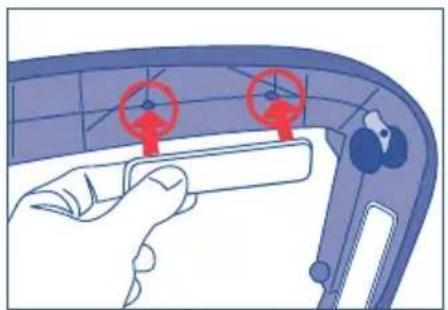
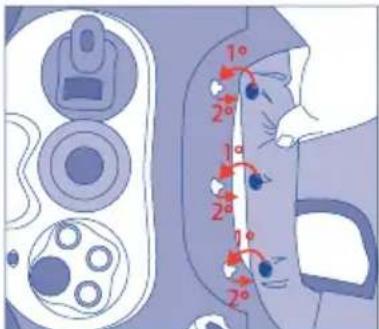
ASSEMBLING THE COVER
Front fastening
Slot the front plastic cover supports into the front holes on the upper base and press the cover down until it fits perfectly.
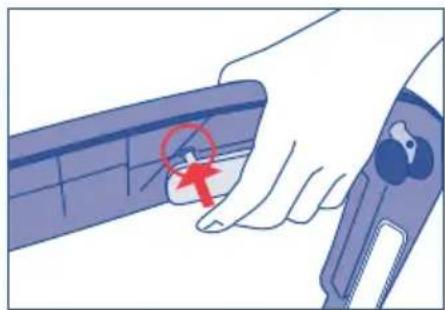
Backrest fastening
Insert the plastic supports into the holes on the upper tray by pushing until it fits perfectly. Check that all the supports are completely secured.
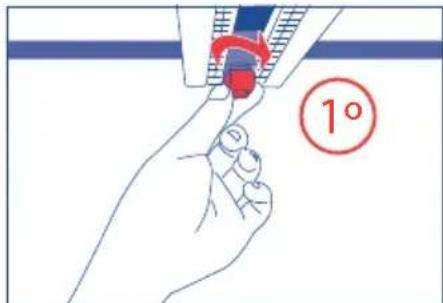
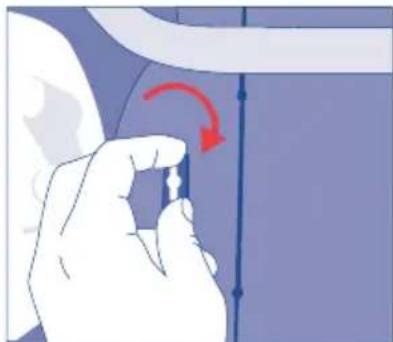
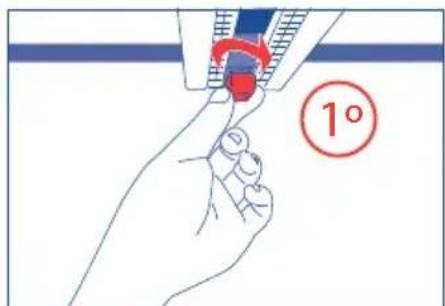
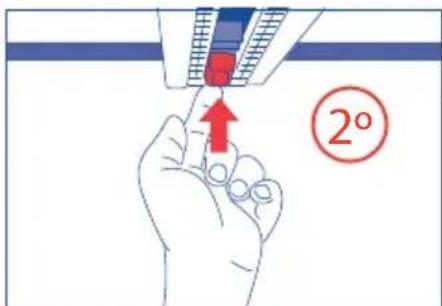
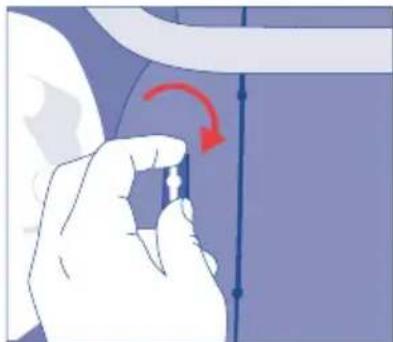
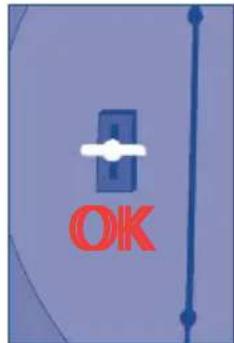
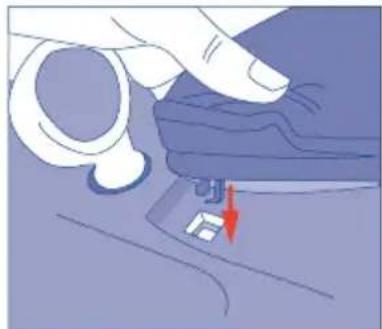
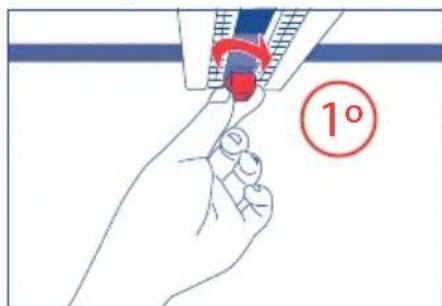
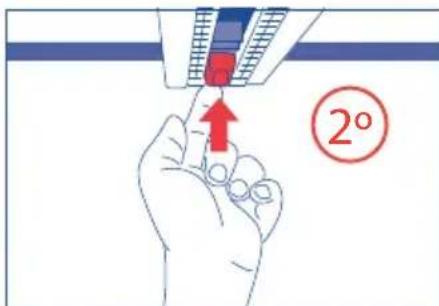
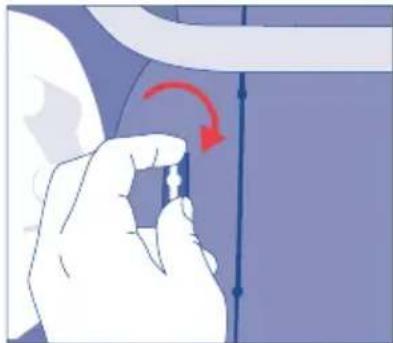
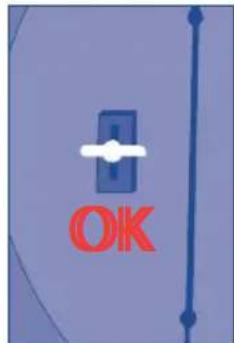
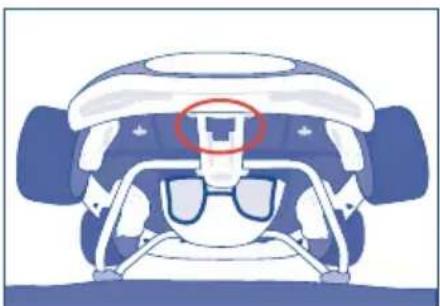
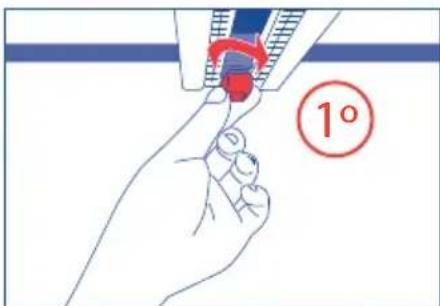
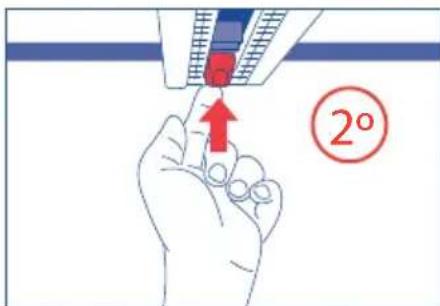
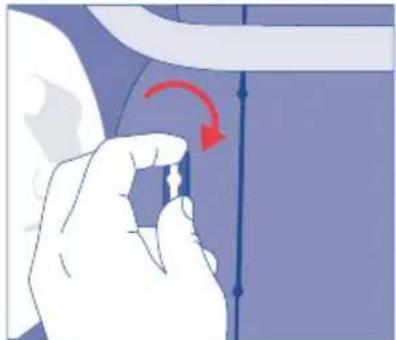
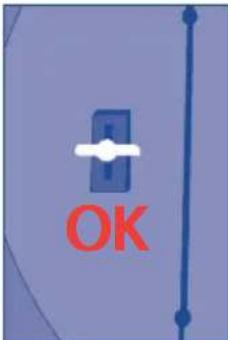
To adjust the walker to the height you want, hold the upper part with one hand and with the other unlock the safety switch located below the upper tray, turning it 90^ and pressing upwards until you reach the desired height.
Warning - Do not adjust the height of the walker while the child is in it.
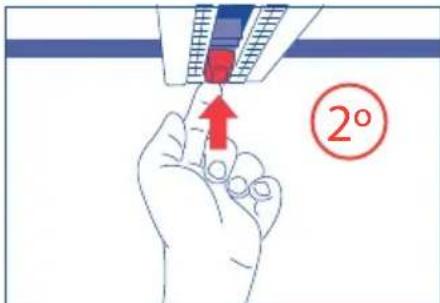
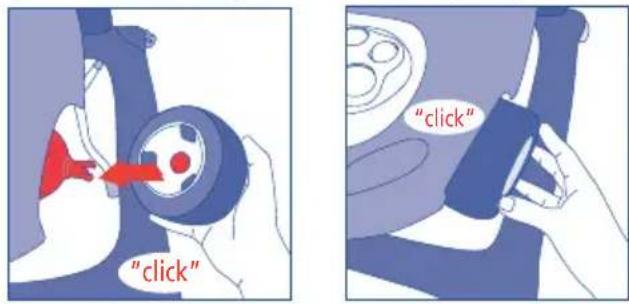
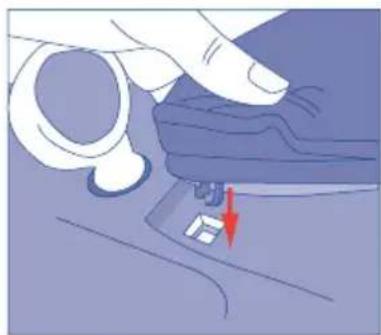
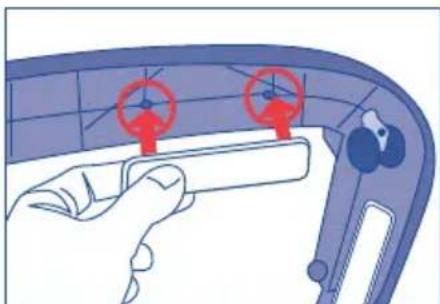
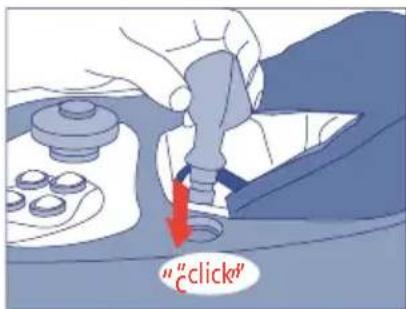
INSTALLING THE ACTIVITY TRAY
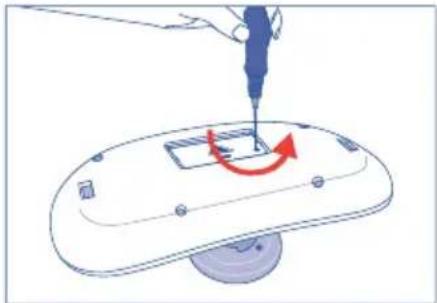
Insert 2 AA (1.5V) batteries as indicated on the cover.
To change the batteries: -Remove the screw and cover, then take out the old batteries.
-Insert 2 AA (1.5V) batteries as indicated on the cover.
-Close the cover and tighten the screw correctly.
The activity tray should be assembled by an adult.
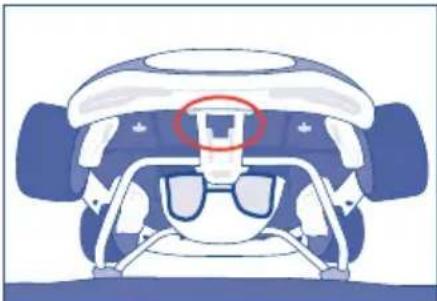
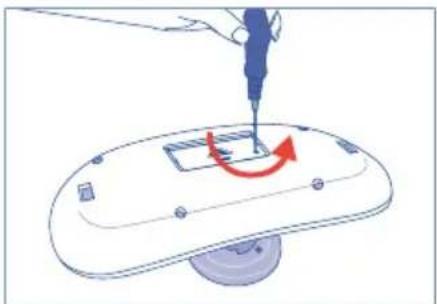
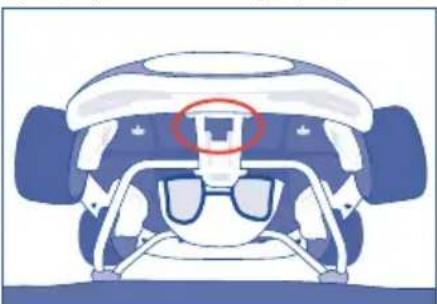
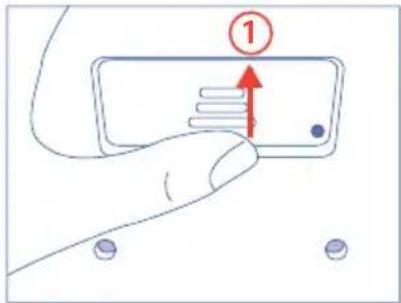
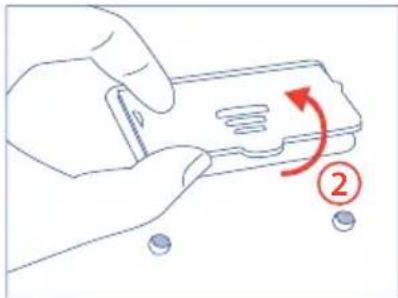
To attach the tray to the upper base of the walker, position the tray so that the slots on the bottom of the tray are facing the upper base of the walker (A).
(A) (B)
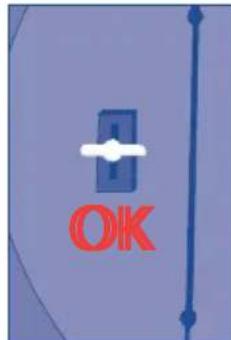
On the bottom of the upper base of the walker there are two supports that should be turned so they are horizontal instead of vertical. Make sure that the activity tray is securely fastened (B).
WARNING:
-Attention! The batteries must only be changed by an adult.
-Keep batteries away from children at all times.
-Batteries or rechargeable batteries must be set up by respecting the polarity.
-Do not mix new and used batteries or rechargeable batteries.
Do not mix battery types.
-Non rechargeable batteries must not be recharged.
-Rechargeable batteries must be removed from the toy before charging wherever possible.
-Rechargeable batteries should only be changed under adult supervision.
-Remove used batteries or rechargeable batteries from the toy.
-Do not short circuit battery terminals.
-Keep packaging outside the reach of children.
-Keep these instructions for future reference.
- The activity tray should be assembled by an adult.

This electronic device must be recycled according to the directive 2002/96/CE.
All electrical or electronic apparatus must be correctly disposed of in collection points designated by local authorities.
MAINTAINING THE WALKER
Cleaning the walker: Clean the plastic parts with a damp cloth, soap and water.
Washing the cover: Wash it by hand and leave it to dry at room temperature.
GUARANTEE INFORMATION
This article is guaranteed in accordance with R.D. 1/2007 of 16th November. Keep your receipt as proof of purchase, you need to show it at the store where you purchased the product to prove validity in the event of any type of claim.
This guarantee does not cover any faults or breakages caused by misuse of the article or by not following the safety and maintenance information listed in the instructions and on the care labels.
TROTTEUR "AUTO SPORT"

IMPORTANT! LIRE ATTENTIVEMENT CES AVERTISSEMENTS ET LES CONSERVER POUR Toute CONSULTATION ULTÉRIEURE
INFORMACJA NA TEMAT GWARANCJI
He pekomeHdyetbca IaI Tei BaroIO noHa12Kr.
- L'ey xodyhok moke bukopucctobyBatncra tIbkn npotram HeTpnbaiux Biip3kiv acy (Hanpknad, 20 xbninH).
- He BnKOpNCToBvBaTn XOyHOK, kIIO Jky-He6yDb 3 NOro YacTHN 3JamaHO a6o BTPaueHo.
He 3actocobbyatn 3anachi yactHHN, Kpim Tnx, IIO NOCTabJHOTb BInpo6HNK YI NOCTaHaJIbHNK.
IHCTPYKU3 BVKOPUCTAHH
AKPO3KIACTXOdyHOKIINPKPINITK OJIeCA
Po3ropHtB xOdyHOK 7naxom nIHNrTTB BepxHbOI naHeJI Do hAaBnUo pIBH,doKHe nouyeTe KlaucHHaikcaTopa.06yCTaHOBTu KOleca, NOCTABTE XOdyHOK Ha TBepHy nobepxHIO, MiHO npITNCHTb KOleca, 06 BOHI BBiWII B nepeDbaueHi dna Hnx Na3n, po3TaWoBaHI No KyTAX nI HDHXHM KapKaCom.


HIXKHO6MEXKYBAI-ΓAJIbMA
Pomictu8 06mexybauiPiHnXhboIO OCHOBOIO.
Bctabn2 onopn koxhoro o6mexybaa y BiDnOBiHi OTbOp n iHnxHbOIO OCHBOIO I BCTaBHTn ix NobHicTIO B OTbOp, iHaKwe o6mexybaui TopKaTnca nIiNOrn, nepeXKOJaUOn nepecyBaHHIO XoYHKIB.
MOHTAX 4 BEPXHIX KOJIC
BctahOBiB BHyTpiHni OTBip KoxHoro 3 4 BepxHix Konic B onopax BepxHboi OCHOBn i HATNCKaITe, NOKn HE BCTABNTe ix (BN NOBHHI NouyTu KlaZaHn8 6e3neKn).
MOHTAXДЗЕРКАla 3AДнБОгOrIaIy
BcTaHOBIb 3epKano 3aHbOro Orly B OTBip i HaTNCiTB Bn3, NOKn He BCTaBiTe NOrO (Bn NobHHi NouyTu KnaaHa Hs6e3neKn).
YCTAHOBJIENHH YOXXIA
PepedneKpInnHn
YCTABTE nepedhi nactikobi fikcatopn yoxna B nepedhi OTBOPN BepxHbOrO Kapkaca HATNCHTb Ha YOXON BHN3 Do ynopy.
3akpinneHHcnHKn yoxna
YcTaBTe nIactNKoBi fikcatOpn B OTbOpn BepxHboi naHeni H aTNCiTb ix do ynopy, nepeBipTe haidinHicTh 3akpinneHHBAcx fikcatopib.

PERYJIOBAHHBbICOTXOyHKIB
Ioo6 biDperyHIOBAtn BucOTy XOdyHKiB, cIId OndHieIO pyKOIO yTPmYBaTn IX BepXHO qACTuHy, a DpyROIO pyKOIO po36JOKOBaTNI KhoNkU, 0o 3haoNTbcraPiBexHIM nIDHOOM, NOBepTaIOCh II Ha 90^ I HATNCKUYOn No HAnpMy BROPy DO DoCGRHeHHNoTpi6HOI BUCOTn.
3aCTepexeHH. 3a6OpHaeTbc peryNIOBAtn BnCOTy XoynKIB, AkiO B Hnx 3HaXOnITbc DNTHa.
YCTAHOBJIEHHBAIATOΦYHKUHOHAJIbHOI PAHEJI
Yctabntu 26atapei AA (1,5V),K3a3haueHo Ha Kpuuci.
3amih6aTapei: -3HHTn TBnHT i KpnuKy, BnHHTn 3yKnti 6aTapei.
-устави 2 6атapei AA (1,5 V), як пokaaso Ha кршци.
-3akpnTu Kpwnkuy npabunbHo 3aTnHyTu TBnHT.

PozBuaOya naHeNb MaE 6yTu BCTaHOBNeHa dopocnM.
3aikcybaTn naHb Ha Bepxhi OCHOBi XOyHKIB, BCTaHObitb naHb TaK, 06 OTBOpHa HxHHIOBepxhi naHeJI 6ynn CnpmaBoHi y BepxHIO uactHy xOyHKIB (A).
(A) (B)
Ha HnKhi NobepxHi BepXhboi OCHOB XOyHKB E DBi ONOpN, Aki Heo6xIHO o6ePaTn, NOKI BOH He 6yDyTB cnpaMOBaHI ynonepek. IpekoHaTeCra, 0 p03BnBaUOa naHEnb HadiH NoikcoBaHa (B).
3ACTEPEXEHH
-Yara! 3aima6atapein MoKe 3diIChIOBaTnCra TINbKn DOpocnMn.
-TpmaTe 6aTapei y HeoocxHOMy dIeTiemicu.
-ycabJyTe 6atapei BiIOBIOHO DO nonpHocTi.
-He 3miuyte pi3Hn TUNN 6atapei, a taKoX cTapi i HOBi 6atapei.
-He nepe3apJxKaIte 6aTapei, kI He nIiJaRaIOb nepe3apJxKeHHIO.
-BudanaiTe 3yKnti 6atapei.
-He donyckaitekopotkoro 3amukahHa KneMax.
-TpmaTe ynaKOBky u HeocxHOMy dny iTeu Micui.
-36epiraTeIIOHCTpyKciIOIINMaIb6yTHbOi IOBIDKn.
-3apAaHHa aKymyIaTOPHnx 6aTaapei 3iINCHOBaTNnne iN HarnlOM dopocnoro.
-CnBnMaTn aKymyIaTOpHi 6atapei3 irpaok nepeix 3apJkaHHaM.
-BaratofoyHKioHaIbHa NaHeIb NOBHHa BCTaHOBNIoBaTnC aDopocnM.

Cey eektoHHn npnaIOBHeH 6yTu yTuI3OBaHn 3rIdHO 3 dapeKtBOIO 2002/96/CE.
Yci enektpnhi a6o enektponhi npncptoi cnid 3daBAtNo cneiaJIIOBAHnx nyHKTB npniomy, Bu3HaueHx
MICUEBIMN OprHaAMn CaMOBpyBaHHr.
DOrJIa3A XOyHKOM
HnueHHxOyHKa. Ounuatn nactukobi deTani xOdyHka M'koTO TKAHNHO, 3BOJIOKeHO BDOIO, IMNLOM.
PpHn yoxna. Ppatn BpyHy n cyuHTn npn Tempeatypi DOBkiJllra.
IHΦOPMALI IPO TAPAHITII
Cen Bnpi6 Mae rapaHIO, nepeB6aueHy KopoiBcBKM 3aKoHOaBm yka3OM 1/2007 BiD 16 nctOnaJa. 36epiraTe TObAPHn Yek, BIn NOTpi6eH dIy npE'ABneHH B mara3HHi, De 6yB npu6aHn Bnpi6, o6 doBeCTn o6pyHTOBaHicTb npTeH3II.
3uii rapaHTii BnKIOueHO 6yIaKeTn a6o noSKOKeHHB, BnKNIkaH i HnpaBnBHM BnKOpNCaHHM BnPo6y a6o HeoTpMaHHM cTaHdaptIB 6e3neKn Ta texHiUHorO oCnyroByBaHH, 3a3HaueHux B IHCTpyKcII Ta Ha npalbHX npnukax.
BAJKH! IPOYETETE BHIMATEJIHNO IN CbXPAHETE 3A Быдец СпРавки
Ako He cna3BaTe Te3n HNCTpyKcUn, DeTeTo Bn MoKe Ja NoctpaJa.
PPEyIPEXKeHNE
- Hukora He octabay Te dTeTo 6e3 np.
Korato ce hamnpa B npoxoJikata, Deteto e MoKe da n3MnHaBa no-rotempa3ctOHHN I da ce npuBnxBa no-6bp30.
He no3B0JIaIe Ta Ima DoCTbI Do CTbI6IIa, CTbIana IIH HepaBHIOBbpxHOCTN.
BHHMabAte aKO mMa OTKPNTn PAmbU, n3TOUHNu Ha TOnnHa KOTNOHM. - O'CTpaHete ot o6ceHa na Deteto ropeuTe TeuHOCTn, eJeKtpnuecknte Ka6eni n dpyrN pOio6Hn n3ToUHnHa onaChOCT.
- Iorpnjxte Ce npoxoikkata Da He ce yprB CtbkIeHnTe YaCTN Ha BpaTne, IpO3OpunTe n Me6eJnte.
-TaipoxoJnka Tp6Ba da ce n3noJI3Ba cAmo B pOdbJIkeHne Ha KpaTkn nepNoi OT BpeMe (hanpImep 20 mH.)
-TaipnoxoDnIka e npedHa3NaueHa 3a non3BaHe ot deca, KOINTMOrAT da cIaT 6e3 yJxJa nOMoU, npi6n3ntenHO ot 6-MecuHa Bb3pact Harope. He e noXoJua 3a deua, no-TexKn OT 12 kr. - He ynoTpe6raBaiTe npoxoHnKata, aKO hkoR OY cactnte ie cyuNeHa nnLncBa.
- He n3no13BaIte pe3epBn yactn, KOIOHe ca oO6peHn OT npOn3BOuNTeYnIOn DTncpU6yTopa.
MHCTPYKLIMN 3A YNOTPEBA
PA3fBBAHE HAPPOXOДИКATA MOHTAX HA KOJIENATA
Pa3rhe npoxoJnkata, noBnraKn ropnnaHn DO nai-BncOKOT My noLoXeHne,doKaTO ueTe npuipakBaHTo Ha MexaHn3Ma 3a 6e3onacnoct. 3a da nocTabte KOJenata, cNoXeTepnoxOJnkata Bbpxy TBbpda NobbpxHOCT N CINHO HATNCHe KOJenata, 3a da Bn3at BCbOTBeTHnte OTBOpn, HAMpuu Ce B bIInTe NOD OJHnnaHn.
DOLHNOPTAHNHTEJIIN
Noctabete 8-te orpaHnHTeJI NOI donHnnaHeJ.
BkapaTe 2-Ta IbpxaTeIHa BceKn OrpaHnHTe B cBoTBeTHnte OTbOp nOd OJOnHnaHeN n N3LJIIO BkapaTe OraPaHnCTe R BbTpBe BOTbOpTe, B npTINBEH CnyaH OrpaHnHTeNTe Ie Ce ONnpa T B nOda n IpePeaT Ha DInKeHneTo H npoxoDnKata.
MOHTIPPAHE HA 4-te TOPHN KOJELA
ФИКСИРаTe BCЯКо 1 OT 4-Te rOpHи KОлЕ Na Taka, Ye BbTpeShnIr Nm OTBOP Da CbBnaJHe C HocaUte Ha rOphata OCHOBa NHaTINCHeTe HABbTpe,ДOKATO yCneEe Ta Ra Nв BKapate (Tpr6Ba Da ce ue "ПРИШРAKBAHETO" Ha obe3oNaCЯBaшя МexaHn3bM).
MOHTIPAHE HA ORJIEDAJOTO 3A OBPATHO BUXDAHE
ФИКСИРаTe orneIaNoTo 3a obpaTHO BIXkDaHe B OTbopa n HATncHete HaOny,doKaTO ycNeeTe da ro BKapate (Tp6Ba Da ce ue "PNIUcPAKBAHETo"Ha o6e3OpacBaunmexaHn3bM).
MOHTIPAHE HA TANILCEPNRA
3aKpenBaHe OTnpen
BkapaTe npedHnTe pactMacOBu ufoToBe Ha tanuepnTa B npedHnTe OTbOpn Ha rOpHaT a OCHOB n HATNCHe TaunucepnTa HADONY DOkATO npnnerHe HAnbIHO.
3aKpenBaHe 3a o6JeraJaKaTa
BkapaTe PnactMacOBte uNTOBE BbTpE BO TBOpNTe Ha TropHnaHe, KaTo HATnCKaTe DOKaTo npInerHe HanbIHO nnpOBepTe daNN BCNUKu NTOBe ca Do6pe 3akpenen.
PERYUNPAHE HA BINGOHNATA HA IPOXODNIKATA
3a da Harglacnte npoxoJikata Ha JekhaHata BncoUHa, XbaHeTe rOpHata yact C eHaT a pbka, a c dpyrata OTboknpaTe o630napaun 6ytoh, pa3noJoxhen noi ropHnaHen, 3abpbTaNrHa 90% n HATNCKn HArope, dOKato ce doCTnHne JekhaHata BncoUHa.
PpeDynpexdHne.-He perynpaTe BncounHaTa Ha npoxoJikKaTa,doKaTo DeTeTo e Hne.
MHCTAJINPAHE HA TABJNUKATA 3A INPNI
IocTabeTe 26aTeepnn AA (1,5V) TaKa, KaKTo e NOKa3aHo Ha KaNaueTo.
CmHa Ha 6aTePnIte: -OTcTaPaHeTe BnHTa n KaNaHeTo, n3BaJeTe n3paXoDbaHIne 6aTePnI.
-ПoctabeTe 2бATEPUN AA(1,5V)ТаKa, KaTTo e nOKa3aHo Ha KaNaayeto.
-3aTbopeTe KanaeTo n 3aBnTe npabuHb BNHTa.

Ta6nukka 3a npr Tp6Ba da 6bJe MOHTnpaHa oT Bb3paTeH OBeK.
3a da 3akpennte Ta6nukkata KbM ropHata OCHOBA Ha npoxoDnKATA, noCTabete Ta6nukkata Taka, ye OTbOpnte Ha donHaTa CTpaHa Ha Ta6nukkata da 6bDaT opneHTnpAH Kbm ropHata OCHOBA Ha npoxoDnKATA (A).
(A) (B)
Ha donHaTa cTpaHa Ha roPHaTa OCHOBa Ha npoxoAnkata mHa Dba Hocaya, KOHTo Tp6Ba Da ce 3aBbPTrT, DOKaTo 3actaHAT opneHTnpaHn HanpeuHo. YBepeTe Ce Ta6nukata 3a nprn da e do6pe 3akpeneHa (B).
IPEyIPEKDEHNA:
-BHIMaHHe! CmHaTa Ha 6aTePnnte Tp6Ba Da ce n3BbPbBAOT Bb3paCTHn.
- CbxaHraBaIte 6aTePnITe BnHar n3BbN O6cera Ha decaTa.
-Пoctabe6aTePmTe KaTo BHMMaBaTe 3a NOHOCnTe.
-
He nocTabaIte 3aeIHO pa3IuHb INIOBE 6aTePN, HTO HOBn IN3pa3XoDBaHN 6aTePN, KaKTo N O6NKHOBeHN 3apeJdaUNCe 6aTePN.
-
He 3apejdaIte 6atepnnte, KOUTHe MoTa da ce 3apejdaT.
-3BaTeOTnnpaKaTa3apexKaunTece6aTePNepuNpaTn3apeUnTe.
-3apejdaunte ce 6atepn Tp8Ba da 6bdat 3apejdaHn cmo nD Hnd30pa Ha Bb3pactHn.
-13baTeI3pa3XoEHHTe 6aTePN.
-He npedn3BnKBaIte KbCO CbeINHeHne B KOHTaKTtTe.
- CbxaHraBaiTe onakOBkata N3BbN o6cera Ha deuata.
-3ana3eTe Te3n yka3aHn 3a 6bdeu cnpaBKn.
-Ta6nukata 3a 3aHmamna Tp6Ba da 6bde crno6eHa OT Bb3paCTH.

To3n eNeKtpoHEn ypei Tp86Ba Da 6bIe peuKJIupaH B CbOTBcTCTBne C n3NCKBaHnra Ta Ha NipeKTNBaTa 2002/96/CE. BCnUKN eNeKtpuueckn nn eneKtpoHH upei Tp86Ba Da ce octabrt no ceneKtUBeH NaHH Ha ONpeJeHnry OT MeCTHNTe Bnactn NyHKT 3a pa3dEInHO cb6bpapHe.
SYNAPMOAOHSHTOYKAOPENTH
PpOaPouoTe Tov KaOpentn Otnv Otnkai Pte Poc Ta KATW WOnou Va Tov EIOyETe (Oa akouotei To XapakntpiotIKo «Klik» aOpaiaionc).

TONOETHH TANETZAPIA
Mnpoovn ouvdeon
Eioayete ta unpootiva nlaotika otnpiymuata tnc tanetoapiaoc ic npootivec tpune c nca naw baonc kal niote npoc ta katw tvtanetopapia wannou va eapapooeivteawc.
TnpiEn Taenetoapiac nAtns
Eioayete ta nlaotiká otnpiymuata meoa otic onec tou naow diokou niécovtac wonou va epapmuoouv. Bebaiwtheta otioa ta otnpiymuata eiva nnpwc aqpaiaoeva.
PYOMIHTOY YPOOYTHESTPATA
Tia va puθμioεTE Tn OTPaTa OTO EπIθuμntó uψoc, KpatnoTE μE To εva xépi To πavw μeρoc Ka I e To aλλo anaσφaloti To kouμni aopáλεiac nou βpiokεtai katw ano tv naw δioko yupicovtac to 90° kal niεovtac npoc ta naw éwc otou λθει oTo επIθuμntó uψoc.
Ppoeioloin: M nputheta to uoc ot npatae to naidmu
TONOETHsH TOY AIEKOY APAHTHPTON
TooTheTne 2 natapiec AA (1,5V) onw c avaypapetai oTo kaluua.
AALayn mntapwv: -Apaipote Tn biδa kaio kαλuμa. ByaTe tic adεiec μntapapiε.
-TooTheTne 2 matapeiC AA (1,5V) onwcaavapapetai oTo kalumu.
-KλeioTe to kαλuμμa kaI σφiEte oωoτa tn βiδa.
Odeltaoc dpaoTpiotntwv npEe va ouvapmooyn0i ano evnaiko ato.
Tia va otepewoetevov bioko otyn avw baon tnc otpatac, tonoototevov bioko me teio tpono wote ta avoiyuata tnc katow oynou dou biokou va piokovta npoaavatoiaeva npoc tnv avw baon tnc otpatac (A).
(A) (B)
Σtnv katw oyn tnc avw baonc tnc otpatac unapxouv duo stnpiymuata ta onoia npenei va nepiotpaov wanouva epouv oEykapoiia eon. Bbaowite oti o diokoc dpaoptnpiotntw viva opeewevoc ka (B).
IPOEIAOIOIHSEIEI:
-Ipoooh! Oi μanatapiec npénei va aalacovtat ano evnlaiko ato.
-ФuaosTe navTa Tc matapiea akpiia ano naidiia.
-Eiayetyic mntapiec me tn owt npopa noaiokntac.
-Mynxponoionoiite pa zi diapopetikouc tounoc
muataipiw, oute kaivoupiec matapiec mazi pe naiaec
kavovikec matapiec me enavaqoptiOevec.
-Mn qoprticTe Tc matapiec nou 8ev evau enavaopoticiouvec.
-ApaiaeTe Tc enavaopntocevec unatapieac ao to naixviipotou Tc opptioe.
-OI enavaopoptiOevec matapie c npene i va optiovtai katw ano Tn EiBLeyn Evnlikou.
-ApaipoeTe Tic adEieC μntatapieC.
-MnbpaxukukawveTeTOcakpoδekTEC.
-ФuaoTe Tn oukeuaia paikia an to naidi.
-DiatnpnoTe autec tic odnyie yia eAovtkn xpnon.
-0 diokoc dpaotnpiottw npéi va ouvapuoynθe i anovnλiko ato.

Autn n nEeKpovikn oukeun npenei va avakukwthetai oupwva e tnv odnyia 2002/96/EK. OeC oI nEeKpiKec n nEeKpovikec ouokeuc npenei va anoppintovtai xwpiota stouc katalnnlouc xwpouc oulloync nou exouv opiaei ol toNIkec apxec.
SYNTHPHES THE STPATA
Kaapiooc nC Opatac: Kaapioe ta naotik aepn me diakua vepou kai oanoviu, xnoiopoiovvTac eva navi.
Iauo taneoapiac: Anoonatae tnv tanetaoia, nuvete tn 0to xepi kai apote tnv va oteywoei oe eepokpaic
peipalovtoc. iia va tnv tonoetnoete
IIAHPOΦOPIE ΣXETIKA ME THN EITYHΣH
To npoiov auto diahe teyunon ouqwva e tov vmo: Baoilko Nooetiko Diatayma api.1/2007 Tnc 16 nC Noeubiou. DiatnpnoTe tnV ano8eiEyn ayopac. Eivaanapaittnn npookoian tnc oTo kataoTna oTo onio ayopaaote to npoiov, wote va dikaioLoynthe ioyuc tnc, oe ppiwn onoioadnone axiownc.
An tv npouoa eyyunon eiaipovtai onoiadnote EaattwmaT n Baaec npokuovyoyw kaicxnpocn Tou npoiovtoc n un tnpnonc twv kavovwvaopaaleiac kai ouvtnpnonc, ownc autoi nepiypapovtal ota pfalaa odnyiw kai otic etiketec nluoimuatoc.
IMPORTANT! A SE CITICU ATENTIE ŞI A SE PÁSTRA PENTRU CONSULTÄRULTERIOARE
Copilul dumneavoastrarputea fi ranit dacanu respectaicoste instrutiuni.
AVERTIZARE

- IMPORTANT! READ CAREFULLY AND KEEP FOR FUTURE REFERENCE
- WARNING
- INSTRUCTIONS OF USE
- UNFOLDING THE WALKER AND ASSEMBLING THE WHEELS
- LOWER STOPPERS
- FITTING THE 4 UPPER WHEELS
- FITTING THE WING MIRROR
- ASSEMBLING THE COVER
- Front fastening
- Backrest fastening
- INSTALLING THE ACTIVITY TRAY
- WARNING:
- MAINTAINING THE WALKER
- GUARANTEE INFORMATION
- IMPORTANT! LIRE ATTENTIVEMENT CES AVERTISSEMENTS ET LES CONSERVER POUR Toute CONSULTATION ULTÉRIEURE
- INFORMACJA NA TEMAT GWARANCJI
- IHCTPYKU3 BVKOPUCTAHH
- AKPO3KIACTXOdyHOKIINPKPINITK OJIeCA
- HIXKHO6MEXKYBAI-ΓAJIbMA
- MOHTAX 4 BEPXHIX KOJIC
- MOHTAXДЗЕРКАla 3AДнБОгOrIaIy
- YCTAHOBJIENHH YOXXIA
- PepedneKpInnHn
- 3akpinneHHcnHKn yoxna
- PERYJIOBAHHBbICOTXOyHKIB
- YCTAHOBJIEHHBAIATOΦYHKUHOHAJIbHOI PAHEJI
- 3ACTEPEXEHH
- DOrJIa3A XOyHKOM
- IHΦOPMALI IPO TAPAHITII
- BAJKH! IPOYETETE BHIMATEJIHNO IN CbXPAHETE 3A Быдец СпРавки
- PPEyIPEXKeHNE
- MHCTPYKLIMN 3A YNOTPEBA
- PA3fBBAHE HAPPOXOДИКATA MOHTAX HA KOJIENATA
- DOLHNOPTAHNHTEJIIN
- MOHTIPPAHE HA 4-te TOPHN KOJELA
- MOHTIPAHE HA ORJIEDAJOTO 3A OBPATHO BUXDAHE
- MOHTIPAHE HA TANILCEPNRA
- PERYUNPAHE HA BINGOHNATA HA IPOXODNIKATA
- MHCTAJINPAHE HA TABJNUKATA 3A INPNI
- IPEyIPEKDEHNA:
- SYNAPMOAOHSHTOYKAOPENTH
- TONOETHH TANETZAPIA
- PYOMIHTOY YPOOYTHESTPATA
- TONOETHsH TOY AIEKOY APAHTHPTON
- IPOEIAOIOIHSEIEI:
- SYNTHPHES THE STPATA
- IIAHPOΦOPIE ΣXETIKA ME THN EITYHΣH
- IMPORTANT! A SE CITICU ATENTIE ŞI A SE PÁSTRA PENTRU CONSULTÄRULTERIOARE
- AVERTIZARE
Brand : JANE
Model : Auto Sport
Category : Baby products