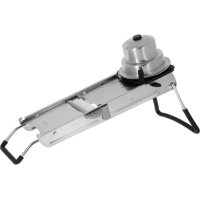
Viper - Kitchen mandoline de Buyer - Free user manual and instructions
Find the device manual for free Viper de Buyer in PDF.
| Brand | de Buyer |
| Model | Viper |
| Product Type | Kitchen Mandoline |
| Blade Material | Cutlery Stainless Steel |
| Main Functions | Slicing, julienne (4 mm and 10 mm), cubes, diamonds |
| Adjustable Cutting Thickness | From 1 to 10 mm |
| Cube Cutting System | SYSTEM CUBE (mobile V blade with ON/OFF button) |
| Package Contents | Frame with integrated blade, slicing plate, 2 julienne plates (4 mm and 10 mm), carriage, pusher, storage box, instruction manual, DVD |
| Safety | Mandatory use of carriage and pusher; very sharp blade, handle by gripping zones |
| Care and Cleaning | Hand washing recommended; do not put in dishwasher; wipe after washing; store away from humidity |
| Warranty | 2 years against manufacturing defects |
| Power Source | Manual (no electrical power) |
| Rear Foot | Foldable for use on work surface or container |
Frequently Asked Questions - Viper de Buyer
User questions about Viper de Buyer
0 question about this device. Answer the ones you know or ask your own.
Ask a new question about this device
Download the instructions for your Kitchen mandoline in PDF format for free! Find your manual Viper - de Buyer and take your electronic device back in hand. On this page are published all the documents necessary for the use of your device. Viper by de Buyer.
USER MANUAL Viper de Buyer
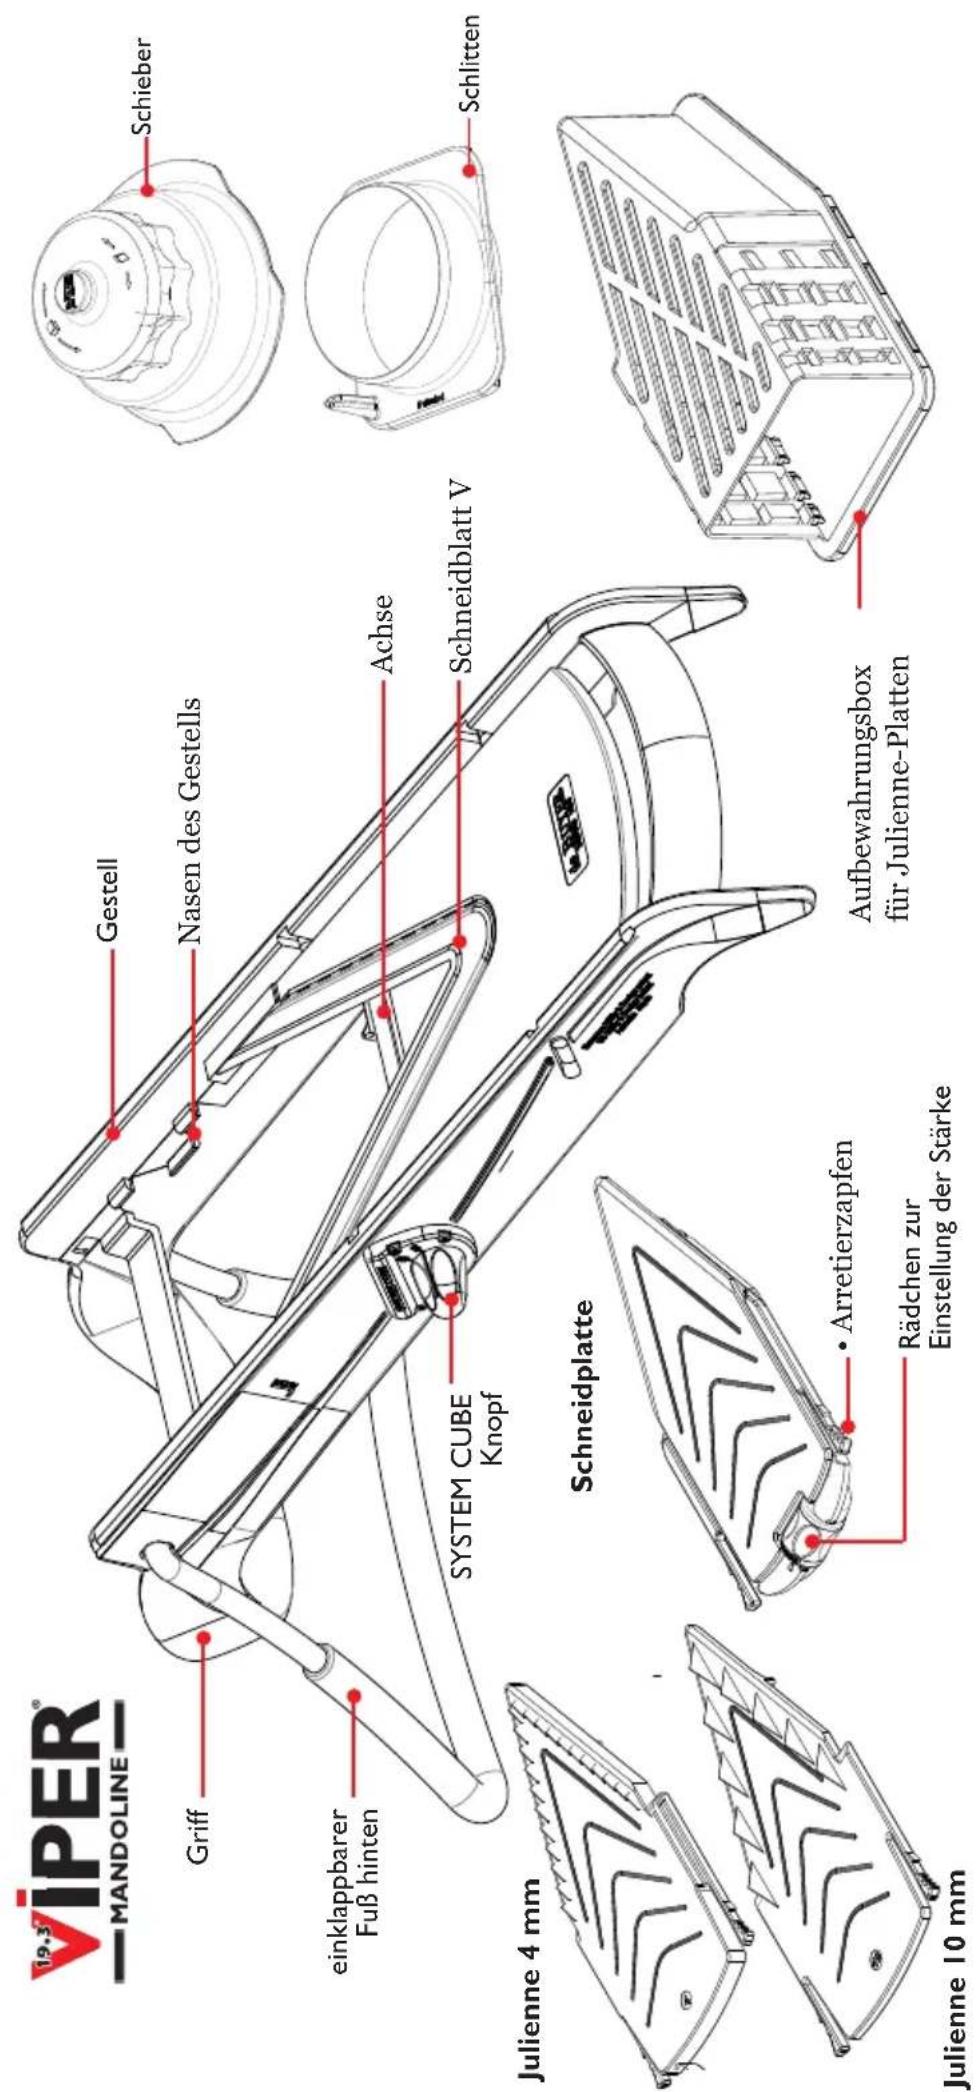
Thank you for having chosen the VIPER mandoline. We hope that this fruit and vegetable slicer will give you entire satisfaction.
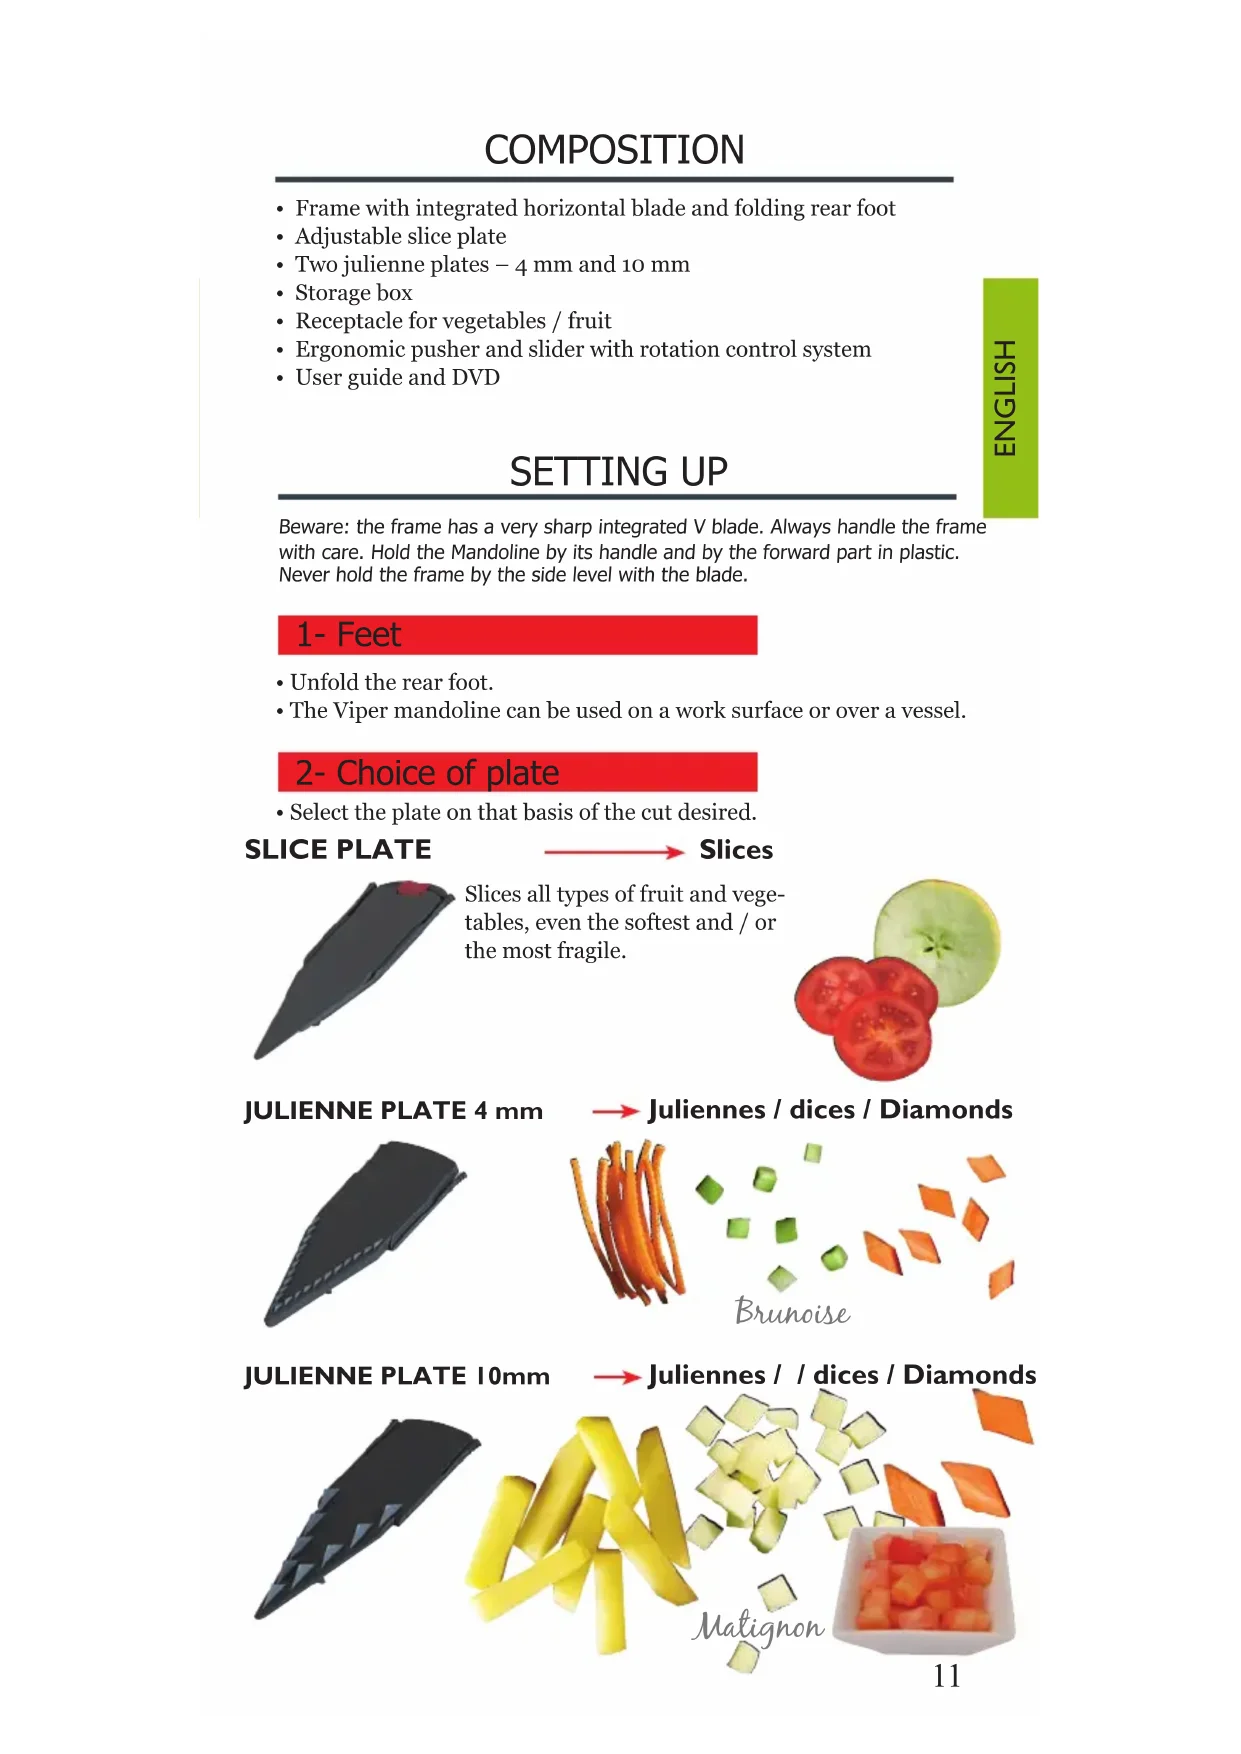
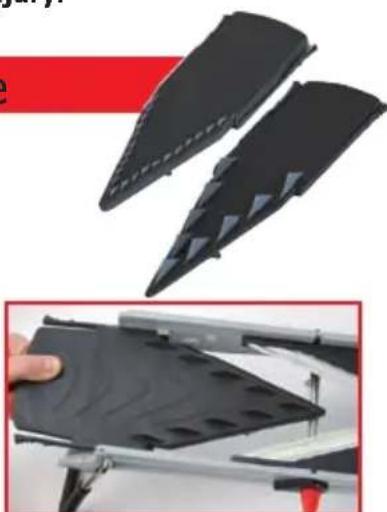
- Frame with integrated horizontal blade and folding rear foot
- Adjustable slice plate
- Two julienne plates - 4 mm and 10 mm
Storage box - Receptacle for vegetables / fruit
- Ergonomic pusher and slider with rotation control system
- User guide and DVD
SETTING UP
Beware: the frame has a very sharp integrated V blade. Always handle the frame with care. Hold the Mandoline by its handle and by the forward part in plastic. Never hold the frame by the side level with the blade.
1- Feet
- Unfold the rear foot.
- The Viper mandoline can be used on a work surface or over a vessel.
2- Choice of plate
- Select the plate on that basis of the cut desired.

SLICE PLATE

Slices
Slices all types of fruit and vegetables, even the softest and / or the most fragile.


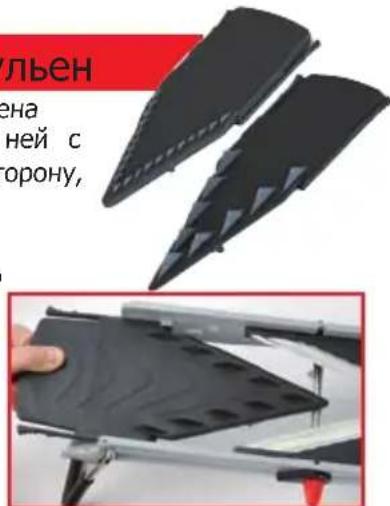
JULIENNE PLATE 4 mm

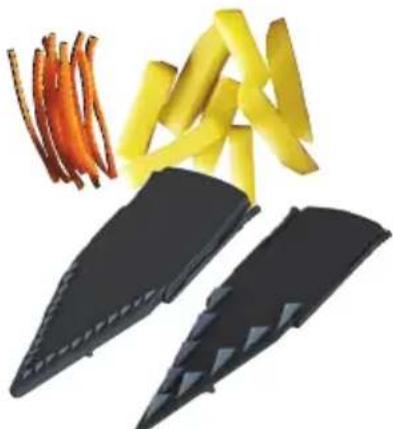
Juliennes / dices / Diamonds
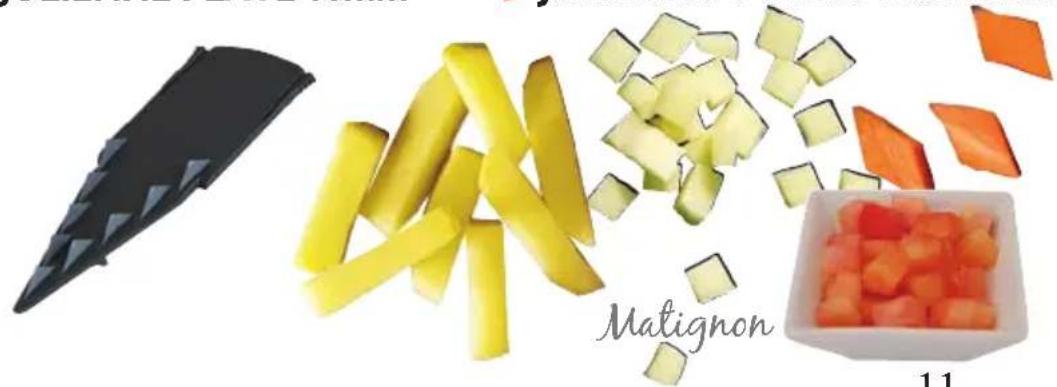
JULIENNE PLATE 10mm
3- Inserting the slicer plate
Tip: before insertion, place the plate at the midway position by turning the knob to position 4 or 5.
- Hold the frame so that its rear is towards you. Engage the plate by sliding it under the first 2 lugs of the frame (1).
- Check that the tip of the plate is above the stainless-steel axis (2).
- Push the plate straight towards the blade in the frame slider until it stops. A slight noise will confirm that insertion is complete.


- To remove the plate: press on the 2 lateral stop tabs and remove the plate.
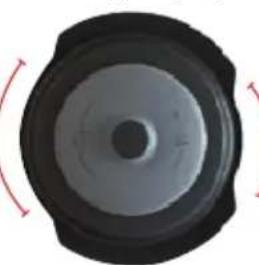
4- Setting the thickness of cut
The thickness of cut can only be set with the slicer plate.
- The Viper mandoline enables slices to be cut that range in thickness from 1mm to 10mm .
The knob is graduated, and turns for easy setting. - Line up the graduation on the knob with the black triangle.

Tip: in storage position, always leave the smooth slicer plate on the Viper mandoline and set the thickness of cut to 0. The plate lines up with the blade, which reduces the risk of injury.
5- Inserting a julienne plate
Beware: the julienne plate has very sharp blades. Handle it with care by picking it up from the rear end. Never take hold of the tip.
- Hold the frame with its rear end towards you, then engage the plate by sliding it on the first 2 lugs of the frame (1).
- Push the plate straight towards the blade in the frame slider until it stops. A slight noise confirms that insertion is complete.
- To remove the plate: press on the 2 lateral stop tabs and remove the plate.
6- Slider and pusher
-
The Viper mandoline is supplied complete with receptacle and pusher. The receptacle holds the items to be cut. The slider (receptacle) and pusher are essential for using the mandoline in complete safety.
-
Simply slide the receptacle onto the mandoline frame. It will then not come off its rails during cutting.
-
Place the items to be cut in the receptacle (large fruits and vegetables must first be cut into smaller pieces).

- Ensure that the receptacle is well centred on the frame. Push the pusher against the fruit / vegetables to be cut. The needles enter the item to stop it from rolling and the spring applies constant pressure on the item during the cutting process. Depending on the hardness of the item, press on the ejector for greater ease during the cutting process.
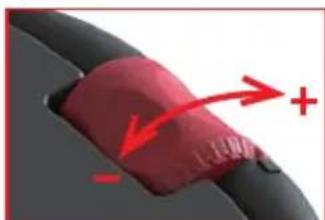
PUSHER ROTATION CONTROL SYSTEM
- The receptacle and pusher unit has a rotation-adjustment system to make it easy to cut cubes and lozenges, and to make a julienne cut.
-
The slider stop limits the pusher's rotation in both directions, enabling regular cuts to be made.
-
The stop also acts as a pusher support, and enables you to keep a straight line when making julienne cuts.
CUTTING

Slices
-
Insert the slicer plate (§3).
-
Move the SYSTEM CUBE button to OFF (the V-blade is in the high position and remains fixed).
-
Adjust the thickness of cut (§4).
-
Place the product to be cut in the receptacle.
-
Centre the pusher on the receptacle (§6) and move it to and fro towards the blade by holding the frame knob.


Julienne cut
- Select a julienne plate (§2) and insert it into the frame (§5).
- Move the SYSTEM CUBE button to OFF (the the V-blade is in the high position and remains fixed).
- Place the item to be cut into the receptacle. Centre the pusher on the receptacle and move it to and fro towards the blade by holding the frame knob.
Tip: to obtain a regular julienne cut, place the pusher stopped against the slider to set its position.
Dice cut
- Choose a julienne plate (§2) and insert it into the frame (§5). Engage the SYSTEM CUBE: move the button to ON.
- Place the receptacle in the lower part of the frame (1). Place the item to be cut into the receptacle.
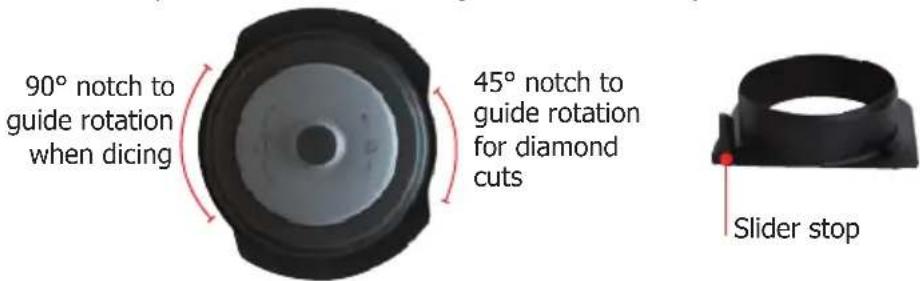
- Position the pusher: place the longest notch (90^) at the level of the slider stop (2-3). When you press down on the pusher, the V blade moves downward.
- Move the slider backwards (4) while pressing down on the pusher.
- The V blade moves upward. Make a 1/4 turn to the stop and once again push the receptacle downward (5).
- Repeat the operation until the item is completely cut.


1
2
90° notch to guide rotation when dicing


345


Tips: - depending on the hardness of the fruit / vegetables, it may be necessary to press on the pusher rod to ensure that the V blade moves downward. - For tomato dices: use the Julienne plate 10mm and select firm and fleshy tomatoes.
Diamond cut
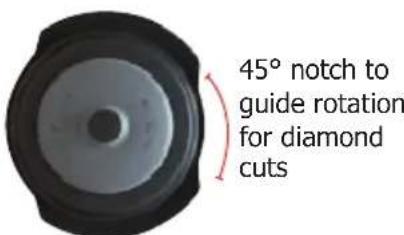
- The process is the same as for dicing, except that the rotation is less pronounced. For the pusher position, place the shortest notch (45^) level with the receptacle stop.

CARE
- We advise against putting the Viper mandoline in a dishwasher.
- The blades / combs are made of cutlery-grade stainless steel; washing them by hand will prolong their life. A brush can be used to clean between the teeth of the julienne combs.
- The blades can also be sharpened.
-
Wipe the Viper mandoline thoroughly after washing and store it away from humidity.
-
The pusher can be disassembled for complete cleaning. An end piece on the top releases the pusher, separating the ergonomic dome from the rod and freeing the spring. To remove the end piece, release it by turning clockwise. However, the needles cannot be disassembled. The reverse procedure must be followed to re-assemble the pusher components.

ENGLISH

STORAGE
- The storage box for the Viper mandoline takes the julienne plates (capacity: 3 plates). Just slip the plates along the side rails inside the box.
- Always leave the slicer plate in place on the frame of the mandoline when the latter is not being used, and adjust the thickness of cut to 0.
- For storage, the storage box with the plates slides onto the mandoline frame after the slider (receptacle) is in place.


CAUTION
The Buyer Viper mandoline is a fruit and vegetable slicer that has been designed and manufactured to give you the greatest safety when you carry out your preparation work. This device uses extremely sharp blades and combs which should be handled with the greatest care. That is why we ask you to please respect the following rules for use:
- The slider receptacle and its pusher provide a guarantee of safety. It is essential to have them in place when using the Viper mandoline.
- Always handle the frame of the Viper mandoline and the plates by their designed lifting areas.
- When the mandoline is not in use, leave the slicer in place and set the thickness of cut to 0.
- Keep out of the reach of children.
BESTANDTEILE
VOORZORGSGMAATREGELEN
5- YcTaHOBka nIaTΦopMbIXyIbeH
BHHMaHHe: nIaTΦopMa KylbeH Cha6KeHa OueHb OCTpbIMN ne3BnAIM. 06paanTeCb C Hei c octopoxhoctbIO. Bepnte Bcerda 3a o6pArHyo CTOpOHy, HIKOrda CO CTOpOHbl Ne3Bm.
BcTaBBte IIaTΦOpMy co cToPOHbI 3aJHeI YaCTN IIIaccn, IpeDBrrae eI IO DByM IIepBbIM IIa3Am IIIaccn.
BcTaBJIaIte IIaTΦOpMy IprMo B cToPOHy Je3BnI IO HAnPpABJIOUIMM IIIacCH Do MOMeHTa 6JIOKNpOBKn. JIerKn IIeJIyOK IIOITBepJdaet ydaunHyIO ycTaHOBky.
- YTO6bI cH8tB IIaTΦopMy: HaxKMITE Ha 2 6JIOKINPOBOUHbIX φJIaXKa c6OKy I CHMHTe IIaTΦopMy.
6- Kapetka n ToIkaTeJIb
MaHIOJIHa BaIIepe IOCTaBJIeTcB KOMIIeKTe c KapeTKo H TOJIkATEJIeM. B KapeKy pa3MeIaIOT IIPOyKTbI, KOtOpBie IIOJIeKAt Hape3Ke.ДЯ obecIeueHnI IOJIHO 6e3OIIaChOCTN HCIOJIb3OBaHHa MaHIOJIHHb YJbTpA Heo6XoIHMo HcIOJIb3OBaTb φnpMeHHyO KapeKy H TOJIkATEJIb.
-
Kapetka OndeBaetcHa Iaaccn MaHIOJIHHb. TaKHM o6pa3OM, B IIpoIeCE C Hape3KN KapetKa He BbIXOHT N3 MHN-peJIbcoB.
-
PacnoJIOKHTe IPOdyKTbI IOJIeKaIIHe Hape3Ke B KapeTKy (cJIINIKOM KpyIIHbIe OBOIIH n pykTbI 1OJIJKHbI 6bITb IIpeBapHTeJIbHO Iope3aHbI).
-
PacnoJIOKHTe TOJIkaTeIb HaI IeHTpOM KapETKn. OJeHbTe TOJIkaTeIb Ha /OBOUH, IOJIeKaIIHe Hape3Ke. CTePJKH IIPOHNKAIOr BRJy6b IIPOdyKTa, YTO6bI H36eKaTb IIPOkpyuHaHHa a IIpyJHKHHbIMexAHN3M ObecneHTIOCToRHHoe daBJIeHHe Ha IIPOdyKT B IIPOueCce Hape3Kn.

CNCTEMA KOHTPOJI BPAUCEHNA
- Kapetka n ToJIkateJIb Cha6KeHbI CnCTeMoI KOHTPOJI BpaIIeHHN, KOTopaa o6JIerHaAeT Hape3Ky ky6HKamH, pom6aMn n Hape3Ky «KyJIbeH».
ДИNHbI Bblpe3 Na TOnKaTeNe -YTO6bI KOHTpOJInpOBaTb BpaUeHne NOr YrIOM 90" npn Hape3Ke KByNKaMn.
KopoTkn BbIpe3
HaToIkaTeNe
-TO6bl
KOHTpoInpoBaTb
BpaueHne
POnyYrnom
45"npn Hape3Ke
pOmbkAm.

-
CToIop KapeTKn ORpaHnUHbAe T BpaIaTeJIbHbIe IBNXKeHHN B OJHOM HaIIpaBJIeHHN, 3aTeM B O6paTHOM; OH IIO3BOJIaET CJeJIaTb Hape3Ky paBHOMepHOH.
-
CToIop TaKke cIyKHT OIOpO IJIaTOJIkaTeJIa HIO3BOJIaET DePkaTb pyky IIpAIMO BO BpeMa IIPOH3BeDEHHaPe3KN «JyJIbeH».
Hape3ka

JIOMTNKIN KpyxOuyKN
-
YctaHOBHTIaTΦOpMy IJIpe3KJI JOMTHKAMH (S3).
-
OTKJIIOUHTe cHCTemy Hape3KN Ky6HKaMH (IIaTΦopMa 3aΦHKCHPOBaHa B KpaIHeM BepXHeM IIOJOKeHH).
-
OTPeryIpyiTe ToJIuHnHu Hape3Kn ( 4)
-
PacioIooKHTe Hape3aembI IpoDyKT B Kapetke.
-
IomeCTHTe ToIkaTeJIb Ha Kapetky (S6) HJeIaIte BO3BpaTHO-IIOCTyIIaTeJIbHbIe IBNKeHHK JLe3BnIO n 6paTHo, He OTnycKa pyKn IIIaccn.


Prrnnnne
Hape3ka XyIbeH
BbI6epHTe IJIaTΦopMy KJyJIbeH (\2) n yCTaHOBHTe eHa IIacCH (\5).
- OTKJIIOUHTe cHCTeMy Hape3KN Ky6NKaMn. KhoIka SYTEM CUBE B IIOJIOKeHH OFF. IIaTΦOpMa 3aΦHKcHpObaHa B KpaIHHem BEpxHem IIOJOKeHH.
PacnoJoxKHe Hape3aembI npOdyKT B Kapetke.
IIomeCTHTe TOJkATEJB Ha KapeTKy (86) HJeIaHTe BO3BpATHO-IOCTYIIaTEJIbHbIE DBHXKeHnK Je3BnIO O6pATHO, He OTIpycka pyKn IIIacn.

MEPbI I PEPdoCTOPOXHOCTN
MaHDoJIHa BaInep Ie BYEP cneuaIbHO pa3paBomana dIra obecneueHn MaKcMaJIbHo bezOnacHOZ uCNOIb3OBAHn 6 npouceCe BauuX KluHapbIX npUcOMoBJeu. Ondako omo ycmpoiucmbo npedonlaaem uCNOIb3OBAHue Je3uui upeheu c ocobo ocmpbmu acmAm. 3mo mpebyem ouenb ocMopooKHOz uCNOIb3OBAHn.Ipu3bIbaem Bac co6Ibodamb ciedyouue npabua bezOnacHocMu:
- Kapetka H TOJIKAteJIb 06ecIeHuBAOT IOJIHyO 6e3OHaCHOCTb; Heo6XoJHMO npaBnblHo yctaHOBTb Hx pRn HcNoJIb3OBAHH MaHdoJIHHb.
Bcerda 6epnte Iaccn MaIIOJIHHb, Je3BnI rpe6Hn 3a cneHaJIbHo IIpcIIHa3HaUcHHbc yuaCTKN.
KoHaMaHIOJIINHa Hc HcIOJIb3yCTc, OCTaJIByIc Ha Hei IIarFOpy IJIpe3KN JOMTHKaMn, c yCTaHOBJIeHHO ToJIINHOJ JOMTHKO B 0.
-XpaHHTe B HeIOCTyIOM IJIa ITei MeCte.
«LA MANDOLINE VIPER» is guaranteed for 2 years against manufacturing defect and when used under normal conditions. All documents, information, characteristics and photographs in this manual are for information only and are not warranted. We claim liability in event of inaccuracy thereof. We reserve the right to make any changes therein without prior notice.