
SB2900 - Blender AEG - Free user manual and instructions
Find the device manual for free SB2900 AEG in PDF.
| Product type | Blender with accessories (mixer, grinder, chopper, cooling stick) |
| Brand | AEG |
| Model | SB2900 |
| Mixing bowl capacity | 600 ml |
| Mini-bottle/grinder capacity | 300 ml |
| Number of speeds | 2 speeds + Pulse function + stop |
| Pulse function | Yes, for brief power bursts |
| Motor power | 400 W (estimated) |
| Power supply | 220-240 V, 50/60 Hz |
| Blade material | Stainless steel |
| Included accessories | Mixing bowl, mixing blade set, mini-bottle/grinder jar, grinder blade set, cooling stick with lid, chopper (base, shaft, blades, jar), drinking lid, thermal sleeve* |
| Safety | Safety lock preventing operation if the bowl is not properly attached |
| Cleaning | Dishwasher-safe accessories except blade sets and chopper base; base wiped with a damp cloth |
| Maximum continuous use | 1 minute with maximum load, then 10 minutes cooling |
| Maximum liquid temperature | 80 °C |
| Maintenance | Do not use abrasive products; dry completely after washing |
| Warranty | Consult the retailer or AEG authorized service |
Frequently Asked Questions - SB2900 AEG
User questions about SB2900 AEG
0 question about this device. Answer the ones you know or ask your own.
Ask a new question about this device
Download the instructions for your Blender in PDF format for free! Find your manual SB2900 - AEG and take your electronic device back in hand. On this page are published all the documents necessary for the use of your device. SB2900 by AEG.
USER MANUAL SB2900 AEG
Thank you for choosing this AEG product. We have created it to give you impeccable performance for many years, with innovative technologies that help make life simpler features you might not find on ordinary appliances. Please spend a few minutes reading to get the very best from it.
Visit our website to:

Get usage advice, brochures, trouble shooter, service information: www.aeg.com/webselfservice

Register your product for better service: www.registeraeg.com

Buy accessories and consumables for your appliance: www.aeg.com/shop
CUSTOMER CARE AND SERVICE
When contacting Service, ensure that you have the following data available:
- Model Number
- PNC number
- Serial number
The information can be found on the rating plate.
ENGLISH
Thank you for choosing an AEG product. In order to ensure the best results, always use original AEG accessories and spare parts. They have been designed especially for your product. This product is designed with the environment in mind. All plastic parts are marked for recycling purposes.
COMPONENTS
A. Spill-proof drinking lid with carry handle
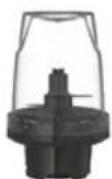
B. Blend Bottle
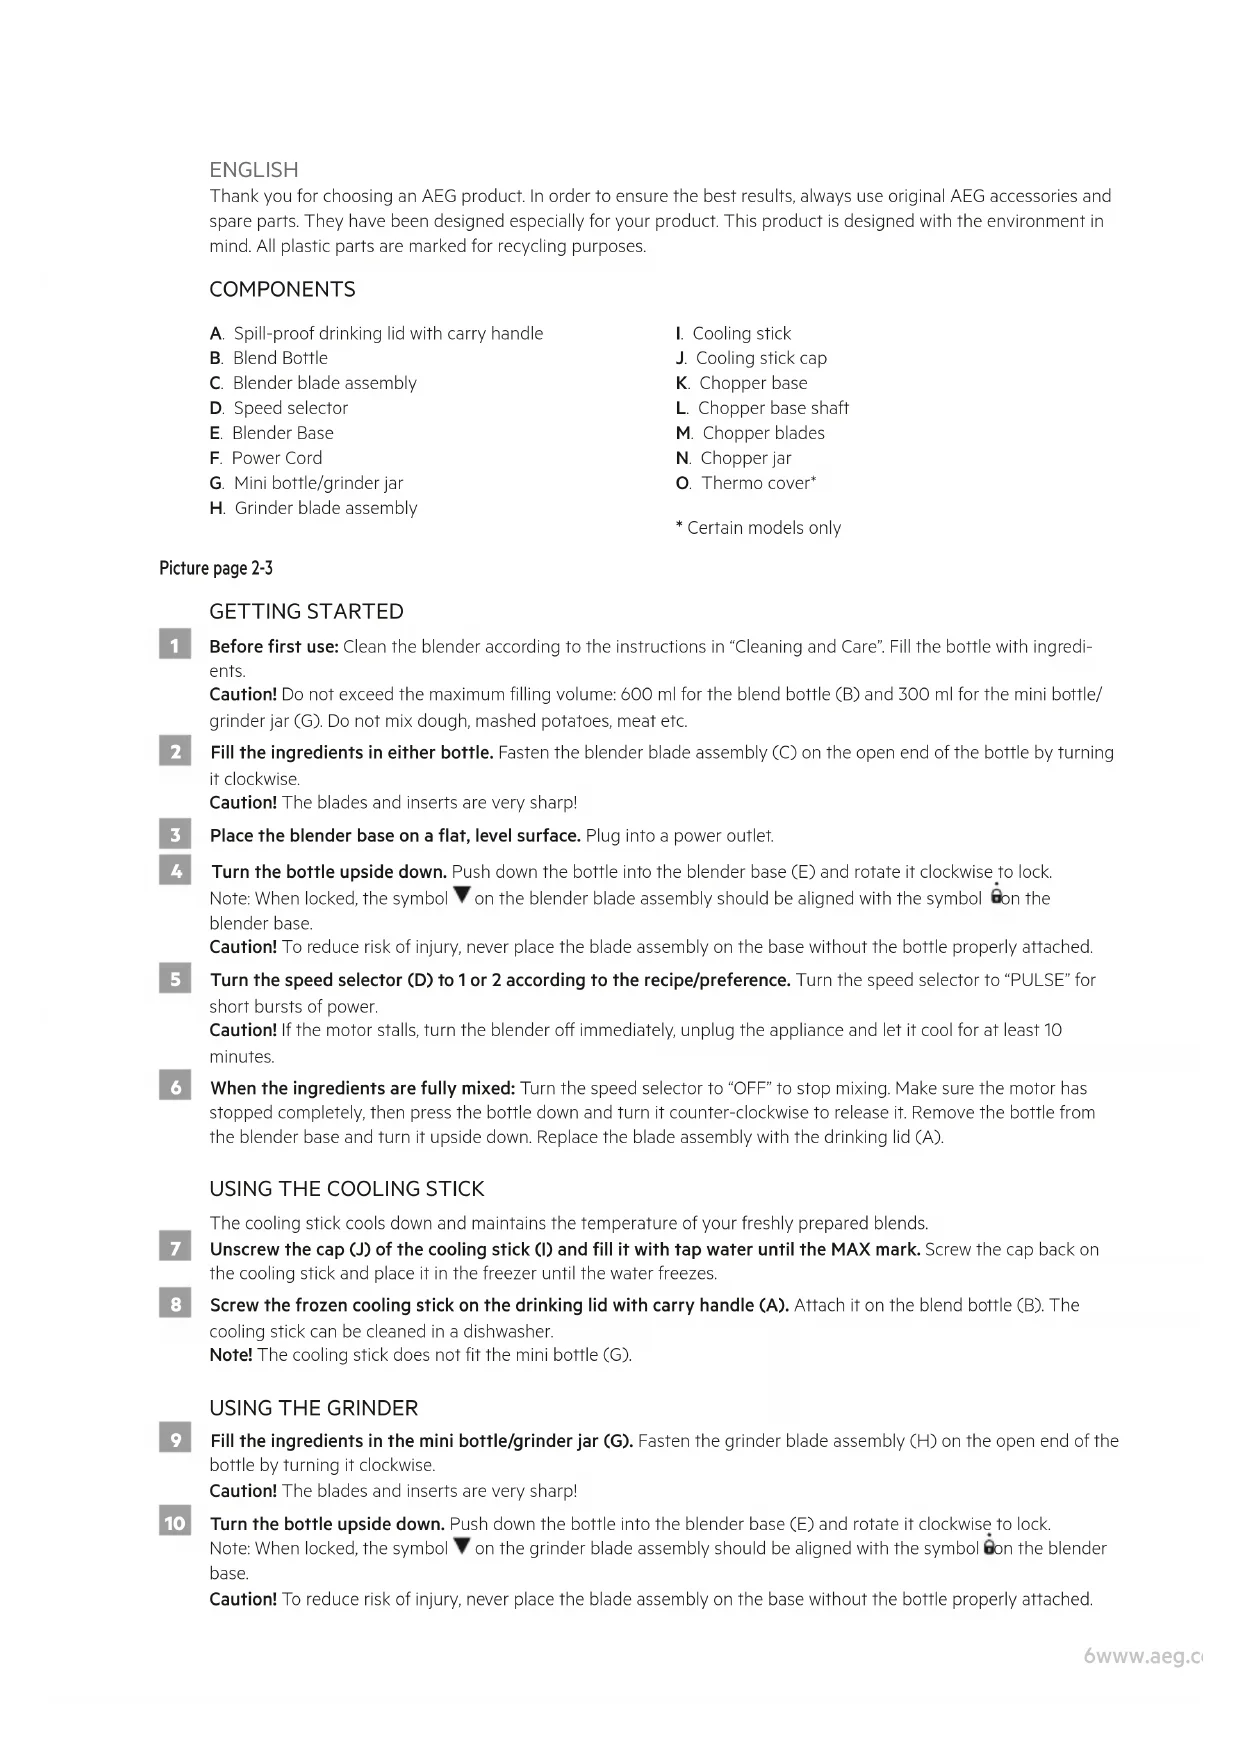
C. Blender blade assembly
D. Speed selector
E.Blender Base
F. Power Cord
G. Mini bottle/grinder jar
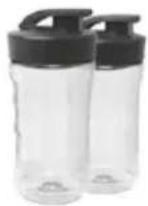
H. Grinding blade assembly
- Cooling stick
J. Cooling stick cap
K. Chopper base
L. Chopper base shaft
M. Chopper blades
N. Chopper jar -
Thermo cover*
-
Certain models only
Picture page 2-3
GETTING STARTED
Before first use: Clean the blender according to the instructions in "Cleaning and Care". Fill the bottle with ingredients.
Caution! Do not exceed the maximum filling volume: 600 ml for the blend bottle (B) and 300 ml for the mini bottle/ grinder jar (G). Do not mix dough, mashed potatoes, meat etc.
2 Fill the ingredients in either bottle. Fasten the blender blade assembly (C) on the open end of the bottle by turning it clockwise.
Caution! The blades and inserts are very sharp!
3 Place the blender base on a flat, level surface. Plug into a power outlet.
4 Turn the bottle upside down. Push down the bottle into the blender base (E) and rotate it clockwise to lock. Note: When locked, the symbol on the blender blade assembly should be aligned with the symbol 0 on the blender base.
Caution! To reduce risk of injury, never place the blade assembly on the base without the bottle properly attached.
5 Turn the speed selector (D) to 1 or 2 according to the recipe/preference. Turn the speed selector to "PULSE" for short bursts of power.
Caution! If the motor stalls, turn the blender off immediately, unplug the appliance and let it cool for at least 10 minutes.
When the ingredients are fully mixed: Turn the speed selector to "OFF" to stop mixing. Make sure the motor has stopped completely, then press the bottle down and turn it counter-clockwise to release it. Remove the bottle from the blender base and turn it upside down. Replace the blade assembly with the drinking lid (A).
USING THE COOLING STICK
The cooling stick cools down and maintains the temperature of your freshly prepared blends.
7 Unscrew the cap (J) of the cooling stick (I) and fill it with tap water until the MAX mark. Screw the cap back on the cooling stick and place it in the freezer until the water freezes.
Screw the frozen cooling stick on the drinking lid with carry handle (A). Attach it on the blend bottle (B). The cooling stick can be cleaned in a dishwasher.
Note! The cooling stick does not fit the mini bottle (G).
USING THE GRINDER
9 Fill the ingredients in the mini bottle/grinder jar (G). Fasten the grinder blade assembly (H) on the open end of the bottle by turning it clockwise.
Caution! The blades and inserts are very sharp!
10 Turn the bottle upside down. Push down the bottle into the blender base (E) and rotate it clockwise to lock. Note: When locked, the symbol on the grinder blade assembly should be aligned with the symbol on the blender base.
Caution! To reduce risk of injury, never place the blade assembly on the base without the bottle properly attached.
USING THE CHOPPER
11 Attach the chopper blades (M) on the chopper base shaft (L) by pushing it down until the blades click into position. Fill the ingredients in the chopper jar (N). Attach the chopper base (K) on the chopper jar by turning it clockwise until the chopper jar clicks into position.
12 Turn the chopper upside down. Push down the chopper into the blender base (E) and rotate it clockwise to lock. Note: When locked, the symbol on the chopper base should be aligned with the symbol 0 on the blender base. Caution! To reduce risk of injury, never place the blade assembly on the base without the chopper jar properly attached.
USING THE THERMO COVER* (CERTAIN MODELS ONLY)
Thermo Cover performance: Keeps liquids at the same temperature longer, whether cold or hot beverages. Place the bottle into the cover and close the zipper.
CLEANING AND CARE
14 Unplug the appliance. Accessories are dishwasher safe, except for the blender blade assembly (C), the grinder blade assembly (H) and the chopper base (K). Let all parts dry thoroughly. Caution! The blades and inserts are very sharp!
15 Clean the blender base with a damp cloth. Caution! Never immerse the blender base in water! Do not use abrasive cleaners or scouring pads when cleaning the appliance.
Enjoy your new AEG product!
SAFETY ADVICE
Read the following instruction carefully before using the appliance for the first time.
- This appliance shall not be used by children. Keep the appliance and its cord out of reach of children. Appliances can be used by persons with reduced physical, sensory or mental capabilities or lack of experience and knowledge if they have been given supervision or instruction concerning use of the appliance in a safe way and if they understand the hazards involved. Children shall not play with the appliance.
- Cleaning and user maintenance shall not be made by children without supervision.
- The appliance may only be connected to a power supply whose voltage and frequency comply with the specifications on the rating plate!
- Never use or pick up the appliance if:
- the supply cord is damaged,
- the housing is damaged.
- If the appliance or the supply cord is damaged, it must be replaced by the manufacturer, its service agent or similarly qualified person, in order to avoid hazard.
Always place the appliance on a flat, level surface. - Always disconnect the appliance from the supply if it is left unattended and before assembling, disassembling or cleaning.
Do not immerse the appliance in water or any other liquid. - Do not let cord hang over edge of table or counter, do not let cord contact hot surface, including the stove.
- Never use accessories or parts made by other manufactures not recommended or sold; may cause a risk of injury to persons.
-
Make sure the motor has completely stopped before disassembling and cleaning.
-
Avoid contact with moving parts. Contact could result in injury!
- The blades and inserts are very sharp! Danger of injury! Caution when assembling, disassembling after use or when cleaning! Ensure that the appliance is disconnected from the mains supply.
- Do not use the appliance for other purpose than its intended use.
- Do not attempt to bypass the safety interlock system that powers the appliance on.
- Never process boiling liquids (max 80^ ).
- Do not let this appliance run for more than 1 minutes at a time using heavy loads. After running for 1 minutes with heavy loads, the appliance should be left to cool for at least 10 minutes.
- When the mixer is subject to heavy use for chopping hard, dry substances such as nuts, the blades may become blunt. The mixer is not suitable for crushing ice, e.g. for cocktails. It is possible to add nuts occasionally to a mixture as long as this is not done on a continuous basis, as this will blunt the blades.
- Care shall be taken when handling the sharp cutting blades, emptying the bowl and during cleaning.
- Switch off the appliance and disconnect from supply before changing accessories or approaching parts that move in use.
- Do not use this appliance to stir paint. Danger, could result in an explosion!
- Do not exceed the maximum filling volume as indicated on the appliance.
- This appliance is intended for domestic use only. The manufacturer cannot accept any liability for possible damage caused by improper or incorrect use.
RECIPES
MAXIMUM PROCESSING TIME WITH HEAVY LOAD MAXIMUM CAPACITY
1 min 600 ml
RECOMMENDED BLENDING SPEED
| Recipe Ingredients Quantity Unit Time/Speed | ||||
| Pureeing raw vegetables | Carrots | 40 | g | 10 sec x (2-3) times Speed: 2 |
| Potatoes | 40 | g | ||
| Onions | 40 | g | ||
| Water | 80 | ml | ||
| Pureeing cooked vegetables | Onions | 25 | g | 10 sec x (2-3) times Speed: 1 |
| Carrots | 50 | g | ||
| Potato | 50 | g | ||
| Zucchini | 50 | g | ||
| Water | 100 | ml | ||
| Pitaya and cauliflower | Water | 120 | ml | 10 sec x (4-6) times Speed: 2 |
| Pitaya | \( \frac{1}{4} -\frac{1}{2} \) | pcs | ||
| Carrots | \( \frac{1}{4} -\frac{1}{2} \) | pcs | ||
| Cauliflower | 30 | g | ||
RECOMMENDED BLENDING SPEED
| Recipe Ingredients Quantity Unit Time/Speed | ||||
| Pineapple-apricots Smoothie | Pineapple in slices | 60 | g | 10 sec x (4-6) times Speed: 1 |
| Dried Apricots | 10 | g | ||
| Yoghurt | 75 | g | ||
| Banana Smoothie | Fresh banana 240 g | 30 sec/Speed: 2Milk 330 ml | ||
| Water 30 ml | ||||
| Apple and cauliflower | Apple 1/4 - 1/2 ml | 10 sec x (4-6) times Speed: 2 | ||
| Cauliflower 30-50 g | ||||
| Lemon | 1/4 | pcs | ||
| Water 120 ml | ||||
| Vitamine | Apple 40 g | 10 sec x (4-6) times Speed: 2 | ||
| Banana | 50 g | |||
| Papaya | 100 | g | ||
| Milk | 150 | ml | ||
| Celery and tomato | Celery | 200 | g | 10 sec x (4-6) times Speed: 1 |
| Tomato | 1/2 | pcs | ||
| Water 120 ml | ||||
RECOMMENDED CHOPPING SPEED*
| Recipe Ingredients Quantity Unit | Time/Speed | |||
| Chopped onions | Onions | 200 | g | 10 sec/Speed: 2 |
| Dry shrimp | 30 | g | 20 sec/Speed: 1 | |
| Garlic | 60 | g | 5 sec/Speed: 1 | |
| Chopped almonds | Almonds | 100 | g | 10 sec/Speed: 2 |
| Chopped beef | Beef | 250 | ml | Max 20 sec/Speed: 2 |
| Dry pepper | 30 | g | 20 sec/Speed: 1 | |
| Fresh red small pepper | 30 | g | 20 sec/Speed: 1 | |
| The rated power of the chopper is 185W. | ||||
| Pesto | Grated parmesan | ½ | cup | 90 sec Speed: 1 |
| Fresh basil leaves | 2 | cup | ||
| Garlic | 3 | cloves | ||
| Pine nuts | 1/3 | cup | ||
| Extra virgin olive oil | ½ | cup | ||
| Salt | ||||
| Black pepper | ||||
| Method 1. Grate parmesan in chopper. 2. Add basil, garlic cloves and pine nuts. Chop and mix in with parmesan. 3. Add 1/3 of the olive oil and mix until even. Gradually add the rest of the oil until the texture becomes creamy. 4. Add salt and pepper to taste. | ||||
| * Recommendation: Juicy fruits and vegetable should be processed in the blender instead of the chopper. Note: Maximum capacity for chopping beef: 250ml and indicated on the cup. | ||||
| RECOMMENDED GRINDING SPEED* | ||||
| Recipe Ingredients Quantity Unit Time/Speed | ||||
| Coffee Coffee beans Min 20 g 20-30 sec/Speed: 2 | ||||
| Nuts Nuts 100 g 20-30 sec/Speed: 2 | ||||
| * Recommendation: Juicy fruits and vegetable should be processed in the blender instead of the chopper. | ||||
TROUBLESHOOTING
| PROBLEM POSSIBLE | CAUSE SOLUTION | |
| The appliance does not turn on. | The appliance is not connected to a power source. | Connect the appliance to a power source. |
| The bottle and blade assembly is not installed correctly in the blender base. The safety interlock system prevents the machine to power on. | Install the bottle and according to instructions in “Operating instructions”. | |
| The motor stalls during operation. | If the motor stalls, turn the blender off immediately, unplug the appliance and let it cool for at least 10 minutes. | |
| Ingredients are too large. Cut all firm fruits and vegetables into pieces no larger than 1.8 cm2to 2.5 cm2. | ||
| Wrong ingredients. | The appliance intended use is production of beverages. Add fruits, vegetables or similar. Never mix ingredients such as dough, mashed potatoes, meat or similar. | |
| For any further problems, contact an authorized AEG service centre. | ||
DISPOSAL

This symbol on the product indicates that this product contains a battery which shall not be disposed with normal household waste.

This symbol on the product or on its packaging indicates that the product may not be treated as household waste. To recycle your product, please take it to an official collection point or to an AEG service center that can remove and recycle the battery and electric parts in a safe and professional way. Follow your country's rules for the separate collection of electrical products and rechargeable batteries.
AEG reserves the right to change products, information and specifications without notice.
DEUTSCH
AEG jie gao, caiiia 1 aie prilil jai l jaoaill jaiai AEG jia jia i jia i jia jia jia jia jia jia jia jia jia jia jia jia jia jia jia jia jia jia jia jia jia jia jia jia jia jia jia jia jia jia jia jia jia jia jia jia jia jia jia jia jia jia jia jia jia jia
1
Eikova otn oελiδa 2-3
EKKINH∑H XPH∑H
1 Pniv aTRO TIV TPOWTHPNO: Kaopaiote To pTAEVTEp OUmpwva ME TIG obnyies TOU TEPIpypovtai OTO KEpaalio "Kaopiaoic kai qpovtida. PiTe ta uikac oTo doxio.
Ppoox! Mny utepbaive Toy eviTo oyko TAnpwoanc: 600 ml yia To mToukaki avapicns (B) kai 300 ml yia To mvi Tnoukaki/boxeio uou (G).Mny avamivvute zuapi, Toupe, Kpeac K.
2 TOnoBtne Ta uIka oe OTOIOHnToe aTo ta MTOUkaiia. TEpeWote Tn diataaN aeTIDwV mTAEVTep (C) otynv aoixtn akpn Tou mTOUkaiou OTepovtac n Tg EIOStpOpa.
Ppoox! OI kai ta evtheta eapntmuata evai trolu aixunpa!
3 Totrothe note tn baoon tou mleve np eia enitebn, opiciovria enipaveia. suvdeote tn otny npia.
4 TupioTe avatnoa to moukai. NIEOTe to moukai TPOC ta kATW TPOC Tnv BaoTou pIavtep (E) KAI OtpesTe to dEiooTpoqa yia va aopalisei.
Enmuon: Otav aopaioei, to ouo oTo n diataaen aeTioov pTAEvTeP 0 npEe i va eivau Eouypamuaev o To ouoAo o Tn baoTou pTAEvTeP.
Pooox! Ia va Tepiopiae ToV Kivuvo Tpaumaiou, mV toTtoeite n diataqn mIav dEv exeToTOIOEIOI Owota to doxio.
Cebolas as rodela Cebola 200 g 10 sec/Speed: 2
Alho 60 g 5 sec/Speed: 1
600ml bottle Cooling Stick
Ref: ASBS1
PNC: 900168900/0
Chopper
Ref: ASBC1
PNC: 900168902/6
2x 300ml bottle
Ref: ASBEB2
PNC: 900168109/8

2x 600ml Bottle Covers
Ref: ASBBC1
PNC: 900169030/5

2x 300ml Bottle Covers
Ref: ASBBC2
PNC: 900169031/3
CoffeeGrinder
Ref: ASBG1
PNC: 900168901/8


- CUSTOMER CARE AND SERVICE
- ENGLISH
- COMPONENTS
- Picture page 2-3
- GETTING STARTED
- USING THE COOLING STICK
- USING THE GRINDER
- USING THE CHOPPER
- CLEANING AND CARE
- SAFETY ADVICE
- MAXIMUM PROCESSING TIME WITH HEAVY LOAD MAXIMUM CAPACITY
- RECOMMENDED BLENDING SPEED
- DISPOSAL
- DEUTSCH
- Eikova otn oελiδa 2-3
- EKKINH∑H XPH∑H
Brand : AEG
Model : SB2900
Category : Blender