
GH 500 W - Heating AEG - Free user manual and instructions
Find the device manual for free GH 500 W AEG in PDF.

| Product type | Radiant heating |
| Brand | AEG |
| Model | GH 500 W |
| Dimensions (W x H x D) | 1000 x 600 x 49 mm |
| Weight | 12.9 kg |
| Electrical power | 0.47 kW |
| Supply voltage | 230 V ~ 50 Hz |
| Protection class | I |
| Protection rating (IP) | IP24 |
| Color | White |
| Main material | Tempered safety glass (ESG) |
| Mounting type | Wall-mounted, vertical or horizontal |
| Functions | On/off by selector switch; compatible with room thermostat (optional) |
| Operating temperature | Approximately 100 °C |
| Minimum distance to floor | 500 mm |
| Minimum distance to walls/objects | 100 mm |
| Care and cleaning | Clean with a damp cloth and possibly a glass cleaner; do not use abrasive products |
| Safety | Do not cover; avoid contact with hot surface; keep children away |
| Child protection | Children under 3 years must be supervised; children 3-7 years must not plug in or adjust |
| Spare parts | Original replacement power cable; mounting bracket |
| Repairability | Installation and repairs by a qualified installer only |
| Warranty | According to conditions of country of purchase; manufacturer warranty for Germany, subsidiaries for other countries |
| Package contents | Unit, 1 mounting bracket, 1 wall console |
| Options | Room thermostat (optional) |
Frequently Asked Questions - GH 500 W AEG
User questions about GH 500 W AEG
0 question about this device. Answer the ones you know or ask your own.
Ask a new question about this device
Download the instructions for your Heating in PDF format for free! Find your manual GH 500 W - AEG and take your electronic device back in hand. On this page are published all the documents necessary for the use of your device. GH 500 W by AEG.
USER MANUAL GH 500 W AEG
Operation and Installation 11
natural_image
Technical diagram of a mechanical assembly with labeled component '1' (no text or symbols beyond label)D0000055943
1 Betriebsschalter
- General information 12
- Safety 12
- Appliance description....13
- Settings....13
- Cleaning, care and maintenance 14
- Troubleshooting 14
INSTALLATION
- Safety 14
- Appliance description....14
- Installation....14
- Handover 16
- Maintenance....16
- Specification 16
GUARANTEE
ENVIRONMENT AND RECYCLING
SPECIAL INFORMATION
- Keep children under the age of 3 away from the appliance if constant supervision cannot be guaranteed.
Children from the age of 3 to 7 may switch the appliance on and off, provided they are supervised or have been instructed in the safe operation of the appliance and understand any risks that may result. This is subject to the appliance having been installed as described.
Children from the age of 3 to 7 must not plug the power cable into its socket nor regulate the appliance.
• The appliance may be used by children aged 8 and older and persons with reduced physical, sensory or mental capabilities or a lack of experience and know-how, provided that they are supervised or they have been instructed on how to use the appliance safely and have understood the resulting risks.
Children must never play with the appliance. Children must never clean the appliance or perform user maintenance unless they are supervised.
• The appliance is not equipped with a facility for controlling room temperature. Ensure constant supervision if the appliance is operated in a small room and the persons within that room cannot leave the room on their own.
- Parts of the appliance can get very hot and may cause burns.
Particular caution is advised when children or vulnerable persons are present.
- Never cover the appliance.
- Never install the appliance directly below a wall socket.
• Install the appliance in such a way that the control equipment cannot be touched by a person in the bath or shower.
• In the case of a permanent connection, the appliance must be able to be separated from the power supply by an isolator that disconnects all poles with at least 3 mm contact separation.
• The power cable may only be replaced (for example if damaged) by a qualified contractor authorised by the manufacturer, using an original spare part.
- Secure the appliance as described in chapter "Installation / Installation".
OPERATION
1. General information
The chapters "Special Information" and "Operation" are intended for both the user and qualified contractors.
The chapter "Installation" is intended for qualified contractors.

Note
Read these instructions carefully before using the appliance and retain them for future reference.
Pass on the instructions to a new user if required.
1.1 Safety instructions
1.1.1 Structure of safety instructions

KEYWORD Type of risk
Here, possible consequences are listed that may result from failure to observe the safety instructions.
» Steps to prevent the risk are listed.
1.1.2 Symbols, type of risk
| Symbol Type of risk | |
| Injury | |
| Electrocution | |
| Burns(burns, scalding) | |
1.1.3 Keywords
| KEYWORD | Meaning |
| DANGER | Failure to observe this information will result in serious injury or death. |
| WARNING | Failure to observe this information may result in serious injury or death. |
| CAUTION | Failure to observe this information may result in non-serious or minor injury. |
1.2 Other symbols in this documentation

Note
General information is identified by the adjacent symbol.
» Read these texts carefully.
| Symbol Meaning | |
| Material losses(appliance damage, consequential losses and environmental pollution) | |
| Appliance disposal | |
» This symbol indicates that you have to do something. The action you need to take is described step by step.
1.3 Information on the appliance
| Symbol Meaning | |
| Never cover the appliance | |
1.4 Units of measurement

Note
All measurements are given in mm unless stated otherwise.
2. Safety
2.1 Intended use
This appliance is intended for domestic use. It can be used safely by untrained persons. The appliance can also be used in a non-domestic environment, e.g. in a small business, as long as it is used in the same way.
Any other use beyond that described shall be deemed inappropriate. Observation of these instructions and of instructions for any accessories used is also part of the correct use of this appliance.
2.2 General safety instructions

WARNING Injury
- Keep children under the age of 3 away from the appliance if constant supervision cannot be guaranteed.
Children from the age of 3 to 7 may switch the appliance on and off, provided they are supervised or have been instructed in the safe operation of the appliance and understand any risks that may result. This is subject to the appliance having been installed as described.
Children from the age of 3 to 7 must not plug the power cable into its socket nor regulate the appliance.
The appliance may be used by children aged 8 and older and persons with reduced physical, sensory or mental capabilities or a lack of experience and know-how, provided that they are supervised or they have been instructed on how to use the appliance safely and have understood the resulting risks.
Children must never play with the appliance. Children must never clean the appliance or perform user maintenance unless they are supervised.

WARNING Injury
The appliance is not equipped with a facility for controlling room temperature.
If operated on a time switch, the appliance may continue to heat the room unchecked.
Ensure constant supervision if the appliance is operated in a small room and the persons within that room cannot leave the room on their own.

WARNING Burns
Never operate the appliance when work, such as laying tiles, grinding, sealing, cleaning with naphtha or floor maintenance (spray, floor polish), is being carried out in the installation room.

WARNING Burns
Parts of the appliance can get very hot and may cause burns. Particular caution is advised when children or vulnerable persons are present.

WARNING Burns
- Never place any objects on top of the appliance.
- Do not lean any objects against the appliance.
- Never place any objects between the appliance and the wall.
Do not place any flammable, combustible or insulating objects or materials, such as laundry, blankets, magazines, containers with floor polish or naphtha, spray cans or similar, in close proximity to the appliance.

Never cover the appliance
Even covering up a section, for example with a towel, can cause overheating and damage the heating element.
- Never cover the appliance.
- Never stick anything onto the appliance (e.g. decorative foil, post-it notes).

Material losses
Observe the minimum clearances (see chapter "Specification / Minimum clearances").

Material losses
Never operate the appliance when the toughened safety glass or other components are damaged.
2.3 Test symbols
See type plate on the appliance. The type plate is located on the outer edge of the appliance near the ON/OFF switch.
3. Appliance description
The appliance is a wall mounted electric heating plate made of toughened safety glass.
A heating mat is glued to the back of the glass plate which warms the plate evenly.
The heat stored in the glass plate is delivered as infra-red radiation. Consequently, occupants and objects alike are heated in the room without any air turbulence.

Note
Never place objects between the appliance and persons requiring heating. In this case, the objects would be heated rather than the persons.
3.1 Toughened safety glass plate

Material losses
Never operate the appliance when the toughened safety glass is damaged.
The front of the appliance is made of 6 mm thick toughened safety glass.
If damaged, the safety glass will shatter into many small pieces with blunt edges to minimise any risk of injury. On very rare occasions, safety glass can spontaneously break even without external influences.
- Avoid any strain on the glass plate, e.g. caused by people or objects leaning on it.
- When selecting an installation site, ensure that no persons or objects can come to harm if the toughened safety glass spontaneously breaks.

Note
Raw mirror glass and cast glass are subject to special manufacturing processes. Spherical or linear inclusions and blisters due to a roll change and pattern offset cannot be excluded and do not constitute a quality defect.
4. Settings

CAUTION Burns
When pressing the ON/OFF switch, avoid any contact with the potentially hot glass plate.

Note
Depending on the size and design of the appliance, it may take some time for it to reach its operating temperature.

Note
When the appliance is first commissioned, it may give off an odour temporarily.
» Ensure that the room is adequately ventilated (with a partially open window, for example).
The ON/OFF switch is located on the outer edge of the appliance.
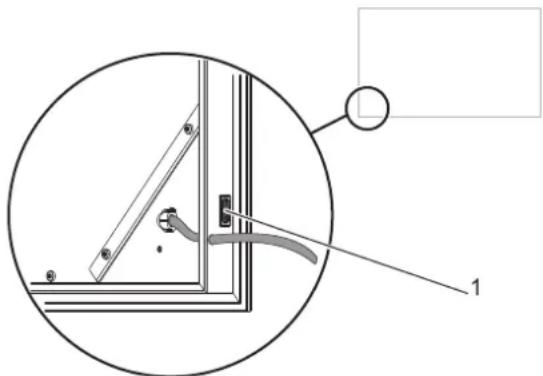
natural_image
Technical diagram of a mechanical assembly with labeled component '1' (no text or symbols beyond label)D0000055943
1 ON/OFF switch
» Switch the appliance on or off using the ON/OFF switch.
After reaching the operating temperature, the appliance heats constantly at around 100 °C.
You can operate the appliance with an optional wall mounted room thermostat.
» Observe the operating and installation instructions of the connected room thermostat.
5. Cleaning, care and maintenance
• After it has cooled down, clean the appliance with a damp cloth and, if necessary, commercial glass cleaner.
- Never use any abrasive or corrosive cleaning products.
6. Troubleshooting
| Problem Cause Remedy | ||
| The appliance does not heat up. | Fuse or safety switch has blown/tripped. | Check the respective fuses and safety switches.Remove the cause. |
| Overheating. The high limit safety cut-out has tripped. | Remove the cause. The appliance restarts after it has cooled down for a few minutes. | |
If you cannot remedy the fault, notify your qualified contractor. To facilitate and speed up your enquiry, please provide the serial number from the type plate (000000-0000-000000).
INSTALLATION
7. Safety
Only a qualified contractor should carry out installation, commissioning, maintenance and repair of the appliance.
7.1 General safety instructions
- We guarantee trouble-free function and operational reliability only if original accessories and spare parts intended for the appliance are used.
- Fit the appliance to a vertical wall that is temperature-resistant to at least 90 °C.
- Observe the minimum clearances to adjacent object surfaces (for minimum clearances see chapter "Specifications / Minimum clearances").
- Never install the appliance directly below a wall socket.
- Select your installation location so that no sockets are installed on the surface concealed by the appliance.
- When installing the heating appliance in rooms with a bath and/or shower, observe the safety zone according to VDE 0100, part 701, in accordance with the details on the appliance type plate. The mains junction box must not be installed in safety zone 1 or 2 in this instance.
• Install the appliance in such a way that switching and control equipment cannot be touched by a person in the bath or shower. - Design all materials in accordance with the rated consumption of the appliances.
- When selecting an installation site; ensure that no persons or objects can come to harm if the toughened safety glass spontaneously breaks.
7.2 Instructions, standards and regulations

Note
Observe all applicable national and regional regulations and instructions.
8. Appliance description
8.1 Standard delivery
The following are delivered with the appliance:
- 1 retaining bracket
- GH 300, GH 500: 1 wall mounting bracket
- GH 700, GH 900: 2 wall mounting brackets
8.2 Accessories
- Room temperature controller (optional)
9. Installation
9.1 Installation site

Material losses
Observe the minimum clearances (see chapter "Specification / Minimum clearances").

Material losses
The appliance is not suitable for mounting on ceilings or inclines.
- The appliance is exclusively designed for installation on a solid wall.
- Ensure the wall offers adequate load bearing capacity.
The appliance can be mounted in any room. You may only mount the appliance within protection zone 2 or higher in bathrooms.
9.2 Wall mounting

Note
You can mount the appliance both vertically and horizontally.
The ON/OFF switch position can be used to correctly align the appliance:
- When mounted vertically, the ON/OFF switch is located on the bottom edge of the appliance.
- When mounted horizontally, the ON/OFF switch is located on the left outer edge of the appliance when viewed from the front.
9.2.1 Wall mounting bracket
GH 300, GH 500:
The appliance comes with a wall mounting bracket.
- The wall mounting bracket is used to mount the appliance vertically or horizontally.
GH 700, GH 900:
The appliance comes with two wall mounting brackets of different lengths.
- The short wall mounting bracket is used to mount the appliance vertically.
- The long wall mounting bracket is used to mount the appliance horizontally.
9.2.2 Retaining bracket
The appliance is supplied with a retaining bracket to prevent the wall mounted appliance from moving or tilting. Two mounting holes for the retaining bracket are already pre-punched into the rear panel. These mounting holes are each provided with a fixing screw for the retaining bracket.
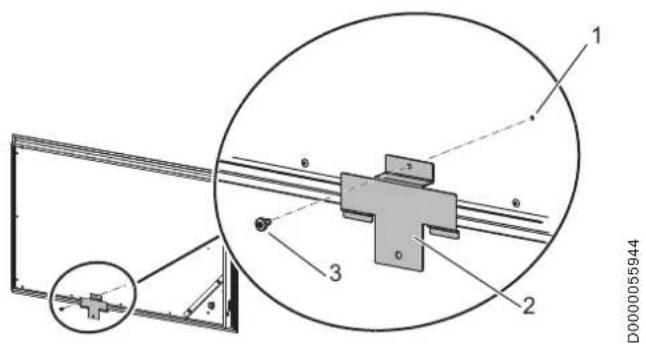
1 Pre-punched mounting hole
2 Retaining bracket
3 Fixing screw
- If you mount the appliance horizontally, attach the retaining bracket to the long edge of the appliance.
- If you mount the appliance vertically, attach the retaining bracket to the short edge of the appliance.
9.2.3 Wall mounting bracket installation

Note
Use the wall mounting bracket as a drilling template when marking the fixing holes.
» Attach the wall mounting bracket to the wall using one horizontal slot and one vertical slot.

Note
The screws and rawl plugs are not part of the standard delivery.
» Use appropriate fixing materials.
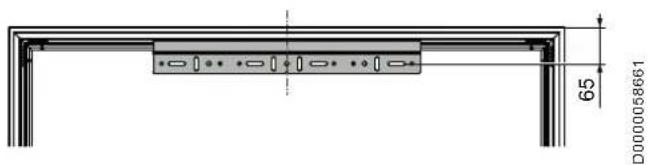
» Determine the position of the appliance. Mark the centre of the top edge of the appliance on the wall.
» Starting from the centre of the top edge of the appliance, mark the fixing holes for the wall mounting bracket on the wall.
» Drill the fixing holes for the wall mounting bracket.
» Secure the wall mounting bracket on the wall.
» Adjust the position of the wall mounting bracket until it is horizontally level. The horizontal and vertical slots in the wall mounting bracket enable alignment if drilled holes are not completely accurate.
9.2.4 Fitting the retaining bracket
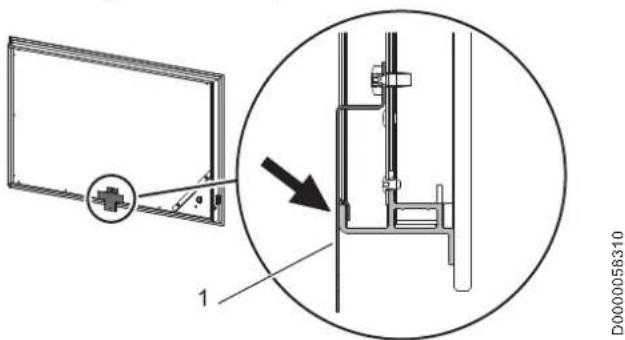
1 Retaining bracket
» Attach the retaining bracket to the rear panel using the fixing screw provided.
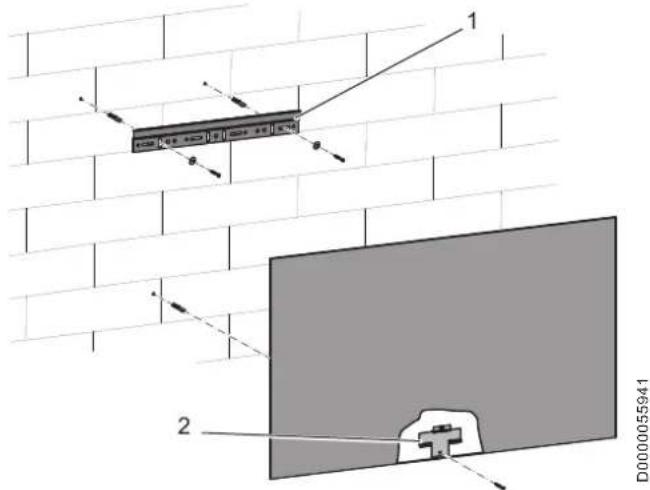
1 Wall mounting bracket
2 Retaining bracket
Material losses
Ensure that the power cable is not pinched or damaged when you hook in the appliance.
We recommend that you fully extend the power cable before wall mounting.
» Hook the appliance centrally onto the wall mounting bracket.
» Mark the fixing hole for the retaining bracket on the wall.
» Lift the appliance off the wall mounting bracket.
» Drill the fixing hole for the retaining bracket.
9.2.5 Hooking the appliance into place
» Hook the appliance centrally onto the wall mounting bracket.
» Lock the appliance in by securing the retaining bracket to the wall.
9.3 Power supply

WARNING Electrocution
Carry out all electrical connection and installation work in accordance with relevant regulations.

Material losses
The specified voltage must match the mains voltage. » Observe the type plate.

Material losses
This appliance is unsuitable for fixed electrical cables.
» Connect the appliance to a suitable socket.

Note
The power cable may only be replaced (for example if damaged) by a qualified contractor authorised by the manufacturer, using an original spare part.
The appliance is delivered fully wired. The following electrical connections are permissible:
| GH 300-900 | |
| Connection to a freely accessible standard socket with matching plug | X |
| Permanent connection to an appliance junction box with earth conductor | X |
9.3.1 Connection to a standard socket
» Plug the appliance into a standard socket.

Note
You can push excess cable back into the space between the rear panel and wall.
9.3.2 Permanent connection

WARNING Electrocution
In the case of a permanent connection, the appliance must be able to be separated from the power supply by an isolator that disconnects all poles with at least 3 mm contact separation.

Material losses
- Trim the power cable so it leads directly to the appliance connection socket.
- Ensure that, after trimming the power cable, the appliance can still be removed from the wall without problem.
» Trim the power cable by cutting off the plug.
» Connect the power cable to a suitable socket.
10. Handover
» Explain the functions of the appliance to the user.
Draw special attention to the safety instructions.
» Hand over the operating and installation instructions to the user.
11. Maintenance
The appliance contains no serviceable parts.
12. Specification
12.1 Dimensions and connections
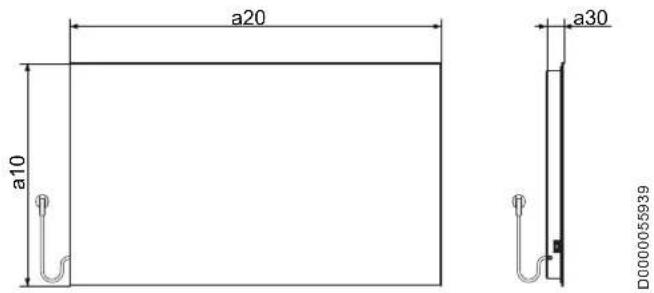
| GH 300 | GH 500 | GH 700 | GH 900 | ||||
| a10 | Appliance | Height | mm | 600 | 600 | 600 | 600 |
| a20 | Appliance | Width | mm | 600 | 1000 | 1400 | 1800 |
| a30 | Appliance | Depth | mm | 49 | 49 | 49 | 49 |
12.2 Minimum clearances
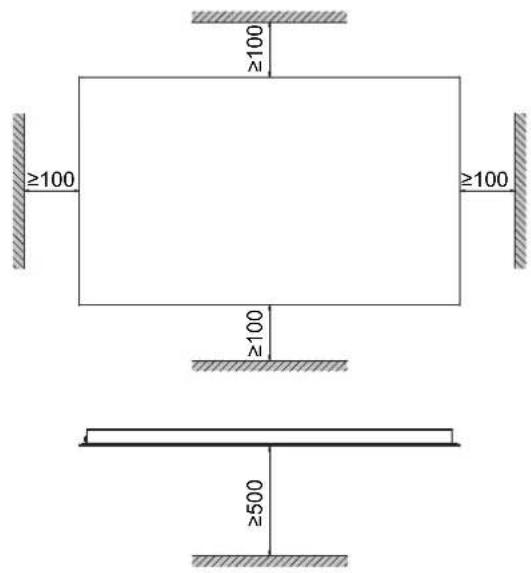
D0000055940
12.3 Data table
| GH 300 | S | GH 500 S | GH 700 S | GH 900 S | GH 300 W | GH 500 W | GH 700 W | GH 900 W | GH 300 K | GH 500 K | GH 700 K | GH 900 K | |
| 234434 | 234435 | 234436 | 234437 | 234438 | 234439 | 234440 | 234441 | 234442 | 234443 | 234444 | 234445 | ||
| Electrical data | |||||||||||||
| Connected load | kW | 0.28 | 0.47 | 0.66 | 0.85 | 0.28 | 0.47 | 0.66 | 0.85 | 0.28 | 0.45 | 0.635 | 0.82 |
| Power supply | 1/N/PE ~ 230 V 50Hz | 1/N/PE ~ 230 V 50Hz | 1/N/PE ~ 230 V 50Hz | 1/N/PE ~ 230 V 50Hz | 1/N/PE ~ 230 V 50Hz | 1/N/PE ~ 230 V 50Hz | 1/N/PE ~ 230 V 50Hz | 1/N/PE ~ 23O V 50Hz | 1/N/PE ~ 230 V 50Hz | 1/N/PE ~ 230 V 50Hz | 1/N/PE ~ 230 V 50Hz | 1/N/PE ~ 230 V 50Hz | |
| Dimensions | |||||||||||||
| Height | mm | 600 | 600 | 600 | 600 | 600 | 600 | 600 | 600 | 600 | 600 | 600 | 600 |
| Width | mm | 600 | 1000 | 1400 | 1800 | 600 | 1000 | 1400 | 1800 | 600 | 1000 | 1400 | 1800 |
| Depth | mm | 49 | 49 | 49 | 49 | 49 | 49 | 49 | 49 | 49 | 49 | 49 | 49 |
| Weights | |||||||||||||
| Weight | kg | 7.8 | 12.9 | 18.2 | 23.4 | 7.8 | 12.9 | 18.2 | 23.4 | 7.8 | 12.9 | 18.2 | 23.4 |
| Versions | |||||||||||||
| Colour | Black | Black | Black | Black | White | White | White | White | Crystal mirror | Crystal mirror | Crystal mirror | Crystal mirror | |
| IP rating | IP24 | IP24 | IP24 | IP24 | IP24 | IP24 | IP24 | IP24 | IP24 | IP24 | IP24 | IP24 | |
| Protection class | I | I | I | I | I | I | I | I | I | I | I | I | |
Guarantee
The guarantee conditions of our German companies do not apply to appliances acquired outside of Germany. In countries where our subsidiaries sell our products a guarantee can only be issued by those subsidiaries. Such guarantee is only granted if the subsidiary has issued its own terms of guarantee. No other guarantee will be granted.
We shall not provide any guarantee for appliances acquired in countries where we have no subsidiary to sell our products. This will not affect warranties issued by any importers.
Environment and recycling
We would ask you to help protect the environment. After use, dispose of the various materials in accordance with national regulations.
REMARQUES PARTICULIÈRES
UTILISATION
natural_image
Technical diagram of a mechanical assembly with labeled component 1, showing no readable text or symbols beyond the label.D0000055943
1 Sélecteur de mode
WAARSCHUWING verbranding
natural_image
Technical diagram of a mechanical assembly with a circular component and labeled part '1' (no text or symbols beyond labels)D0000055943
1 Werkschakelaar
Urzhumskaya street 4,
building 2
129343 Moscow
Tel. 0495 7753889
Fax 0495 7753887
Switzerland
STIEBEL ELTRON AG
Industrie West
Gass 8
5242 Lupfig
Tel. 056 4640-500
Fax 056 4640-501


- Betriebsschalter
- INSTALLATION
- GUARANTEE
- SPECIAL INFORMATION
- OPERATION
- General information
- Note
- Safety instructions
- Structure of safety instructions
- KEYWORD Type of risk
- Symbols, type of risk
- Keywords
- Other symbols in this documentation
- Information on the appliance
- Units of measurement
- Safety
- Intended use
- General safety instructions
- WARNING Injury
- WARNING Burns
- Never cover the appliance
- Material losses
- Test symbols
- Appliance description
- Toughened safety glass plate
- Settings
- CAUTION Burns
- ON/OFF switch
- Cleaning, care and maintenance
- Troubleshooting
- Safety
- General safety instructions
- Instructions, standards and regulations
- Appliance description
- Standard delivery
- Accessories
- Installation
- Installation site
- Wall mounting
- Wall mounting bracket
- GH 300, GH 500:
- GH 700, GH 900:
- Retaining bracket
- Wall mounting bracket installation
- Fitting the retaining bracket
- Hooking the appliance into place
- Power supply
- Connection to a standard socket
- Permanent connection
- Handover
- Maintenance
- Specification
- Dimensions and connections
- Minimum clearances
- Environment and recycling
- REMARQUES PARTICULIÈRES
- UTILISATION
- WAARSCHUWING verbranding
- Werkschakelaar
- Switzerland
Brand : AEG
Model : GH 500 W
Category : Heating