
DigitRadio 20 CD - Radio TECHNISAT - Free user manual and instructions
Find the device manual for free DigitRadio 20 CD TECHNISAT in PDF.
| Product Type | Under-cabinet kitchen radio |
| Brand | TechniSat |
| Model | DigitRadio 20 CD |
| Dimensions (W x H x D) | 224 mm x 72 mm x 160 mm (excluding mounting plate) |
| Weight | Approx. 1.5 kg (estimate) |
| Power Supply | Mains adapter: input AC 110-240 V~, 50-60 Hz; output DC 9 V, 1 A |
| Power Consumption | Operation: 9 W max; Standby: < 1 W |
| Frequency Ranges | FM: 87.5 - 108 MHz; DAB/DAB+: 174.928 - 239.200 MHz |
| Audio Output Power | 3 W (RMS) |
| Presets | 10 stations (DAB and FM) |
| Reception Modes | DAB/DAB+, FM, auxiliary input |
| Auxiliary Input | 3.5 mm AUX IN socket |
| Headphone Output | 3.5 mm headphone socket |
| Antenna | Extendable antenna (wire) |
| Equalizer | Treble and bass adjustment from -3 to +3 |
| Timer | Egg timer (1 to 99 minutes) |
| Clock | Auto update by DAB/FM or manual; 12/24 h formats |
| Backlight | 5 brightness levels when on; adjustable in standby (off or 5 levels) |
| Menu Language | Multiple languages available (adjustable) |
| Reset | Restore factory settings |
| Care and Cleaning | Wipe with a dry cloth only |
| Safety | Do not expose to water, rain or humidity; unplug during storms; repairs by qualified technician |
| Spare Parts and Repairability | Mains adapter supplied; for repairs contact an authorized service center |
Frequently Asked Questions - DigitRadio 20 CD TECHNISAT
User questions about DigitRadio 20 CD TECHNISAT
0 question about this device. Answer the ones you know or ask your own.
Ask a new question about this device
Download the instructions for your Radio in PDF format for free! Find your manual DigitRadio 20 CD - TECHNISAT and take your electronic device back in hand. On this page are published all the documents necessary for the use of your device. DigitRadio 20 CD by TECHNISAT.
USER MANUAL DigitRadio 20 CD TECHNISAT
Under Cupboard Kitchen Radio
CONTENTS
ENGLISH 3-20
FRANCAIS 21-38
ITALIANO 39-56
NEDERLANDS. 57-74
NORSK. 75-92
DANSK. 93-110
POLSKE 111-128
CEsTINA. 129-146
SLOVENSKÉ 147-164
Instruction Manual
DIGITRADIO 20
Under Cupboard Kitchen Radio
TechniSat
1 Important Safety Instructions

- Read these instructions.
- Keep these Instructions.
- Heed all Warnings.
- Follow all instructions.
- Do not use the speaker near water.
- Clean only with dry cloth.
WARNING: TO REDUCE THE RISK OF FIRE OR ELECTRIC SHOCK, DO NOT EXPOSE THIS SPEAKER TO RAIN OR MOISTURE.
To reduce the risk of electrical shock, fire, etc.:
- Do not place unit near any heat source such as radiators, heat registers, stoves, or other apparatus (including amplifiers) that produce heat.
- Do not block any ventilation openings of unit.
- The unit shall not be exposed to dripping or splashing and no objects filled with liquids, such as vases, shall be placed on the unit.
- Do not place any heavy loads onto the unit, and do not step on it, the load may fall and cause serious injury to the unit.
- Please read Rating Labels at the rear of unit for power input and other safety information.
- This unit is intended to be used only with the power supply provided.
- Protect the power cord from being walked on or pinched particularly at the plugs, convenience receptacles, and at any point where they exit from the unit.
-
Never unplug your unit by pulling on the power cord. Always grasp the plug firmly and pull straight out from the outlet.
-
Repair or replace all electric service cords that have become frayed or otherwise damaged immediately. Do not use a cord that shows cracks or abrasion damage along its length, the plug, or the connector end.
- To prevent fire or shock hazard, do not use this plug with an extension cord or other outlet unless the blades can be fully inserted to prevent blade exposure.
- During lightning or raining days, unplug the unit for additional protection during thunderstorms or when the unit is not used for prolonged periods. This will prevent damage to the unit from lightning and power surges.
- Do not attempt to carry out any service work yourself. By opening or removing the cabinet, you may be exposed to dangerous voltage or other hazards. Any service work should be carried out by qualified technicians.
- The normal function of the product may be disturbed by strong Electro-Magnetic Interference. If so, simply reset the product to resume normal operation by following the instruction manual. In case the function could not resume, please use the product in other location.
- The means of disconnecting this apparatus from the mains supply is plug of adaptor. The disconnect device shall remain readily operable.
- In the interests of safety and to avoid unnecessary energy consumption, never leave the unit switched on while unattended for long periods of time, e.g. overnight, while on holiday or while out of the house. Switch it off and disconnect the mains plug from the mains socket.
Content
1 Important Safety Instructions 4
2 Your radio. 8
3 Getting Started 10
4 DAB Mode. 13
4.1 Selecting another Station 13
4.2 Secondary Service 13
4.3 Scanning Stations 14
4.4 Manual Tune 14
4.5 Viewing Station Information 14
4.6 Showing Signal Strength 14
4.7 Storing Preset Stations 15
4.8 Recalling a Preset Station 15
5 FM Mode 15
5.1 Scan setting 16
5.2 Audio Settings 16
5.3 Storing Preset Stations 16
5.4 Recalling a Preset Station 17
6 Aux in Mode 17
7 General Operation 18
7.1 Setting Egg Timer 18
7.2 Setting Equaliser 18
7.3 Setting Time 18
7.4 Setting Backlight 19
7.5 Setting Language 19
7.6 Factory Reset 19
7.7 SW Version 20
8 Specification 20
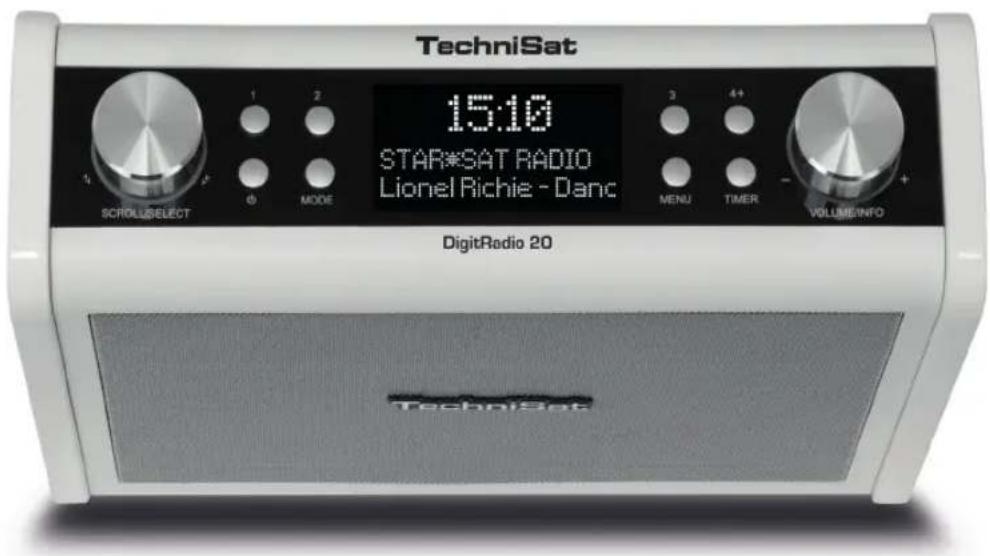
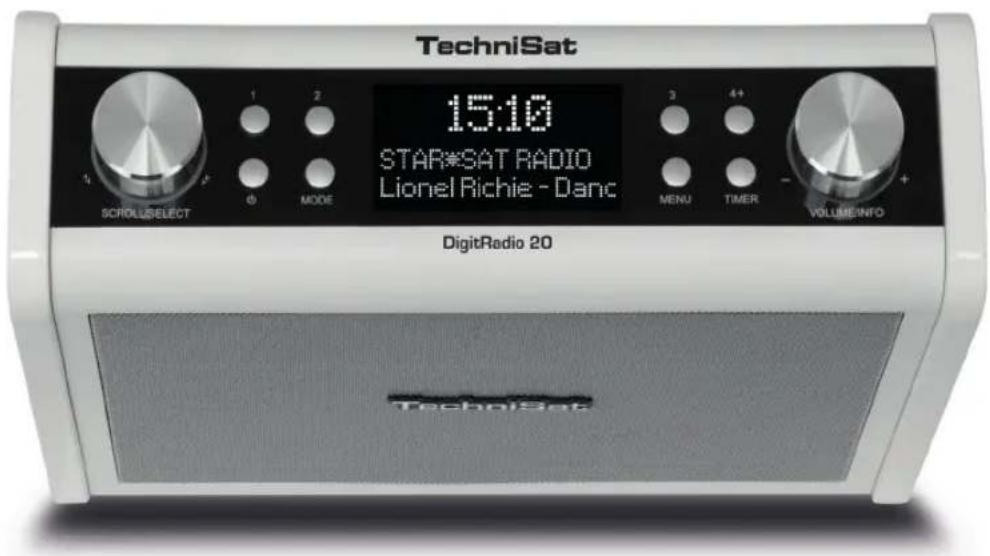
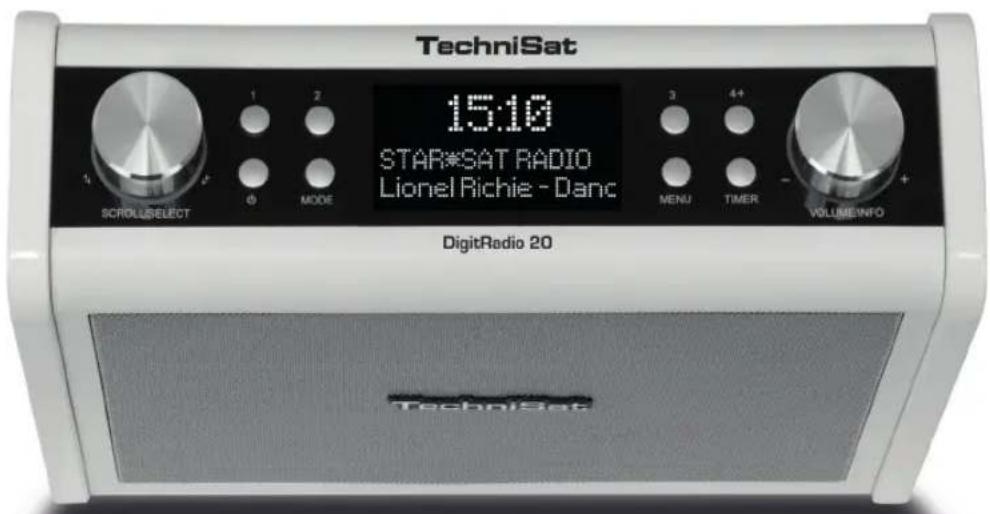
2 Your radio
Front view & Buttons
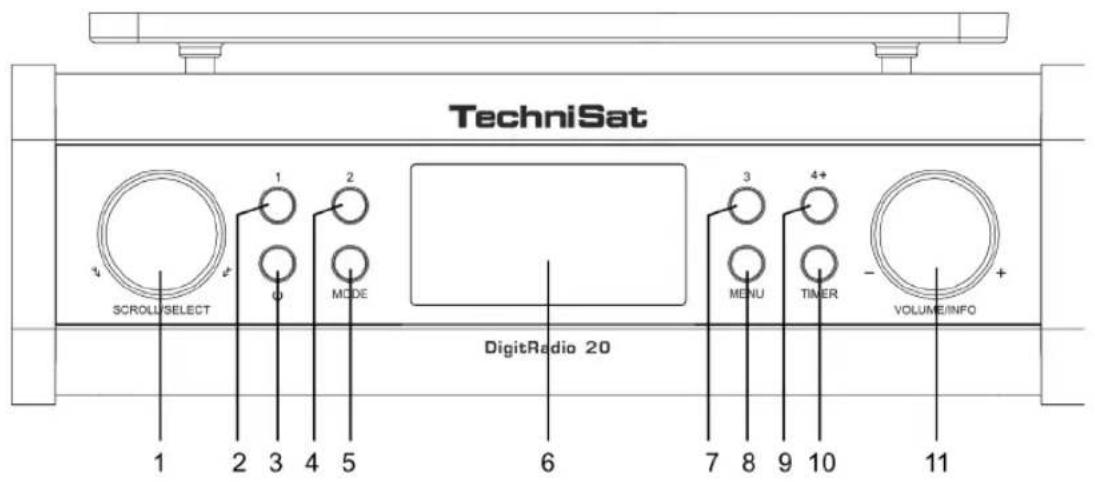
- SCROLL/SELECT knob Turn to browse options. Press to confirm option.
- 1 button Press and hold to directly save preset station 1. Press to directly recall preset station 1.
- POWER button Press to switch radio on or standby.
- 2 button (Refer to '1 button')
- MODE button Press to switch among
- Display
- 3 button (Refer to '1 button')
- MENU button Press to display or exit menu screen.
- 4+ button Press and hold to save preset stations 1-10. Press to recall preset stations 1-10
- TIMER button Press to set Egg timer.
- VOLUME/INFO knob Turn to adjust volume level. Press to browse program information.
Back view & connectors

- Antenna socket
- Headphone socket
- AUX IN socket
- DC IN 9V/1000mA socket
3 Getting Started
Carefully remove your radio from the box. You may wish to store the packaging for future use.
What you can find inside of your package
Main unit x 1
Instruction Manual x 1
Poweradapterx1
Fixing plate x 1
Fixing screws x 5
Positioning your Radio
There are two ways to place your radio - placing on a flat / stable surface or mounting under a cupboard.
Avoid the following locations:
Where the radio will be exposed to direct sunlight.
Where the radio will be close to heat radiating sources.
Where the humidity is high and ventilation is poor.
Where it is dusty.
Where it is damp or there is a possibility of water dripping or splashing onto unit.
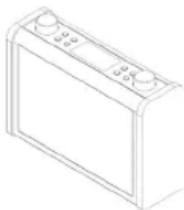
Place the Unit on a Table
Installing the Unit under a Cupboard
Make sure removing all connections from unit.
- Install the Fixing plate under cupboard with the supplied Fixing screws. (See Figure 1)
- Mount the unit to the installed Fixing plate. (See Figure 2 and 3)
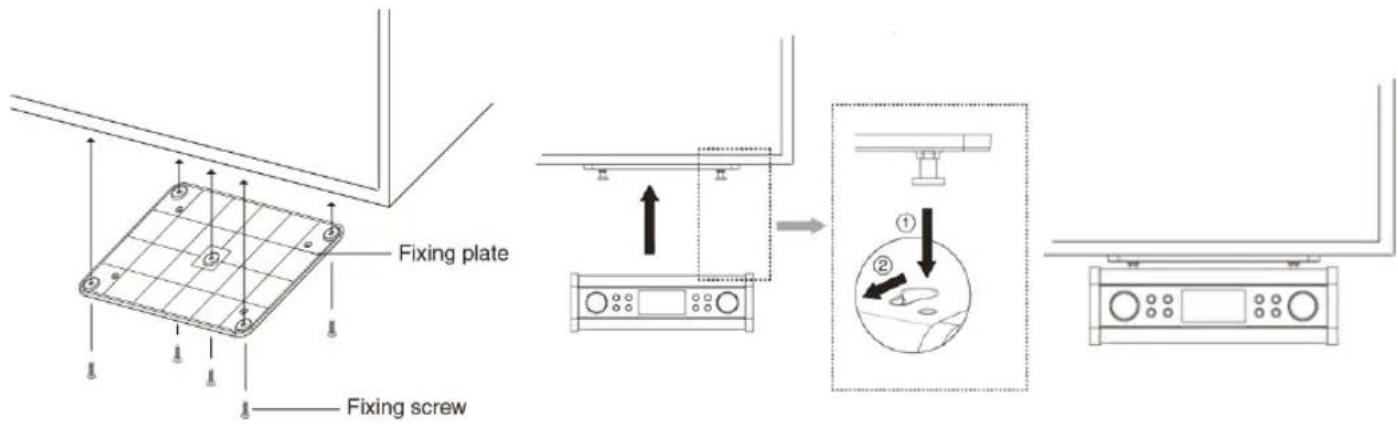
Figure 1 Figure 2 Figure 3
Caution
- Since the unit is heavy, be careful when installing the unit.
- To reduce the risk of fire, do not place any heating or cooking appliance beneath this unit.
- Install the unit so that its power cord can be connected directly to a wall outlet. Do not use a converter or extension cord.
- Install the unit as far as possible from a source of noise. (for example, refrigerator, microwave oven, fluorescent lamp, etc.)
Installing and Adjusting the Antenna
Extend the antenna and insert to Antenna socket of unit to ensure you receive the best reception possible in both DAB and FM radio modes. It may be necessary to adjust the position of the radio and /or antenna to achieve the best signal.
Turning the Unit On/Off
Connect the plug at the end of power adapter cable to the DC IN socket of unit. Then insert the power adapter into the mains socket. The unit will switch on.
Press POWER button to switch radio to standby mode.
To switch the unit off completely, unplug the power adapter from the mains socket.
Volume Control
While a program is playing, turn VOLUME/INFO knob clockwise or anti-clockwise to adjust volume level.
Using Headphones
Insert headphones fitted with a 3.5mm diameter stereo plug to Headphone socket of unit. Headphones are not supplied with this radio.
Turn down the volume before connecting headphones. Slowly raise the volume with the headphones on until you reach your desired level.

Caution: long-term exposure to loud music may cause hearing damage. It is best to avoid extreme volume when using headphones, especially for extended periods of time.
Automatically Setting the Clock
The clock can be set and updated automatically if is received DAB / FM signals in your location. In order for the clock to synchronise to the current local time you must leave it on a DAB or FM station for a short period of time. You can also choose how you would like to keep the clock up to date the DAB or FM radio signals. Press Menu button > Time > Auto update.
4 DAB Mode
When you turn on the radio it will automatically search and store all the available stations. You should conduct an additional Full Scan to ensure all stations are picked up and stored. It is also recommended every few months to run a new scan to pick up any new DAB/DAB+ that may have begun broadcasting after purchasing your DAB radio.
- For initial use, radio will carry out a full scan and store stations list in memory.
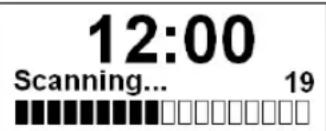
- Once the scanning is completed, the DAB/DAB+ stations will be displayed in alphanumeric order. The first station in the list will be selected to broadcast.

Note: if no DAB/DAB+ signal is found in your area, it may be necessary to relocate your radio to a stronger signal area.
4.1 Selecting another Station
While a program is playing, turn SCROLL/SELECT knob to show station list and select the station you want to play, and then press SCROLL/SELECT knob to confirm.
4.2 Secondary Service
You may see a “>>” symbol after the name of the station, this indicates that there are secondary services available to that station. These secondary services contain extra services that are related to the primary station. E.g. a sports station may want to add extra commentaries. The secondary services are inserted directly after the primary station (a “<<” symbol is before the name of the station) in the station list.
To select the secondary station, turn SCROLL/SELECT knob until you find the secondary service you want, and then press SCROLL/SELECT knob to select it.
When the secondary service ends, the unit will automatically switch back to the primary station.
4.3 Scanning Stations
Press MENU button, turn SCROLL/SELECT knob to select 'Full scan', and then press SCROLL/SELECT knob to automatically scan.
4.4 Manual Tune
This can help you when adjusting your antenna or when adding stations that were missed while auto tuning.
- Press MENU button, turn SCROLL/SELECT knob to select 'Manual tune', and then press SCROLL/SELECT knob to confirm, the display will show the channel number and frequency.
- Turn SCROLL/SELECT knob to step among the channels and then press SCROLL/SELECT knob select the current channel.

Note: If there is a multiplex corresponding to this channel and frequency, then the display will show a tuning meter with the signal strength and the multiplex name after a few seconds.
- To play the station, first press MENU button twice to exit manual tune.
4.5 Viewing Station Information
DAB/DAB+ stations broadcast additional information. Press VOLUME/INFO knob on the main unit repeatedly to view information through Scrolling text, Signal strength, Program Type, Ensemble, Frequency, Signal error, Bitrate, Codec, Audio format, Time and Date.
4.6 Showing Signal Strength
While you selected signal strength, a signal bar with the strength of the current station will show on the display. The indicator on the signal bar shows the minimum acceptable signal level.
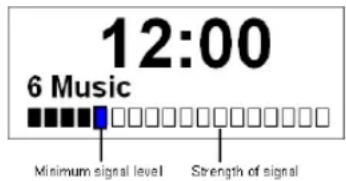

Note: Stations with signal strength below the minimum signal level may not provide a steady stream of audio.
4.7 Storing Preset Stations
Your radio can store up to 10 of your favourite DAB/DAB+ stations as preset stations. This will enable you to access your favourite stations quickly and easily.
- While your favorite station is playing, press and hold 4+ button until display show 'Preset Store <#: (Empty)>'.
- Turn SCROLL/SELECT knob to select among preset numbers 1-10, and then press SCROLL/SELECT knob to confirm. The display will show 'Preset # stored'.
- You can also press and hold 1, 2 or 3 button to directly save preset station to 1, 2 or 3. The display will show 'Preset # stored'.
4.8 Recalling a Preset Station
- Press 4+ button to show the saved preset stations.
- Turn SCROLL/SELECT knob to select the stored preset station you want to play, and then press the SCROLL/SELECT knob to confirm.
- The display will show 'Preset Recall <#: (Empty)>' if the preset station isn't allocated.
- You can also press 1, 2 or 3 button to directly recall preset station 1, 2 or 3. 'Preset Recall <#: (Empty)>' will be shown if the preset station isn't allocated.
5 FM Mode
Selecting FM Mode
- Press MODE button repeatedly to select FM mode.
-
For initial use, it will start at the beginning of the FM frequency range (87.50MHz). Otherwise, the last listened FM station will be selected.
-
To manually scan the FM frequency, while FM frequency shows up, turn SCROLL/SELECT knob clockwise or anti-clockwise to change the frequency by 0.05MHz per step.
- To automatically scan, while FM frequency shows up, turn SCROLL/SELECT knob clockwise or anticlockwise and then SCROLL/SELECT knob, your radio will skip forwards or backwards until it reached the next available station.
5.1 Scan setting
By default, FM scans stop at any available station. This may result in a poor signal-to-noise ratio (hiss) from weak stations.
- To change the scan settings to stop only at stations with good signal strength, press MENU button, and then turn SCROLL/SELECT knob to select ,Scan setting', press SCROLL/SELECT knob to confirm.
- Turn SCROLL/SELECT knob to select, Strong stations only, and then press SCROLL/SELECT knob to confirm.
5.2 Audio Settings
By default, all stereo stations are reproduced in stereo. For weak stations, this may result in a poor signal-to-noise ratio (hiss).
- To play weak stations in mono, press MENU button, and then turn SCROLL/SELECT knob to select 'Audio setting', press SCROLL/SELECT knob to confirm.
- Turn SCROLL/SELECT knob to select Forced mono, and then press SCROLL/SELECT knob to confirm.
5.3 Storing Preset Stations
Your radio can store up to 10 of your favourite FM stations. This will enable you to access your favourite stations quickly and easily.
- While your favorite station is playing, press and hold 4+ button until display show 'Preset Store <#: (Empty)>'.
-
Turn SCROLL/SELECT knob to select among preset numbers 1-10, and then press SCROLL/SELECT knob to confirm. The display will show 'Preset # stored'.
-
You can also press and hold 1, 2 or 3 button to directly save preset station to 1, 2 or 3. The display will show 'Preset # stored'.
5.4 Recalling a Preset Station
- Press 4+ button to show the saved preset stations.
- Turn SCROLL/SELECT knob to select the stored preset station you want to play, and then press the SCROLL/SELECT knob to confirm.
- The display will show 'Preset Recall <#: (Empty)>' if the preset station isn't allocated.
- You can also press 1, 2 or 3 button to directly recall preset station 1, 2 or 3. 'Preset Recall <#: (Empty)>' will be shown if the preset station isn't allocated.
6 Aux in Mode
AUX IN allows for quick and easy connection to an MP3 player or other external audio sources.
- Before connecting to the mains socket, use a 3.5mm audio cable (not supplied) to connect to your external audio device through the AUX IN socket of unit.
- Connect power adapter to mains socket, press POWER button to switch unit on.
- Press MODE button repeatedly to select Auxiliary Input mode.
- In Aux in mode, you may operate your audio device directly for playback features.
- To gain optimal volume levels, adjusting the output volume level on the audio device as well is recommended.

Note: the unit will automatically switch to standby mode after 15 minutes if the source device is disconnect, switch off or the volume is too close to mute.
7 General Operation
7.1 Setting Egg Timer
This feature enables you to set a countdown timer while cooking for enjoying your cooking hour easy.
- Press TIMER button to select 'Egg timer'.
- Turn SCROLL/SELECT knob to set the cooking time from 1 minute to 99 minutes, and then press SCROLL/ SELECT knob to confirm.
- The Egg timer will countdown. Press TIMER button can check the remaining time.
- Buzzer will be triggered once reached the time. Press TIMER button to turn buzzer off.
7.2 Setting Equaliser
Select this option to set sound equalization. Each setting will change the tone of the sound from your radio.
- Press MENU button, turn SCROLL/SELECT knob to select 'Equaliser', and then press SCROLL/SELECT knob to confirm.
- Turn SCROLL/SELECT knob to select 'Treble' or 'Bass', and then press SCROLL/SELECT knob to confirm.
- Turn SCROLL/SELECT knob to change the value of Treble or Bass among -3' to +3' , and then press SCROLL/SELECT to confirm.
7.3 Setting Time
- Press MENU button, and then turn SCROLL/SELECT knob to select 'Time', press SCROLL/SELECT knob to confirm.
- Turn SCROLL/SELECT knob to select options, and then press SCROLL/SELECT knob to confirm the setting.
| Set Time/date: Manually set-up | up both Time and Date |
| Auto update: 'Update from Any', 'Update from DAB', 'Update from FM' or 'No update' | |
| Set 12/24 hour format: 'Set 2' | 4 hour' or 'Set 12 hour' |
| Set date format: 'DD-MM-YYYY' | 'Y' or 'MM-DD-YYYY' |
- Then setting time according to your personal preference.
7.4 Setting Backlight
This feature enables you to adjust the brightness level of display.
- Press MENU button, and then turn SCROLL/SELECT knob to select 'Backlight', press SCROLL/SELECT knob to confirm.
- Turn SCROLL/SELECT knob to select 'Power on' or 'Standby', and then press SCROLL/SELECT knob to confirm.
- Turn SCROLL/SELECT knob to select backlight level, and then press SCROLL/SELECT knob to confirm the setting.
| Power on Level 1, Level 2, Level 3, Level 4 or Level 5 | |
| Standby Standby Off, Level 1, Level 2, Level 3, Level 4 or Level 5 |
7.5 Setting Language
This feature enables you to change menu language. The default menu language is German.
- Press MENU button, and then turn SCROLL/SELECT knob to select 'Language', press SCROLL/SELECT knob to confirm.
- Turn SCROLL/SELECT knob to select your language, and then press SCROLL/SELECT knob to confirm.
7.6 Factory Reset
Doing a factory reset clears all user defined setting, replacing them with the original default values, so time/date, DAB station list and preset stations are all lost.
-
Press MENU button, and then turn SCROLL/SELECT knob to select 'Factory Reset', press SCROLL/SELECT knob to confirm.
-
Turn SCROLL/SELECT knob to select 'YES', and then press SCROLL/SELECT knob to confirm.
7.7 SW Version
Press MENU button, and then turn SCROLL/SELECT knob to select 'SW version', press SCROLL/SELECT knob to confirm. The software version will show on the display.
8 Specification
| Items Specifications | |
| Description: Under Cupboard Kitchen Radio | |
| Frequency Range: FM: 87.5-108 MHz | DAB/DAB+: 174.928-239.200 MHz |
| Power Requirements: AC Input: 110-240V~, 50-60 Hz | DC Output: 9V, 1000mA (please use our provided adaptor) |
| Audio Output Power: 3W rms | |
| Power Consumption: Operation: 9W (Max) | Standby: < 1W |
| Dimension (W x H x D): 224mm x 72mm x 160mm (not including Fixing plate) | |

CE
This symbol on the product or in the instructions means that your electrical and electronic equipment should be disposed at the end of its life separately from your household waste. For more information, please contact the local authority or your retailer where you purchased the product.
Mode d'emploi
DIGITRADIO 20
Radio de cuisine suspendue
TechniSat
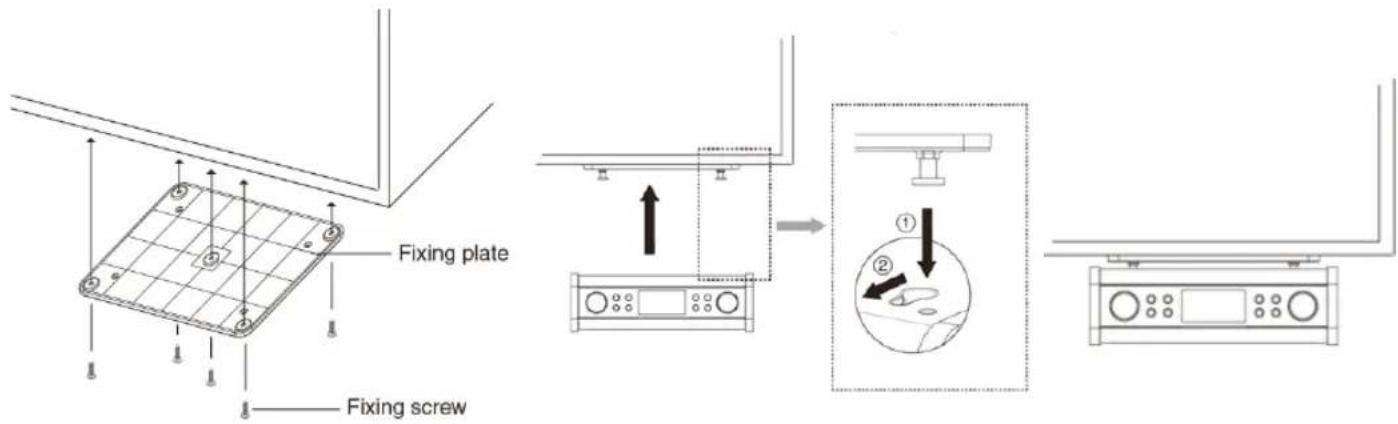
Figure 1 Figure 2 Figure 3
Attention
4.3 Zenders scanners
7.2 Indstilling at Equaliser
Vaelg denne valgmulighed for at indstille toneudligning. Hver indstilling aendrer tonen for lyden fra din radio.
- Tryk på knappen MENU, drej knappen SCROLL/SELECT (RUL/VÆLG) for at vælgge "Equaliser", og tryk derefter på knappen SCROLL/SELECT (RUL/VÆLG) for at bekraefte.
- Drej knappen SCROLL/SELECT (RUL/VELG) for at vaelge "Treble (Diskant)" aller "Bass", og tryk derefter pa knappen SCROLL/SELECT (RUL/VELG) for at bekraefte.
- Drej knappen SCROLL/SELECT (RUL/VELG) for at aendre vardien for Treble aller Bass mellem "-3" til "+3", og tryk derefter pa knappen SCROLL/SELECT (RUL/VELG) for at bekrafte.
Kuchynské rádio pod kuchynskú linku
TechniSat
- CONTENTS
- Instruction Manual
- Important Safety Instructions
- To reduce the risk of electrical shock, fire, etc.:
- Content
- Your radio
- Front view & Buttons
- Back view & connectors
- Getting Started
- What you can find inside of your package
- Positioning your Radio
- Place the Unit on a Table
- Installing the Unit under a Cupboard
- Caution
- Installing and Adjusting the Antenna
- Turning the Unit On/Off
- Volume Control
- Using Headphones
- Automatically Setting the Clock
- DAB Mode
- Selecting another Station
- Secondary Service
- Scanning Stations
- Manual Tune
- Viewing Station Information
- Showing Signal Strength
- Storing Preset Stations
- Recalling a Preset Station
- FM Mode
- Selecting FM Mode
- Scan setting
- Audio Settings
- Storing Preset Stations
- Recalling a Preset Station
- Aux in Mode
- General Operation
- Setting Egg Timer
- Setting Equaliser
- Setting Time
- Setting Backlight
- Setting Language
- Factory Reset
- SW Version
- Specification
- Mode d'emploi
- Attention
- Zenders scanners
- Indstilling at Equaliser
Brand : TECHNISAT
Model : DigitRadio 20 CD
Category : Radio