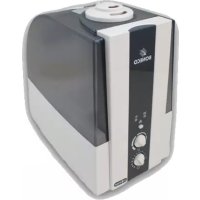
U7137 - Humidifier BONECO - Free user manual and instructions
Find the device manual for free U7137 BONECO in PDF.


Frequently Asked Questions - U7137 BONECO
User questions about U7137 BONECO
0 question about this device. Answer the ones you know or ask your own.
Ask a new question about this device
Download the instructions for your Humidifier in PDF format for free! Find your manual U7137 - BONECO and take your electronic device back in hand. On this page are published all the documents necessary for the use of your device. U7137 by BONECO.
USER MANUAL U7137 BONECO
natural_image
Illustration of two BONECO air purifiers with control knobs and ventilation gauges (no text or symbols on the devices themselves)
BONECO
AIR COMFORT
BONECO U7138
DN
text_image
RZ BD Ultrasonic 7137/38.Indd 18.7.2005, 10:48 Ohl2
bar
| Category | Value | |---|---| | Gebrauchsanweisung | de | | Instructions for use | en | | Mode d'emploi | fr | | Gebruiksaanwijzing | nl | | Istruzioni per l'uso | it | | Instruciones para el uso | es | | Használati útmutató | hu | | Instrukcja obsługi | pl |
text_image
RZ BD Ultrasonic 7137/38.Indd 18.7.2005, 10.48 Unr3 3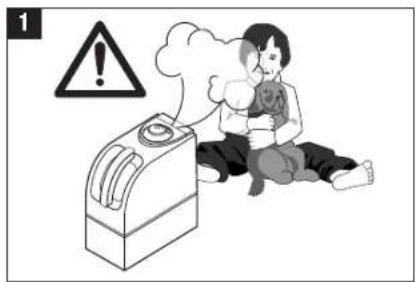
text_image
1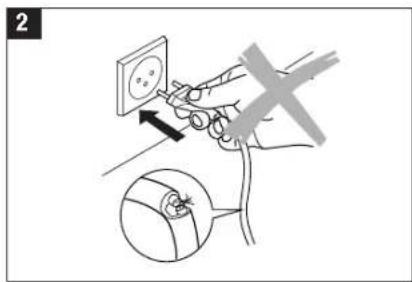
text_image
2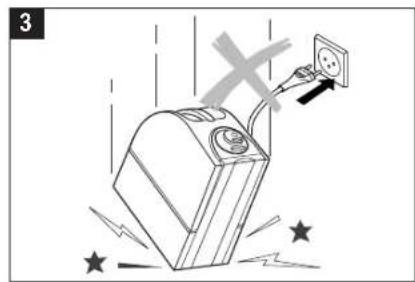
natural_image
Illustration of a device emitting electrical shock with stars and lightning bolts (no text or symbols)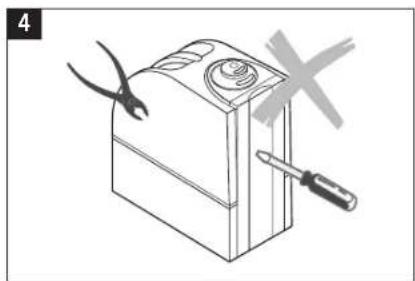
natural_image
Line drawing of a battery with a screwdriver and pliers, no text or symbols present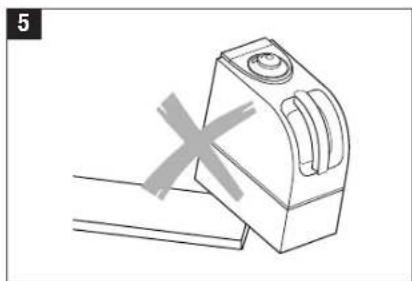
natural_image
Simple line drawing of a mechanical device with a cross mark, no text or symbols present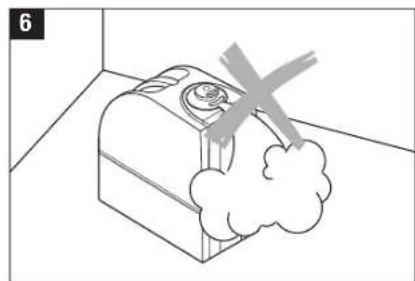
natural_image
Simple line drawing of a device with a cross mark and cloud shape, no text or symbols present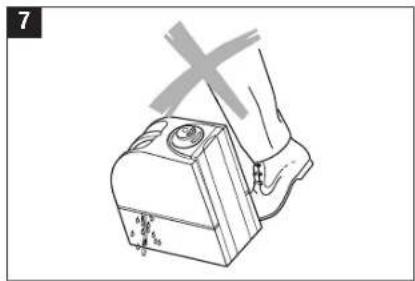
natural_image
Illustration of a hand pressing a button on a device (no text or symbols visible)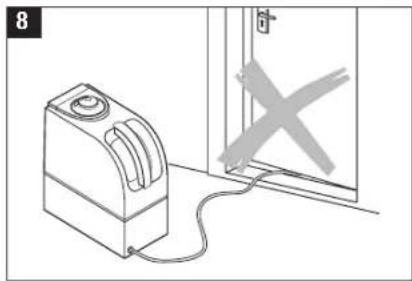
natural_image
Simple line drawing of a device next to a door with a cross mark (no text or symbols)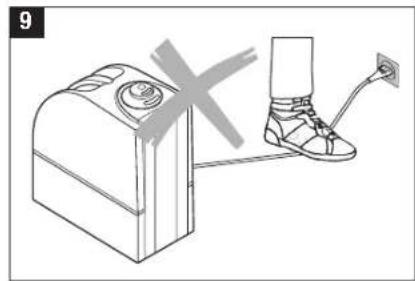
natural_image
Illustration of a device connected to a foot with a foot wearing a high-visibility shoe (no text or symbols)Gerätebeschreibung
natural_image
Illustration of a sofa and two household appliances with crossed-out X marks (no text or symbols)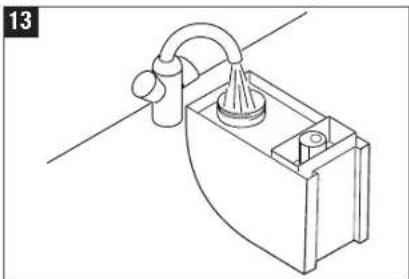
natural_image
Line drawing of a mechanical device with a lever and base (no text or symbols)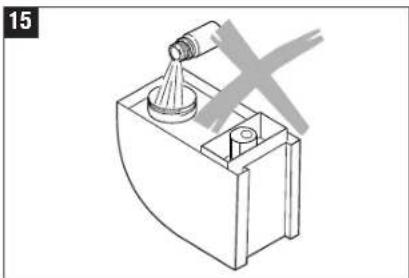
natural_image
Technical line drawing of a mechanical device with a conical component and a cross mark (no text or symbols)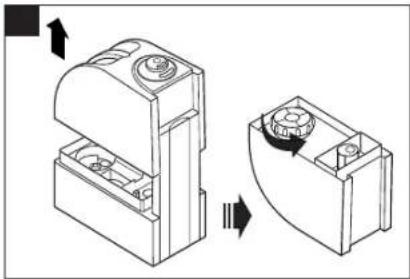
natural_image
Technical line drawing of a mechanical component with two views showing internal structure and rotation (no text or symbols)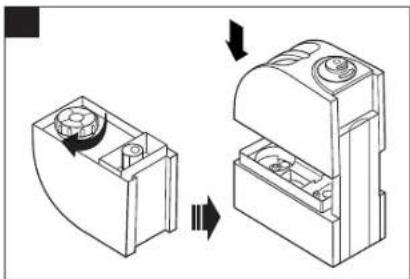
natural_image
Diagram showing a mechanical component before and after assembly, with no visible text or symbols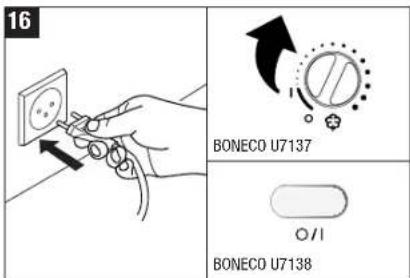
text_image
16 BONECO U7137 BONECO U7138de
natural_image
Top-down schematic of a device interior showing internal components and a highlighted section (no text or symbols)

Bedienung U7138
text_image
H G J A B O S E AUTO/SLEEP DESired CURRENT 88% 1 2 4 6 G I A I B A B A Fnatural_image
Two-step illustration showing hands holding a container and pouring liquid into a potted plant (no text or symbols)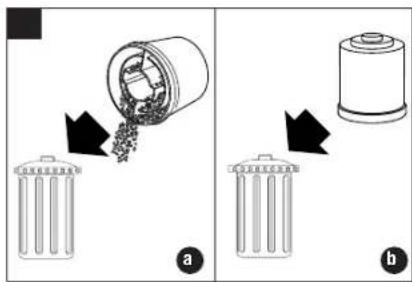
text_image
Diagram illustrating the process of removing a plastic bottle into a cylindrical container, labeled with steps a and b.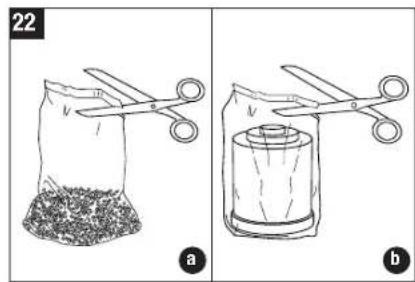
text_image
22 a b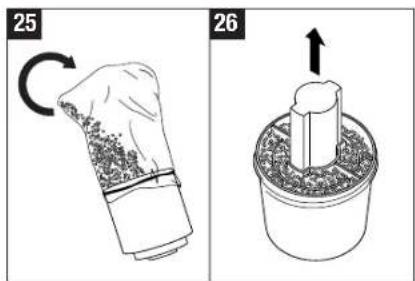
text_image
25 26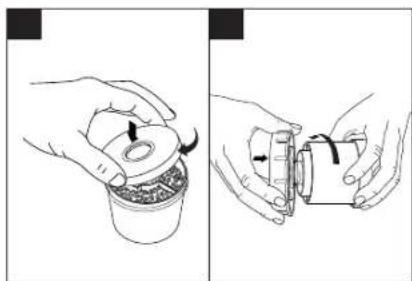
natural_image
Two-step illustration showing hands holding a container and a mechanical component, no text or symbols present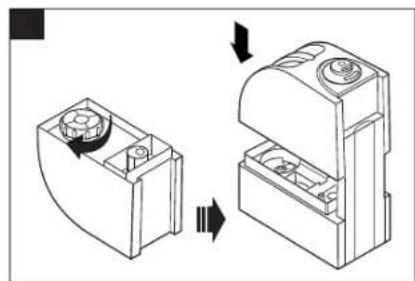
natural_image
Diagram showing two mechanical components with directional arrows indicating motion (no text or symbols)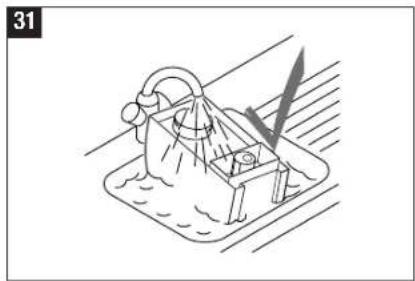
natural_image
Line drawing of a mechanical device with a lever and base, no text or symbols present
text_image
32 33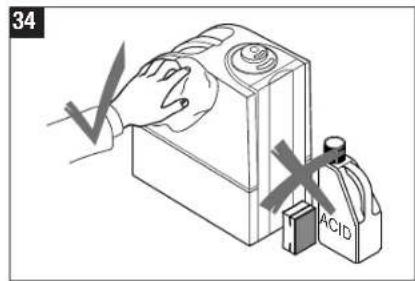
text_image
34 ACIDCongratulations on your choice of the Ultrasonic BONECO U7137 / BONECO U7138!
Did you know that dry room air:
- Causes the membranes in your respiratory system to dry out, and also causes chapped lips and stinging eyes?
- Encourages infections and illnesses of respiratory system?
- Causes weariness, tiredness and poor concentration?
• Stresses household pets and house plants? - Encourages the formation of dust and the electrostatic charging of textiles made of synthetic fibres, carpets and plastic flooring?
• Damages furnishings made of wood and parquet?
• Detunes musical instruments?
General information
A comfortable atmosphere indoors is reached with a relative humidity level between 40 and 60%. Your humidifier controls automatically the humidity level according to desired setting. If the air is too dry, the humidifier will automatically switch on. As soon as the desired humidity level is reached, it will switch off.
Safety instructions
- Read the operating instructions carefully before using the humidifier and keep them for later reference.
- Connect the unit only to alternating current with voltage according to the rating label.
- Only use the humidifier indoors and within the specified technical data. If used for a purpose for which it is not intended it could cause serious danger to health and life.
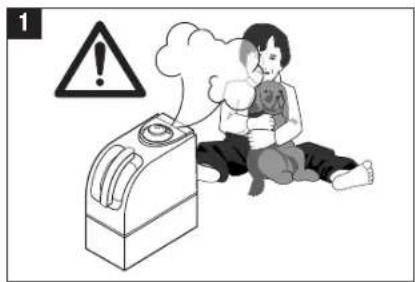
- Children cannot recognise the hazards associated with the usage of electrical appliances. For this reason, always supervise children when they are near the humidifier (image 1).
- Persons who are not familiar with the operating instructions, as well as children and persons under the influence of medication, alcohol, or drugs are not permitted to operate the appliance, or are only permitted to operate it under supervision.
- Never use the appliance if there is any damage to the appliance or cable (2), after malfunction, after the appliance has been dropped (3) or damaged in any other way.
- Only operate the humidifier when it is completely assembled.
- Repairs of electrical appliances are only to be made by qualified service engineers (4). Improper repair work can cause considerable danger to the user.
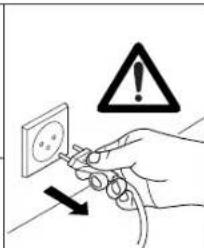
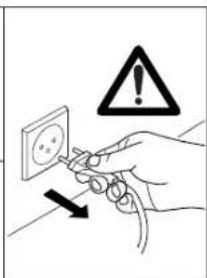
- Disconnect the appliance from the mains power before filling/emptying the water tank, before cleaning/maintenance, assembling/dismantling of individual parts and before moving the appliance.
- Do not touch the atomiser during operation. Although it is not dangerous, it is unpleasant due to the high frequency oscillation.
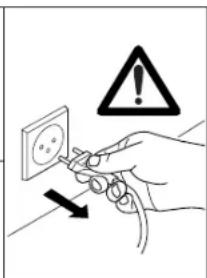
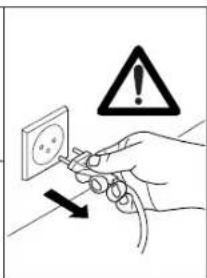
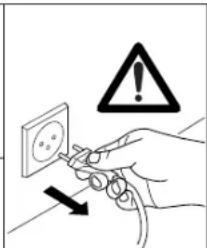
- Never pull the plug from the mains socket by the cable or with wet hands.
- Place the humidifier on a dry, level surface (5).
-
Do not place the appliance directly on the floor or next to heating.
-
If the mist comes in contact with the floor prior to evaporating, the flooring surface can become damaged (6). We do not accept any liability for damages in the case of wrong placement of the unit.
- Do not pour water into the vapour outlet of the evaporator.
- Do not put any additives in the water (e.g. fragrances, essential oils, water fresheners, etc.)
- Do not submerse the main body in water or other liquids.
- Place appliance where it is not easily knocked over by persons in the household (7).
• Always unplug when not in use. - Do not run power cords under carpets, and do not cover with throw rugs. Arrange cord such that it will not be tripped over.
- Do not use the appliance where combustible gases or vapors are present.
- Do not expose the appliance to rain, or use near water, in a bathroom, laundry area or other damp location.
- Do not allow foreign objects to enter ventilation.
- Do not block air outlets or intakes.
- Do not sit, stand or place any heavy objects on the appliance.
- The use of water additives, such as ethereal/essential oils, fragrances, eucalyptus, water conditioners etc., damages the tank material and as a consequence the whole unit. Any use of such additives will void the manufac-turer's warranty.
- Remark: Neither humans nor animals can hear the high frequency vibrations.
text_image
1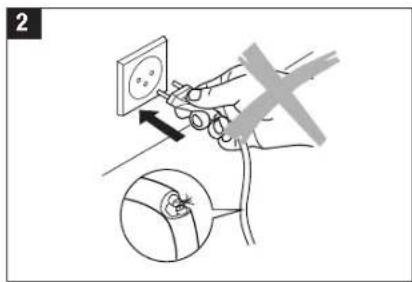
text_image
2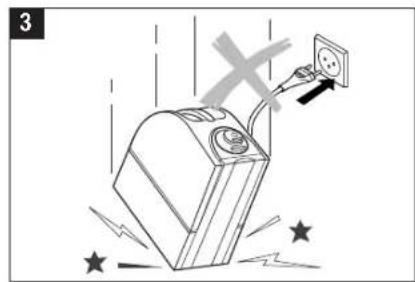
natural_image
Illustration of a device emitting electrical shock with stars and lightning bolts (no text or symbols)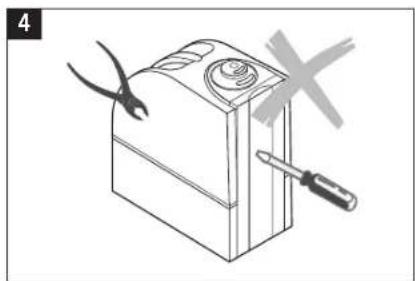
natural_image
Line drawing of a battery with a screwdriver and pliers, no text or symbols present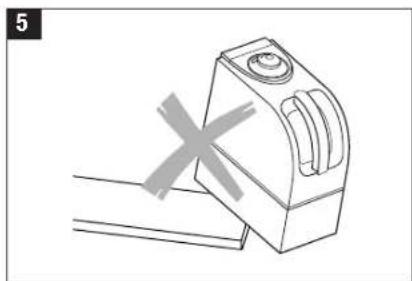
natural_image
Simple line drawing of a mechanical device with a cross mark, no text or symbols present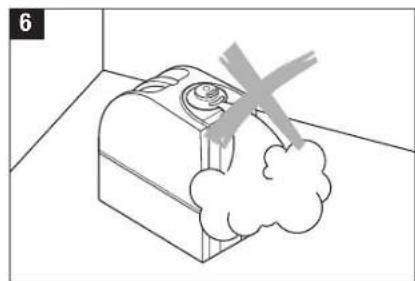
natural_image
Simple line drawing of a device with a cross mark and cloud shape, no text or symbols present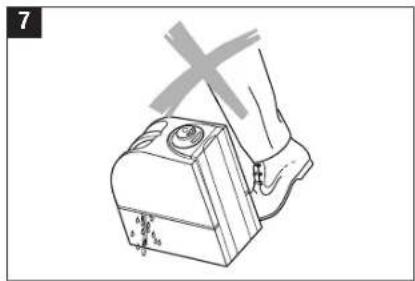
natural_image
Illustration of a hand pressing a button on a device (no text or symbols visible)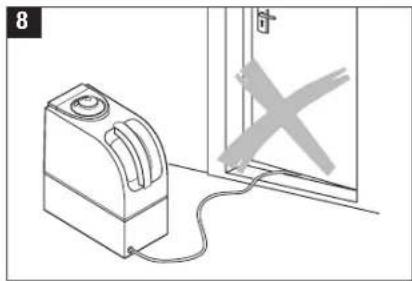
natural_image
Diagram showing a device connected to a door with a cross mark, no text or symbols present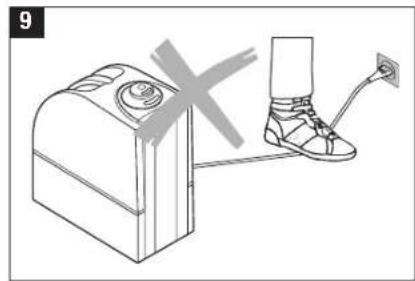
natural_image
Illustration of a device connected to a foot with a foot wearing a high-visibility shoe (no text or symbols)Description of the appliance
text_image
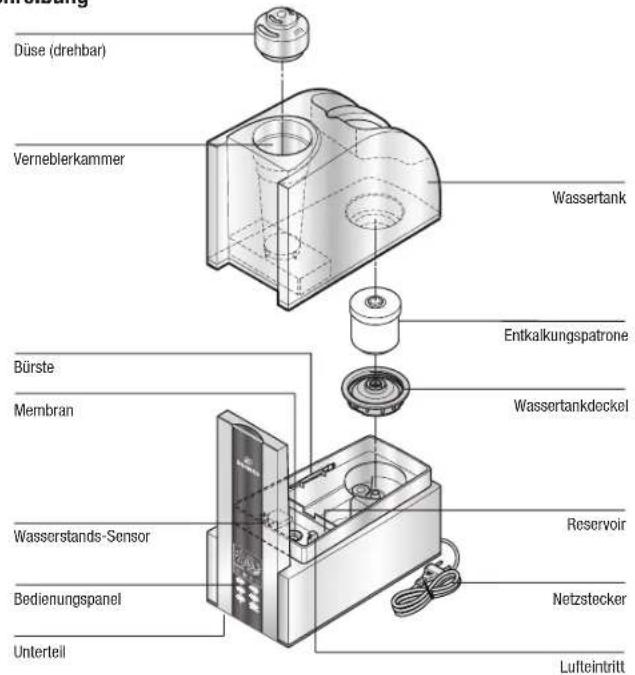
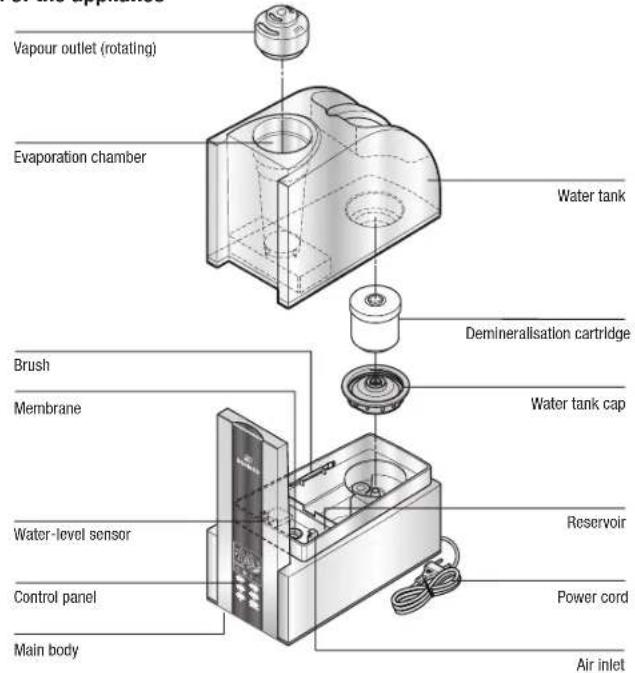
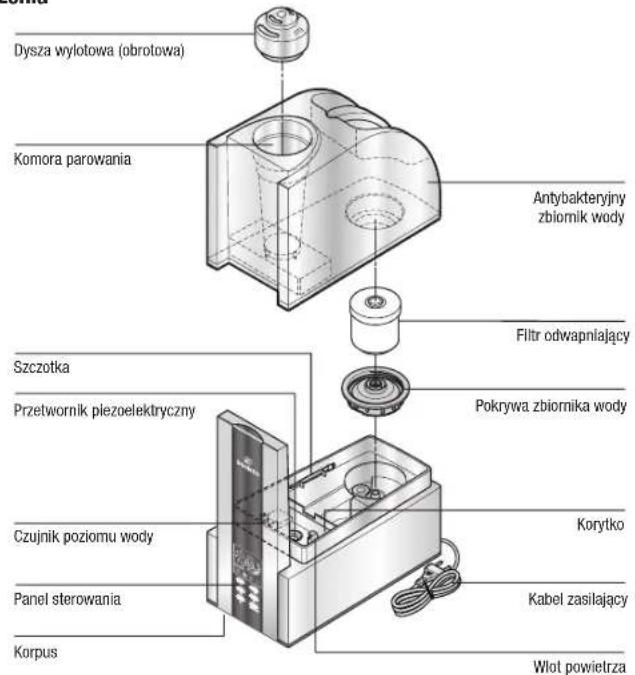
Vapour outlet (rotating) Evaporation chamber Water tank Demineralisation cartridge Brush Membrane Water-level sensor Control panel Main body Reservoir Power cord Air inletPutting into operation
Finding the ideal location for your humidifier
- Do not place the humidifier directly next to a heating element or on a floor with floor heating. The moisture of the mist can damage the floor surface (6) (see Safety Instructions).
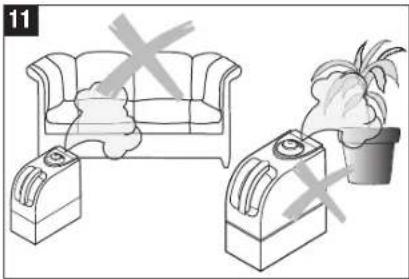
- The vapour outlet must not be pointed directly at plants or other objects. Keep distance of at least 20inch) (11).
- The Ultrasonic should be placed in a higher position (on a table, commode etc.)
- Soak the demineralisation cartridge in the watertank approx. 24 hours before using it. The resin has to absorb water to reach high performance.
- On average the demineralisation cartridge should be replaced every 2 – 3 months depending on your water hardness. Some areas may need to replace the cartridge sooner some may last longer. See «Replacement of the demineralisation cartridge».
- Read the instructions under «Filling the Tank» for putting water in the humidifier.
- Place the water tank on the base and insert the vapour outlet.
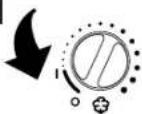
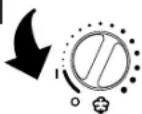
- Insert the plug into the socket and switch on the appliance using the on/off switch (16).
- About 10 to 15 minutes after having been switched on the device will reach is full power.
- Make sure that the cable is not pinched anywhere (8 – 9). Do not operate the humidifier if the cable is damaged (2).
Unpacking
- Carefully remove the humidifier from the box.
- Important: the vapour outlet is stowed in a red bag in the cardboard insert. Make sure that you take the vapour outlet from the packaging.
-
Remove the plastic bag from the humidifier.
-
Observe the information given on the rating plate about the mains supply.
- Use the original packaging for storing the appliance if you do not use the humidifier all year round.
Filling the tank

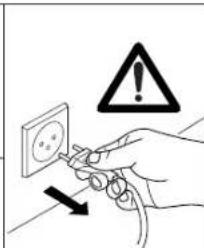
Always unplug the unit before removing the water tank. Do not touch the water in the base during operation!
Do not operate the humidifier when the water tank is empty! When the water reaches the minimum level, the unit switches off the nebulizer function automatically. The red light comes on.
• Make sure that no foreign objects are in the water tank.
- Take off the water tank cap to fill the tank with water (12). Fill the tank with clean, cold water from the tap (13). Close the cap of the water tank securely, place the water tank on the base and insert the vapour outlet (14). Do not add any conditioners to the water (15).
- Insert the plug into the socket and switch on the appliance using the on/off switch (16). The green light comes on. If you see the red light that displays that the water tank is empty.
natural_image
Illustration of a sofa and two household appliances with crossed-out X marks (no text or symbols)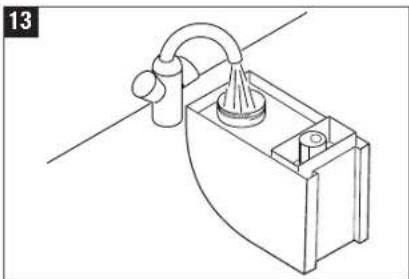
natural_image
Line drawing of a mechanical device with a lever and base (no text or symbols)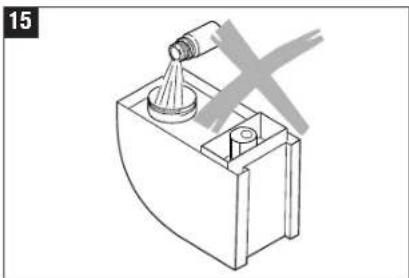
natural_image
Technical line drawing of a mechanical device with a conical component and a cross mark (no text or symbols)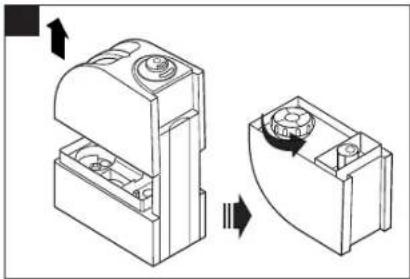
natural_image
Technical line drawing of a mechanical component with two views showing internal structure and rotation (no text or symbols)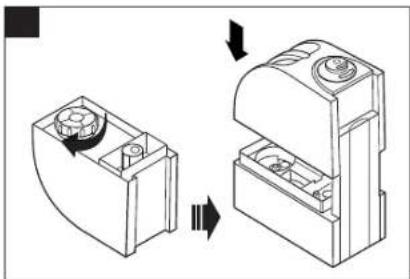
natural_image
Diagram showing a mechanical component before and after assembly, with no visible text or symbols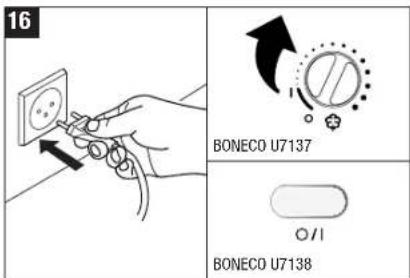
text_image
16 BONECO U7137 BONECO U7138Water purification (optional)
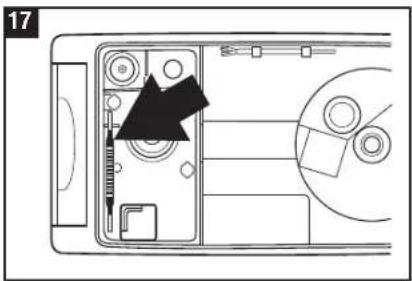
An Ionic Silver Stick (17) keeps the water free of harmful bacteria. The anti-microbial action of silver is used. The Ionic Silver Stick releases silver ions in the water over a long period (approx. one year). Look at picture 17 for the position of the ISS in the base part of the unit. Do not touch the water in the base during operation! Switch off the unit first. (If the Ionic Silver Stick is not automatically in your device, you can buy it optionally later).
Use of additives
Water additives (ethereal/essential oils, fragrances, eucalyptus, water conditioners etc.) must not be used! Even a small amount can cause cracks in the tank material. The material isn't made for the use of such additives. One drop is enough to damage the tank and as a consequence the unit. Any use of such additives will void the manufactures warranty.
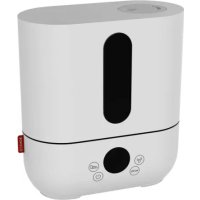
Operating Model U7137
text_image
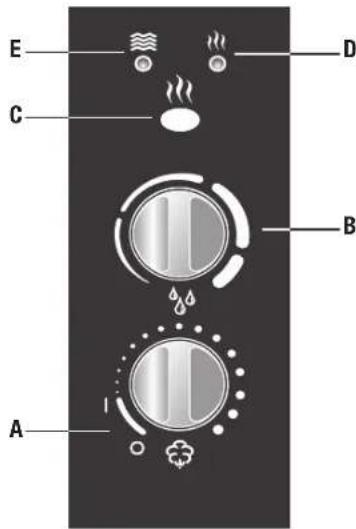
E C D B AA On-off switch and regulation of vapour output
B Hygrostat
C Pre-heating
D Preheating display
E Empty display
A) On-off switch and regulation of vapour output
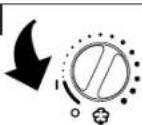
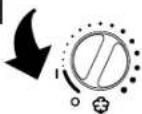
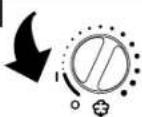
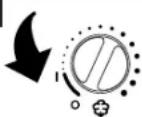
Turning the lower knob clockwise switches the humidifier on and also regulates the vapour emission from low to high.
B) Hygrostat (regulating humidity level)
By turning the upper knob clockwise, you set the desired humidity. Recommended is a relative humidity between 40% and 60%. As soon as the desired humidity is exceeded the humidifier is switched off. The appliance does not switch off when it is set to continuous operation.
C) Operating with preheating
On pressing the preheating switch the water is preheated to 80°C before entering the humidifier room. So, the outlet vapour will have the pleasant temperature of 40°C. This provides the advantage that the room temperature will not fall, and additionally the water can be kept essentially cleaner (bacteria are killed).
E) Empty display
The red LED indicates that the water tank is empty. For more information, see the chapter «Filling with Water».
text_image
1718
RZ BD Ultrasonic 7137/38.indd 18.7.2005, 10.48 UHI 18

Operating Model U7138

text_image
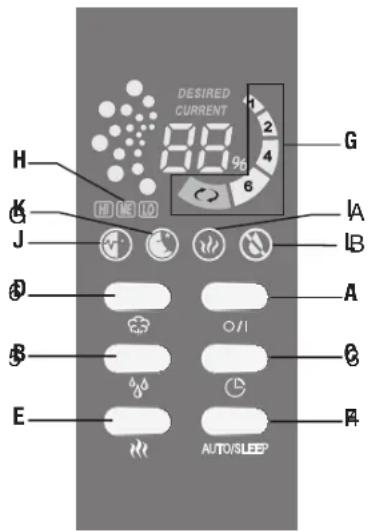
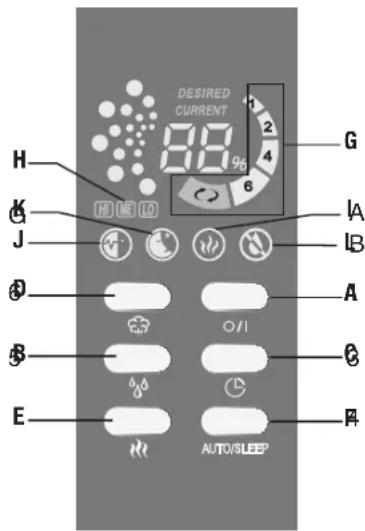
H G J A B O S E AUTO/SLEEP DESired CURRENT 88% 1 2 4 6 G I A I B A B C A FA On-off switch
B Hygrostat
C Timer
D Regulation of vapour output
E Pre-heating
F Auto/Sleep
G Timer display
H Vapour emission display
I Preheating display
J Automatic display
K Sleep display
L Empty display
A) On / Off
Press Button (A) to turn the air humidifier on and off.
B) Hygrostat / Set humidity
Set the desired humidity in % by pressing Button (B). We recommend a relative humidity of between 40% and 60%. The appliance can be regulated from 40% to 75%. If the humidity exceeds the desired setting, the appliance turns itself off. The appliance does not turn itself off if it has been set for continuous operation.
The desired value is shown while you are making the selection. After a few seconds, the display automatically switches to the current value.
C) Timer
You can use Button (C) to determine the operating time – it can be regulated between 1 and 6 hours or for continuous operation. Symbol G indicates the duration that has been set (1h/2h/4h/6h/continuous operation).
D) Regulating vapour emission, evaporation rate
You can regulate the mist emission by pressing Button (D) several times. The display LO/ME/HI (H) indicates which of the three levels (low/medium/high) you have chosen.
E) Operation with pre-heating
Button (E) is used to turn the pre-heating on (symbol I appears on the display) or off. When it is on, the water is pre-heated to 80°C before it enters the nebulizer chamber. The mist is now at a comfortable 40°C when it is emitted from the appliance. This is advantageous as it does not cause the room temperature to fall; in addition, there is substantial improvement in maintaining the purity of the water (bacteria are killed).
F) Auto/Sleep
Pressing Button (F) activates the automatic and sleep mode. The automatic function is switched on by pressing once (symbol J appears on the display), which maintains the optimal humidity depending on the temperature. It is regulated according to the emission quantity and the present desired value. If the sleep function is set (symbol K appears on the display), the desired humidity is 60% ; the timer is automatically set for 8 hours; the heating is turned on. In addition, the emission quantity is regulated in dependency on the difference between desired and current value.
L) Water level display
The transparent water tank makes it easy to see how much water is in the appliance. In addition, the appliance shows on the display (L) when water must be refilled.
Attention!
The water tank is equipped with a demineralisation cartridge.
This cartridge has to be replaced every 2 – 3 months. If the water is very hard, it may be necessary to replace the cartridge earlier. White dust around the device is a sure sign that the cartridge needs replacing. Please note white dust is not harmful. If white residues still forms around the device after a new cartridge has been inserted, please make sure that the water you are using is untreated. Otherwise the demineralisation cartridge does not work anymore. If the water flows through a decalcification system in the building before it is used in the humidifier, salt will precipitate around the device.
Replacement of the demineralisation cartridge

Always unplug the unit before removing the water tank. Do not touch the water in the base during operation!
Option A: replace the resin
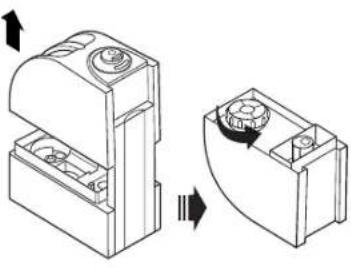
- Turn around the tank and open the turn-lock (18). The demineralisation cartridge is attached to the inside of the cap. Unscrew the cartridge turning it anti-clockwise (19). Important: do not dispose of the tank cap!
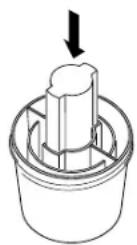
- Open the cartridge (20).
- Throw the content into the waste (Attention! Thrown out resin can make the floor slippery!) (21a).
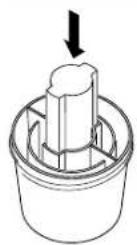
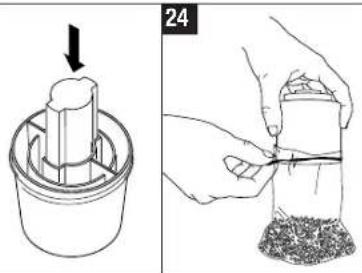
• Cut the bag open at the marked point (22a). - Insert the piece of styrofoam into the provided opening (23).
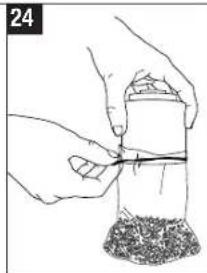
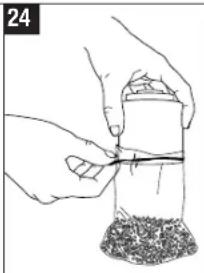
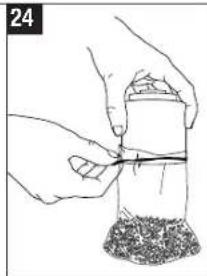
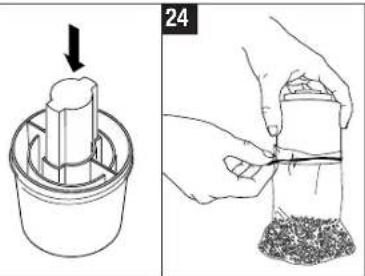
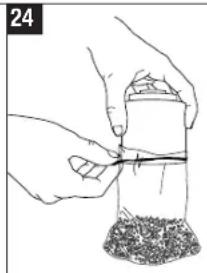
- Put the open bag over the cartridge and fasten it to the cartridge right at the top using the rubber band (24).
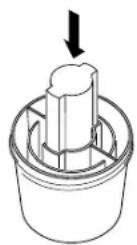
• Pour the replacement resin into the cartridge (25) - Remove the bag, rubber band and styrofoam piece (26).
- Close the cap (27).
- Screw the cartridge on the water tank cap (28). Close the tank cap well, place the tank on the lower part, and insert the vapour outlet (29).
- Soak the new granules for 24h before use! The resin must soak up water to reach full performance!
Option B: replace the whole cartridge
- Turn around the tank and open the turn-lock (18). The demineralisation cartridge is attached to the inside of the cap. Unscrew the cartridge turning it anti-clockwise (19). Important: do not dispose of the tank cap!
- Throw the whole cartridge into the waste (21b)
- Unpack the new cartridge (22b)
- Screw the cartridge on the water tank cap (28). Close tank cap well, place the tank on the lower part and insert vapour outlet (29).
- Soak the new cartridge for 24h before use! The resin must soak up water to reach full performance!
Cleaning/Maintenance

Always unplug the unit before removing the water tank. Do not touch the water in the base during operation!
- Switch of the appliance and unplug it from the socket before cleaning it (30).
- Clean the water tank and the reservoir regularly once a week. When operating with preheating every two weeks (31).
- Use decalcification agents found in stores everywhere to remove deposits from the fogging chamber regularly (32). Rinse out the decalcification agent thoroughly with plenty of water.
Attention
• Make sure that no water gets into the lower part of the main body (33).
- Clean the inner parts with a soft cloth. Do not use any solvents or aggressive cleaning agents to clean the appliance (34).
- Only use the brush to clean the membrane. This should be done once a week.
- Change the water in the tank at least once a week.
18
natural_image
Technical line drawing of a mechanical component with two views and directional arrows indicating assembly (no text or symbols)23
natural_image
Illustration of hands performing a manual tool on a cylindrical object, no text or symbols present30
BONECO U7137

0/1
BONECO U7138
text_image
Diagram showing hand using a power socket to switch an electrical warning symbol with an exclamation mark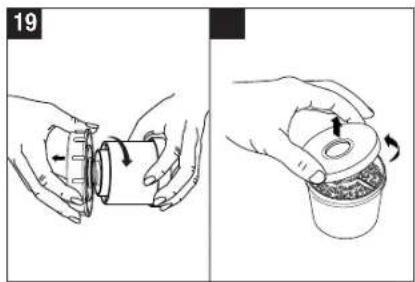
natural_image
Two-step illustration showing hands holding a container and pouring liquid into a potted plant (no text or symbols)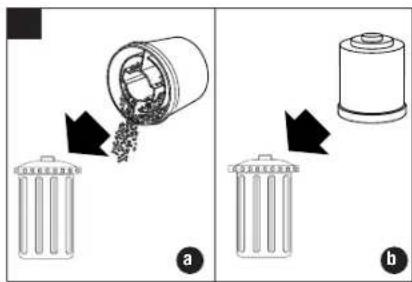
text_image
Diagram illustrating the process of removing a plastic cup into a battery, labeled with steps a and b.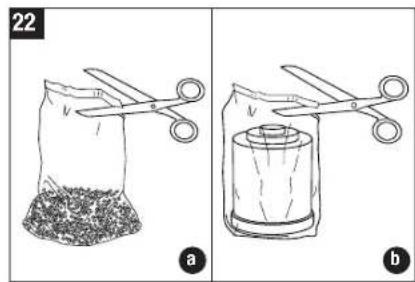
text_image
22 a b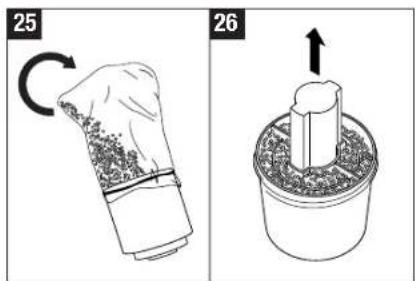
text_image
25 26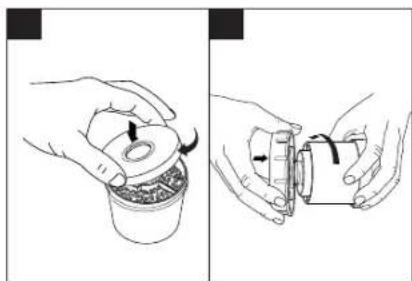
natural_image
Two-step illustration showing hands holding a container and a mechanical device (no text or symbols)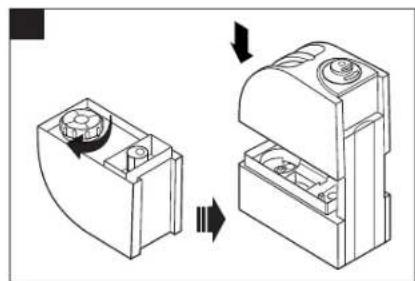
natural_image
Diagram showing a device being rotated into a housing, with no visible text or symbols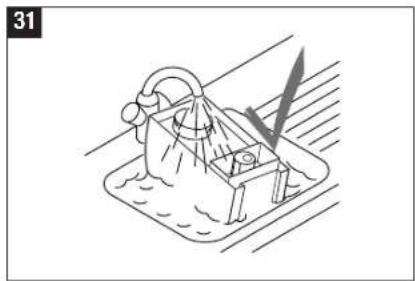
natural_image
Line drawing of a mechanical device with a lever and base, no text or symbols present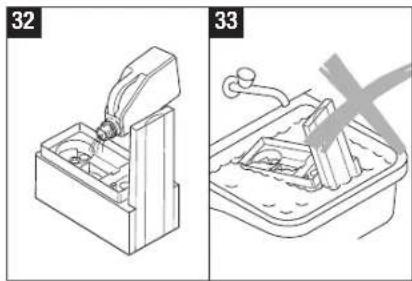
text_image
32 33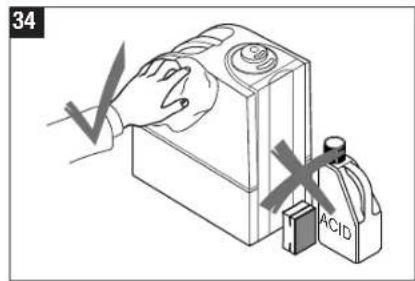
text_image
34 ACIDStoring the appliance
Clean the humidifier as described earlier and dry it thoroughly. Preferably store the appliance in its original box. Avoid high temperatures.
Disposal
Return your worn out humidifier to your dealer for proper disposal. You can obtain information on other ways to dispose of the humidifier from your local council.
Warranty
The warranty conditions are defined by our representative in the country of sale. Please contact your dealer if, despite strict quality control, your humidifier becomes defective. You must present the receipt when making a claim under the warranty.
Technical data
| Mains voltage 230 V / 50 Hz | |
| Power consumption 40 W without preheating140 W with preheating | |
| Humidity output 400g/h without preheating550 g/h with preheating | |
| Suitable for rooms up to 60m | ^2/150 m ^3 |
| Water capacity 5.0 litres | |
| Dimensions 320 x 170 x 320 mm | |
| Weight (empty) | 3.7 kg |
| Operating noise level | < 25 dB(A) |
| Accessories | Demineralisation cartridge(optional) Ionic Silver Stick |
Trouble shooting
| Problem | Possible cause | What to do |
| Humidifier does not operate | Power cable not plugged in | Plug in power cable |
| No water in the tank (Empty-light flashing) | Fill tank with water | |
| No vapour output | Desired humidity level lower than actual | Increase desired setting |
| Residues of washing-up liquid | Rinse with clear water | |
| Week vapour output | Water temperature too low | Set vapour output to maximum, after 10 min.the humidifier will work properly again |
| Mineral deposits on membrane | Clean membrane | |
| White dust around the humidifier | Demineralisation cartridge exhausted | Replace demineralisation cartridge or resin. |
text_image
Mode d'emploi fr 23 HZ BD Ultrasonic 7137/38.Indd 18.7.2005, 10.49 Ohl23Avant-propos
natural_image
Illustration of a device emitting electrical shock with stars and lightning bolts (no text or symbols)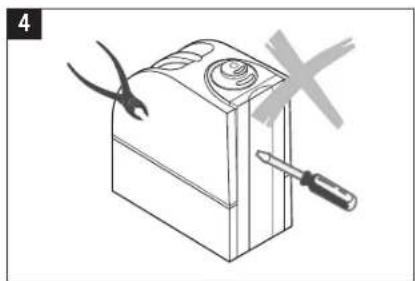
natural_image
Illustration of a battery with a screwdriver and pliers, no text or symbols present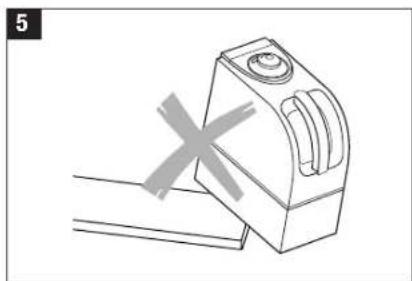
natural_image
Simple line drawing of a mechanical device with a cross mark, no text or symbols present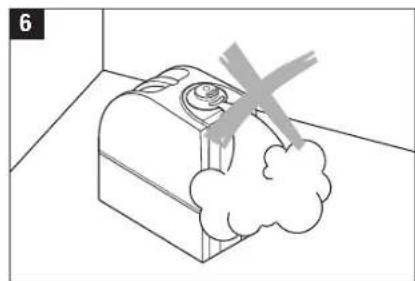
natural_image
Simple line drawing of a device with a cloud and a cross mark, no text or symbols present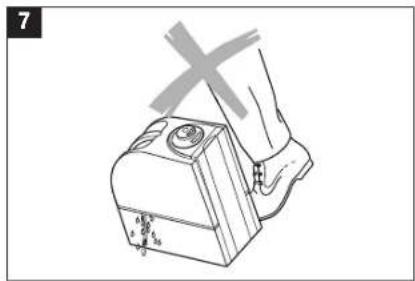
natural_image
Illustration of a hand pressing a button on a device (no text or symbols visible)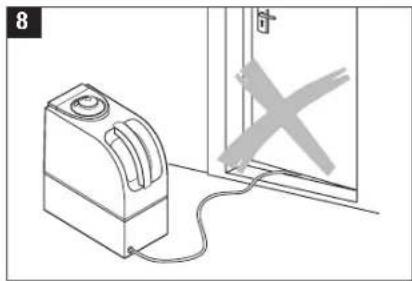
natural_image
Simple line drawing of a device connected to a door with a cross mark (no text or symbols)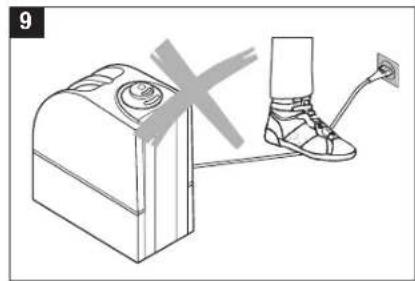
natural_image
Line drawing of a device connected to a foot with a foot wearing a high-visibility shoe (no text or symbols)natural_image
Illustration of a sofa and two household appliances with no visible text or symbols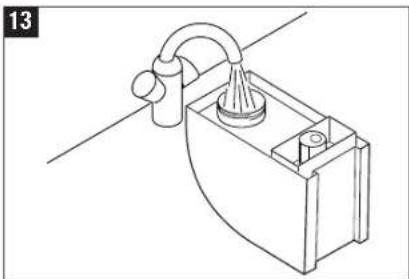
natural_image
Line drawing of a mechanical device with a lever and base (no text or symbols)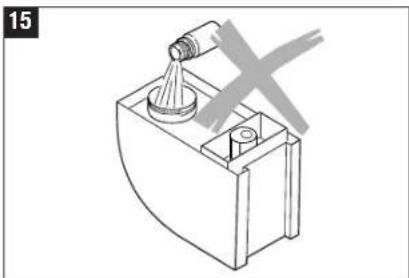
natural_image
Technical line drawing of a mechanical device with a conical component and a cross mark (no text or symbols)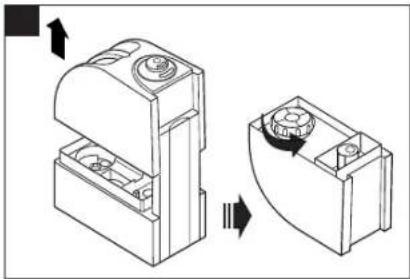
natural_image
Technical line drawing of a mechanical component with two views showing internal structure and rotation (no text or symbols)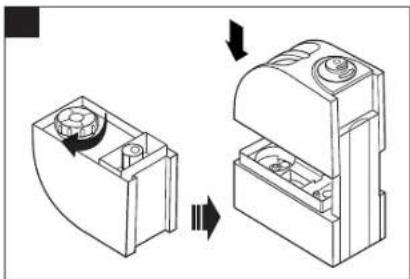
natural_image
Diagram showing a mechanical component before and after assembly, with no visible text or symbols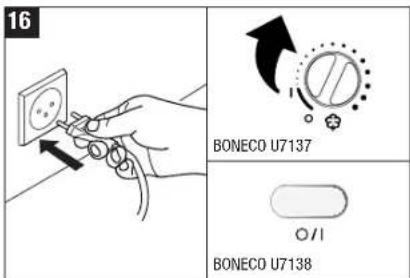
text_image
16 BONECO U7137 BONECO U7138fr
text_image
E C A D B Itext_image
H G J A B O S E AUTO/SLEEP DESired CURRENT 88% 1 2 4 6 G I A I B A B A Fnatural_image
Two-step illustration showing hands holding a container and pouring liquid into a potted plant (no text or symbols)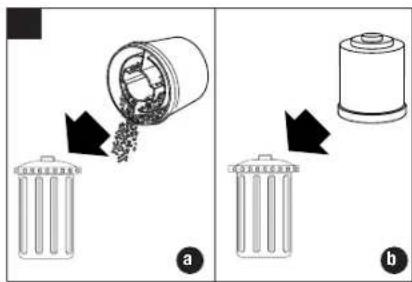
text_image
Diagram illustrating the process of removing a cylindrical component into two bins, labeled (a) and (b), with arrows indicating removal and recycling steps.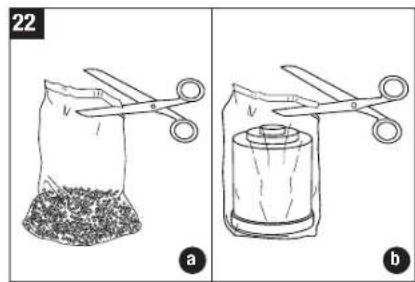
text_image
22 a b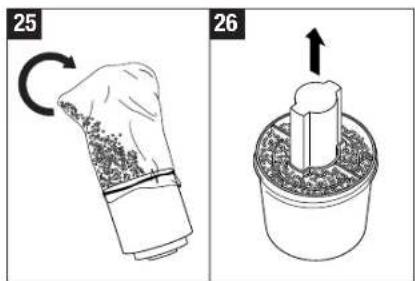
text_image
25 26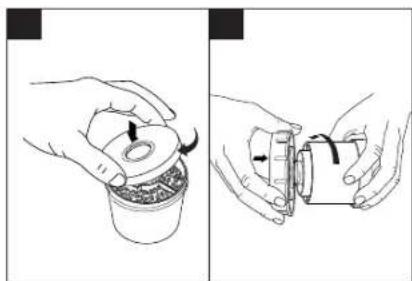
natural_image
Two-step illustration showing hands holding a container and a mechanical component, no text or symbols present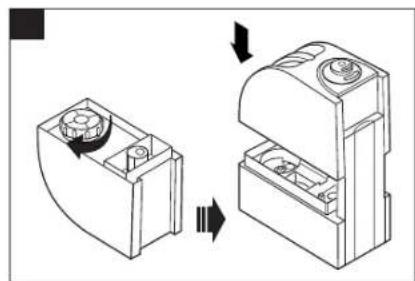
natural_image
Diagram showing two mechanical components with directional arrows indicating motion (no text or symbols)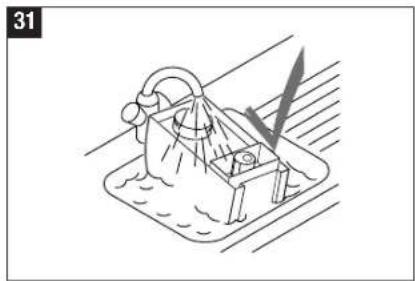
natural_image
Line drawing of a mechanical device with a lever and base, no text or symbols present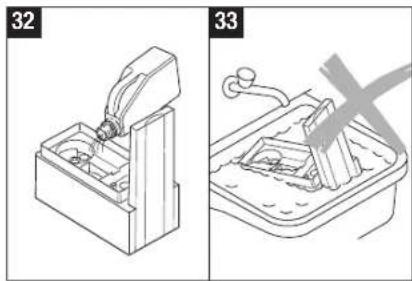
text_image
32 33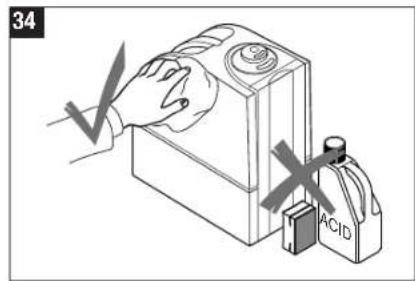
text_image
34 ACIDnatural_image
Pure horizontal line with a crosshair marker at the center (no text or symbols)Gebruiksaanwijzing
nl



text_image
RZ_BD_Ultrasound 7137/38.1mm 18.7.2005, 10.49 Ohr33 33
Voorwoord
natural_image
Illustration of a device emitting electrical shock with stars and lightning bolts (no text or symbols)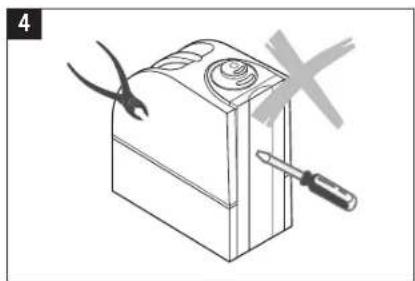
natural_image
Line drawing of a battery with a screwdriver and pliers, no text or symbols present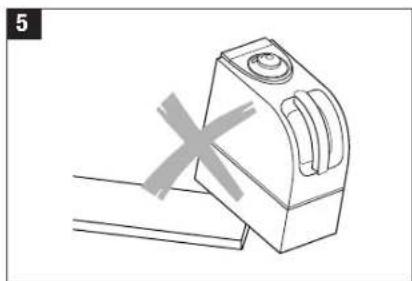
natural_image
Simple line drawing of a mechanical device with a cross mark, no text or symbols present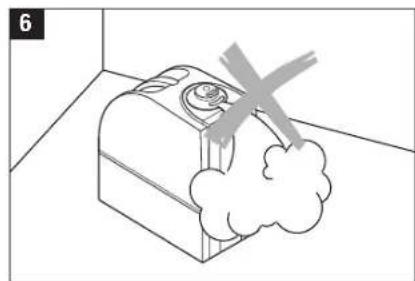
natural_image
Simple line drawing of a device with a cross mark and cloud shape, no text or symbols present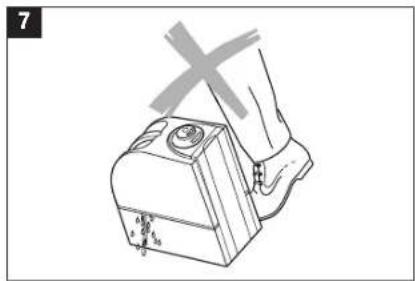
natural_image
Illustration of a hand pressing a button on a device (no text or symbols visible)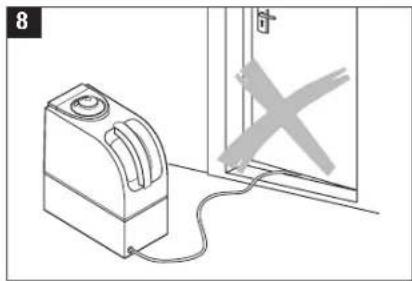
natural_image
Simple line drawing of a device connected to a door with a cross mark (no text or symbols)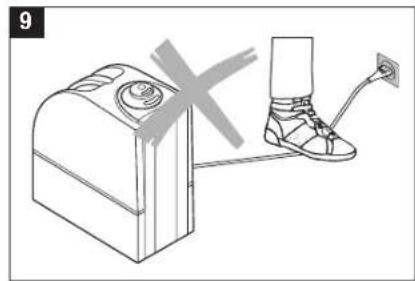
natural_image
Illustration of a device connected to a foot with a foot wearing a high-visibility shoe (no text or symbols)natural_image
Illustration of a sofa and two household appliances with no visible text or symbols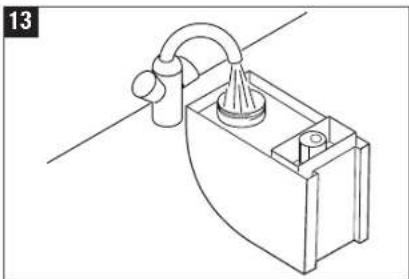
natural_image
Line drawing of a mechanical device with a lever and base (no text or symbols)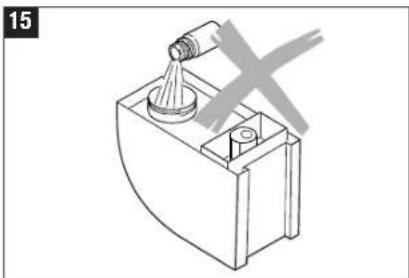
natural_image
Technical line drawing of a mechanical device with a conical component and a cross mark (no text or symbols)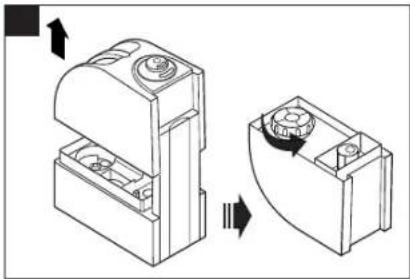
natural_image
Technical line drawing of a mechanical component with two views showing internal structure and rotation (no text or symbols)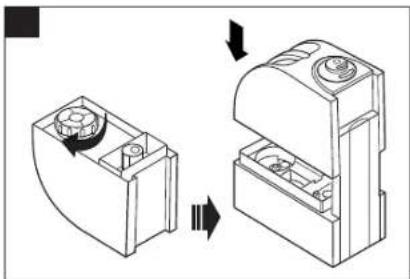
natural_image
Technical line drawing of a mechanical component with two views showing internal components (no text or symbols)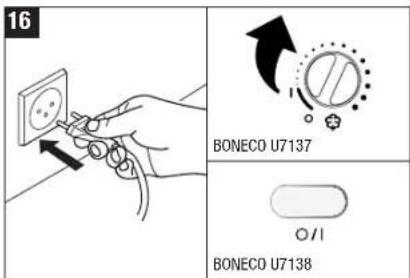
text_image
16 BONECO U7137 BONECO U7138nl
text_image
E C A D B IE) Display lege tank
natural_image
Top-down schematic of a device interior with labeled components and a black arrow pointing to a specific area (no text or symbols present)38
RZ BD Ultrasonic 7137/36.indd 18.7.2005, 10.49 Umi

Bediening U7138
text_image
H G J A B E AUTO/Sleep DESired CURRENT 88% 1 2 3 4 5 6 7 8 9 10 11 12 13 14 15 16 17 18 19 20 21 22 23 24 25 26 27 28 29 30 31 32 33 34 35 36 37 38 39 40 41 42 43 44 45 46 47 48 49 50A In-/uitschakelen
B Hygrostaat
C Timer
D Neveluitstoting regelen
E Voorverwarming
F Auto/Sleep
G Timer display
H Display neveluitstoting
I Display voorverwarming
J Automatic display
K Sleep display
L Display lege tank
natural_image
Technical line drawing of a mechanical component before and after assembly (no text or symbols)23
natural_image
Illustration of hands using a tool to cut or spread material on a textured surface (no text or symbols)30
BONECO U7137

BONECO U7138
text_image
Diagram showing hand using a power socket to switch an electrical warning symbol with an exclamation mark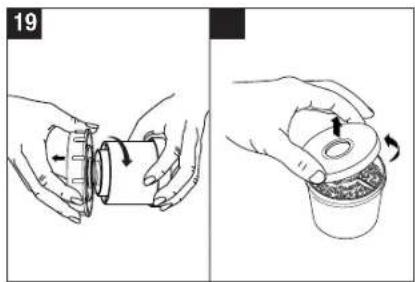
natural_image
Two-step illustration showing hands holding a container and pouring liquid into a potted plant (no text or symbols)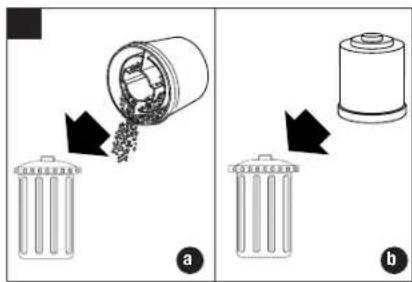
text_image
Diagram illustrating two stages of battery recycling: (a) particle transfer and (b) solid recycling with labeled arrows.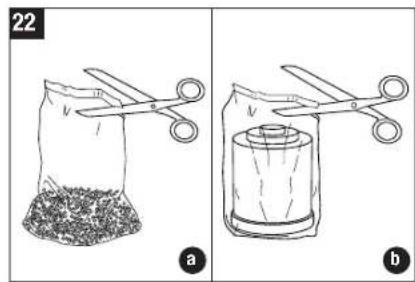
text_image
22 a b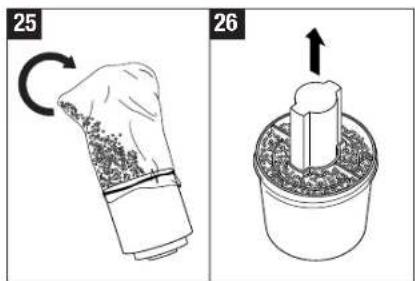
text_image
25 26
natural_image
Two-step illustration showing hands holding a container and a mechanical component, no text or symbols present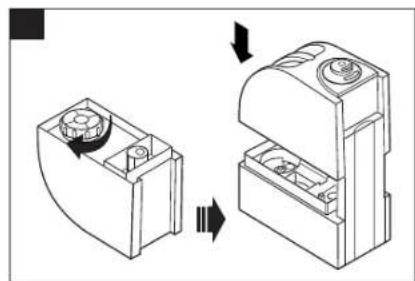
natural_image
Diagram showing a device being rotated into a housing, with no visible text or symbols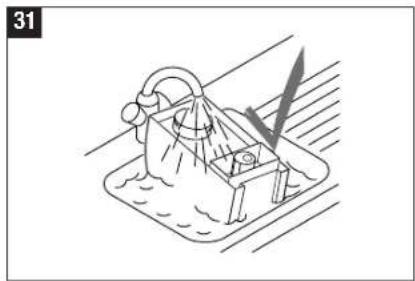
natural_image
Line drawing of a mechanical device with a lever and base, no text or symbols present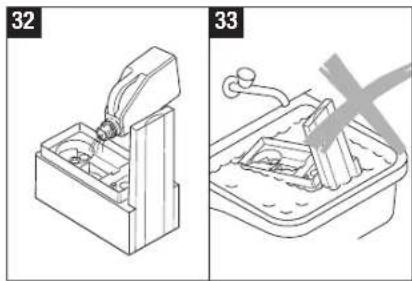
text_image
32 33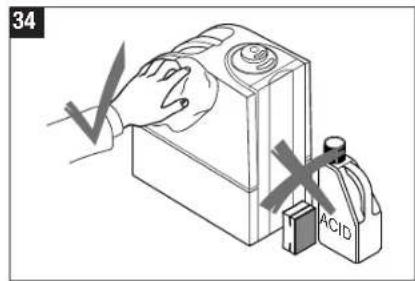
text_image
34 ACIDnatural_image
Pure horizontal line with a crosshair marker at the center (no text or symbols)natural_image
Illustration of a device emitting electrical shock with stars and lightning bolts (no text or symbols)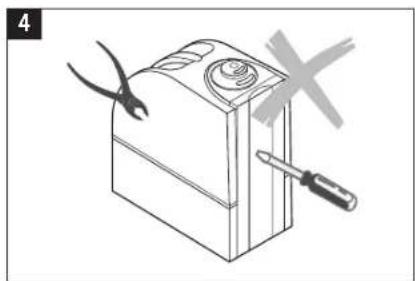
natural_image
Line drawing of a battery with a screwdriver and pliers, no text or symbols present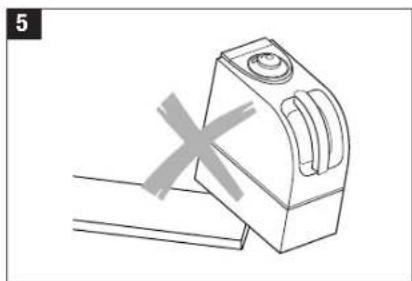
natural_image
Simple line drawing of a mechanical device with a cross mark, no text or symbols present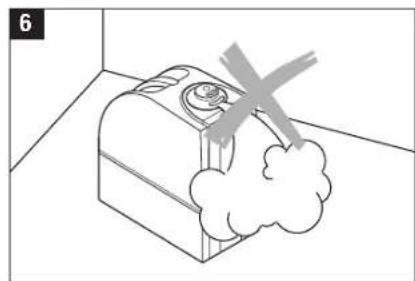
natural_image
Simple line drawing of a device with a cross mark and cloud shape, no text or symbols present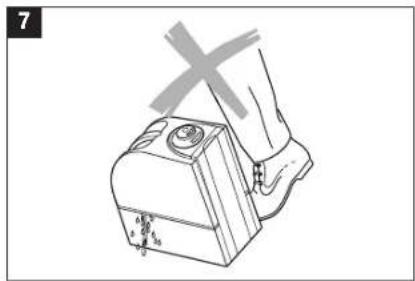
natural_image
Illustration of a hand pressing a button on a device (no text or symbols visible)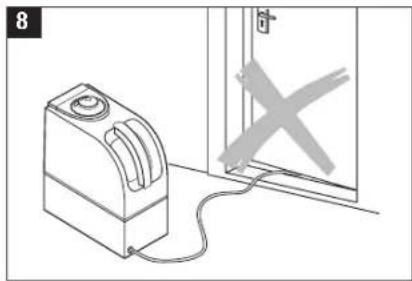
natural_image
Simple line drawing of a device connected to a door with a cross mark (no text or symbols)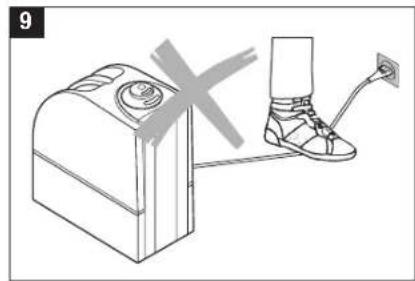
natural_image
Illustration of a device connected to a foot with a foot wearing a high-visibility shoe (no text or symbols)natural_image
Illustration of a sofa and two household appliances with no visible text or symbols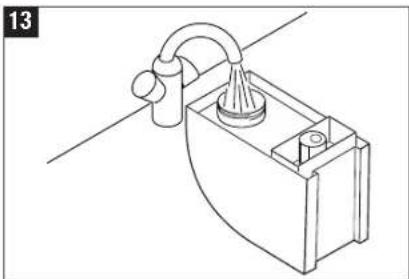
natural_image
Technical line drawing of a mechanical device with a curved handle and base (no text or symbols)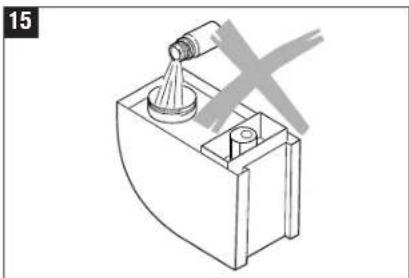
natural_image
Technical line drawing of a mechanical device with a conical component and a cross mark (no text or symbols)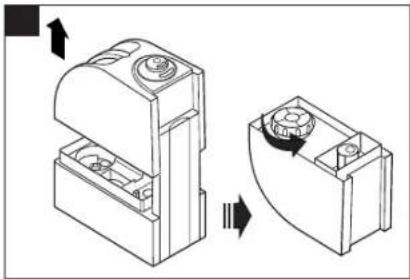
natural_image
Technical line drawing of a mechanical component with two views showing internal structure and rotation (no text or symbols)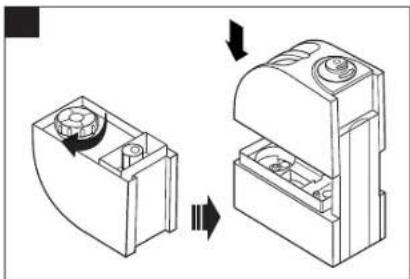
natural_image
Diagram showing a mechanical component before and after assembly, with no visible text or symbols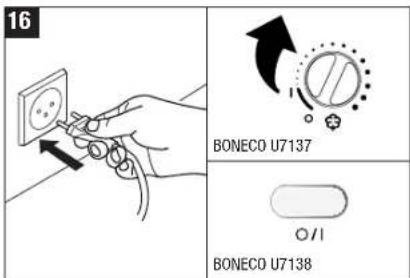
text_image
16 BONECO U7137 BONECO U713847

natural_image
Top-down schematic of a device interior with labeled components and directional arrows (no text or symbols)text_image
DESired CURRENT 88% H G A J I B A O/I B E AUTO/SLEEPnatural_image
Technical line drawing of a mechanical component with two views, showing internal structure and assembly (no text or symbols)23
natural_image
Two-step illustration showing a cylindrical object being inserted into a container and then being cut with a tool, both without any text or symbols.30
BONECO U7137

0/1
BONECO U7138
text_image
Diagram showing hand holding electrical socket with warning symbol and directional arrow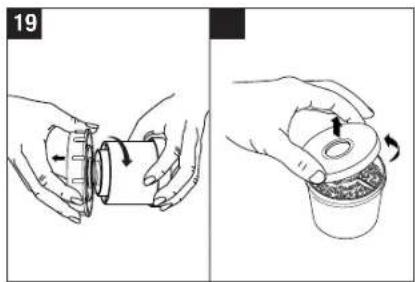
natural_image
Two-step illustration showing hands holding a container and pouring liquid into a potted plant (no text or symbols)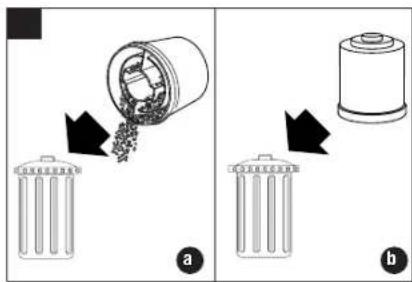
text_image
Diagram illustrating two stages of battery recycling: (a) particle transfer and (b) solid recycling.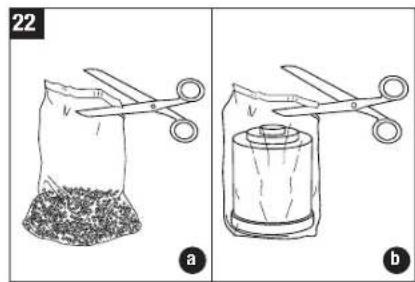
text_image
22 a b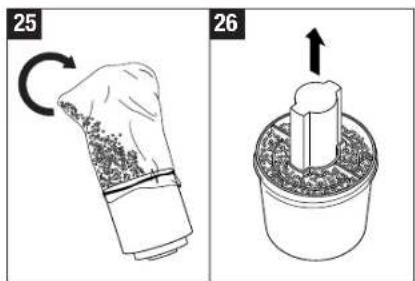
text_image
25 26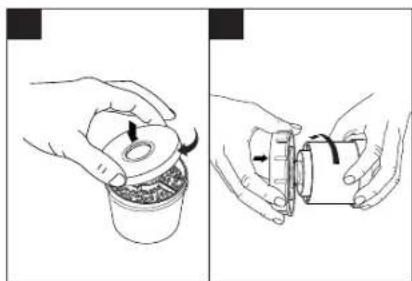
natural_image
Two-step illustration showing hands holding a container and a mechanical component, no text or symbols present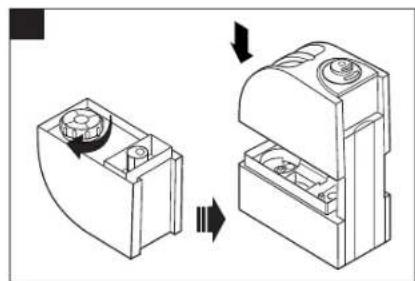
natural_image
Diagram showing a device being rotated into a housing, with no visible text or symbols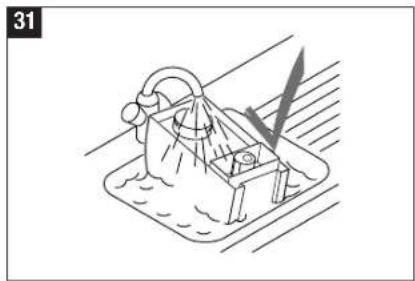
natural_image
Line drawing of a mechanical device with a lever and base, no text or symbols present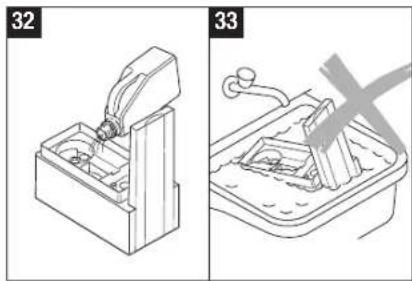
text_image
32 33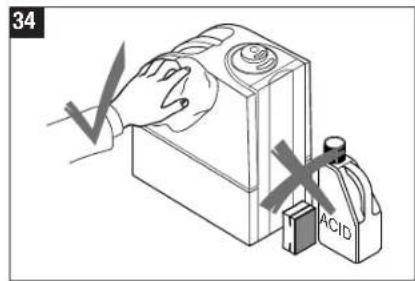
text_image
34 ACIDnatural_image
Pure horizontal line with a crosshair marker at the center (no text or symbols)
natural_image
Illustration of a device emitting electrical shock with stars and lightning bolts (no text or symbols)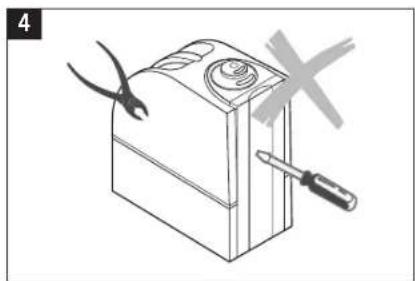
natural_image
Line drawing of a battery with a screwdriver and pliers, no text or symbols present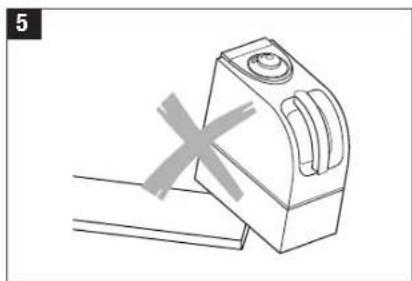
natural_image
Simple line drawing of a mechanical device with a cross mark, no text or symbols present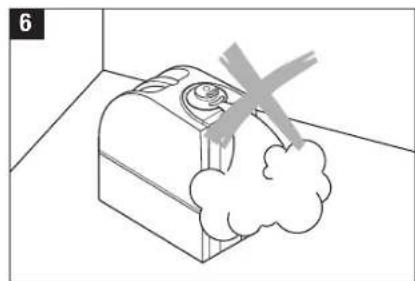
natural_image
Simple line drawing of a device with a cross mark and cloud shape, no text or symbols present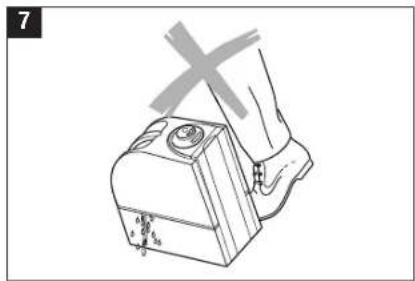
natural_image
Illustration of a hand pressing a button on a device with a cross symbol (no text or labels)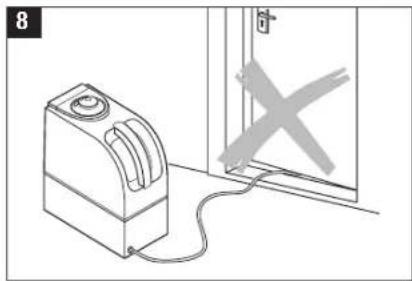
natural_image
Simple line drawing of a device connected to a door with a cross mark (no text or symbols)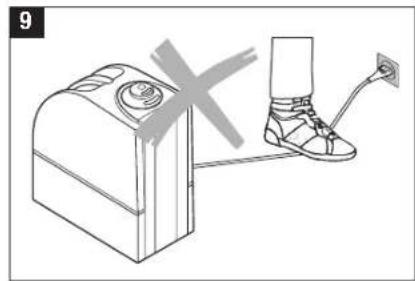
natural_image
Line drawing of a device with a foot and a foot wearing a high-visibility shoe (no text or symbols)
natural_image
Illustration of a sofa and two household appliances with no visible text or symbols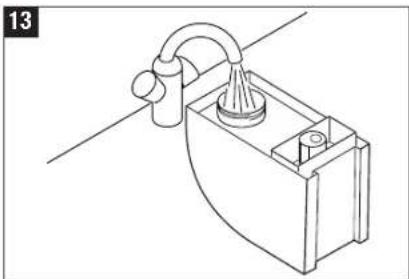
natural_image
Line drawing of a mechanical device with a lever and base (no text or symbols)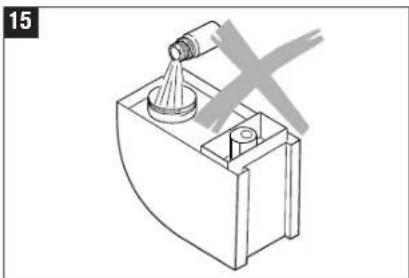
natural_image
Technical line drawing of a mechanical device with a conical component and a cross mark (no text or symbols)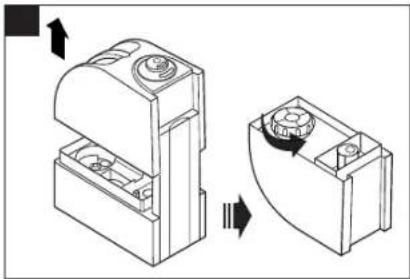
natural_image
Technical line drawing of a mechanical component with two views showing internal structure and rotation (no text or symbols)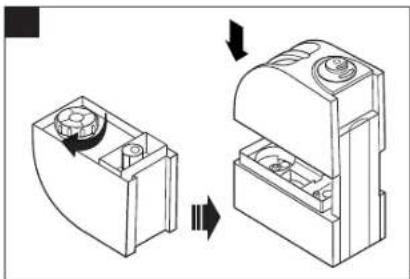
natural_image
Diagram showing a mechanical component before and after assembly, with no visible text or symbols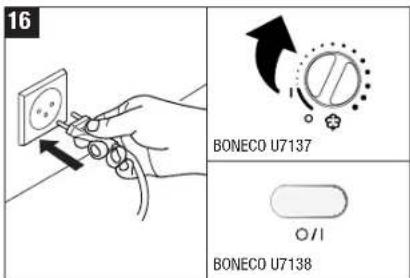
text_image
16 BONECO U7137 BONECO U7138text_image
H G J A B O S E AUTO/SLEEP DESired CURRENT 88% 1 2 4 6 G I A I B A B A Fnatural_image
Technical line drawing of a mechanical component with two views and directional arrows indicating assembly (no text or symbols)23

natural_image
Illustration of hands cutting a cylindrical object with a bandage, no text or symbols present30
BONECO U7137

0/1
BONECO U7138
text_image
Diagram showing hand using a power outlet to switch an electrical warning symbol with an exclamation mark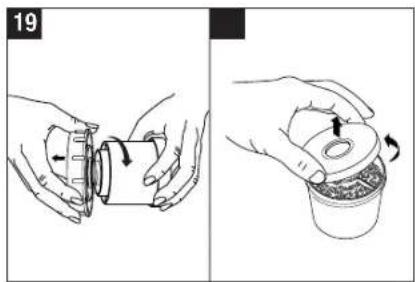
natural_image
Two-step illustration showing hands holding a container and pouring liquid into a potted plant (no text or symbols)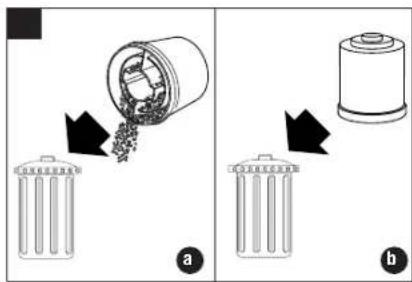
text_image
Diagram illustrating two stages of battery recycling: (a) particle transfer and (b) solid recycling with labeled arrows.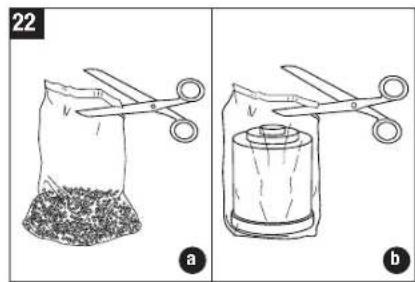
text_image
22 a b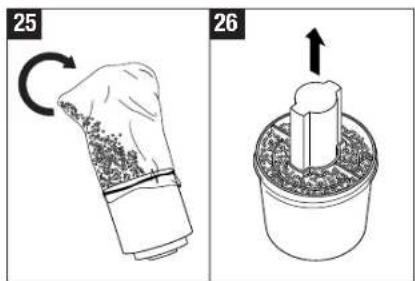
text_image
25 26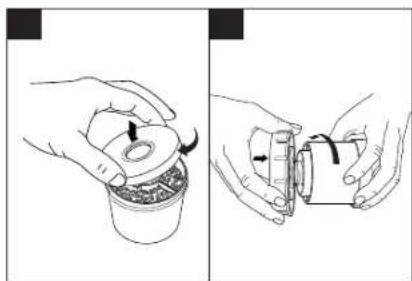
natural_image
Two-step illustration showing hands holding a container and a mechanical device (no text or symbols)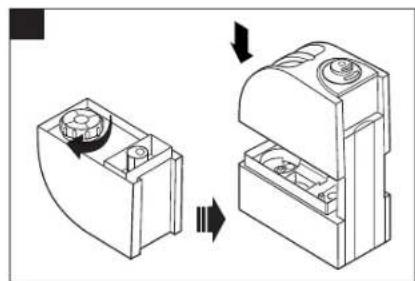
natural_image
Diagram showing two mechanical components with directional arrows indicating motion (no text or symbols)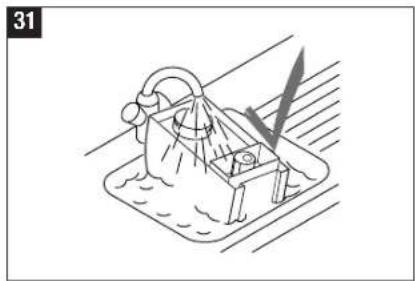
natural_image
Line drawing of a mechanical device with a lever and base, no text or symbols present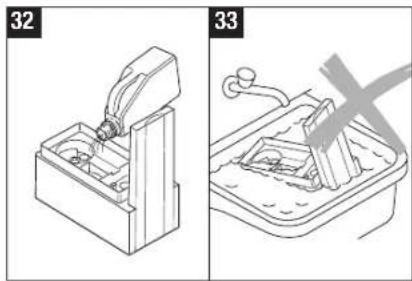
text_image
32 33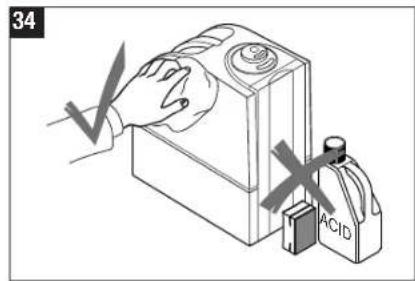
text_image
34 ACID
61
Almacenamiento
natural_image
Pure horizontal line with a crosshair marker at the center (no text or symbols)
Használati útmutató
hu

text_image
RZ_BD_Ultrasonic 7137/38.Indd 18.7.2005, 10.50 UIn63 63Előszó
natural_image
Illustration of a device emitting electrical shock with stars and lightning bolts (no text or symbols)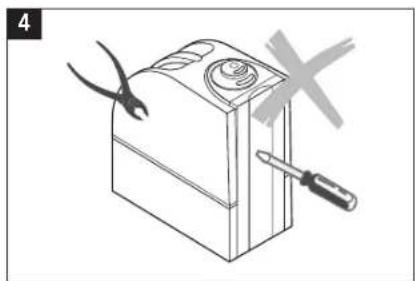
natural_image
Line drawing of a battery with a screwdriver and pliers, no text or symbols present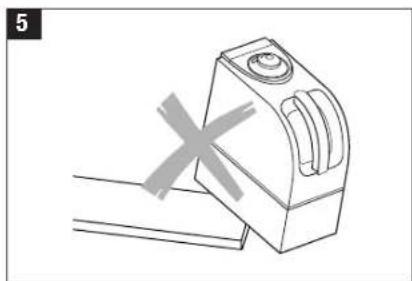
natural_image
Simple line drawing of a mechanical device with a cross mark, no text or symbols present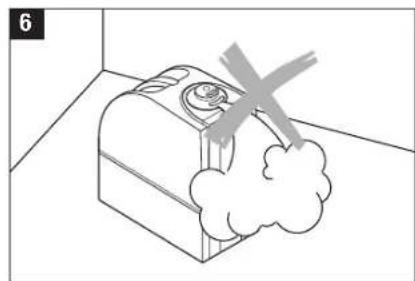
natural_image
Simple line drawing of a device with a cloud and a cross mark, no text or symbols present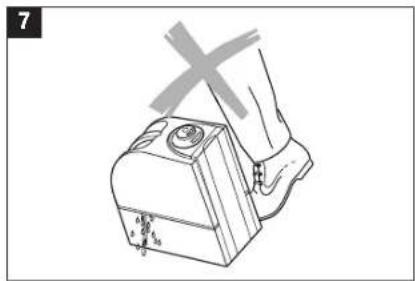
natural_image
Illustration of a hand pressing a button on a device (no text or symbols visible)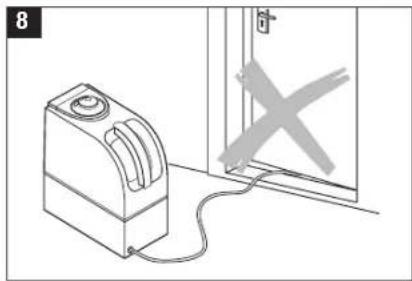
natural_image
Diagram showing a device connected to a door with a cross mark, no text or symbols present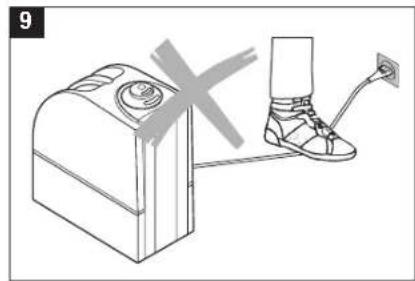
natural_image
Illustration of a device connected to a foot with a foot wearing a high-visibility shoe (no text or symbols)A készülék leírása
natural_image
Illustration of a sofa and two household appliances with crossed-out X marks (no text or symbols)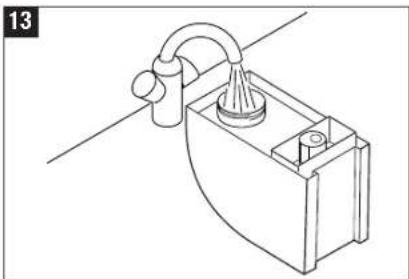
natural_image
Line drawing of a mechanical device with a lever and base (no text or symbols)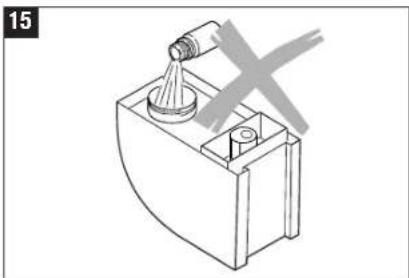
natural_image
Technical line drawing of a mechanical device with a conical component and a cross mark (no text or symbols)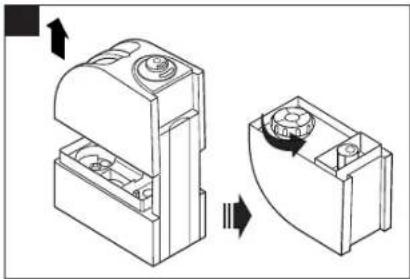
natural_image
Technical line drawing of a mechanical component with two views showing internal structure and rotation (no text or symbols)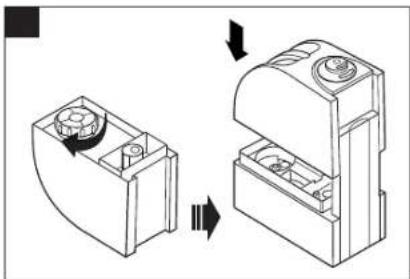
natural_image
Diagram showing a mechanical component before and after assembly, with no visible text or symbols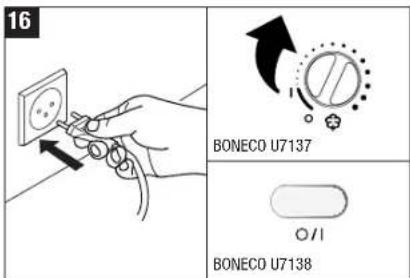
text_image
16 BONECO U7137 BONECO U713867
text_image
H G J A B O S E AUTO/SLEEP DESired CURRENT 88% 1 2 4 6 G I A I B A B A Fnatural_image
Technical line drawing of a mechanical component with two views (top and side), showing internal components and directional arrows indicating movement (no text or symbols)23
natural_image
Two-step illustration showing a container being inserted into a pot and then being cut with a tool (no text or symbols)30
BONECO U7137

011
BONECO U7138
text_image
Diagram showing a hand using a power plug to switch an electrical outlet, with warning symbol and arrow indicating dislocation.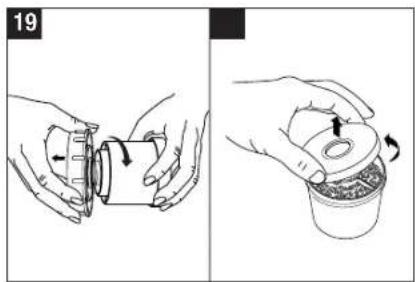
natural_image
Two-step illustration showing hands holding a container and pouring liquid into a potted plant (no text or symbols)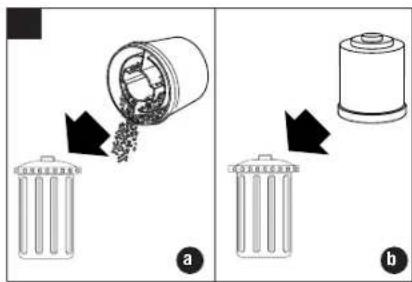
text_image
Diagram illustrating the process of removing a plastic cup into a battery, labeled with steps a and b.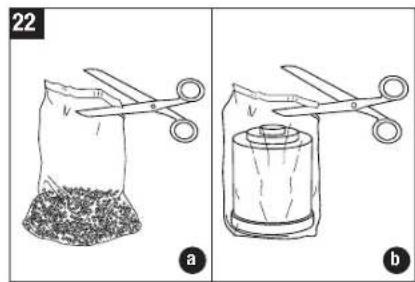
text_image
22 a b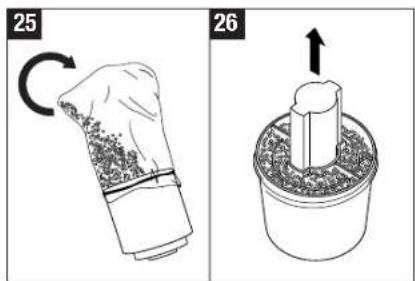
text_image
25 26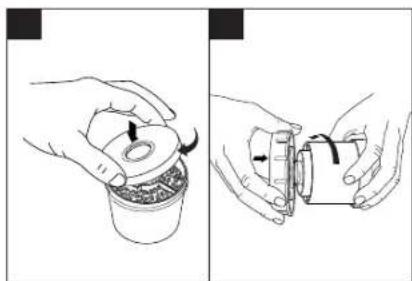
natural_image
Two-step illustration showing hands holding a container and a mechanical component, no text or symbols present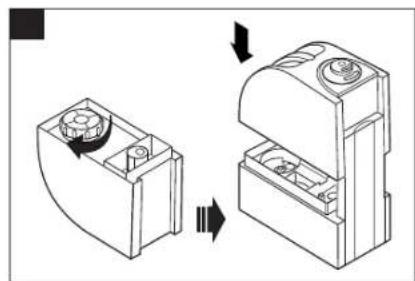
natural_image
Diagram showing two mechanical components with directional arrows indicating motion (no text or symbols)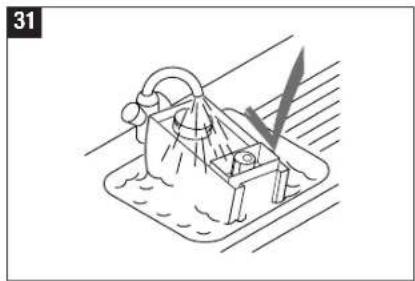
natural_image
Line drawing of a mechanical device with a lever and base, no text or symbols present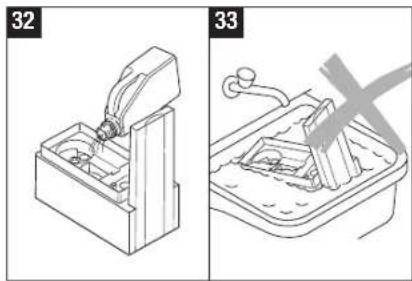
text_image
32 33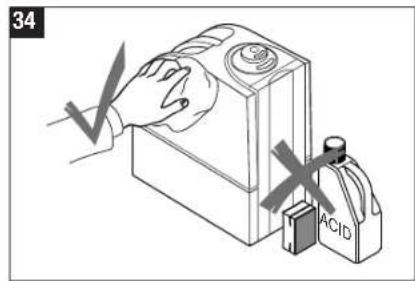
text_image
34 ACID
hu

natural_image
Pure horizontal line with a crosshair marker at the center (no text or symbols)

Instrukcja obsługi
pl

text_image
RZ_BD_Oltrasound 7137/38.Indd 18.7.2005, 10.51 Unr73 73Wstep
natural_image
Illustration of a device emitting electrical shock with stars and lightning bolts (no text or symbols)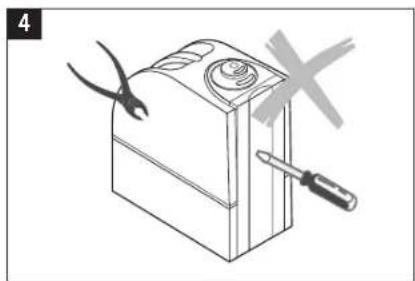
natural_image
Line drawing of a battery with a screwdriver and pliers, no text or symbols present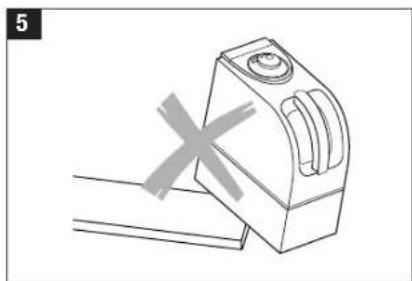
natural_image
Simple line drawing of a mechanical device with a cross mark, no text or symbols present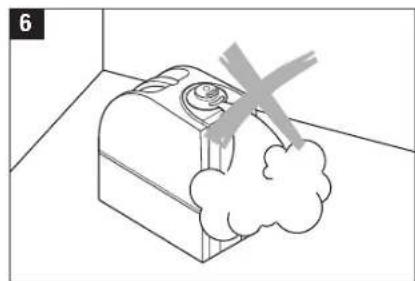
natural_image
Simple line drawing of a device with a cloud and a cross mark, no text or symbols present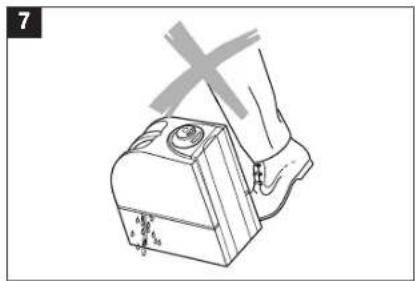
natural_image
Illustration of a hand pressing a button on a device (no text or symbols visible)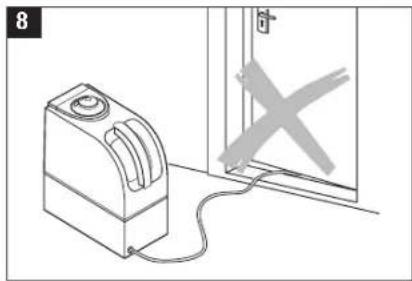
natural_image
Simple line drawing of a device connected to a door with a cross mark (no text or symbols)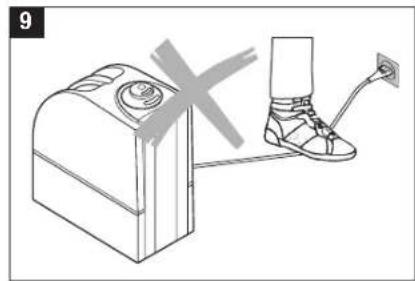
natural_image
Illustration of a device connected to a foot with a foot wearing a high-visibility shoe (no text or symbols)Opis urządzenia
natural_image
Illustration of a sofa and two household appliances with crossed-out X marks (no text or symbols)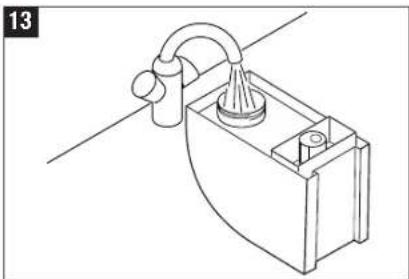
natural_image
Line drawing of a mechanical device with a lever and base (no text or symbols)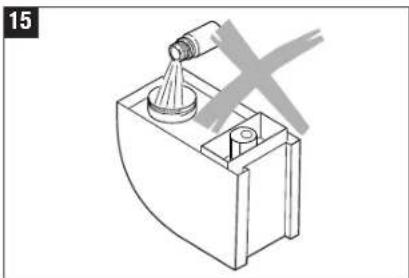
natural_image
Technical line drawing of a mechanical device with a conical component and a cross mark (no text or symbols)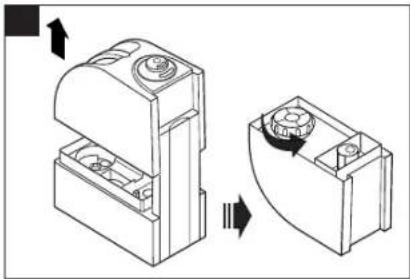
natural_image
Technical line drawing of a mechanical component with two views showing internal structure and rotation (no text or symbols)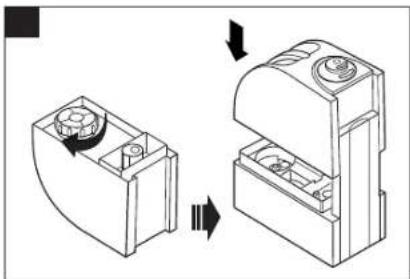
natural_image
Diagram showing a mechanical component before and after assembly, with no visible text or symbols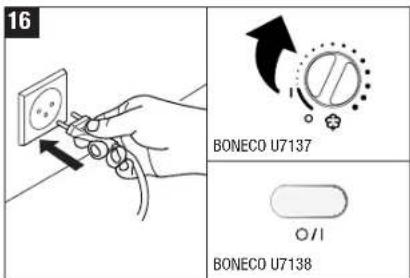
text_image
16 BONECO U7137 BONECO U7138pl
text_image
E C A I B DThe image contains a graphical symbol (a target with a crosshair and a circle) and no textual content.
natural_image
Technical line drawing of a mechanical component before and after assembly (no text or symbols)23
natural_image
Illustration of hands cutting a cylindrical object with a measuring tape (no text or symbols)30
BONECO U7137

011
BONECO U7138
text_image
Safety warning illustration showing hand using a power outlet to switch an electrical component with warning symbol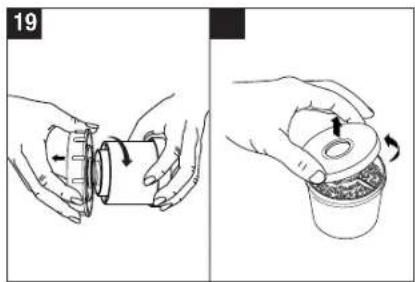
natural_image
Two-step illustration showing hands holding a container and pouring liquid into a potted plant (no text or symbols)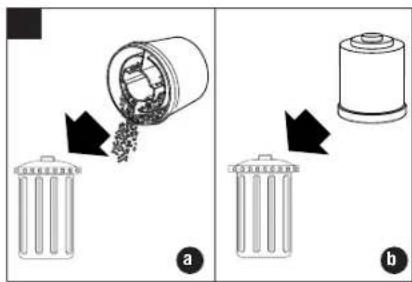
text_image
Diagram illustrating the process of removing a plastic cup into a battery, labeled with steps a and b.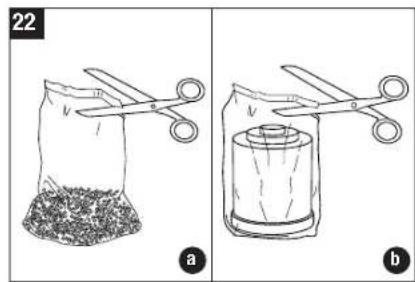
text_image
22 a b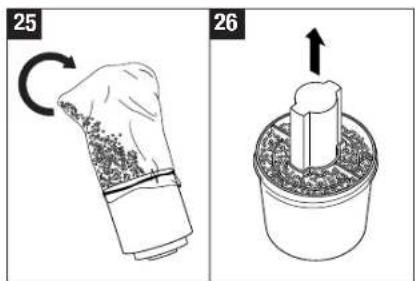
text_image
25 26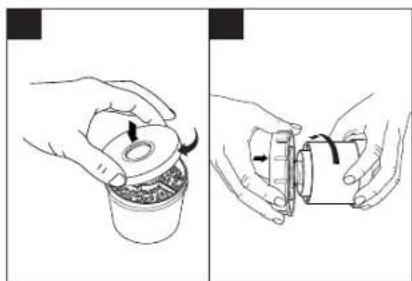
natural_image
Two-step illustration showing hands holding a container and a mechanical component, no text or symbols present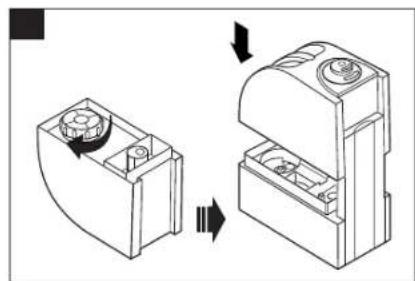
natural_image
Diagram showing two mechanical components with directional arrows indicating motion (no text or symbols)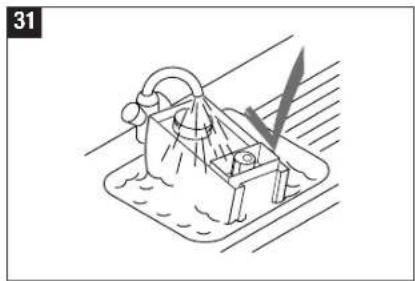
natural_image
Line drawing of a mechanical device with a lever and base, no text or symbols present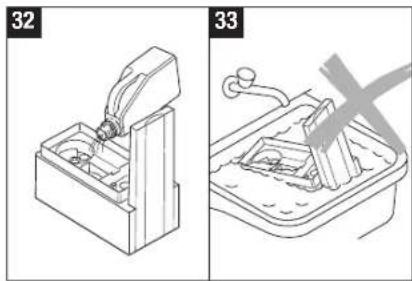
text_image
32 33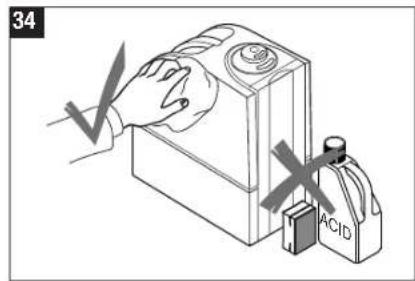
text_image
34 ACIDBONECO is a brand name of PLASTON AG, Switzerland.