
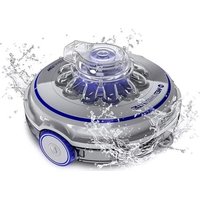
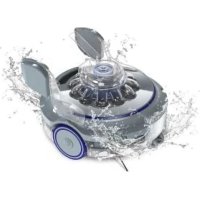
RKA80 - Vacuum Cleaner GRE - Free user manual and instructions
Find the device manual for free RKA80 GRE in PDF.
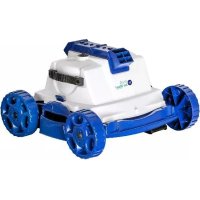
| Product type | Pool cleaning robot |
| Brand | GRE |
| Model | RKA80 |
| Power supply | Low voltage transformer (approx. 24V DC) |
| Filter type | Washable cartridge filter |
| Floating cable length | Approximately 15 meters (standard) |
| Recommended water temperature | 13°C to 35°C (optimal 22°C-32°C) |
| Storage temperature | 10°C to 40°C |
| Transformer protection rating | IPx? (must be placed 3.6 m from pool) |
| Electrical safety | Required residual current device (RCD) 30mA |
| Weight (estimated) | Approximately 7 kg |
| Dimensions (L x W x H) estimated | 45 x 40 x 25 cm |
| Brush type | Side brushes and main brushes (tracks) |
| Filter capacity | Large capacity filter bag |
| Cycle runtime | Approximately 2 hours (standard) |
| Functions | Automatic cleaning of floor, walls, and waterline |
| Movement modes | Random or programmed (not specified) |
| Maintenance | Clean filter after each cycle, clean impeller monthly, rinse with clean water |
| Spare parts | Filter, brushes, belts, tracks, impeller, seals available |
| Warranty | Subject to storage at recommended temperature |
Frequently Asked Questions - RKA80 GRE
User questions about RKA80 GRE
0 question about this device. Answer the ones you know or ask your own.
Ask a new question about this device
Download the instructions for your Vacuum Cleaner in PDF format for free! Find your manual RKA80 - GRE and take your electronic device back in hand. On this page are published all the documents necessary for the use of your device. RKA80 by GRE.
USER MANUAL RKA80 GRE
Operating Instructions
English

Operating Instructions and Parts List
Français

Robotic Pool Cleaner
CAUTION: Do not plug the power supply into a grounded outlet or do not switch the pool cleaner "ON" if it is not fully immersed in water. Operating the cleaner out of water will cause severe damage immediately and will result in loss of warranty.
Allow the cleaner to remain in the pool for 15 to 20 minutes following the end of its cleaning cycle. This will allow the motors to cool adequately. Do not leave the cleaner in the pool all the time. Always remember to turn the power supply "OFF" and unplug it from the power outlet before removing the cleaner from the pool.
WARNING: The cleaner must not be used when people are in the water. For use with swimming pool only
Safety Note
- The unit must be supplied through a residual current device (RCD) having a rated residual operating current not exceeding 30mA
- The connection to the branch circuit should be consistent with the local and national wiring rules (electrical code).
- Mishandling of the unit can result in leakage of lubricants.
- If the supply cord is damaged, it must be replaced by the manufacturer's service agent or a qualified and trained person in order to avoid hazards.

This appliance is not intended for use by persons (including children) with reduced physical, sensory or mental capabilities, or lack of experience and knowledge, unless they have been given supervision or instruction concerning use of the appliance by a person responsible for their safety. Children should be supervised to ensure that they do not play with the appliance.
WARNING: A Ground Fault Current Interruption (GFCI-USA) or a Residual Current Device (RCD-EUROPE) must be installed to protect your electric outlet and prevent any possible electric shock.
SAVE THESE INSTRUCTIONS
Dear Customer,
Thank you for choosing our product to clean your pool. We hope that you will enjoy using your new robot to maintain your swimming pool for years to come.
Before you begin to use your robot, please take a few minutes to carefully read these operating instructions.
Again, thank you for choosing our product.
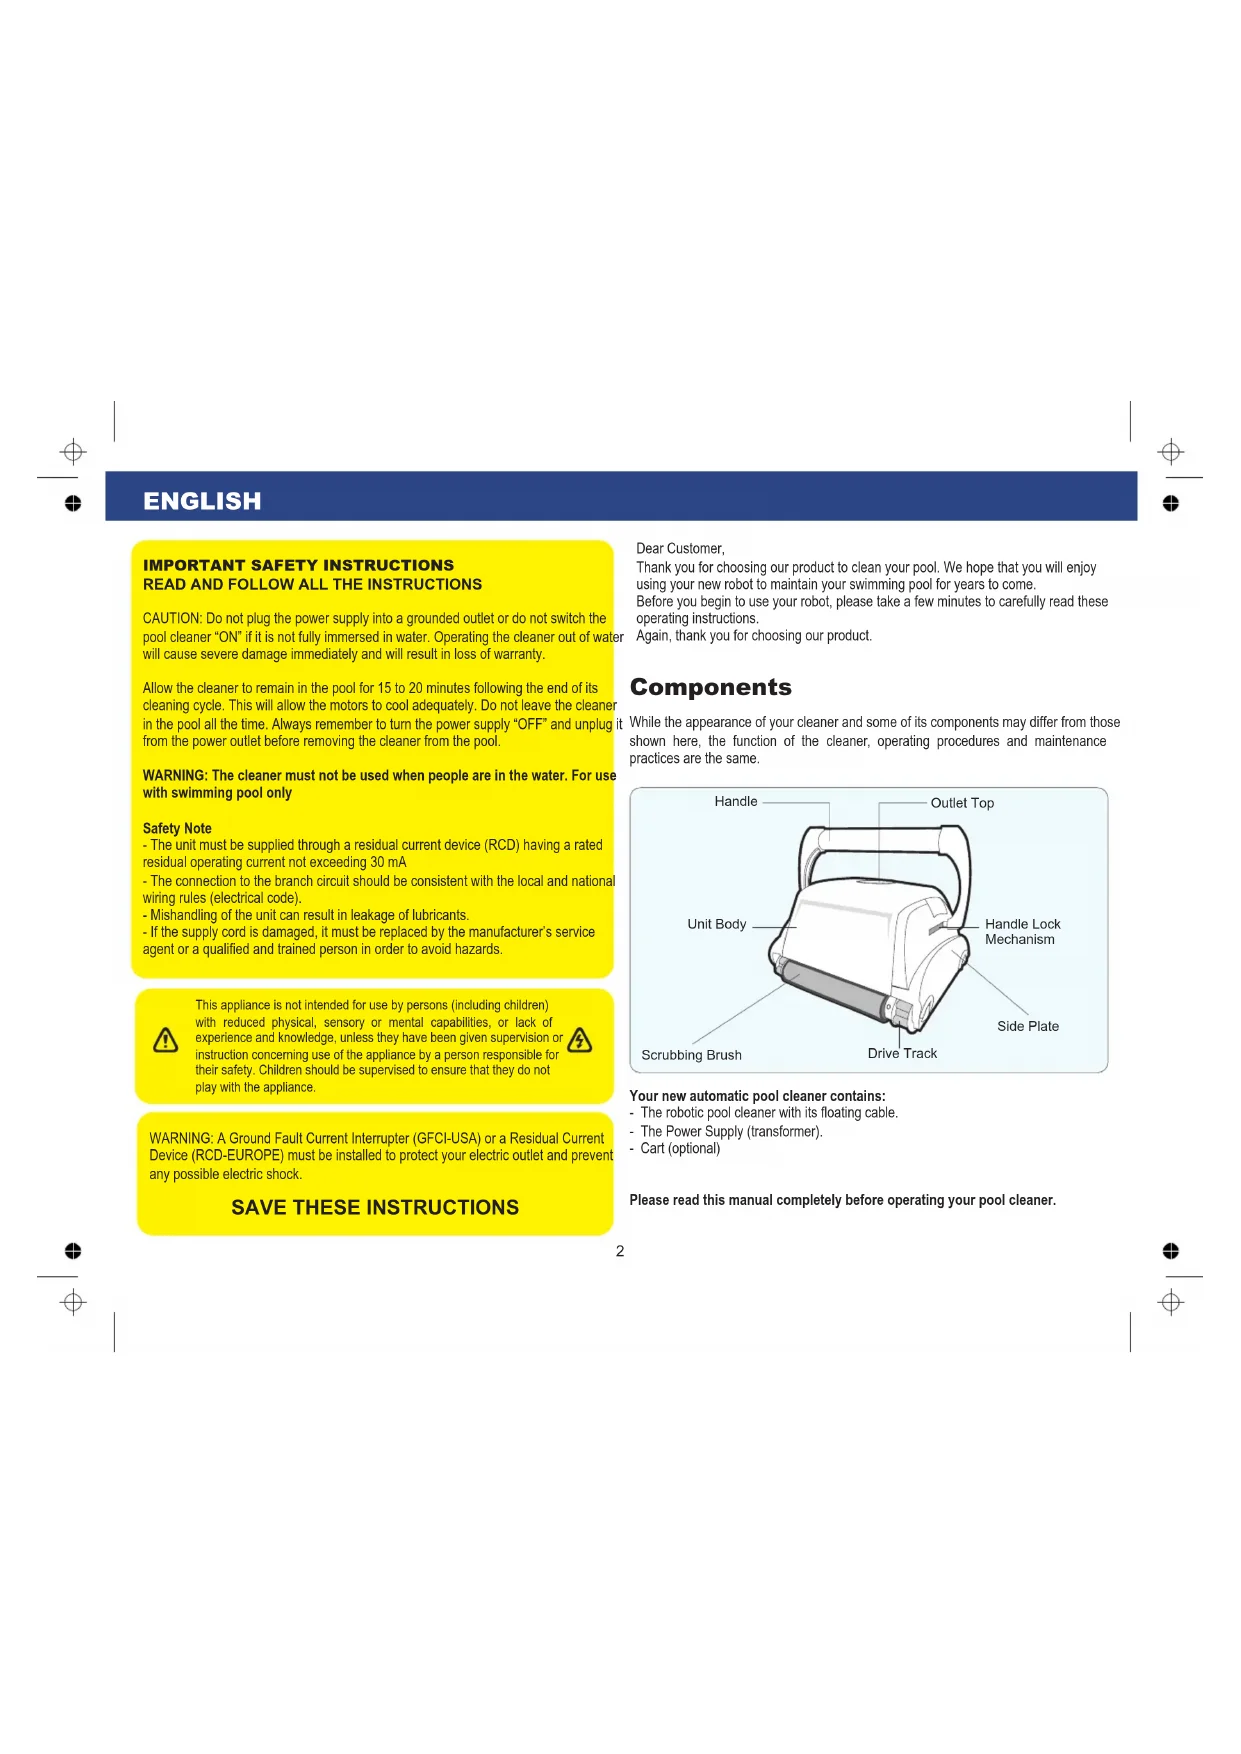
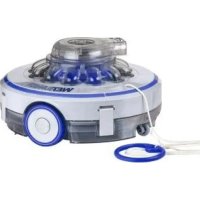
Components
While the appearance of your cleaner and some of its components may differ from those shown here, the function of the cleaner, operating procedures and maintenance practices are the same.

Your new automatic pool cleaner contains:
-
The robotic pool cleaner with its floating cable.
-
The Power Supply (transformer).
- Cart (optional)
Please read this manual completely before operating your pool cleaner.
Operating the pool cleaner
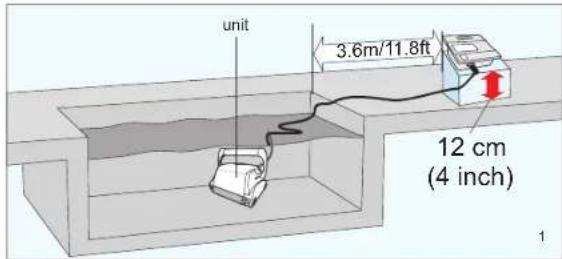
- Place the power supply (transformer) at least 3.6 meters / 11.8 feet from the pool and at least 12cm / 4 inch above the surface (fig.1). The transformer will supply low voltage to the cleaner.
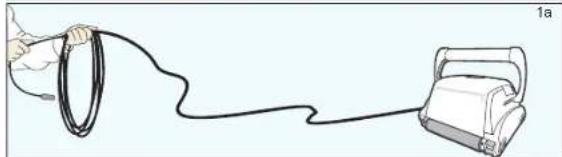
- Uncoil the cable.(fig.1a)
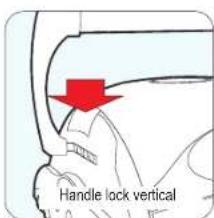
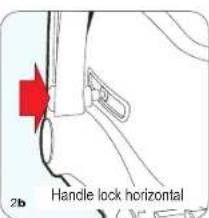
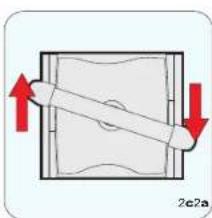
3. For proper operation, lock the moveable handle diagonally across the top of the cleaner's body. Push down on the handle lock mechanism and slide the handle all the way to the end (recommended one slot before the end), then release the lock. Depending on your model, the handle lock button might be vertical or horizontal (fig.2a, 2b). The handle will remain fixed in this position. Repeat this process on the other side of the cleaner. Remember, the handle must be fixed diagonally (fig.2c)
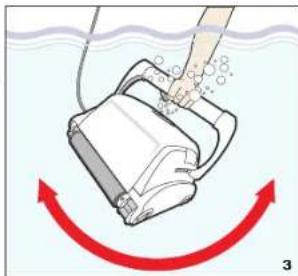
Place the unit in the water. Turn the unit side to side in the water to allow air to escape from the body and then let the cleaner sink to the bottom of the pool (fig.3). Then, spread the cable over the surface of the pool as evenly as possible (fig.1).
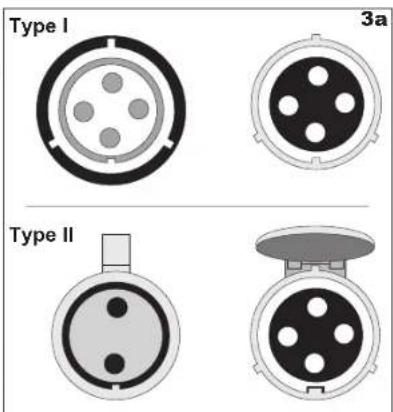
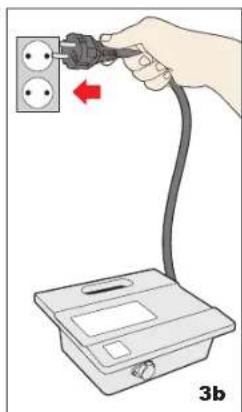
5. Plug the cable into the power supply. Depending on your model (Type I or Type II), make sure the key on the plug corresponds exactly with the key slot on the socket of the power supply (fig.3a). Plug the power supply into a grounded outlet. Ensure that the electric outlet has been properly grounded (fig.3b). Press the "ON" button on the power supply. The light will glow indicating that the system is ON and the pool cleaner will start the cleaning cycle. The unit keeps record of the number of cleaning cycles. Only an authorized service center can display the accumulated cleaning cycles. (See details on the next page)
Operating the pool cleaner
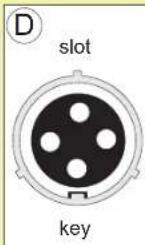
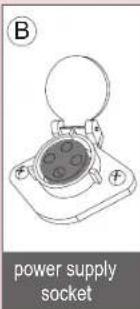
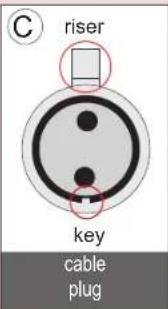
Plugs Type I
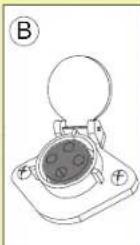
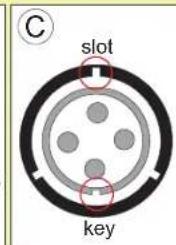
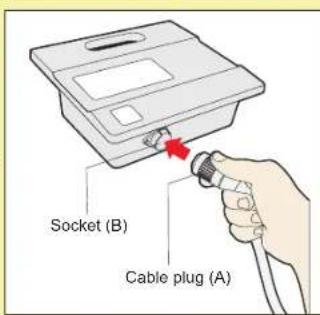
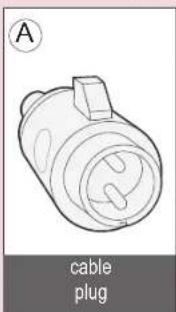
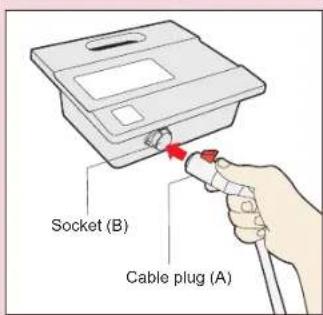
To plug the cable (Fig A) into the socket on the power supply (Fig. B), please do the following:
1.Prepare the plug as seen in (Fig. C) with the key and 3 outside slots exactly as shown.
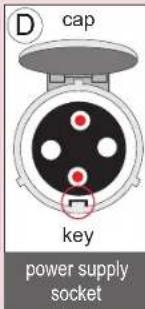
2.Fit exactly the key and the slots from cable plug with the corresponding key and slots from the power supply socket. (Fig. D)
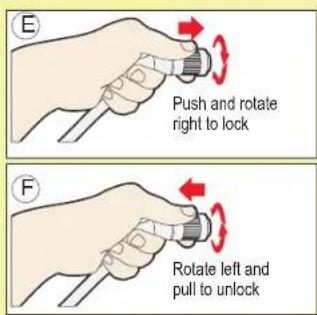
3.Push the plug into the socket of the power supply all the way in.
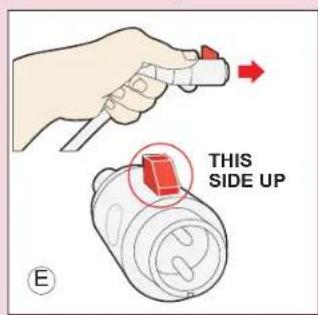
4.Once the plug is in, rotate the plug to the right to lock it into place (Fig. E).
5.To remove the plug, first rotate the plug to the left to unlock it, then pull it out (Fig. F).
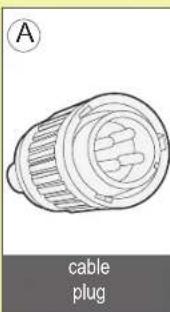
Plugs Type II
To plug the cable (Fig A) into the socket on the power supply (Fig. B), please do the following:
1.Prepare the plug as seen in (Fig. C) with the key and the riser exactly as shown.
2. The riser should face up (Fig. E) in order to keep the socket cap open. The cap will lock the cable in place.
3.Fit exactly the key with the corresponding key slot from the power supply socket.
Although the socket has 4 holes, only the top and the bottom one will be used (Fig. D)
4. Push the plug into the socket of the power supply all the way in. After inserting the plug all the way, the cap should be pressed on it to secure it.
5. To remove the plug, you need to lift the cap, and then pull.
Operating the pool cleaner
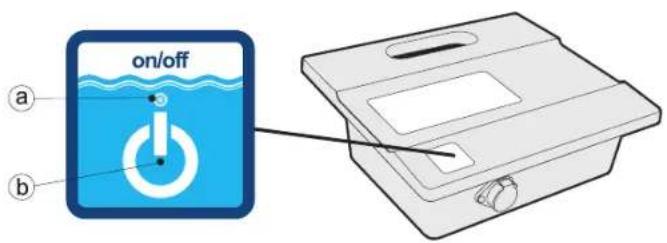
a. Power LED
The blue LED flashes when the power supply is in standby mode and lights continuously when the pool cleaner is operating. The power button switches between ON and STANDBY
b. "POWER" button
The button switches between "ON" and "STANDBY".
IMPORTANT- After every cycle the pool cleaner will automatically go to "standby". In case you want to turn the machine off during the working cycle, press the "power" button once and the LED will start flashing, indicating that the machine has stopped running.
IMPORTANT:
Please be sure to always keep your pool cleaner properly stored anywhere between 10 to 40 degrees Celsius (50 to 104 degrees Fahrenheit). This will keep the motors, plastics and seals protected. Failure to comply will result in loss of warranty.
Robot can be used in water with temperatures ranging from 13^ to 35^ (55°F to 95°F). However, the recommended optimal temperature is between 22^ and 32^ (72°F and 90°F)
Maintenance and adjustment
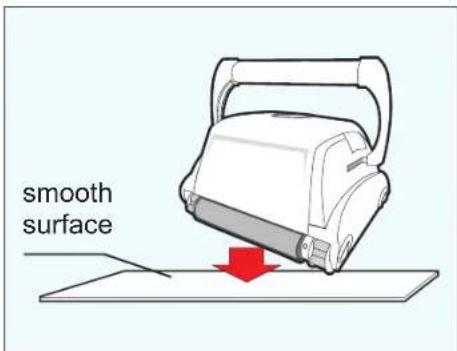
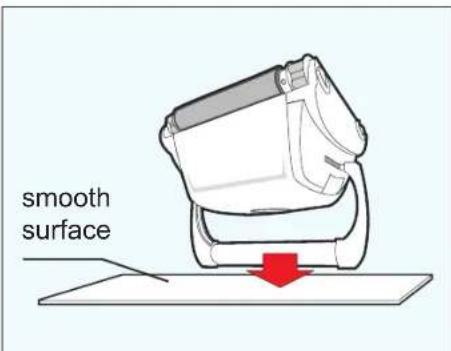
CAUTION:
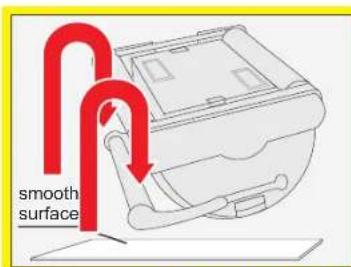
To avoid scratches and other blemishes appearing on your robot, simply find a smooth surface for it to rest on when cleaning the debris bag or performing minor adjustments.
These scratches could produce changes in the robots soft and smooth edges resulting in potential damage to some flexible pool surfaces.
Maintenance and adjustment
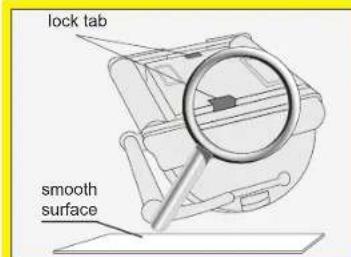
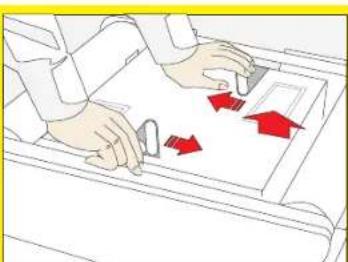
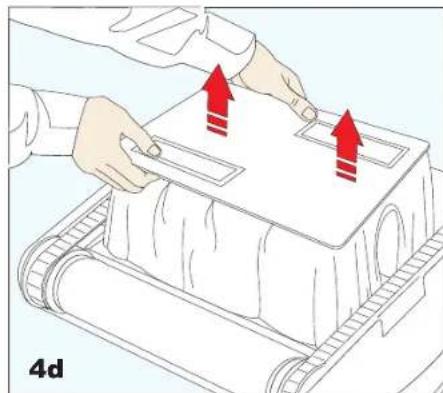
LOCK TAB SWIVELETAB4a

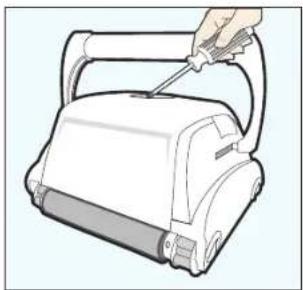
CLEAN THE FILTER BAG AFTER EVERY CLEANING CYCLE
a. Unplug the power supply. (Please keep the plug away from contact with water)
b. If the unit is in the pool, gently pull the cleaner toward you using the cable until the handle is within reach. Use the handle (not the cable) to pull the cleaner out of the pool after allowing most of the water to drain from the unit.
c. Lay the unit on its back on a smooth surface (in order to prevent scratches on the machine body), release the lock tabs and remove the bottom lid assembly. (fig.4a, 4b, 4c, 4d)
(continue on the next page)
LOCK TAB SWIVELETAB4b
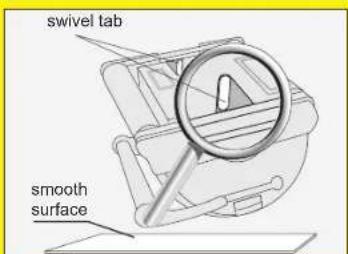
NOTE:
Depending on your model, there are 2 types of bottom lid releasing mechanisms: LOCK TAB or SWIVEL TAB. Please follow the instructions diagram according to your model.
LOCK TAB SWIVEL TAB4c
Maintenance and adjustment
(continued from the previous page)
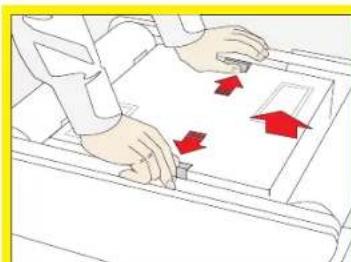
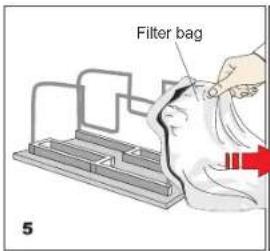
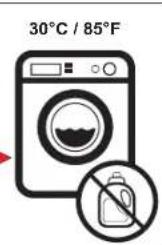
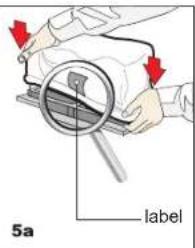
d. Remove the filter bag from the support bars, turn it inside out and wash off all the dirt with a garden hose or in a sink. Squeeze the bag gently until the rinse water is clear, necessary, machine wash the bag using only cold water with NO DETERGENT! (fig.5)
e. Re-install the bag on the support bars with the label in the center of one of the long sides of the bottom lid (5a)
f. Re-install the bottom lid assembly in the body. Push down on it until lock tabs will snap into place properly.
IMPORTANT TIPS:
- Shut off and unplug the power supply every time you remove the cleaner from the water.
Clean the filter bag after every cycle. - Reverse the handle after every cleaning cycle to avoid tangling the cable.
Periodically straighten out the floating cable. - Replace worn brushes to ensure maximum cleaning performance
Make sure that your pool cleaner positions itself properly on the wall. The machine handle must rest parallel to the water line upon reaching the surface of the water. - Save your cleaner's packaging for off-season storage or for shipping the unit to your dealer if service is required.
- Leave your pool cleaner in the water for 15 to 20 minutes after every cleaning cycle.
- Do not leave your cleaner in direct sunlight when not in use.
- Never leave the power supply in direct sunlight and avoid leaving it in the rain.
Occasionally, you should rinse your cleaner in clean, fresh water. This will lengthen the service life of the drive belts, drive tracks and scrubbing brushes.
Clean the propeller once a month
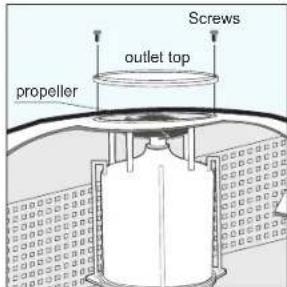
Cleaning the pump propeller:
1) Take out the 2 (4) screws from the outlet top
2) Take out the outlet top and remove hair and other debris around propeller
CABLE CARE
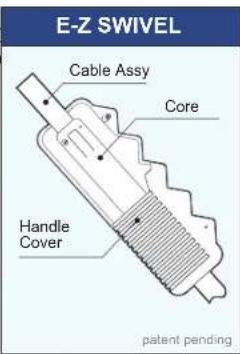
The cable may become twisted after a period of time in use. To correct this condition, simply lock the moveable handle on the top of the cleaner in the opposite diagonal direction. The pool cleaner will now travel in the opposite direction while cleaning your pool and the cable will uncoil. Check the cable periodically for external damage. If the problem persists, use the E-Z Swivel device.
Place the robot on the ground and unplug the cable from the transformer. With one hand, holding the E-Z Swivel, walk away from the robot, pulling the cable to its full length. The core will rotate inside the cover and in this way will untangle the cable.
Troubleshooting Guide
PLEASE CHECK THE FOLLOWING BEFORE CALLING YOUR SERVICE CENTER
Before troubleshooting, the pool cleaner must be disconnected from the power supply and the power supply must be unplugged from the electrical outlet to prevent damage to the unit and possible personal injury.
For reference numbers, consult the parts list diagram located on the last page of the instructions.
1. Unit does not pump water or move:
a) Check to see if electric outlet (22) has power.
b) Check if transformer (16) is plugged into a grounded outlet and the blue cable assembly is plugged into the transformer.
c) Switch the power supply "OFF" and "ON" a few times. Allow 45 seconds between "ON" and "OFF".
d) Check for and remove any debris such as hair, string, or leaves that may be obstructing the free movement of the Drive Pulley (5), Drive Belts (6), or Drive Tracks (7).
e) Check that the Drive Belts (6) and Drive Tracks (7) are properly aligned and are taut. Adjust or replace if necessary.
2. Unit does not pump water at all, or pumps slowly but moves:
a) Check to see if propeller (1) is seized due to accumulation of hair or debris on the propellers. Remove the top screws on each outlet top (1) and clean the propeller. When reassembling the top cover, do not overtighten the screws.
b) Check to see if the filter bag (12) is thoroughly clean. Clean as necessary.
c) If a and b are negative, check the pump motors (2). If they are not functioning send the unit to your service center.
3. Unit does not move but does pump water:
a) Check to see if forward/reverse motion is obstructed by foreign matter; hair, debris, etc. on drive belts (6) or drive tracks (7) or there is an entanglement with the power cord. Clean as necessary.
b) Check if drive belts (6) have slipped out of place. Also check for proper tension of drive belts (6). If necessary replace belts.
c) Check for loose drive motor (3) connections.
d) If a, b, and c are negative, check the Master and Slave motors. If one or the other is not functioning, send the unit to your service center.
4. Unit does not pick up dirt and debris:
a) Check 2a and 2b of this guide.
b) Check the Intake Valve Flaps (23) on the underside of your unit. The Flaps should move freely to open and close. Clean and free the Valve Flaps (23) if necessary.
5. Unit does not seem to cover the entire pool:
a) Most likely a thorough cleaning of the filter bag (12) is needed.
b) Check to see that the blue cable (15) is properly spread out and is untangled.
c) Allow the unit to run in the pool for the entire cleaning cycle.
d) Make sure that the Floating Handle (14) is locked diagonally across the top of your unit's body.
e) Check that the Pump Motor (2) is operating. Please refer to the Troubleshooting section titled "Moves But Does Not Pick Up Dirt And Debris"
f) After following all of the above, if there is still a problem, call your dealer for specific additional assistance.
6. Debris Comes Out Of The Aquabot When Removing It From Pool (Bottom Lid Does Not Close Properly)
a) Lock Tabs (24)-Check that the Lock Tabs (24) are not warped. They should be straight and aligned with the unit's body.
b) Intake Valves (23) - Check that the Intake Valve Flaps on the underside of your unit (in the Bottom Lid) move freely to open and close. Clean Flaps if necessary.
7. The cable is twisted:
a) Reverse the diagonal position of the handle.
b) Use the E-Z Swivel (see "Cable Care" chapter)
*The transformer cord can only be replaced with the aid of special purpose tools normally available only to authorized dealers, distributors and service centers.
FRANÇAIS
CONSIGNES DE SECURITE IMPORTANTES LIRE ET SUIVRE TOUTES LES INSTRUCTIONS
The power supply must be connected to a grounded 3 conductor socket. The mains power supply must be connected via a GFCI (ground fault circuit interrupter) or RCD (residual current device) having a rated residual operating current not greater than 30mA .
Fuse
The fuse must be changed by an authorized service agent or trained and qualified person only. For continued protection against risk of fire, replace only with the same type and rating of fuse.
Maintenance and safety
The cover should not be removed except by an authorized service agent or trained and qualified person. No internal adjustment or component replacement can be carried out by the user. The power cable must be disconnected before removing the cover.
If the power supply cord is damaged, it must be replaced by an authorized service agent or trained and qualified person. Do not operate the supply if the cord is damaged.
Environmental conditions
The power supply is designed to work both indoors and outdoors. However, the unit should not be operated in direct sunlight or be exposed to water. The power supply should not be operated in an ambient temperature in excess of 40^ .
Erdung
Output rating 29V,6.3A.
Storage temperature -10°C - 60°C
Operating temperature 0^ - 45^
Ingress protection IP54
Physikalische Daten
Abmessungen (^^) 273mm 242mm 90mm
Gewicht 1.9 Kg
Elektrische Daten
- Operating Instructions
- Safety Note
- SAVE THESE INSTRUCTIONS
- Components
- Operating the pool cleaner
- Plugs Type I
- Plugs Type II
- a. Power LED
- b. "POWER" button
- IMPORTANT:
- Maintenance and adjustment
- CAUTION:
- CLEAN THE FILTER BAG AFTER EVERY CLEANING CYCLE
- NOTE:
- IMPORTANT TIPS:
- CABLE CARE
- Troubleshooting Guide
- PLEASE CHECK THE FOLLOWING BEFORE CALLING YOUR SERVICE CENTER
- Unit does not pump water or move:
- Unit does not pump water at all, or pumps slowly but moves:
- Unit does not move but does pump water:
- Unit does not pick up dirt and debris:
- Unit does not seem to cover the entire pool:
- Debris Comes Out Of The Aquabot When Removing It From Pool (Bottom Lid Does Not Close Properly)
- The cable is twisted:
- FRANÇAIS
- CONSIGNES DE SECURITE IMPORTANTES LIRE ET SUIVRE TOUTES LES INSTRUCTIONS
- Fuse
- Maintenance and safety
- Environmental conditions
- Erdung
- Physikalische Daten
- Elektrische Daten
Brand : GRE
Model : RKA80
Category : Vacuum Cleaner