RKJ14 - Vacuum Cleaner GRE - Free user manual and instructions
Find the device manual for free RKJ14 GRE in PDF.
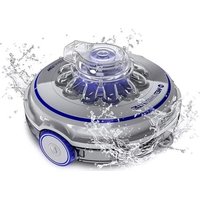
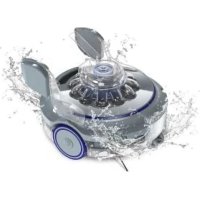
| Product type | Pool cleaning robot |
| Brand | GRE |
| Model | RKJ14 |
| Power supply | 12 V DC transformer, 220-230 V mains plug with 30 mA residual current circuit breaker |
| Suitable pool dimensions | Up to 5 m x 10 m, flat bottom |
| Cleaning cycle | Approximately 2 hours, programmable automatic stop |
| Timer | Digital, adjustable from 0 to 90 seconds |
| Movement type | Random with adjustable orientation (clockwise/counterclockwise via adjustable clip) |
| Filtration system | Machine-washable filter bag (without detergent, cold) |
| Cable length | Not specified, floating cable |
| Weight | Approximately 10 kg (estimate) |
| Materials | Plastic, waterproof parts |
| Storage temperature | 10°C to 40°C |
| Warranty | Void if used out of water or improper storage |
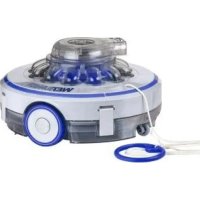
| Included accessories | Robot, transformer, floating cable, filter bag, adjustable clip, cable unwinding handle |
| Regular maintenance | Clean filter bag after each cycle, check valves and impellers |
| Safety | Do not use with swimmers in the pool, unplug before removing from water |
Frequently Asked Questions - RKJ14 GRE
User questions about RKJ14 GRE
0 question about this device. Answer the ones you know or ask your own.
Ask a new question about this device
Download the instructions for your Vacuum Cleaner in PDF format for free! Find your manual RKJ14 - GRE and take your electronic device back in hand. On this page are published all the documents necessary for the use of your device. RKJ14 by GRE.
USER MANUAL RKJ14 GRE
Robotic Pool Cleaner - Jet System Operating Instructions

English
Français
Deutsch
Italiano
Espanol
Portugues
Nederlandss

Operating Instructions

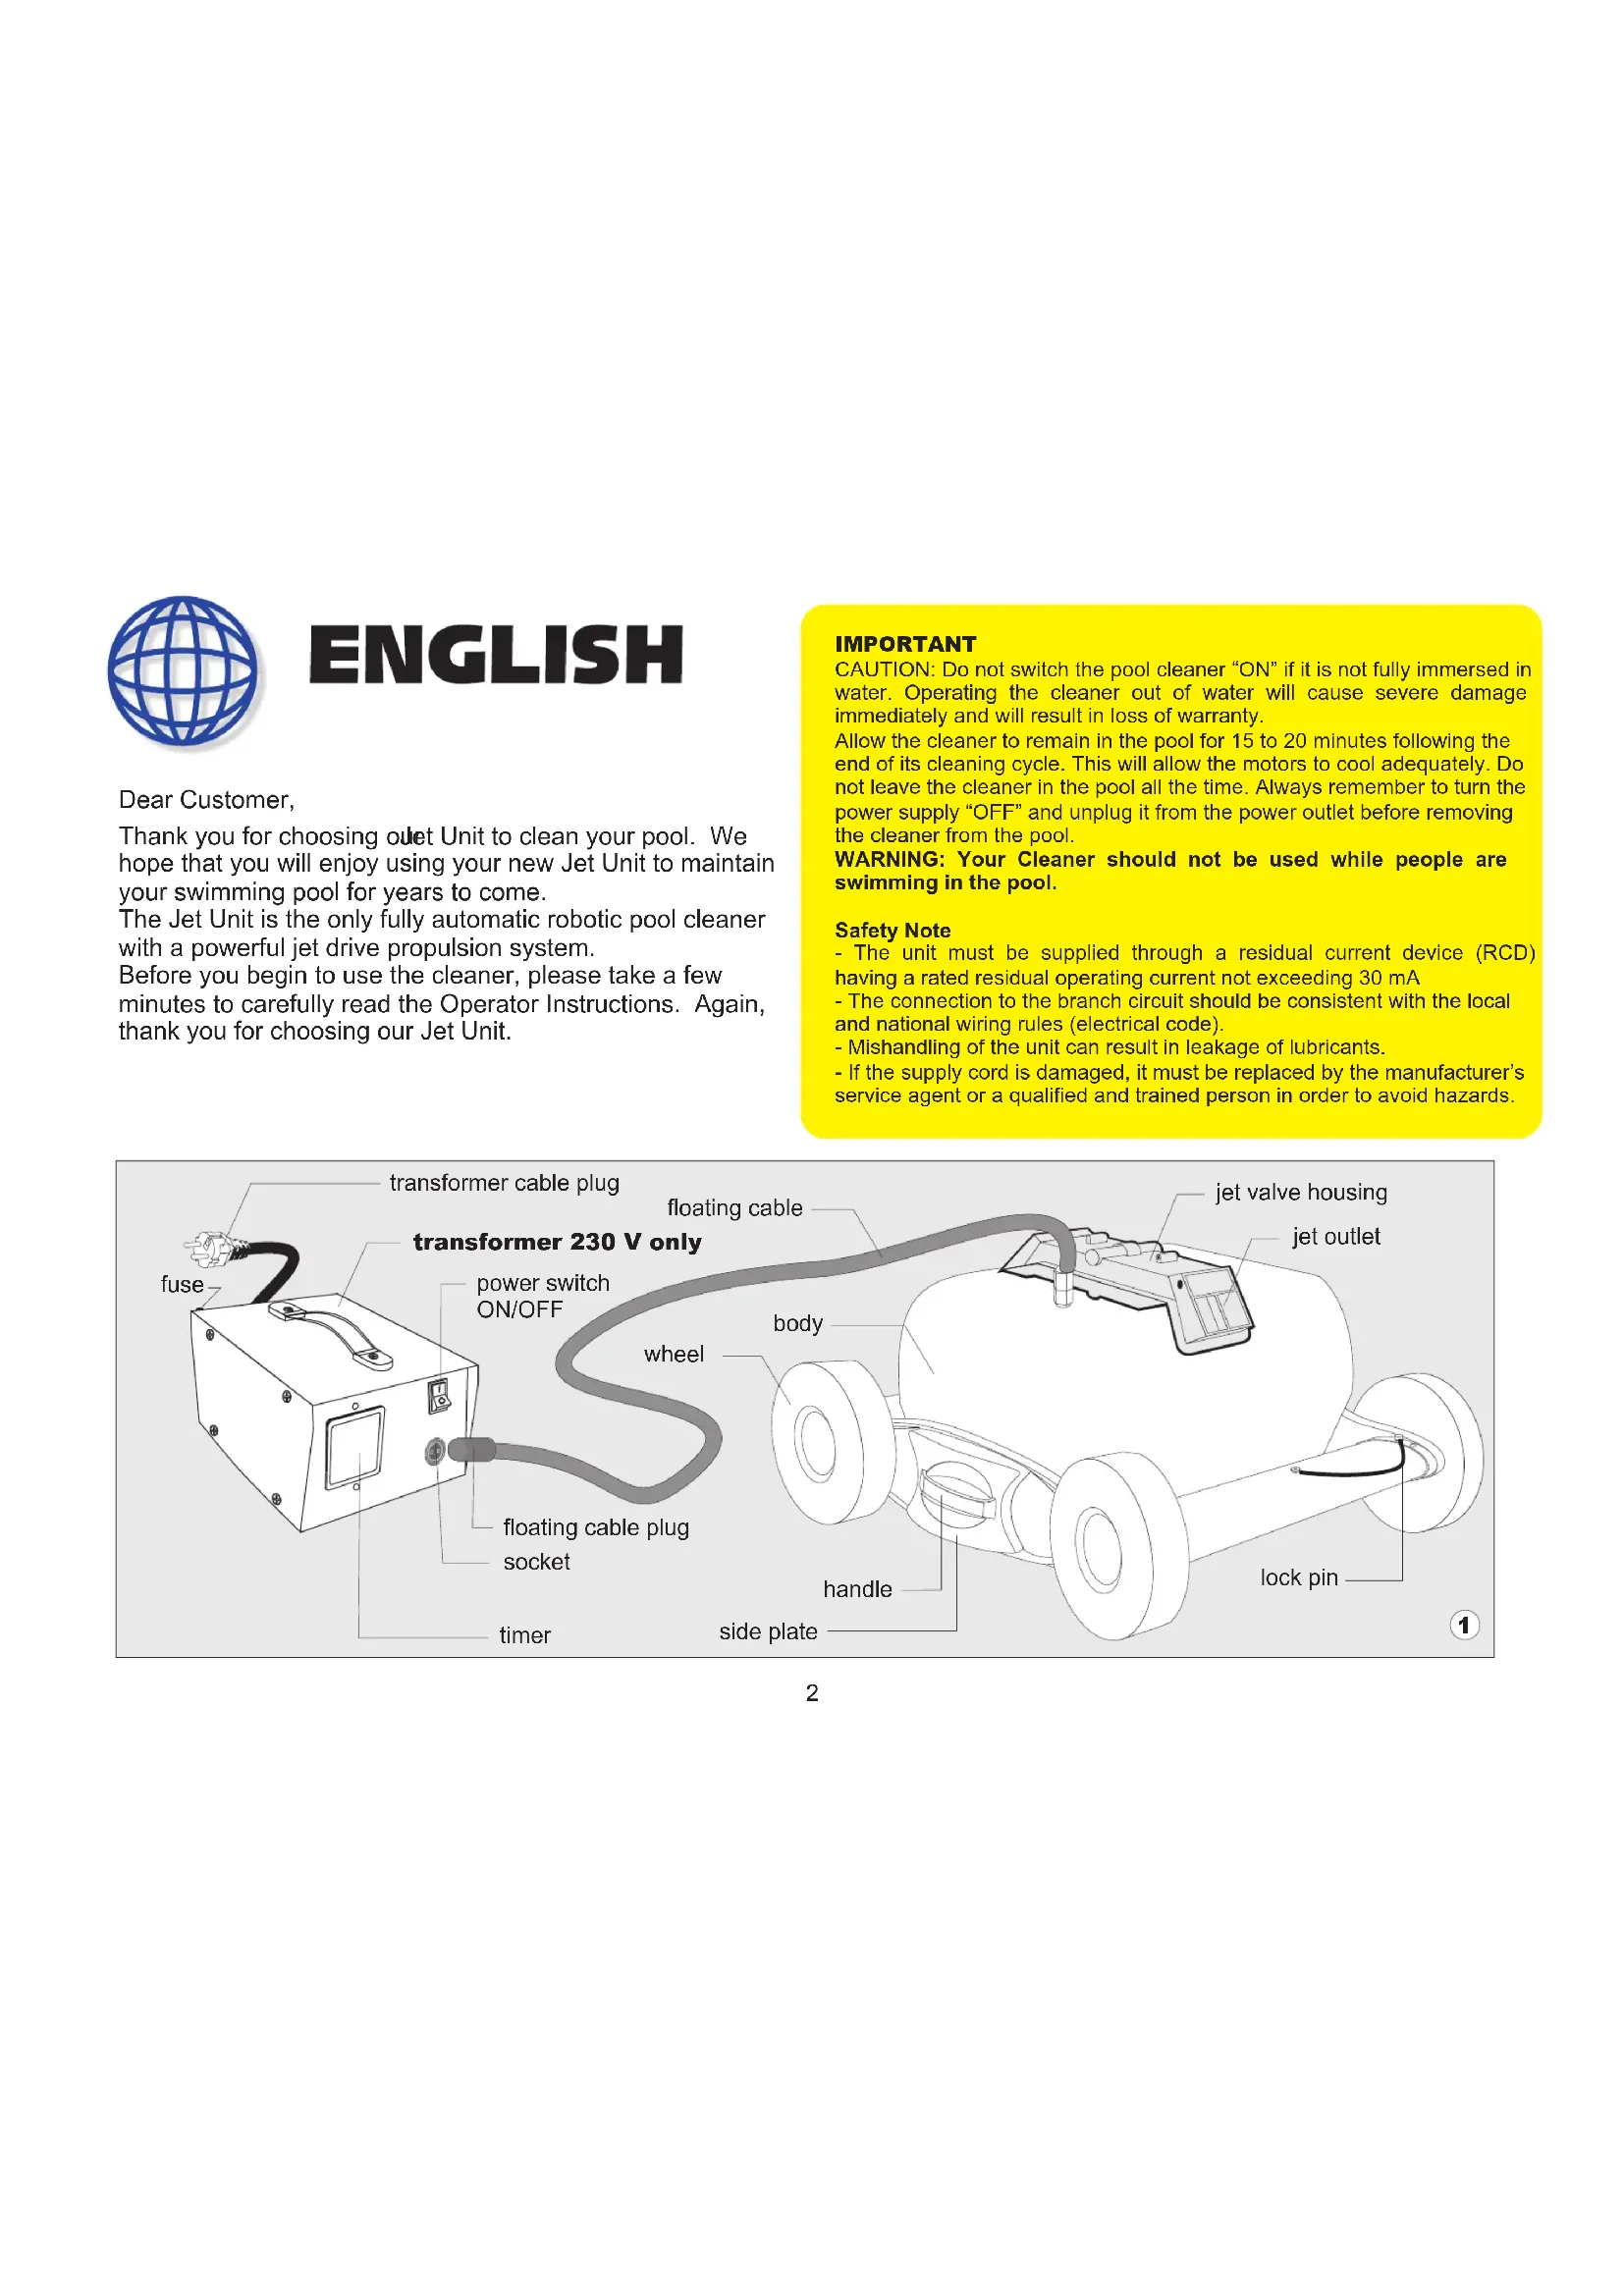
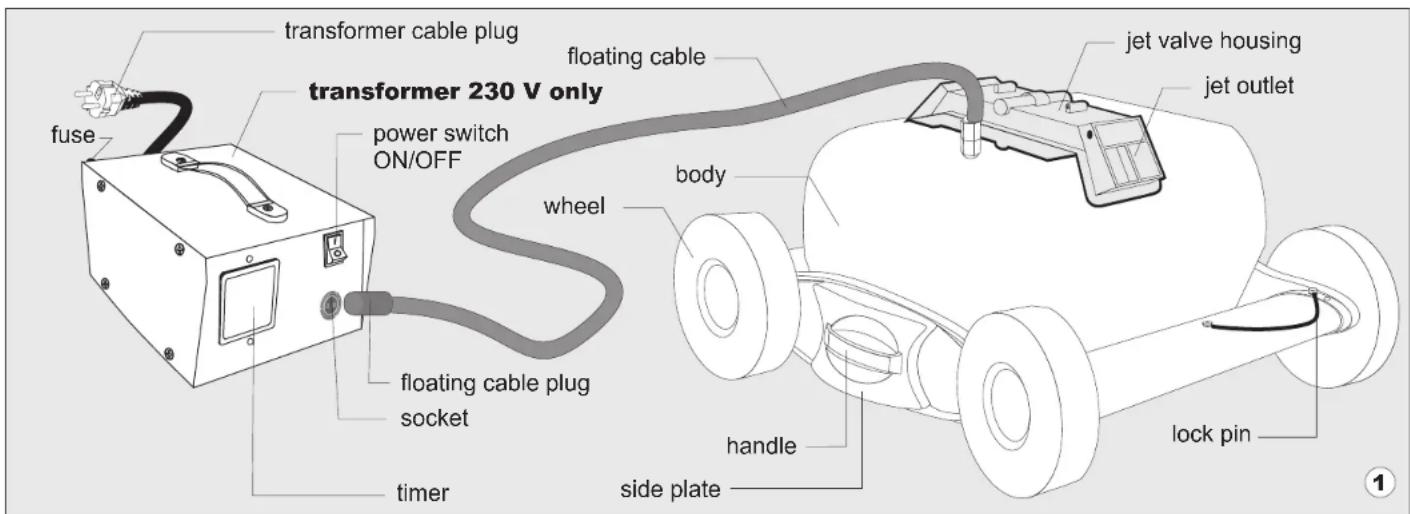
Thank you for choosing ouet Unit to clean your pool. We hope that you will enjoy using your new Jet Unit to maintain your swimming pool for years to come.
The Jet Unit is the only fully automatic robotic pool cleaner with a powerful jet drive propulsion system.
Before you begin to use the cleaner, please take a few minutes to carefully read the Operator Instructions. Again, thank you for choosing our Jet Unit.
IMPORTANT
CAUTION: Do not switch the pool cleaner "ON" if it is not fully immersed in water. Operating the cleaner out of water will cause severe damage immediately and will result in loss of warranty.
Allow the cleaner to remain in the pool for 15 to 20 minutes following the end of its cleaning cycle. This will allow the motors to cool adequately. Do not leave the cleaner in the pool all the time. Always remember to turn the power supply "OFF" and unplug it from the power outlet before removing the cleaner from the pool.
WARNING: Your Cleaner should not be used while people are swimming in the pool.
Safety Note
- The unit must be supplied through a residual current device (RCD) having a rated residual operating current not exceeding 30mA
- The connection to the branch circuit should be consistent with the local and national wiring rules (electrical code).
- Mishandling of the unit can result in leakage of lubricants.
- If the supply cord is damaged, it must be replaced by the manufacturer's service agent or a qualified and trained person in order to avoid hazards.
Operating Instructions
Your new automatic pool cleaner contains:
A. Robotic Pool Cleaner and floating cable.
B. Power Supply (transformer)
Please read this Manual completely before operating your Pool Cleaner.
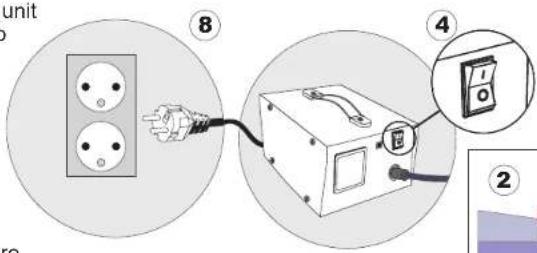
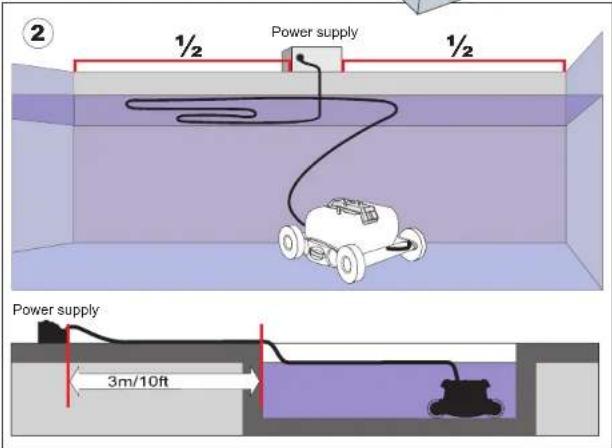
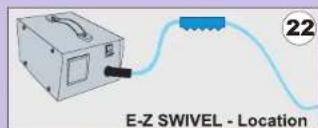
- Place the power supply (transformer) at least three meters (10 feet) from the pool. (See figure 2). The transformer should not be left out in the rain or placed in puddles of water. The transformer will supply very low voltage (12V) to the cleaner.
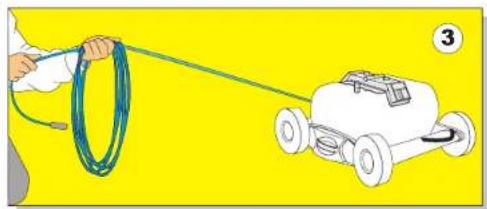
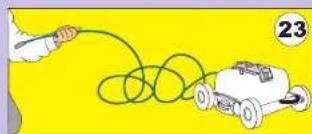
- Uncoil the cable (See figure 3).
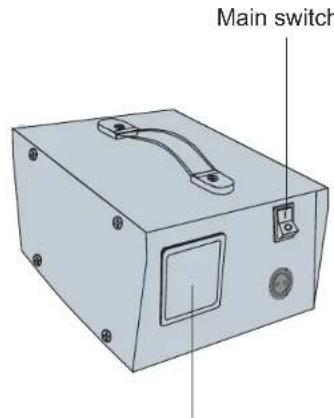
- Make sure that the power supply switch is in the "OFF" position (See figure 4).
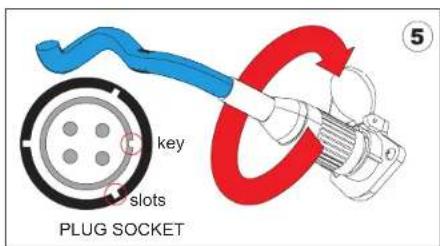
- Plug the cable into the socket on the power supply (See figure 5):
a. Fit exactly the key and the slots from cable plug with the corresponding key and slots from the transformer socket.
b. Push the plug into the socket of the transformer all the way in.
c. Once the plug is in, rotate the plug to the right to lock it into place.
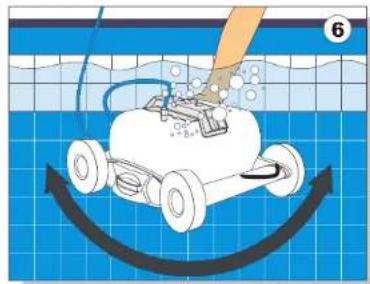
- Place the unit in the water. Turn the unit side to side in the water to allow air to escape from the body and then let the cleaner sink to the bottom of the pool (See figure 6). Then spread the floating cable over the surface of the pool as evenly as possible making sure it is not tangled or kinked
- Plug the transformer cord into a 230V three grounded outlet (See figure 8).

Operating Instructions
90 Seconds Timer Operating Instructions
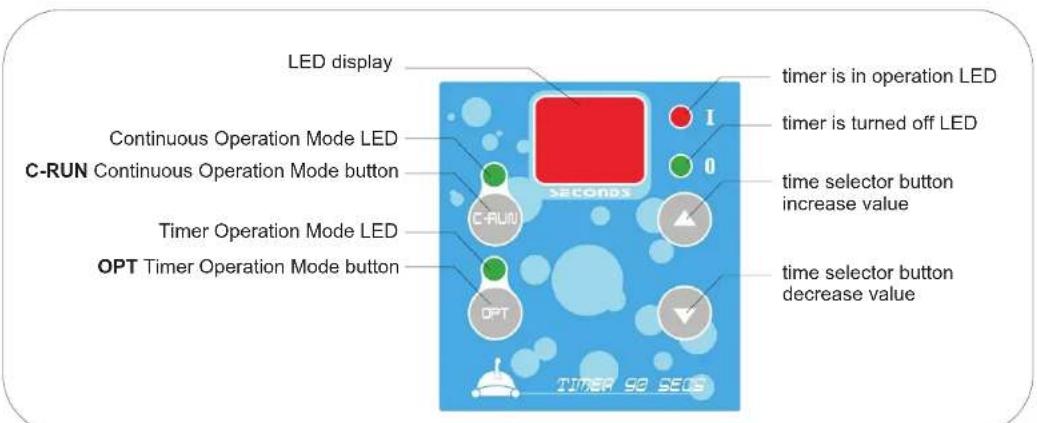
Your Cleaner is equipped with a 90 second DIGITAL TIMER located on the power supply. To operate it please do the following:
- Switch the power supply ON pressing the main switch. The display will flash two horizontal bars.
- Press the C-RUN button. The machine will start to run and the green light indicator above the C-RUN button lights up to confirm the operation.
- Observe the time required for the machine to move across the pool, at its widest point from one side to another. For details regarding this operation please see the "Operating Instructions" chapter from your User Manual.
- According to your swimming pool dimensions, adjust the timer using the time selector arrows. Up arrow will increase the number of seconds, down arrow will decrease the number of seconds. You can choose between 0 and 90 seconds.
- Now your unit will work in Continuous Operation Mode and it will stop only when the operator will turn the machine OFF from the main switch.
- As an option, you can set the machine to turn off automatically after 2 hours. To do so, press the OPT button. The green light indicator above the OPT button lights up to confirm the operation.
Now that the OPT button is selected the machine will stop after 2 hours.
Please Note: In addition to the user selected operation time, the timer has a default shutdown for 5 seconds every 5 minutes.
Changing the Time Setting:
- The user can change the time (0-90 seconds) at any time, even as the pool cleaner is operating in the pool.
- Please keep in mind that whenever the timer is in operation, you will find the LEDs labeled "I" and
"0" will be lighted alternately. The Red LED "1" indicates that the timer is in operation for the selected (0-90 seconds) time. The Green LED "0" indicates the timer is turned off (for a default 1 second).
Digital Timer
IMPORTANT If you shut off the power supply from the main switch this will cancel all the settings you have entered and the selected programming. To resume cleaning you must repeat the procedures listed above.
CLEANING CYCLE
The cleaning cycle of the cleaner is two hours. After two hours of working, the cleaner will shut off automatically by an integrated timer inside the unit. In some cases the pools are clean after less than 2 hours and sometimes two hours is not enough. The size and shape of the pool and the amount of debris in it, will determine the total time of cleaning. When the cleaner slows down and constantly reverses directions before reaching the end sides of the pool, it is sending a signal that it is time to clean or change the filter bag.
Filter bag maintenance
CLEAN THE FILTER BAG AFTER EVERY CLEANING CYCLE
a. Unplug the power supply. (Please keep the plug away from contact with water)
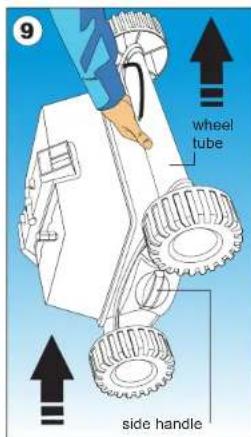
b. If the unit is in the pool, gently pull the cleaner toward you using the cable until the handle is within reach. Use the side handle (not the cable) or the wheel tube (fig 9) to pull the cleaner out of the pool after allowing most of the water to drain from the unit.
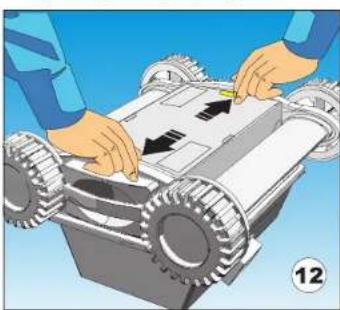
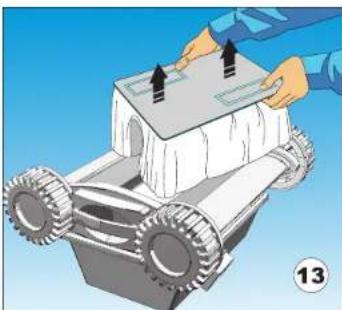
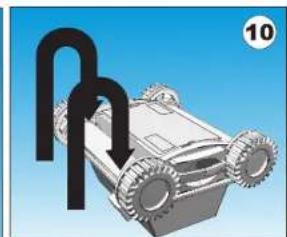
c. Lay the unit on its back on a smooth surface (in order to prevent scratches on the machine body), unlock and remove the bottom lid assembly. (fig.10,11,12,13)
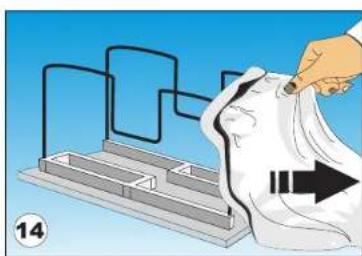
d. Remove the filter bag from the support bars (fig.14), turn it inside out and wash off all the dirt with a garden hose or in a sink. Squeeze the bag gently until the rinse water is clear. If necessary, machine wash the bag using only cold water with NO DETERGENT!
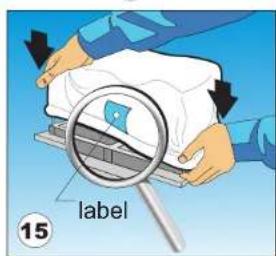
e. Re-install the bag on the support bars with the label in the center of one of the long sides of the bottom lid (fig. 15)
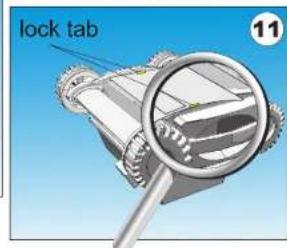
f. Re-install the bottom lid assembly in the body. Push down on it until the lock tabs will snap into place properly.
SETTING THE CLEANING PATTERN
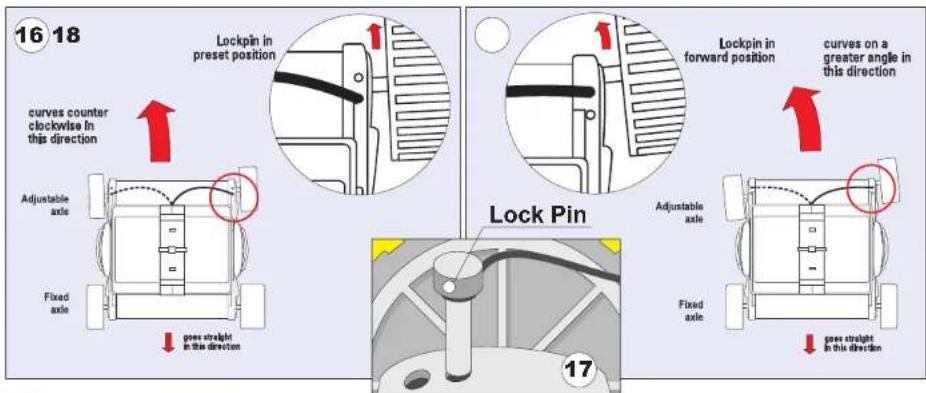
Your cleaner is pre-set to scan and clean round pools from 14 feet (4.3 m) to 30 feet (9.15 m) in diameter. The cleaner is factory set with the lock-pin installed in a hole on the right side of the adjustable axle. In this position the cleaner will systematically clean the pool in a counter clockwise pattern. (see fig 16).
After the cleaning cycle is complete, remove the cleaner from the pool and transfer the lock-pin ( see fig 17) from the right side of the unit to the left side (with the wheel in front of the pin) Next time, when the unit will be used, the cleaning pattern will be in a clockwise pattern. This will keep the cable from being twisted or entangled.
CLEANING SMALL OR OVAL-SHAPED POOLS
In order to clean properly a small or an oval-shaped pool, the factory lock-pin setting needs to be changed. The lock-pin will need to be moved to the forward hole position. This position is currently blocked. To unblock the opening, use the lock pin and a hammer. Leave the lock pin in this position. This way the cleaner will clean the pool counter clockwise with a greater angle. (see fig 18). After the cleaning cycle is complete, place the lock-pin in the front hole on the opposite side, so the cleaning pattern will be clockwise next time.
TROUBLE SHOOTING:
A.Does not reverse directions:
- Take a garden hose and spray water into the valve housing at each opening. The high water pressure should free the jet valve system of any debris.
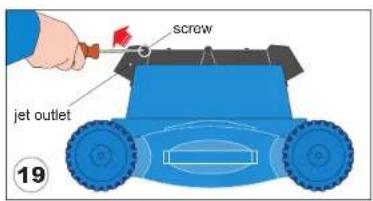
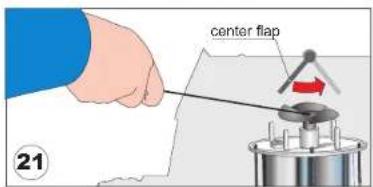
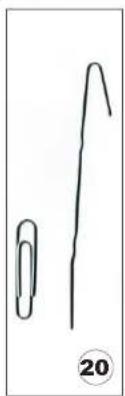
- Remove one of the jet-outlets, taking out the two lateral screws (FIG. 19). Bend a common "giant" paper clip into a hook as shown in (FIG. 20) Push the center Flap to open it and look into the Impeller. Typically, you may find debris like hair, string, or a small twig caught in the impeller. Use your paper clip to hook or free the debris and remove it (FIG. 21).
TROUBLE SHOOTING:
B.Does not pump water:
- Check to see if the electric outlet has power.
- Check to see if the cable is plugged into the power supply.
- Check the fuse in the Power Supply - if necessary replace it.
- Check the cable for possible cuts or damage.
C. Does Not Vacuum well or at all:
- Check to see if the filter bag is clean.
- Check to see if the intake valve flaps on the bottom of the cleaner are free to allow entry of water and debris.
D.Does not cover the entire pool:
- Check to see if the wheel movement is free of obstructions like hair or accumulated debris.
- Check to see if the filter bag is clean.
- Adjust timing cycle so that the cleaner reaches the other side of the pool.
E. Reverse Direction before reaching the opposite side wall of the pool.

1. Adjust the transformer timer:
Up arrow will increase the number of seconds. You can choose between 0 and 90 seconds. Repeat if necessary.
F. Waits too long at the wall site before reversing:

1. Adjust the transformer timer:
Down arrow will decrease the number of seconds. You can choose between 0 and 90 seconds. Repeat if necessary.
G. Floating cable and twisting cable care
- Your new cleaner was designed to clean most above-ground pools. Some pool shapes may cause the cable to coil or tangle because the cleaner operates in a systematic circular pattern. If that happens, use the E-Z swivel, a patented feature that allows you to easily untwist the cable.
Cable care
Your new cleaner was designed to clean most above-ground pools. Some pool shapes may cause the cable to coil or tangle because the cleaner operates in a systematic circular pattern. If that happens, use the E-Z swivel, a patented feature that allows you to easily untwist the cable.
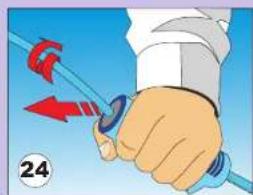
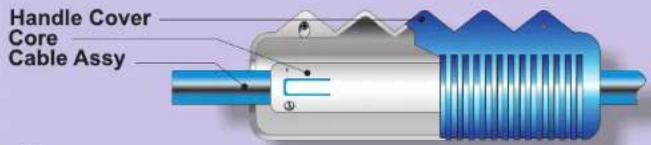
Holding with one hand the E-Z Swivel.
Place the Robot on the ground and unplug the cable from the transformer. With one hand, holding the E-Z Swivel (see fig. 24), walk away from the Robot, pulling the cable to its full length.
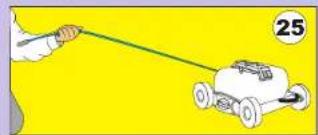
The core will rotate inside the cover and in this way will untangle the cable.
26
patent pending
important
Please be sure to always keep the cleaner properly stored anywhere between 10 to 40 degrees Celsius (50 to 104 degrees Fahrenheit). This will keep the motor, plastics and seals protected. Failure to comply, will result in loss of warranty.

FRANÇAIS
Chers clients,