T 500 - Hand dryer Starmix - Free user manual and instructions
Find the device manual for free T 500 Starmix in PDF.
Frequently Asked Questions - T 500 Starmix
User questions about T 500 Starmix
0 question about this device. Answer the ones you know or ask your own.
Ask a new question about this device
Download the instructions for your Hand dryer in PDF format for free! Find your manual T 500 - Starmix and take your electronic device back in hand. On this page are published all the documents necessary for the use of your device. T 500 by Starmix.
USER MANUAL T 500 Starmix
Mounting Instructions and Directions for Use
Pages 9-12

These Operating Instructions will ensure that you can quickly and comprehensively familiarize yourself with the new appliance.
- Please, read the following carefully before using the appliance for the first time. These instruction give important information concerning use, safety, care and maintenance, and waste disposal.
- Familiarize yourself in the same sequence as these Operating Instructions with the new appliance and its different functions.
- Observe all instructions for the correct operation and care of the appliance to maintain its operating readiness at all times and to ensure a long and dependable service life.
- Ensure that all instructions concerning safety are carefully observed to prevent accidents and to protect the appliance against damage.
- Keep these Operating Instructions in a safe place as they could prove to be a useful source of reference on a future occasion.
The appliance complies with the accepted rules of technology and the requisite laws on the safety of electrical appliances. The manufacturer cannot be held liable for possible damage resulting from incorrect appliance use or operation.
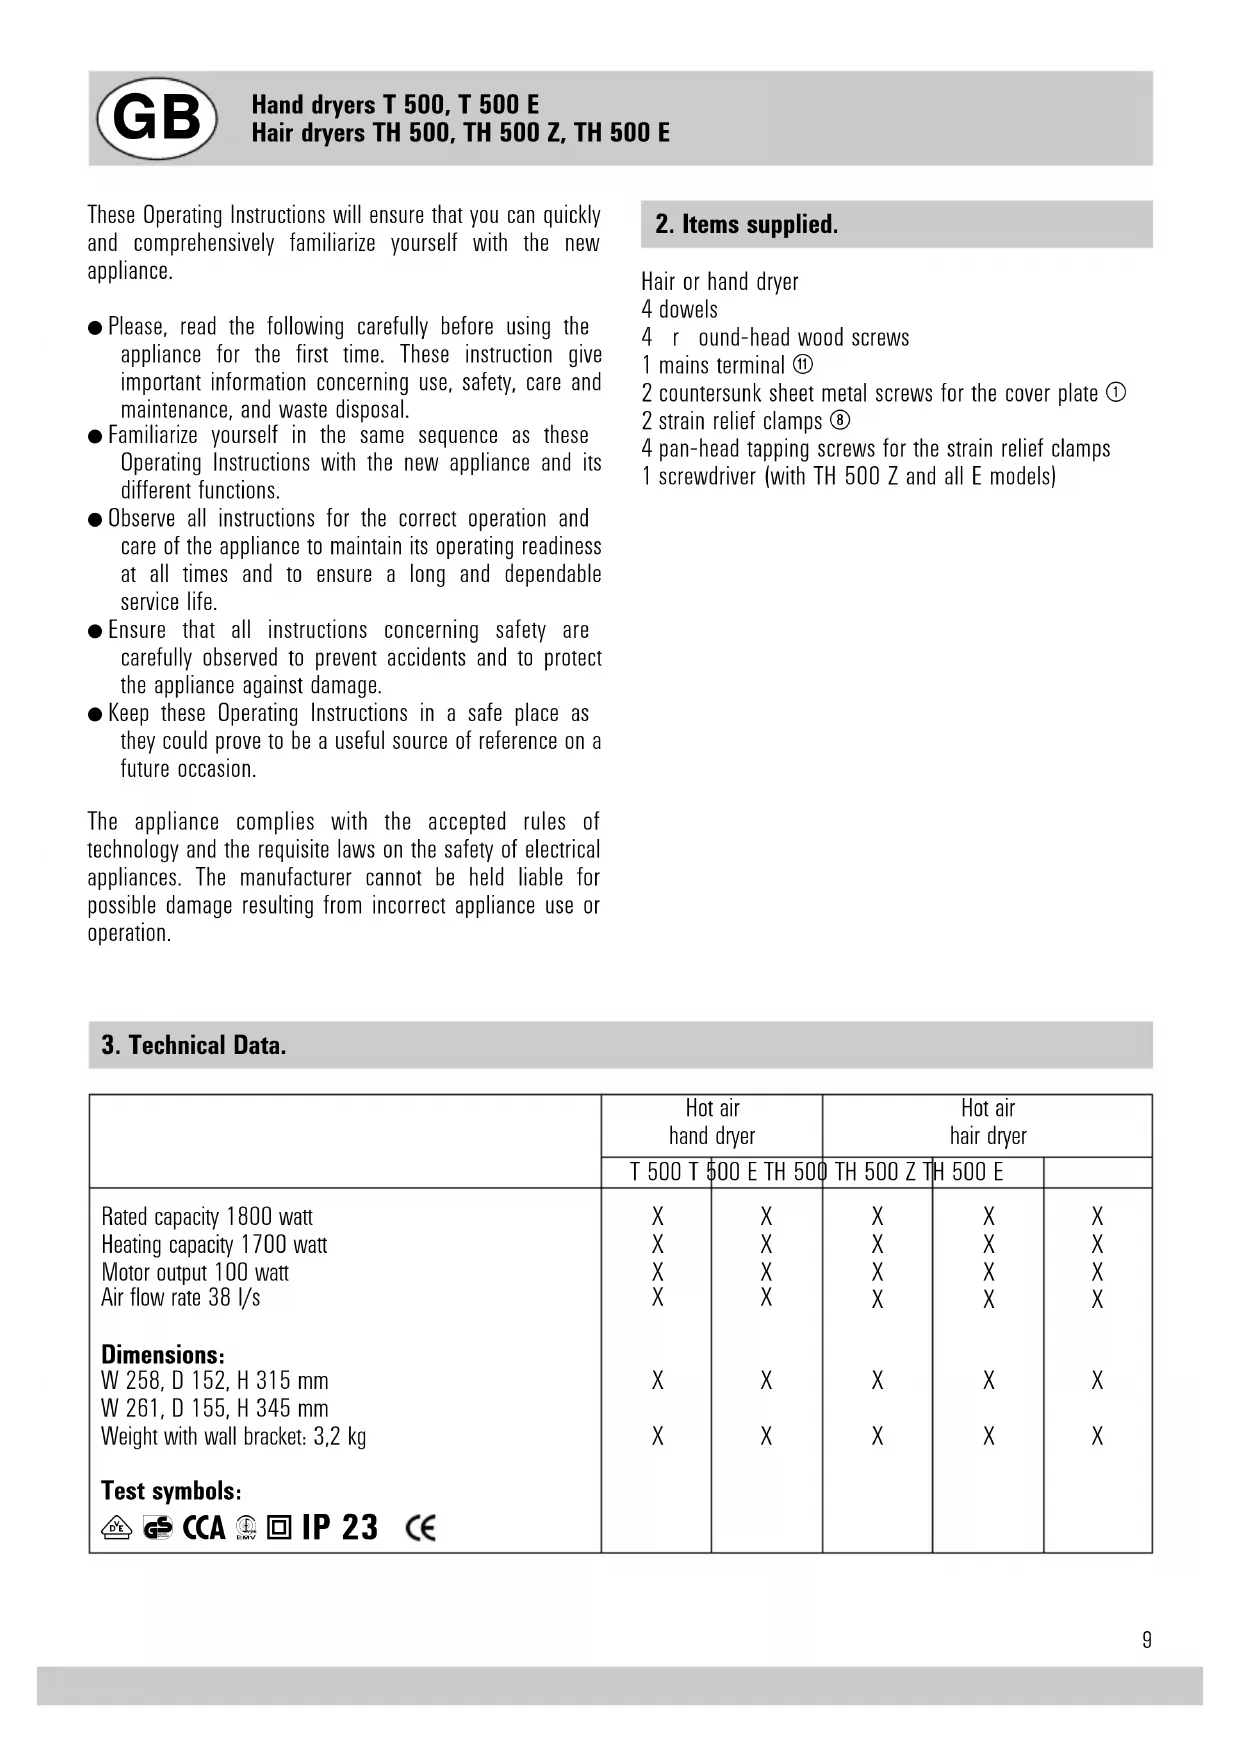
2. Items supplied.
Hair or hand dryer
4 dowels
4 round-head wood screws
1 mains terminal ⑩
2 countersunk sheet metal screws for the cover plate ①
2 strain relief clamps ⑧
4 pan-head tapping screws for the strain relief clamps
1 screwdriver (with TH 500 Z and all E models)
3. Technical Data.
| Hot air hand dryer | Hot air hair dryer | ||||
| T 500 T $500 E TH 500 | TH 500 Z TH 500 E | ||||
| Rated capacity 1800 watt | X | X | X | X | X |
| Heating capacity 1700 watt | X | X | X | X | X |
| Motor output 100 watt | X | X | X | X | X |
| Air flow rate 38 l/s | X | X | X | X | X |
| Dimensions: W 258, D 152, H 315 mm | X | X | X | X | X |
| W 261, D 155, H 345 mm | |||||
| Weight with wall bracket: 3,2 kg | X | X | X | X | X |
| Test symbols: DE CCA ☑ IP 23 CE | |||||
| Features: | T 500 T $500 E TH 500 TH 500 Z TH 500 E | ||||
| Electronic short-duration timer | X | ||||
| Timer running time 32 sec. | |||||
| Electronic short-duration timer | X | ||||
| Timer running time approx. 4 min. | |||||
| Electronic infrared proximity switch | X | X | |||
| Without switching facility (for coin-operated timer MZS 4) | X | ||||
| Safety mains connection | X | X | X | X | X |
| Safety temperature limiter | X | X | X | X | X |
| Safety sensor switch-off | X | X | |||
| Thermal safety fuse | X | X | X | X | X |
| Integrated mounting plate | X | X | X | X | X |
| Theft-proofing cover plate | X | X | X | X | X |
| Air-inlet grille, cleanable by suction | X | X | X | X | X |
4. Mounting instructions.
The appliance must be installed by a specialist to ensure that the requisite safety rules for the connection of electrical appliances are observed. In rooms with showers and baths the appliance must not be installed within the safety areas set forth in the VDE German standard (0.6 m from the edge of showers or baths, and 1.2 m from shower heads). The electrical wiring must incorporate a switch with a contact opening of ≥ 3mm for all-pole disconnection of the appliance.
5. Mounting sequence.
The service friendly mounting concept
The T 500 mounting system ensures simple wall installation without having to open the appliance. For reasons of practicality the appliance is subdivided into 2 sections. The electrician must first install a socket outlet (or a permanent connection), then screw the mounting plate to the wall, slide the ready-to-operate appliance onto the plate, plug the power supply cable into the socket (or connect the permanent wiring), screw the anti-theft plate onto the appliance - and that's it. It just couldn't be easier!
- Pull the cover plate ① (which is not screwed tight) down out of the appliance.
The mounting plate ② inserted in the back of the appliance is likewise pulled down.
- After having determined the point of installation, mark out the 4 mounting holes ② using the mounting plate ② as a template for this purpose, and then drill 8mm diameter holes. Insert the dowels and fasten the mounting plate with the 4 supplied wood screws. The appliance should be mounted at a level indicated in figs. A, B or C. The appliance must be firmly mounted on a solid wall.
- The 5 subsequently described methods of connection are possible.
3.1 Connection by way of flush-mounted socket:
The top part of the cover plate ① is not required. Break it off at the predetermined breaking point ④. Fasten the mounting plate ② as indicated in fig. B, push the appliance from above onto the mounting plate, plug the power supply cable into the socket outlet ③, and push the appliance all the way down. Fasten the cover plate with the 2 supplied countersunk sheet metal screws.
3.2 Connection by way of concealed wiring:
Connect with the concealed wire ⑦ coming out of the wall (in place of the socket). Fasten the mounting plate ② to the wall as indicated in fig. C. Push the mount plate from underneath into the mounting plate. Conduct the wire coming out of the wall through the hole in the
cover plate. Insert the supplied mains terminal ⑪. Cut the plug off the power supply cable ⑤.
Remove the cable sheath and conductor insulation, and crimp on the wire end sleeves. Connect the two conductors as shown in fig. C. Ensure that L (brown) and N (blue) are correctly connected. Secure the connecting cable of the appliance-with the supplied strain relief clamp ⑧.
Push the appliance right down onto the cover plate and secure with the 2 supplied countersunk sheet metal screws.
3.3 Connection from above by way of surface-mounted wiring:
Break out the lead-through ⑨ at the top in the middle of the back of the appliance. Fasten the mounting plate ② as indicated in fig. C. Conduct the surface-mounted cable on the mounting plate down to the cover plate ① and pass it through the hole.
Connect as described in section 3.2.2.
3.4 Connection from below by way of surface-mounted wiring:
Break out the predetermined lead-through 9 at the bottom in the middle of the cover plate ① Fasten the mounting plate ② as indicated in fig. C. Conduct the surface-mounted cable through the opening in the cover plate. Connect as described in section 3.2.2.
3.5 Connection by way of power supply cable with plug:
Connection to an adjacent mains socket by way of a flexible power supply cable with plug. For this purpose break out the predetermined lead-through 9 at the bottom in the middle of the cover plate 9. Push the cover plate from underneath into the mounting plate. Insert the supplied mains terminal 10.
Cut the plug off the power supply cable ⑤ of the appliance. Remove the cable sheath and conductor insulation and crimp on the wire end sleeves. Prepare the free end of the power supply cable with plug in the same manner, and conduct it through the opening in the cover plate. Connect the two cables as indicated in fig. C., and secure with the 2 supplied strain relief clamps ⑧.
Push the appliance right down onto the cover plate and secure with the 2 supplied countersunk sheet metal screws.
The appliance is now ready for operation.
6. Switching functions.
T 500, TH 500 Z
Actuate the electronic short-duration timer on the T 500 and TH 500 Z. Timer running time on the T 500 32 sec. on the TH 500 Z 4 min.
The appliances are automatically switched off.
The timer running time on the TH 500Z can be changed by a specialist. It is adjustable in 9 settings from 1-9 min. For this purpose insert the screwdriver pin in the hole on the left-hand side of the air intake grille and turn the built-in switch anti-clockwise to 3-2-1 min., or clock wise to 5-6-7-8-9 min.
The O-position of the switch is a blind setting in which the appliance will not operate.
T 500 E, TH 500 E
The appliances are switched ON/OFF by an electronic infrared proximity switch.
The switch spacing between the bottom edge of the appliance and the hands or head for the T 500 is approx. 15cm and for the TH 500 approx. 40~cm . The switching sensitivity can be changed by a specialist. For this purpose insert the screwdriver pin in the opening on the left-hand side of the air intake grille and turn the built-in potentiometer anti-clockwise to reduce the sensitivity, or clockwise to increase the sensitivity. Bright rooms require a lower sensitivity setting.
TH 500
This appliance is supplied without switch. It can be operated by the MZS 4 coinoperated timer, a normal ON/OFF switch or a wall-mounted timer. It is mounted on the wall at the same level as the appliance and connected according to the circuit diagram, see fig. E or F.
T 500 E. TH 500 E sensor safety switch off
The built-in electronic safety circuit prevents continuous operation in the event that the infrared proximity switch is covered, e.g. chewing-gum, vandalism.
T 500 models switch off after 2 minutes, and TH 500 models after 10. The dryers are once again operable as soon as the fault has been remedied.
MZS 4 coin-operated timer
The function of the power-saving electronic switch and the proximity switch are retained when the TH 500 Z/E hair dryers are operated with a coin-operated timer. Installation of the MZS 4 will ensure that the cost of the hair dryers will be quickly refunded and protect the appliance against improper use.
7.Height adjustment for Starmix hair dryer.
Height adjustment of the strong attractively designed Starmix THH 500 is continuously variable so that the hair dryer can be easily adapted to the individual's height. This makes it substantially easier for children and people in wheelchairs to dry their hair.
As an alternative to height adjustment it is also possible to mount two separate hair dryers at a height difference of 40~cm (the maximum range of the electronic infrared proximity switch is 40~cm ).
8. Cleaning and care.
Use a vacuum cleaner with crevice nozzle to remove fluff and dust adhering to the air intake grille ⑥ at the bottom of the appliance. Stubborn grime in the grille must be removed with a brush.
9. Safety instructions.
- Before connecting the appliance check that the voltage specified on the rating plate matches the mains voltage. The rating plate is located on the lower sloping housing surface ①.
- Improper use of electrical appliances can result in hazards that may not be recognized by children.
- Make these Operating Instructions available to other users so that they can inform themselves of all the functions of the appliance.
- All-pole disconnection from the power supply is imperative before cleaning or repairing the appliance.
Haar- of handdrogers
4 pluggen
4 halffrond bolle schroeven
LETOP! Schakelaar in stand 0 isuit.
T 500 E, TH 500 E
GB We declare, with sole responsibility, that this product conforms with the following standards and guidelines: EN 60335, EN 44014, EN 60555 according to the provisions of the Low-voltage guideline 89/336/EEC.