M14ACS Dualflow Plus - Hand dryer Mediclinics - Free user manual and instructions
Find the device manual for free M14ACS Dualflow Plus Mediclinics in PDF.
Frequently Asked Questions - M14ACS Dualflow Plus Mediclinics
Download the instructions for your Hand dryer in PDF format for free! Find your manual M14ACS Dualflow Plus - Mediclinics and take your electronic device back in hand. On this page are published all the documents necessary for the use of your device. M14ACS Dualflow Plus by Mediclinics.
USER MANUAL M14ACS Dualflow Plus Mediclinics
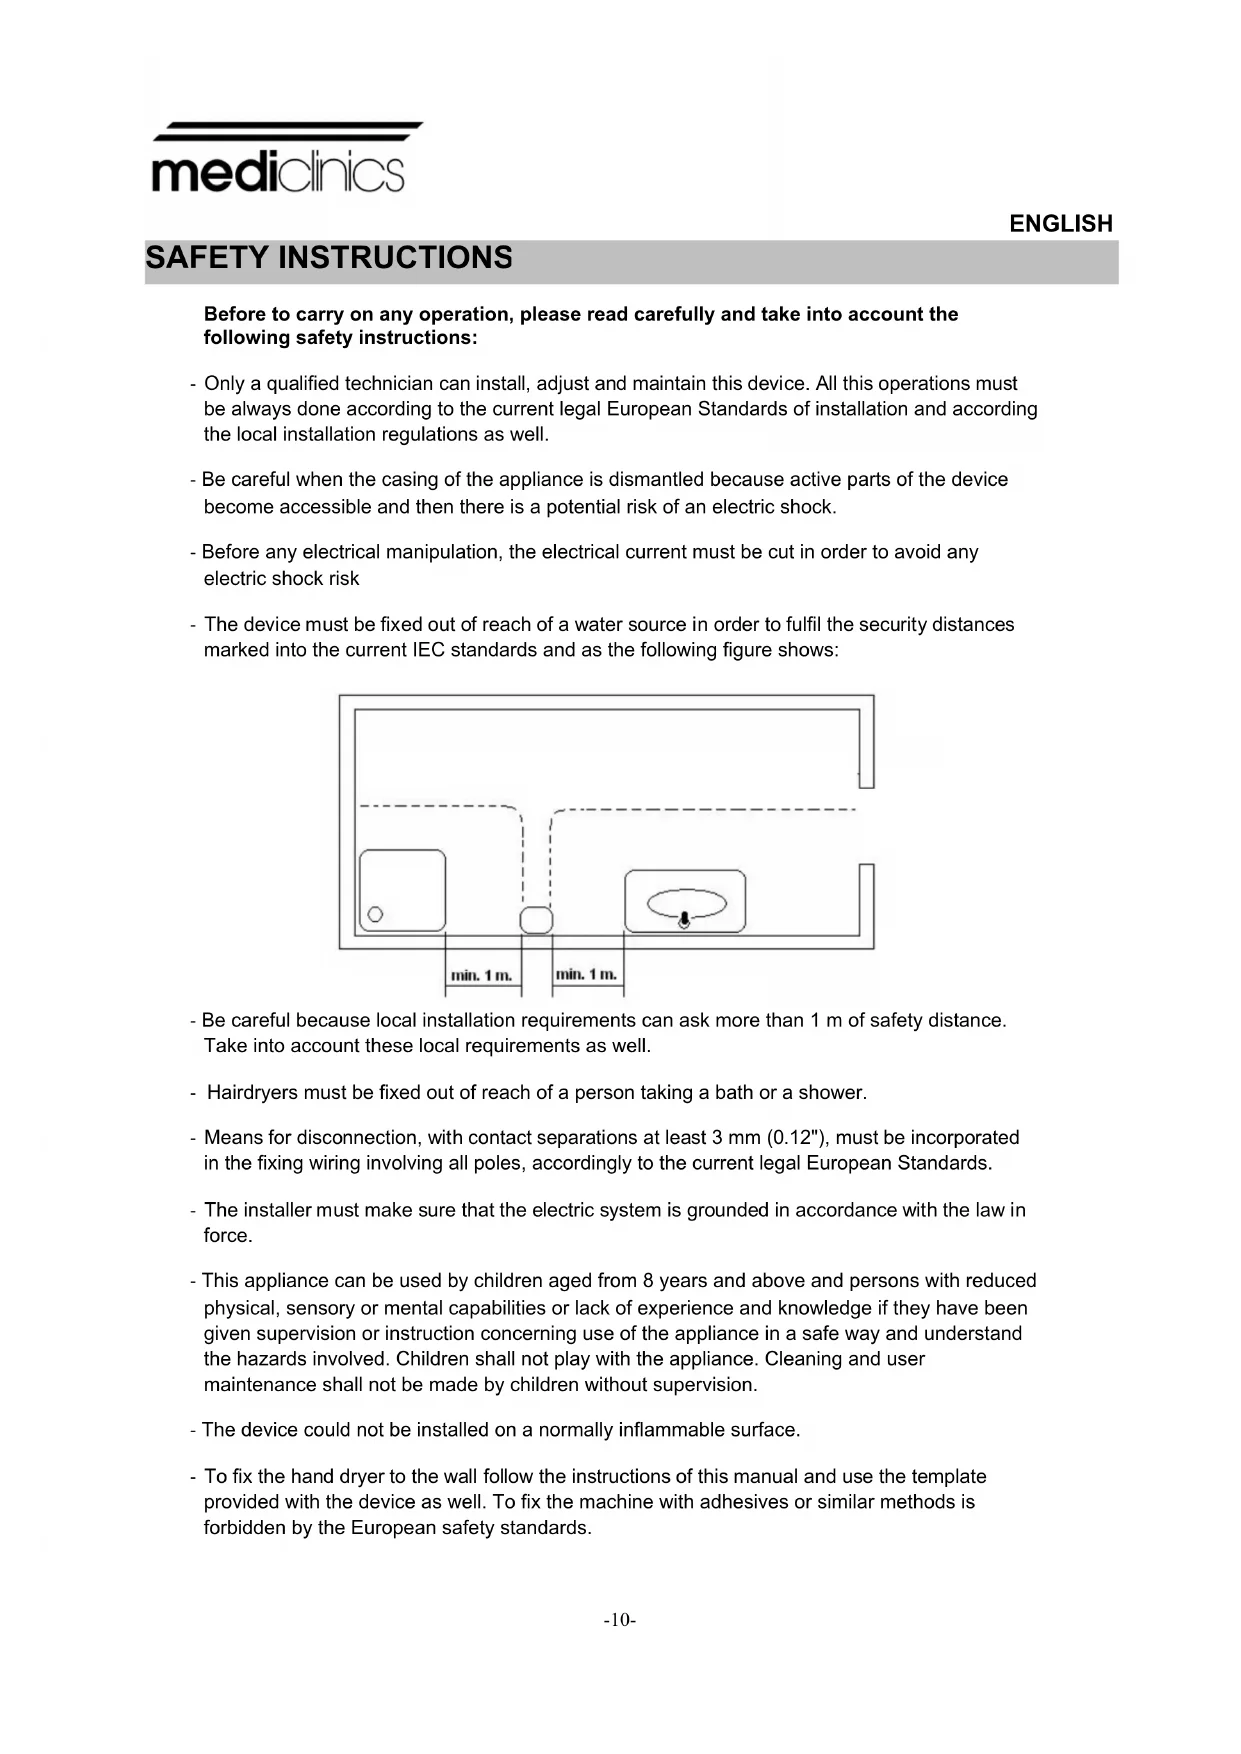
Before to carry on any operation, please read carefully and take into account the following safety instructions: - Only a qualified technician can install, adjust and maintain this device. All this operations must be always done according to the current legal European Standards of installation and according the local installation regulations as well. - Be careful when the casing of the appliance is dismantled because active parts of the device become accessible and then there is a potential risk of an electric shock. - Before any electrical manipulation, the electrical current must be cut in order to avoid any electric shock risk - The device must be fixed out of reach of a water source in order to fulfil the security distances marked into the current IEC standards and as the following figure shows: - Be careful because local installation requirements can ask more than 1 m of safety distance. Take into account these local requirements as well. - Hairdryers must be fixed out of reach of a person taking a bath or a shower. - Means for disconnection, with contact separations at least 3 mm (0.12"), must be incorporated in the fixing wiring involving all poles, accordingly to the current legal European Standards. - The installer must make sure that the electric system is grounded in accordance with the law in force. - This appliance can be used by children aged from 8 years and above and persons with reduced physical, sensory or mental capabilities or lack of experience and knowledge if they have been given supervision or instruction concerning use of the appliance in a safe way and understand the hazards involved. Children shall not play with the appliance. Cleaning and user maintenance shall not be made by children without supervision. - The device could not be installed on a normally inflammable surface. - To fix the hand dryer to the wall follow the instructions of this manual and use the template provided with the device as well. To fix the machine with adhesives or similar methods is forbidden by the European safety standards. SAFETY INSTRUCTIONS
‘Dualflow Plus’ range hand dryers offer the following technical features:
- Automatic operation. Hand detection is based on Infra Red (IR) movement sensors. Two pairs of those sensors emit a continuous beam of IR light. The introduction of the hands causes the interruption of the IR light beam and switch on the dryer.
- The speed of the air generated by the hand dryer can be adjusted, to achieve an optimum balance between the drying power and noise level.
Means for disconnection with contact separations at least 3 mm (0.12") must be incorporated in the fixing wiring.
Figure 1 Hands must be introduced inside. Hand dryer starts automatically after introducing hands. Move hands vertically (as shown in Fig.1) in order to dry them completely. Green light (in standby state) led on top becomes to orange colour when dryer is in use. Maximum continuous operation time is T = 30 sec. Drying time is less to it (Td ≈ 8 -12 sec). After removing hands, dryer turns off automatically. This appliance can be used by children aged from 8 years or above and persons with reduced physical, sensory or mental capabilities or lack of experience and knowledge if they have been given supervision or instruction concerning use of the appliance in a safe way and understand the hazards involved. Children shall not play with the appliance. Cleaning and user maintenance shall not be made by people without the proper training.-12-
Introduction ‘Dualflow Plus’ family of hand dryers offers the technical features as follows:
- Automatic operation. Drying cycle starts when putting hands in. Two couple of IR sensors detect hands introduction.
- Dryer is a class I (earthed) electrical insulation device.
- Drying process is based on powerful air curtains which remove water from hands.
- Hand dryer has no heating element.
- Speed of air can be adjusted in order to achieve an optimum balance between drying power and noise level.
- Light leds on top supply some information referred to the status of hand dryer.
- Maximum time of continuous operation is T max = 30 sec.
- Water from hands is collected in a removable tank which may be emptied and cleaned.
- An HEPA filter is incorporated in the aspiration area whose state should be reviewed periodically. The place of fitting the air inlet filter allows easy removal and replacement. Optionally, in the aspiration area, an air-freshener can be incorporated. Installation
ONLY A QUALIFIED TECHNICIAN CAN INSTALL, ADJUST AND MAINTAIN THIS HAND DRYER. The installation of the appliance is only allowed on fixed wiring. Means for disconnection of the mains with contact separations at least 3 mm (0.12”) must be incorporated in the fixing wiring. The installer must make sure that the electric system is grounded in accordance with the law in force. Make sure that the electric system has a high-sensitivity breaker I n ≤ 0.03 A. Make sure that the machine is disconnected from the electric power supply, before performing maintenance operation. To install the hand dryer follow the pictures contained in the figure 2. The hand dryer must be fitted to the wall by using the upper metal plate (support) which is supplied.
After fitting the metal plate, the hand dryer should be hung on it. The lower screw fits safely the appliance to the wall. So, to assemble the hand dryer the following steps must be done:
- Make five 8 mm (0.31”) diameter drill holes in the wall using the provided template (1).
- Clean the dust away and insert the wall plugs.
- Screw the upper plate to the wall (2).
- Plastic covers which protect the terminal block (inlet power supply) must be removed (3).
- The hand dryer should be hung on the metal support which has been fitted to the wall (4).
- Pass the electrical cables from mains through the 22 mm diameter hole located in the rear plastic base3 plate. (5).
- Connect the electrical wires to the hand dryer terminal block. Two phases (N,L) and earth wires must be screwed in the right ways of the terminal block, as indicated by the engraved letters (6).
- After this operation has been done, plastic covers must be placed correctly (10).
- Remove the air inlet filter casing (7).
- Firmly place the lower screw for fixing the appliance completely (8).
- Put the inlet air casing to its location (9).
ATTENTION: WHEN THE CASING IS DISMANTELED ACTIVE PARTS OF THE DEVICE BECOME ACCESSIBLE. Installation height must be the showed in figure nº 3.
Maintenance ONLY A QUALIFIED TECHNICIAN CAN INSTALL, ADJUST AND MAINTAIN THIS HAND DRYER. Adjust the speed of the motor To adjust the speed of the motor turn the sensor potentiometer wheel as the picture 4 shows.
Pilot light information Light leds on the top of the hand dryer (see figure 5) give advice about: 1: Standby (green colour) or operation status (orange colour). 2: Red colour led bright when motor has a problem of consumption (due to brushes which may be wearing out or due to a blocked or locked sate of motor). 3.- Blue colour led bright when cabinet of water is full.
Air filter Air filter must be changed as the pictures of figure nº 6 shows.
No smell load charge Figure nº 7 shows how to install the no smell charge.
Figure 5 Figure 6 Figure 7-16- Water tank. Water from hands drops directly to a removable water tank. When water from the removable water tank reaches the ‘full level’ an acoustic alarm sounds and the blue pilot light bright (see Fig. 5). In this case, water in the tank must be emptied. Two options to remove the water from the water tank are available:
I. Press the two lateral clips and pull down the water tank, as the picture 8 shows.
Remove the water tank from its fitting place, empty and clean the tank and re-place it.
II. Press the push button as indicated in Fig. 9 until remove all the water contained into the
- The installer must make sure that the electric system is grounded in accordance with the law in force. - Make sure that the electric system has a high-sensitivity breaker I n ≤ 0.03 A. - Make sure the machine is disconnected from electric power supply, before performing maintenance operation.