Mediflow M02ACS - Hand dryer Mediclinics - Free user manual and instructions
Find the device manual for free Mediflow M02ACS Mediclinics in PDF.
Frequently Asked Questions - Mediflow M02ACS Mediclinics
Download the instructions for your Hand dryer in PDF format for free! Find your manual Mediflow M02ACS - Mediclinics and take your electronic device back in hand. On this page are published all the documents necessary for the use of your device. Mediflow M02ACS by Mediclinics.
USER MANUAL Mediflow M02ACS Mediclinics
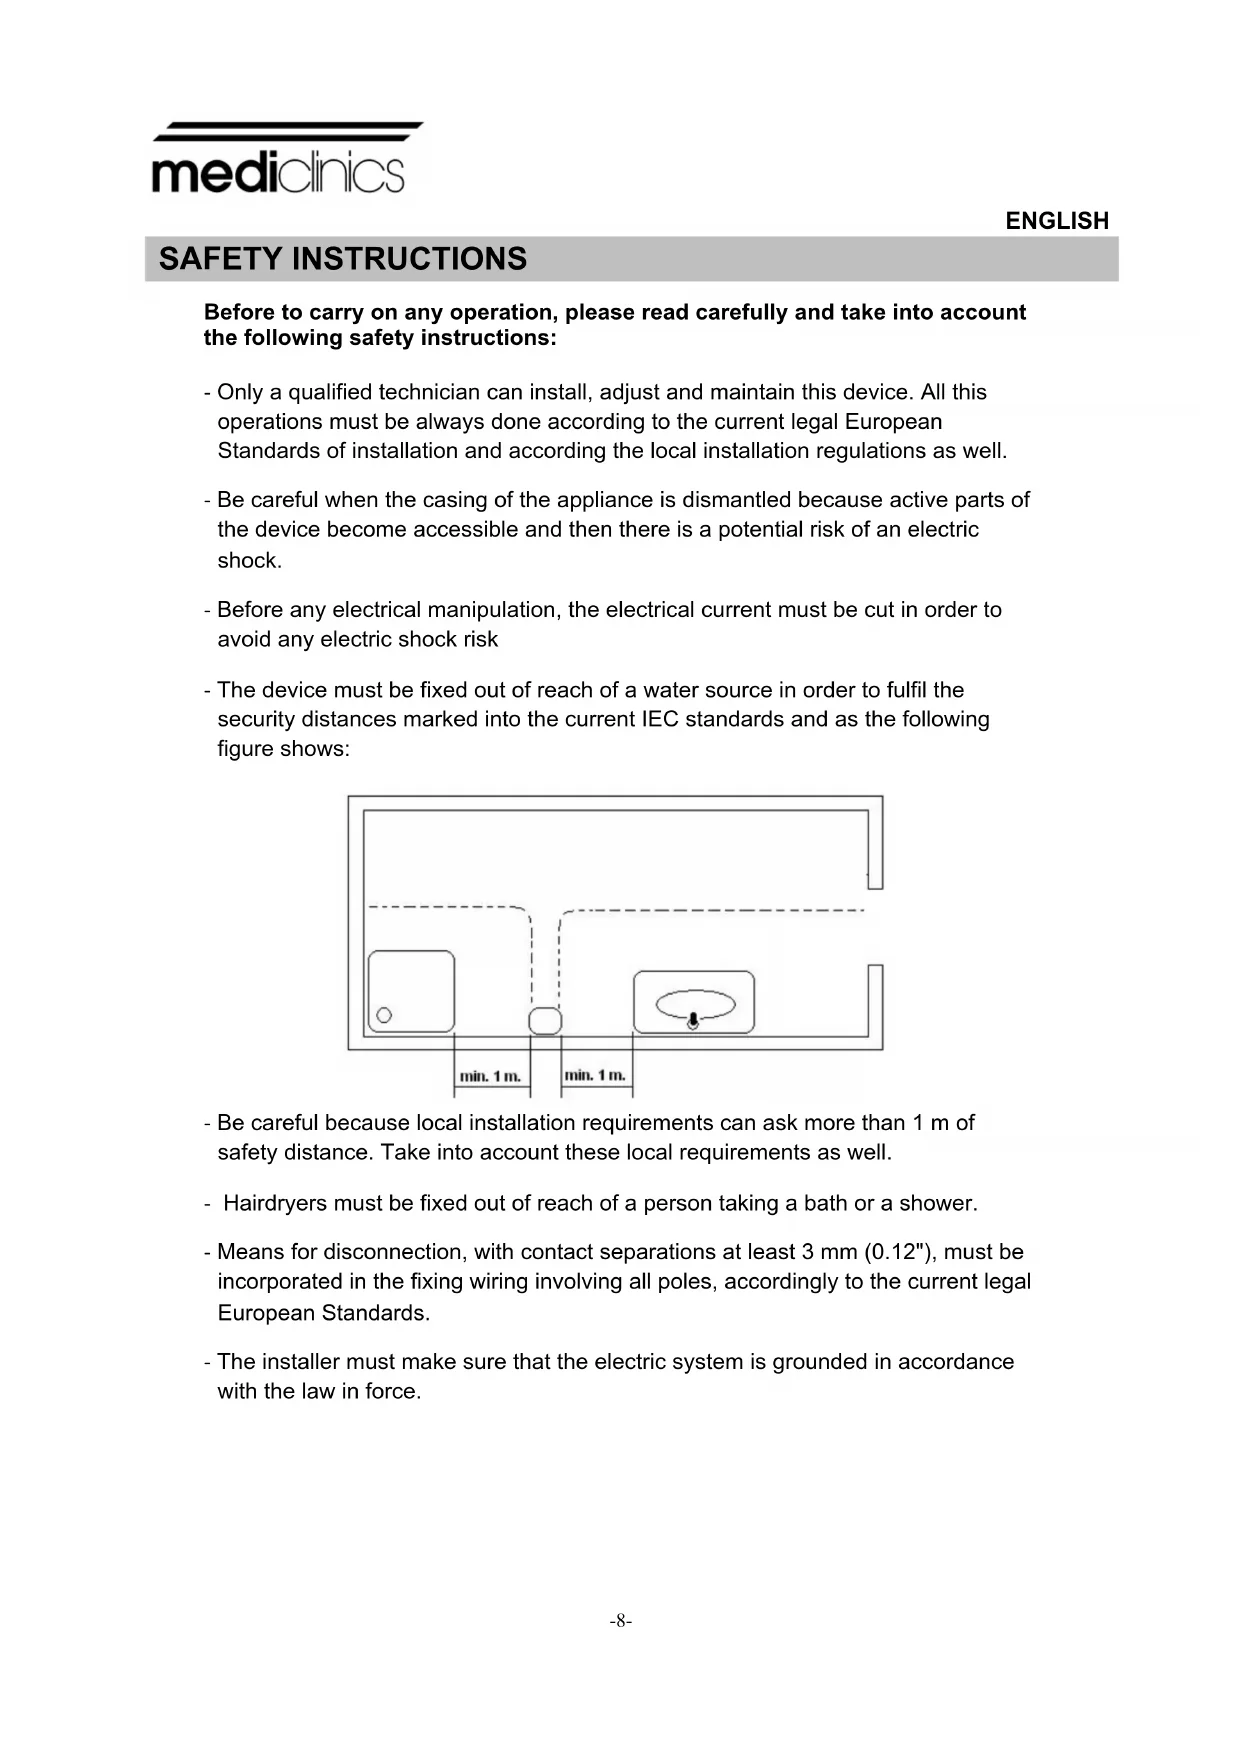
Before to carry on any operation, please read carefully and take into account the following safety instructions: - Only a qualified technician can install, adjust and maintain this device. All this operations must be always done according to the current legal European Standards of installation and according the local installation regulations as well. - Be careful when the casing of the appliance is dismantled because active parts of the device become accessible and then there is a potential risk of an electric shock. - Before any electrical manipulation, the electrical current must be cut in order to avoid any electric shock risk - The device must be fixed out of reach of a water source in order to fulfil the security distances marked into the current IEC standards and as the following figure shows: - Be careful because local installation requirements can ask more than 1 m of safety distance. Take into account these local requirements as well. - Hairdryers must be fixed out of reach of a person taking a bath or a shower. - Means for disconnection, with contact separations at least 3 mm (0.12"), must be incorporated in the fixing wiring involving all poles, accordingly to the current legal European Standards. - The installer must make sure that the electric system is grounded in accordance with the law in force.
- This appliance can be used by children aged from 8 years and above and persons with reduced physical, sensory or mental capabilities or lack of experience and knowledge if they have been given supervision or instruction concerning use of the appliance in a safe way and understand the hazards involved. Children shall not play with the appliance. Cleaning and user maintenance shall not be made by children without supervision. - The device could not be installed on a normally inflammable surface. - To fix the hand dryer to the wall follow the instructions of this manual and use the template provided with the device as well. To fix the machine with adhesives or similar methods is forbidden by the European safety standards.
Dismantling for installation
- The hand dryer is supplied with the metallic cover coupled to the base in a unscrewed stated.
- The cover should be extracted taking into account its upper rib placed in its fitting on the base.
- The cover must be removed obliquely until the upper rib has been extracted. Take care to avoid: - Damaging the internal parts (mainly electronic components). - Damaging the cover. It is recommended placing it on a flat surface facing upwards and on a cloth.
INSTALLATION-10- Mounting The assembly should be preferably prepared for rear ducting.
- Drill holes of 8 mm (5/16”) in the wall, using the template supplied. Clean the holes of the resulting dust and insert the plugs.
- Pass the power cables from the wall through the 22 mm (7/8”) hole situated beneath the connection board of the appliance.
- Screw the base of the appliance tightly to the wall ensuring the 4 silent-blocks are correctly positioned.
- Enter the power cables into the inside space containing the terminal strip, passing them through the entry hole.
- To reach the terminal strip the protective top should be opened.
- Connect the cables from the mains to their locations in the terminal strip. Once the electrical connection has been made, close the protective cover again.
- Fit the metallic cover into the base, placing it from top to bottom with a certain inclinations. Make sure the upper rib has entered in their location in the base.
- Place the lower screws, tightening with the specially supplied key.
Means for disconnection with contact separations at least 3 mm (0.12”) must be incorporated in the fixing wiring. During the installation process, the protection areas should be considered according to norm VDE 0100. The hand dryer must only be installed on a closed surface (wall, partition or similar)www.mediclinics.com
White steel cover 1 RC82010 Satin stainless steel cover 1 RC82020 Bright stainless steel cover 1 RC82030 Turbine 2 RC82777 Motor 3 RC82748 Heating element 4 RC82760 RC82710 Electronic circuit set 5 RC82600 RC82610 Screen and chassis of IR sensor 6 RC82601 Electronic circuit 7 RC82602 Coal brushes set 8 RC95750-AMT WIRING DIAGRAM
To achieve optimum drying of the hands, it is advisable to rinse them well first, eliminating any soap left on them. Then, once the dryer is working, place the hands at a distance of approximately 6-7 cm (2,4 - 2,8") from the air outlet and rub the hands together. The hand dryer action is automatic when the hands approach the air outlet area. The detection of the hands and the later start-up of the appliance is based on the emission/reflection/reception of an IR light beam that comes from the sensors positioned close to the exit outlet area. The detection distance is approximately 12-15 cm (4,7 - 5,9"). On removing the hands, the appliance stops in 2-3 seconds. This appliance is not intended for use by persons (including children) with reduced physical, sensory or mental capabilities, or lack of experience and knowledge, unless they have been given supervision or instruction concerning use of the appliance by a person responsible for their safety. CHILDREN SHOULD BE SUPERVISED TO ENSURE THAT THEY DO NOT PLAY WITH THE HAND DRYER.
Correct cleaning of the machine will lengthen its working life considerably. It is recommended to carry out the cleaning process at least once a year.
- Disconnect the hand dryer from the mains supply.
- Remove the 2 lower holding screws from the cover using the special key.
- Remove the cover and place it carefully on a cloth avoiding scratches and scrapes.
- Clean the dust from the surface and the parts of the main card of the electronic circuit. To do this, use a soft brush.
- Use the same brush to clean the motor surface, the fan, the air outlet and the air inlet grille.
- With a soft cloth, clean the surface of the IR sensor closure screen and remove any dust covering on its surface.
- Open the volute removing the safety screw and folding the closure clips and clean the fan wheel and heating element of dust. Close the volute again, putting in the closure clips and tightening the safety screw.
- Clean the dust from the perimeter of the base, especially the upper section.
- Assemble the cover, place the lower screws and connect the dryer once again.
- Start up the machine repeatedly in order to expel remains of dust after the cleaning process. CLEANING OF CHROMED AND GOLD PLATED COVERS For cleaning purposes only a wet cloth is to be used. Do not use any kind of detergent, acids, lye, abrasives, hydrochloric acid, etc. Take care not to damage or force any component.