
HTT 4 - Hand dryer STIEBEL ELTRON - Free user manual and instructions
Find the device manual for free HTT 4 STIEBEL ELTRON in PDF.
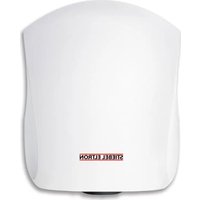
| Product type | Touchless automatic hand dryer |
| Model | HTT 4 WS turbotronic |
| Brand | Stiebel Eltron |
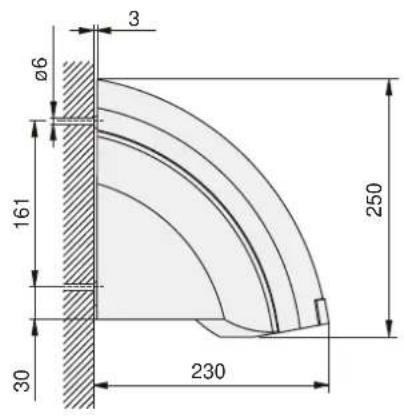
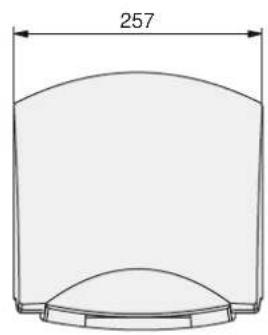
| Dimensions (H x W x D) | 250 x 238 x 230 mm |
| Weight | 2.7 kg |
| Colour | Snow white |
| Housing material | Plastic (ABS) |
| Electrical supply | 1/N ~ 220-240 V, 50/60 Hz |
| Total power | 2600 W |
| Heating power | 2500 W |
| Fan power | 100 W |
| Protection class | II |
| Protection rating (IP) | IP 23 |
| Sound level | ~ 54 dB(A) |
| Air flow | ~ 146 m³/h |
| Indicative drying time | 36 s |
| Sensor type | Infrared optical (contactless) |
| Detection zone | 4 to 13 cm below the air outlet grille |
| Automatic stop | 3 seconds after hands are removed |
| Maintenance | Damp cloth, no abrasive or solvent products |
| Air outlet temperature | Up to over 90 °C |
| Wall mounting | On solid wall, minimum distances to be observed |
| Warranty | According to conditions of country of purchase (see manual) |
Frequently Asked Questions - HTT 4 STIEBEL ELTRON
User questions about HTT 4 STIEBEL ELTRON
0 question about this device. Answer the ones you know or ask your own.
Ask a new question about this device
Download the instructions for your Hand dryer in PDF format for free! Find your manual HTT 4 - STIEBEL ELTRON and take your electronic device back in hand. On this page are published all the documents necessary for the use of your device. HTT 4 by STIEBEL ELTRON.
USER MANUAL HTT 4 STIEBEL ELTRON
BEDIENUNG UND INSTALLATION
OPERATION AND INSTALLATION
UTILISATION ET INSTALLATION
BEDIENING EN INSTALLATIE
OPERAÇÃO E INSTALAÇÃO
OBSLUGA I INSTALACJA
OBSLUHA A INSTALACE
KEZELES ES TELEPITÉS
ЖКСПЛУATAЦИЙ MOHTAK
HÄNDETROCKNER | HAND DRYER | SÉCHE-MAINS | HANDENDROGER | SECADOR DE MAOS | SUSZARKA DO RAK | SUSIC RUKOU | KÉZSZÁRÍTO | ΘJEKTPNUECKNE CUYUNIKIДЛРYK
》HTT4
》HTT5
STIEBEL ELTRON
BEDIENUNG 2
- Equipment description
- Operation
- Cleaning, care and maintenance
6.What to do if ... 14
6.1 ... the appliance does not start
6.2 ... the fan is running but there is no hot air.
6.3 The type plate
INSTALLATION 15
- Safety 15
7.1 General safety instructions
7.2 Instructions, standards and regulations - Installation 15
8.1 Installation information
8.2 Installation conditions and preparations
8.3 Power supply - Installation 15
9.1 Removing the HTT 4 casing cover 15
9.2 Removing the HTT 5 casing cover 15
9.3 Wall mounting
9.4 Fitting the HTT 4 casing cover 16
9.5 Fitting the HTT 5 casing cover 16 - Appliance handover
- Specification 17
11.1 Specification 17
11.2 Wiring diagram 18
11.3 Clearances 18
11.4 Guidelines for installation height 18
11.5 Dimensions 19
CUSTOMER SERVICE AND WARRANTY 20
ENVIRONMENT AND RECYCLING 20
1. General information
1.1 Document information
The chapter Operation is intended for users and contractors.
13The chapter Installation is intended for heating contractors.

Please read
Read these instructions carefully before using the appliance and retain them for future reference. Pass on the instructions, if required, to a new user.
14.2 Key to symbols
Symbols in this documentation:
In these instructions you will come across symbols and highlights.
These have the following meaning:

Risk of injury!
Information concerning possible risk of injury.

Danger of electrocution!

Risk of burning!

Fire hazard!

Never cover!

Possible damage
Information concerning damage to the appliance, environmental damage or material losses.

Note!
Text next to this symbol is particularly important.
» The "»" symbol indicates that you should do something. The action you need to take is described step by step.
2. Safety
2.1 Intended use
The appliance is used to dry wet hands.
Any other use beyond that described shall be deemed inappropriate. Observation of these instructions is also part of the correct use of this appliance. Any modifications or conversions to the appliance void all warranty rights.
2.2 Safety information

Risk of burning!
During operation, temperatures in excess occur at the hot air outlet.

Risk of burning!
Where children or persons with limited physical, sensory or mental capabilities are to be allowed to control this appliance, ensure that this will only happen under supervision or after appropriate instructions by a person responsible for their safety.
Children must be supervised to ensure that they never play with the appliance.

Fire hazard!
Never place any objects on top of the appliance. Never lean any objects against it or place any objects between the appliance and the wall.
Never place any flammable, combustible or insulating objects or materials, such as laundry, blankets, magazines, containers with floor polish or napsan, spray cans or similar, in direct proximity of the appliance.

Fire hazard!
Never operate this appliance ...
... in rooms where the appliance is at risk from fire or explosion as a result of chemicals, dust, gases or vapours.
... in the direct proximity of pipes or receptacles that carry or contain flammable or explosive materials.
... if work such as laying cables, grinding or sealing is carried out in the installation room.
... if sprays, floor polish or similar products containing napsan are used. Ensure the room is adequately ventilated before using the appliance.

Danger of electrocution!
Never insert any objects into any aperture in the appliance. This can lead to fatal electric shocks and / or fires.

Never cover!
Never cover the appliance to prevent overheating.

Note!
Never operate the appliance if the minimum clearances to adjacent surfaces are not maintained.

Note!
If you use the appliance in workshops or other rooms where flue gases, oil and petrol vapours, etc. are present, or solvents and chemicals are used, lasting, unpleasant odours and possibly contamination can result.

Note!
Ensure that the air inlet aperture at the bottom and back of the appliance is always open.

Note!
Maintain the minimum clearance (see chapter Specification) to the air outlet grille at the bottom. The hot air must be able to escape unimpeded.

Note!
Never spray the appliance with a water hose to clean it (see chapter Cleaning, care and maintenance).
2.3 CE designation
The CE designation shows that the appliance meets all essential requirements according to the:
- Electromagnetic Compatibility Directive
-Low Voltage Directive
2.4 Test symbols
See type plate.
3. Equipment description
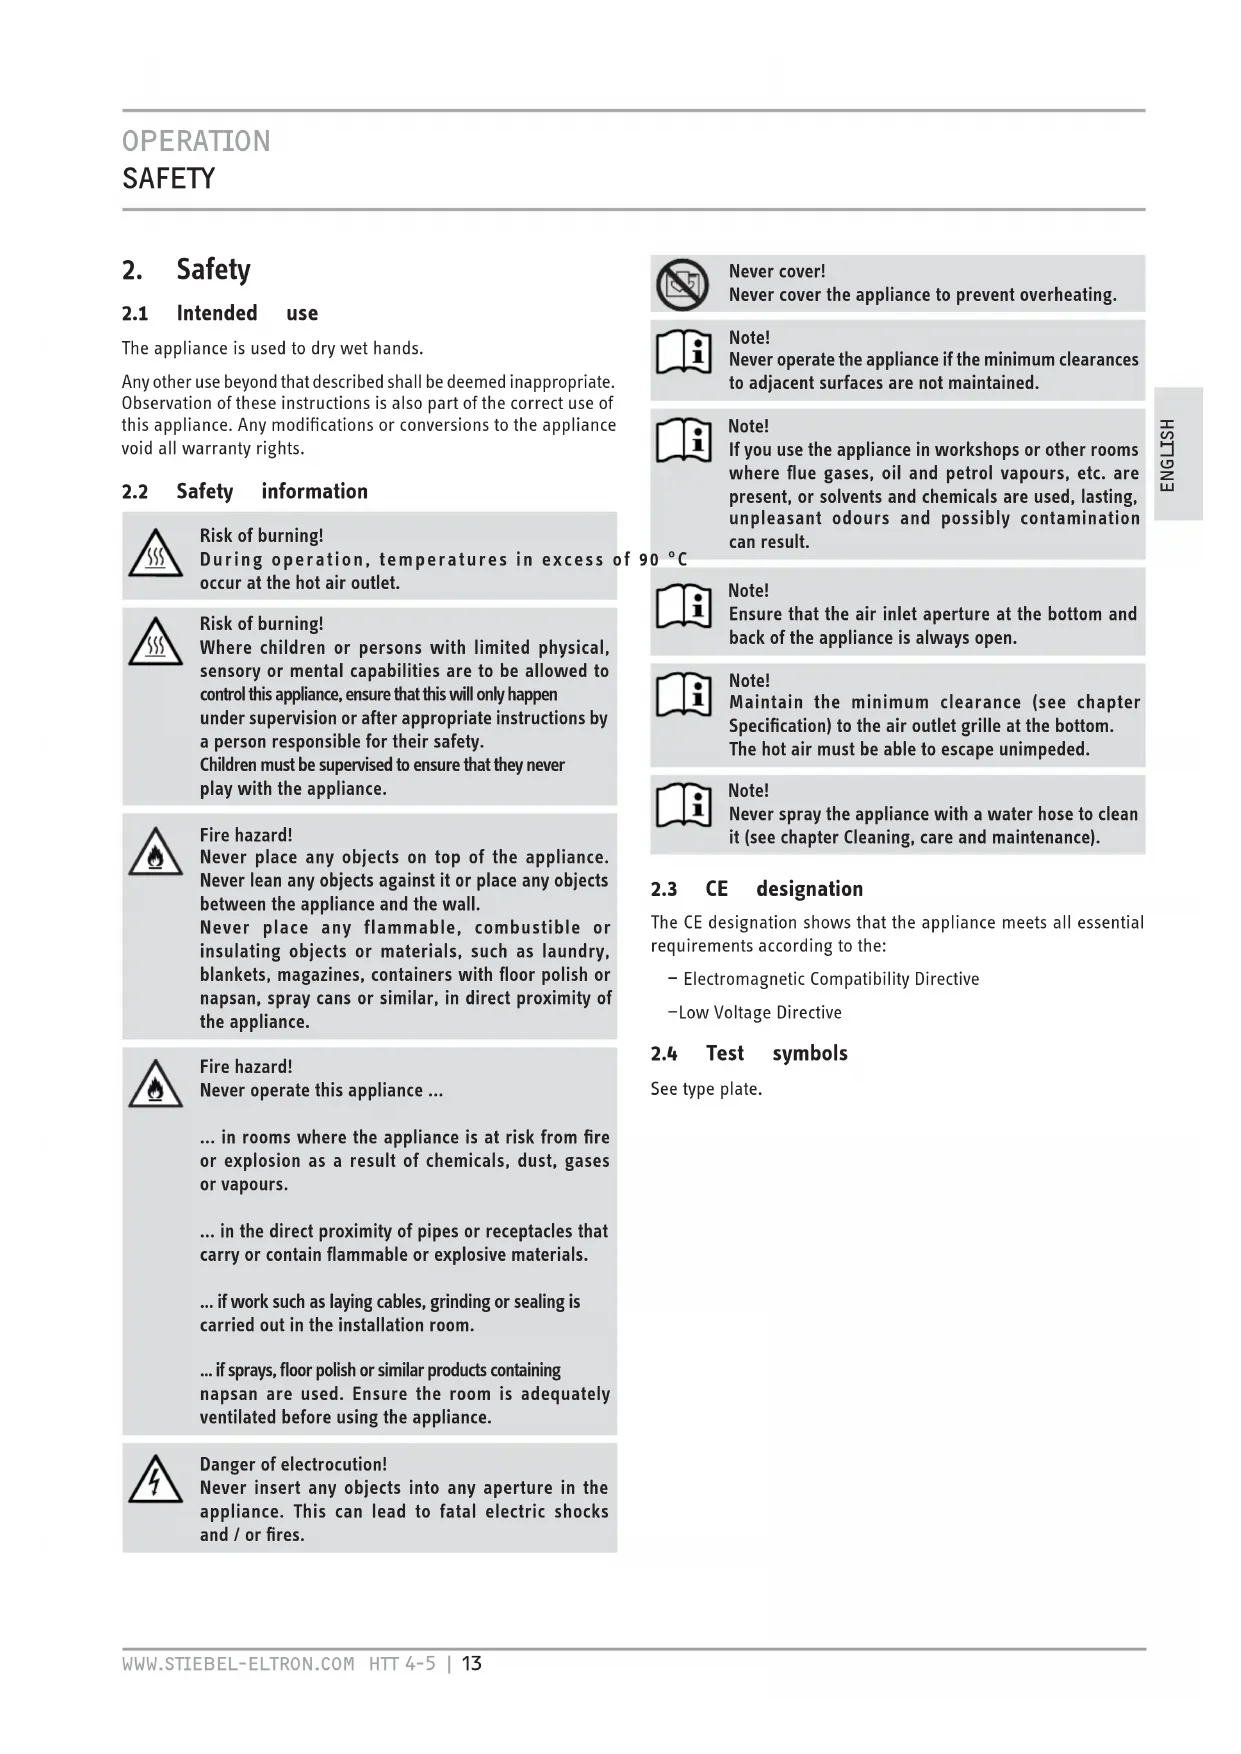
The appliance works without contact. It is fitted with an optical proximity sensor, which automatically activates the heater and fan when your hands approach the appliance. The response area is between 4cm and 13cm beneath the air outlet grille. When you remove your hands, the appliance stops after approx. three seconds.
The casing design makes it virtually impossible to use the appliance as a depository for cigarettes or similar. Avoid any wall offset at the top of the appliance to maintain this effect.
The HTT 5 is also protected against damage by its robust diecast aluminium casing.
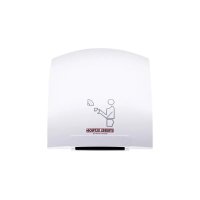
4. Operation
Shake your wet hands over the sink before drying. This reduces the drying time and saves energy.
Then hold your hands under the air outlet grille and rub them together in the hot air current.
5. Cleaning, care and maintenance
A damp cloth is sufficient for cleaning the casing. Never use abrasive or corrosive cleaning agents. Go over the casing with a soft cloth. Never spray the appliance using a water hose or other tools. This would let water penetrate the appliance.
6. What to do if ...
6.1 ... the appliance does not start
-Check the fuses / MCBs in your fuse box.
- Covering the optical proximity sensor impairs the function of the appliance. In this case, the appliance stops after approx. three seconds to avoid constant operation. In the event of a fault, check whether the sensor surface is clear. Once you have removed any objects, the appliance will work correctly again.
6.2 ... the fan is running but there is no hot air
- When overheating occurs, the heater bank is switched off but the fan continues to run for cooling purposes. The temperature sensor switches the heater on again approx. two minutes after the appliance stops.
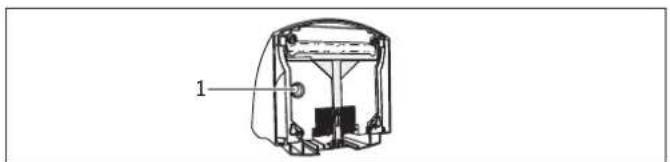
6.3 The type plate
The type plate is located at the bottom of the appliance.
7. Safety
Only qualified contractors should carry out installation, commissioning, maintenance and repair of the appliance.
7.1 General safety instructions
We guarantee trouble-free operation and operational reliability only if the original accessories and spare parts intended for the appliance are used.
7.2 Instructions, standards and regulations

Note!
Observe all applicable national and regional regulations and instructions.

Note!
When installing the appliance in rooms with a bath and / or shower, take the relevant safety zone into account. Install the appliance in accordance with the information on the type plate. Refer to VDE 0100 - 701 for the standard applicable to safety zones in Germany.
8. Installation
8.1 Installation information
-Fit the appliance flat against a solid wall (without any offset) to prevent damage caused by vandalism.
8.2 Installation conditions and preparations
-
Always fit the appliance to a vertical wall that is temperature-resistant to over 90^ .
-
Always maintain the specified minimum clearances.
8.3 Power supply

Note!
Observe the type plate. The specified voltage must match the mains voltage.

Danger of electrocution!
Only use a permanent connection to the power supply. The appliance must be able to be separated from the mains power supply by an isolator that disconnects all poles with at least 3mm contact separation.
» Select a power cable with an adequate cross-section.
Connect the power cable in accordance with the wiring diagram (see Specification).
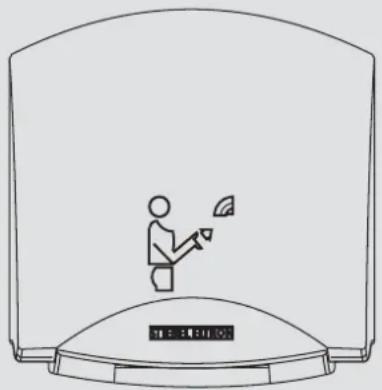
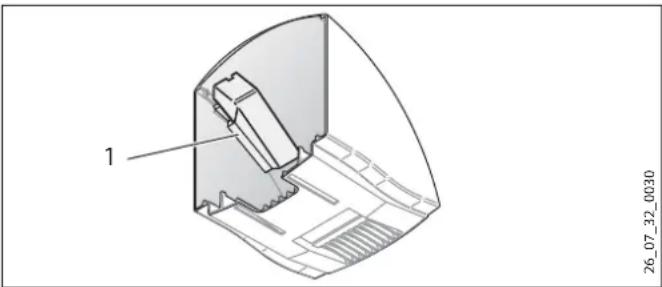
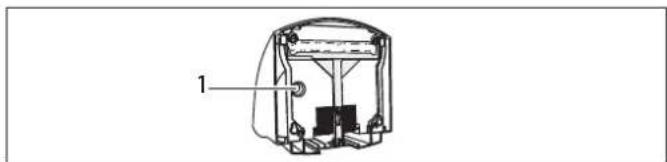
1 Plastic bracket
The plastic bracket fixed to the inside of the HTT 5 casing cover provides additional insulation for the power cable and terminal.
9. Installation

Danger of electrocution! Carry out all electrical connection and installation work in accordance with relevant regulations.
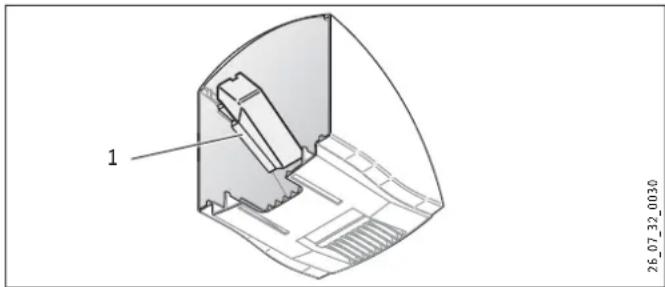
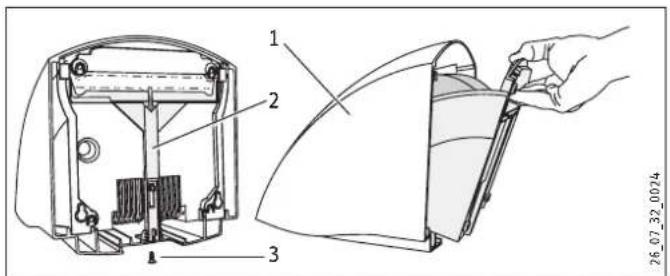
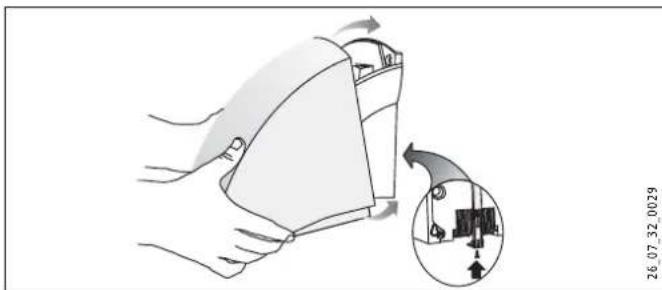
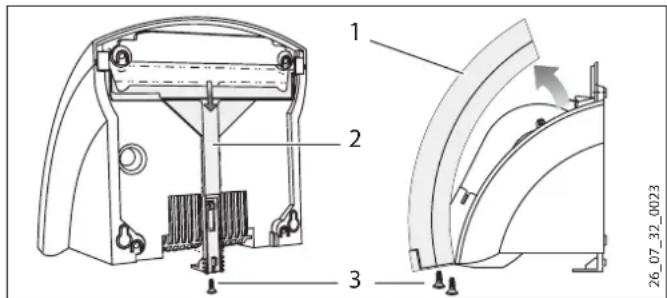
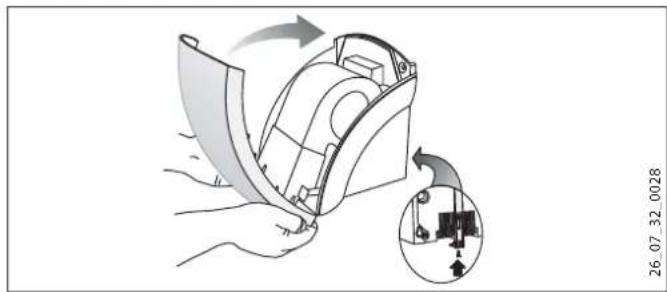
9.1 Removing the HTT 4 casing cover
1 Casing cover
2 Locking slide
3 Screws
» Undo the screws on the casing cover and locking slide.
Pull the locking slide down.
» Remove the casing cover.
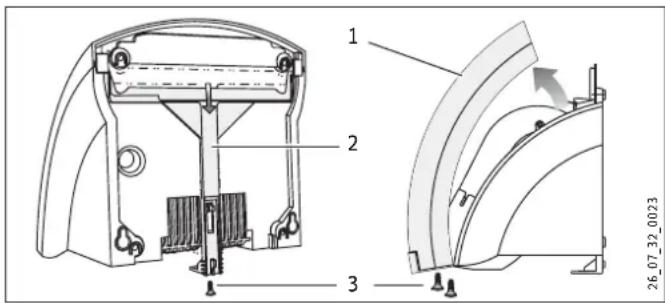
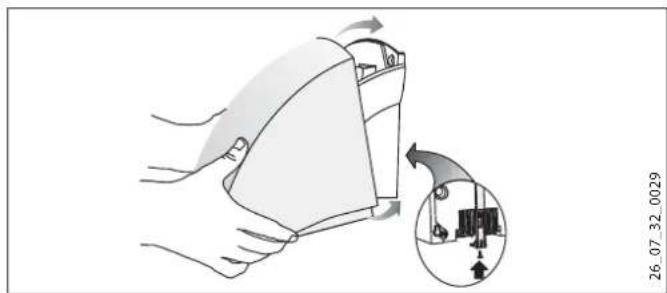
9.2 Removing the HTT 5 casing cover
» Undo the locking screw.
Pull the locking slide down.
» Remove the casing cover.
1 Casing cover
2 Locking slide
3 Locking screw
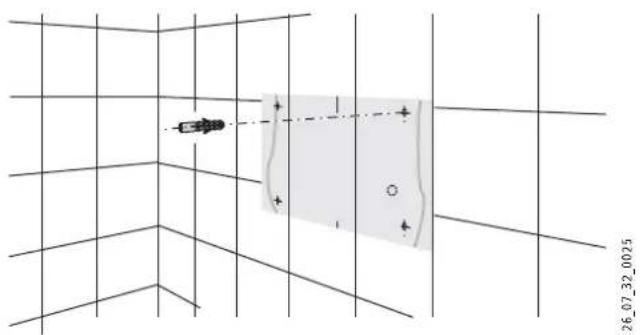
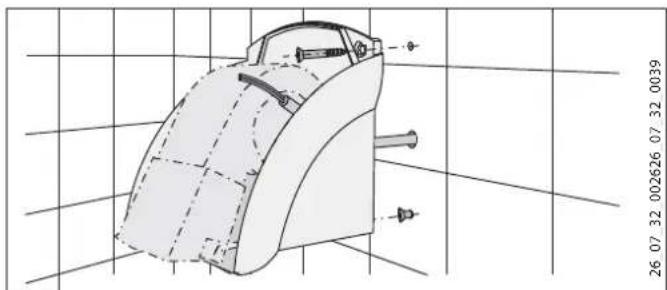
9.3 Wall mounting
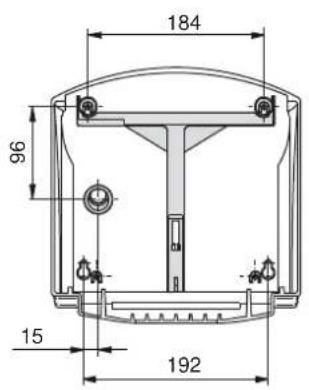
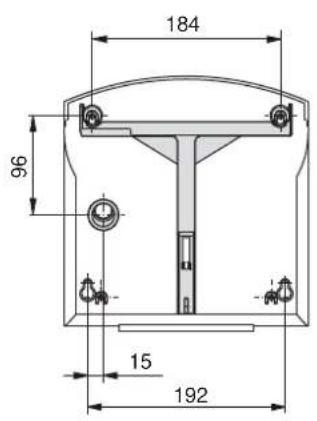
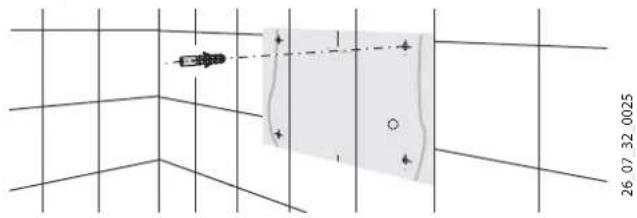
Cut out the drilling template. This can be found at the end of these instructions.
Transfer the four mounting points on to the wall using the drilling template. Pay attention to the length and position of the power cable. Use our height guidelines to help you (see Specification).
Drill the fixing holes and insert rawl plugs.
Insert the lower fixing screws into the wall.

1 Cable entry
Pull the power cable through the cable entry in the back panel of the appliance.
» Fit the appliance with the keyhole fixings on to the fixing screws.
» Secure the appliance to the wall using two more screws.
» Connect the power cable to the appliance.

Note!
Ensure that the wires of the power cable are not near the fan motor.

Note!
Observe the maximum length of the power cable. (See Specification)
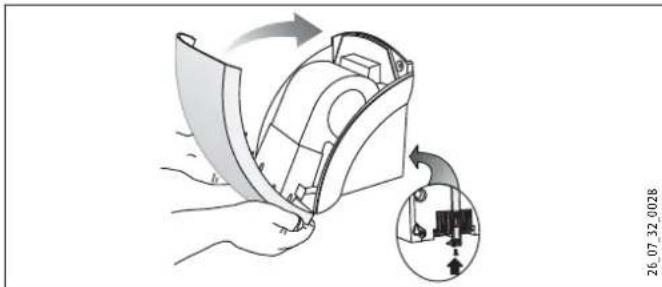
9.4 Fitting the HTT 4 casing cover
» Place the casing cover on the appliance so that it is slightly tilted and pivot it towards the wall.
Push the locking slide up as far as it will go.
Secure the locking slide and the casing cover with screws.
9.5 Fitting the HTT 5 casing cover
Slide the casing cover, slightly tilted, over the appliance towards the wall as far as it will go. Ensure that the hooks provided on the bottom of the casing cover catch behind the back panel of the appliance.
To lock in place, lift the casing cover slightly at the front and push the locking slide up as far as it will go.
» Secure the locking slide with screws.
10. Appliance handover
Explain the functions of the appliance to the user. Draw special attention to the safety information. Hand the operating and installation instructions to the user.
11. Specification
11.1 Specification
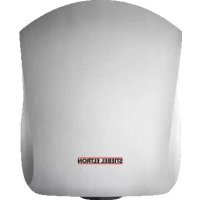
| Model Hand dryer | ||||||
| Type | HTT 4 WS turbotronic | HTT 5 WS turbotronic | HTT 5 AM turbotronic | HTT 5 SM turbotronic | ||
| Part number 074464 074465 | 182052 182053 | |||||
| Colour | alpine white | signal white | anthracite metallic | silver metallic | ||
| Casing | Plastic (ABS) | Diecast aluminium, painted | Diecast aluminium, painted | Diecast aluminium, painted | ||
| Operating details | ||||||
| Rated output | W | 2600 | 2600 | 2600 | 2600 | |
| Output | W | 2500 | 2500 | 2500 | 2500 | |
| Fan power | W | 100 | 100 | 100 | 100 | |
| Connection | 1/N 220-240 V 50/60 Hz | 1/N 220-240 V 50/60 Hz | 1/N 220-240 V 50/60 Hz | 1/N 220-240 V 50/60 Hz | ||
| Protection cat. to EN 60335 | II | II | II | II | ||
| Protection | IP 23 | IP 23 | IP 23 | IP 23 | ||
| Operating noise | ~ dB (A) | 68 | 68 | 68 | 68 | |
| Air throughput | ~ m³/h | 250 | 250 | 250 | 250 | |
| Runtime | s | 20 | 20 | 20 | 20 | |
| Dimensions and weights | ||||||
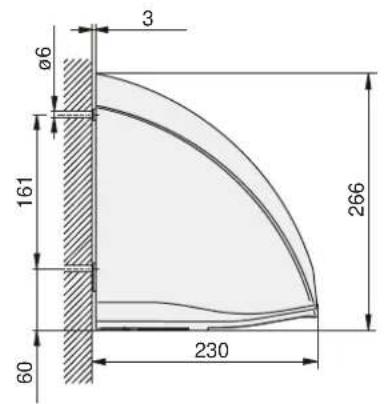
| Dimensions H x W x D | mm | 250 x 238 x 230 | 266 x 257 x 230 | 266 x 257 x 230 | 266 x 257 x 230 | |
| Weight | kg | 2,7 | 4,2 | 4,2 | 4,2 | |
| Maximum length of the power cable | mm | 200 | 200 | 200 | 200 | |
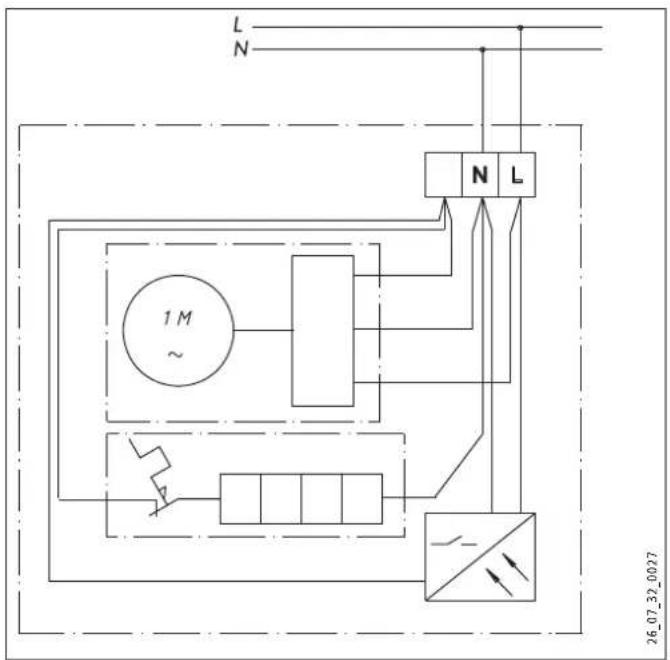
11.2 Wiring diagram
11.3 Clearances

1 Detection range of IR proximity sensor
11.4 Guidelines for installation height

Note! Height (mm) indicates the clearance between the bottom of the appliance and the floor.
Age Age Height (mm)

Adult man 1350

Adult woman 1250

Nursery school age 4-7 810

Primary school age 7-10 910

Middle school age 10-13 1120

High school age 13-16 1250
11.5 Dimensions
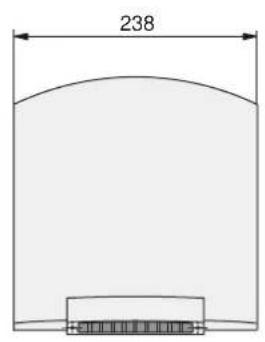
11.5.1 HTT 4


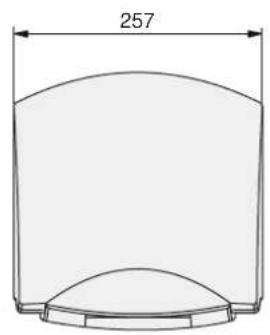
11.5.2 HTT 5

Warranty
The warranty conditions of our German companies do not apply to appliances acquired outside of Germany. In countries where our subsidiaries sell our products, it is increasingly the case that warranties can only be issued by those subsidiaries. Such warranties are only granted if the subsidiary has issued its own terms of warranty. No other warranty will be granted.
We shall not provide any warranty for appliances acquired in countries where we have no subsidiary to sell our products. This will not affect warranties issued by any importers.
Environment and recycling
We would ask you to help protect the environment. After use, dispose of the various materials in accordance with national regulations.
UTILISATION 21
Middelbarel school 13-16 1250
11.5 Afmetingen

11.5.1 HTT 4
11.5.2 HTT 5

Garantie
CEPBNUCHA CNYKBA I TAPAHTN8 83
3AUHTA OKPYXAOUeI CPeDbI UYTIN3AUIN 83
1. 06üne yka3aHn
1.1 CbeHnOpyKOBoDCTBe
Inaba 3Kcnnyataa npeHa3NayeHa dna noB3oBaTe na CneuaJNCTa.
Pa3denn MoTAn npEHa3NaeH nIy CneuaJIInCTOB.

CneNyET 03HaKOMtbcra!
IpeNd HaayoM 3KcNpyatauBnHMaTeNbHO
IpOuyTae DaHHoe pyKOBOCTBO n COxpaHNTe
ero. Pn Heo6XoDMocTn nepeaaiTe
HaCTOJaee pyKOBOCTBO CneDyUoSeMy
NoIb3OBaTeJIIO.
1.2 3haueHme cMBOJIOB
CnMBonbl,ncnoJb3yeMbIeB DaHHOM pyKOBoDCTBe
B daHHOM pyKOBOcTBe BCTpeyauTc CneDyuOuue CNMBONbln 06o3HaueHna. OH nmeOT CneDyuOuee 3HaueHne:

TpabmoonacHo!
Yka3aHne Ha BO3MOxHbI pNc K noJyehnA
TpabMbI!

Onacno JnJxN3H! BbICOKoe HapjKeHne!

Onachoctb nolyuhenno oxorob!

OnachocTb BO3HNKHOBeHn noXkapa!

He HaKpbIbAaTe!

Bo3MOxHbIOBpeXeHnI
Yka3aHHe Ha nobpeXeHne np6opa, yuep6
okpykaioe cpee nn EkoHOMueckn yuep6.

Yka3aHne! TekTOBbIe COO6ueHnRAyOM CTaKIM CUMBOJOM Oc06eHNO BaxHbl.
》PpeIIOXeHn,PpeBOPaEMbIE CmMBOLOM «》,OINcBiBaHT Heo6xOuMbIe NowarOBbIe JeCTBn.
2. TexHnka 6e3oNaChOCTn
2.1 IcnoJb3ObaHne no Ha3HaueHmIO
Pnp6op npedHa3HaueH dna cyuK pyK.
Hoe nCnoB3OBAHnE daHHoro yctpoiCTBa He ABJETcA
ncNoB3OBAHnEM no Ha3NaueHnIO. NcNoB3OBAHnE no
Ha3NaueHnIO Takke NoDpa3ymeBaet Co6NIODeHne NOLOXKeHn
HactoIeero pykoBOdCTBa.B Cnyae n3MeHeHn IIN
nepeo6OpydoBaHnY cTpoiCTBa rapaHTnHOe O6CnyKJBAHnE
He npEOCTabJIaTeC!
2.2 Yka3aHnno TeXHnke 6e3oNaCHOCTu

Onachoctb noyuene oxora!
Bo Bpempa60tbpn6opa y OTBepctna DnBbIXoHa Harpetoro Bo3dyxa TemnepatypadoCTnraet Cbbie 90°C.

Onachoctb noyuene oxora!
UnpabHeHne np6opom DeTbMn nn nuaMn cOrpaHueHHbIMn fN3uYeCKm, ceHCOPbIMn yMCTBeHHbIMn cnOCo6HOCTaMn DOJXHO npOxCODHTb TOBko NOpnpCMOTpOMnn NocNe COOTBeTcTByUoero NHCTpyKtTaJa, pOBeEHHORO IINOM, OTBeuaIOUM 3a IN 6e3OnaCHOCTb.
He donyckaute, yto6bI detu 6anobannc b cnpi6opom!

OnachocTb BO3HNKHOBeHHn noXkapa!
He knaute npemetbHa np6op.He npncnohnte npemetbK np60py Hc BCTabnTe nx Mekj np60pom n cteHoi.
Takke He pa3meaIte B HenocpeDCTBeHHoH 6n30ctn ropoune, BocnpameHaOnuIecea Inn TeNnO3OInpyUOnue npedMetbI IIN MaTePnaIbI, KaK Hanpimep, 6enbe, OeJNa, KypHaIbI, EMKOCtnc MactNKoI IIN 6eH3HOM, fnaKoHbI co cnpem I T.I.

Onachoctb BO3HNKHOBeHHn noXapa!
He nCnoB3yIte npn6op ...
...ecnB NOMeueHnXn3-3a HnNnYXmMnuecknx BeueCTB, nblnn, ra3OB nn npOB cyueCTByet PnCK BOCnIameHeHHn nn B3pbBa.
...B HenocpeDCTBeHHo6Jn30CTOnOT Marnctpanei HmEKMOCTeI DnTpaHCnOpTnpOBKnnXpaHeHnRopOuNX B3pbIOONaChbIX MaTePnaNoB.
...ecnBnomeueHnn, ryeycTaHOBJeH npu6Op, npoBoaTcraTakne pa6Otbl, KaK yKnAdKa, WnfoBka, repmetnaua.
... ecn B nomeueenn BeyTcra pa60tbic nCnoB3oBAHnem 6eh3nHa, cnpeeB, MaCTNK dIa noOB nn aHaONrHuBx BeueCTB. Xopoio npOBeTpntb nomeeHne nepei nCnoB3oBAHnem np60pa.

Onacho JnJn3H! Bbcokoe HanpXeHne!
He BCTaBnIte npedMeTbIB OTBepctna np6opa.3To MoKet npuBecTu K nopaxeHIO 3NeKtpnueckm Tokom n/nnn noxapy.

He hakpbBaIe!
He haKpbBaIe npu6op Bo n36exKaHne eroneperpeBa.

Yka3aHne!
He 3Kcnnyatnpyute np6op,ecn pacctoHne do nobepxhoctn 6nn3nexkaunx npedmetOB Mehwe MNHMmaIbHO dOnyctUMoro 3HaueHna.

Yka3aHne!
Pn nCnoB3OBAHnn np6opa B MaCTepcknx nn NHBx NOMeueHnax, rde BbIeJIoTcra3bl, IMeetc3aNaX Macna N 6eH3nHa N T.D. nn BeDyTcpa60tbc pactBOpntenMaMn XmUneCKmN BeIeCTBaMn, Bo3MOxHO NOABHeHne DOIro He yXoJaunx 3aNaXOB u, npn ONpeJeHHbx O6ctOarTeNbCTbax, B np6ope MOrTy OTNOXHTbc3aRpa3HeHn.

Yka3aHne!
Cneinte 3a Tem, yTo6bl Bo3dyxo3a6OpHbIe OTBepCTnHa HxHHei 3aHHei naHEnJx npu6opa 6bln Bcerda OTKpbItbl.

Yka3aHne!
Co6nOaIte MmHMaJIbHoe pacCToHHe MEXkDy BblNyCKHO peWetKoN HaxoJaEeCra NOd Hei nobepxHocTbO (cm. rnaBy TexHueckne xapaKTepnCTnKn).
HarpebBn BO3dyx DOJXeH BbIXoNTb Chepe3 BbInyckHyIO peWetKy 6ecnpenrTcBeHHO!

Yka3aHne!
He noIbAte np6op B0oJ n3 wlaHra (cm. rnaBv Ynctka, yXoJ nTexO6cnyKbAHne).
2.3 3HaK CE
3NaK CE cBnTeIbCTByeT, YTO npu6Op COOTBeTCTByeT BcEM OCHOBbIM Tpe6OBAHm:
6.1 ...npi6op He BkIouaetcA
-Поберп Te npeoxpaHntiДомaшн eJektpnuecko cetn.
-Пи Нхождени NOCTOPOHHIN XnpedMeTOB None DeIeCTBnJa DaTUnKa pa6oTOcNOc6HocTb npu6opa Hapywaetc. B ATOM Cnyae npu6Op BbIKNoUaETc npimepHO uepe3 Tpi cekyHdbI BO n36ExaHne HepepbIBHOpa60tBJ.Ecn Ipu6Op He BkIOUaETc, npOBepbTe, He HaxOJrTaC IIN B NOE DeIeCTBnJa DAuKNa NOCTOPOHHIne npedMeTb.Ipn ydaJIeHNN NOCTOPOHHINX npedMeTOB pnp6Op BHObPa6oTaet Becnepe6oHNo.
6.2 ... BeHTnIaTOp pa6oTaet 6e3 HarpeTorO BO3dUxa
-ПиперревнаграватьньллелмENTВБКИQUаeTCa, BeHTINJTop npOdoJIkaeT pa6oTaT do OXlaXKeHn. Ппмерночесдve мИнHyтbl NOcIe BbIKIIOUeHnnp6opaHarpeBaTeBHyblлelmeNTBHOBB BKIOUaeTCa DaTuNKOM TemnepaTypbI.
6.3 3aBODcka Ta6nnuKa
3aBoDcKa Ta6nUHc HaxoDntcHa HnXHe nAneH npi6opa.
7. TexHnka 6e30NaCHOCTN
MOnTaX, BBOB E KcPnyatauio, a TaKKe Texo6CnyxHBnE n peMOHT npu60pa DoJXHb I pOun3BOUntbcra TOnbKO KBaJIINΦIuPObAHbIM CneuaJIInCTOM.
7.1 06uye yka3aHnno TeXnKe 6e3oNaChOCTn
Mby rapaHTnpyem 6e3ynpeuhyo pa60ty yctpoiCTBa n 6e3ONaCHOCb 3KcNlyaTaunn TOIbKO npn nCnObn3OBAHn OPnHnHaBHorO dONnHntelbHorO o6OpydoBAnn n opnHnHaBbIX 3anacten.
8.2 MoNTaXHbIe ycNoBnI nOaTROBHTeNbHbIe pa6oTbI
- YctaHaBnBaIte np6Op ToIbKO Ha BepTKaIbHOI CTeHe C TepMOCTOIKoCTbIO He MeHee 90^
-063aTeJIbHO co6IIOJaTe yKa3aHHbIe MInHMaJIbHbIe paCCTOHHJ.
8.3 ΘeKtpoNodkIoueHne

Yka3aHne!
CneNyET yuHTbBaTb daHHbIe Ha 3aBOdcko Ta6nUyKe. HanpXeHne cTe n DoJXHO COBnaDaTb C yka3aHHbIM Ha Ta6nUyKe.

OnacHOJnK3H!BbICOKoe HanpXe
IopKnloueHHe K 3neKtpocTeu DoJxHo 6bItb B Hepa3bemHom nCnonHeHH. Pnp6Op dOnKeH paCuenTbCn CetBIO C nomOuBIO pa3dENoUoero yuaCTka pa3Mepom He MeHee 3 MM Ha KaXDom NoIOce.
»BbIbpaTne npoBOd doCTaTOHOrO ceueHnA.
ПОДКИюаиTe эл ektpnueckne coeINHITeNBhIe Ka6eN B COOTBeTCTBUN C3л ektpnueckOJ CXeMOI (cM.TexHnueckNe xapaKTEpncTnK).
1Пл actMaccobbyyrgolok
IlnactMaccobby yroLOK B KpbIwke Kopnyca HTT 5 npedHa3HaueH dny DOONHHTeBHO H3OJUKN Ka6eJn CTeBOrO NITaHnN KJIEMMbI.
9. MoHTaX

Onacno JnJn3H! BbICOKoe HAnpJxHeH! Bce pa6Otbl no yctahOBnEHIO 3neKtpuYeCKnx coeINHeHm MOHTaKy Heo6XoDIMO npONBODTb B COOTBeCTBUN CnHCTpyKuNei.
9.1ДемонтжкрьшккорPNycaHTT4
1 Kpbiika Kopnyca
2Фнсуюа3aBnKka
3 BuHTbl
Ocna6bTe BnHbI Ha KpbIwke Kopnyca n φικCηpyOuOyO 3aDbNkKy.
》TOnrHnTeΦKcPpyUOuY3aDbuXKyBn3.
» CHMnTe KpbIshKy Kopnyca.
9.3 KpenJIeHnHa cTeHe
»BbipexkTe Ⅲa6JNoH dIJI OTBepCTNI. OH HaxoDITcB KOHcE HACTOJIeO pyKOBOdCTBa.
Ipeheecnte 4 KpeneKhble Tockn Ha CteHy C nOMOsbIO Wa6NoHa dny OTBepctn. YuHTbBaHte npn EtondHy nnoJoxHe NabeJIceTeBOrO NtAHy.PyKOBoDCTByTcB HaunmOpneHTnpOBoYbIMN 3HaueHnA M BblCOTbl (cm.TexHnueckne xapakTepcntKn).
»ПрсевпгуOTBергдяКренииУCTAHOBITeВнхДIO6eN.
»BBePhHnTe BCTeHy HnKHe KpeNexKhble BuHTbl.
1 Ka6eBbHbI BBOd
PpOynCTnTe Ka6eNb CeTeBOrO NtAHnY uepe3 Ka6eNbHbI BBoD B 3aDHIOU CTeHKy npu6opa.
»UctaHOBnTe np6Op 3amOuHbIMN OTBepCTnMn Ha COOTBeTCTByIOJIne KpeIeXHbIe BNHTbl.
3aKpEnTe np6Op Ha cTeHe C nOMOuBIO DByx DpyrNX BnHTOB.
IoiKIOUHTe coeUNHtBbHbIKa6bK np60py.

Yka3aHne! CnEduTe 3a Tem, yTo6bI KInbI Ka6eNc ceTeBOro nTuHaHHe paCnOlaRaIncb B 3OHe DBrTaTeNr BEHTUJrTopa.

Yka3aHne! Co6nOdaTe MaKcMaIbHyo dInHy Ka6eNa ceTeBOrO nTuHaN. (Cm. TexHnueckne xapakTepncn).
9.4 MoHTaX KpbIiKm Kopnyca HTT 4
»YcTaHOBInTe KpbIshky Kopnyca NOJ IerKIM HaKIOHOM Ha np6Op IN OTBeINTE ee B CTOpOHy CTeHbl.
CdbnHbTe ΦNKcnpyUOuY 3aDbNkKy do yNopa BBepx.
3aKpeneTcHnKcnpyuOyU 3aBnKky IN KpbIuKy KopnyCa BnHTaM.
9.5 MoHTaX KpbIuKn Kopnyca HTT 5
BCTaBtE KpbIuKy Kopnyca NOJ IeKIM HAKIOHOM NOBepx np6opa Do ynpa K CTHe. IpocneiTe 3a TEM, YTO6bl KpOChn Ha HIXHei CTOpOHe KpbIuKn np6opa 3aueennnncb 3a 3aHIOU CTeKHy np6opa.
Длдфнкаи сlerka npinodHmnte cnepei KpbIshky Kopnycaи CdBnHbTe Фнсирую 3aDbNkKуdo ynpa BBepx.
3aKpenTeΦHKcnpuyoUyO 3aDbuKkBy BNHTaMn.
10.пека пибopa
O6barchte noIb3OBaTeJIo cyHKUIM npu6opa.Oc06o 6paTne ero BHNMaHHe Ha yka3AHnNo TeXHKe 6e3OnacHocTn. Bpynte noIb3OBaTeJIIO pyKOBoIDCTBO nO 3Kcnnyataunn MOHTaxy.
11. Texnueckne xapaktepnctnkn
11.1 TexHnueckme xapaKTePncTmKn
Urzhumskaya street 4,
building 2 | 129343 Moscow
Tel. 0495 7753889 | Fax 0495 7753887
info@stiebel-eltron.ru
www.stiebel-eltron.ru
Slovakia
TATRAMAT - ohrieva vody, s.r.o.
Hlavná 1 | 058 01 Poprad
Tel. 052 7127-125 | Fax 052 7127-148
info@stiebel-eltron.sk
www.stiebel-eltron.sk
Switzerland
STIEBEL ELTRON AG
Industrie West
Gass 8 | 5242 Lupfig
Tel. 056 4640-500 | Fax 056 4640-501
info@stiebel-eltron.ch
www.stiebel-eltron.ch
Thailand
STIEBEL ELTRON Asia Ltd.
469 Moo 2 Tambol Klong-jik
Amphur Bangpa-In I 13160 Ayutthaya
Tel. 035 220088 | Fax 035 221188
info@stiebeeltronasia.com
www.stiebeleltronasia.com
United Kingdom and Ireland
STIEBEL ELTRON UK Ltd.
Unit 12 Stadium Court
Stadium Road | CH62 3RP Bromborough
Tel. 0151 346-2300 | Fax 0151 334-2913
info@stiebel-eltron.co.uk
www.stiebel-eltron.co.uk
United States of America
STIEBEL ELTRON, Inc.
17 West Street | 01088 West Hatfield MA
Tel. 0413 247-3380 | Fax 0413 247-3369
info@stiebel-eltron-usa.com
www.stiebel-eltron-usa.com
STIEBEL ELTRON

- BEDIENUNG 2
- INSTALLATION 15
- CUSTOMER SERVICE AND WARRANTY 20
- ENVIRONMENT AND RECYCLING 20
- General information
- Document information
- Key to symbols
- Safety
- Intended use
- Safety information
- CE designation
- Test symbols
- Equipment description
- Operation
- Cleaning, care and maintenance
- What to do if ...
- ... the appliance does not start
- ... the fan is running but there is no hot air
- The type plate
- Safety
- General safety instructions
- Instructions, standards and regulations
- Installation
- Installation information
- Installation conditions and preparations
- Power supply
- Installation
- Removing the HTT 4 casing cover
- Removing the HTT 5 casing cover
- Appliance handover
- Specification
- Specification
- Guidelines for installation height
- Dimensions
- Warranty
- Environment and recycling
- UTILISATION 21
- Afmetingen
- Garantie
- CEPBNUCHA CNYKBA I TAPAHTN8 83
- 3AUHTA OKPYXAOUeI CPeDbI UYTIN3AUIN 83
- 06üne yka3aHn
- CbeHnOpyKOBoDCTBe
- 3haueHme cMBOJIOB
- CnMBonbl,ncnoJb3yeMbIeB DaHHOM pyKOBoDCTBe
- TexHnka 6e3oNaChOCTn
- IcnoJb3ObaHne no Ha3HaueHmIO
- Yka3aHnno TeXHnke 6e3oNaCHOCTu
- 3HaK CE
- ...npi6op He BkIouaetcA
- ... BeHTnIaTOp pa6oTaet 6e3 HarpeTorO BO3dUxa
- 3aBODcka Ta6nnuKa
- TexHnka 6e30NaCHOCTN
- 06uye yka3aHnno TeXnKe 6e3oNaChOCTn
- MoNTaXHbIe ycNoBnI nOaTROBHTeNbHbIe pa6oTbI
- ΘeKtpoNodkIoueHne
- MoHTaX
- 9.1ДемонтжкрьшккорPNycaHTT4
- KpenJIeHnHa cTeHe
- Ka6eBbHbI BBOd
- MoHTaX KpbIiKm Kopnyca HTT 4
- MoHTaX KpbIuKn Kopnyca HTT 5
- 10.пека пибopa
- Texnueckne xapaktepnctnkn
- TexHnueckme xapaKTePncTmKn
- Slovakia
- Switzerland
- Thailand
- United Kingdom and Ireland
- United States of America
Brand : STIEBEL ELTRON
Model : HTT 4
Category : Hand dryer