EZC 35 - Refrigerator EZetil - Free user manual and instructions
Find the device manual for free EZC 35 EZetil in PDF.

| Product type | Portable compressor refrigerator and freezer |
| Brand | EZetil |
| Model | EZC 35 (35 liters) |
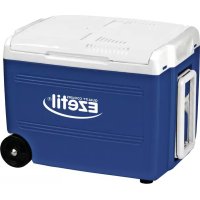
| References | 777950 (DC 12/24 V) or 777980 (DC 12/24 V + AC 100-240 V) |
| Gross capacity | 35 liters |
| Dimensions (H x W x D) | 390 x 360 x 580 mm |
| Weight | 15 kg |
| Adjustable temperature range | from +10°C to -18°C |
| Power supply | DC 12 V / 24 V (model 777950) or DC 12/24 V + AC 100-240 V (model 777980) |
| Average power consumption | 40 W |
| Current consumption on 12 V (at 5°C interior, 20°C exterior) | approx. 0.6 Ah/h |
| Digital display | Displays current interior temperature and set temperature |
| Temperature adjustment | In 1°C increments, + and - buttons; switch °C/°F by pressing both simultaneously |
| Operating modes | Boost (maximum cooling) and Eco (energy saving) |
| Battery monitoring device | Yes, adjustable High/Med/Low, protects vehicle battery |
| Memory function | Saves the last set temperature and restores it after power-on |
| Interior light | LED |
| Insulation | PU foam, HCFC-free |
| Defrosting | Manual, do not use sharp objects |
| Cleaning | Damp cloth, do not use abrasive products; lid seal: clean water and talc |
| Priority connection | If AC and DC are both connected, the device uses AC preferentially (switching takes up to 3 min) |
| Lid opening | Unlockable hinge to remove lid (opening angle 20°) |
| Included accessories | 12/24 V cable; 230 V cable (AC models only); operating instructions |
| Warranty | 2 years (excluding wear parts) |
Frequently Asked Questions - EZC 35 EZetil
User questions about EZC 35 EZetil
0 question about this device. Answer the ones you know or ask your own.
Ask a new question about this device
Download the instructions for your Refrigerator in PDF format for free! Find your manual EZC 35 - EZetil and take your electronic device back in hand. On this page are published all the documents necessary for the use of your device. EZC 35 by EZetil.
USER MANUAL EZC 35 EZetil
natural_image
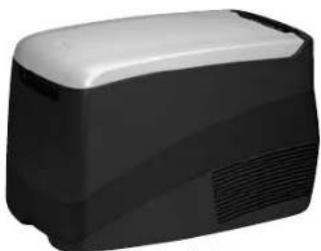
Exterior view of a black and white portable electronic device (no visible text or symbols)Modell EZC 25
natural_image
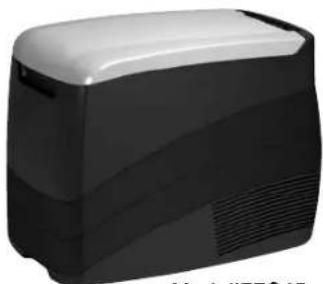
Exterior view of a modern office building (no signage)Modell EZC 35
natural_image
Exterior view of a modern office building (no signage)ModelIEZC45
natural_image
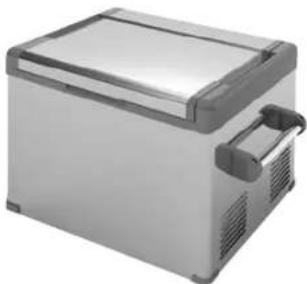
Exterior view of a modern stainless steel appliance with lid and side panel (no visible text or symbols)Modell EZC 60
natural_image
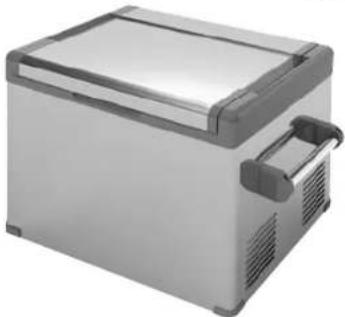
Exterior view of a modern stainless steel appliance with lid and side handle (no text or symbols visible)Modell EZC 80
Seite
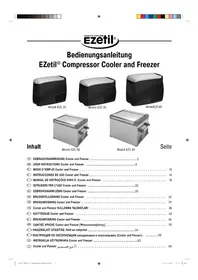
Inhalt
DE GEBRAUCHSANWEISUNG Cooler and Freezer 2
GB USER INSTRUCTIONS Cooler and Freezer 6
MODE D'EMPLOI Cooler and Freezer 10
ES INSTRUCCIONES DE USO Cooler and Freezer 14
MANUAL DE INSTRUÇÕES PARA O Cooler and Freezer 18
① ISTRUZIONI PER L'USO Cooler and Freezer 22
NL GEBRUIKSAANWIJZING Cooler and Freezer 26
DK BRUGERVEJLEDNING Cooler and Freezer 30
NO BRUKSANVISNING Cooler and Freezer 34
TR Cooler and Freezer KULLANMA TALIMATLARI 38
F1 KÄYTTÖOHJE Cooler and Freezer 42
SE BRUKSANVISNING Cooler and Freezer 46
GR ODHΓIEΣ XPHΣΗΣ Cooler and Freezer [Ψυγειοκαταψύκτης] 50
H HASZNÁLATI UTASÍTÁS Hütő és mélyhűtő 54
①u ИНСТРУКЦИЯ ПО ЭКСПЛУАТАЦИИ холодильника и морозильника (Cooler and Freezer) . .....58
PL INSTRUKCJA UŻYTKOWANIA Cooler and Freezer 62
© Cooler and Freezer ١٨ دَلِيل الاستخدام 69
natural_image
Close-up of a sewing machine needle stitching fabric (no visible text or symbols)GB USER INSTRUCTIONS Cooler and Freezer
Dear customer,
You have chosen to purchase an EZetil compressor cooler box. We thank you for this purchase and hope that your experiences with this quality product will be pleasant ones. The cooler is an ideal companion for keeping your beverages, refreshments and food refrigerated while on trips, picnics, camping excursions and shopping trips.
Important notices:
Before first-time use of this unit, you should carefully read these user instructions so that you can then connect and operate your cooler accordingly.
Please keep these user instructions so that you can reference them later on.
This unit may only be connected to the power sources intended for it!
Therefore make sure that the voltage on the cooler's rating plate matches the voltage of the power source before making the connection. When making connections to boat or yacht power systems, be sure that the connection is properly protected (e.g. fuse)!
| ItemNo | 777850 | 777950 | 777980 | 778050 | 778080 | 778780 | 778880 |
| Capacity in litres | 25 | 35 | 35 | 45 | 45 | 60 | 80 |
| Supply voltage (V) | DC 12/24 | DC 12/24 | DC 12/24/AC100-240 | DC 12/24 | DC 12/24/AC100-240 | DC 12/24/AC100-240 | DC 12/24/AC100-240 |
Delivery complement
- Compressor cooler
• 12 V / 24 V connection cable - 230 V connection cable (types 777980, 778080, 778780 and 778880 only)
- User instructions
1. Operation
All operating elements necessary to use this unit are gathered together into a single operator panel in the upper part of the cooler.
A

B
C
D
E
F

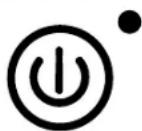
A Main switch for turning the unit on and off
B Selector switch for full cooling performance at maximum power consumption ("Boost") or energy-efficient operation at reduced cooling performance ("Eco")
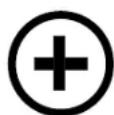
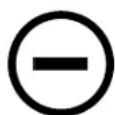
C Pre-select button for setting the desired cooling temperature or raising the temperature setting in increments of 1°C.
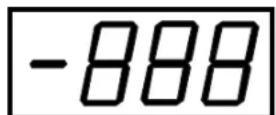
D Digital display of the desired/actual temperature
E Pre-select button for setting the desired cooling temperature or lowering the temperature setting in increments of 1°C.
F Setting for the sensitivity of the built-in battery monitor (see table on Page 8)
“Hi” means a high shut-off voltage, see table
"Med" means a medium shut-off voltage, see table
"Low" means a low shut-off voltage, see table
After the cooler has been set up, connected and switched on, the digital display will indicate the measured temperature now in the cooler (e.g. 20°). You can now use the pre-select buttons to set the desired temperature in increments of 1° by pressing the minus or plus button repeatedly until the digital display shows the desired cooler temperature (e.g. -12°). If you now release the pressed button, the pre-set value will be confirmed by blinking the display. Thereafter, the display will again show the actual temperature inside the cooler and the box will refrigerate the cool-space until the desired temperature has been reached. The cool-space has zones with slightly differing temperatures. The display always reflects an approximate average temperature.
Operate the unit in boost mode for particularly low pre-select temperatures (under -12^ ) or to rapidly cool your refrigerated items.
This will increase the cooling performance of the unit.
By simultaneously pressing the “+” and “-” buttons, the temperature display can be switched between °C and °F.
Memory function: The cooler's electronics stores the last-set cooling temperature. If the cooler is switched off and then at some later time switched on again (without setting a new temperature), the box will "remember" the last preset temperature and automatically use this setting.
GB USER INSTRUCTIONS Cooler and Freezer
2. Safety instructions
• Always ensure that the selected power source is suitable for operating the cooler (see technical data on the rating plate).
- Only use and transport the cooler in an upright position. An angle of up to 30^ is permissible.
- Ensure that all connection cables are firmly attached. Only unplug the connection by pulling on the plug itself, not on the cables.
- Ensure that ventilation slits are free of dirt and that the refrigeration unit has adequate ventilation.
- Never operate the unit with defective connecting cables.
- Prevent hard or sharp objects from entering the ventilation slits.
- Protect the electric cooler from rain, moisture and spray water.
- Do not allow children to operate the unit unsupervised.
- Never open the cooling circuit.
- Never touch bare electric wires or contacts.
- When operating the unit on an AC power source, always be sure that the power source is protected with an earth-fault switch.
- Disconnect the unit from the power source when it is not to be used for longer periods of time.
- When disposing of this appliance, make sure it is unusable. Pull the plug and cut through the cord. Remove or destroy any dead-bolt or snap locks. Thus you can prevent children from locking themselves in and endangering their lives at play. Refrigerators and freezers contain insulating gases and refrigerants which require professional disposal. They also contain valuable materials which should be recycled. For this reason, please let your municipal waste disposal authority dispose of them. If you have any questions, please ask your municipal administration or your dealer. Please ensure that the pipes in your refrigerator are not damaged before it is hauled away to be disposed of in a professional, environmentally compatible manner.
3. Set-up and cleaning
3.1 Set-up
Place the unit on a solid floor or an appropriate surface where adequate inlet and outlet ventilation is ensured.
A location in direct sunlight or in the immediate vicinity of heat sources, e.g. heaters, should be avoided. The cooler should be set up such that it is protected from rain and spray water.
3.2. Cleaning
Please wipe out the cooler's containers with a moist cloth prior to the unit's first usage. Never use abrasive or caustic agents. Wipe the cleaned surfaces dry with a soft cloth. Use only clear water to clean the lid's seal. Rub talcum powder onto this seal from time to time.
Please be careful that water does not penetrate into the electronics located behind the ventilation grille.
Useful advice:
Do not put open vessels of liquids directly into the cooler but rather always use the cool-space only to cool closed containers such as bottles, packaged products and so on.
4. Operation on an AC power source (100-240 V)
The 777980 cooler (35-liter capacity, DC 12/24/AC100-240 V), 778080 (45-liter capacity, DC12/24/AC100-240 V), 778780 (60-liter capacity, DC12/24/AC100-240 V) and 778880 (80-liter capacity, DC12/24/AC100-240 V) can not only be run on a vehicle electrical system (12/24 V), but also on an 100-240 V alternating current system.
Before you make the connection and start the unit, please check that line supply voltage meets unit operating voltage requirements as specified by the unit's rating plate.
If the voltage is permissible, plug the earthed plug into a properly installed, earthed safety outlet. An adapter may be necessary in some foreign countries where the format of standard outlets are different.
The unit has an internal priority circuit. If both an AC cable connection and a DC cable connection are detected, the unit will switch over to operate from the AC power source to prevent the battery from discharging unnecessarily. This switch-over process may take as long as 3 minutes.
5. Operation on a vehicle's battery (12 V or 24 V)
Please check whether battery voltage meets the requirements specified on the cooler's rating plate. Check to see that the power source is at least fuse-protected at 15 A (12 V) or 7.5 A (24 V).
If these conditions are met, please use the 12 V/24 V cable provided with the cooler to make the connection at the rear-side of the cooler; insert the cable's plug into the vehicle's electric outlet or the cigarette lighter socket.
The built-in battery monitor will ensure that battery voltage does not drop below a certain minimum value when the vehicle's motor is not running.
When power is supplied from a starter battery, the "high" position is recommended.
The following values are based on the compressor's connections and do not account for any voltage drop in connecting lines:


GB USER INSTRUCTIONS Cooler and Freezer
| Switch-off voltage | High | Med | Low |
| 12 V operation | 11.3 V | 10.8 V | 10.0 V |
| 24 V operation | 24.6 V | 23.6 V | 22.0 V |
| Switch-on voltage | |||
| 12 V operation | 12.5 V | 12.0 V | 11.3 V |
| 24 V operation | 26.0 V | 25.0 V | 23.4 V |
It is absolutely necessary to disconnect the cooler from the battery when a high-rate charger is being used.
When used in a tip-up truck cab, switch off the cooler before tipping the cab forward.
Useful advice:
Foodstuffs and beverages stored in the cooler should always be in closed containers or wrapped so that air can circulate around these refrigerated items. Do not place warm or hot foods or beverages into the cooler.
6. Maintenance and storage
A heavy build-up of frost and ice in the unit will reduce its cooling effect. Do not use sharp objects to remove the layer of frost and ice; instead, switch off the unit and allow it to defrost. It is recommended that the unit be regularly defrosted.
If the unit is not in use over an extended period of time, open the lid enough to produce an air gap so that fresh air can circulate in the cool-space.
Important notice:
Maintenance or repair work, particularly on the cooling aggregate, cooling circuit or electronics, may only be performed by qualified technicians.
Troubleshooting notice:
Before you call customer service with a problem, we recommend that you check the following aspects:
- Is the unit in a suitable location where it has adequate ventilation?
- Does the outlet where the unit is connected have power?
• Is the connecting cable damaged? - Is the plug fully inserted into the outlet?
- Is the unit switched on?
The unit has its own fault diagnostic system that helps to find the source of problems. Watch the LED next to the on/off button:
1 blink: the input voltage is too low
2 blinks: ventilator current is too high
3 blinks: compressor start-up fault, locked rotor
4 blinks: compressor speed fault, the cooling system is overloaded
5 blinks: compressor over-temperature shutdown
If the LED indicates faults 3, 4 or 5, empty the cooler put it in a cool location and then try to start it again.
If "Er" appears in the temperature display, the temperature sensor may be faulty. This unit has an emergency-operation system for this case. This will maintain a minimum level of cooling. The temperature cannot be precisely regulated under these conditions.
If these checks do not lead to flawless operation of the unit then please contact customer service.
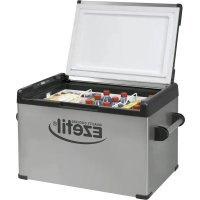
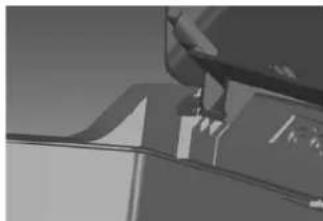
7. Releasing the lid's hinge (only models 25, 35, 45)
If the cooler is to be used in a confined space where raising its lid is difficult, you can release the lid hinge to make the lid removable.
Loosen the lid latch with a screwdriver as shown in the illustration (later picture). Once this has been done, the lid need only be open to an angle of about 20^ to remove or replace it.
natural_image
Close-up of a sewing machine needle stitching fabric (no visible text or symbols)GB USER INSTRUCTIONS Cooler and Freezer
- Technical data:
| Item No. | 777850 | 777950 | 777980 | 778050 | 778080 | 778750 | 778880 |
| Designation | EZC 25DC12/24 V | EZC 35DC12/24 V | EZC 35DC12/24/AC100-240 V | EZC 45DC12/24/AC100-240 V | EZC 4512/24/100-240 V | EZC 6012/24/100-240 V | EZC 8012/24/100-240 V |
| Approx. gross capacity in . | 25 | 35 | 35 | 45 | 45 | 60 | 60 |
| Supply voltage (V) | DC12/24 | DC12/24 | DC12/24/AC100-240 | DC12/24/AC100-240 | DC12/24/AC100-240 | DC12/24/AC100-240 | DC12/24/AC100-240 |
| Dimensions (mm): | |||||||
| Height | 425 | 390 | 390 | 460 | 460 | 455 | 555 |
| Length | 260 | 360 | 360 | 360 | 360 | 460 | 460 |
| Length | 550 | 580 | 580 | 580 | 580 | 690 | 690 |
| Average power consumption | +10 to -18°C | +10 to -18°C | +10 to -18°C | +10 to -18°C | +10 to -18°C | +10 to -18°C | +10 to -18°C |
| Max. cooling delta t for climate class N | 50° | 50° | 50° | 50° | 50° | 50° | 50° |
| Approx. weight in kg | 13 | 15 | 15 | 18 | 18 | 30 | 32 |
| Material | CFC-free | CFC-free | CFC-free | CFC-free | CFC-free | CFC-free | CFC-free |
| Insulation | PU foam | PU foam | PU foam | PU foam | PU foam | PU foam | PU foam |
| Interior light | LED | LED | LED | LED | LED | LED | LED |
| Aconsumption | 40 Watt | 40 Watt | 40 Watt | 40 Watt | 40 Watt | 40 Watt | 40 Watt |
| Current draw on 12 V(5°C inside,20°C outside) | about 0,5 Ah/h | about 0,6 Ah/h | about 0,6 Ah/h | about 0,7 Ah/h | about 0,7 Ah/h | about 0,8 Ah/h | about 0,9 Ah/h |
| Certification | GS/CE/E certified | GS/CE/E certified | GS/CE/E certified | GS/CE/E certified | GS/CE/E certified | GS/CE/E certified | GS/CE/E certified |
| Guarantee period | 2 year | 2 year | 2 year | 2 year | 2 year | 2 year | 2 year |
| Battery monitor | x | x | x | x | x | x | x |
9. Warranty
This cooler comes with a 2 year warranty (the warranty excludes wear parts such as fuses, connector plugs, etc.) from the day of purchase under the following conditions:
- If all defects are verifiably attributable to material or production errors and not to improper use (the warranty is void if the unit is run with supplementary parts or accessories from other manufacturers).
- The warranty claim is made within the warranty period.
- The purchase receipt can be presented with the unit.
Claims other than the above right-to-repairs are not covered by this warranty.
Please contact our Service Team at the following telephone numbers in regard to warranty claims.
10. Service
Do not dispose of electrical appliances together with your household waste, make use of the waste collection stations near you. Ask your municipal administration where these stations are located. If electrical appliances are disposed of without regard to regulations, exposure to the weather may cause hazardous materials to get into the groundwater, thus poisoning the food chain or flora and fauna for years. If you replace the appliance with a new one, the seller is required by law to take back the old appliance for disposal free of charge, at least.
® MODE D'EMPLOI Cooler and Freezer
Chère cliente, cher client,
natural_image
Close-up of a hand using a sewing machine to cut a piece of fabric (no visible text or symbols)FR MODE D'EMPLOI Cooler and Freezer
natural_image
Close-up of a sewing machine needle stitching fabric (no visible text or symbols)

ES INSTRUCCIONES DE USO Cooler and Freezer
8. Datos técnicos:
MANUAL DE INSTRUÇÕES PARA O Cooler and Freezer
MANUAL DE INSTRUÇÕES PARA O Cooler and Freezer
P MANUAL DE INSTRUÇÕES PARA O Cooler and Freezer
natural_image
Close-up of a hand using a sewing machine to cut a piece of fabric or paper (no visible text or symbols)P MANUAL DE INSTRUÇÕES PARA O Cooler and Freezer
- Dados técnicos:
natural_image
Close-up of a hand using a sewing machine to cut a piece of paper (no visible text or symbols)

IT ISTRUZIONI PER L'USO Cooler and Freezer
- Dati tecnici:
natural_image
Close-up of a sewing machine needle stitching fabric (no visible text or symbols)natural_image
Close-up of a hand using a sewing machine to cut a piece of material (no visible text or symbols)DK BRUGERVEJLEDNING Cooler and Freezer
- Tekniske data:
natural_image
Close-up of a sewing machine needle stitching fabric (no visible text or symbols)NO BRUKSANVISNING Cooler and Freezer
- Tekniske data:
| Art.nr. | 777850 | 777950 | 777980 | 778050 | 778080 | 778750 | 778880 |
| Forkortelse | EZC 25DC12/24 V | EZC 35DC12/24 V | EZC 35DC12/24/AC100-240 V | EZC 45DC12/24/AC100-240 V | EZC 4512/24/100-240 V | EZC 6012/24/100-240 V | EZC 8012/24/100-240 V |
| Innhold/ I brutto/ ca. | 25 | 35 | 35 | 45 | 45 | 60 | 60 |
| Nettspenning (V) | DC12/24 | DC12/24 | DC12/24/AC100-240 | DC12/24/AC100-240 | DC12/24/AC100-240 | DC12/24/AC100-240 | DC12/24/AC100-240 |
| Mål(mm): | |||||||
| Høyde | 425 | 390 | 390 | 460 | 460 | 455 | 555 |
| Bredde | 260 | 360 | 360 | 360 | 360 | 460 | 460 |
| Lengde | 550 | 580 | 580 | 580 | 580 | 690 | 690 |
| Temp.område/regulerbart | fra +10 til -18°C. | fra +10 til -18°C. | fra +10 til -18°C. | fra +10 til -18°C. | fra +10 til -18°C. | fra +10 til -18°C. | fra +10 til -18°C. |
| Maks. Kjøleeffekt delta t | |||||||
| Ved klimaklasse N | 50° | 50° | 50° | 50° | 50° | 50° | 50° |
| Vekt, ca./kg | 13 | 15 | 15 | 18 | 18 | 30 | 32 |
| Materiale | CFK fritt | CFK fritt | CFK fritt | CFK fritt | CFK fritt | CFK fritt | CFK fritt |
| Isolering | PU-skum | PU-skum | PU-skum | PU-skum | PU-skum | PU-skum | PU-skum |
| Innvendig belysning | LED | LED | LED | LED | LED | LED | LED |
| Gjennomsnittliginngangseffekt | 40 watt | 40 watt | 40 watt | 40 watt | 40 watt | 40 watt | 40 watt |
| Strømforbruk på 12 V (5°C.inne, 20°C.utetemperatur) | ca. 0,5 Ah/h | ca. 0,6 Ah/h | ca. 0,6 Ah/h | ca. 0,7 Ah/h | ca. 0,7 Ah/h | ca. 0,8 Ah/h | ca. 0,9 Ah/h |
| Kontrollmerke | GS/CE/E-kontroll | GS/CE/E-kontroll | GS/CE/E-kontroll | GS/CE/E-kontroll | GS/CE/E-kontroll | GS/CE/E-kontroll | GS/CE/E-kontroll |
| Garantitid | 2 år | 2 år | 2 år | 2 år | 2 år | 2 år | 2 år |
| Batterivakt | x | x | x | x | x | x | x |
9. Garanti
natural_image
Close-up of a sewing machine needle stitching fabric (no visible text or symbols)TR KULLANMA TALİMATLARI Cooler and Freezer
- Teknik verileri:
natural_image
Close-up of a sewing machine needle stitching fabric (no visible text or symbols)FI KÄYTTÖOHJE Cooler and Freezer
- Tekniset tiedot:
natural_image
Close-up of a sewing machine needle stitching fabric (no visible text or symbols)SE BRUKSANVISNING Cooler and Freezer
- Tekniska data:
natural_image
Close-up of a sewing machine needle stitching fabric (no visible text or symbols)GR OΔΗΓΙΕΣ ΧΡΗΣΗΣ Cooler and Freezer
natural_image
Close-up of a sewing machine needle stitching fabric (no visible text or symbols)natural_image
Close-up of a sewing machine needle stitching fabric (no visible text or symbols)natural_image
Close-up of a sewing machine needle stitching fabric (no visible text or symbols)PL INSTRUKCJA UŻYTKOWANIA Cooler and Freezer
- Dane techniczne:
natural_image
Close-up of a sewing machine needle stitching fabric (no visible text or symbols)© Cooler and Freezer [دليل الاستخدام]
- تعليمات الأمن
CE -73/23/EEC-low voltage directive
-89/336/EEC-EMC directive
-2004/104/EC-motor vehicle directive