CDC5506 - Cd player/recorder SHERWOOD - Free user manual and instructions
Find the device manual for free CDC5506 SHERWOOD in PDF.
Frequently Asked Questions - CDC5506 SHERWOOD
User questions about CDC5506 SHERWOOD
0 question about this device. Answer the ones you know or ask your own.
Ask a new question about this device
Download the instructions for your Cd player/recorder in PDF format for free! Find your manual CDC5506 - SHERWOOD and take your electronic device back in hand. On this page are published all the documents necessary for the use of your device. CDC5506 by SHERWOOD.
USER MANUAL CDC5506 SHERWOOD
| CAUTION : TO REDUCE THE RISK OF ELECTRIC SHOCK, DO NOT REMOVE COVER (OR BACK). NO USER-SERVICEABLE PARTS INSIDE. REFER SERVICING TO QUALIFIED SERVICE PERSONNEL. | This symbol is intended to alert the user to the presence of uninsulated "dangerous voltage" within the product's enclosure that may be of sufficient magnitude to constitute a risk of electric shock to persons. |
| This symbol is intended to alert the user to the presence of important operating and maintenance (servicing) instructions in the literature accompanying the appliance. |
WARNING : TO REDUCE THE RISK OF FIRE OR ELECTRIC SHOCK, DO NOT EXPOSE THIS APPLIANCE TO RAIN OR MOISTURE.
| CLASS 1 LASER PRODUCT | CAUTION Invisible laser radiation when the unit is open. Do not stare into beam. |
| CAUTION: USE OF ANY CONTROLS, ADJUSTMENTS, OR PROCEDURES OTHER THAN THOSE SPECIFIED HEREIN MAY RESULT IN HAZARDOUS RADIATION EXPOSURE. | |
| FOR YOUR SAFETY | ||
| EUROPE AUSTRALIA | 220 V - 240 V | Units shipped to Australia are designed for operation on 230 V AC only. To ensure safe operation, the three-pin plug supplied must be inserted only into a standard three-pin power point which is effectively earthed through the normal household wiring. Extension cord used with the equipment must be three-core and be correctly wired to provide connection to ear Improper extension cords are a major cause of fatalities. The fact that the equipment operates satisfactorily does not imply that the power point is earthed and that the installation is completely safe. For your safety, if in any doubt about the effective earthing of the power point, consult a qualified electrician. PAN-EUROPEAN UNIFIED VOLTAGE All units are suitable for use on supplies 220-240 V AC. |
CAUTION
- Leave a space around the unit for sufficient ventilation.
- Avoid installation in extremely hot or cold locations, or in an area that is exposed to direct sunlight or heating equipment.
- Keep the unit free from moisture, water, and dust.
- Do not let foreign objects in the unit.
- The ventilation should not be impeded by covering the ventilation openings with items, such as newspapers, table-cloths, curtains, etc.
- No naked flame sources, such as lighted candles, should be placed on the unit.
- Please be care the environmental aspects of battery disposal.
The unit shall not be exposed to dripping or splashing for use. - No objects filled with liquids, such as vases, shall be placed on the unit.
- Do not let insecticides, benzene, and thinner come in contact with the set.
- Never disassemble or modify the unit in any way.
Notes on the AC power cord and the wall outlet.
- The unit is not disconnected from the AC power source(mains) as long as it is connected to the wall outlet, even if the unit has been turned off.
To completely disconnect this product from the mains, disconnect the plug from the wall socket outlet. - When setting up this product, make sure that the AC outlet you are using is easily accessible.
- Disconnect the plug from the wall outlet when not using the unit for long periods of time.

Information for Users on Collection and Disposal of Old Equipment and used Batteries
These symbols on the products, packaging, and/or accompanying documents mean that used electrical and electronic products and batteries should not be mixed with general household waste. For proper treatment, recovery and recycling of old products and used batteries, please take them to applicable collection points, in accordance with your national legislation.
Pb
By disposing of these products and batteries correctly, you will help to save valuable resources and prevent any potential negative effects on human health and the environment which could otherwise arise from inappropriate waste handling.
For more information about collection and recycling of old products and batteries, please contact your local municipality, your waste disposal service or the point of sale where you purchased the items.
[Information on Disposal in other Countries outside the European Union]
These symbols are only valid in the European Union. If you wish to discard these items, please contact your local authorities or dealer and ask for the correct method of disposal.
Note for the battery symbol (bottom two symbol examples):
The sign Pb below the symbol for batteries indicates that this batteries contains lead.
PRECAUTIONS
■ Moisture condensation
Moisture may form on the lens in the following conditions.
- Immediately after a heater has been turned on.
In a steamy or very humid room.
- When this unit is moved from a cold place to a warm one.
If moisture forms inside this unit, it may not operate properly.
In this case, turn on the power and wait about one hour for the moisture to evaporate.
If there is noise interference on the TV while a broadcast is being received.
Depending on the reception condition of the TV, interference may appear on the TV screen while you are watching a TV broadcast and this unit is left on. This is not a malfunction of this unit or the TV. To watch a TV broadcast, turn off this unit.
Do not transport this unit with discs left in it.
■Do not place on the component such as amplifier or receiver that generates heat.
If so, the temperature inside this unit rises and malfunction may occur.
CONTENTS
Introduction
- READ THIS BEFORE OPERATING YOUR UNIT 1 2
Rear Panel Connections 5
Front Panel & Remote Controls 1 6
- REMOTE CONTROL OPERATION RANGE 1 9
- LOADING BATTERIES 9
Preliminary Knowledge About Discs & Files
- PLAYABLE DISCS 10
USB MEMORY DEVICES 10 - PLAYABLE AUDIO FILE FORMATS I 10
CARE AND HANDLING OF DISCS 10
Operations
- PLAYING TRACKS/FILES | 11
- PLAYING IN RANDOM ORDER 13
REPEAT PLAY 13 - PLAYING THE FIRST 10 SECONDS OF EACH TRACK/FILE I 14
- PLAYING IN DESIRED ORDER 14
SELECTING A TIME DISPLAY (Audio CD only) 16
ADJUSTING THE BRIGHTNESS OF THE FLUORESCENT DISPLAY 16
LISTENING WITH HEADPHONES 16
Troubleshooting Guide 17
Specifications 18
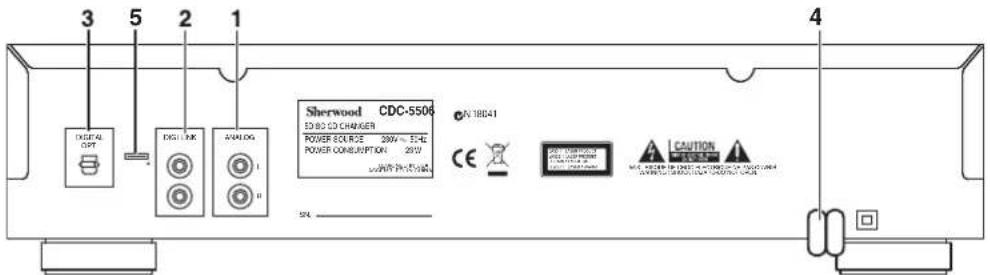
Rear Panel Connections
- Do not plug the AC input cord into the AC outlet when making connections.
- Be sure to connect the white plugs to the L(Left) jacks and the red plugs to the R (Right) jacks when making connections.
Refer to the connecting diagram in the operating instructions of your amplifier/receiver
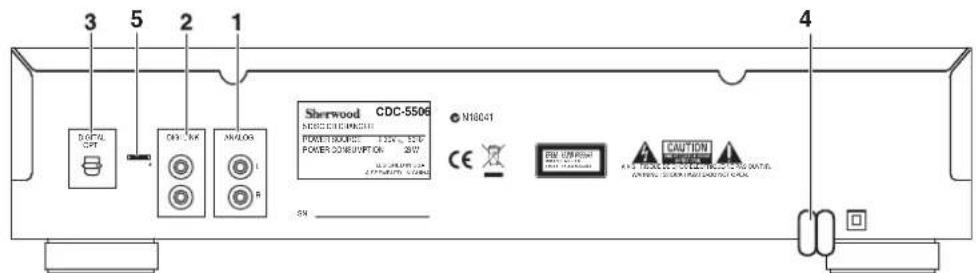
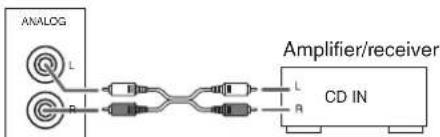
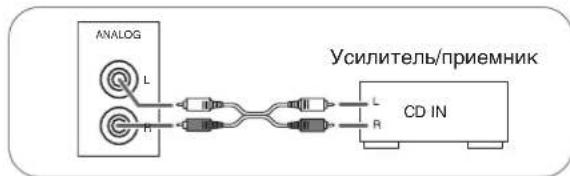
1. CONNECTING ANALOG AUDIO OUTS
- Connect the ANALOG L and R jacks to the CD IN jacks of your amplifier/receiver.
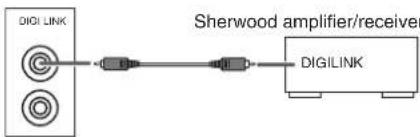
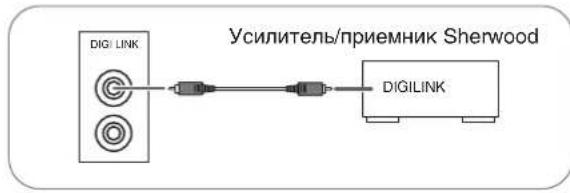
2. CONNECTING DIGILINK
- Connect this jack to the DIGILINK jack of Sherwood system amplifier/receiver to control this unit remotely by DIGILINK II or III system. (For details, refer to the operating instructions of Sherwood amplifier/receiver.)
■Note: - The DIGILINK operation may not work on some Sherwood components.
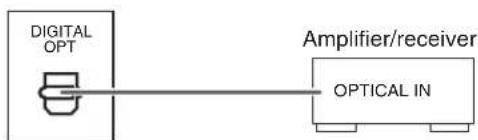
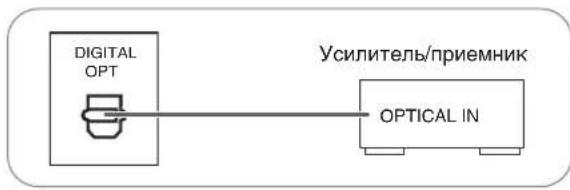
3. CONNECTING OPTICAL DIGITAL OUT
- Connect this jack to the OPTICAL DIGITAL IN jack of your amplifier/receiver to enjoy digital sound.
Notes: - It is not recommended to record digital audio signals with digital audio connection between this unit and MD or CD recorder, etc.. When recording the sounds played on this unit, record them through the ANALOG AUDIO OUT jacks.
- Some of the commercially available optical fiber cords cannot be used for the equipment. If there is an optical fiber cord which cannot be connected to your equipment, consult your dealer or nearest service organization.
4. AC INPUT CORD
- Plug the cord into a wall AC outlet.
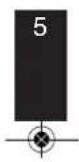
5. TERMINAL FOR UPGRADE
- This terminal may be used in the future to update the operating software, etc.
■Note: - Programming for upgrade requires specialized programming knowledge and for that reason we recommend that it only be done by qualified installers.
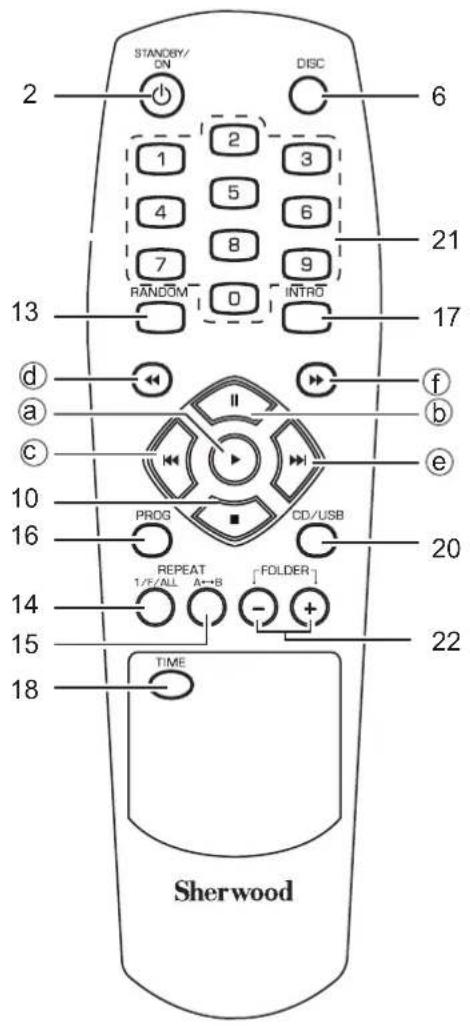
Front Panel & Remote Controls
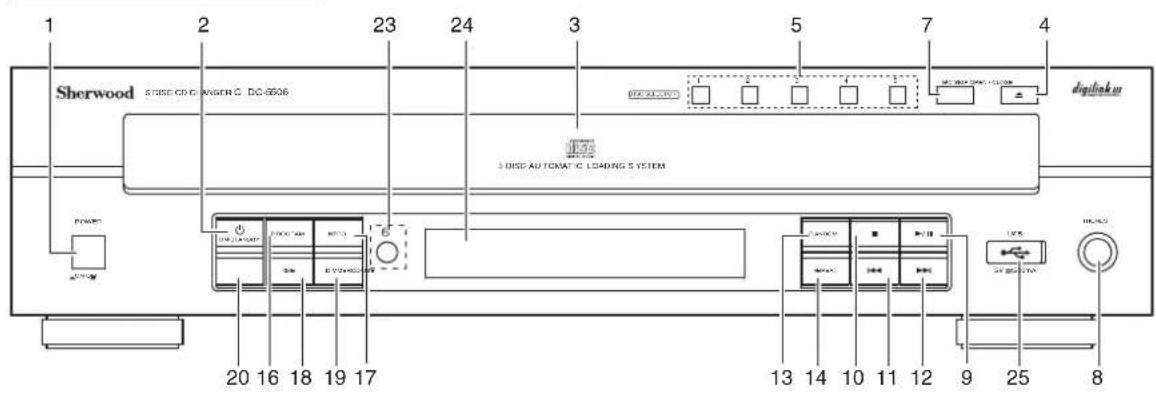
Front panel controls
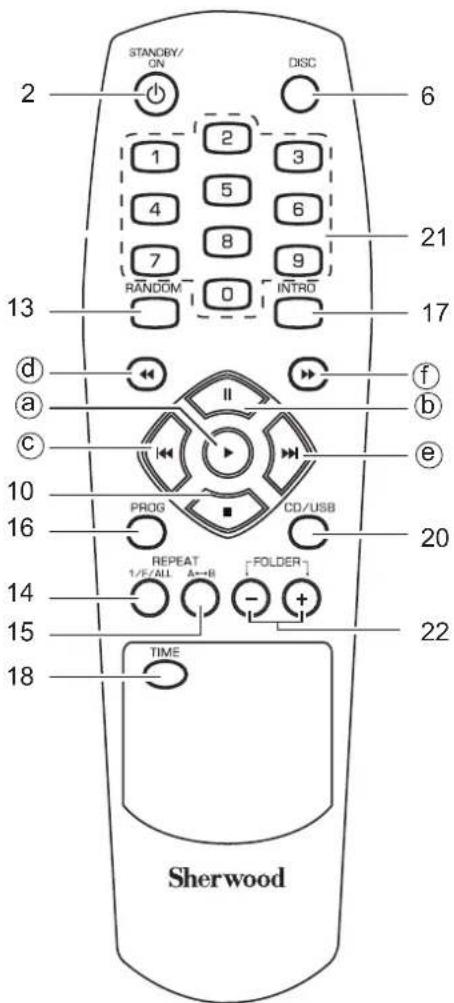
Remote controls
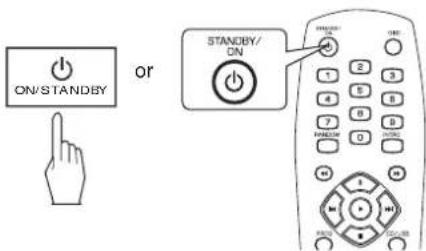
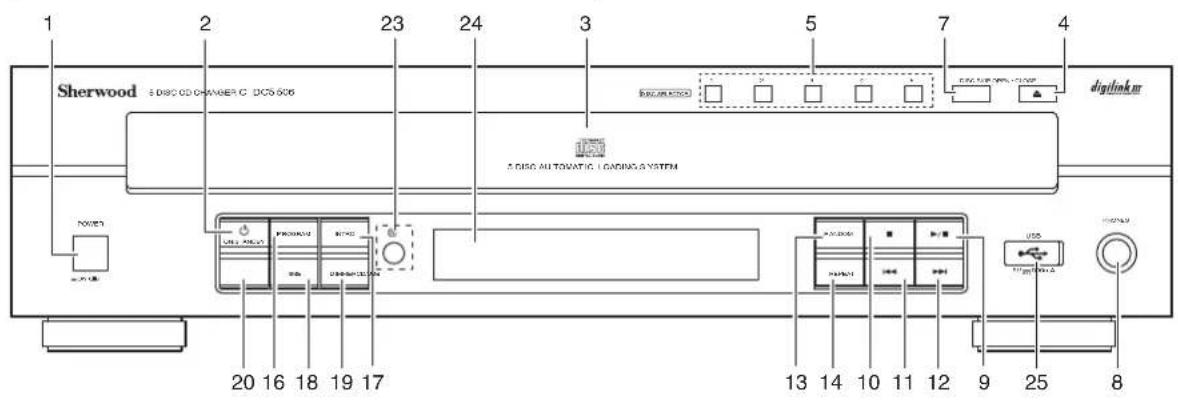
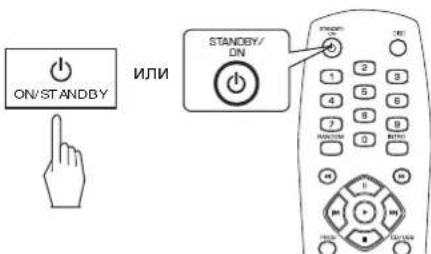
1. POWER SWITCH
Push this switch to enter the standby mode. To switch the power off, push this switch again.
2. POWER ON/STANDBY button
In the standby mode, press this button to turn the power on and to enter the operating mode.
In the operating mode, press this button again to turn the power off and to enter the standby mode.
3. DISC TRAY
Load a disc on the disc tray.
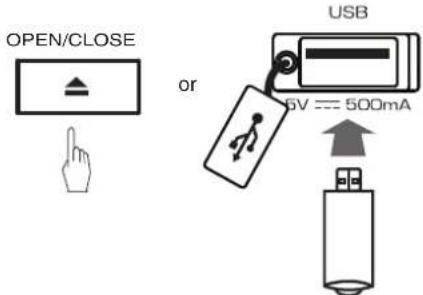
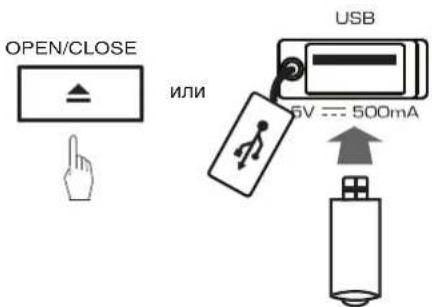
4. OPEN/CLOSE (▲) BUTTON
Press this button to open or close the disc tray.
5.DISC SELECTOR BUTTONS
Use these buttons to select the disc to be played.
6.DISC BUTTON
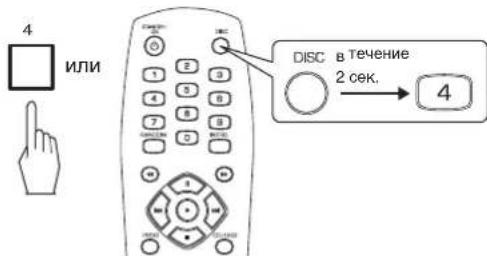
When selecting a disc with this button, press this first and then the desired disc number(1~5) on the numeric buttons within 2 seconds.
7.DISCKIPBUTTON
For loading or unloading discs, press this button to rotate clockwise to the next disc position.
8. HEADPHONE JACK
Stereo headphones can be plugged into this jack for private listening.
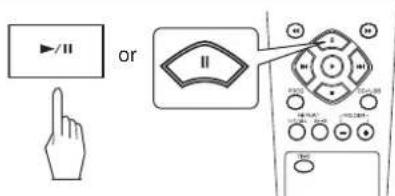
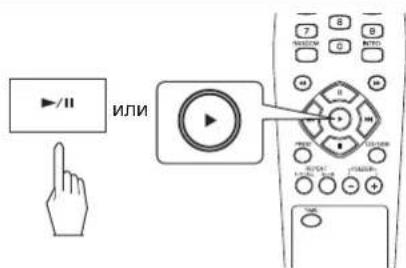
9. PLAY/PAUSE (▶/II) BUTTON
Press this button to start play in the stop or pause mode.
密 Press this button to interrupt play temporarily.
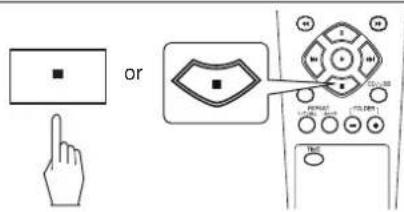
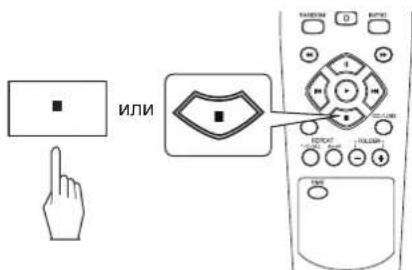
10. STOP (■) button
Press this button to stop play or clear the programmed tracks/files.
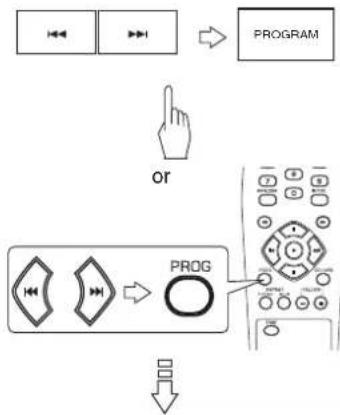
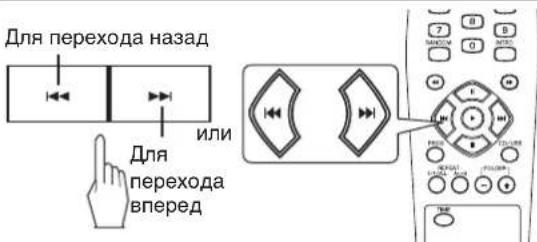
11. BACKWARD SKIP/SEARCH(4) BUTTON
Press this button to replay from the beginning of the current track/file or return to a previous track/file.
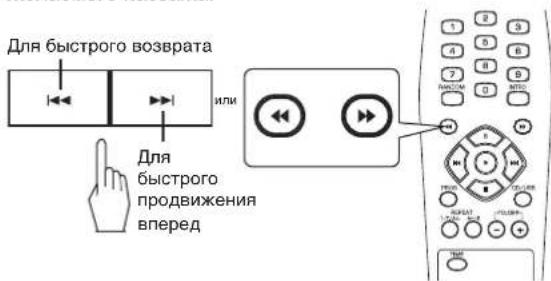
Press and hold down this button to search for a specific passage in fast backward.
12. FORWARD SKIP/SEARCH(▶/▶) BUTTON
Press this button to play from the beginning of a next track/file.
Press and hold down this button to search for a specific passage in fast forward.
13. RANDOM PLAY BUTTON
Press this button to play tracks/files in random order.
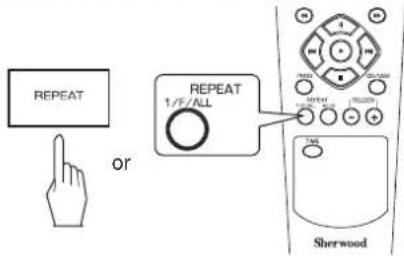
14. REPEAT (1/F/ALL) BUTTON
Press this button to play a track/file, a folder, or all tracks/files repeatedly.
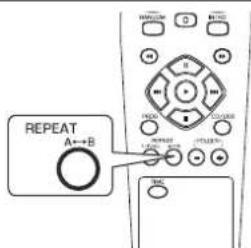
15. REPEAT A→B BUTTON
Press this button to play a specific passage repeatedly.
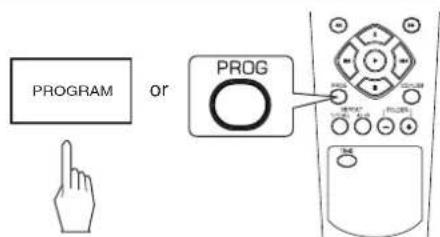
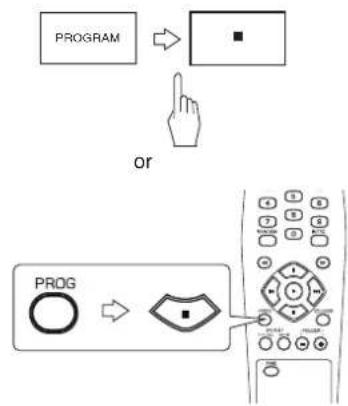
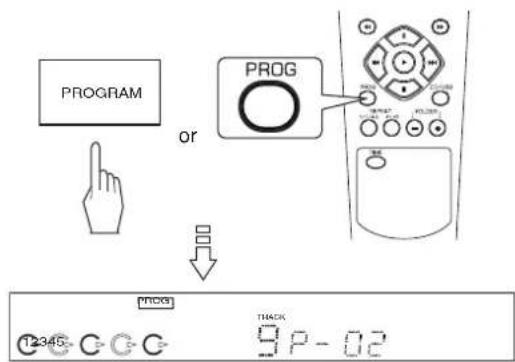
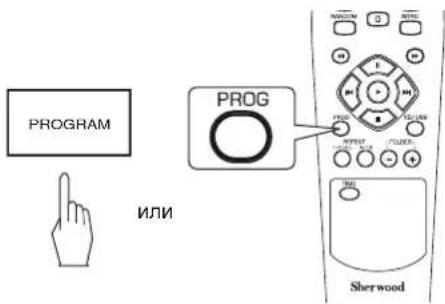
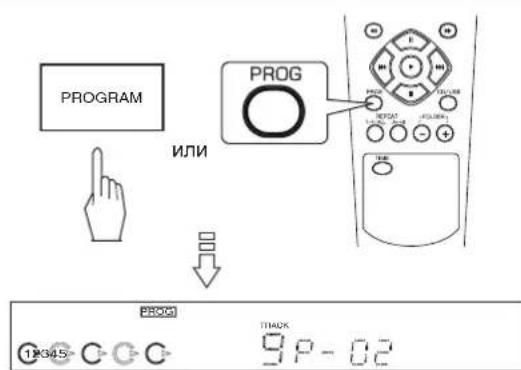
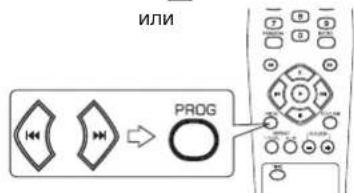
16.PROGRAM BUTTON
Press this button to program your favorite tracks/files or to review the programmed tracks/files.
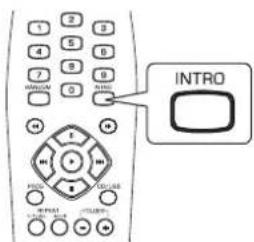
17. INTROSCAN BUTTON
Press this button to play the first 10 seconds of each track/file.
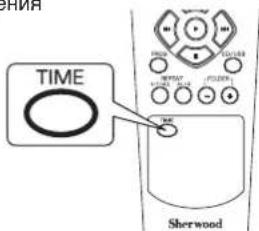
18. TIME BUTTON
Press this button to display the different time information on the Audio CD.
19. DIMMER BUTTON
Press this button to select the brightness of the fluorescent display as desired.
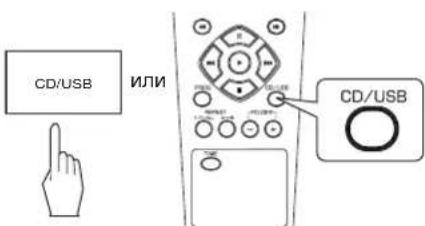
20. CD/USB SELECTOR BUTTON
Press this button to select the disc or the USB memory device as playback source.
21. NUMERIC(0~9) BUTTONS
Press the corresponding buttons to select a track/file for play or programming.
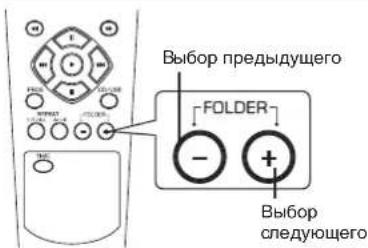
22. FOLDER UP/DOWN (+/-) BUTTONS
Press these buttons to select the desired folder.
23. REMOTE SENSOR
This receives the signals from the remote control unit.
24. FLUORESCENT DISPLAY
For details, see next page.
25. USB CONNECTOR
For details, see next page.
■ DIGILINK SYSTEM REMOTE CONTROL
This unit can be remotely controlled with Sherwood DIGILINK III amplifier or receiver.
- For available functions, refer to the compatible unit's operating instructions.
- To listen to a CD by DIGILINK system, first make DIGILINK connection between this unit and the Sherwood compatible amplifier or receiver.
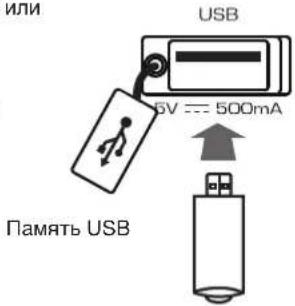
USB CONNECTOR
- An USB memory device can be connected to th USB connector to listen to MP3 or WMA files stored on it through this unit.
Note:
- After USB playback, remove the USB memory device in the stop mode or in the standby mode.
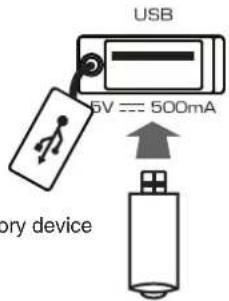
USB memory device
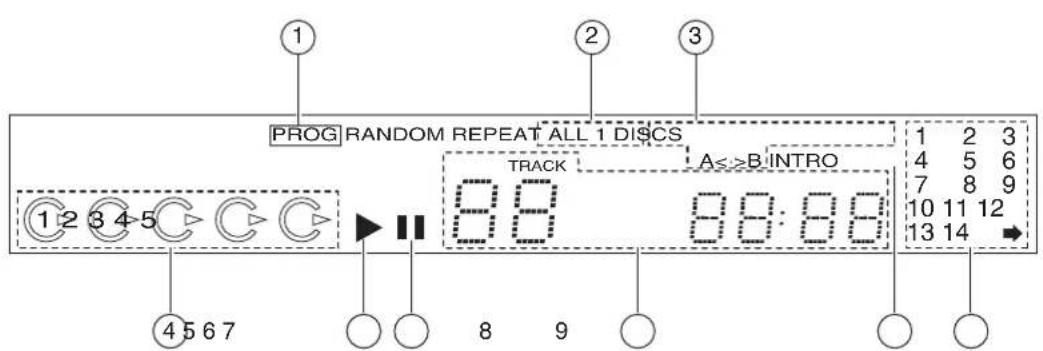
FLUORESCENT DISPLAY

1.PROGRAMindicator
-
RANDOM indicator
-
REPEAT display
-
Disc tray number display
-
1~5:Disc tray Numbers
Light(s) up when disc(s) is(are) loaded. -
Lights up to show the disc being played currently.
-
PLAY indicator
- PAUSE indicator
- Track/file number, playing time, operating information, etc.
- INTROSCAN indicator
- MUSIC CALENDAR display
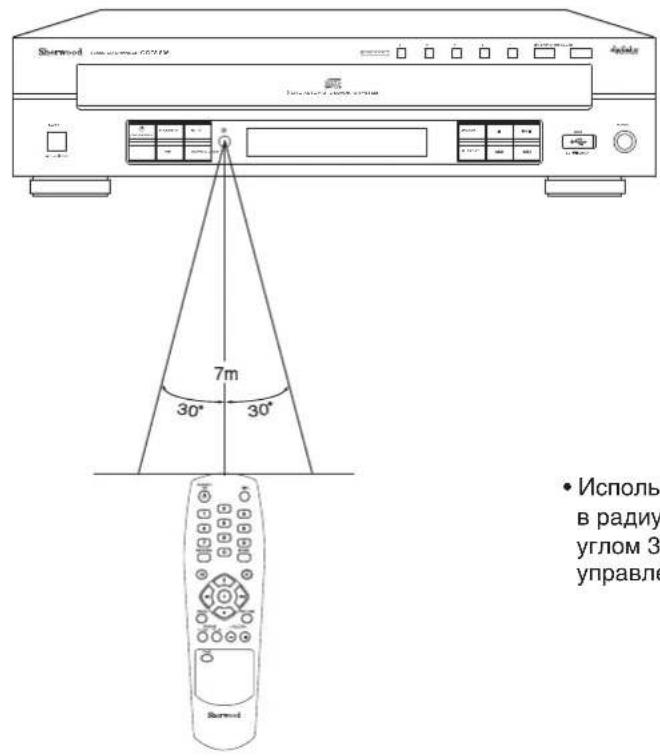
- Use the remote control unit within a range of about 7 meters (23 feet) and angles of up to 30 degrees aiming at the remote sensor.
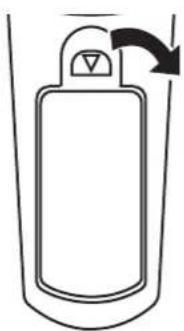
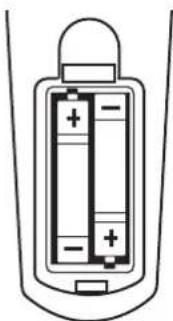
LOADING BATTERIES
- Remove the cover.
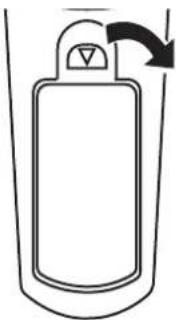
- Load two batteries ("AAA" size, 2 × 1.5V ) matching the polarity.
- Remove the batteries when they are not used for a long time.
- Do not use the rechargeable batteries (Ni-Cd type).
Preliminary Knowledge About Discs & Files
PLAYABLE DISCS
This unit supports the following discs.
| Disc Logo | Format or file type | |
| Audio CD | COMPACT DISC DIGITAL AUDIO | PCM |
| CD-R | COMPACT DISC DIGITAL AUDIO COMPAETED | Audio CD, MP3, WMA |
| CD-RW | COMPACT DISC DIGITAL AUDIO ReWritable | Audio CD, MP3, WMA |
- This unit supports CD-R and CD-RW discs recorded in Audio CD(CD-DA) format, MP3 or WMA format.
Only CD-R and CD-RW discs recorded with ISO9660 format can be played back. - This unit supports multi-session discs. Some multi-session discs may take a long time to load and some may not be loaded at all.
Unplayable discs
- Since this unit cannot support disc types, formats and file types not listed above, do not play such discs.
- Some CD-R and CD-RW discs cannot be played due to incomplete disc finalization, recording quality or physical condition of the disc, characteristics of recording device or authoring software, etc.
See the operating instructions supplied with your recording device for more information.
Some Audio CDs use copy protection that doesn't conform to the official CD standard. Since these are nonstandard discs, this unit cannot play them properly. - When an Audio CD recorded in DTS-ES or Dolby Digital EX is played, noise may be heard.
USB MEMORY DEVICES
- An USB memory device can be connected to the USB connector on the front panel to play MP3 or WMA files stored on it.
- Only USB memory devices conforming to mass storage class and MTP(Media Transfer Protocol) standards can be played on this unit.
- Thin unit supports FAT16 or FAT32 file format system for USB memory divorce.
PLAYABLE AUDIO FILE FORMATS
MP3(MPEG-1 Audio Layer-3)
Sampling frequency : 32, 44.1, 48 kHz
- Bit rate: 32 ~ 320 kbps
- Extension:.mp3. MP3
- Fixed bit-rate files are recommended. Variable bit-rate (VBR) fiels are playable, but playing time may be displayed incorrectly.
- ID3 Tag is not available.
MPEG Layer-3 audio coding technology licensed from Fraunhofer IIS and Thomson.
WMA(Windows Media Audio)
Sampling frequency : 32, 44.1, 48 kHz
Bit rate: 32 ~ 320 kbps
- Extension : .wma , .WMA
WMA Tag is not available.
- Windows Media and the Windows logo are trademarks or registered trademarks of Microsoft Corporation in the United States and/or other countries.
Notes:
- Folders can be up to ten levels deep.
- For some files, it may not be possible to use certain functions during playback.
- Files protected by DRM(Digital Rights Management) cannot be played.
- When the data of file and folder names is larger than the unit's memory capacity, some files, etc. cannot be recognized and played.
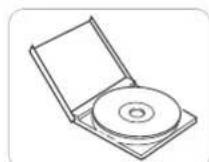
CARE AND HANDLING OF DISCS

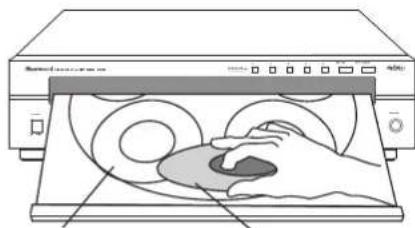
- In handling a disc, hold it carefully with edges.

- Do not stick paper or write anything on the printed surface.
- Finger marks and dust on the recorded surface should be carefully wiped off with a soft cloth. Wipe straight from the inside to the outside of the disc.
Always keep the discs in their cases after use to protect them from dust and scratches.
- Do not use a cracked, deformed, or repaired disc. These discs are easily broken and may cause serious personal injury and apparatus malfunction.

Notes:
- Do not expose discs to direct sunlight, high humidity or high temperature for a long time.
- When loading or unloading a disc in the disc tray, always place it with the printed side up.
Operations
PLAYING TRACKS/FILES
Before operation
- Push the POWER switch.


- Then this switch is kept depressed, it enters the standby mode.
- To switch the power off, push this switch again.
- Then the power is cut off.
Standby mode
- In the standby mode, this unit is not disconnected from the AC mains and a small amount of current is retained to support the operation readiness.
Auto Power Save
-
The auto power save is a function that automatically turns the power off to enter the standby mode. When it is in the stop mode, in the pause mode, etc. for more than 30 minutes, the auto power save will function.
-
In the standby mode, turn the power on.
Each time this button is pressed, this unit is turned on to enter the operating mode or off to enter the standby mode.
- Select the disc or the USB memory device as a playback source.
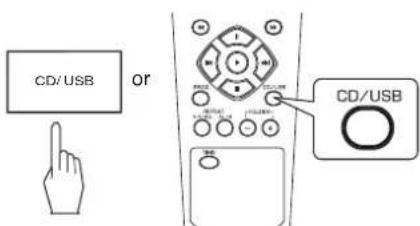
Each time this button is pressed, the playback source changes as follows: "Cd" "USb"
Note:
Depending on the selected playback source, the DISC SELECTOR buttons or the FOLDER UP/DOWN (+/-) buttons, etc. will not function.
- Depending on the selected playback source, load the disc(s) or connect the USB memory device.
Example : Audio CD

Music calendar
Total tracks Total playing time
Example: Music files (923 files and 15 folders)

- When the number of files is more than 99 (i.e. a three-digit number), the third-digit number is displayed on the music calendar.
indicator lights up on the music calendar when the number of tracks is more than 14. - For loading discs on other trays each, press the DISC SKIP button.
- 8 cm (3 inch) discs can be loaded on the inside circle of the tray, too.
- It may take a long time to read a disc or an USB memory device that contains many files and folders, etc.
■Note :
- Do not open or close the tray by force.
Doing so may damage it.
4. Start play.
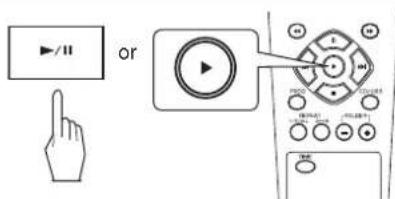
indicator lights up.
- The unit plays from the first track/file (on the current disc to the last on the 5th disc.
5. To interrupt play temporarily.
indicator lights up.
To resume play, press the PLAY(“▶/■” or “▶”) button.
6. To stop play.
Changing discs during play
1. Open the disc tray.

OPEN/CLOSE
2. Change the desired discs.
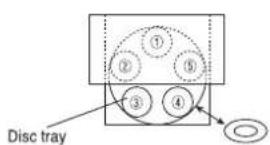
During playing the disc ①, the disc ③ and ④ can be changed.
After changing the discs, press the OPEN/CLOSE( )utto to close the disc tray.
- When changing the disc ② or ⑤ , press the DISC SKIP button and rotate the disc tray.
Selecting a disc
- Press the corresponding button to start play from the desired disc.
Example : When selecting the disc 4
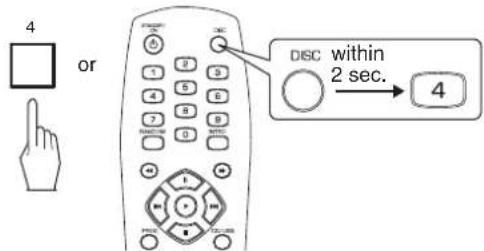
The first track/file of the selected disc will be played.
Selecting a track/file during play
Each time the button is pressed, a track/file is skipped.
- When the BACKWARD SKIP() button is pressed once midway through a track/file, play returns to the beginning of that. When it is pressed again, a track/file is skipped.
- When using the NUMERIC buttons on the remote control.
Example:
For "3": 3
For "15": 1 within 2 sec. 5
For "123": 1 within 2 sec. 2 within 2 sec. 3
To advance or reverse fast during play
- Press and hold down the button until the desired passage is reached.
Selecting a folder during play
Each time the button is pressed, the previous or the next folder is selected and the first file in that folder is automatically played.
PLAYING IN RANDOM ORDER
"RANDOM" indicator lights up.
Each time the button is pressed, the random mode changes as follows:
In case of CD
1 DISC ALL DISC OFF
In case of USB
1 DISC OFF
The unit automatically selects and plays tracks in random order.
- Press this button again to cancel the random play.
Notes:
The random play skip the track/folder which has 100 tracks/files more.
- When the NUMERIC buttons are pressed during random play or program play, the random play or the program play is canceled. (However, the programmed contents are not cleared. To recall the programmed contents, press the PROGRAM button in the stop mode.)
REPEAT PLAY
- You can play a track/file, a folder, all tracks/files or a specific passage repeatedly.
Repeating a track/file, a folder, all tracks/files
- During play of the desired track/file or folder,
Each time this button is pressed, the repeat mode changes as follows.
In case of Audio CD
ONE("REPEAT 1") : Track repeat ↓ dISC("REPEAT 1DISC") : Disc repeat ↓ ALL("REPEAT ALL DISCS") : All disc repeat ↓ OFF:Repeat mode off
In case of CD with files
ONE("REPEAT 1") : File repeat
↓
FOL("REPEAT") : Folder repeat
↓
DISC("REPEAT 1 DISC") : Disc repeat
↓
ALL("REPEAT ALL DISC") : All disc repeat
↓
OFF : Repeat mode off
In case of USB
DISC("REPEAT 1DISC") : All file repeat
↓
ONE("REPEAT 1") : File repeat
↓
FOL("REPEAT ") : Folder repeat
↓
OFF : Repeat mode off
Notes:
- During random play or introscan play, you can select the all track/file repeat mode only.
- During program play, the folder repeat mode cannot be selected.
Repeating a specific passage
- During play at the beginning of the desired passage, press the REPEAT A B button.
-
"REPEAT" and "A<>" indicators light up.
-
At the end of the desired passage, press the REPEAT A B button again.
-
Then "3" indicator lights up as well and the desired passage is played repeatedly.
- Press this button again to cancel the repeat A↔B play.
Notes :
- Repeat A B play works only within a track/file.
- During random play or introscan play, repeat A→B play will not work.
PLAYING THE FIRST 10 SECONDS OF EACH TRACK/FIL
Each time this button is pressed, the intro mode changes as follows:
In case of CD
1 DISC INTRO ALL DISC INTRO OFF
In case of USB
1 DISC OFF
The unit plays the first 10 seconds of each track/file.
- Press this button again to cancel the introscan play.
Notes:
During program play, introscan play will not work.
- During all disc introscan play, the unit plays only the first track on each disc for 10 seconds.
PLAYING IN DESIRED ORDER
- Up to 32 tracks/files can be programmed to be played in any desired order.
- In the stop mode, enter the program mode.
- Then "PROG" indicator flickers.
- Select the desired track/file and store it in the memory.
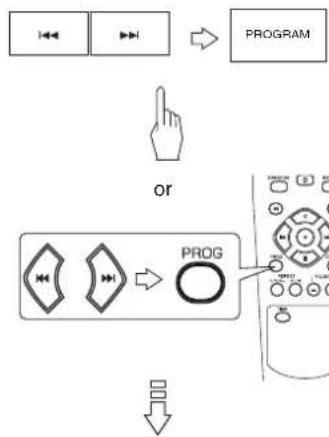
Example:
When selecting and storing track 4 on an Audio CD
- You can select a track/file with pressing the NUMERIC buttons.
Example :
For "3": 3
For "15": 1 within 2 sec. 5
For "123": 1 within 2 sec. 2 within 2 sec. 3
-
Then the selected track/file is stored automatically without pressing the PROGRAM button.
-
Repeat the above step 2 until the desired tracks /files are programmed.
-
Start program play.
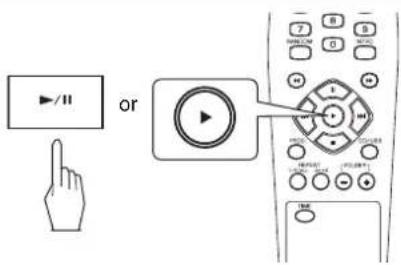
- Play starts in the programmed order.
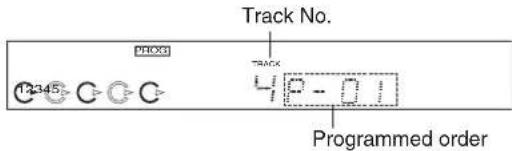
Checking the programmed tracks/files
Each time the PROGRAM button is pressed in the program mode, the programmed tracks/files are displayed in the programmed order.
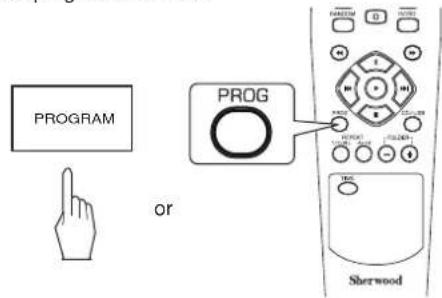
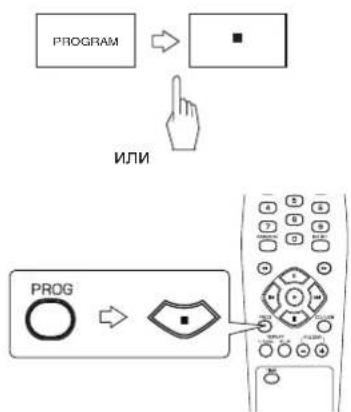
Clearing the programmed tracks/files
To clear on by one
Each time the STOP( ) button is pressed in the program mode, the programmed tracks/files are cleared one by one in the opposite order.

To clear all programmed tracks/files
- Press the STOP( ) button for more than 4 seconds in the program mode.
- Opening the disc tray or selecting the other playback source clears all programmed tracks/files, too.
To clear a specific track/file
Find the desired track/file and clear it in the program mode.
Rectifying any wrong programmed track/file
Example :
When track 5, 9 and 7 are programmed and you want to replace track 9 with track 10 on an Audio CD.
- Find track(/file) 9 in the program mode.
-
Then the programmed track(/file) is displayed for several seconds.
-
While displaying the track(/file) to be replaced with new one, select track(/file) 10 and store it in the memory.

- You can select a track(/file) with pressing the NUMERIC buttons.
Example: For "10": 1 within 2 sec. - When selecting a track with the NUMERIC buttons, the selected track is stored automatically without the PROGRAM button.
- When the track/file to be replaced disappears, perform the above step 1 again.
SELECTING A TIME DISPLAY (Audio CD only)
During play,
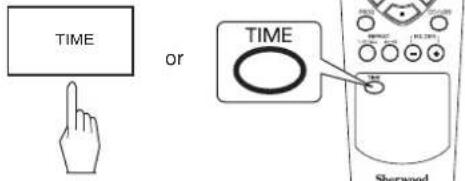
Each time this button is pressed, the time display changes as follows.

Elapsed time of the current track

Remaining time of the current track
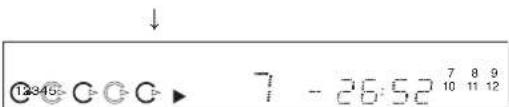
Remaining time of the disc
- During random play, etc., the time display may show "---".
ADJUSTING THE BRIGHTNESS OF THE FLUORESCENT DISPLAY
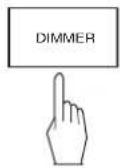
Each time this button is pressed, the brightness of the fluorescent display changes as follows.

- In the display OFF mode, pressing any buttons cancel the display OFF mode to display the operation status.
LISTENING WITH HEADPHONES
- For private listening, insert the headphones into the PHONES jack.
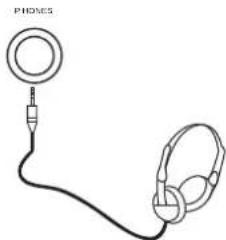
■Note :
- Be careful not to set the volume too high when using headphones.
Troubleshooting Guide
If a fault occurs, run through the table below before taking your unit for repair.
If the fault persists, attempt to solve it by switching the unit off and on again. If this fails to resolve the situation, consult your dealer. Under no circumstances should you attempt to repair the unit yourself. This could void the warranty.
| PROBLEM POSSIBLE CAUSE REMEDY | ||
| No power | ·The AC input cord is disconnected. ·Poor connection at AC wall outlet or the outlet is dead or off. | ·Connect the cord securely. ·Check the outlet using a lamp or another appliance. |
| No play | ·The disc is loaded upside down. ·Dirty disc. ·Defective or deeply scratched disc. ·The CD-R/CD-RW disc is nonstandard. ·Music files in non-compatible format are recorded. | ·Reload the disc with the printed side up. ·Clean the disc. ·Load another disc. ·See "Unplayable discs" on page 10. ·Only music files in MP3 and WMA formats can be played. |
| No sound | ·Incorrect connections. ·Incorrect operation of the amplifier/receiver. ·The "II" indicator lights up. | ·Make connections correctly. ·Operate the amplifier/receiver correctly. ·Press the "▶/■" button to cancel the pause mode. |
| Poor or distorted sound | ·The unit is connected to the PHONO input jacks of the amplifier/receiver. ·Poor connections. | ·Make connections correctly. ·Check the connections and connect all cords securely. |
| Sound skips | ·Defective or deeply scratched disc. ·The unit is placed on a surface that is subject to vibration or physical shock. | ·Play another disc. ·Place this unit on a stable surface. |
| Programming is not performed | ·The disc is dirty or badly scratched. ·The programming procedure is not correct. ·The number of the programmed tracks/files is 32. | ·Try again with a scratch-free disc. ·Try again. ·Check the number of the programmed tracks/files. |
| It takes a long time to read a disc or an USB memory device. | ·It may take a longer time to read a disc or an USB memory device that contains many files and folders, etc. | B·This is not mulffunction. |
Specifications
TYPICAL AUDIO PERFORMANCES
Number of channels 1 2
Frequency response, 20~20,000 Hz ±0.8 dB
- Signal to noise ratio, A Wtd. 1 94 dB
Dynamic Range 86 dB
Total harmonic distortion, 1 kHz 0.009 %
- Wow and flutter | Quartz crystal precision
Audio output level 2 V RMS
Digital output, optical, wavelength 660 nm -20~15 dBm
OPTICAL READOUT SYSTEM
Laser Semiconductor laser
Wavelength 760-800 nm
Numerical aperture 0.45
■ SIGNAL FORMAT
Sampling Frequency 44.1 kHz
D/A Conversion Multibit (Sigma-delta conversion)
- Oversampling 8 times
GENERAL
Power supply 230 V ~ 50 Hz
Power consumption 23W
Dimensions (WxHxD, including protruding parts) 440x112x397 mm (17-5/16x4-7/16x15-4/6 inches)
Weight (Net) 5.6 kg (12.4 lbs)
Note: Design and specifications are subject to change without notice for improvements.
MEMO
Einleitung
BITTE LESEN SIE DIESE HINWEISE VOR INBETRIEBNAHME DES GERÄTS


VORSICH: ZUR VERMEIDUNG VON STROMSCHLAG
GERATEGEAUSE NICTT OFFNEN. ES BEFINDEN
SICH KEINE VOM VERBRAUCHER WARTBAREN
TEILE IM INNERN DES GERATIS. REPARATUR UND
WARTUNG NUR DURING FACHPERSONAL.

MP3(MPEG-1 Audio Layer-3)
MP3(MPEG-1 audio Layer-3)
PRODUIT LASER DE CLASSE 1
ATTENTION
MP3(MPEG-1 Audio Layer-3)
PPOUTNTE DO INCIOJIb3OBAHINY UCTPOICTBA
| BAHIMAHNE: CHINJEXHIA ONACHOCTN NOPAXEHIA JIIEKTPMNECKM TOKOM HE OTKPbBAITE KpbIUKY (ПИМ 3АДНЮ ПАЕЛБ) BHUTR NHT CACTEIN ОБСЛХКИВЕМБIX NOTPEBITEJIEM ДИЕ СЕРВИСA ОБPATITTEСК B KBALIMILIPROBAHOMY CIELIMAIINCTY | ФТOT CBMBOI NepeDnyPexJaet NOTpe6BnteЯ O haIyHIM He I3OJIIMPOBaHHbIX KOMNHOENTOB C OIaCHbIM HAprrJExHcHbM B Kopnyce npOdyKTa, MOruyuXn PnInBeCTN K NopaxEHIO 3IeKTPnueCKM TOKOM. |
| ФТOT CBMBOI NepeDna3HaUeH DnIe NpeDnyPexJaHn NopTeB6tTEnI O hAlHyHm BaxhBIX INCTpyKlM NO ЗкрлуаTuZHи TExHnueckOMy OcbLsyKbBaHIO (peMoHTy) В руковodctBax, ВklNoeHbIX B KomPnlKeT yctPoIcTBa. |
IPEyIPEXJHEHNE:HTObI YMEHbUHTb PNCK IOXAPA NIN IOPAXEHN3JIKETPNUECKM TOKOM, HE IIOBEBPRAITE DAHHOE YCTPOICTBO BO3DEICTBNIO JOXJN NIN BIArN.
MEPbI INPEIOCTOPOXHOCTN
KoHdeHcaunBlau
HaHH3ax MoXeT 6pa30BaTbC Bnra npn CneDyUOx yCNOBnX:
Cpa3y Xe nocne BkIIOueHnHaIpeBaTeTn
B 3anaepHHOM nnn OueHb BnaXHOM nomeeHn.
-Припаперемшенисторостаихологого метаВтеллoe.
06pa3oBAHne Bnarn BHytpn ycTpoNCTBa MoKET npNBecTN K erO HENpaBnIbHOMy cyHKUHOHPOBaHIO.
B 3TOM cnyuae BbIKIOHTe NITAHNE I NOJOKDITE PnIMEPHO YAC IINCnapeHn BnArN.
Ecn Ha TeIeBn3ope ecTb yMoBbl e nomEx npn npne me nepedaH.
B 3aBnCIMOCtN OT COCToRHHI npHema TeLEBn3Opa npn IpocMTope nepeDaH Na 3KpaHe MOrY TB Bo3HKnHyTb NOMExn, ecnn yctpoiCTBO OCTaBHeO BKIOUeHNbIM. 3TO He ABnETCa HEnCnpaBHOCTbO yCTpOcTBA INI TbeuBn3Opa. PnipocMTope TeIepeDau BbIKIOuaTe yCTpoiCTBO.
He nepebo3nte yctpoiCTBO C oCTaBnEHbIMn BHytpn DnCKamN.
He ctabte yctpoiCTBO Ha KOMNOHeTbI KaK ycJIInTeJIb IIN npHemHKn, KOtOpblre HepuYOT TEnIO.
B 3TOM cnyuae noBbIuaeTcR TemnepaTypa BHyTpN yCTponCTBa N MOryT BO3HnKHyTB HEnCnpaBHOCTN.
CODEPKAHNE
BBeHeHne
-ПОЧТЕ ДО ИСПОЛБ3ОВАНИ YСТРОДТBA I 2
Pa3bembl 3aHnei nanei I 5
IpeednnaHeIb nIyIbT dNCTaHcNoHHoro ynpabHeHn I 6
PAINUCENCTBNAINCTAHUHOYNPABJEHNI 9
- YCTAHOBKA 3JIEMEHTOB IITAHINI 9
PpeBapnteHna HOpmaun O duckax n faJnax
·BOCPPOIN3BODIMbIE DnCKN1 10
- PAMRTb USB I 10
BOCIPON3BOIDMBIEΦOPMATbI AYINO FAJIOB I 10
- YXOD IN OBPAAEHNCE DNCKAMNI 10
Функциуупраьлени.
BOCPON3BEDEHNE TPEKOB/FAJIOB I 11
·BOCIPON3BEDEHNE B CJUYAHOM IOPRAI 13
HEOHNOKPATHOEBOCPOIN3BEDEHNEI 13
BOCPON3BEENHE NEPBbIX 10 CEKYH KAKDOTO TPEKA/FAIJI A I 14
BOCPON3BEDEHNE B XEJIaEMOM IOPAKeI 14
BbIbOP INHINKAUIN BPEMEHN (ToJIko ayno CD) I 16
HACTPOIKA APKOCTN ΦLYOPECUENTHO DINCNIIER I 16
-ПОСЛУSHIBAHNE C HAYUHNIKAMN1 16
PykoBoCTBO no ycTaPHeHnHO HeuCnpaBHOteI 17
Texnueckne xapaKtepncnkn 18
Pa3beMbI 3aHHei NaHeJIi
-He BKJIOUaTe UHyp nHTaHnpeMeHHORo TOKA B PO3eTK npB BbINOnHeHm CoEiHNHeHn.
- 063aTeNbHO NOdknIOUHTe 6bIy wTeKeP K pa3bemy L (neBOMy) n KpaChbI wTeKeP K pa3bemy R (npabOMy).
- 06paTntecb K cXeMe CoeHHeHn pykoBoCTBy No 3KcIIpyaTuIN BaIero yCInTeJI/npneMHnka.
1. NOДКЛIOЧЕHNE AHAJIOrOBbIx AYДNO BbIXOДOB
CBAKHTe pa3bEmbl ANALOG L n R cpa3bemamn CD IN ycHNTeI/npHmNka.
2. NOKJIIOUeyE HNE DIGILINK
CBAKHTe3OT pa3bem c pa3bEMOM DIGILINK ycHNTeJI/npnEMHnKA CnCTEmb Sherwood nIaCTAHUONHOYnpaBHeHn 3TNM yCTpOJcTBOM CNCTeMaN DIGILINK II nnI III. (JaDOnoJIHnTeJIbHoINHΦopMaUN o6paTHeCb K pyKOBoIDCTBy no 3KcPnyatauN ycHNTeJI/npnEMHnKa Sherwood.)
PnmeuHHe:
ΦyHKUH DIGILINK MORYT He pa60TaB Ha HEKOTOpbIX KOMHOHeHTax Sherwood.
3. NOДКЛюЧЕНЕ ONТИССКOrO LИФРОВOrO BblXODA
CBAKNTe3OTpa3bemcpa3bEMOMOPTICALDIGITALIN ycnnten/npneMHkaDnHaacnaXdeHnUcpobbIM3BykOM.
PpmeaHn:
He peKoMeHnyetca 3aNcB cHpOboBix aydno ciHrHaNoepe3 ayDIO CBa3b MExJy 3TmU yCTpoiCTBOM u yCTPOICTBaMn 3aNcMD nIu CD n dp. Dnra 3aNcN 3ByKOB, BOCPOn3BOIDMbIX Ha 3Tom yCTpoiCTBe, NOJIb3yITeCb pa3bemAmANALOG AUDIO OUT.
- HeKOTOpbIe I3 KOMMepueckn DoCTyHbIX ONTneckx HHypOB He MOrTy 6bItb NcNoB3ObaHbI Dnla DaHHoro O6OpyDoBaHnA. Ecnn ONTneckn UHyp He MoKet NoDKJIIOHTbcra K BaWemy O6OpyDoBaHnIO, 6paTntecb K NocTabuNky INN B 6nXaJMyo cepBnchHyO opraHn3aunIO.
4. BXODHOH HYP NHTAHNA NEPEMEHHOrO TOKAK
BkIIOHHTe shyp B po3eTky nepemehHoro Toka.
5. TEPMNHAДЯ OБHOBJEHNA
Moxete BOCNolb3OBaTbC H TTM TepMNHaHOM B 6yduem nI R OboHNn IporpamHoro ObceNeHHn T.
PpmeuHne:
- Pporpammbi dnn 6noBHeHH Tpe6yIOT CnEuaJIbHbIX 3HaHH NporpammpoBaHH. PO3TOMy MbI peKomeHdyem B 3TOM cnhyae o6paNTbc K KBaIIINPcnpoBaHHOMy CneuaIInCTy.
IpeednnaheJIb n nyIbT dNCTaHcNoHHoro ynpabJeHn
ФункиуnpaBlenHa nepeDne naneJn
DuctanHnoHoe ynpabHeHne
1.BbIKJIOyATEJIb NITAHNPOWER
HaKMnte 3Ty KHONky DnBxOa BpeKIMrTOOBHOCTN.
DnBbIKJIOHcHINr NITAHIN CHOBA HaKMnte 3Ty
KHONky.
2. Khonka POWER ON/STANDBY
BpeXmme roTOBHOCTn HaxmTe 3Ty KhoNky IBAKIOUeHn IBxOda B pa6oHn peXm. Bpa6oUem peXmme haxmTe 3Ty KhoNky IBAKIOUeHn IBxOda B peXm roTOBHOCTn.
3. JIOTOK MICKOB
YCTAHOBNTE DNCB JNOTOK.
4. KHONKA OPEN/CLOSE (△)
HaKMTe 3Ty KONKy dIa OTkpBITnN 3akpBITnN IOTKa DnCKOB.
5. KONK DISC SELECTOR
UcnoIb3yIte 3Tn KHOKN IaBbI6opa BOCpOn3BOIMORO DnCKa.
6. KONKA DISK
PnBbIbOpE nUcKa cHauana HaxMnte 3Ty KHOkny, a 3aTeM Jeknaembl HmOp E nCKa (1-5) Ha UncpOboBix KHOkKax B TeueHne 2 cekyHd.
7. KHONKA DISC SKIP
Ucnonb3yuteKhoNkydIa nepexoAOT Ondoro nCKpryomynoacobOCTpeKe.
8.PA3bEM HAYuHKNOB
Ctepeo HayuHnKmMoryT 6bTbNoDKIIOHeBk K3tOMy pa3bemy INHINBnDyalbHoro npocnyuBaHn.
9. KHONKA BOCNPOIN3BEHNE/NAY3A (▶/II)
HaKMMTe 3Tu KONKy dIra Hauana BocPOn3BeDEHnB Pexkme CTon nnn nay3bl.
HaKMMTe 3Ty KONkny DnBpeMeHHORnpekpaueHn Bocnpoun3BeDeHn.
10. KONKA (■) STOP
HaKMMTe 3Tu KHOKNy DnOCTaHOBKn BOCpOn3BeDeHnN yDaNHeHn3aPOrpaMMIpOBaHHbX TpeKOB/phiNoB.
11. KHONKA IEPEMOTKN HA3AD/IONCKA
(/)
Hakmte 3ty KONky dnn BOCpon3BedeHHa Hauana TeKyuero Tpeka/paai na uin BO3bpata K npdeIyemy Tpeky/pauiNy.
Hakmte udepknaTe 3Ty KhoNky npn noncke KOHKpeTHoro naccka npn 6bictpo npemOTke Ha3a.
12. KHONKA INPEMOTKINBNEPED/NONCKA
(→/→)
Hakmnte 3ty KhoNky DnBocpon3BeDenHaC hayana CneDyUoero Tpeka/paIa.
HaKMTe n ydepKnBaIte 3Ty KHOkny npn noncke KOHKpeTHOro naccaxa npn 6bICTpoN nepemOTke Ha3a.
13. KHONKA RANDOM
HaKMTe 3Ty KONky IJN BOCPON3BeDenH N TpeKOB/paIIOB BCnyAHOM NOPaIKe.
14. KHONKA REPEAT (1/F/ALL)
HaKMTe 3Ty KhoNky dIa HEOdHOKpaTHORO BocpOn3BeDeHnTpeKa/paaiNa, npKn nIN BCEx TpeKOB/paaiNoB.
15. KHONKA REPEAT A→B
Haxmte 3ty KhoNky dna HeoHOKpaTHORO Bocnpoun3BeDeHHa KOHKpeTHORo naccka.
16. KHONKA PROGRAM
HaxMMTe 3Tu KhoNky dIg nporpammmpoBaHHn IIO6MbIX TpeKOB/paIIOB INI pOcMOTpa 3anporpammmpoBaHHbIX TpeKOB/paIIOB.
17. KHONKA INTROSCAN
Haxmte 3Ty KhoNky IJNA BocnpounBedeHnepBbIX 10cekynd kakdo Tpeka/daJna.
18. KHONKA TIME
HaxMMTe 3Ty KhoNky IJNA NOKa3a pa3HOI BpeMeHHoI INHOpMaunn Ha Audio CD.
19. KHONKA DIMMER
Haxmte 3Ty KONky dIy BbIbopa JekaemOn IpKoCTn FnyopecueHTHO DnCnnner.
20. KHONKA BbIEOPA CD/USB
HaKMTe 3Ty KONky IaI BbIbopa NcKa INn NaMRTN USB KaK NCTOCHNA BOCPON3BeDeHIN.
21. ΚιηφΟΒβIE KλΑΝΙωι (0~9)
HaxMMTe COOTBeTCTByOuYIO KONKy, YTO6bI Bbl6paTb
paIN DnBOCnpOn3BeDeEHNA
nporpaMmPObaHH.
22. KHONKU FOLDER (+/-)
HaxmTe 3TN KHOKNI DnBb6opa XeJaemoi nAnKn.
23.ДИСТАЦИОНьI CEHCOP
PpHmMaet CnHaBbI OT nybTa DuctaHNOHHOr ynpabHeHH.
24.ФлЮPECUEHTbIДИСПЛЕI
ДяdononHntelbHOnMHΦopMaun,cm. cneDyUOuyO CTpaHnUy.
25.PA3bEM USB
Дпг ДОПОПНТЕьнOH INHФОмИ, CM. CLEdYIOUO CTpaHnIy.
CNCCTEMA INCTAHUHNOHHOrO
YIPABJIEHN DIGILINK
3TO yCTpoIcTB MOXHO ynpabIbIb IINCTaHIOHNO C ycNInTeI INI npIeMHnka Sherwood DIGILINK III.
-ДЯdoCTyHbIXФункиообразntecьКpyKOBoIDCTByno3KcnIyatauCOOTBeTCTBHyIOUeOyCTpoNCTBa.
-Дя npocnyuBaHn CD Ha cnCTeMe DIGILINK chauana ocyuaceTBnte CB3b DIGILINK mexdy 3TUM yCtpoiCTBOM u COBMecTUMbIM ycunnteIem nI npneMHNKOM Sherwood.
PA3bEM USB
- PAMTb USB MOXHO NOOKHIOHTb K pa3bemy USB dno npocnyuBaHHaPnOB MP3 nWMA oToro yctpoiCTBA.
Pnmueyane:
- Pocne Bocnpoun3BeDHeHc USB ydaIte naMaTb USB b peXmE cToI nnB peXmE roTOBHOCTn.
ΦIyOPECUEHTHbIДИCNJIeI
-1~5:HomepaNotKOBDnCKOB
C:CBeTOBaA INnKaun npu 3aRpy3Ke DnCKaOB
CBeToBAnHmDnKaunIpnHaayane npabNbHorO Bocnpoun3BeDeHn DaCKa
5.ИндikaTop PLAY (ПОСЛУДИВАНЕ)
6.ИнданkaTop PAUSE (ПАУЗА)
7.HomeTpkeKa/paJna,BpeMeHN BOCPpOu3BeJeHn,pyHKUHOHaJIbHaN HΦOpMaunI T.I.
8.ИндikaTop INTROSCAN
9. Noka3 MY3bIKAJbHOrO KAJIeHdAPR
PAINUC DEICTBNA INCTAHUHHOYNPABNEHNA
- IcnoJb3yIte npblT nctaHIOHOY npabHeHHB paDnCy7 MeTpOB (23 cyTOB) n C OTKIOHeHHem yrIOM 30 rpaDycob K ceHCOPY dNCTaHIOHOHOY npabHeHH.
YCTAHOBKA BATAPEI
1. CHIMITE Kpbilky
- YctaHOBnTe IBe 6aTapeu (Tuna "AAA", 2 x 1.5 B), B COOTBEcTbMn C NOJIrpHOCTbIO
- YdaIte 6aTapei, ecn dOnro He nOlb3yeTecb VCTPOINCTBOM.
He noIb3yIteCb aKKymyIaTOpHbIMn 6aTapeMn (Tna Ni-Cd).
IpeBapntbHaHnOpMaunO dNcKax n paJnaX
BOCNPOIN3BOIDMbIE DnCKN
3To yctpoiCTBO noDdEpxnBaet CneDuOuHne Tnbl DnCKOB:
| ДиСК | ЛоготиП ФОВМАТ ИП TИР ФАЛА | |
| Audio CD | COMPACT DIGITAL AUDIO | PCM |
| CD-R | COMPACT DIGITAL AUDIO REWIRABLE | Audio CD, MP3, WMA |
| CD-RW | COMPACT DIGITAL AUDIO REWIRABLE | Audio CD, MP3, WMA |
-3To yctpoCTBO NOIDepKNaBaET DNCKn CD-R n CD-RW, 3aIncAHaHbE B Audio CD(CD-DA) fopMaTe, MP3 nn WMA fopMaTe.
Moxho BOCPON3BOJnTb TOJIbKO INCKN CD-R n CD-RW, 3aHncaHHhe BΦopMaTe ISO9660.
3TOYCTPOIHTBOIIOEPDKXBAET MYLbTtCECCNOHbIE DnCKN. HeKetOpBie MybLTncCECCNOHbIE DNKn 3aRpyKaIOTcA MeHNHOIN MORYT BOO6e He 3aRpy3NTbCn.
HeBocnpon3BODnMbIe DnCKN
He noIb3yTEcB DnCKaMn TINOB, fOpMaTOB nN TINOB
fainOB, He nepeuMCneHbIX Bblue -yCTPOINCTBO INx HE
noIeepKBAET.
- HeKoTOpbIe DNCKN CD-R n CD-RW He BocnpOn3BODAtcna 3a HenoHOrO 3aBepueHn 3aInCn, KaeeCTBa 3aInCn INn ΦnueckOrO COToTHn INCKA, XapaKTepNCtIK 3anncbIbAOJero yctpOChTBa INn nporpaMMHOrO o6ecneHHeN n T. n.
Длд ДОЛНТЕьн ИСБОРМУИОЗHAнКOMБТECБ уковоздом NO 3КСПЛУАТAUМ 3АПСВIBAOJOERO уCTОПСТBA.
HeKoTOpbIe Audio CD nCnOlb3yIOT 3aunTy OT 3aunCN, HECOOTBETCTByUO OfNcNAnbHbIM CTANapTAM KOMNaKT- DnCKOB. YcPoTHCBo HE MoXET BoCpON3BoNDtB PpaBnHbHO HeCTaHdAPThBE Mckn.
Bocnpoun3BeHeHne Audio CD, 3aIncahHoro B DTS-ES mDolby Digital EX moKET cOnpOBoXdAcbYmOM.
NAMrTb USB
- MoXHO NOKIOHHTb NaMTb USB K pa3bemy USB Ha nepeDnei naHEn nIra Bocpon3BeHnM MP3 nn WMA phaioB.
Tobko narnu USB,OTbeaohnue KNACCy 6bema xpanehn H OTbeaohnue ctaHapTm (Media Transfer Protocol),MORyt 6bHTB BOCPON3BeHb HA TOM yCTPOINCTBE. - YcTpoIcTBo NOIDepKxNBAeT fOpMaTbI paINOB FAT16 nIiFAT32 InI naMATEI USB.
BOCPON3BODIMbIEΦOPMATbI AYdNO ΦAIIOB
MP3(MPEG-1 Audio Layer-3)
- Yactota DnckpeTn3aun: 32, 44.1, 48 K
- Ckopoctb nepeaay daHHbx 32 ~ 320 K6nt/c
PacunpeHne.mp3.MP3
Pekomehyctc yctahOBnHHaCKopoCTb nepeaHnDaHHbIX.Фанblc cpeMHHOckopoCTbNopeaHnDaHHbIX(VBR)BCOPOPMAOIMMbI,HO BPEM
BOCPON3BeDHeM MoKET NOKa3bIbTaTbcr HEnpaBnJbHO.
ID3 Tag He noДерхиВаeTс.
TexhONoraynO KoINpOBKn MPEG Layer-3 3anaTeHToBaHa Fraunhofer IIS n Thomson.
WMA(Windows Media Audio)
- Yactota DnckpeTn3aun: 32, 44.1, 48 K
- CkopocTb nepeaHn daHHbx: 32 - 320 K6nt/c
PacunpeHne:Wma.WMA
WMA Tag He noDpeKnBaetcA.
Windows Media n Norotn Windows, HAIOTCT ToabpHbIMn 3HaKAMn HIN 3apErntCtpnoBaHbIMn ToabpHbIMn 3HaKAMn Microsoft Corporation B CLUA n/nm DpyrIcx cTpaHAn.
PnmuMeaHnA:
- PanKMOrT mEmTeB do 10 ypoBHeB rnybHy.
-ⅡIaHEKOTOpbix qaINOB HeBO3MOXHO NcONJIb3OBAHHe ONpeDeEHHbIX cyHKm BO BpMaBocPOn3BeDeHnA. - HeBc3MoKHO Bocpoa3BoDntb pauiIb, 3auuueHHie DRM(Digital Rights Management).
KordaaHbIe 6mHnHa mHa nAnKn dnnHHee B03MOxHOCTeN aMnTn yCtPOCTBA, HEKOTOpBie paAbln T. H MOryt 6blbOnO3HbHn BCOPONB3BeDbHb.
YXOД N OБРАСЕННО C ДИСКAMN I 10

-Пипөрөнcke ДИСКАДЕХИТЕ ER0 octopoxKHO 3a Kpa.
He npknneBaute 6umary n He nnWNTe YTO-NIO ha neaTHo NOBepxHocn.

OTneatkn nabueB nblb cneyET OCTOPOXHO BtInpataB MARKOI TPAIOKOH. BtInpaTte C BHyTPHeHrO K HApYxHOMy Kpaio DnCKA.
Pocne Bocpon3BeHeHnBcerda xpaHnTe DnCKn BnxynakOBKe, YTObbl 3aunTntb nx OT bInn Uapabnn
He noIb3yIeTcB TpeChyBIMM, DeOpMnPoBaHHbIMN INCKneEHbIMN DnCKAMN.
3Tn DnCK N IERKO NOMAOTCA N MORY T pNBecCTN K Cepbe3HbIM TpaBMAM N BblBOy annapaTpybI n3 CTPOR.


PnmuMeaHnA:
He noDBepraiTe BnCKu BO3dEHTBNO pRMAbX COHNEHHbIX nyHei, BbICOKBnAkhHOCTN INI bIBcOKOI TemhepaTye BTeHeHne DInTEbHOrO BPemEHn.
- Pn yCTaHOBKe n CHATm INCKa H3 NtKa BcERda DEpKInTe ero neaTHOH NOBepxHOCTbIO BBepx.
IOTOK
NepaTHa NOBepxHocTb
Функции упраВленья
BOCPON3BEDEHNE TPEKOB/ФАЛNOB
DIOHCNOJb3OBAHNA
- Haxmnte KhoNkpy POWER.

POWER

Korda Khonka Haxata, yCTpoNCTBO B peXnme roTOBHOCTN.
-ДЯ BBIKIIOUeHIM NITaHIM CHOBA HAXMITE 3Ty KHOINK.
TOrda nntaHne BbIKIOueHO.
PexnM rTOBHOCTN
B pexmIe roTOBOCTO yCPOTcBO HE OKJIOaETCOT cTe nepemHoro TOKA nNotp6JIeT He6oNboe KOnuueCTBO 3EHPnI rnoNoDpeKKn roTOBOCTO.
■ABTOMaTnueckoe BbIKJIOUeHHe NITaHn
- ABTomatneckoe BbIKIOueHne NHTAHN - cyHKUN, aBtOMATneCKn BbIKIOUaOuaNITAHNE uBKIOUaOuaPpeKIM rOTOBHOCTN. OHa cpaBaTbIbaET npH hAXoJdeHN yCToPiCTBA peKIMe CTOn, peKIMe nay3bl T. n. 60Je e 30 MNHT.
1. B pexkme roTOBHOCTn, BKIOHOTe NITaHMe.
-Пи Кадом Hахати 3ToI KhoNk, yCTpoIcTB BxOHT B pa6OHypeKIM INN BBiKIOaETcH IN BXOHT B peKIM rTOBHOCTN.
2. BbIepeTe IINCK NnN nAmrTb USB KaK NCTOUYHKA BOCIPON3BeDEHNA.
-Пи Кадом Нжати 3TOI KHOHKN,ИCTOHNKBOCINPOUN3BEdENH MEHOTCR:"Cd" "USb"
PpimMeaHne:
B3aBnCIMOCtN OT BbIbpaHHOrO NCTOCHNKA BocPon3BeDeHnKHOJa BbIbopa DnCKa NIN KHOJKA FOLDER (+ / - ) n. n. He 6ydyT pa6oTaTb.
- B 3aBnCmOCTn OT BbIbpaHHOro nCTouHnKa BocnpOn3BeDeHn, yCTaHOBnTe DnCK(n) nnn NoDKnOHTe NaMrtb USB.
HannpMep: Audio CD
MzkaBnKaneHapb
Hapnmep:ФaIbIcMy3bIKoN (923ФaIaN15nanok)
Korda KoliuecTbO paaiOB npebBicIT 99 (T.e. Tpex3HaHoe Yncno), TpeTBa Uphi poka3bIbaeTcB My3bIkaJIbHOM KaenHape.
“-”HndkaTop 3axnraetcHa My3bkaIbHom KaIeHdape, KOrJa KOnIueCTBO TpeKOB npeBbIaet 14.
-ДЯустанови ДИСКOBВДPyгнNotKax,нжмTe Kногky DISCSKIP.
-Bo BHTpeHHn Kpyr Notka MoKeTe yCTaHOBt b 8 cm (3-DIOHMOBbIe) DNCKN.
-TeHHe DNCKa HNN NaMHTN USB MOKET OTHrB HeMaIO BpEmHn, ECIN B HNX COePKeNTCA MHO rAIOB, nANOK T. N.
PnmeaHne:
He OTKpbBaIte IIN 3aKpbBaIte IOTOK C npMHeHEm Cnbl. TaK MoXeTe BbIeCTn erO n3 cTpor.
4. Hauano Bocnpoun3BedeHn
- 3aropaetcn INHdkaTop
YCTPOICTBO BOCIPON3BOJNT, HauHnHa C nepBOrO TpeKa/ faIIHa aKtNBHom DnCKe K nocneHemy Ha 5 dincke.
5. BpemeHNO npEkpAtnb BocnpOn3BedeHne.
3aropaaetcnHnDnKaTOp "
TO6bIBOCCTaHOBtBBOCPON3BeDHeHn,HAKMnTe
KhoNky PLAY(“▶/II”mnn“▶”).
6. 60bIOCTaHOBNTb BOCnpon3BeDeHne.

3aMeHa DnCKOB BO BpMa BOCIpOn3BeDeHn
1. OTKpoIte loTOK DCIOKOB.

2. 3aMeHnTe JeKeJaembI dNcK.
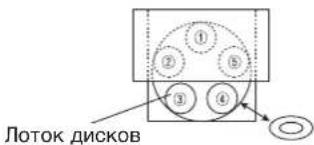
BoBpMaBocPon3BeDHeMa DNCKa ① MOxHO 3aMeHHTb DnCKN ③ N ④.
- Nocne 3aMeHbI dNcKOB, HaxMnTe KHONKy OPEN/CLOSE( 一 ), YTo6bl 3aKpbItb NotOK dNcKOB.
-ПиЗЗаме HeДИСКOB ② HIN ⑤,HAKMITE KHOнky DISC SKIP mEнгte NotOK DИСКOB.
Bb6op dncka
HaxMnte COOTBETCTByOuIy KONKy dHaHaNa BOCPOn3BeDeHnA DnCKa.
Hanpimep: Ppi Bb6pe ncka 4
- HayHeTcBocPon3BeDHeNepBoro TpeKa/paINa Bb6paHnOro DnCKa.
Bb6opTreka/daJNa BO BpeMa BocpnOn3BeDeHn
Kakdbpa3 npn HkaTnn KhoNk TpeK/pannpoynckaoTc.
Korda haxata kHONKa BACKWARD SKIP( )OIN pa3 nocpei BOCnpoN3BeDeHn Tpeka/paIna, BOCpOuN3BeDeHne HaunHaETcC erO hauana. PnnoBTOPHOM Haxatm Tpek/qaI nponyckaETcN.
- Pnp noB3OBaHHuΦpObIX KHOOK dNCTaHIOHORO ynpabJIeHnA.
Hanpimep:
品 日 ^ 3 ^ : 3
15"1B TeueHne 2 cek.5
123:1 B TceHnE 2 cek. 2 B TeueHnE 2 cek. 3
IpynpoDvNxKeHnBnepeNnn BO3BpaueHnBO BpemBOCnpOn3BeDeHn
Haxmte n yepknbate KhoNky do HaxoxKeHH Jenaemoro naccka.
Bb6op nankn BO BpeM BocnpOn3BeDeHnA
KaKbIpa3 npHn HaxaTHN 3Toi KHONKn Bb6npaETc npdeBdyuaa nn CneDyUoaa nanka BOCPon3BeDeHHe NaHnaeTc ABTomTuYeCKn C nepBoro coepxMoro paJla.
BOCPON3BEDEHNE B CNYAHOM NOPRAKA
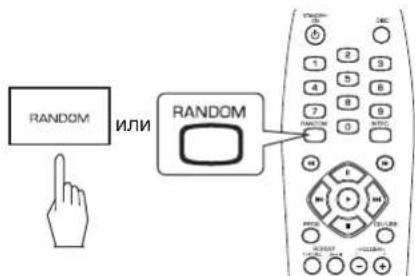
- 3aropaeTcHINdNkaTop“RANDOM”
- Ppi KaJDOM HaxaTmN 3ToI KhoNk, pexKIM cnyauHOrO BocpOn3BeDeHnM HeHReTc NeDyIOUIM O6pa3OM:
B cnyuae CD
→1 DISC → ALL DISC → OFF
B cnyuae USB
1 DISC OFF
YCTPOIcTBoABTOMaTHeCKN BbI6HpAeT IN BOCPON3BOIDT TpeKIN CnYuAHOM NOPRKe.
Haxmte ChOba KhoNky Ia BbIXoJa n3 peXnMa cnYauHoro nopAka.
PpummeuHnA:
CnyaHoe Bocnpoun3BedeHne He BKIOUHaET
TpeKn/naKn C 60onee Yem 100 eDInHnuCaAM coepKaHa.
-Пин haжати HaцфpoBук Honky BpeKIMe CnyaHOrO BOCnpOM3BeDEHnI IN 3anporpamMnPOBaHHORo BOCnpOu3BeDEHnI PPOCXODIT BbIXoJ N3 3TNx peKIMOB. (Tem He MeHee 3anporpamMnPOBaHHoe coepXaHHe He CTnpaETcI.ДЯ NOBTOpHoro BbI3OBA 3anporpamMnPOBaHHORo COePxAHnI, HaxmITE KhoNkY PROGRAM BpeKIMe CTOn.)
HEODHOKPATHOE BOCIPON3BEDEHNE
Bo3MOxHNO HeoHOKpaTHoe BocnpOn3BeDeHne TpeKa/paINa, naKN, Bcex TpeKOB/paIIOB uNn KOHKpeTHoro naccaja.
NoBTopeHne TpeKa/phiJa, panKn, Bcex TpeKOB/phiJIOB.
BoBpemBaocpon3BeHnJKeJaEMOrToTpeKa/paIa nnPiank
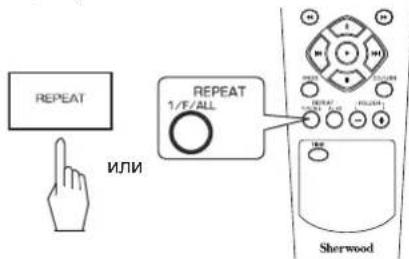
- Pn KaKdom HkKaTm 3Toi KhoNk,peKIM HeoHOKpAHorO Bocpon3BeDeHnM MeHReTc:
B cnyuae Audio CD
PpN BbIbope n cooxpaHenn TpeKa 4 n3 Audio CD.

Tpek No.
3anporpammpoBaHbB
NOPAOK
Moxete Bb6paTb TpeK/phaN, Haxmam LINΦPOBbIE KHONK.
HannmuMp:
Dn“3”:3
15":1 8 TEHHEB2 cek.
123
TOrDa BbIbpaHbI TpeK/paJI coXpaHaTeCTaBtOMaTHueeCKn 6e3 HaxKaTn KhONKn PROGRAM.
3.ПОВТОРпгteшаг2do3aBepseHnnporpaMMIOBAHnBCExKeJaembIXTpeKOB/ФaINOB.
4. NaO BoCnpOn3BeDeHnA
Bocpon3BeDeHne HaunHaetc B 3anporpammpoBaHHOM npAKe.
PpOBepKa 3anporpaMMnpoBaHHbIX TpeKOB/paHIOB.
KaKbIpa3, npHaKaTm KhoNkP ROPRAM B nporpammmHom pexnme, 3anporpammmpoBaHHb TpeK/daHn noka3bIBaETcB 3anporpammmpoBaHHOM npraKe.
YdaJIeHHe 3aIporpaMMnpoBaHHbIX TpeKOB/ΦaIIOB.
UdaJIeHnE no ODHOMy
KaKdbpa3, npHaxKaTHN KhoNkSTOP()B nporpaMMHom pexnme, 3anporpaMMnpoBaHHbIe TpeKn/paaiydaHOTcB ObpaTHOM nopAKe.
YdaJIeHHe BcEx TpeKOB/paJNoB
- Haxmnte KhoNky STOP ( ) Ha 6oJee Yem 4 cekyHdbi B nporpammmom pexme.
OTKpbITHe NtKa DnCKa Hn BbIbOp dpyrOro nCToHnKa BOCPOn3BeDeHnC TnpaET TaKke BCE 3anporpamMnpoBaHHbte TpeKN/paaibl.
YdaJIeHne KOHKpeTHORo TpeKa/paIa
HainTeKeJaembTpeK/paun ydaIne ero B nporpamMHom pexnme.
YcTaPaHeHne IIO6bIX HenpaBnIbHo 3aIporpaMMnpoBAHHbIX TpeKOB/ΦaIIOB
Hanpimep:
Korda Tpekn 5, 9 n 7 3anporpaMMnpoBaHb i N Bbl XenaTe
3aMeHHTb Tpek 9 Tpekom 10 Ha Audio CD.
- HauTe TpeK(paun) B nporpaMMHom pexnme.
TOrJa 3anporpamMnpoBaHHb TpeK/paHn3o6paKaaETcHa HeCKOJIbKO CekyHd.
2.BoBpMaNOKa3aTpeKa/paIa,KOToPbIN CNeDyET 3aMeHHTb HOBbIM,BbI6epNTe TpeK/paI10ncoxpaHNTeeroBNAMrN.


HNN


-MoKeTe BbIbpaTb TpeK/paain,HaXImaI LlΦPOBbIE KHONK.
Hanpimep:10"10":1BTeMHHe2Cek. 0
Korda BbIbpaTe Tpek UINΦOBBIMN KhONKaMn, Bbl6paHbI TpeK coXpAHReTc ABTOMaTHueckn 6e3 HaxaTn KhONKn PROGRAM.
Korda Tpek/paJn, KOtOpbI cneyET 3aMeHHTb, UcHe3aET, UNONHTE ONUcaHHB bIwe 1.
BbIBOP INHДИКAUIN BPEMEHN (ToIbko aydno CD)
-BoBpEMBAocPon3BeDENH

NIN
- BydTe OCTOpOKHbI H He HactpaBaNTe 3ByK HayuHKOB CnUKOM rPOMKO.
PykoBODCTBO NO yCTpaHEnIO HeNCpPaBHOCTeN
B cIyue HeIcnpabHOCTH cnpaBbTecb C HIXHei TaBnuei, Nepe TEm KaK OTdaTb YcTPOINCTBO B NOHNHY.
Ecni HncnpabHocTb He ycTaPHeHa, nonItaIeTcB peWntb npObnemy, nepeKIOUoA yCtpoCTBO. EcInu TaKIM o6pa3OM He cnpaBNTecb C cHTyaUnne, NocOBTeyIeTcB C Baunm NoCTaBUNKOM. Hn npN KaKINx ObCToAteJIbCTBX He cIeDyET npOboBaTb YHINTb ycTPOCTBO CAMOMy. 3TO MOKeT npNBecTN K aHHyIpOBaHIO rapaHTM.