S7 - Speaker SHERWOOD - Free user manual and instructions
Find the device manual for free S7 SHERWOOD in PDF.
User questions about S7 SHERWOOD
0 question about this device. Answer the ones you know or ask your own.
Ask a new question about this device
Download the instructions for your Speaker in PDF format for free! Find your manual S7 - SHERWOOD and take your electronic device back in hand. On this page are published all the documents necessary for the use of your device. S7 by SHERWOOD.
USER MANUAL S7 SHERWOOD
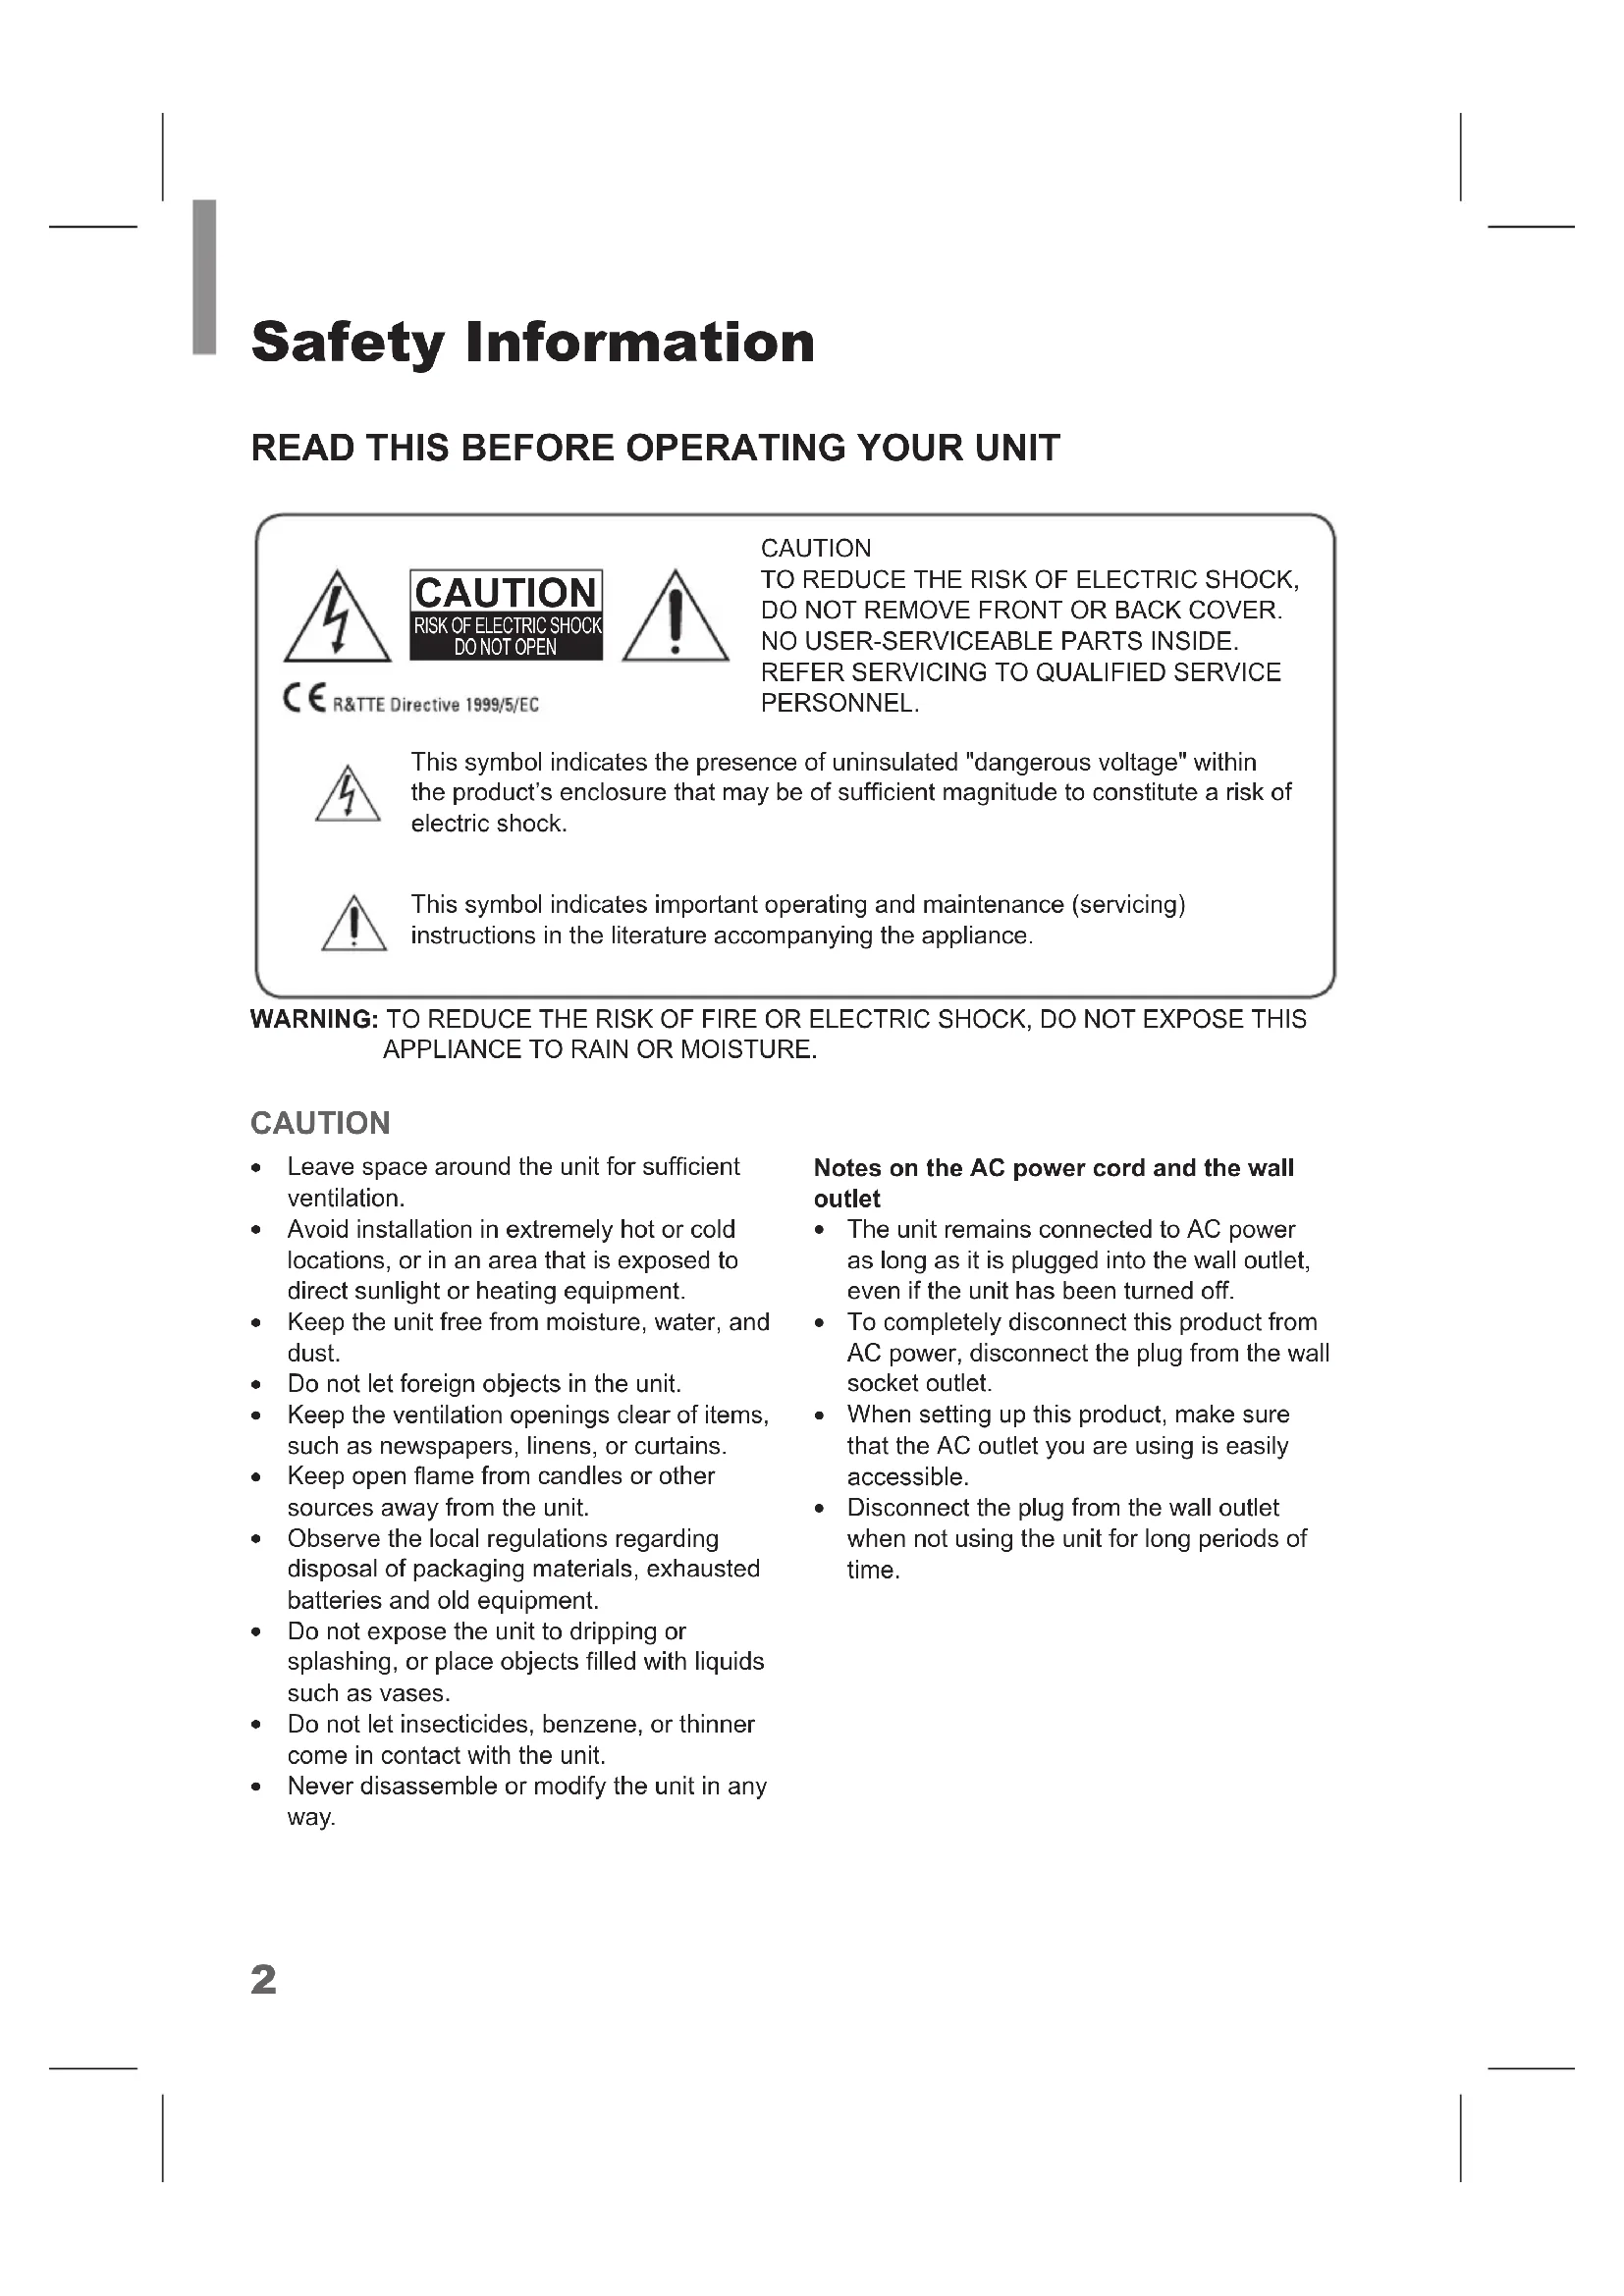
CER&TTE Directive 1999/5/EC

This symbol indicates the presence of uninsulated "dangerous voltage" within the product's enclosure that may be of sufficient magnitude to constitute a risk of electric shock.

This symbol indicates important operating and maintenance (servicing) instructions in the literature accompanying the appliance.
WARNING: TO REDUCE THE RISK OF FIRE OR ELECTRIC SHOCK, DO NOT EXPOSE THIS APPLIANCE TO RAIN OR MOISTURE.
CAUTION
- Leave space around the unit for sufficient ventilation.
- Avoid installation in extremely hot or cold locations, or in an area that is exposed to direct sunlight or heating equipment.
- Keep the unit free from moisture, water, and dust.
- Do not let foreign objects in the unit.
- Keep the ventilation openings clear of items, such as newspapers, linens, or curtains.
- Keep open flame from candles or other sources away from the unit.
- Observe the local regulations regarding disposal of packaging materials, exhausted batteries and old equipment.
- Do not expose the unit to dripping or splashing, or place objects filled with liquids such as vases.
- Do not let insecticides, benzene, or thinner come in contact with the unit.
- Never disassemble or modify the unit in any way.
Notes on the AC power cord and the wall outlet
- The unit remains connected to AC power as long as it is plugged into the wall outlet, even if the unit has been turned off.
- To completely disconnect this product from AC power, disconnect the plug from the wall socket outlet.
- When setting up this product, make sure that the AC outlet you are using is easily accessible.
- Disconnect the plug from the wall outlet when not using the unit for long periods of time.
FCC Notice
This equipment has been tested and found to comply with the limits for a Class B digital device, pursuant to Part 15 of the FCC Rules. These limits are designed to provide reasonable protection against harmful interference in a residential installation. This equipment generates, uses and can radiate radio frequency energy and, if not installed and used in accordance with the instructions, may cause harmful interference to radio communications. However, there is no guarantee that interference will not occur in a particular installation. If this equipment does cause harmful interference to radio or television reception, which can be determined by turning the equipment off and on, the user is encouraged to try to correct the interference by one or more of the following measures:
Reorient or relocate the receiving antenna.
Increase the separation between the equipment and the receiver.
Connect the equipment to an outlet on a circuit different from that to which the receiver is connected.
Consult the dealer or an experienced radio/TV technician for help.
This device complies with part 15 of the FCC Rules. Operation is subject to the following two conditions:
(a) This device may not cause harmful interference, and
(b) This device must accept any interference received, including interference that may cause undesired operation.
(FCC Part 15.21) Caution: changes or modifications not expressly approved by the party responsible for compliance could void the user's authority to operate the equipment.
For Canadian customers:
This Class B digital apparatus complies with Canadian ICES-003.
FCC Radiation Exposure Statement:
This equipment complies with FCC radiation exposure limits set forth for an uncontrolled environment. This equipment should be installed and operated with a minimum distance of 20~cm between the radiator and your body.
This transmitter must not be co-located or operated in conjunction with any other antenna or transmitter.
Important Safety Instructions
1 Read these instructions.
2 Keep these instructions.
3 Heed all warnings.
4 Follow all instructions.
5 Do not use this apparatus near water.
6 Clean only with dry cloth.
7 Do not block any ventilation openings. Install in accordance with the manufacturer's instructions.
8 Do not install near any heat sources such as radiators, heat registers, stoves, or other apparatus (including amplifiers) that produce heat.
9 Do not defeat the safety purpose of the polarized or grounding-type plug. A polarized plug has two blades with one wider than the other. A grounding type plug has two blades and a third grounding prong. The wide blade or the third prong are provided for your safety. If the provided plug does not fit into your outlet, consult an electrician for replacement of the obsolete outlet.
10 Protect the power cord from being walked on or pinched particularly at plugs, convenience receptacles, and the point where they exit from the apparatus.
11 Only use attachments/accessories specified by the manufacturer.
12 Use only with the cart, stand, tripod, bracket, or table specified by the manufacturer, or sold with the apparatus. When a cart is used, use caution when moving the cart/ apparatus combination to avoid injury from tip-over.
13 Unplug this apparatus during lightning storms or when unused for long periods of time.
14 Refer all servicing to qualified service personnel. Servicing is required when the apparatus has been damaged in any way, such as power-supply cord or plug is damaged, liquid has been spilled or objects have fallen into the apparatus, the apparatus has been exposed to rain or moisture, does not operate normally, or has been dropped.

Table of Contents
2 SAFETY INFORMATION
6 GETTING STARTED
6 What's Included
7 Parts Description
10 INSTALLATION
10 Installing the System
11 Installing the Remote Control Battery
12 CONNECTIONS
12 Subwoofer Connection
12 Connecting to HDMI Components
14 Connecting to Audio Components
15 Connecting the FM Antenna (Only for S9)
15 Power Connection
16 OPERATION
16 Listening to Your System
18 Listening to USB (Only for S9)
20 Listening to FM Radio (Only for S9)
22 Listening to Music via Bluetooth (Only for S9)
23 SETTINGS
23 Setting the System
25 TROUBLESHOOTING
27 SPECIFICATIONS
28 TRADEMARKS AND LICENSES
29 INDEX
Getting Started
What's Included

Main unit


Remote control (1 ea) Battery (1 ea) HDMI cable (1 ea)


Power adapter (1 ea)
FM antenna (1 ea) (Only for S9)
User manual (1 ea)
Parts Description
Front Panel

1 Sherwood BRAND
2 Power Button
Press to turn the main unit on or turn off to standby mode.
Input Selector
Rotate to select an input source for playback.
3 Display Panel
Displays the current status of the main unit.
4 Volume Controller
Adjusts the volume level.
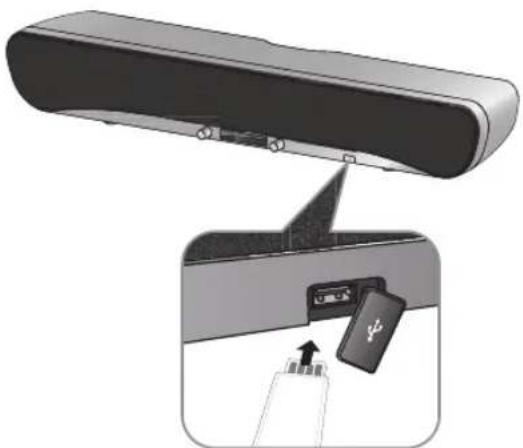
5 USB Port (Only for S9)
Connects a USB device.
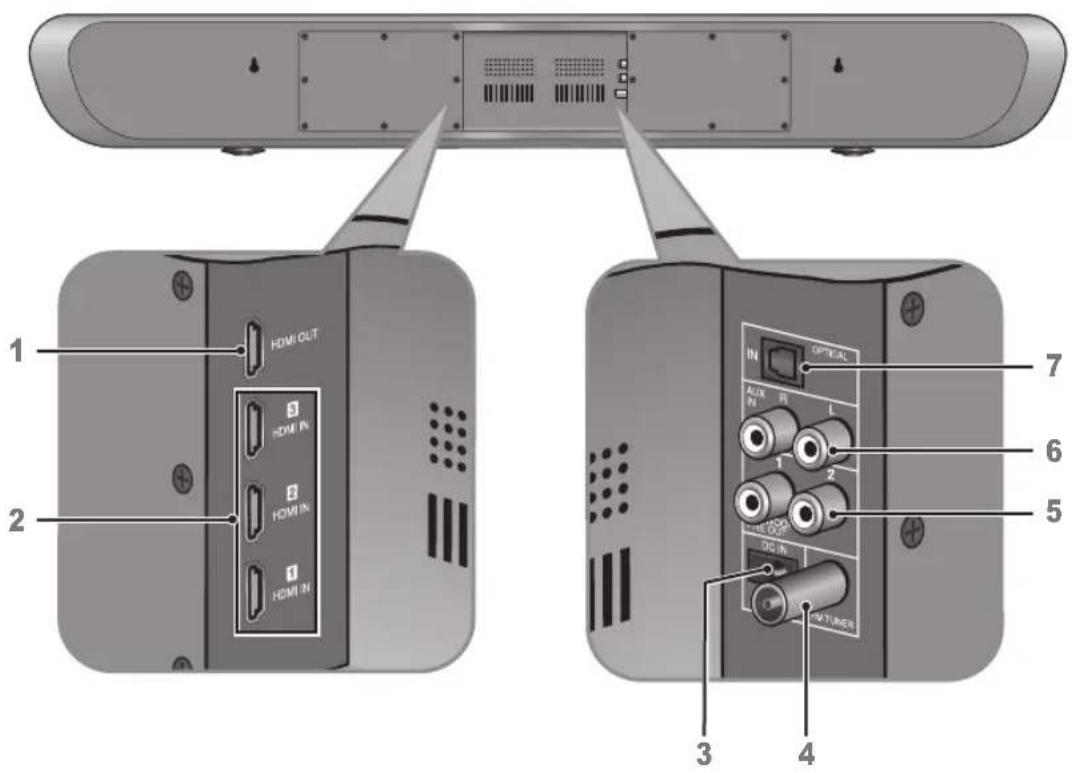
Rear Panel
1HDMI OUT
See page 12.
2 HDMI IN 1/2/3
See page 12.
3 DCIN
See page 15.
4 FM TUNER (Only for S9)
See page 15.
5 SUBWOOFER PRE OUT 1/2
See page 12.
6 AUX IN R/L
See page 14.
7 OPTICAL IN
See page 14.
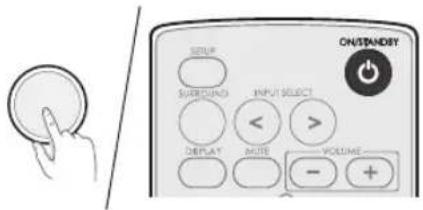
Remote Control
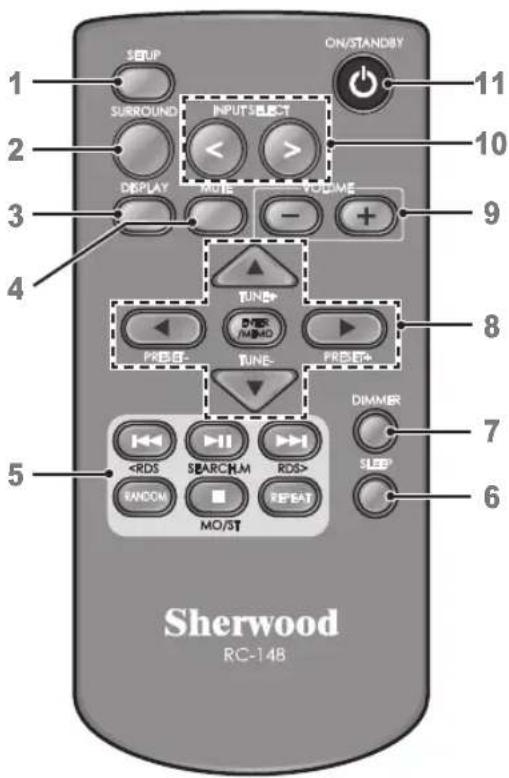
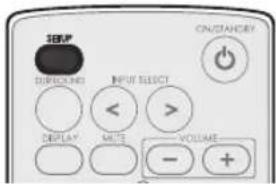
1 SETUP
Enters or exits the system setup menu.
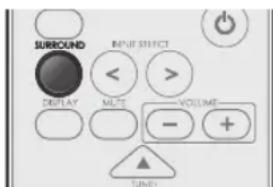
2 SURROUND
Selects surround mode.
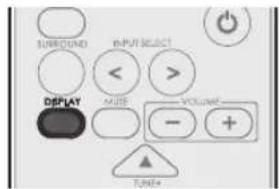
3 DISPLAY
Displays the current status of the main unit.
4 MUTE
Mutes or activates the sound.
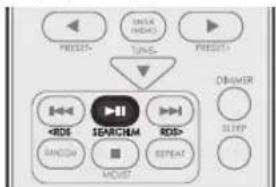
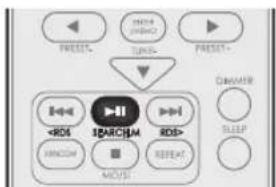
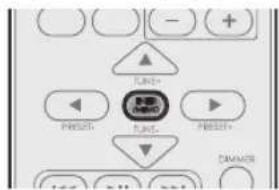
5 H1 (USB)
Starts or pauses playback.
SEARCH.M (FM TUNER)
Searches FM tuner stations.
USB
Stops playback.
MO/ST (FM TUNER)
Toggles between FM stereo and mono modes.
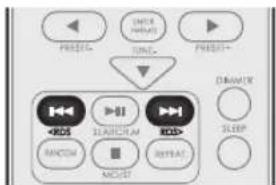
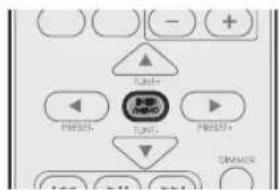
USB)
Skipping to the next or returns to the previous file or track.
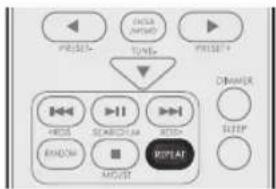
REPEAT (USB)
Selects a repeat function.
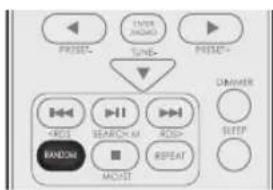
RANDOM (USB)
Selects random playback.
6 SLEEP
Sets a certain period of time for the main unit to be turned off.
7 DIMMER
Dims or brightens the display panel.
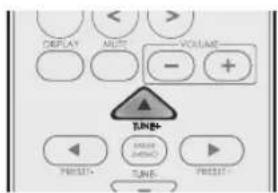
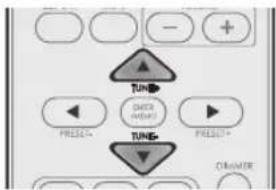
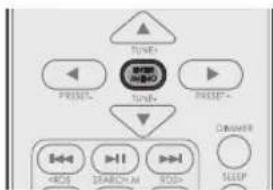
8 ▲/▼
- Selects a file, folder, or track for music files.
- Selects a setting option or menu.
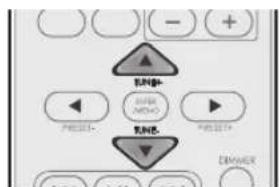
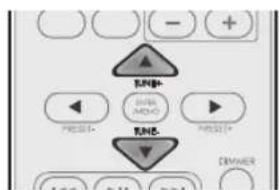
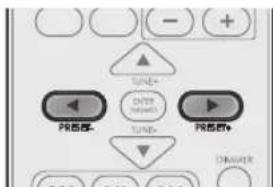
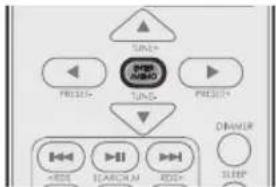
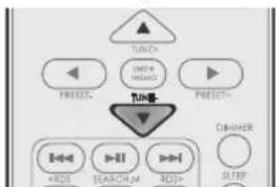
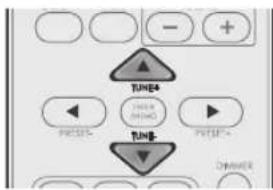
TUNE +/ TUNE -
Tunes to a desired FM station.
PRESET-/PRESET+
Selects a preset FM station.
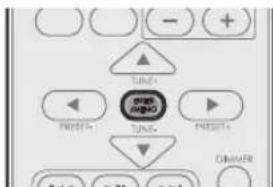
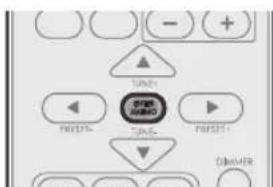
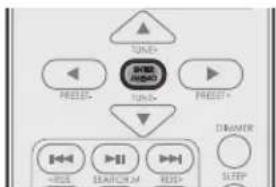
ENTER/MEMO
- Confirms the selection.
Stores a preset station.
9 VOLUME
Adjusts the volume level.
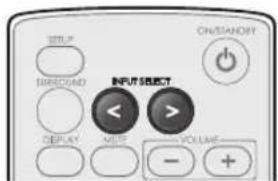
10 INPUT SELECT
Selects an input source for play back.
11 ON/STANDBY
Turns on the main unit or turn off to normal standby mode.
Installation
Installing the System
To Install on a shelf
You can install the main unit on a shelf. Place the main unit at a height close to ear-level in the listening area.
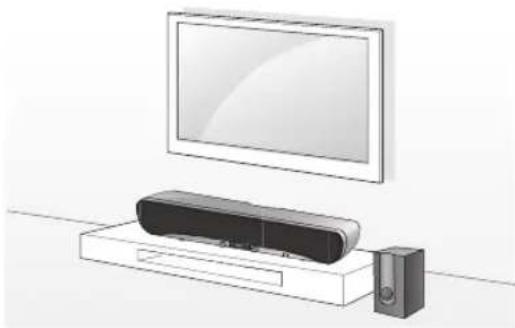
When installing the main unit, use a stable surface to avoid accidents or injury.
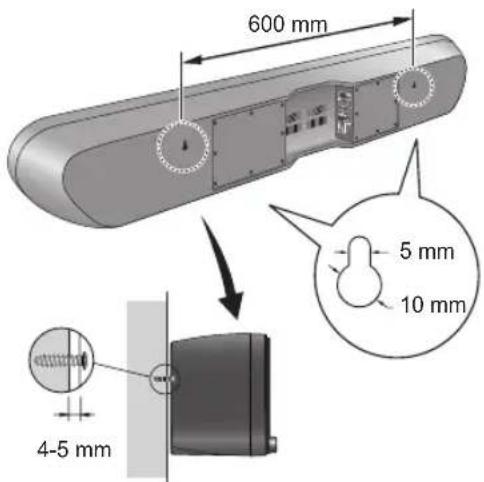
To Install on a Wall
You can install the main unit on the wall. Before installation, see "CONNECTIONS" on page 12 and complete the wiring connections.
#
Caution
- When the main unit is installed on a wall, its weight could cause the screws to come loose over time, or it may not be adequately supported by the wall, resulting in the unit falling. Make sure that the wall you intend to mount the unit on is strong enough to support it. Do not mount on plywood or soft surface walls. If you are uncertain of the wall quality, consult a professional for an advice.
- Sherwood is not responsible for any accidents or damage that result from improper installation, misuse or modification of the product, or from natural disasters.
- Mounting screws are not supplied. Use screws suitable for the wall material and that can support the weight of the unit. It is recommended to use 2 inch (50 mm) long screws.
- The main unit is magnetically shielded. However, depending on the installation location, color distortion may occur if the main unit is installed extremely close to the screen of the TV. If this happens, turn the main unit off, and turn it on after 15 minutes. If the problem persists, move the main unit further from the TV.
Installing the Remote Control Battery
1 Press inward to release the lock (1), and at the same time, slide the battery holder out of the remote control with your fingernail (2).
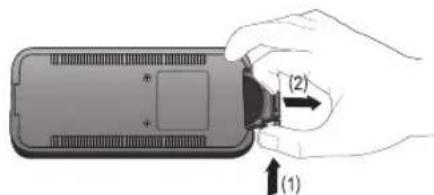
2 Place the "+" (top) side of the battery down into the battery holder.
3 Push the battery holder back into its original position.


Caution
- If the battery is placed incorrectly, it can cause explosion.
- Use only one CR2025 (3 V) lithium battery.
- Remove the battery if the remote control is not used for a long period of time.
- Do not leave the product in a hot or humid place.
- Do not handle and store the battery with metallic tools.
Connections
Subwoofer Connection
You can enjoy deep bass sounds by connecting an active subwoofer.
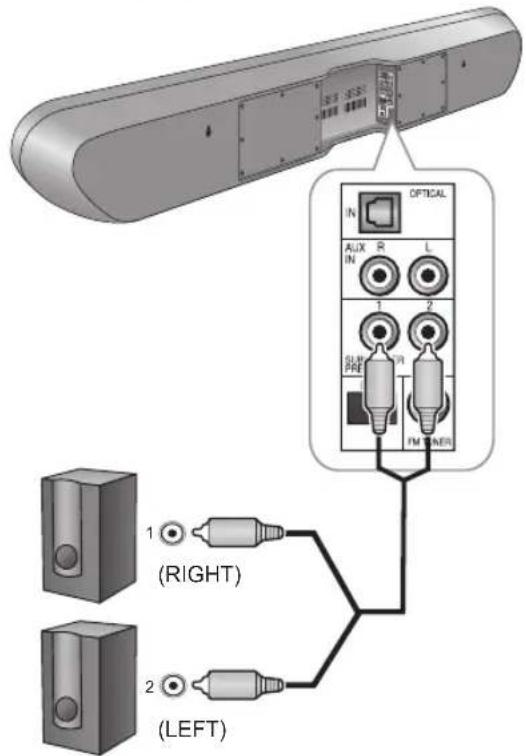
Active Subwoofer

Caution
- Do not place objects behind the subwoofer and block the ventilation ports.
- Signal reception by the subwoofer may be unstable if it is placed too close to the main unit. In this case, separate the subwoofer at least 1 m from the main unit.
- Signal reception by the subwoofer may be interrupted if an obstruction (metal door or concrete wall, aluminum covered insulation, etc.) is placed between it and the main unit. If this occurs, install the subwoofer in an uninterrupted line-of-sight orientation from the main unit.
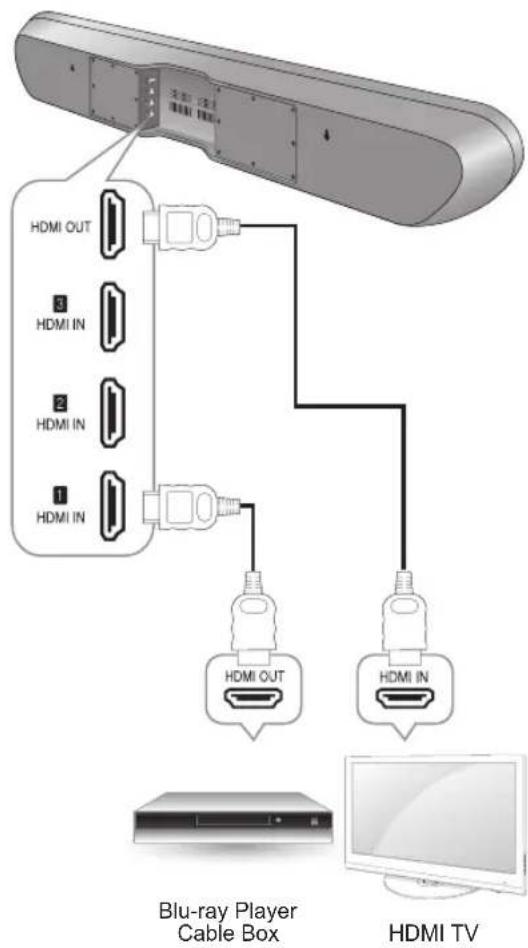
Connecting to HDMI Components
With HDMI, you can easily enjoy high quality sounds and images. The main unit plays audio from HDMI compatible products while also passing on the video signal to a HDMI-connected TV.
Confirming the HDMI control functions
To use the HDMI control functions properly, it is recommended to confirm the HDMI control functions usable with each connected component by performing the following operations.
1 Turn on all the components connected with HDMI cables.
2 Turn the TV off to standby mode.
- Confirm that all the components are turned off.
3 With all the components off, start playback of a device (connected with HDMI cable).
4 Confirm that all the components are turned on and the inputs of the main unit and TV are switched automatically.
About HDMI
HDMI (High Definition Multimedia Interface) supports both video and audio on a single digital connection for use with DVD players, DTV, set-top boxes, and other AV devices. HDMI was developed to provide the technologies of High Bandwidth Digital Content Protection (HDCP) as well as Digital Visual Interface (DVI) in one specification. HDCP is used to protect the digital content transmitted and received by DVI-compliant displays.
HDMI has the capability to support standard, enhanced, or high-definition video plus standard to multi-channel surround-sound audio. HDMI features include uncompressed digital video, a bandwidth of up to 2.2 gigabytes per second (with HDTV signals), one connector (instead of several cables and connectors), and communication between the AV source and AV devices such as DTVs.
This main unit is also compatible with the DeepColor and x.v.Color feature (x.v.Color is trademarks of Sony Corporation.).
HDMI, the HDMI logo and High-Definition Multimedia Interface are trademarks or registered trademarks of HDMI Licensing, LLC.

Note
- Check the setup of the connected component if an image is poor or the sound does not come out of a component connected via the HDMI cable.
- Audio signals (sampling frequency, bit length, etc.) transmitted from an HDMI jack may be suppressed by the connected component.
- When the connected component is not compatible with copyright protection technology (HDCP), the image and the sound from the HDMI TV OUT jack may be distorted or may be not output. In this case, check the specification of the connected component.
- Regardless of which input is selected for the system, the video signal from the HDMI input jack (BD, DVD, SAT) that was last selected is output from the HDMI TV OUT jack.
Connecting to Audio Components
AUX Connection
You can connect your audio devices to the unit and enjoy multichannel surround sound capabilities.
- Ensure the left (L) and right (R) channels and the inputs and outputs are correctly connected.
- To listen to the sound of a connected audio device, select AUX as the input source.
- To listen to TV audio, select TV as the input source.
You can connect components equipped with an optical out jack. On the main unit, you can enjoy more plentifully the sound of components, such as DVD players, Satellite receiver/Cable boxes, BD (Blu-ray DiscTM) players or TVs.
- "Blu-ray Disc" is a trademark of Blu-ray Disc Association.
TVs without an optical output jack cannot be connected to the unit.
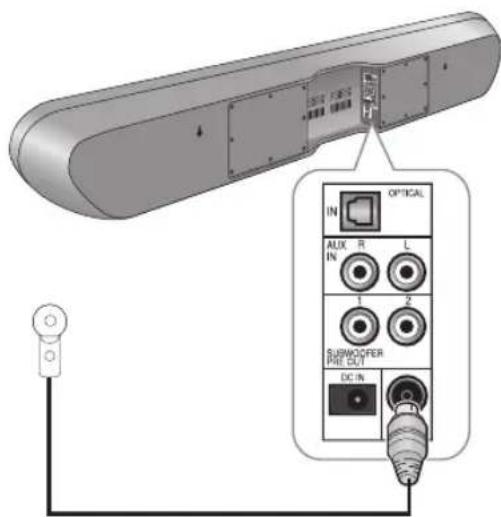
Connecting the FM Antenna (Only for S9)
You can listen to FM radio by connecting the FM antenna to the FM terminal on the main unit.
To strengthen the signal reception, extend the antenna to its full length.
Power Connection
Make sure to plug in after you have connected all your components to the main unit. Plug the supplied AC input cord into the AC inlet and then into the wall AC outlet.

Caution
The supplied AC adapter is designed exclusively for use with this unit. Do not attempt to use it with any device for which was not expressly designed, since fires or shocks may occur.
- Handle the power cord by the plug part. Do not pull out the plug by tugging the cord, and never touch the power cord when your hands are wet, as this could cause a short circuit or electric shock.
The system should be disconnected by removing the main plug from the wall socket when not in regular use for a long period of time.
Operation
Listening to Your System
Basic Operation
You can listen to audio by following the basic procedures below.
1 Turn on the connected component.
2 Turn on the main unit.
- On the main unit, press PUSH ON/STANDBY.
On the remote control, press ON/STANDBY
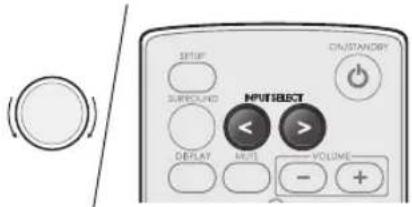
3 Select an input source you want to play back.
- On the main unit, rotate INPUT SELECT.
- On the remote control, press INPUT SELECT < /> .
Each time the button is pressed, the display changes as follows. S9
HDMI1 HDMI2 HDMI3 TV AUX OPTICAL FM STEREO USB BLUETOOTH S7
HDMI1 HDMI2 HDMI3 TV AUX OPTICAL
4 Start playback of the component you selected in step 1.
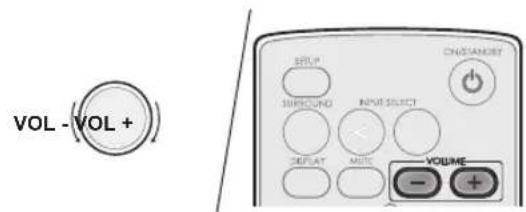
5 During playback, you can adjust the volume level.
- On the main unit, rotate the volume controller.
On the remote control, press VOLUME-/+
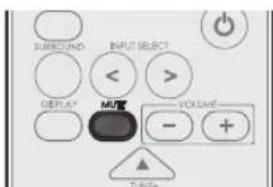
Muting the Sound
You can mute the sound temporarily by pressing MUTE.
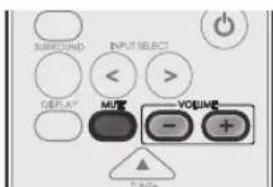
1 Press MUTE to mute the sound.
2 Press MUTE or VOLUME -/ + to turn on the sound.
Selecting Surround Mode
This system uses OPSODIS Technology, which generates spatial sound, without having to use walls to reflect the sound. This creates the illusion of three-dimensional acoustics and enables you to experience the film soundtrack and music with a power and intensity not previously achieved. However, the options available will depend on the type of source you're listening to. The following modes provide basic surround sound for stereo and multichannel sources.
1 Press SURROUND to select STEREO, 3D STEREO, or 3D SURROUND.
STEREO
STEREO reproduces realistic sound through the front speakers (and possibly your subwoofer depending on your speaker settings). Dolby Digital and DTS multichannel sources are downmixed to stereo with the aid of digital sound processing.
3DSTEREO
3D STEREO produces more sound expansion through 2 channel audio system with the aid of Opsodis sound processing.
3D SURROUND
3D SURROUND enriches the sound reproduction quality of an 2 or 5.1 audio input source with the aid of virtual 5.1 channel 3D effects from speakers that surround the listener.
If the source is Dolby Digital, DTS, or Dolby Surround encoded, the proper decoding format will automatically be selected and appear in the display.
With two channel sources, you can select from:
DOLBY Digital
Dolby Digital is a multi-channel digital signal format developed by Dolby Laboratories. Discs bearing the Dolby Digital logo include the recording of up to 5.1 channels of digital signals. This will put you right in the middle of the action, just like being in a movie theater or concert hall.
DTS
DTS Digital Surround (also called simply DTS) supports up to 5.1 discrete channels and uses less compression for high fidelity reproduction. Use it with DVDs and CDs bearing the DTS logo.
Displaying Operation Status
Press DISPLAY.
Each time the button is pressed, the display mode changes as follows:
USB
Playback file status Repeat setting Random setting Playback file status
- BLUETOOTH
Paired device name Surround mode Signal input Volume level Paired device name
HDMI
HDMI Surround mode Signal input Volume level HDMI
Listening to USB (Only for S9)
You can play audio files from a USB device. However, editing or copying the data file is not possible.
Note
The USB jack does not support the connection of other USB devices except for a USB flash drive or a USB memory card reader.
- When the USB device does not fit into the USB jack, a USB extension cable is required.
- You can only play back the content from the connected USB device.
- Copy-protected contents are not playable.
Playback Operation
To StopPlayback
1 During playback, press

2 To resume playback, press
To Pause Playback
1 During playback, press
- Playback will stop at the point where the button is pressed.
To resume playback from this point, press the button again.
To Skip Forward or Backward
1 During playback, press.
Each time the button is pressed, a track is skipped forward or backward.
To Play Repeatedly
1 During playback, press REPEAT. Each time the button is pressed, repeat mode changes as follows:
Repeat One
Repeats the currently playing music file.
Repeat Fol
Repeats all music files in the folder.
Repeat All
Repeats all music files.
To Play Randomly
1 During playback, press RANDOM.
- "Random On" is displayed on the display panel.
- All music files in the folder are played in random order.
2 To cancel random playback, press RANDOM again.
"Random Off" is displayed on the display panel.

Note
- You can only use the skip mode, repeat mode and random mode when playing music files stored on a USB memory device.
Listening to FM Radio (Only for S9)
Auto Tuning
1 Press TUNE + or TUNE - for more than 2 seconds.
- The tuner keeps searching until a station with strong signal strength is found. The display shows the tuned frequency.
If the station found is not the desired one, simply repeat this operation. - Stations with weak signal strength are skipped during auto tuning.
Auto Presetting
1 Press and hold down ENTER/MEMO for more than 2 seconds.
"AUTO MEMORY" blinks and the receiver begins to preset stations with strong signal.
- Up to 30 FM stations may be stored.
- To stop auto presetting, press ENTER/ MEMO again.


Note
FM stations with weak signal strength cannot be stored to memory.
Manual Tuning
1 Press TUNE + or TUNE - repeatedly until the desired station is found.
Manual Presetting
1 Tune in to the desired station with auto or manual tuning.
2 Press ENTER/MEMO.
- A preset number blinks.
3 Select a desired preset number (1~30) by pressing TUNE + or TUNE -
- A station has now been stored in the memory.
- A stored station is erased from the memory by storing another station in its place.

4 Press ENTER/MEMO again to confirm your selection.
The station has now been stored in the memory.
- A stored station is erased from the memory by storing another station in its place.
5 Repeat the above steps 1 - 4 to store another station.
Tuning in to Preset Stations
1 Select FM TUNER as the input source.
2 Select a desired preset number by pressing PRESET - or PRESET +.
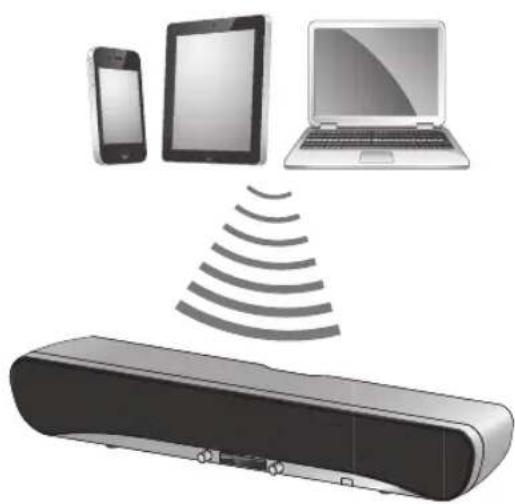
Listening to Music via Bluetooth (Only for S9)
The main unit uses Bluetooth wireless technology to stream music from your portable devices.
1 Turn on the main unit.
2 Press INPUT SELECT repeatedly to select BLUETOOTH.
3 Press to display "PAIRING" on the display panel.
4 Press ENTER/MEMO to display the pin code (0000) on the display panel.
5 Press ENTER/MEMO. "PAIRING" blinks.
6 Search and pair the main unit with your portable device.
The name of the main unit is displayed as "Sherwood S9" on your portable device.
7 When the pairing is complete, the paired device name is displayed on the display panel.
Note
- Before you connect a Bluetooth device to the main unit, familiarize yourself with the Bluetooth capabilities of the device.
- Keep the main unit away from other electronic devices that may cause interference.
Settings
Setting the System
You can set additional sound settings.
1 Press SETUP.
2 Press or select 1 SYSTEM SET or 2 HDMI SET.
3 Press ENTER/MEMO to confirm.
4 Press to select an option.
5 Press ENTER/MEMO to confirm the selected setting.
6 Press or set a value.
English
7 Press ENTER/MEMO to confirm.
To return to the previous menu, press
- To exit the menu, press SETUP again.
- Default settings are shown in bold below.
| Setting Option Descriptions | |||
| 1 SYSTEM SET | STANDBY (Auto Standby) | 6hr | Sets the standby time for the system. |
| 4hr | |||
| 2hr | |||
| OFF | |||
| DRC (Dynamic Range Control) | OFF | Adjusts the level of dynamic range for movie soundtracks optimized for Dolby Digital, DTS, Dolby Digital Plus and Dolby TrueHD (You may need to use this feature when listening to surround sound at low volumes.) | |
| ON | |||
| DELAY | 0ms ~ 200ms | Some monitors have a slight delay during video playback, so the soundtrack will be slightly out of sync with the picture. By adding a bit of delay, you can sync the sound to the video. The delay can be adjusted within the range of 0 ms - 200 ms. | |
| SW LEVEL | Off ~ -20 ~ 0dB | Adjusts the sound level of the subwoofer. | |
| 2 HDMI SET | HDMI (HDMI Audio) | AMP | Specifies the routing of the HDMI audio signal from the system (amp) or through to a TV or flat screen TV. When THRU is selected, no sound is output from the system. |
| THRU | |||
| CEC | OFF | Allows input selection of this receiver to be interlocked with the operation of the connected components. The CEC Control function may not work depending on the connected component and its settings. | |
| ON | |||

Note
- When the CEC Control is set to "ON", you can also use the ARC (Audio Return Channel) function, enabling TV to send audio signals to this receiver via a HDMI cable. To use the ARC function, TVs that support the ARC function of the HDMI 1.4 standards are required.
Troubleshooting
If you experience any of the following difficulties while using the system, use this troubleshooting guide to help remedy the problem before requesting servicing. Should any problem persist, consult your nearest authorized dealer or authorized independent company.
If the unit does not operate normally due to external influence such as static electricity, disconnect the power plug from the outlet and insert again to return to normal operating conditions.
GENERAL
| Problem Remedy | |
| The power does not turn on. | Disconnect the power plug from the outlet, and connect again. |
| The system suddenly turns off. | After about a minute (you won't be able to turn the unit on during this time), turn the system back on. If the message persists, call an authorized independent service company. |
| No sound is heard after a function is selected. | Make sure the component is connected correctly. (See "CONNECTIONS" on page 12.) Press MUTE to restore the sound. |
| Can't operate the remote control. | Replace the batteries. (See page 11.) Operate within 7 m, 30° of the remote sensor Remove any obstacles, or operate from another position. Avoid exposing the remote sensor on the front panel to direct light. |
| The display is dark or off. | Press DIMMER on the control repeatedly to return to the default setting. |
CONNECTED COMPONENTS
| Problem Remedy | |
| There is no sound from the selected component. | Check that the component is connected correctly to the audio input jacks of components. Check that the cords are fully inserted into the jacks on both the component and the main unit. Ensure that the component is selected correctly. |
| Sound is interrupted or there is noise. | Check the output audio formats support system. |
| No sound is heard or there is noise when software with DTS is played back. | Set the digital volume level of the system to full, or to the neutral position. Ensure the player's settings are correct and/or the DTS signal out is on. Refer to the instruction manual supplied with the DVD player. |
| During playback search, there is noise from a DTS compatible CD player. | This is not a malfunction, but be sure to turn the volume down to prevent the output of loud noise from the system. |
HDMI
| Symptom Remedy | |
| No picture or sound. | If the problem still persists when connecting your HDMI component directly to your monitor, consult the component or monitor manual or contact the manufacturer for support. |
| No picture. | Depending on the output settings of the source component, the video format may not be displayed. Change the output settings of the source, or connect your source component directly to TV using the component or composite video jacks. This system is HDCP-compatible. Check that the components you are connecting are also HDCP-compatible. If they are not, please connect your source component directly to TV using the component or composite video jacks. Some source components will not work with this system (even if it is HDCP-compatible). In this case, connect your source component directly to TV using the component or composite video jacks. If video images do not appear on your TV or flat screen TV, try adjusting the resolution, DeepColor or other setting for your component. To output signals in DeepColor, use an HDMI cable (High Speed HDMI Cable) to connect this system to a component or TV with the DeepColor feature. |
| No sound, or sound suddenly ceases. | If you've made separate connections for audio, make sure you have assigned the analog/digital jack(s) to the corresponding HDMI input for the component. Check the audio output settings of the source component. If the component is a DVI device, use a separate connection for the audio. |
Important Information Regarding the HDMI Connection
Some HDMI signals cannot be routed through this system. (This depends on the HDMI-equipped component you are connecting. Check with the manufacturer for HDMI compatibility information.)
If you cannot receive HDMI signals properly through this system (from your component), please try the following configuration when connecting up.
Specifications
| Amplifier | |
| Rated power output Front Tweeter High/Low Front Woofer | 25 W per channel (6 Ω, 1 %) |
| Input/Output | |
| HDMI terminal Input | HDMI INPUT x 3 HDMI OUTPUT 1 (ARC) |
| Output | AUX (Analog), Optical x1 (Digital) |
| Speaker | |
| Woofer Type | 5" Cone Type 6 Ω |
| Impedance | 1" Dome Type 6 Ω |
| Tweeter Low Type | |
| Impedance | |
| Tweeter High Type | 0.8" Dome Type 6 Ω |
| Impedance | |
| General | |
| Power Requirements | AC 100-240 V, 50/60 Hz (DC 24 V) |
| Power Consumption | AC 45 W (DC 1.8 A) |
| In standby | 1 W or less |
| Dimensions | 1,055 mm (W) x 145 mm (H) x 130.5 mm (D) |
| Weight (without package) | 6.4kg (S9) / 6.3kg (S7) |
Trademarks and Licenses
This system incorporates a sophisticated Digital Signal Processor that allows you to create optimum sound quality and sound atmosphere in your personal Home Theater.
DTS Digital Surround

dtts
Digital Surround
DTS Digital Surround (also called simply DTS) supports up to 5.1 discrete channels and uses less compression for high fidelity reproduction. Use it with DVDs and CDs bearing the DTS logo.
Manufactured under license under U.S. Patent Nos: 5,956,674; 5,974,380; 6,487,535 & other U.S. and worldwide patents issued & pending. DTS, the Symbol, & DTS and the Symbol together are registered trademarks & DTS Digital Surround and the DTS logos are trademarks of DTS, Inc. Product includes software. © DTS, Inc. All Rights Reserved.
Dolby Digital

DOLBY. DIGITAL
Dolby Digital is the multi-channel digital signal format developed by Dolby Laboratories.
Discs bearing the Dolby Digital logo include the recording of up to 5.1 channels of digital signals. This will put you right in the middle of the action, just like being in a movie theater or concert hall.
Dolby and the double-D symbol are trademarks of Dolby Laboratories.
HDMI
HOMI
HIGH DEFINITION MULTIMEDIA INTERFACE
HDMI, the HDMI Logo, and High-Definition Multimedia Interface are trademarks or registered trademarks of HDMI Licensing LLC in the United States and other contries.
OPSODIS

OPSODIS is a registered trademark of the OPSODIS LTD.
Opsodis and Opsodis Device are Trade Marks of Adaptive Audio Limited and are used under licence by Inkel corporation. Patents covering Opsodis technology are owned by Adaptive Audio Ltd and are also used under licence by Inkel corporation.
Bluetooth

Bluetooth
The Bluetooth® word mark and logos are registered trademarks owned by Bluetooth SIG, Inc. and any use of such marks by Inkel Corporation is under license. Other trademarks and trade names are those of their respective owners.
Index
A
About HDMI 13
Auto Presetting 20
AUX Connection 14
B
Basic Operation 16
Bluetooth 22
C
Connecting to HDMI Components 12
D
Displaying the Operation Status 18
DOLBY Digital 17
DTS 17
F
FM Antenna 15
FM Radio 20
Front Panel 7
1
Installing the Remote Control Battery 11
Installing the System 10
L
Listening to USB 18
M
Manual Presetting 21
Muting the Sound 16
0
Optical Connection 14
P
Playback Operation 16
Power Connection 15
Preset Stations 21
R
Rear Panel 8
Remote Control 9
S
Setting the System 23
STEREO 17
Subwoofer Connection 12
Surround Mode 17
T
Tuning 21
Number
3DSTEREO 17
3D SURROUND 17
CER&TTE Directive 1999/5/EC

DTS Digital Surround

dt
Digital Surround
R&TTE Directive 1999/5/EC
PRECAUCION
PARA REDUCIR EL RIESGO DE DESCARGA
ELECTRICA, NO DESMONTE EL FRONTAL
NI LA CUBIERTA TRASERA. NO HAY PIEZAS
REPARABLES POR EL USUARIO EN EL
INTERIOR. LLEVELO A REPARAR A PERSONAL
DE SERVICIO CUALIFICADO.

MONO/ESTEREO (Radio FM)
DTS Digital Surround

dtts
Digital Surround