SR1 - Motorcycle helmet Schuberth - Free user manual and instructions
Find the device manual for free SR1 Schuberth in PDF.

Frequently Asked Questions - SR1 Schuberth
User questions about SR1 Schuberth
0 question about this device. Answer the ones you know or ask your own.
Ask a new question about this device
Download the instructions for your Motorcycle helmet in PDF format for free! Find your manual SR1 - Schuberth and take your electronic device back in hand. On this page are published all the documents necessary for the use of your device. SR1 by Schuberth.
USER MANUAL SR1 Schuberth
This helmet is not intended for use in the USA and Canada. The helmet has been inspected and approved to the European ECE Standard and therefore does not conform to US and Canadian regulations and requirements. It is only legal to use the helmet in countries in which the European ECE Standard is valid. If you use the helmet in other countries, you will not in the event of injury be entitled to make a claim for compensation before the US or Canadian courts or the courts of other countries not bound by the ECE Standard.

Avertissement
www.schuberth.com/us/home
2. ECE-ZULASSUNG

8
3. ANATOMIE DES HELMS
4. AUSSENSCHALE
Anti-Roll-Off-System (A.R.O.S.)
In selecting the SCHUBERTH SR1 you have made a wise choice. The SR1 is the result of the latest development and production methods. With this helmet you have a quality product designed to provide the highest level of safety and capability in road traffic and the best performance on the racetrack that will provide you with much enjoyment.
We wish you safe riding.
F.-J. Gorges E. Van Hoof
Head of Sales
SCHUBERTH GmbH

International Sales
SCHUBERTH GmbH
A. CORRECT USE OF THIS MANUAL
Please read this manual thoroughly to ensure that you obtain the best protection from your helmet when motorcycling. To avoid missing any aspect relevant to your safety, we recommend that you read this manual in the order in which it appears.
Please note particularly the following symbols and conventions:

Warning: safety instructions

Note: advice

Tip: practical tips

Caution:
This helmet is not intended for use in the USA and Canada. The helmet has been inspected and approved to the European ECE Standard and therefore does not conform to US and Canadian regulations and requirements. It is only legal to use the helmet in countries in which the European ECE Standard is valid. If you use the helmet in other countries, you will not in the event of injury be entitled to make a claim for compensation before the US or Canadian courts or the courts of other countries not bound by the ECE Standard.

Avertissement :
Note: We reserve the right to make alterations for purposes of technical development without giving you express notice.
B. CONTENTS
A. Correct use of this manual 49
B. Contents 50
C. The helmet 52
1.Standard 52
2. ECE approval 52
3. Anatomy of the helmet 53
4. Outer shell 53
5. Inner shell 53
6.Aerodynamics 54
7. D-Force spoiler 54
8.Aeroacoustics 55
9. Wind deflector 57
10.Retention system 58
11. Visor shield 59
12. Internal lining 64
13. Ventilation systems 69
14. Additional safety features 71
D.Choosing the correct helmet 73
- Measuring your head size 73
2.Determining the correct helmet size 74 - Checking that the helmet size is correct 75
E. Putting on and removing the helmet 77
- Putting on the helmet 77
- Removing the helmet 77
F.Before every ride 78
1. Checking the helmet 78
2. Checking the chin strap 78
3. Checking the visor 79
G.For your safety 80
- Safety information: helmet 80
- Safety information: visor 82
- Safety information: modifi cations/accessories 82
H. Care and maintenance 83
- Outer shell 83
- Visor 83
- Internal lining 8
- Fastening system 86
- Storage 86
I. Accessories and parts 87
- Accessories and parts 87
2.Communications systems 87 - Obtaining original SCHUBERTH parts 87
J. SCHUBERTH Service 88
- Safety check 88
- Repair service 88
- Warranty 89
- SCHUBERTH online 90
K. How to contact us 90
C. THE HELMET
1. STANDARD
The SR1 satisfies the ECE-R 22.05 standard. This testing standard guarantees adherence to defi red safety standards concerning shock absorption, visor, retention system and the fi eld of vision. This approval both permits you to use the helmet in the EU member states and in all countries that recognise the ECE standard and provides the insurance conformity that is important in the event of an accident. Please note that this SR1 model with ECE approval is specially designed for the ECE standard and is therefore not intended to be used in the USA, Canada or other non-EU countries. It may only be legal for use in countries in which the ECE standard holds validity.

Note: For use in the USA, Canada and other non-EU countries, only SCHUBERTH helmets may be worn that have the appropriate authorisation and technical specifi cation for that region and purpose. For further information on such helmets and where to obtain them, please visit our website at:
www.schuberth.com/us/home
2. ECE-APPROVAL

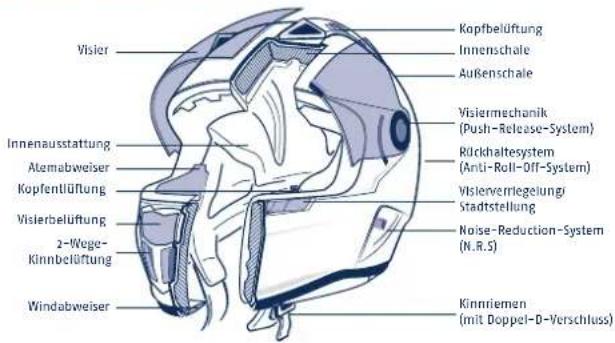
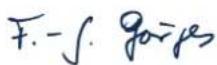
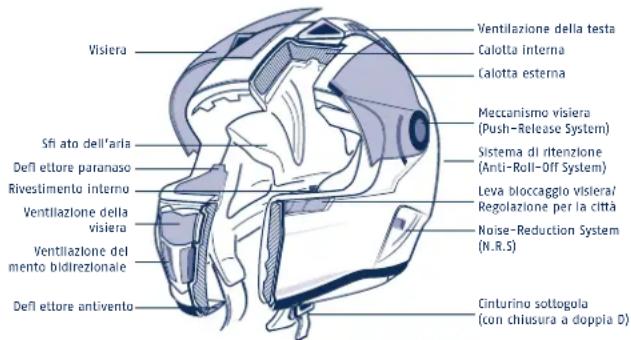
3. ANATOMY OF THE HELMET
4. OUTER SHELL
The outer shell of the SR1 combines an aerodynamically optimised shape with effective protection. It consists of a special fi breglass-reinforced duroplastic woven material developed by SCHUBERTH that provides the strength necessary for maximum protection.

Warning: This helmet is designed to protect from only one shock or impact. After any fall, accident or other forceful impact the helmet must be replaced.
5. INNER SHELL
The inner shell of the helmet is constructed of multiple parts to optimise shock absorption. A complex arrangement of EPS densities in multiple zones allows force to be absorbed and distributed more effectively to maximize safety. The large side parts allow the helmet to sit comfortably in its optimum position.
C. THE HELMET
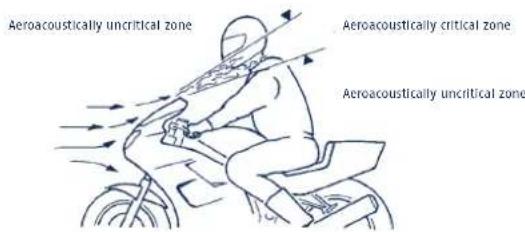
6. AERODYNAMICS
All SCHUBERTH motorcycle and motor racing helmets are developed and optimised in SCHUBERTH's own wind tunnel under precisely defi red conditions. The SR1 is specially designed for a sporty sitting position and sits calmly in the airstream. Even at high speeds (above 200 km/h) the SR1 generates practically no lift. Other characteristics of the SR1 are low air resistance, high directional stability and low side forces. On motorcycles without fairing, buffeting* is also signifi cantly reduced at high speeds.
Juddering of the body in the airstream
Note: Please be aware that on motorcycles with fairing, the strong air turbulence that can be caused by the fairing can substantially alter the aerodynamic characteristics of a helmet.
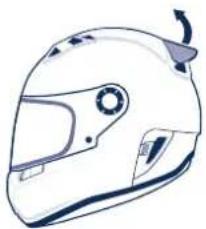
7. D-FORCE SPOILER
By using the D-Force spoiler the SR1 can be adjusted to a given sitting position and a given speed to ensure optimal helmet performance in the airstream. Two positions with different angles of attack are available.
Down position, close to helmet: Standard downthrust. Recommended for motorcycles with fairing and an upright sitting position.
Hinged up: 60% higher downthrust. Recommended for motorcycles without fairing and a low sitting position.
8. AEROACOUSTICS
SCHUBERTH has developed a number of measures in the wind tunnel to ensure a pleasantly quiet helmet that also provides optimal acoustic feedback while riding. This enables you to concentrate when riding, particularly at higher speeds.
Note: The aeroacoustic values achieved may vary with the motorcycle type, fairing, sitting position and body size.
Warning: As a result of the optimised aeroacoustics of the helmet (and thus low level of wind noise in the helmet) it is easy to underestimate your real speed. Do not rely on your hearing to estimate your speed, check the reading on your speedometer.
Note: Strong air turbulence occurs at the edges of the wind shadow created by motorcycles with fairings. This may signifi cantly reduce the aeroacoustic performance of the helmet. The fairing should be adjusted so that the outgoing turbulence layer does not come into contact with the underside of the helmet.
C. THE HELMET
NOISE-REDUCTION-SYSTEM (N.R.S)
The innovative noise-reduction system allows the noise level in the helmet to be varied, thus enabling sounds to be experienced at different intensities. Two settings are available.
Race (N.R.S open): In this setting, acoustic signals are perceived with a heightened intensity. Recommended for race conditions.

Street (N.R.S closed): In this setting, the acoustics in the helmet are reduced to the perception of important traffic and warning signals. Recommended for longer journeys.

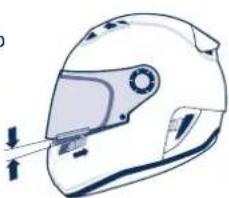
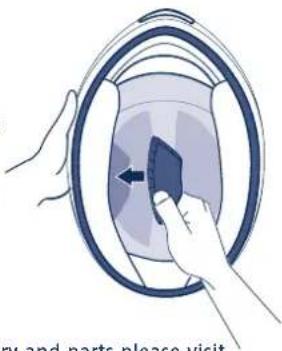
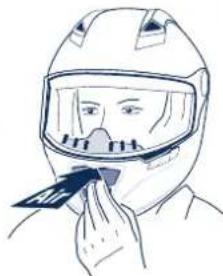
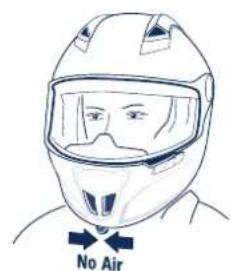
9. WIND DEFLECTOR (included with helmet)
By fitting the wind deflector supplied, undesired entry of wind from the airstream can be prevented. The device also further reduces the noise level in the helmet.
To fi t, slide the retaining pocket of the wind defi cctor gradually outwards from the centre into the guide gap between the interior of the helmet and the outer shell.
Tip: The fit of the underside of the helmet is very important for further reducing the noise level in the helmet. Take care to ensure that the helmet is properly closed. For smaller neck sizes we recommend that you wear a scarf.
C. THE HELMET
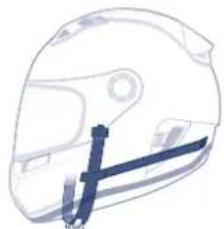
10. RETENTION SYSTEM
The retention system on the SR1 consists of a chinstrap that is further secured with neckbands at the rear of the shell (anti roll-off system, see section C.14).
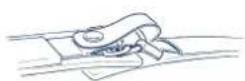
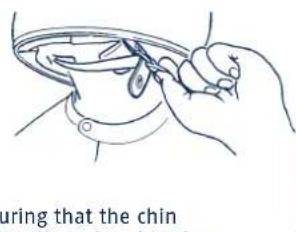
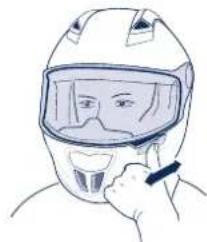
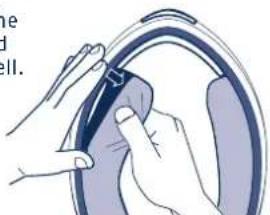
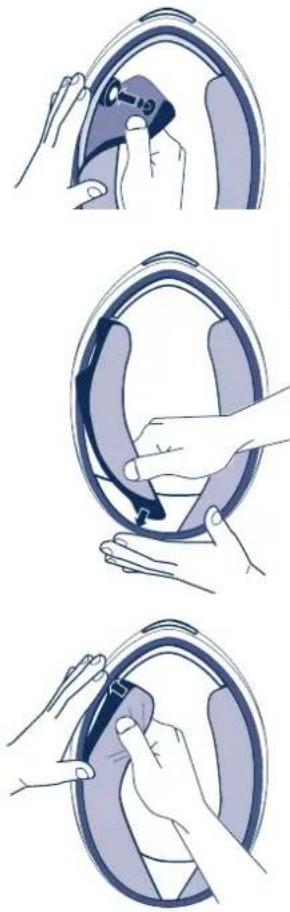
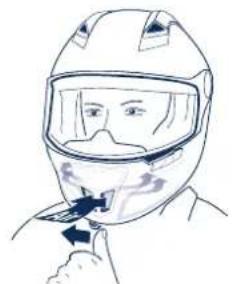
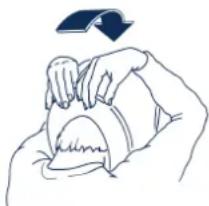
CHIN STRAP WITH DOUBLE-D FASTENING
The double-D fastener lets you adjust the length of the chinstrap easily and precisely every time you put on the strap and fitts tightly and individually to your chin.
Closing and pulling tight
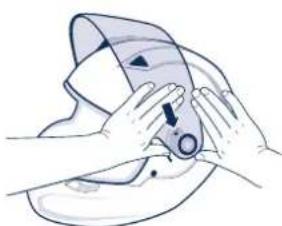
- Thread the free end of the chinstrap, as shown in the pictures opposite, through the double-D fastener.
- Pull the strap tight. The chinstrap should be taut but not uncomfortable. Then feed the free end of the strap back through the first ring of the fastener.
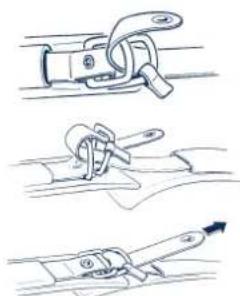
Tip: To ensure the correct position we recommend that you grasp the helmet by the sides with both hands and use gentle rotating movements on the head, and then pull the chinstrap tight again.
3. The free end of the strap is tucked away and fastened by means of the snap. This prevents the strap from flapping in the wind.
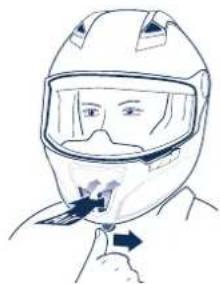
Loosening and opening
- Release the snap and pull on the little red lug of the double-D fastener so that the strap is loosened.
- Now thread the free end of the chin strap out of the double-D fastener.
Warning: Never ride without ensuring that the chin strap is properly fastened, correctly adjusted and in the right position. If the chin strap is not properly adjusted or fastened, it is possible that in the event of an accident the helmet could come loose from your head.
Warning: Never open the chin strap while riding.
11. VISOR SHIELD
The 3D visor shield, with its average thickness of 2.5mm is manufactured using an injection moulding technique. The special polycarbonate used has superb transparency, high strength and toughness, high impact and breaking strength and very good resistance to weathering. Thanks to the characteristics of its materials for absorbing UV radiation it also offers effective protection against UV radiation, which is harmful to human eyes. The shape and thickness distribution of the visor are the result of many years of research and development using complex mathematical methods. The visor sets standards for technical optics: it is almost entirely free of distortion throughout the field of vision and is rated optical class 1, the highest available quality and a prerequisite for fatigue-free sight on longer journeys.
C. THE HELMET
COATING
The visor shield features anti-fog and anti-scratch coatings. The anti-scratch coating on the outside increases the surface hardness of the visor and its resistance to scratches. This has a signi cant positive effect on the useful life and quality of view offered by your visor.
A specially developed, high-performance anti-fog coating has been applied to the interior that substantially reduces condensation mist on the shield.
Note: Avoid hard rubbing or scrubbing either side of the shield when cleaning, and do not immerse the visor in water (see visor maintenance notes, section H.2).
Note: The active anti-fog and anti-scratch coatings are prone to ageing, the rate of which depends on the intensity of use and on environmental conditions. For your own safety we recommend that you replace the visor when its anti-fog properties begin to deteriorate.
Tip: After thorough cleaning, riding in rain or a long ride in cold conditions, the anti-fog coating will require a certain amount of time to become fully effective again. During this time the coating may not absorb, or only partially absorb, the moisture produced by breathing. Placing the helmet in an airy, dry place will accelerate the reactivation of the coating.
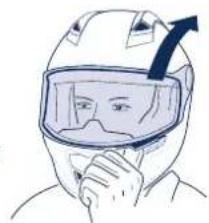
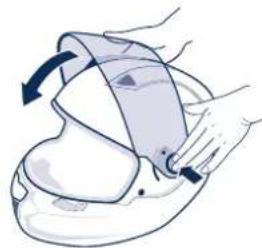
Opening the visor
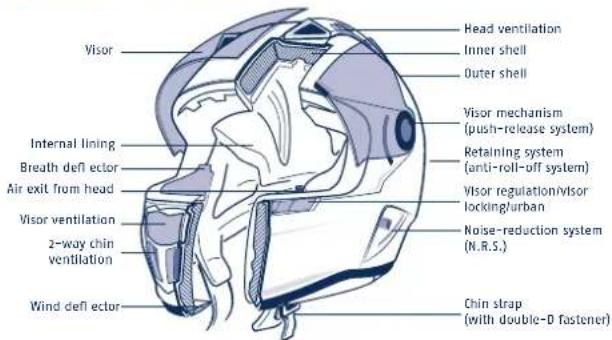
To open the visor, grip the finger tab below the visor on the left-hand side using the thumbs and push the visor shield upwards to the desired position.
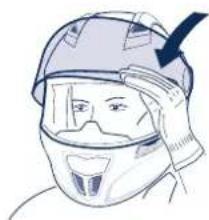
Closing the visor
Grip the finger tab and push the visor shield downwards with a movement of the hand.
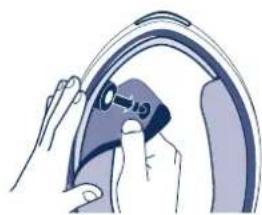
Locking the visor
To lock the visor when fully closed, move the operating element towards the rear with a movement of the hand. To release the visor again, move the operating element back to its original position.
Urban mode
To ensure suffcient fresh air in the helmet when moving slowly (e.g. city riding), you can set the visor to the 'urban mode' by means of the locking operating element. To set urban mode, start with the visor open and move the operating element towards the rear with a movement of the hand. The catch pins of the visor engage on the operating element, creating a small gap between the visor and visor seal.
C. THE HELMET
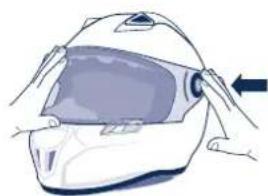
CHANGING THE VISOR SHIELD
The visor shield can be changed easily and with the convenient push-release system. It is helpful when changing the shield to place the helmet on a flat surface or on your lap.
Removing the visor shield
- Close the visor. Press the button of the push-release visor mechanism on one side and hold it down.
- Move the visor upwards until it is released from its fi xing.
- Repeat steps one and two above on the opposite side of the visor.
Fitting a new visor shield
- Using both hands, guide the catch pins of the visor into the recess provided for them in the visor mechanism.
- Apply light pressure directed towards the helmet and a closing motion until the visor engages audibly.
- Check the functioning of the visor mechanism by opening it until it hits the end stop and then closing it again.
SAFETY NOTICE
Check the functioning of the visor before every ride and ensure that it offers adequate vision. Remove any dirt before each ride. Check the visor for mechanical damage and cracks. Badly scratched or dulled visors will affect vision and should be replaced before riding for safety reasons.
Warning: Petrol, solvent and fuel vapours may lead to the formation of cracks on the visor. Do not expose the visor to these vapours. You should never place the helmet on the fuel tank of your motorcycle.
C. THE HELMET
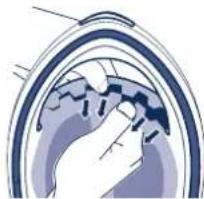
12. INTERNAL LINING
The washable, replaceable internal lining of the SR1 offers not only a superb shape but also improved entry and exit of air to and from the helmet.
The cheek comfort padding and ear pads provide soft cushioning to the cheeks and the headband cushion offers good positioning around the head. The central head pad ensures comfortable fitting to the head while ensuring that the air channels do not become blocked (see Ventilation systems/Head ventilation, section C.13).
The internal lining consists of skin-friendly materials throughout, particularly in areas that come in contact with the head. These are a soft, breathable COOLMAX material that transports heat and moisture very well, a special noise-reducing Polygene material with antibacterial properties and a sweat-absorbing Interpowel material.
REMOVING THE INTERNAL LINING
The internal lining is fixed to the inner shell of the helmet by means of a clamp fastening. It can be removed by pulling it gently out.
Removing the cheek comfort pads
- Loosen the pins stitched into the cheek pads from the red-marked insertion points on the inner shell.
- Gently pull the cheek pad away from its fi xing.
- Repeat process for the other cheek pad.
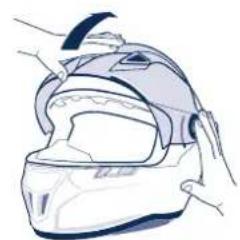
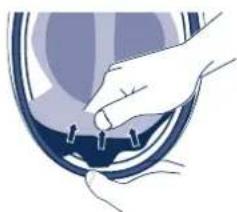
Removing the headband cushion
- Pull the semicircular guide rail of the headband cushion out of the slots of the plastic rail fixed to the inner shell.
- Pull the retaining strap in the neck area out of the guide slot between the inner and outer shells.
C. THE HELMET
FITTING THE INTERNAL LINING
Fitting the headband cushion
The semicircular guide rail stitched onto the face side is used for fi xing the cushion, aided by the retaining strap situated in the neck area.
- Push the semicircular guide rail gradually under the gaps of the plastic rail fixed to the inner shell.

- Push the retaining strap of the neck cushion gradually into the guide gap between the inner and outer shells.

- Arrange the headband cushion within the helmet ensuring that no air channel is blocked.
Fitting the cheek comfort pads
-
Fix the cheek pad with the aid of the red-marked plug-in device.
-
Push the retaining strap of the cheek pad into the guide gap between the inner and outer shells. Begin with the lower part of the pad.
-
Push the retaining strap with a gentle pressure towards the shell into the guide gap between the inner and outer shells.
-
Repeat steps 1-3 with the other cheek comfort pad.
C. THE HELMET
Ear-Pads
The ear pads supplied as standard can be positioned individually in the ear area of the helmet by means of a Velcro-type fitting. For stronger padding around the ears, pads with other thicknesses are available as accessories.
Note: For an overview of all accessory and parts please visit www.schuberth.com and check the 'Accessories' section of your helmet model.
Note: When fitting the internal lining, ensure that the ventilation gaps of the head band are positioned over the ventilation channels in the rear of the helmet and that the headband is situated in the centre between the two ventilation channels.
Warning: Never ride with any part of the internal lining removed.
Warning: Strong heat sources (such as from exhaust) may cause damage to the internal lining.
Note: To avoid damage to the internal lining and inner shell, do not hang the helmet over the mirrors or handlebars.
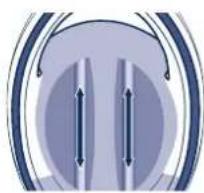
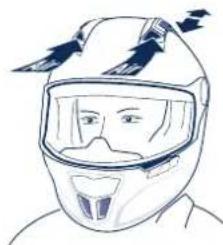
13. VENTILATION SYSTEMS
Ventilation 1 - adjustment of the visor
The SR1 features a visor that can be adjusted to various positions. You can open the visor to suit your speed and the tendency to fogging until fogging does not occur but your eyes remain protected from unpleasant air draughts.
Ventilation 2 - visor ventilation
To ventilate the visor, the SR1 features an inlet vent in the chin area. Regardless of the positioning of the helmet, some 80 - 90% of the air in the central flow pattern flows into the open air inlet. A defl actor ensures that even at low speeds the airflow ventilates the inner side of the visor shield effectively. Pressing on the lower or upper part of the ventilation element will respectively open or close the air inlet.
Ventilation 3 - head ventilation
(Proactive dynamic ventilation system) To provide ventilation to the surface of the head, two air inlet fairings are fitted on the upper side of the helmet shell. Air entering these inlets is guided effectively via channels to the top of the head. The advanced cushion system inside the helmet allows direct contact between incoming air and the head, making the collection and removal of heat from the interior through the air outlet vents on the rear of the helmet and in the embedded mesh fabric in the neck area. Moving the ventilation sliders to the rear position opens the
C. THE HELMET
ventilation channels in the helmet; if they are in the forward position, the ventilation is closed.
The level of ventilation varies with the current speed and sitting position. The maximum volume of air intake is obtained by assuming a sports sitting position.
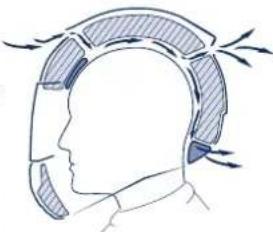
Ventilation 4 - air removal from head area
The SR1 is equipped with a constant air extraction system. Air present in the interior and entering via the ventilation is guided via channels towards the rear of the helmet. The reduced pressure present to the rear of the helmet ensures a constant suction of the air from the inside through the air outlets under the spoiler and in the special mesh material in the neck cushion ensuring a comfortable temperature inside the helmet.
Ventilation 5 - chin ventilation (2-way chin ventilation)
Die fortschnittliche 2-Wege-Kinnbelüfung The advanced two-way chin ventilation provides for fresh air at all times around the chin. If required, fresh air entering the air inlet can be diverted through air channels in the cheek comfort pads in such a way that moisture and heat in the cheek pads can be effectively removed from the helmet. You can set chin ventilation as required by means of the operating element on the chin.
Switch to centre - ventilation disabled
Switch to right - ventilation of cheek pads Switch to left - chin ventilation enabled
14. ADDITIONAL SAFETY FEATURES
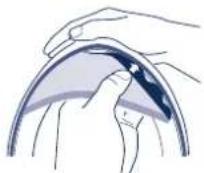
Anti-roll-off system (A.R.0.S.)
The anti-roll-off system developed specially by SCHUBERTH and fitted in every SCHUBERTH motorcycle helmet as a safety device features three safety elements. These always depend on the chin strap being fastened and correctly adjusted.
1) The helmet is prevented from being stripped from the head.
2) The small angle of inclination prevents contact occurring between the chin section of the helmet and the chin or throat of the rider.
3) The consequences of the helmet coming into contact with the ribcage in the event of an accident are reduced.
C. THE HELMET D. CHOOSING THE CORRECT HELMET
Reflective areas
One aspect of the characteristic design of the SR1 is the silver-coloured areas of reflective material on the rear areas of the neck cushion and acoustic collar. These aid the rider's visibility in road traffic, particularly where visibility is poor.
On single-colour helmets (without graphics) the SCHUBERTH name lettering appears on the front and rear of the helmet in refl active foil.
Note: Keep the safety reflective areas clean.
Note: If you intend to use the helmet in France, you are required by law to affix additional reflective stickers to the front and rear and also on the left and right-hand sides of the helmet.
It is important to take care in fi tting a helmet. Only a helmet that fi ts properly can provide the best possible protection in the event of a fall or accident. Use the following steps to determine which helmet fi ts you best:
- Schritt: Measure the circumference of your head
- Schritt: Determine the correct helmet size
- Schritt: Check that the helmet size is correct
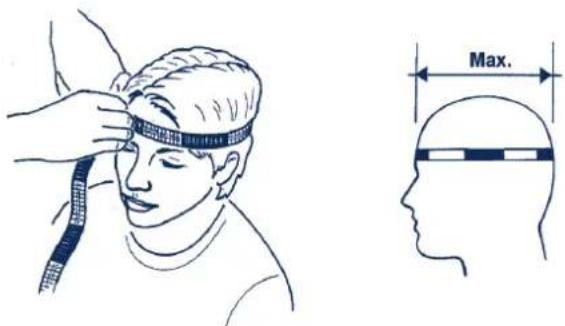
1. MEASURING YOUR HEAD SIZE
Use a fl exible tape measure to determine the size of your head. Wrap the tape measure around your head so that it lies about 2 cm above the eyebrows, so as to obtain the maximum circumference. This value represents your head size in centimetres.
D. CHOOSING THE CORRECT HELMET
2. DETERMINING THE CORRECT HELMET SIZE
We produce the SR1 in six double helmet sizes. Please use the following table to determine the correct helmet size for you:
| Head size in cm | SCHUBERTH helmet sizes | Alpha helmet sizes |
| 52 - 53 52 / 53 | XS | |
| 54 - 55 54 / 55 | S | |
| 56 - 57 56 / 57 | M | |
| 58 - 59 58 / 59 | L | |
| 60 - 61 60 / 61 | XL | |
| 62 - 63 62 / 63 | XXL |
The SR1 is produced in three shell sizes:
| Shell size | SCHUBERTH helmet sizes |
| S | 52 / 53 - 54 / 55 |
| M | 56 / 57 - 58 / 59 |
| L | 60 / 61 - 62 / 63 |
If your head measurement falls between two helmet sizes (e.g. 57.5 cm), we recommend that you try the smaller size first.
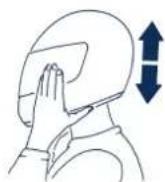
3. CHECKING THAT THE HELMET SIZE IS CORRECT
Put the helmet on and fasten and adjust the chin strap correctly (this is important; see section C.10, 'Retention systems'). Check that the helmet is the correct size for you and sits properly.
Step 1: Check that all internal cushion pads lie firmly against your head but without pressing:
(a) Cheek comfort pads
(b) Headband cushion (particularly in forehead area)
Should you feel an uncomfortable (not necessarily painful) pressure, try the next helmet size up.
Step 2: Check whether the helmet gives you a sufficient peripheral field of vision. Some restriction of lateral vision is inevitable in any helmet design, but this should not be so great as to be perceived as interfering with or limiting your ability to see.
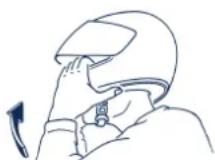
Step 3: With the helmet on your head, hold it firmly between your two hands and move it upwards and downwards. Try also to twist the helmet. You should feel these movements pulling on your facial skin and scalp. If the helmet moves too easily, it is too large – in this case, try a smaller size.

D. CHOOSING THE CORRECT HELMET E. PUTTING ON AND REMOVING THE HELMET
Step 4: With the helmet on your head, grip the chin section and try to push it backwards and off your head. If you can do so, the helmet is too small (or the chin strap is not fastened tightly enough). For your own safety, try a smaller size and/or readjust the chin strap.
Step 5: With the helmet on your head, grasp the rear edge of the helmet with both hands and try to pull it forward over your head. If the helmet can be pulled from your head in this way then either the chin strap is too loose or the helmet is too large. Readjust the chin strap; if this does not help, select a smaller helmet size.
Repeat these steps with different helmet sizes until you find the size suitable for you. Ideally you should take a test ride to check that you have chosen correctly.
Warning: Never ride with a helmet that does not fit properly.
1. PUTTING ON THE HELMET
Note: Observe the instructions on operating the chin strap and fastening systems (see 'Retention systems', section C.10).
- Open the chin strap.
- Take hold of the lower ends of the chin strap and pull these apart firmly.
- Place the helmet on your head.
- Close the chin strap by threading the free end of the strap through the double-D fastener, pull taut and fasten (see section C.10, 'Retention systems').
- Ensure that the chin strap passes under your chin and is taut.
Note: Check the correct position and length of the chin strap regularly (see section F.2, 'Checking the chin strap').
2. REMOVING THE HELMET
- Open the chin strap by pulling on the red lug of the double-D fastener and pulling the strap out from the metal eyes.
- Grasp the ends of the strap and pull them firmly apart.
- Remove the helmet from your head.
Tip: To avoid scratching objects where the helmet may be placed, we recommend you close the chin strap after you have taken the helmet off.
For your safety you should check the following points before every ride:
1. CHECKING THE HELMET
Check the helmet regularly for damage. Small superficial scratches will not affect the protection afforded by the helmet. If more serious damage (cracks, dents, chipped and cracked lacquer, etc) is present, however, the helmet should no longer be used. If necessary we will check your SR1 for any damage at no cost (see section J.1, 'Safety Check').
Note: If your body weight has significantly reduced, you must check whether your helmet is still the correct size for you (see 'Checking that the helmet size is correct', section D.3).
2. CHECKING THE CHIN STRAP
With helmet on and closed)
- Check that the chin strap passes under your chin.
- Place your forefinger under the strap and pull.
If the chin strap is loose against the chin, it is set too long and must be drawn tighter.
If the chin strap slackens or loosens, it is not properly fastened. Open the chin strap completely and close it again. Repeat the check.
- If the chin strap cannot be closed in such a way that it lies firmly under your chin, you should check whether the helmet is still the correct size for you (see 'Checking that the helmet size is correct', section D.3).
Note: Repeat this check each time you make an adjustment.
Warning: Never ride without the chin strap being fastened and correctly adjusted. The chin strap must sit correctly and must not come loose when pulled. The fastening is only properly closed when the chin strap does not give.
3. CHECKING THE VISOR
Before every ride, check that the visor is fit for function and that it offers sufficiently good vision. Remove dirt before riding (see 'Visor maintenance', section H.2). Check the visor for mechanical damage and/or cracks. A badly scratched visor shield is detrimental to vision and must be replaced before riding.
Warning: Scratched and/or dirty visors interfere seriously with vision. Change or clean the visor for your safety.
Warning: Ensure that the visor is always in good condition. Damaged visors are not safe for riding and should be replaced.
Warning: If vision is poor, stop riding.
G. FOR YOUR SAFETY
1. SAFETY INFORMATION: HELMET
Never ride without a helmet!
Motorcycling poses specific health risks and hazards for riders and passengers. These risks and hazards can be reduced by wearing a helmet, but they cannot be excluded. No defi nitive statement can be made about the specific protection offered by a helmet in the event of an accident. A safe riding style that is adapted to road and weather conditions is the prerequisite for your safety.
Use only a helmet that fits correctly.
To assure sufficient protection the helmet must fit well and be securely fastened.
Always fasten the chin strap and check that the fastening system and chin strap are correctly positioned before riding.
Never ride with an unfastened or incorrectly adjusted chin strap. The chin strap must sit correctly and must not come loose when pulled. The fastening is only correctly closed when the strap does not loosen when pulled.
After a fall, accident or any other violent impact to the helmet, its full protective function can no longer be guaranteed. The energy that acts on it in a collision will be absorbed by partial or total structural damage to the outer and possibly inner shells of the helmet, which act like the crumble zone of a car. The design is such that this damage is often not easy to see. The helmet is designed to absorb only one impact. Once the helmet has been subjected to a fall or impact the helmet must be replaced. For safety reasons you should make the old helmet unusable. If necessary you may send the SR1 to the SCHUBERTH Service Centre, carriage paid, for a free inspection.
The protection mechanism of the helmet previously described may cause small cracks in the shell to occur if the helmet is dropped from even a small height (< 1m)
Any helmet that has been subjected to a major impact must be replaced.
No helmet can offer protection against all conceivable impacts. This helmet has been specially developed for motorcycling. It is not suitable for other purposes.
Check the helmet regularly for damage. Small scratches will not affect its protective performance.
The helmet should be replaced after 5 years, depending on the intensity of use and care taken of it. The outer shell is designed for a longer service life in principle; however, since the materials of other components are subject to fatiguing and wear, the overall functioning of the system is subject to deterioration and the conditions in which the helmet are used are beyond our control, we recommend for your own safety that you replace the helmet after the period stated above.
Strong sources of heat (e.g. exhaust heat) can cause damage to the graphics, the inner shell and the internal lining.
Direct contact with fuels, thinners and solvents may cause structural damage to the inner and outer shells of the helmet. Do not allow the helmet into contact with such substances, even for cleaning purposes.
G. FOR YOUR SAFETY H. CARE AND MAINTENANCE
2. SAFETY INFORMATION: VISOR
Scatched and/or dirty visors can seriously damage vision - particularly at night or against the light - and increase the risk of an accident. Replace or clean the visor as required immediately for the sake of your safety.
Petrol, solvent and fuel vapours can cause cracks to appear on the visor. Do not expose the visor to such vapours or allow contact with these substances. You should never leave the helmet on the fuel tank of your motorcycle.
Take care to ensure that your visor is always in good condition. If vision is poor you should stop riding.
3. SAFETY INFORMATION: MODIFICATIONS/ACCESSORIES
Original components (particularly on the outer shell, inner shell and retention system) must not be modified or removed. Fitting the helmet with other, non-recommended accessories may compromise its protective function and will nullify the ECE approval and any warranty and insurance claims.
Use only original accessories and parts and accessories that are expressly recommended by SCHUBERTH for your helmet.
1. OUTER SHELL
Use water, soapy water and all generally available lacquer cleaners, shampoos and polishes and vinyl conditioners to clean the outer shell of the helmet. Generally soap and water are suffi client. Be careful when using other substances that these do not come into contact with the visor, as these can damage the visor and its coating.
Note: Do not use any automotive fuel, thinners or solvents for cleaning. These substances can cause serious damage to the helmet without any visible signs of harm. Use of such substances will compromise the protective function of the helmet.
2. VISOR
Outer visor surface
Use a soft rag and mild soap solution in water to remove dirt from the outer surface of the visor. To dry the visor, use a lint-free cloth.
Inner visor surface
Use only a soft cloth, slightly damp if necessary, to clean the inner surface of the visor. Do not use detergent or cleaning agent. To protect the anti-fog coating, avoid heavy rubbing or scrubbing.
H. CARE AND MAINTENANCE
Note: After intensive cleaning, riding in the rain or a long journey in cold weather, the anti-fog coating requires a certain period of time to become fully active again. During this time the coating may absorb little or none of the moisture produced by breathing.
Note: Use only lukewarm (<20C) water for cleaning. Never clean the visor with petrol, solvents or window or glass cleaners or other alcohol-based cleaning agents.
Note: To protect the anti-fog and anti-scratch coatings avoid heavy rubbing or scrubbing.
Note: Do not apply anti-fog gel, spray or similar substances to the anti-fog coating. Doing so may lead to undesirable reactions and possible irreparable damage to the coating.
Note: The active anti-fog and anti-scratch coatings are prone to ageing, the rate of which depends on the intensity of use and on environmental conditions. For your own safety we recommend that you replace the visor when its anti-fog properties begin to deteriorate signifi cantly.
Note: The active anti-fog coating absorbs chemical substances such as solvents and can be damaged by them. You should avoid storing the helmet close to aggressive substances (such as fuels).
Note: Even moist cleaning cloths for glasses (lens cloths) are - despite recommendations to the contrary - not suitable for cleaning the visor, since the substances they contain are not tolerated by the anti-fog and anti-scratch coatings avoid using such cloths.
Note: The visor must not be immersed in water, even when heavily soiled, since this will result in the surface hardness and thus resistance of the anti-fog coating being severely reduced.
Note: Except when in use, and particularly during storage, the visor should not be fully closed, as any moisture inside the helmet is then unable to escape and will be absorbed in large quantities by the anti-fog coating. This can cause a reduction in the useful life of the coating. Ideally you should position the visor in the second position above the urban setting.
Note: Do not affi x any labels, adhesive tape or stickers to the visor.
Tip: If the helmet is not used for a long period, a milky surface may sometimes appear (caused by a reaction of the active anti-fog coating with the surroundings). This can most easily be removed using a dry cloth.
Tip: Stubborn dirt on the exterior of the visor (e.g. the dried remnants of insects) can be easily removed by covering the visor, while closed, with a moist cloth and leaving for 1/2 to 1 hour for the dirt to soften.
Note: It is important to avoid storing the visor in temperatures above 40^ and in high humidity, as these conditions will cause damage to it.
H. CARE AND MAINTENANCE I. ACCESSORIES AND PARTS
3. INTERNAL LINING
The headband cushion, the cheek comfort pads and the ear pads can be hand-washed using a mild detergent (best if well diluted with water) at a maximum temperature of 30^ . Allow damp linings to dry at room temperature in airy conditions.
4. FASTENING SYSTEM
The double-D fastening system is maintenance-free.
Warning: Do not oil or grease the metal parts of the double-D fastener.
5. STORAGE
Store the helmet in the pouch provided in a safe, dry place. To avoid buildup of moisture inside and to prolong the life of the anti-fog coating, ensure that the visor is not completely closed. Ideally it should be set to the 2nd position above the urban mode setting. Always place the helmet so that it cannot fall onto the floor.
Note: Keep the helmet out of reach of children and animals.
1. ACCESSORIES AND PARTS
For an overview of all available accessories and parts, visit www.schuberth.com and go to 'Accessories' for your helmet model.
Warning: All other helmet components may only be replaced by your dealer for safety reasons.
2.COMMUNICATIONS SYSTEMS
Warning: Fitting any communications system (including ordinary headsets) into a helmet constitutes a modifi cation to the helmet. The communications system and headsets must therefore be specially tested and approved for use in helmets in accordance with the European helmets standard ECE-R 22.05. Otherwise, installation of such items will invalidate the approval and insurance conformity of the helmet. Proof for an ECE-R 22.05 approval of a helmet - in conjunction with a suitable communications system - is only valid where it is certified by an offi cial approval authority of the EU member states. Other forms of information from these institutions (including the general suitability of communications systems for use in motorcycle helmets) or information from other institutions are of no relevance, and the helmet will lose its approval if these are used.
3. OBTAINING ORIGINAL SCHUBERTH PARTS
You can obtain original SCHUBERTH parts through your dealer. You can find your specialist SCHUBERTH dealers on the SCHUBERTH website www.schuberth.com under the 'Motorcycle' product area and the 'Dealer' heading.
J. SCHUBERTH SERVICE
1. SAFETY CHECK
If required, you may send your SR1, carriage paid, to the SCHUBERTH Service Centre for a free safety check. You can find the relevant contact person for this via the SCHUBERTH Service Centre. In all cases please include the purchase date of the helmet and the reason for sending it.
Please be aware that such safety checks cannot be undertaken within the framework of ordinary repairs and a longer processing time may be necessary.
2. REPAIR SERVICE
The SR1 is a quality product that has been designed and manufactured to the latest development and production methods. Should a repair be necessary, please contact your dealer.
Note: Where a repair order is received without a clear statement of the fault, we or your dealer are entitled to examine the item and/or to delay fulf lling the order until a consultation can be held with the customer. Where the fault has been clearly stated but further faults are discovered during the repair, we or your dealer are entitled, but not obliged, to repair these without a further order from you, where these are necessary to maintain the effective functioning of the helmet and where the costs of doing so are small relative to that of the original repair. In other cases the consent of the customer is required before extra work is undertaken.
3. WARRANTY
The warranty period for your helmet is 2 years from the date of purchase when the helmet is used for its intended purpose. Should warranty work be required, this will be carried out by your dealer. Presentation of proof of purchase is a condition of work being carried out under the warranty. Please keep the original invoice carefully. In the event of work being carried out under the warranty, the original (or a copy) invoice must be supplied with the helmet. No warranty claim will be accepted without proof of purchase.
The original warranty period is not extended as a result of proper replacement or repair being granted. Complaints must be communicated in writing without delay to your dealer within 8 days of the purchase date. Defects that were not detected even after careful inspection during this period must be communicated to your dealer in writing immediately when discovered. When contacting your dealer please do not forget to include a detailed description of your complaint.
SCHUBERTH or your dealer reserves the right to check the serial number for invoking the warranty.
Items that have already been worn are not replaced and will be repaired. In general the decision whether parts that are the subject of a complaint shall be repaired, replaced or credited shall be at the discretion of SCHUBERTH or your dealer.
Warranty claims are excluded in particular for:
- improper use and overstress of the product,
- modifi cations to the product by the customer,
- non-observance of our product recommendations
normal wear and tear
J. SCHUBERTH SERVICE K. HOW TO CONTACT US
4. SCHUBERTH ONLINE
If you would like to stay up to date with what is new with us and our helmet range, visit our website: www.schuberth.com
| Company headquarters Phone Address | |
| +49 (0)391 8106-0 | SCHUBERTH GMBH Stegelitzer 39126 Germany |
| +49 (0)391 8106-555 | SCHUBERTH GMBH Service Stegelitzer D-39126 Germany |
| Website |
| www.schuberth.com |
| motorcycle-helmets@schuberth.com |
SR1

Felicitations!
Vouavesaftuntrésbonchoixenoptant pourleSRISCUBERTH. Le SR1estleresultatdesdernieresmethodesdedeveloppement et defabrication.AVECcecasque,vousdispoezd'unproduit de qualiteconquporpondereuxexigenceslesplusseveres en matièredesecurite,derendemusturouteetdepformanceencircuit,quiyou apporterabeaucoupdejoie.
This helmet is not intended for use in the USA and Canada. The helmet has been inspected and approved to the European ECE Standard and therefore does not conform to US and Canadian regulations and requirements. It is only legal to use the helmet in countries in which the European ECE Standard is valid. If you use the helmet in other countries, you will not in the event of injury be entitled to make a claim for compensation before the US or Canadian courts or the courts of other countries not bound by the ECE Standard.

MENTONNIÈRE AVEC FERMETURE À BOUCLE DOUBLE D
Anti-Roll-Off-System (A.R.0.S.)
This helmet is not intended for use in the USA and Canada. The helmet has been inspected and approved to the European ECE Standard and therefore does not conform to US and Canadian regulations and requirements. It is only legal to use the helmet in countries in which the European ECE Standard is valid. If you use the helmet in other countries, you will not in the event of injury be entitled to make a claim for compensation before the US or Canadian courts or the courts of other countries not bound by the ECE Standard.
Avertissement :
www.schuberth.com/us/home
2.OMOLOGAZIONE ECE

3. STRUTTURA DEL CASCO
4. CALOTTASTERNA
Anti-Roll-Off System (A.R.O.S.)
This helmet is not intended for use in the USA and Canada. The helmet has been inspected and approved to the European ECE Standard and therefore does not conform to US and Canadian regulations and requirements. It is only legal to use the helmet in countries in which the European ECE Standard is valid. If you use the helmet in other countries, you will not in the event of injury be entitled to make a claim for compensation before the US or Canadian courts or the courts of other countries not bound by the ECE Standard.
Avertissement :
Anti-roll-off-systeme (A.R.O.S.)
This helmet is not intended for use in the USA and Canada. The helmet has been inspected and approved to the European ECE Standard and therefore does not conform to US and Canadian regulations and requirements. It is only legal to use the helmet in countries in which the European ECE Standard is valid. If you use the helmet in other countries, you will not in the event of injury be entitled to make a claim for compensation before the US or Canadian courts or the courts of other countries not bound by the ECE Standard.

Avertissement:
www.schuberth.com/us/home
2. HOMOLOGACION ECE

3. ANATOMÍA DEL CASCO
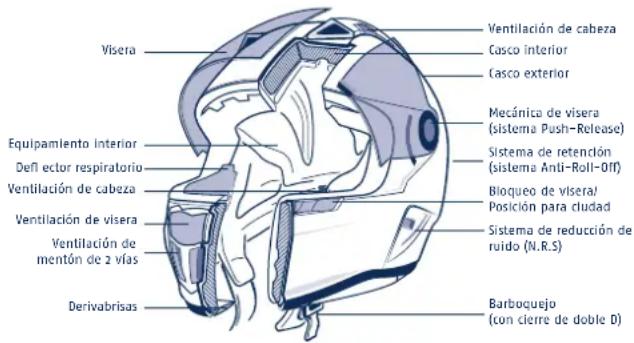
4. CASCO EXTERIOR
A研讨会 on the role of a lissidler in the study of the relationship between the risk of developing diabetes and the risk of cardiovascular diseases.