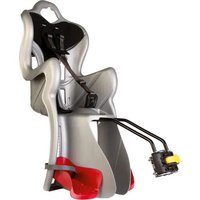
Freccia - Child bike seat Bellelli - Free user manual and instructions
Find the device manual for free Freccia Bellelli in PDF.
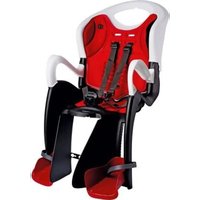
| Product type | Front child bike seat |
| Brand | Bellelli |
| Model | Freccia |
| Use | Child transport on bicycle |
| Maximum child weight | 15 kg |
| Recommended age | From 9 months (child able to sit alone) |
| Attachment type | Front, between the rider and handlebars |
| Bicycle compatibility | Bicycles 26"/28" with round or oval frame, minimum load capacity 18 kg |
| Safety system | Safety belt with buckle, foot straps, anti-theft system with key |
| Main materials | Polypropylene (PP), polyethylene (PE), polyamide (PA), steel, polyester, PVC, PC+ABS |
| Maintenance and cleaning | Water and soap, avoid aggressive detergents |
| Warranty | See Bellelli website for conditions |
| Recycling | Materials identified for sorting (PP, PE, PA, steel, etc.) |
| Included accessories | Attachment bracket, support fork, footrests, security key |
| Assembly method | Bracket screwed onto the frame, then insertion of the fork |
Frequently Asked Questions - Freccia Bellelli
User questions about Freccia Bellelli
0 question about this device. Answer the ones you know or ask your own.
Ask a new question about this device
Download the instructions for your Child bike seat in PDF format for free! Find your manual Freccia - Bellelli and take your electronic device back in hand. On this page are published all the documents necessary for the use of your device. Freccia by Bellelli.
USER MANUAL Freccia Bellelli
EN. Baby Seat for Bicycle - Front Mounting
natural_image
Exterior view of a modern bicycle with a black seat and orange seat, set against a blue sky background (no text or symbols visible)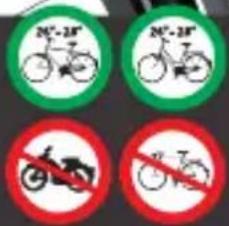
text_image
C3 38-40 mm 1.50"-1.57' 4 3/2 9 8
text_image
C4 45-50 mm 1.77"-1.96" 40-45 mm 1.57"-1.77" 11 2 4 9 8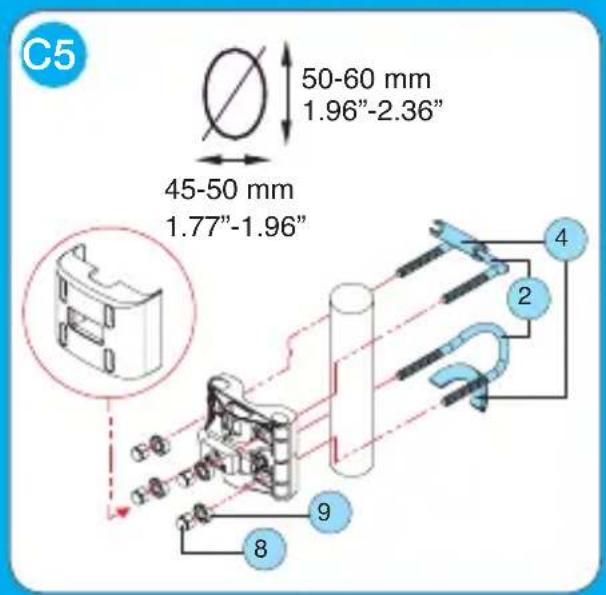
text_image
C5 50-60 mm 1.96"-2.36" 45-50 mm 1.77"-1.96" 8 9 4 2 8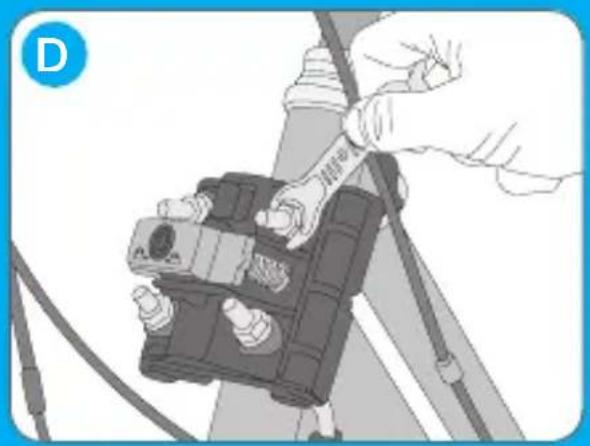
natural_image
Illustration of hands installing or adjusting a cable or cable device (no text or symbols visible)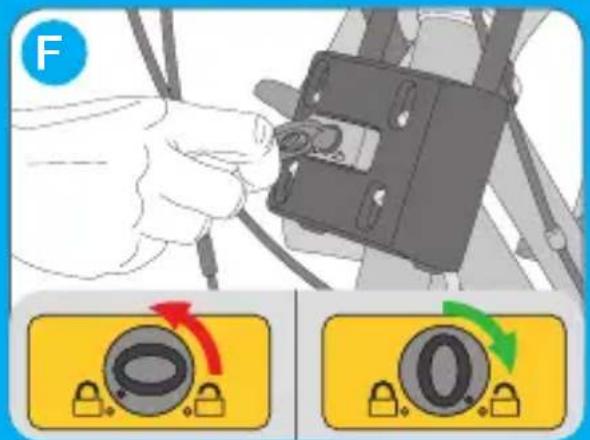
text_image
Diagram showing hand operating a device with lock mechanism, accompanied by two labeled buttons for rotary switch operation.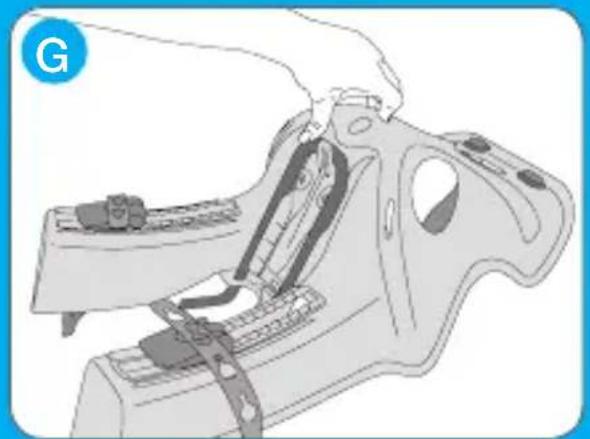
natural_image
Technical illustration of a mechanical assembly with clamps and components (no text or symbols)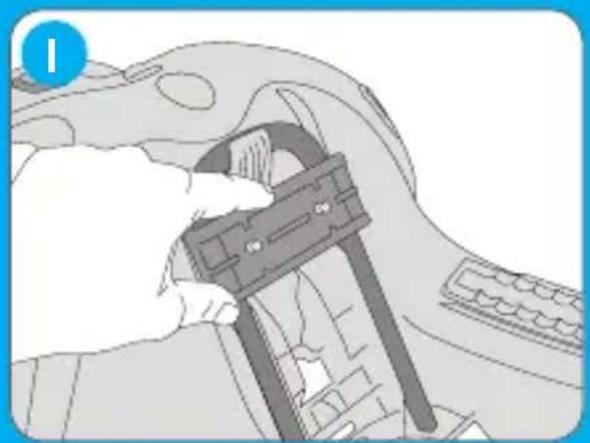
natural_image
Illustration of a hand using a tool to adjust or install a mechanical component on a vehicle head (no text or symbols visible)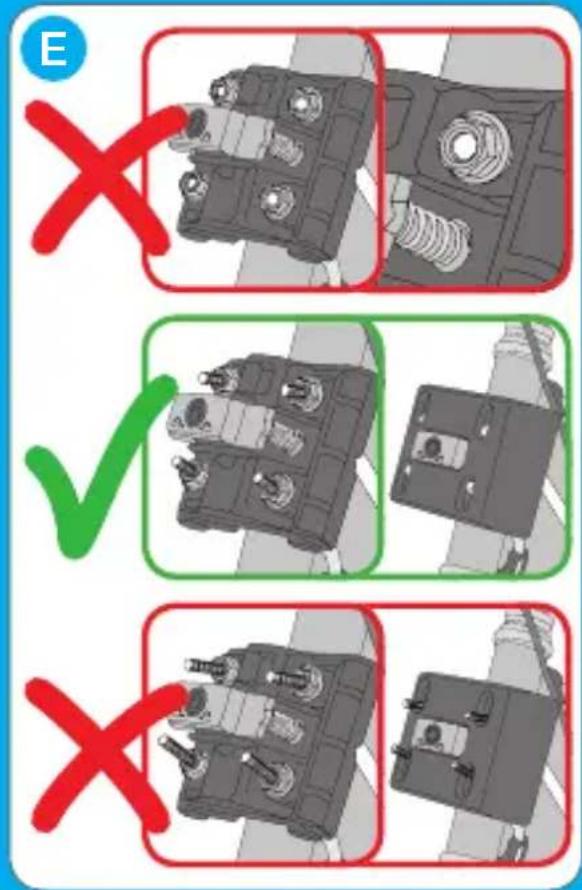
text_image
E X ✓ X
natural_image
Illustration of a hand inserting a plug into a device component (no text or symbols visible)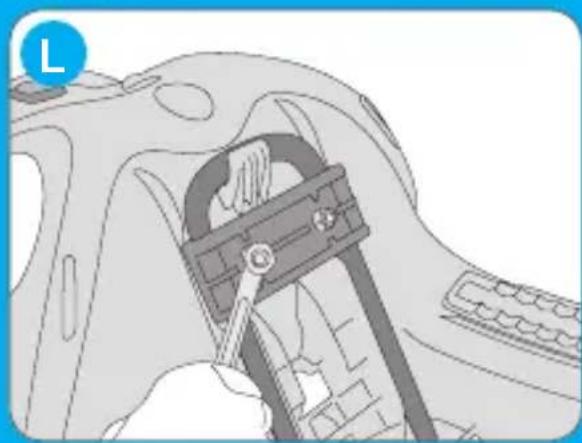
natural_image
Illustration of a hand using a pliers to adjust or install a component, no text or symbols present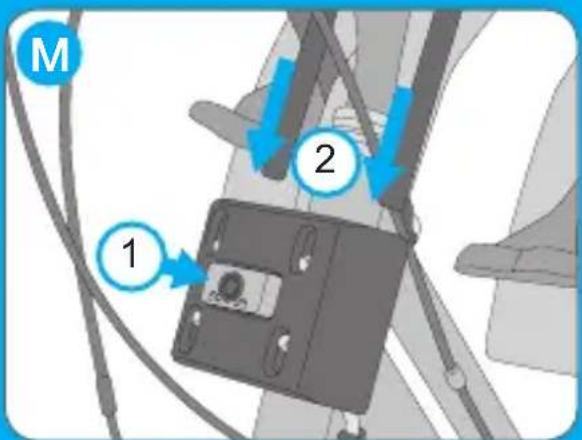
text_image
M 1 2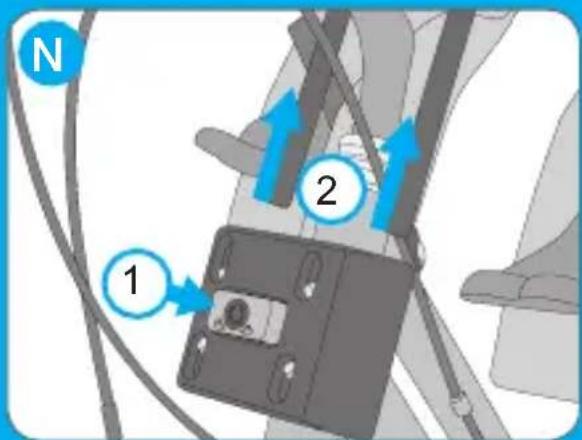
text_image
N 1 2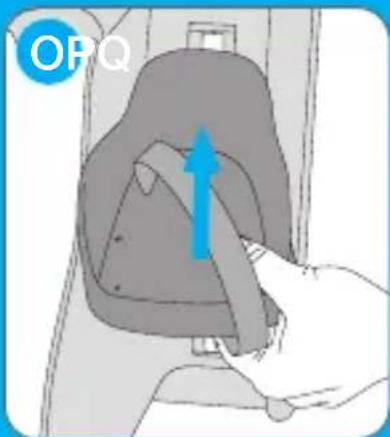
text_image
OPQ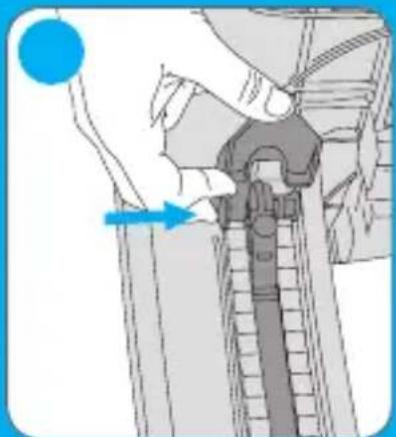
natural_image
Illustration of a hand adjusting a mechanical component with blue arrows indicating direction (no text or symbols)
natural_image
Illustration of a hand pressing a mechanical component with a blue arrow indicating rotation (no text or symbols)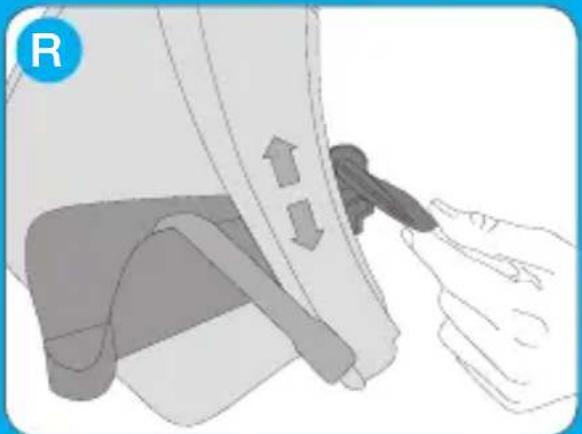
natural_image
Illustration of a hand pressing down a device with a tool, showing mechanical components and motion arrows (no text or symbols)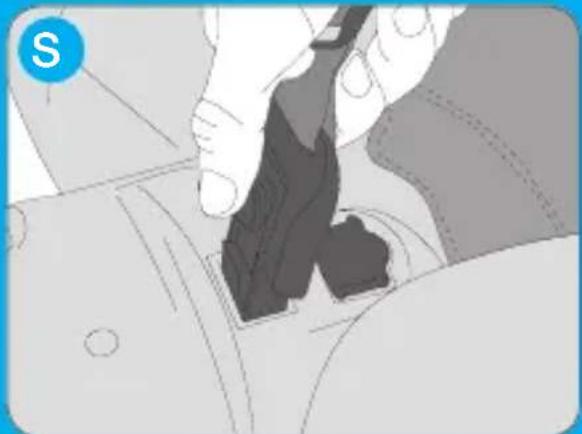
natural_image
Close-up of a hand using a black tool to press down a mechanical component (no text or symbols visible)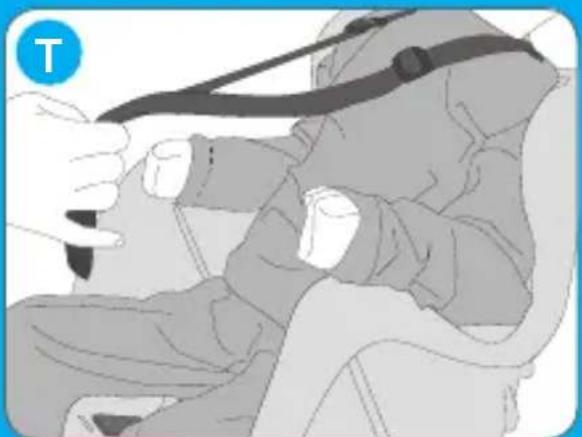
natural_image
Illustration of a person wearing a seatbelt and holding a belt, with hands adjusting the belt (no text or symbols visible)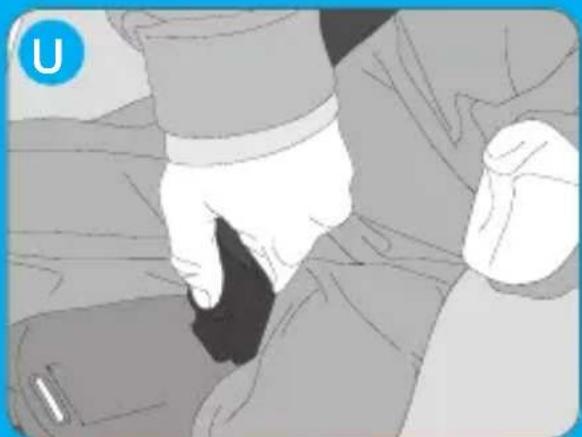
natural_image
Illustration of a hand inserting a small black object into a car seat (no text or symbols)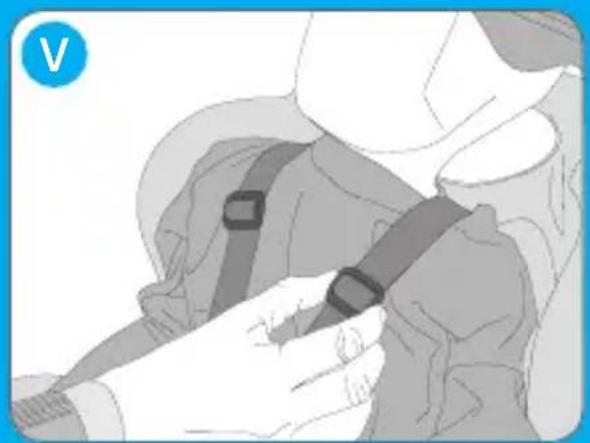
natural_image
Illustration of a person adjusting a seatbelt (no text or symbols visible)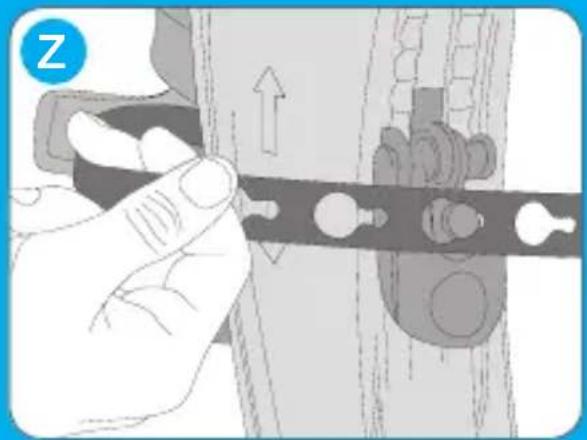
natural_image
Illustration of a hand adjusting a mechanical component with arrows indicating motion (no text or symbols)
text_image
WASHING INSTRUCTIONS 30°X E I B
IT 08
EN 14
FR 20
DE 20
ES 26
PL 32
SEGGIOLINO ANTERIORE B-FIX - IT
Congratulations and thank you for the purchase of your new bicycle seat. If you would like information about other Bellelli products, visit our website: www.bellelli.com.
These instructions apply only for Bellelli front seats.
Read the installation and operating instructions carefully before you install the seat and use it. Do not mount the seat by following only the pictures on the cover.
Keep the manual for possible, future reference.
NOTES
WARNING: The seat is designed exclusively for transporting a child. Do not add any other loads to the seat. Any additional loads must be attached on to the back of the bicycle by using other supports, such as a rear luggage carrier.
WARNING: Any change to the seat or its mounting support is prohibited. The manufacturer and the retailer are not responsible for possible damages due to changes.
WARNING: The manoeuvrability of the bicycle may vary significantly with a child in the seat, in particular regarding balance, steering and braking.
WARNING: Never leave the bike parked and unattended with a child in the seat unattended.
WARNING: Never use the seat if any part of the seat or of the bicycle is broken or missing. Contact the manufacturer or dealer to purchase necessary spare parts for the seat. Replace the seat after any accident even if it has no visible damage.
GENERAL INFORMATION ABOUT ASSEMBLY
The bicycle front seat for children is to be mounted between driver and handlebars.
Install the seat facing the direction of travel.
The mounting support is suitable for a frames with a round cross section as well as a variety of frame with an oval cross section. Carefully read the section "Mounting support installation".
The seat is equipped with a mounting system with support fork.
Use the seat for 26 “-28” bikes in order to withstand the additional loads of at least 18 kg (39.7 lb).
Consult the user's manual of the bicycle or your dealer.
Always attach the child's straps and the foot straps. Check carefully and regularly that the child is properly secured in the seat. Carefully read the section "Placing the child in the seat".
Do not mount the seat leaning forward. Tilt it slightly backwards, to better hold the child.
With the seat mounted, check your bike regularly and pay attention particularly to the tires, brakes and lights.
GENERAL INFORMATION ABOUT USAGE
Before using the product check over the highway code of the country in which it is being used.
The bicycle front seat is suitable for children with a maximum weight of 15 kg (33lb). Do not use the seat if the weight of the child is more than the approved amount.
Regularly check that the weight of the child does not exceed this limit.
For use only with children who are able to sit for a long time alone and without help (as of roughly 9 months old).
Do not use the seat on motorcycles, scooters, mopeds, racing bikes and bikes with suspension.
Do not use the seat on electric bicycles. The seat may be used on Pedelecs.
Check that the limbs and clothes of the child or that of the driver cannot be caught in the moving parts of the bicycle or in the seat (e.g. in the brakes or the spokes of the wheel). Use a saddle cover or a saddle with internal springs. Check this regularly with the child's growth.
Check that the child cannot stick fingers nor feet in the wheel spokes.
Check that the child cannot reach any sharp or pointed parts (e.g. frayed brake cables)
Check that the child is dressed sufficiently and warmer than the driver is and appropriately protected in the case of rain.
Have children wear a safety-approved helmet of an appropriate size (in some countries wearing a helmet is a requirement, consult the highway code of the country where you use the seat).
Never carry two children at the same time.
The cyclist must be at least 16 years old.
Attach all the straps, even if you are not carrying a child.
Check that the straps cannot reach the wheels or other moving parts of the bicycle, both with and without the kid on the bicycle.
Always check before placing the child in the seat, that the seat is not too hot (this can happen, for example, when the seat has been exposed to direct sunlight).
Take the seat off the bike when transporting it on the outside of a vehicle (e.g. on the roof of a car, on a trailer or on the back of the RV). The air flow could damage the seat or break the fasteners of the seat on the bike thus causing an accident.
WARNING: The manoeuvrability of the handlebars can be hindered by the child seat. Replace the handlebars, if the child seat reduces the steering angle on each side to below 45^ .
ASSEMBLING THE SEAT
WARNING: Do not perform installation operations with the child in the seat.
Normally, the bracket (13) is not necessary for mounting the support to fasten the bicycle front seat.
Nevertheless, it is recommended to keep the bracket in order to mount the support of the Bellelli seat at a later date. For this type of installation follow the manual that comes with the rear seat.
Remove the luggage carrier or the basket of a bicycle they obstruct the installation of the seat.
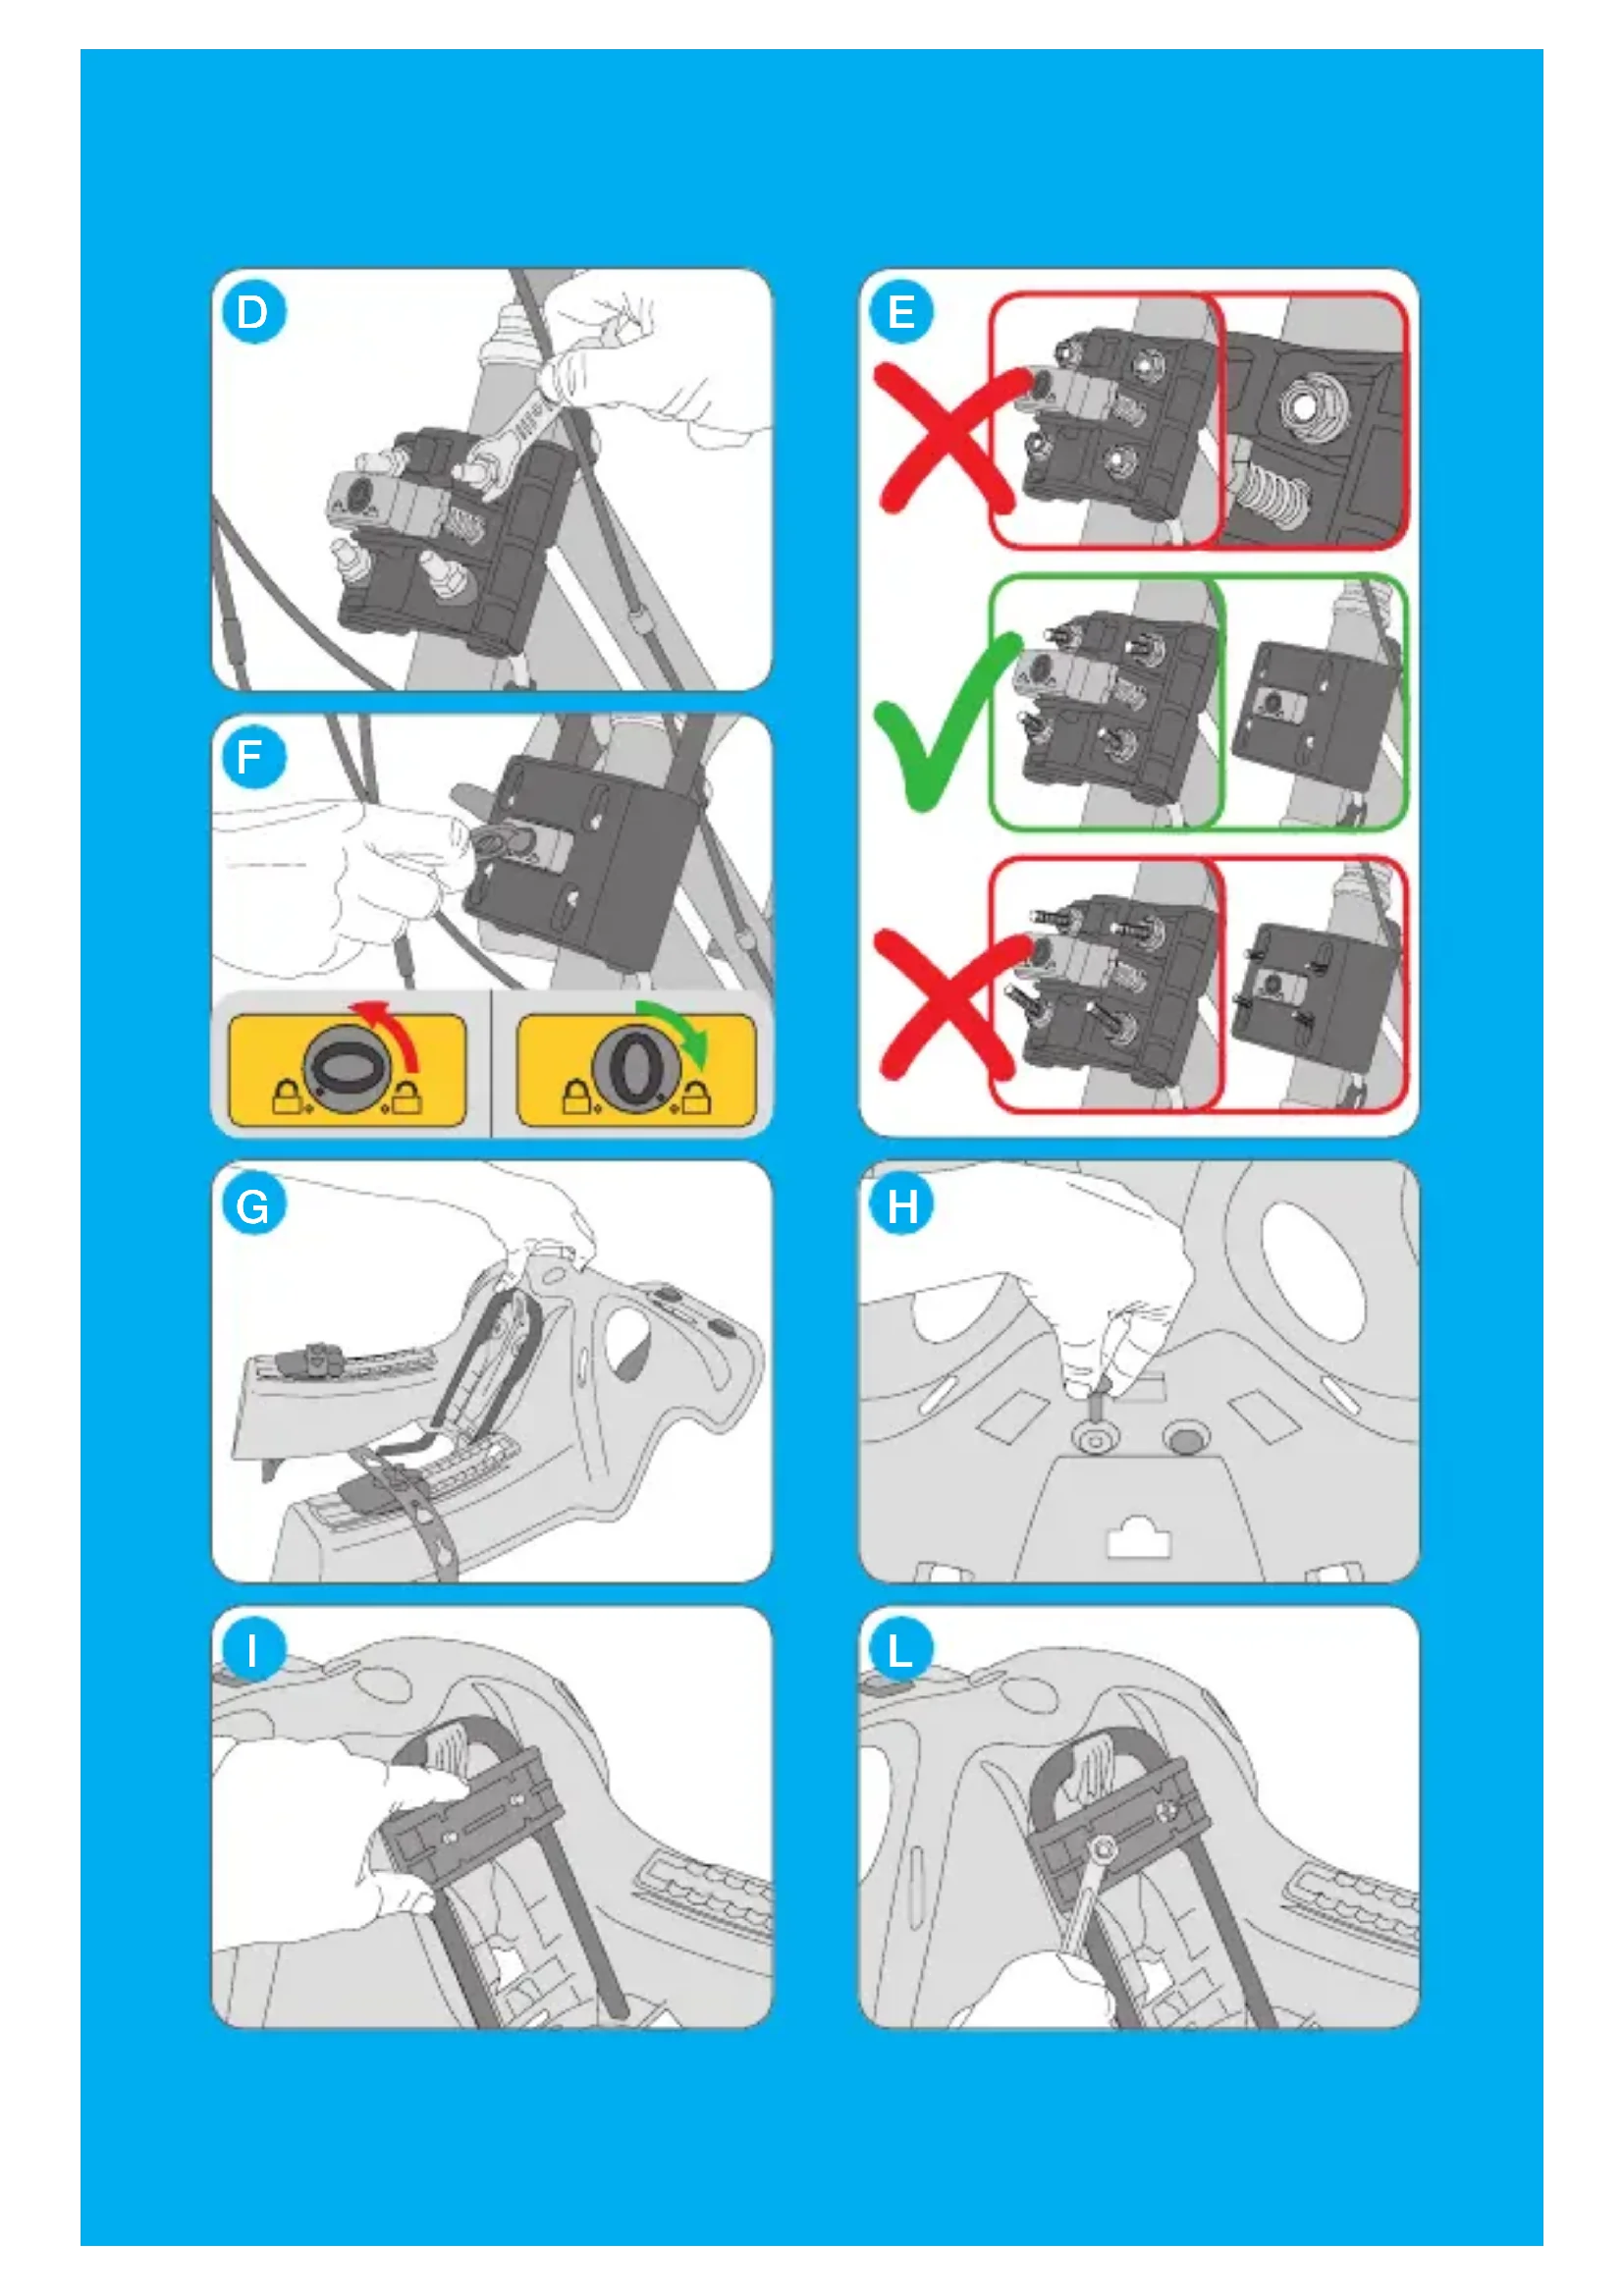
Mounting Support Installation
Locate the area where the mounting support is attached to the bicycle.
See figures C1, C2, C3, C4, C5 and familiarize yourself with the components which are necessary for mounting the support (fig. A).
Insert the gaskets (4) into the two iron screws (2 or 3). The choice of the correct pair of screws, as well as the appropriate components, depends on the bicycle frame, as shown in figures C1, C2, C3, C4, C5. Keep the other pair of screws and the unused components for possible later configuration of the attachment. Do not confuse the screws of the two pairs.
The screws can be fixed according to four different combinations (fig. B). Select the suitable combination for the bicycle frame on which the support is mounted.
The configurations shown in figures C1, C2, C3 are equivalent. The right choice of this only depends on the shape and the dimensions of the bike frame.
REMARK: Correct installation foresees that the nuts completely wrap the screw thread after their fastening, i.e. There must be no space inside the nut. If this is not the case, the mounting support is
not properly attached. Furthermore, after tightening and covering the mounting support, the screws may only emerge slightly (see fig. E).
Position the mounting support (7) on the bicycle frame and make sure that the two openings which are meant for the support fork are placed upwards.
WARNING: Do not attach the mounting support to the handlebar.
WARNING: Align the mounting support in the direction of travel (yellow button aligned towards the front part of the bicycle).
Screw the nuts slightly and evenly on (fig. D). The mounting support must be able to rotate freely around the bar, in so far as it is consistent with the shape of the bike frame. The definitive fixing takes place after the correct position for the seat is set (as is shown in the following section “Assembly of the seat on the bike”).
WARNING: Check that the mounting support does not interfere with the break and gear shift cables.
Safety System / Theft Protection
The mounting support is equipped with a security system/theft protection, which can be operated with a key (5) that is operates with the equipment.
If the system is in the closed position, it is not possible to insert the support fork of the seat in the bracket or pull them out.
If the system is in the open position, it is possible to insert the support fork of the seat in the bracket and pull them out.
To move from the open to the closed position: Insert the key into the lock (fig. F) and rotate one quarter turn clockwise.
To move from the closed to the open position: Insert the key into the lock (fig. F) and rotate a quarter turn counter clockwise.
Mounting the Support Fork on the Seat
Place the seat on the head.
Position the support fork (17) under the seat (fig. G).
Place the screws (15) into the seat (fig. H).
Position the fixing plate (16) under the seat (fig. I).
Tighten the nuts (14) to fasten the support fork (fig. L).
WARNING: Periodically check the tightening of the nuts. These can come loose during use.
Assembling the Seat on the Bike
Be sure that the mounting support lock is in the "open" position.
Press the yellow button (6) and place the support fork (17) into the holes on the upper part of the mounting support (fig. M).
WARNING: After successful insertion, make sure that the yellow button (6) is latched. If it is not latched, the support fork (17) is not correctly inserted: Repeat the process.
Align the seat along the bike's axis.
Check that the seat does not interfere with the pedals, brakes, gears and any other moving parts of the bicycle.
Leave enough space to be able to place the child in and remove it from the seat.
The child must have enough leg room while riding.
The cyclist must have enough space to comfortably drive and steer.
Make sure that the knee does not hit against the seat while riding.
Make sure that the handlebars do not jam in the seat while steering.
Tighten the nuts (8) on the mounting support, once you have determined the best location for the seat.
WARNING: Check to make sure that tightened nuts completely cover the threads (fig. E). If this is not the case, the mounting support is not properly attached.
Attach the cover (1) by pushing against the front of the mounting support so that it locks into place on the sides of the mounting support where the corresponding notches are located. For a correctly positioned cover, make sure that the rectangular indentation is directed upward. A click shows a successful mounting.
The correct choice of the components, in particular the screws ensures that the they do not emerge from the cover. Lock the mounting support by turning the key to the “closed” position (Fig. F).
WARNING: Check the tightening of the screw regularly. These can come loose during use.
Removing the Seat from the Bike
Place the security system / Burglar in the open position.
Press and hold the button (6) on the mounting support (17) and pull the seat upwards (fig. N).
Installing the Footrests
Take the left footrest (25) (L symbol printed on the back).
Insert it into the vertical slot of the left leg strap.
Push it all the way up (fig. O).
Take the catch lever (23) of the left footrest (L symbol printed on the back).
Insert the catch lever into the hole on the backside of the footrest. insert it from the outside and push it all the way through to the back (fig. P).
Close the locking lever by pushing it down until you hear a click (fig. Q).
Repeat the same operations for the right footrest (symbol R).
USE AND ADJUSTMENT OF THE SEAT
Adjusting the footrests
Prior to the use of the seat, check that the child's feet rest fully on the supports (25).
WARNING: Do not install the footrests with the child in the seat.
Turn the catch lever on the rear of the footrest upwards (fig. R).
Adjust the footrest (25) upwards or downwards until you reach the desired position.
Push the lever downwards to lock it. A click indicates that the lever is correctly locked in.
Final Inspection
WARNING: Do not conduct the final inspection with the child in the seat.
Push the bike for a few meters by hand, making sure that no moving parts touch the seat, no protruding straps are close to the wheels and brakes and that pedals are still in good condition.
Check that the fastening system is adequately attached to the bicycle frame and the seat is correctly hooked in the fastening system.
Placing the child in the seat
Press the button of the middle buckle (20) until you hear a click indicating that the sprocket is unhooked (fig. S). Pull the buckle upwards to take it off.
Place the child in the seat.
Push the straps through on the side of the child's head (fig. T).
Place the middle buckle through the opening (Fig. U). Slide the buckle through the opening until you hear a click.
Adjust the loops (19) on the strap, so that it rests better on the body of the child (fig. V).
Place the feet of the child on the footrests.
Close the straps (23) by attaching them on the pins on the back of the footrests (fig. Z).
Removing the child from the seat
Loosen the straps holding the feet.
Press the button of the middle buckle (20) until you hear a click indicating that the sprocket is unhooked.
Pull the buckle upwards to take it off.
Pull the straps over the child's head.
MAINTENANCE
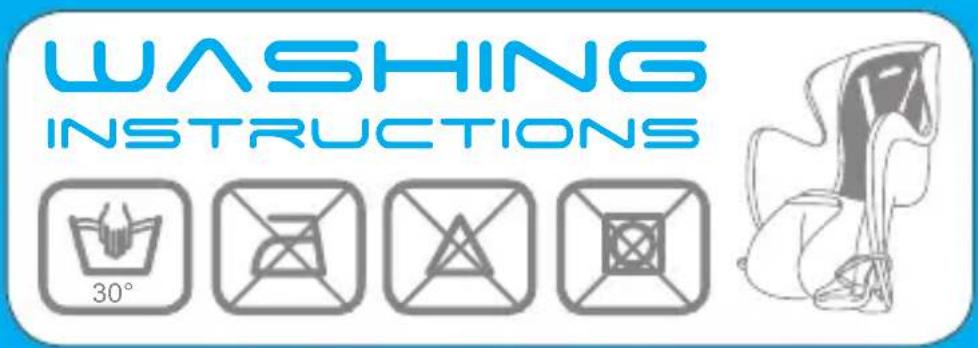
Wash the seat regularly with soap and water. Do not use aggressive detergents.
GUARANTEE
The warranty terms can be found on the warranty web page.
RECYCLING
- PP
2nd Iron
-
Iron
-
PP
-
PP
-
PE
-
PA
-
Iron
-
PA
-
Iron
-
PP
-
PP
-
PA
-
Eisen
-
Iron
-
PA
EN
- Iron
- PP
- PA
- PC + ABS
- PP
- Polyester
- PP
- PE
- PP
- PVC