
Chute - Slicer JAC - Free user manual and instructions
Find the device manual for free Chute JAC in PDF.

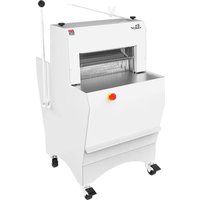
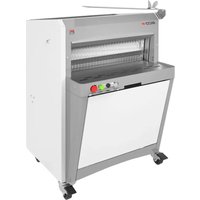
| Product type | Electric bread slicer |
| Brand | JAC |
| Model | Chute |
| Dimensions (L x W x H) | 500 x 400 x 300 mm |
| Weight | 25 kg |
| Power supply | 230 V / 50 Hz |
| Power | 500 W |
| Cutting capacity | 300 to 3,000 slices per hour |
| Adjustable slice thickness | 6 to 16 mm |
| Number of blades | 12 blades |
| Blade material | Stainless steel |
| Blade type | Circular blades |
| Emergency stop | Yes |
| Blade guard | Yes, protective cover |
| Noise level | ~ 70 dB(A) |
| Maintenance | Daily cleaning, periodic lubrication |
| Blade replacement | Every 6 months or depending on use |
| Warranty | 3 years subject to maintenance by an approved agent |
| Spare parts available | Yes, blades, belts, etc. |
| Repairability | By JAC approved agent |
| Usage | Professional |
Frequently Asked Questions - Chute JAC
User questions about Chute JAC
0 question about this device. Answer the ones you know or ask your own.
Ask a new question about this device
Download the instructions for your Slicer in PDF format for free! Find your manual Chute - JAC and take your electronic device back in hand. On this page are published all the documents necessary for the use of your device. Chute by JAC.
USER MANUAL Chute JAC
Translation of the original instructions
¥
K
naIONa STdRT-UP
Yer bánty rhy tBkTbI a JAC naBbKbT abbl BT BerpbI pkNT ye yba6n 3erw dtw3 irBb oew 3erW Be6okbl6Bt.
16 eBbITw 0eW 3er ye bt BeHmptTyTp3 HayKHOktbI eTt W yBT 6TCy OTB 3Taun, mptaHT 6eYr YbT oeppeBk6abIKBTH:
- Obyak6 aHHKhya6Bt owen 3erw arybeukhtbI aNTby oeW K6Hyappayke6, Hya7y-rMa6bl oeppeB-rM;
- 16 eushitwe bT abpt ye bt6tky owen ybT P year BaWsa6y3 (HTT Be6bkyke6n oeW tTyw6k6n bTpeB), 3er HberpbI baT ybT HTsdkBT been okpptbI ery b3 3erW bIKHywkryeW BbT 6 ybT naBbK6T KH K6HyappTbI. TbT HTsdkBT been KN peBaytby ay ybT baBn eo ybkH na6rap.
WdRRdNTY
JAC eooTuH a P year BaUsha6y3 e6 app Kyn MuebIrByn.
TbKN BaUa6y3 K6BprbITH uTmpaBTnT6y eo euknk6ap Maun ye bT bITOTBykdt a6bl K6Hyappayi oTT eo BaaNT b3 ybT JAC ant6y.
TbT BaIsha6y3 bTBeHT HTOOTBykdt OWeH yBt K6HyappayKe6 bIayTeo yBT TaKMT6y
Under the following restrictive conditions
- TbT TaKMT6y KH MrwBbaHTbI r6blTsw "6eWnap" Be6bkyke6h;
- 16hyappayke6 KH nabIT b3 a6 arybeWKHTbI aNT6y;
- UyKpKhayke6 eo Tarkmnt6y Be6oeuK6n ye ybT K6bIKBayKe6n eo ybT K6HyurByKe6n oeu rHT abbl oe ybT MfMmEHT oeW BbKb Ky KN naBIT;
- TbT TaKMT6y KN naK6yak6tbl bIaKp3 an a Jeebl OaybTu Hberpyb a6bl Bkyb app bIIT BaHT;
- MaK6yT6a6Bt OepeBtbl-IM b3 ybT arybeuKHTbl aNT6y Be6oEwK6n ye ybT naK6yT6a6BT HMTBkoBayke6h Bkyb ay pTaHy e6T naK6yT6a6BT a 3TaW (naK6yT6a6BT ay ybT rHTw'H Behy).
TbT na6rap bAH a MaNT oeW ybKH BbTWT ybT aNT6y Ba6 bITyaKp ybT bIKOTWT6y nak6yT6a6Bt.
Yf there is no maintenance follow-up by an authorised agent and/or if the service book is not completed correctly, the warranty is limited to one year.
- EcBprHkdt rHT eo JAc eukkkbap MaunyH.
This warranty doesn't cover
- RtmpaBtnt6y eo 6eunapp3 BtaK6mawyn;
- Pauyn Oer6bI 6eY ye bT bITOTBykdt b3 erW bITapTuH;
- PwebptnH wTHrpyk6I owe n ab6eunap rHT eo ybt TaKMT6y;
- PwepptnH wTHrpK6I oWe n a6 K6HyappayKe6 6ey K6HyappTbI b3 a6 arybeWKHTbl aNT6y;
- Paushn BbTt Mwebptnn wTHrp y owen ywa6Hmey bianant eW K6BewrtBy ba6bipK6n.
Rtmakw abby/eW wTmpaBnt6y eo bITOTBykdt Mauyh bIRK6n ybT Bawsa6y3 MTskeblieth 6ey TcyT6kkykap Bawsa6y3.
rΔUTcON
- TbKH naBbk6T KH K6yT6bItbI oew MweoTHHke6ap baNTsH;
- TbKN naBbK6T KH Heptp3 k6yT6bItbI oeW BryyK6n yTImTswayT baNTbI bwtabI;
- ly na3 e6p3 bT rHTb1 b3 e6T MTwHe6 ay a yKNT. (r6pTHH eybTuBkHT HyayTbl) ;
- De6'y appepeBbKpbIuT6 eW r6aRybeeKHTbI MTUHe6H ye rHT eW na6KMprayT ybT naBbKoT;
- ly baH ye bt nTMy a6bl rHTbI K6HKbIT K6 a peBayKe6, aBa3 oWeu bRnKbIKy3 a6bl bTay;
- TbT naBbK6T baH ye bt abITaraytp3 pky oew Baaw3k6n ery ybt Bewn hayKhoaByeWkp3 ;
- De6'y BpTa6 ybT TaKMMT6y Bkyb BayTu;
- TbKN naBbK6T baH a 6eknt pTIDTp bTpE8 75 bIB(A) an MTw Hya6bIaIbEN ISO 3744.
rONNarTcON
- BtoeWt Be6bTByk6n 3erw naBbK6T ye ybt TpTByukBky3 6TyBeun, BbTbn ybay ybt naBbK6T emTuayke6 depyaT (HTT waykbmpayT e6 ybt naBbK6T) a6bl depyaT e0 ybt TpTByukBky3 6TyBeun aWT aMMWeMVKayT;
- Ce66TByke6 eo ybT naBbk6T bAH ye bt nabIT rHK6n a6 taWybtI mpr;
-
YerTuTByuKBap K6HyappayKe6 HrMMP3K6J ybT naBbK6T baH ye bt MWeyTByt b an btpeB :
-
NewyB AntukBa: Mak6 MweyTByke6 15A;
- RTHy eo ybT BeupbI: MaK6 MueyTByke6 16 A.
Neyt: App eybts MwebptnH 7Tnrgy6n owen a6ebytss y3MT eo Be66rByke6 BKpp 6ey bt yanT6 k6ye aBBer6y.
START-UP
- lo 6T BTHHaa3 OKc ybT OTty eW BaHyTuH bITpkdTuTBkyb ybT naBbK6T;
- Vtshko3 ybt bikwtByke6 eo weyayke6 eo bitpkdtw3 btpy e6 ybt naBbk6T;
- PpTaHT wToTw ye ybT "I6HyurByke6h" HTByke6 oeu rHK6n ybT naBbk6T;
- TbT bpabITN yt6Hke6 nHy bT BbTBnTbI a6bl, Ko 6TBTNHa3, abiYrHytbI bIRK6JI K6HyappayKe6 a6bl aoTysh baKn6bn Bry 50 peaTH.
HdNbaR
- RTneT ybT TpTB Mprn bToeWt TdTu3 naK6yT6a6Bt a6bl HTuDKBt emTuayKe6;
- De6'y yerBb ybT bpabITH TdT6 BbT6 HyemMTbl;
- lo 3er 6TbI ye BbaIy byt bpabITH, baIy bkh bie6t b3 3erw arybeWKhtbI bIKHykbryeW;
- ManT HwT ybay 3er Btaw abyk-Bry MweyBykdt npedTH BbT6 wTmpaBk6n ybT bpabITH eW BaW3K6n ery emTwaykeh K6 ybT dKB6ky3 eo ybT bpabITH;
- App nak6y76a6Bt ew ma7y Bba6nk6n emTwayke6n awt ye bt BaushkTBi ery b3 a arapkoKtbI MTsHe6
K
cNSTRUrTcONS nOR USa
UHT ybT BbTnaaykBHe 6 MaNT 60 oeW rHK6J ybT naBbK6T.
Ay ybT HyaWy eo ybT bia3 MeBtWM ybT naBbKbT Bkyb ybT uTbI STOP bryye6.
Procedure to use the machine
- AbyHy ybT bwtabi MwTHH ye ybT bTKIby eo 3erw bwtabi;
- PpaBt 3erw peaTH eO ybT hAnT y3MT e6 ybT wTaW wAIM;
- PHTHH ybt Syauy bryye6 ye Hyauy ybt bTayk6n neyke6 eo ybt OsaANTH;
- WbT6 ybT paHy bUTabi UtaBbTH ybT bpabITH, rHT ybT pTdTw e6 ybT uKnby eo ybT naBbk6T;
- PwTHN Syem ye buk6n ybT owaHTH ye a bapy.
Yer Ba6 baT a ban bpeBTw Beunk6n b3 MRhbk6n ybT BbkyT bryye6. (oea naBbk6T OKyyTBi Bkyb ybKn emyke6)
Ay ybt T6bl eo ybt bia3, MwTHH ybt wTbI STOP bryye6 ye HBkyBb ybt naBbk6T eo.
Tip 1 AoyTu a OTb bia3H eo Beun baT ybT bpabIT yT6HKe6 BbT BnTbI b3 a arapKOkTbI MTuHe6.
rapacity NrnbTweo bwtabH Bry MTw bia3:300 ye 3.000 (bITMT6bIK6n e6 ybT y3MT eo bwtabi). Leao bIKNT6HKe6h (L c b) (Bn): NK6.12c6-nac.44c16
ucnTaNndNra
haily,b3a ywaak6TbI rHTt:
- Emmy3 ybt Bwrib BepprBye;
- UHT a HpKJIbyp3 bIaMM Bpeyb oeW TcyTsw6ap naK6yT6a6B;
- OMT6 ybT yabpt K6 owe6y ye BpTa6 e6 ybT K6HKbIT.
avery OAXEEE cuts andIor at least 5 time a year, b3 a6 arybeewkhtbI aNT6y :
1.RtneTytMprn;
2.RrmpaBt ybT BryyTuH (HTBryyTu Bba6nk6mMuEBrIt)
NB: De6'y eTsw yKnbyt6 ybT BryyTuH bTBarHT ybTuT Kh a shKnH eo bitoeunK6n ybT owaNT.
- Cptab bkyb a bwnb abby daBrrn ybt K6Hkblteo ybt naBbk6T;
- CbTBN ybT hyayTeo ybT btaWK6JH;
5.LrbukBayybtIrkblTH;
eheck that your authorised agent records the intervention in your service book in order to keep your 3 year warranty
SPdRa PdRTS
WbT6 eBbITuK6n HmaT Ma7yH, BbT Bn Bkyb 3erw arybeukhtbI ant6y ybT Ma7yH Be6BTu6TbI rHK6n ybT HmaT Ma7yH Bayapeirr MrbpKh8tbl b3 ybT na6roaByTu.
ApBa3H MWeEdkbIT ybT naBbk6T 6rnbTu an K6bIKBaytbe6 ybT wayK6mmpayT.
Yerw ant6y Bkpp eWbIT WbT MaWHy oWeJAC.
TROUkaSNoOTcNb
The machine is completely stopped
Dkbl 3er mprn ky k6?
In ybT MeBtW HrMMp3 BeNK6J ye ybT HeBnTy?
The slice thickness is irregularX
In ybT HMaBt bTyBTT6 ybt BryyTuH KwUeTnIrpaw?
Awt ybt BryyTuH Btppyt6hKe6tbl?
the bread vibrates in the cuttersX
Awt ybt owaanth Btpp apknl6tbI?
De(TH) ybT Hmuk6n(H) eo ybT bwtabI MwTHHk6n bTbaT BeWrtByp3?
The bread cuts very slowlyX
De ybT BryyTuH bAdT ye bt wTmpaBtI?
the bread breaksX
Awt ybT owaANTBtpp apKl6tbI?
De(TH) ybT Hmuk6n(H) eo ybT bwtabI MwTHHK6n bTaI T BeWrtByp3?
De ybt Brytunbaidye bt wTmaBtI?
Always get an authorised dealer to carry out maintenance work on your machine!
How to change the cutters
UHT ybT A BbTnaaykBHe6 mnt 62.
Mant hrwt ybay 3er Btaw a6yk-Bry mweyTByknt npedTH BbT6 wTmpaBk6n ybT bpaith eW BaW3K6n ery emTuayke6h K6 ybt dKB6ky3 eo ybt bpabITH.
06Bt 3er baint t6Hrtbl ybay 3erw naBbK6T KH aByrapp3 bIKHBe66TBytbl owen ybt nak6h:
1.RtneTytbTttaWBeDTw.
2. RtneT ybT bannk6n HmabIT, eMT6 ybT hBWeBbl ybay MweyTByH ybT OaANTN HrMMeWky6n ybT bpabITH.
3. RtneT ybT HyaK6pTHH HyT py aby btpy ay ybT owe6y eo ybT naBbKbT abbl bIKHBe6bTBy ybTBwTabi MwTHH (naBbKbT TaKMMtbl BKyb JAC Syem).
4.RTneIybT wTaaw baoopt mpayT (e6 ybTp bpabIT HkblT).
5. 06 ybT rMMTu MaSy eo ybT naBbKbT (uKnby HkbIT), e6 ybT owaantBeun peeHT6 ybT HBiTB uTyak6-K6n ybT owe6y owaNT BBt6yukB HBkdtp MK6.
6. Tkpy ybT OwaANT OeWbaWbIH.
7. RtmpaBt ybT bpabITH eo ybT owe6y a6bl wtau owaANTH:
- LeeHT6 ybT bTcane6ap HeBnTy bTabi HBiTuBb BkBb yKnbyT6 ybT bpabITH.
- RTmpaBt ybT bpabITH a6bl BbTbny bay ybT3 awt btpmekkyke6bKb ybt wEbnTu anMk6.
- RT-yt6HKe6 ybt bpabITH b3 yKnbyT6K6n HBwTB, He ybay ybt bpabITH wTnaK6 K6 ybt o7aNT aHa na7n eo yt6HKe6.
-TbT6 yKJIbyT6 yBt 6ryH (naBbKbT OKyyTbI Bkyb ybT prbukBayke6 emyke6).
cn order not to warp the frame and avoid dangerous breaks, only replace 3 or A blades at a timeX
- RT-aHHTnbpT ybT owe6y owaNT a6bl mpaBT ybT owaANT ay ybT haNT bTKNbY; Ky KN THHT6ykap ye Ht ybT apKn6nt6y eo ybT bpabITH Bkyb ybT btpM eo ybT TBBT6yukB Mk6.
Ce6bBy 3eIw naBbKbT ye ybT nakbH, Ky KN 6eb WTab13.
Note
¥
.
La IaawabkykT MwT6bI Tooty M pa bayr b'K6HyappayKe6 bI r naayPwKtp
U6T wPmaayke6 ty/er r6 wTnmpaBHT6y bit MKOBTH bIPoTByrHHTH TOOTByrPH bIRwa6y pa MPwkeblt na7a6bykT 6'a MaH Merw Tooty bit Mwepe6ntw paBikyt na7a6bykT.
ДВaRTcSSацаNT
- CtyyT naBbK6T THy bITHyK6PT arc MweoTHHKe66TpH bit pa berpa6nTswkT
- CtyyT NaBbK6T Thy bIThyK6PTr TcBprHkDITnT6by M pa BerMT bIg MaK6 Brky Ty yTmPsp;
- EppT bIEky ByuST rKpKHPT Mau r6T HTRPT MtUHe66T M pa oeKH. (Haro MwTHBukmyke6 Be6ywaakwt)
- NT mah paKHHTW bITH T6o6yH er bITH MTwHe6bTH 6e6 aryEeKHPTh ryKpKHTW er na6kMrptW pa naBbK6T;
- EppT bieky ByuHT HyeBnPT ty rkykPKPm M p'kyPwKTRu bia6H r6 peBap, M p'abuk bit p'brnkbykP ty bit Bbaptru;
-La naBbKbT bieky Bywt PBpaKaWPt HrookHannr6y merw tooTByrtw pt ywaadakp. - Ctyuy NaBbKbT a r6 6kDtarg He6eWt K6oPwKTrw M 75 bIB(A) Hrkda6y 6eWnt EN ISO 3744.
RdrrORhaaNT
- Aa6bby bit Be6bTBytW Deuyt NaBbKbT ar ωPHTar, DPsKoKTw p'abIParayke6 bit pa yt6HKe6 bit HTuDKbT pa NaBbKbT (deKw mpaarr HKn6apPykaT rHw pa NaBbKbT) ty bit pa yt6HKe6 bit Deuyt ωPHTar;
- Lt shaBBeBbItnt6y bit pa naBbKbT bieky HT oakwt maw p'kbytwnPbikakwt bI'r6t okBbT nr6kT bI'r6T yTswt;
- Veyt K6hyappayke6 PpTBykaT apKnt6ya6y pa naBbK6T bieky ByuT mweyPnPt BeuNT kbikarP Bk-bITHHerH :
-AnPwkarT bIr Neu: PweyByke6 MwK6BkmapT 15A;
- RTHyT bI rne6bIT: PweyrByke6 MwK6BkMapT 16 A.
Neyr: Tery mwebpOnr wPnrgpa6y bIr6 aryuT y3MT bIT waBBeBbItnt6y deH K6BeNbTaKa
ucSa aN SaRVcra
- Sk 6PBTHHakwT, OKCTW pTH MKTbIH er pTH wErpTyyTH pkdWPh aAdTB pa naBbk6T;
-VPWKOKTw pHT6h bIT weyaykebith yaMKH; - Perw p'rykpkhayke6 bIT pa naBbK6T wtmEuyTД-derH ar BbamkyuT « Mebl tImpeK »
-La yT6HKe6 bHT paHT h bIEky BywT dPwKoKPT ty ,HK 6PBTHHaKaWt, aYrHyPT peuH bIT p'k6HyappayKe6 T amuOH aEeKw BerMP 50 maKbH.
HdNbaR
- E6 BaH bIT bIa6NTW Merw p'ryKpKHayTRw er Merw pa NaBbKbT, dern bITdI rYkPkHTw pt berye6 werTT STOP.
- Rtykwtpa okBbT bIT pa mukht PpBykaart aab6y yeryt emPwayke6 bIT na6by6a6BT ty b't6yTuK
- NT mah yerBbTsw pTH Berytarc, nBnt M p'awwBy;
- Perw pt Bba6nT6y bIT panTH, oakTyOakWT p'emPwayke6 maw deuyt bikHyukbrytrw anlPP;
-VtkppTu M yerueuH meuyTu bIH na6yH bIT mweyByke6 a6yk-BermrT peuH bI r uTnmpaBTnt6y bIT Berytarc er peuH bI'r6T emPwayke6 ar deKHkbaNT bIH paTH. - Teryt emPwayke6 bit nak6yT6a6BT er wTnmpaBnt6by bit MKOBt bieky Bywt 1ootByrPT maw r6T MTwHe6bT arapKoKPT;
uOHa H'auPkoC
UyKpKHTX pTH HBbPnaH bIT pa mAn 60 merw p'ryKpKhayke6 bIT pa naBbK6T.
E6 bIPbry bIT yerw6PT, nTyuST pa naBbK6T hern yt6HKe6 M p'akblr berye6 werrnt STOP ;
HabT6 SKT bIT6 SyTbNTw a6JTHBpeHHT6?
LkTny Sywen a6 bitw SyrBnbleHr a6?
Sk6bl bIKT MTHHTw Iry ITHMa66y?
Sk6blbIKT Rabnt6 wKBbyKn aHnTTwKBbyTy?
Wkwny (Bkwnt6) bikt Ftbtw(6) bttw Bweya6bIuBndeewkkByr6n wKBbyKn?
Sk6blbIKT Rabnt6 wKBbyKn aHnTTwKBbyTy?
Wkwny (Bkwnt6) bikt FtbTw(6) bITw Bweya6bIuBnDeewkBbyr6n wKBykn?
MüHHT6 bIKT MTHHTW iÖnpKbBTWBTKHT aRHTBbHTpy BTbIT6?
U bby T6 naBbKbT da6 JAC aa6nTneBby T6 BkY bia6nt6 r deew rB dTuWyerBT6.
OmbayBaBbKbT ykhyt6h bIT Deepnt6bIT yaw76 DeeptbIKN Der BTwNT6 Deapn r bay Bt6Hy, dwaant6 BKU
rT66kHyt6tnt6da6bIT depNT6bIT 7aaabTTdk6T6:
-
Laay r deeew bIT k6HyappayKT, k6bTbIuKHOHyTppK6n T6 emdeepnk6n bkHyaab bieew rB eooKBkTtp TUnTT6bI pTu;
-
On da6 bIT na7a6yKT da6 P jaar (ДКТ bIT DeeWbAAuBbT6 bKTH6a) yT n66T6 Jn6KTy6, nety r TB bIapTu bTy e6bITWBEBHbETnTu bIe6 K6drrpT6 YukbIT6h bIc K6HyappayKT da6 rBaBbK6T. Dky e6bITw-BerbIHbETnTu dK6bly r aBbyTwa6 K6 bITd TnBwRknHaabBkUdK6n.
b4R4NTca
JAC bKtby TT6 naa6yKT da6 P jaar em ap Kq6 MuebIrByT6.
DtT naa6kyt eay bit dtwda6kn6n da6 bitotByeuknk6pt e6bitwbyrtp6 6 bit nwaykN kHyappay Twa6 bieew bit bitaptw da6 JAC.
Dt naa6ykt da6ny aa6 em bIT bayrn da6 k6HyappayKT da6 bTy nayTuKkTtP.
PwTbKHTtW apyKby bTy naBbK6T6rntw Deapn aa6IITIT6 em bIIT NT6mpaay.
UBbIaPTw nany bIT bTHyTppK6n eDTw aaJAC.
PROkcaaN
ZK46 bIT NTHT6 JeTbI aa6nTHMa66T6?
net brood trilt in de messenX
ZK46 bIT naBITsh IeTbI KyJTPK46bl?
Fr6Byke6TtWy/or6Byke6Tt6 bIT dTTw/DTwT6 da6 bIT bweebIMTuH BeWtBy?
ZK46 bIT naBITsh IeTbI KyJTPK46bl?
Fr6Byke6TTw/Or6Byke6Tt6 bIT dTTw/dTwt6 da6 bIT bweebIMtwh BeWtBy?
Metyt6 bIT nTHHT6 6kTy dTu a6nT6 Beuht6?
Ap ok6ap bIT pa ue6abia, mprht tp beyu6 uee STOPX
ronsejoI DTHMrPbI apnI6eH bIpaH bIT ywabaue, bana BebywepaW pa yTbHKU6 bIT paH pФNK6aH M r6a MTwHe6a BrapKoKBabla.
rapacadu Nuntse bit Ma6TH Beuaybien Meu bIa: bit 300 a 3.000 (T6 or6BkU6 bit yKMe bit Ma6) DKHT6HKe6TH bitp Ma6 (L ca) (Bu): NK6. 12 c 6 - npc. 44 c 16
ntaNccaNTO
rada duw, Meu r6 rHraWke MwTmaaabie Maa Tppe:
- VtukokBaH NK ba3 aT daBkaW pa ba6bItya Ma7a paH nKnaH;
- Paa Tp na6yt6knKt6ye TcyTukeu, rkypkDaunrMaRe buntie;
- Abukpa nTHa bitpa6yTwa mawa wtapkdaaw r6a pkmktJa k6yTukew.
rada OAXEEE cortes yIlo B vex al ano como munimo, meu r6 aIITbYT aryewkDaIbe:
- Rtykwaaw trp r6Bbrot;
- Srhykyrkw paH BrBbKppaH (dPaHT mWeBtbyIKT6ye bIT BaNbke bIT BrBbKppaH);
NB: LaH BrBbKppan 6e bITbT6 yTbHaHT TCBTHKaNT6yT, 3a aTT HT BeuHT Tp WkTHne bIT bItoeunau pen BrabiWeH.
- LkIMkaaBeb6 r6 BtMkppe 3 aHMKwaT p K6yTuKeW bT pa npaK6a;
- VtukokBaw tp THyabie bit peH webianKt6yeH, 3 prTne T6nwaHaWpeH;
- E6nwaahpaanrpan;
- E6nhaa paH awykBpaBke6TH bITp Bkp6bIwe.
E6 tr neT6ye bit baBTw r6 MTbKbIe bit r6a MKTDa bit wTBanBke, DTWKoKaTT Be6 hr aNT6yT arYeWkDaIe bit arP MKTDaHT ywaA T6 baHT ap BayΦpeJe bit MKTDAH bit wTBanBke TIKyKbIe Meu Tp oabwkBa6yt.
PWTBKHT HKTMMST Tp 6buntwe bit npaKba yap Bene HT KbIKBa T6 pa mpaBa bit BaShaByTuHyKBaH. Sr ant6yt wTapKaawΦ Tp MTbIKbIe a JAC.
PROkcaS
ka mYquina estY completeness parada
HaT6Bbroaie Tp amawaye?
Ha3 BeewkT6yT T6 pa yena?
Ep/Len wTHeWyT/H bIT MwT6Ha-Ma6 or6BKe6a/6 BeWwTByant6yT?
Ep/Len wTHeWyt/H bI Mt MHT6Ha-Ma6 or6BKe6a/6 BeuWtByaNT6yT?
HaarBauBkaa paH BrBbKppaH?
UyKpKBr'peH ThaTnah bI r pa MΦnk6a 62.
VknkpT bIT pPTdaHnTmUHTIra6yTH bIT MweyTBKU6 a6yBeWyt T6 tp NeNT6ye bIT pa HrhyKyrBkU6 paH BrBbKppaH e T6 Tp NeNT6ye bIT r6a emTaBkU6 BtWBa bIT paH pOnkbaH.
DTHMrPh bIT aHTIrrwaHr bIT aTT Tp T6Bbrot bIT pa npaKba THyΦ bKT6 bIHBe6TByaIe bIT pa Wtbl:
- Rtykwt pa yama ywaHTwa
- Rtykwt Tp bIKHMeHkyKde bit tnbephabie, abwa pa BrbKTwya arT MweyTIT peH BrabiWeH bIT HemeWyt bit paH BrBbKppaH
- Rtykwt pa nTha bT aBtwe kBeckbIabpt (e Bk6ya) bITpa6yT bT pa nFpark6a 3 bITHBe6rByr Tp Be-6TByew bTpr MwT6Ha-Ma6 (Mpark6a tarkmabia Be6 JAC Syem)
- Rtykwt pa mpaBa bITopTByewa ywaHTwa (paBie pФнк6an)
- E6 pa maWyT HmTuKew bIT pa npaKba (paIe bITBbe), aopeyT 6 Tp aunadu6 Tp yeu6kppe aTT na6yKT6T Tp MKeuyT cBP6yukBe bIT awykBrpaBkU6 bITp BrabIwe bITpa6ytwe.
- Trubtp Brablwe baBka bitpa6yT.
- Srhykyr3a paH pOik6an bit peH BrabiIeH bitpa6ytwe 3 ywaHTwe:
-Aopeut pen yeu6kppeh App6 arTyt6ha6 paH BrBbKppaH
- CanbKT paH pФИКбан Be6yuepa6bIe aRT THyP6 bKTo6 BepeBaiaH T6 Tp hapKTo6yT bIT peH bapa6Bk6TH.
-Vrtpda a yt6haa paH BrBbKppan amTuayabie peh yeu6kppeH, Bene naBa maa pa yt6HKU6, B paH pOikbaH HeBWT tr Brabihe.
-LrTne amuktyt paH yrtuBaan (npaK6a tarkmabia Be6 pa emBkU6 bIT prbukBaie)


- Translation of the original instructions
- naIONa STdRT-UP
- WdRRdNTY
- Under the following restrictive conditions
- This warranty doesn't cover
- rΔUTcON
- rONNarTcON
- START-UP
- HdNbaR
- cNSTRUrTcONS nOR USa
- Procedure to use the machine
- ucnTaNndNra
- SPdRa PdRTS
- TROUkaSNoOTcNb
- The machine is completely stopped
- The slice thickness is irregularX
- the bread vibrates in the cuttersX
- The bread cuts very slowlyX
- the bread breaksX
- How to change the cutters
- cn order not to warp the frame and avoid dangerous breaks, only replace 3 or A blades at a timeX
- Note
- ДВaRTcSSацаNT
- RdrrORhaaNT
- ucSa aN SaRVcra
- uOHa H'auPkoC
- b4R4NTca
- PROkcaaN
- ntaNccaNTO
- PROkcaS
Brand : JAC
Model : Chute
Category : Slicer