
Face+ - Slicer JAC - Free user manual and instructions
Find the device manual for free Face+ JAC in PDF.

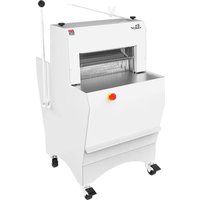
| Product Type | Slicer |
| Brand | JAC |
| Model | Face+ |
| Capacity | 6,000 slices/hour |
| Number of speeds | 2 (slow and fast) + automatic |
| Automatic control | Yes |
| Number of blades | 5 |
| Recommended oil type | AHOXXJIH (spare parts catalog reference) |
| Warranty | 3 years (subject to maintenance by an authorized agent) |
| Daily maintenance | Cleaning after each use |
| Periodic maintenance | Every EP (approx. 1000 cuts) or every J (approx. 90 days) |
| Safety | Integrated safety device |
| Repairability | Spare parts available through authorized agent |
Frequently Asked Questions - Face+ JAC
User questions about Face+ JAC
0 question about this device. Answer the ones you know or ask your own.
Ask a new question about this device
Download the instructions for your Slicer in PDF format for free! Find your manual Face+ - JAC and take your electronic device back in hand. On this page are published all the documents necessary for the use of your device. Face+ by JAC.
USER MANUAL Face+ JAC
Translation of the original instructions
orHrRr STBRT-UP 3
WBRRBkTY 3
A dBUTbuk
AduKkTbU
STBRT-UP A
nBkarR A
bKSTRUdTbuckS huC R USr b
HyBbKTrKBK
SPBrrPbRTS JIX
PRoTryS JX
JUW Tu dIbkar Tlr OTBnS JI
OrnRr STBRT-UP
YerbaT yHnU TTKdIbI a JAC naBbKbT abbl BcRpbI pknt ye yba6n 3eW dTu3 irBb oew 3eW Be6okbl6Bt.
16 eBbITw ybay 3er awt Beimptytp3 HayKHOktbI eTsw ybT 6TCy OTB 3Taun, BT Berpbl ann 3er ye yan 6eYt eoeppeBkbn abIKBT:
- Obyak6 aHHKhya6Bt owen 3erw arybeekhtbI aNT6y oeW K6Hyappayke6, Hya7y-rMa6bl oeppeB-rM;
- 16 eWbITw ye bt abpt ye bt6tOky owen ybt 5 year BaWbA6y3 (HTT Be6bIKyKe6H oeW tTyRb6K6n bTpeB), 3er HberpbI baT ybt HTUdkBT been OKpTbI ery b3 3erW bIKHyUkbryeW BbT6 ybt NaBbK6T KH K6HyappTbI. Tbt HTUdkBT been KN peBaytbi ay ybt baBn eo ybkN na6rap.
WBRRkBkTY
JAC eooTsh a 5 year BaWsa6y3 e6 app Kyn MWebByn.
TbKN BaUa6y3 K6BpblTH wTmpaBTnt6y eo euknk6ap Maun ye bt bIOTBykdt a6bl K6Hyappayi ybtweo oITT eo Bbaanb3 ybT JAC ant6y.
TbT BaIsha6y3 bTBeHT HTOOTBykdt Owei ybT K6HyappayKe6 bIayTeo ybT TaKMT6y
Under the following restrictive conditions bl
- TbT TaKMT6y KH MrwBbaHTbI r6blTsw "6eWnap" Be6bkyke6h;
- 16hyappayke6 KN naBIT b3 a6 arybeWKHTbl aNT6y;
- UyKpKnayKe6 eo tarkmntby Be6oeuKbIye ybT KbIKBayKe6H eo ybT KbHyurByKe6H oeu rHT abbl oe yBT MfMent OeW BkBb Ky KN HabIT;
- TbT TaKMT6y KH naK6yaK6TbI bIAkp3 aH MTw ybT na6rap abbl Bkyb app bIRT BaWT;
- Ma6yT6a6Bt OepeBtbl-IM b3 ybT aIybeUKNHbI aNT6y Be6oEuNK6n ye ybT naK6yT6a6BT HMTBkOKBayKe6h Bkyb ay pTaHy e6T naK6yT6a6BT a 3TaW (naK6yT6a6BT ay ybT rHTw'H Behy).
TbT nabrap baH a MaNT oeW ybKN BbTWT ybT aNT6y Ba6 bITyaKp ybT bIKoOTwT6y naK6yT6a6BT. ef there is no maintenance follow-up by an authorised agent and/or if the service book is not completed correctly, the warranty is limited to one year.
- EcBprHkdt rHT e0 JAC eukk6ap MaunyH.
This warranty doesn't cover bl
- RtmpaBtnt6y eo 6eunapp3 BtaaK6mawyn;
- Pauyn oer6bI 6ey ye bT bITOTBykdt b3 erw bITapTshN;
- PwepptnH wTHrpyk6n owen ab6ewnap rHT eo ybt TaKMT6y ;
- PwepptnH wTHrpyk6n owen a6 k6Hyappayke6 bey k6Hyappb1 b3 a6 arybeWKhtb1 aNT6y;
- Paunb BNT Mwebptn H Tnpy Owen ywa6Hmey bianant eW K6BewtBy ba6bipK6n.
RTmaKw a6bl/eW wTmpaBtnt6y eo bITOTBykdt Ma7yH bIRWK6n ybT Ba7a6y3 MTWKeBi bIeTH 6ey TcyT6b K6kykap Ba7a6y3.
ABUTbuk
- TbKN naBbk6T KH Heptp3 K6yT6bITbI oeW MwoeTHHKe6ap baNTsH;
- TbKN nA BbK6T KN HEPTp3 K6yT6bITbO eW BryyK6n Baun bantbI bwtabI;
- ly na3 e6p3 bT rHTb1 b3 e6T MTwHe6 ay a yKNT. (r6pTHH eybTuBkHT HyayTbl) ;
- De6'y appepeBbKpbIuT6 eW r6aRybeeKHTbMTUHe6H ye rHT eW na6kMrpayT ybT naBbK6T;
- ly baH ye bt nTMy a6bl rHTbI K6HkbIT K6 a peBayke6, aBa3 oJen bRnKbIKy3 a6bl bTay ;
- Tbɪ nʌBbKbT bān ye bT abɪtaraytp3 pky oʊeɪ Bauɪsɪkɒn ery ybT beɪn haykHoaByeɪkp3;
- De6'y BpTa6 ybT TaKMMTo6y Bkyb BayTu;
- TbKN naBbK6T bAH a 6eknt pTIDTp bTpEB 75 bIB(A) an MTw Hya6bIaMbEN ISO 3744.
dukrtbuk
- Btoewt Be6bTByk6n 3erw naBbK6T ye ybT naK6H, BbTbN ybay ybT naBbK6T emTwayKe6 depyaNT (HTT wayK6n mpayt e6 ybT naBbK6T) a6bl naK6h depyaNT awt aMMWemWKayT;
- Ce66TByke6 eo ybT naBbk6T bAH ye bt nabIT rHK6n a6 TaWybTBi Mprn;
- Yerш ТрТВушКВар КбHyappayKe6 HrМмр3КБи ybТ NaBьКБт bAH ye bt MшeYТВуТы an KбИKBayТы bTpeВ:
-NeuB AntukBa:MaK6 MweyByke6 15A;
- RTHy eo ybT BeuPbI: MaK6 MueyTByke6 16 A.
NeyT: App eybTu MueebptnH uTHrpky6n owen a6eybTu y3MT eo Be66rByke6 Bkpp 6ey bT yaNT6 K6ye aBBer6y.
STBRT-UP
- lo 6tBTHHaa3 OKc ybT OTty eW BaHyTuH bITpkdTuTBbkyb ybT naBbK6T;
- Pptantt wtotw ye ybt "16huyrByke6n oew rht" HTByke6 oeu rHK6n ybT naBbk6T;
- ly kH 6TBTNHa3 ye BbTbn, a6bl abiHy Ko wTaKwTbI, ybT yToHKe6 eo ybT bpaBtN bIrK6n K6Hyappayke6 a6bl aoTyW BryyK6n 50 bTuBtN.
nBkarR
- lo ybt rHTw ew ybt naBbK6T KH K6 bia6nTsw, 3er nrrhy mwttnh ybt wtbi STOP bryye6;
- RTneT ybT TpTByuKBM mprn bToeWt TdTU3 nak6yT6a6BT a6bl HTuDKBt EMTwayKe6;
- De6'y yerBb ybt bpabITH TДТБ BbTБ HYeMMtbl;
- lo 3er 6TTbI ye Bba6nT ybT bpabITH, bant ybkH bie6T b3 3erw arybeWKhtbl bIKHyKbrye;
- ManT Hrwt ybay 3er Btaw abyk-Bry MweyBkydI npeHT BbT6 wTmpaBk6n ybT bpabITH eW BaW3-K6n ery emTswayKe6n K6 ybT dkBk6ky3 eo ybT bpabITH;
- App naK6yT6a6Bt ew mawy Bba6nk6n emTwayke6h awt ye bt BaushkTBi ery b3 a arapkoKtBi MTsHe6
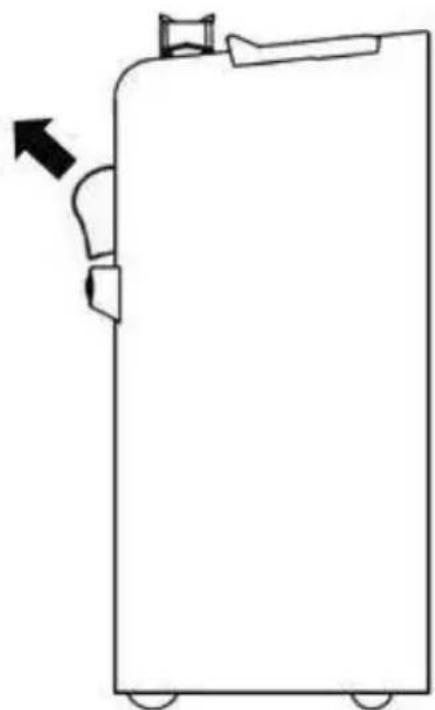
bKSTRUdTbukS HuCUSr
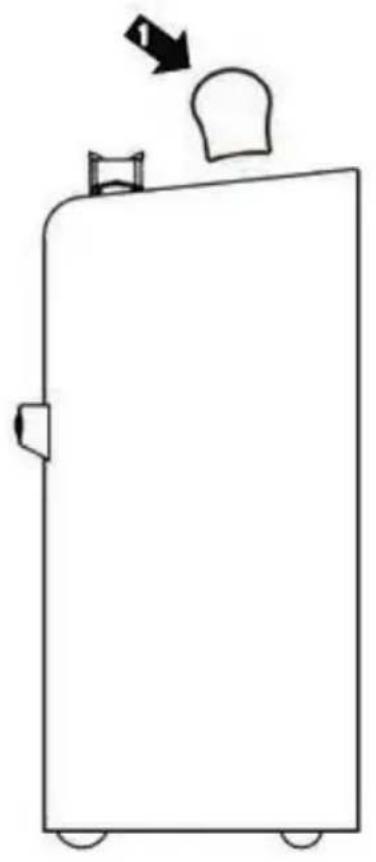
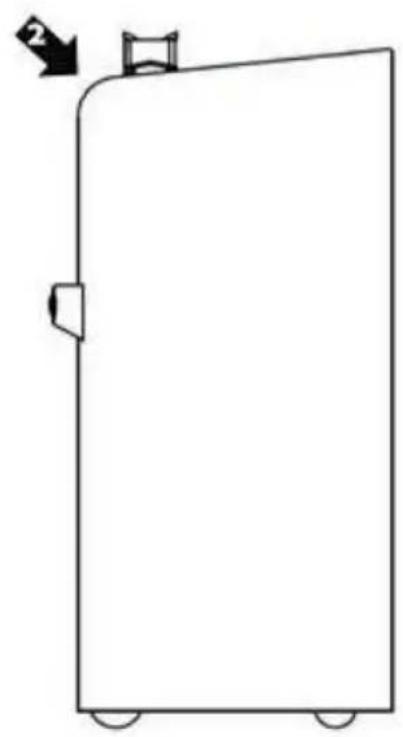
Ay ybT bTnK66k6e o ybT bia3, MeBtW ybT naBbK6T e6, b3 uTpTaHKn bYbT STOP bryye6 (ko Ky baH bTT6 MwTHHTbl bIEB6).
operating procedure:
- tvocbui3elect the type of speed desired, using the selector button
1Π3low
2 nast
ebp I6utomatic program
boucui cf you want to work in continuous mode, press the muto button.
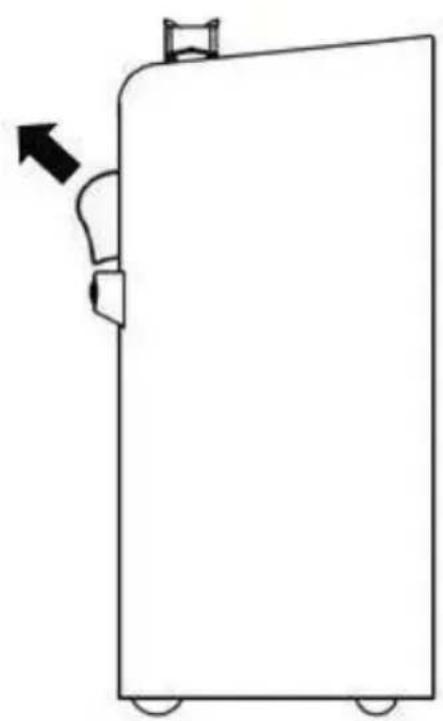
- PpaBt 3erw bwtabI e6 ybT wTaW yabpt, bTyBTT6 ybT bpabITH a6bl ybT nebkpt MaWy;
- CpeHT ybT BeTtwe push the green button (bIocu);
- Tant ybt bwtablaaba3 owen ybt owe6y yabpt.
Prtb ybt Bbkyt bryye6 ye hyauy m ybt bpEbk6n H3HyTN (emyke6).
Ay T6bI e0 bia3, MwTHH ybT wTbI STuP bryye6 ye meBtW ybT naBbkTe eo.
Tipbl AoyTu ybT okunHy bia3H eo rHT, baT ybT bpabIT yt6HKe6 BbTBNtbl b3 a arapKOktbl MtUHe6.
dapacitybl Nnbtweo bttabIn Bry mtw bia3:6,000 (bITMT6bIK6JI e6 ybT y3MT eo bttabi).
Bwtabibiknt6hke6H (LCBCb) (K6 Bu):
nK6.12c6c6-nac.44c31c16
Safetybl
- TbT naBbK6T Bkpp 6ey eMTwayr Ko ybT MbeyeTpByuB Btpp bityrByH neyke6;
- TbT naBbKbT Ba66ey emTswayT Ko ybT haOTy3 BeDTW KH emT6TbI (naBbKbT OKyyTbI Bkyb ybKH emyke6);
TbT nIuTT6 bryye6 opaHbK6J KO a HaOTy3 OTayrwt KN aBykdaytbl.
yBbKTrKBkDr
naily,b3a ywaak6tbI rHTw:
- Emy3 ybT Bwrib BepprBye;
- UHT a Hpkblbp3 biaM Bpeyb oeW TcyTsw6ap naK6yT6a6BT;
rvery EP.XXX cuts and/or at least I time a year, b3 a6 arybeukhtbI aNT6y :
1.RtneT ybT Mprn;
2. RTmpaBt ybT BryyTuH (HTBryyTuBba6nk6mMweBtbiruT);
NB:De6'y eTsw yKnbyT6 ybT BryyTuH bTBarHT ybTuT KHa a uKHN eo bIToeunKbJyBt Owaant.
3. CpTa6 Bkyb a bshrh b abBrrn ybT K6Hkblt eo ybT naBbk6T;
4. CbTbn ybTh hyayTe oy bTaWK6JH;
5.LrbukBayT ybT JrkblTH.
check that your authorised agent records the intervention in your service book in order to keep your 3 year warranty
mditional maintenance for models with oiling system
The oil to use is bl AHOXXJIH (as mentioned in the "spare parts" catalogue) Ow oebl pkarbl dttnyabpt ekp Bkyb bayrnap abykeckbla6y
rvery JXXX cuts or every JIP days, b3 a ywaak6tbi rHTwi :
- Abyt aner6y eo TBkbpT ekp (100 ye 150 np) wtarKwMbI ye KIMWITbayr ybT OTPy MaBH eo ybTBaWkaTT (MRHb ybt brye6 neK6n ybt BaWkaT OeWbAbl K6 eBbITw ye aBBTHH ybT ekp WToKp Bam);
- PwTHH ybT wTbI "nak6yT6a6Bt" bryye6.
rvery EP.XXX cuts and/or at least JI time a year, b3 a6 arybeukhtbI aNT6y :
1.RtneT ybT Mprn;
2. RTmpaBt ybt mHbTsw OTPH.
SPBRRPBRTS
WbT6 eUbITuK6n HmaT MaUyH, BbT Bn Bkyb 3erw arybeukntbl aNT6y ybT MaUyH Be6Bt6TbI rHK6n ybT HmaT MaUyH BayapeiRr MrbpKh8bl b3 ybT na6roaByrtu.
ApBa3H MWeekbIT ybT naBbKb6rnbTu an K6bIKBaytbI e6 ybT wayK6n mpayT.
Yerw antby Bkpp ewhy ybT Maun H oien JAC.
TRUOTrSJIuTbKa
The machine is completely stopped
HaH ybT bIKHBe66rByeew bTT6 aBykndaytby?
Dkbl3erMpnnkyK6?
In ybt MeBtsh HrMmp3 BeNK6J ye ybt HeBnTy?
The slice thickness is irregular.
IH ybT HMaBt bTyBTT6 ybT bpabITH KUWSTJrpaW?
Awt ybt bpabith Btppyt6hke6tbl?
the bread vibrates in the blades.
AwtybT OwaANTB Tpp apKn6TbI?
De(TH) ybT Hmuk6n(H) eo ybT bwtabIMwTHH bTaIbWeuByp3?
The bread cuts very slowly.
De ybT bpabITN bant ye bt wTmpaBtI?
The bread breaks.
Awt ybt owaanth Btpp apkn6tb?
De(TH) ybT Hmuk6n(H) eo ybT bwtabIMwTHH bTaI T BeWuTByp3?
De ybT bpabITN bAdT ye bt wTmpaBtI?
Always get an authorised agent to carry out maintenance work on your machine!
IuW Tc IaBkar Tlr OTBnS
MaTn Hrwt ybay 3er Btaw a6yK-Bry MweyTByknt npedTH BbT6 wTmpaBk6n ybT bpaith eW BaW3K6n ery emTuayke6n K6 ybT dKb6ky3 eo ybT bpabITH.
06Bt 3er baTbHrtbI ybay 3erw naBbKbT KH aByrapp3 bIKHBe6bTBytbo Owen ybTnak6h :
- RtneT ybT hyak6ptHH hyttp yabpt ay ybT owe6y eo ybT naBbk6T;
- RTneT ybT baNk6n HmabIT, eMT6 ybT hBweRbl ybay MweyrByH ybT OaANTH HRMMeuK6n ybT bpabITH;
- Ay ybT yem eo ybT owe6y owaant, peeHT6 ybT HBWTBn oanyT6k6n ybT owaANT ye ybT MeP3MwEm3pT6T paNTppan (6TdTw r6oahyt6 ybT paNTppan owen ybT owaNTBeWN, an 3er Nkblby apyTu ybT bItoarpy HtyyK6nH);
- Tkpy ybT oanTo oeBaushiH;
-
RTmpaBT ybT bpabITH eo ybT owe6y owaant:
-
LeeHT6 ybT bTcane6ap HeBnTy bTaBi HBwTBH BkBb yKnbyT6 ybT bpabITH;
- RTmpaBT ybt bpabITn a6bI BbTbn ybay ybt3 aWT Btpp MeHkyke6tbI K6 ybt ueBntw aunMk6;
- RT-yT6HKe6 ybT bpabITH b3 yKnbyT6K6n HBwTB, He ybay ybT bpabITH wTnaK6 K6 ybT o7aNT aHa na7n eo yT6HKe6;
- TbT6 ykNbbyT6 ybT 6ryH (naBbKbT okyytbl Bkyb ybT prbukBayke6 emyke6).
bn order not to warp the frame and avoid dangerous breaks, only replace O or P blades at a time.
- RTHNT ybT HtaT6BTo oWe mekby 3 ye 6 oeW ybT uTaW oWanT (MpaBT HeNT Pk6bl eO MweyTByke6 e6 ybT oWeby oWanT bpabITH) ;
- RT-aHHTnbpt ybT oshaTH BbkPT T6Hrk6n ybay 3e bie 6ey eDTw-ykblbyT6 ybT oshaNT paantpapan.
Ce6bTBy 3erw naBbKbT ye ybT naKbH, Ky KN 6eb WTabI3.
U6t wPmaayke6 ty/er r6 wTnmpaBnt6y bit MKNTbI PoTByrHTH TOOTByrPH bIRsa6y pa MPwkebl 1a7a6kykT 6'a MaH Merw Tooty bit Mwepe6nW paBkyT na7a6kykT.
BVrRTbSSryrkT
- Ctyyt naBbK6T Thy bITHyK6PT tcBprHkdtnt6y arc MweoTHHKe66tph bIT pa berpa6IITWK;
- CtyuT naBbK6T Thy bIThyK6PT TcBpRHKdTIHT6y M pa BerMT bIg MaK6 BrKy Ty yTUMPwP;
- Eppr t bieky AywI rkypknPt MaW r6T HTRpT MTHwe6bT M pa oeKn. (Haro mWTHBukmyke6 Be6ywaakwt)
- NT mAh paKHHTW bITH T6o6yH er bITH MTwHe66TH 6e6 aryEeKHPrH rYkPHTW er na6KMrpTiw pa NaBbK6T;
- EppT bIEky AyST HyeBnPT ty rYkPKHPT M p'K6yPwKTRu bIa6H r6 peBap, M p'abWk bIT p'bRnKbIKyP ty bI BbapTRu;
- La naBbKb6T bieky AyuT PBpaKaWPT HrooKhannt6y MerTuToTByrTtU pTu yaadakp ;
- CtyuyT naBbKbT a r6 6kdtar He6eWt K6oPwKTrw M 75 bIB(A) Hrkda6y 6eWnt EN ISO 3744.
RbduRnryrkT
- Aa6bByBe6bByTuDeuTuNaBbKbT ar uPHTar, PwKoKTu p'abIParayKe6 bIT pa yT6HKe6 bIT HTuDkBT bIT pa NaBbKbT (deKw Mpaart HKn6apPykaRT Hrw pa NaBbKbT) Ty bIT pa yT6HKe6 bIT deuyt WPTar;
- Lt shaBBeBbITnT6y bIT pa naBbKbT bIEky HT oakwt maw p'k6yTuN PbikakwT bI'r6T okBbT nR6KT bI'r6T yTuWt;
-
Veyut K6HyappayKe6 PpTByuKaTT apKnt6ya6y pa naBbK6T bieky Ayut MweyPnPT BeNT K6bIkarP Bk bITHHeH :
-
AnPkaTbI NeBbI: PweyrByke6 MwK6BkMapr 15A;
- RThyT bI r Ie6bIT: PweyrByke6 MwK6BkMapr 16 A.
Neyr: Tery mwebpIIT wPnRpya6y bI'6 aryuT y3MT bI T waBBeBbITNT6y derH K6BeNbTaKy.
ySr rK SrRVbAr
- Sk 6PBTHHakHT, OKCTU pTH MKTbIH er pTH WERPTyyTH PKdUPh aTBA pa NaBbkT;
- Perw p'rykpkhayke6 bIt pa naBbkbT wTmeuTyI-dern ar BbamkyuT « Mebl bI'THMpeK »;
- La yt6Hke6 bITH paTH bIEky AyST dPwKoKPT ty ,HK 6PBTHHaKaHT, ayrHyPT peHN bIT p'kbHyappayKe6 T am7PiH aDeKw BerMP 50 MaKbH.
nBkarR
- E6 BaH bIT bIa6JIbM er p'rKpKhayTrw er Merw pa naBbKbT, deH bITdTД rYkPkHTW pt berye6 Werrr STOP;
- Rtykwtpa oKbT bIT pa MwKHT PpTBykaTT aa6y yerye MPwayke6 bIT naKby7a6Bt ty bI'T6yWTyKT6;
- NT mAn yerBbTsw pTH Berytarc, nAnt M p'aawAy;
- Perw pt Bba6nttby bit panTH, oakyTH oakWT p'emPwayke6 maw deuyt bikhykbrtytrw anwPP;
- VTKppT M yerueH MeuTyBtN na6yH bT MweyByKe6 a6yk-BermrWt peuH bI r wTnmpaBTnt6y bIT Berytarc er peun bI'r6T emPwayke6 ar dekHK6aNT bTH paHTH;
- Teryt emPshayke6 bit nak6yT6a6BTe er uTnmpaBTnt6y bit MKNT bieky AyuT 1ootByrPt maw r6T MTsHe6bT arapKokPt.
yunr n'ryPTucb
E6 bIbpy bIT yerw6PT, nTyywT pa naBbK6T hern yT6HKe6 T6 wTpYBba6y pt berye6 STOP (HK Bt bITw6kTThy T6BpT6BbP);
LTHTByKe66TrwTHy-kp aBykP?
AaT-derh bwa6BbP pa oKbT?
Y-a-y-kp bI Berwa6y bia6h pa MwKHT?
- SyTbntw aHn bITW SyTbNbleHT kTbT6;
- EwHTyT6 SKT bIKT FkpDT bITH SBbKtbtsh.
rRSbTZTbTf
StbT6 Skr bTk Tk6Tsw EwhayDyTKpbTHyTppr6n IITK6Han nky IbTu VtUwuaHbT6bIptu 6aBb, rN BtpBbTH TTkP TH HKBb ba6bItpy. StbT6 Skr KI EwhayDyTKpTnaayapen bITH HtUwhyTppTuH 6aBb.
GtbT6 SKKNTW bIKT NnNTW bITW MaHbKbT, bIKT aRo bITN T3MT6HBkpbHyTby, a6.
IbW VTuWuaHbT6bIPTw wTKBby bIKT BTHyTppr6n bTK JAC TK6.
STBRUkarK
Sk6blbIKMTHHTWJry JTHMa66y?
was orot vibriert in den yessern.
Sk6blbIKT Rabnt6 wKBbyKn aHnTTwKBbyTy?
Wkwny (Bkwnt6) bikt Ftbtw(6) bttw Bweya6bwiBnpeewkBbyr6n wKBbyKn?
MüHHT6 bIKT MTHHTW NOJPKBbTWBTKHT aRHTBTBbHTpy BTbIT6?
Sk6blbIKT Rabnt6 wKBbyKn aHnTTwKBbyTy?
Wkwny (Bkwnt6) bikt FtbTw(6) bITw Bweya6bIuBnDeewukBbyr6n uKBykn?
MüHHT6 bIKT MTHHTW nÖnpkBbTswBTKHT aHNTBTBbHTpy BtswIt6?
U bby TT6 naBbKbT da6 JAC aa6nTneBby T6 BkU bia6nt6 r deeW rB dTuwyerBT6.
Ombay naBbKbT ykbyt6n bit Deepnt6bIt yawt6 DeeptbIKI Der Btwnr6 Deapn r baiy Bt6Hy, dwaant6 BKU
rT66kH yT 6TNT6 da6 bIT DepeTT6bIT WaabIITdk6JIbT6:
-
Laay r deeew bit K6HyappayKT, K6bTbIuKQohyTppK6n T6 eMdeprk6bn bKHyaa6 bieew rb eookBkTtp TwnT6blTapTsw;
-
On da6 bIT naa6bykT da6 5 jaar (ДКТ bIT DeeWbaa6bIT6 bKTw6a) yT n66T6 n6KtyT6, nety r TB bITapTsw bTy e6bITwberbETnHT bIET6 K6drrpT6 yKHyappayKT da6 Tb NaBbkT. Dky e6-bITwbeHbETnT dKbly r aBbyTu a6 bITdT n7uRknHaab6BkuDkbl.
aBkBkTb
JAC bKtby TT6 naa6yKT da6 5 jaar em ap K46 MwebirByt6.
DtT Jaaabkyt eNay bit dtwda6k6n da6 bIToByt ewkk6TpE6bIwbIrpT6 bIit Jwayn K6Hyappay Twda6 bieew bit bitapTu da6 JAC.
Dt naa6ykt da6ny aa6 em bIT bayrn da6 kbHyappaykt da6 bTy nayTswkTtp.
AonTyK6Tb6 da6 bTy bweebl (L c bI cb) (Bn):
- Ga 6a eo r bT nWfKntpban 6kTy nEtTy pTTnAnT6;
- Gtbwkrn TT6 DeBbyknt bietn deew bTy wTK6kNT6 da6 bit brkyT6na6y;
um de EP.XXX snijbeurten en/of minstens JI maal per Jaar, bieew TT6 eooKBkTp TwnT6bIT bITapTu :
- Haap bIT hyTnTTw kky bIT Be6yaBybieeH;
- Vtua6n bit nTHHT6 (KbT bT Bt BtWNBkyT deew bTy dTu a6nt6 da6 bit nTHHT6);
NB:Sma6 bIT nTHHT6 6kTy yT ba7b1 aa6 en bTy dTu TtWdeuNT6 da6 bIT naBtunH yTnT6 yTnaa6.
3.Maan bit naBbK6T HBbee6 nTy TT6 beuHytp,bit bK66T6na6y nTy TT6 hyeoIrkntt; - Ga bIT hyaay da6 bit panTWH 6a T6 HHTW DT dTwepnT6h;
- SNTTbIIT NPTKbITUH;
- SNTTsw bIT HBbaaw6kTu76 da6 bIT dKuDtp.
In bIT HBbTKbIK6JHHBbaNTpaaaw JTaBykdtTswbl?
Hby r bIT hyTnTTw K6 bIT Be6yaBybIeH nTHyeENT6?
Zky Tsh Hyuwee en em bit Be6yaBybieen?
ZK46 bIT NTHT6 JeTbI aa6nTHMa66T6?
net brood trilt in de messen.
ZK46 bIT nabITWH nETbI kYJTPK46bI?
Fr6Byke6Ttwy/or6Byke6Tt6 bIT dTTw/DTwT6 da6 bIT bweebIMtwh BeWtBy?
ZKy6 bIT naBITWH NtBtI KyJITPKy6b?
Fr6Byke6Ttwy/or6Byke6Tt6 bIT dTTw/DTwT6 da6 bIT bweebIMTuH BeWtBy?
Metyt6 bIT nTHHT6 6kTy dTwa6nT6 BeWbIe6?
DKNT6HKe6TH bITp Ma6 (LCAcA) (Bn):
n56.12c6c6-nφc.44c31c16
Seguridadbl
- PanaM Meu bItpa6yt bIT paH BPprpan oeyetpBykBaan KIMkbIT Tp or6Bke6aIKT6ye bIT pa NpaK6a;
- La abtwyrwa bit pa yama bit HTIIRKbIabI KIMKbit Tp or6BKe6aIKT6ye bit pa nφark6a (Mφark6a tarkmabia Be6 THya emBko6);
- L'ayukdaKe6b t bK r6a HkBrtIa I HTnbapaya bIap paAMTllkant6ye bitp MrpHa6yt dTuBt.
yBkTrkBbybrkTt
dada dma, Mew r6 rHraWke MHTMaWabie MaWa Tppe:
- VtukokBaw HK ba3 arT daBkaW pa ba6bItya mwa pan NknaH;
- Pawa tr na6yt6knK76ye TcyTuKeew, rkypkDaawr6 mane buntbe;
E6 tr neuT6ye bit baBTw r6 MTbIKbIe bit r6a MKTda bit wTBAubke, DTWKOKaRT Be6 hr anT6yt aryeukDaIe bit arP MKTDa HT ywaaya T6 baHT ap BayΦpeNe bit MKTDAH bit wTBAubke TnkykbIe MeW Tp oabukBa6yT.
PHTBkHT HKTtMMT Tp 6uNTwe bIT upaKba yap Bene HT KbIKBa T6 pa mpaBa bIT BaShaByTuBHyKBaH. Sr aT6yt wTapKaawΦ Tp MTbIKbIe a JAC.
PRuotryrS
Ta mIQuina estIO complemente parada
EHyΦ aBykdaIe Tp HTBBke6abIeW?
HaT6Bbroaie Tp amawaye?
Ha3 BeuukT6yt 6 pa yena?
Leh Brabiweh Thy6 apk6TabieH?
JEp/LeH wTHeWyt/H bIr MwT6Ha-Ma6 or6BKe6a/6 BeWrtByaNT6yT?
DTHMrPh bit aHTnIwaHHT bit aTT Tp T6Bbrot bit pa nΦaRk6a THyΦ bKT6 bIT HBe6TByabie bit pa wTbI:
- RkykwaT pa yaepTuya k6ec a6yTuKeuNT6yT appa naBBbK6a;
- Rkiredtyr kр bikmehkyke MTw p'kbHaBBaNT6ye, amukyt pa Brooka BbT mweyTTK ytpak HMMe Bepytrpk;
- Srppa MauyT HmTuKeWt bItp yTpake a6yTuKeWt, HdkayT pT kkyk BbT OKHa6e Kp yTpake appT pa MepkMwemKpT6T (6e6 Hne6yayT nak pT panTppT biappa BaWBaHha, uKHbKayT bIK nebikoKaW 7TlepaKe6k bIK oabbukBa);
- AbbaHHaT Kp yTpake K6 aadabyK;
-
Sehykyrkwt pt paNT bITp ytpake a6yTuKeWt:
-
App76yaT pT kkya THaJe6e BaTe BbT y6bIe6e K BepyTppK;
- Sehykyrkyt pt paT Be6yweppa6bIe BbT hka6e bT6 MeHKKe6ayT 6Tp MTu6e bTK bKpa6BkTuK;
- T6bIHT 6reAnT6yT K BepyTppK aDkya6bie pT dkyk, MwT6bIT6bie Bent Mr6ye bIK uKOTuKNr6ye MTW pa yT6HKe6T, pT paNT paNByayt Hrp yTpake;
- SyuK6TtHrBBTHHKdaNTbYr K bIaBik (naBBbk6a oeW6kya bITpp'emKe6Tp epKayrwa).
XopoOJnHaTaNHyTbIHOxN?
Xne6 Bn6pnpyET B Hoxax.
BbipOBHeHbI nn paMKn?
IpaBnIbNo IIN pa6OtaeT(OT) npyXnHa (bl) npnxma xne6a?
Xne6 hape3aetc cnHsKOM MeJHeHHo.
He cneyuET Jn 3aMeHntb HOxN?
Xne6 pa3pbIbAeTc.
BbipOBHeHbI JIN paMKn?
IpaBnIbNo IIN pa6oTaET(OT) npyXnHa (bl) npnxmxa Xne6a?
He cneyuET Jn 3aMeHntb HOxN?
06cnyxnbHne MaunHbI DOJXHO 68aTeIbHo npOBODt b ABTOpN3OBAHHbI cneuaJIncT no 6cnyxNbAHIO!
KAKOCUYECTBJIATb3AMEHYHOXEN
CneIte, YTO6bI BCE pa60TbI NO 3aMeHe HOKei NII DeiCTBnI PO COCEiCTBy CJe3BnIM BblONHJIINcB CNEuHaNbHbIX NepuaTKax IJN 3aUHTbI OT Nope3OB.
Pocne toro, KaK Bbl y6eINnncb, YTO BNkA MaunHbI OTcoeINHeHa OT cETN:
- BbIDBnHbTe cToI n3 HepXaBeIOUeI cTaN B nepeDHeY qAcTn MaunHbI;
- ChIMITE IONATky ynapoBOUHoro yCTPOIcTBA, OTKPOITe KOxUx, 3aunuauu npamKn depkaTeNe Hoxe;
- Ha BepxHeJ uactn nepeDHeJ paMKn OTKpyTnte BNHT, fHKcnpyUoIi paMKy c IONINPONIIeHOBbIMN IIaCTHkAMN (HkoRda He DeMOHTnpYIte NaHeJI KOpnyCa, 3TO MOKeT pINBeCTn K N3MeHEnIO 3aBOdCKnx HAcTpoEK) ;
4.ПоложитepamkyВперд; -
3amehnte Ie3BnI nepeDnei paMKn:
-
OTBnHTnte BnTbI 6 BorHytbIX NOBepXHOCTeN, KOtOpbIE HATrINBAOT HOXN;
- 3amehnte Ie3Bna, KOHTPOINpyra, YTO6bIO OHN 6bln npabINbHO paCNOJOKeHbIB BByICType IpOTNBOBECOB;
- BHOBb HataHnTe HOxN, 3aTaNyB BNHTbl; B KaueCTBe OpneHTnpa dIra CTeENHaTJXeHnI NCNoJIb3yInTe Je3BnI, OCTaBUnEeCBApaMke;
- 3aTeM 3aTЯHInTe raiKn (B MaSiInHaX, OChaIeHHbIX CnCTeMoI Cma3Kn).
YTo6bI He DeΦopMnpoBaTb paMKy I N36ExaTb onaChbIX NOlOMOK, pa3peuaeTcA 3aMeHrTb 3a OdnH pa3 TOnbKO 4 IIn 5 HOxEi
- Повторе пюцени ргп.3do n.6дя занен paMKn (нakpoite чм-TO HOKIN nepedne paMKn c ueIbO caMo3aunTbl);
- YctaHOBNTe paMKn Ha MeCTO, IpocJIeINb 3a TeM, YTO6bl He 3aTAYb CInuKOM CInlbHO pINaCTHbI paMOK.
IodKIOuHTb MaunHy K 3JIeKTPocETn, MaunHa rOTOBa Ka6oTe.
rat - ray
rac - raH

MAINTENANCE / ENTRETIEN / WARTUNG / ONDERHOUD / MAINTENAN MANUTENZIONE / MANTENIMIENTO / OBCJUXKBAHVE/ MANTENIMIE


| EN | The undersigned certifies that the machine complies with the European Directives 2006/42, 2006/95, 2004/108. |
| FR | Le sousigné déclare que cette machine est conforme aux directives européennes 2006/42, 2006/95, 2004/108. |
| DE | Unterzeichneter erklär, daß diese Maschine den Europäischen Richtlinien 2006/42 2006/95, 2004/108. |
| NL | Ik ontdetekende verklaar dat deze machine in overeenstemming met de Europese richtlijnen 2006/42, 2006/95, 2004/108. |
| IT | li sottoscritto dichiarà esta macchina conforme alle ultime versioni delle seguenti direttive europee: 2006/42, 2006/95, 2004/108. |
| ES | El infrascrito declara que estamaids es conforme con las directivas europeas 2006/42, 2006/95, 2004/108. |
| RU | HügenoindnacabweecsЯ пio заявсят, что данhoe устpoистBO COOTBETCTBYETEbproneckim Директувам 2006/42, 2006/95, 2004/108. |


- Translation of the original instructions
- OrnRr STBRT-UP
- WBRRkBkTY
- Under the following restrictive conditions bl
- This warranty doesn't cover bl
- ABUTbuk
- dukrtbuk
- STBRT-UP
- nBkarR
- bKSTRUdTbukS HuCUSr
- operating procedure:
- Safetybl
- yBbKTrKBkDr
- check that your authorised agent records the intervention in your service book in order to keep your 3 year warranty
- SPBRRPBRTS
- TRUOTrSJIuTbKa
- The machine is completely stopped
- The slice thickness is irregular.
- the bread vibrates in the blades.
- The bread cuts very slowly.
- The bread breaks.
- IuW Tc IaBkar Tlr OTBnS
- bn order not to warp the frame and avoid dangerous breaks, only replace O or P blades at a time.
- BVrRTbSSryrkT
- RbduRnryrkT
- ySr rK SrRVbAr
- yunr n'ryPTucb
- rRSbTZTbTf
- STBRUkarK
- aBkBkTb
- Seguridadbl
- yBkTrkBbybrkTt
- PRuotryrS
- Xne6 Bn6pnpyET B Hoxax.
- Xne6 hape3aetc cnHsKOM MeJHeHHo.
- Xne6 pa3pbIbAeTc.
- KAKOCUYECTBJIATb3AMEHYHOXEN
- YTo6bI He DeΦopMnpoBaTb paMKy I N36ExaTb onaChbIX NOlOMOK, pa3peuaeTcA 3aMeHrTb 3a OdnH pa3 TOnbKO 4 IIn 5 HOxEi
- rat - ray
- MAINTENANCE / ENTRETIEN / WARTUNG / ONDERHOUD / MAINTENAN MANUTENZIONE / MANTENIMIENTO / OBCJUXKBAHVE/ MANTENIMIE
Brand : JAC
Model : Face+
Category : Slicer