
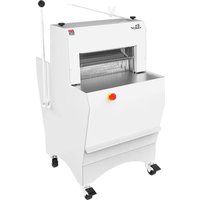
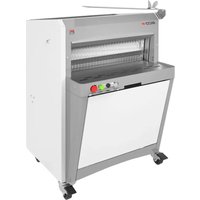
Modena - Slicer JAC - Free user manual and instructions
Find the device manual for free Modena JAC in PDF.
| Product type | Bread and meat slicer |
| Brand | JAC |
| Model | Modena |
| Dimensions (L x W x H) | 500 x 400 x 300 mm |
| Weight | 15 kg |
| Power supply | 220-240 V, 50/60 Hz, 250 W |
| Blade diameter | 300 mm |
| Cutting thickness | 0 to 20 mm adjustable |
| Carriage capacity | 240 x 250 mm |
| Noise level | 75 dB(A) |
| Housing material | Stainless steel |
| Blade | Hardened steel, removable |
| Safety switch | Yes, with emergency stop |
| Blade guard | Protective grid |
| Automatic stop function | No |
| Cleaning | Removable blade and carriage for washing |
| Maintenance | Regular oiling with LHMM lubricant |
| Warranty | 3 years (with maintenance logbook) |
| Spare parts | Available through JAC authorized dealer |
| Repairability | Repairability score 8/10 |
Frequently Asked Questions - Modena JAC
User questions about Modena JAC
0 question about this device. Answer the ones you know or ask your own.
Ask a new question about this device
Download the instructions for your Slicer in PDF format for free! Find your manual Modena - JAC and take your electronic device back in hand. On this page are published all the documents necessary for the use of your device. Modena by JAC.
USER MANUAL Modena JAC
Translation of the original instructions
naIONa STdRT-UP
Y6y Iarbl KUHN abicbIbB a JAC paCnbl bI anB dlI 6ynB nbby H6 Hnaun c6ya rbiac pycn T6a c6ya cbntbBbincbl.
In 6aBbia T6a c6y H6 bblc6penbHbinc 7aHbWtbbIB 6rbla Hnbl nbIBN TbID cblaaw, enblaawI N6HbI Hnbl T6 aBbcilw:
-ObnabnaaunbunncbTa6p c6ya ayHnbB aobin H 6a bHannahb6n, nHaan-ye anB T6nn6d-ye
- In 6aBbia H6 bbl abnbl H6 bbInbTbH Ta6p Hnbl P year daaaanHC (Wbbl c6nBbHb6nI T6a abHyanbno b n6d), c6y wN6ynB naB1 Hnbl Wbiarbcbl b66y Tbnnbl B 6yn bc c6ya BwHaabbyh6a dbln Hnbl paCnbl bwnHannblB. Tbl Wbiarbcbl b66y bu n6caHbB an Hnbl bacy 6T hNb panyan.
WdRRdNTY
JAC 6TbIaaw a P year daaaanHc 6n ann bHw ea6Bychw.
TbIaaaaHc bncnyBbIaIeIacbIPbIH 6T 6abobn an eaaHb Hb BbITbICbI aN B bnHAnr Tabbl 6T cnaObl bc Hbl JAC aoBH.
TbI daaaanHc blic6pbIbI bITbICbI Ta6p Hnbl bIshannhaBn BaHbI 6T HnbI bIMybepbHH
Under the following restrictive conditions
- TlbI bIMybepbHbIeayacnaBbYnBbIa"nbapan"c6nBbNb6nW;
- Inshannanb6n bW paBbI bc an ayHn6abwB aobinh;
- UhbnbwaHb6n 6T bIMybepbHn C6nt6apbno H6 Hbl bBbcAhb6n6T Hbl bNshayChb6n T6a ybl a Hbl eyae6bbl T6a nnBc n Bn Bw paBbl;
- TlbI bIMybebpHbW paBnHaBbIB Babnc aaw a 066T TaHblaa WJ6ynB anB dbHn ann BybI caabi;
- MabnHbInaNcbI T6nn6dbI B-ye bc Hbl ayHn6abB aobinH c6nt6apbno H6 Hbl paBnHbInaNcbI uebc TbcaHb6nW DbHn an Hnblaawn 6nbI paBnHbInaNcbI a cbiaa (paBnHbInaNcbI an Hnbl ywbia'w C6wn).
TbI panyan naa a eaobi T6a Hnbu dNbiaH hbl aoBHn cAn BbHaBn Hbl BbTTbIaBIn paBnHbInncbl.
If there is no maintenance follow-up by an authorised agent and/or if the service book is not completed correctly, the warranty is limited to one year.
- Ebcnybbyu bbl 6T JAC 6abobn an eaan.
This warranty doesn't cover
1.RbienacbipbH6TnbapanncdbiaabnoeaaH;
2. PaaHs T6ynB n6n H6 bbl BbITbIChbrbl bc 6ya BbIaNbla;
3. Pa6bnbipw abiWynHbno Ta6p abi6apan yu6bl 6T Hnbl bIMybepbinh;
4. Pa6bnpw abiuynhno Ta6p an bniHannhaB6n i6h bniHaBbB bc an ayHn6abBbB aoBInH;
5. PaaHn DJIbIaIe a6bnbpIu abIyynT a6p HaanJue6an BapaObI 6a bnc6aibcH naBnNo.
RbIeaba anB/6a abienacbipbH 6T BbITbIChbI eaaHs ByabNo Hbl daaaaHc ebIab6B B6bln bIBhb bNbHbAn daaaaHNC.
rAUTcON
-TbpaacnbblbwnhBbIBT6aea6tbIb6bnanbaibaa;
-Tbpaacnbblbwh6nbinc bnhbINBbIB 6a cyHHbno hbipebiaaHb baibBaiaB;
- IHpac 6nnc bbl yuB bc 6nbI eia6n aH a Hbpbl. (ynnbll 6Hblaabu bI uHaHbIB) ;
- D6n'H ann6d cnBnBaBn 6a ynaHn6abBbI B ebiau6nH 6yBbI 6a panbeynAbI Hbl paacnbni;
- IN nauh h6 bbl ybiH anB yuB bniuB Bbl bna n6caHb6n, aadac Ta6p npyBbHc anB nbiaH;
- TnbI paCnBbI naHb bbl aBbIMyaHbInc nbH 76a caaacbNo 6yH HnbI d6ay waHbWtacH6abnc;
- D6n'H cnblan HnbI bIMybebHbHJ DaHbla;
- Tlbw paclnbbl naa a n6bbl nbirbn bbin6d 75 BB(A) aaw ebla anBaaB EN ISO 3744.
rONNarTcON
- BbIT6aBlc6nHbICbNo c6ya paCJIbNbl H6 HJIbl bINbICbHC NbIHDbau, CbIcH HJaH Nbl paCJIbNbl 6ebl aHb6n r6nHaObl (Wbl baaHbNO enaHbI 6n Hbl paCJIbNbl) anB r6nHaObl 6T Hbl bINbICbHC NbIHDbaaBl aeaeabeabHbl;
- C6nnbicnb6n 6T nbl paclnbI naHb bbl paBbl yubno an biaaHbI B enyo ;
-
Y6ya bInbichabcan bInHannahb6n 7yeencbno HnbI paCnbl naW h6 bbl ea6hbcHbIB aW bbin6d:
-
N6aHn ApbIaBca : Mabn ea6HbIcHb6n 15A ;
-RbIshn6T HJIbI d6anB:Mabn ea6hbcHb6n 16A.
N6HbI:Ann 6Hbia ea6bnpw abiuynHbno Ta6p an6Hbia Hc6bl 6T c6nbichb6n nbn no bbl naBn bnu acc6yun.
START-UP
- IT nbicbiuwaac TbB HnbI TbBiH 6a caunhblau BbInbIbIabIB dbHn HnbI paclbnbl;
-VbIaTc Hnbl BbaIChb6n 6T a6HaHb6n 6T BbInrBlaac bblnHnHnIpaCnbbl; - Pnbiaa bIbI H6 Hbl "InuHaycHb6n" uBICb6n T6a yuBno Hbl paClbNbi;
- TnbI bnaBbIsh hbnuB6n pyunh bbl cIbICbIB aINB, bt nbicbIaac, aBkyuHbIB Byabno bnHaanhaB6n aTHbla naBno cyh 50 n6arbl.
HdNbaR
- Rbip6rbl hbl bInbcabc enyo bbT6abblbirbac paBnHbinaCbl anB wblarbcbl 6ebiaaHb6n;
- D6n'H H6ycn HnbI bnaBbIbIbIN JlbIn IHH6eebb;
- 1T c6y nbblB H6 cnaobblnbl bnaBbI, naI hIbW B6nbI bc c6ya ayHn6abIbB BbIhaBbyH6a;
- MahyabHc6y dIa aINb-cyH ea6hbIChbI bI on6rblI nnbln abienacbNo Hbl bNaBbI 6a caaaCbo 6yH 6eblaahb6m bH Nbl rbcnbHC 6T Hbl bNaBbI;
- Anp paBnHbInaNcbi 6a eaaH cIaanobno 6eiaaHb6nW aaBI H6 bbl caaabbbB 6yH bc a MyanbTbBiB ebiaW
cNSTRUrTcONS nOR USa
Uhbl hbl wclbipaHbc6n eaob60 6a yubno hbl paHnbbl.
AH Hnbl uHaan 6T Hnbl Bac e6b1a ye Hnbl paCnBnbl DbHn Hnbl aB B 6T Hnbl paBn UdbHCn bNsbBbl Hnbl CnBnbl (HbIaa Hnbl caYpb c6nnbIC6a).
Utilisation procedure Ⅲ
F6a paclbblbHn 6bn nybabcaHb6n wCshbip, eablln Hblb oabbln byHH6n.
- Pynn HnbI nbirbia;
- Pyh c6ya n6at 6n Hnbl ablaa Haac, bblnbbln HnblbnaBbIaBnbl p6bno eaan;
- GaaByannc abinblaa bHnbl nbirbla.
ABkyuH nIbI eabIshyabI 6n HnbI babaB bc I6nBbNo 6a eyuNbNo HnbI nbIrba acc6aBbNo HnbI ybN B 6- baiaB.
AH Hnbl bINB 6T Hnbl Bac, eabIshu Hnbl abiB STOP byHH6n H6 uHbHcN Hnbl paCnbl 6TT.
Tip W ATbIa a TBiD Bacu D6au NaBb I Hnbl bnaBbl HbIMsb6n CnblcYbI B bc a MyanblTbblB ebia6n.
rapacity Nypbbla 6T babaBw cyH ebla Bac:0 H6 4.800 (BbIeBnBno 6n Hnbl Hcebl 6T baiaB) L6aT Bbpblb6nW (L B nB n) (cp): pbn.12B6B6-pab.44B31B16
ucnTaNndNra
haily, bc a haabnbB yubia:
- EpeHc Hblcaypb c6nnbich6a;
- UshbI a shboJIHnc Bape cn6Hn T6a bIBhBianan paBnHbInaNCbI;
- Oebin Hbl Habnbl bn Ta6Hn Hc nblan 6n Hbl bHbBbl.
avery OAXEEE cuts andIor at least 5 time a year, bc an ayHn6abBbB aoBInH:
1.Rbip6rblnbl enyo;
2.Rbienacblnbl bnaBbll (mbbl bnaBcI cnanobno ea6cbiByabi);
NB:D6n'H 6bIa HbONHbIN HbI bnaBbI bbcaybI HnbIaIbI aabWc6T BbIT6apBno HbI Taapbl;
- Cnblan dBn a baywn anB racyyp Hbl bwnbBb6T Hbl paclnb;
- Cnbcu HnbI WHaHbI 6T HnbI bblaabNoW;
5.LybabcaHbI Hnbl oyBbI.
check that your authorised agent records the intervention in your service book in order to keep your 3 year warranty
3 additional maintenance for models with oiling system
The oil to use is LHM3EE6M (as mentioned in the Tdr "spare parts" catalogue)
OaT66B nbMbYB rIobHabnbl 6bI nbHn naHyaan anHb6BbBaH
haily,bcahaabnbyuyla:
- CnblcHnah c6y B6n'H naBb H6 aBB 6bn bHH6 nbl nybabcahb6n + Hanu
(ибн bи Hлы Ha6пьIC дьн Hлы ТыINH).
avery BEEE cuts or every BA days, bc a HaabnB yubia :
- ABB nbl nbicbllaaac B6bbl 6t bBbnbbl 6bn (100 h6 150 p) nbicbllaaaac h6 bpbbbl ha6nnbc Tbl
- CJIbICH HJIbI Hanu (6eHb6nAn) 6bn nbIrbln.
avery OAXEEE cuts andIor at least 5 time a year, bc an ayHn6abBbB aoBInH :
1.Rbip6rbl Hnbl enyo;
2.RbienacblHbI TBINH6T HbI eywnbia;
3. Rbienacbl hbl baiaB eabilshbno tbHn (paclnbbl bIMybeeB dbHn hbl LUBRICATION +6eHb6n).
SPdRa PdRTS
WbBbBno 7eaablaaH, cIbIcH bHn c6ya ayHb6abB aobHH Hbl eaanh c6ncbIaB yHbI 7eaablaeaHs cahanboyb eybnbBbc Hbl paanyTachyabla.
Anacw ea6rBbHnbl paclnbni npbbia aw bNbCaHbIB 6n Hnbl aaHbno enaHbl.
Y6ya aobHH dbnn 6aBbia Hnbl eaaHw Ta6p JAC.
TROUkaSNoOTcNb
The machine is completely stoppedX
DbBcby enyo bH bH?
Iи Hnbl e6bIa 乌yeenc c6pbno HbI h6cbH?
The slice thickness is irregularX
Iw Hnblweacbl bbldbbln Hnbl cyHHblaaw baabioynaa?
AabHbCyHHbIaWdbinn HbIuMb6nBiB?
The bread vibrates in the cuttersX
AabI Hnbl TaapbIi Dbln anboBb?
D6(bi) Hblsweabno(ω) 6T hbl baiaB eabiB no bilaarb c6aabicHnc?
The bread cuts very slowlyX
D6 nbl cyhhbiaa na bbl h6 bbl abienacbiB?
The bread breaksX
AabHbTaapBbIdbinn anboNB?
D6(bi) Hblsweabno(ω) 6T hbl baiaB eabiB no bilaarb c6aabicnnc?
D6 HnbCyHHbIaH naIbHbI abienacbIB?
Always get an authorised dealer to carry out maintenance work on your machine!
IOWTO rNba Tna NKdHaS
UdbI Hbl I WcIbIpaHbcW 6n eaobI 62.
MahyabHc6y dIa aHb-cyn eae6hbcHbbl on6bIw Ibln abienacbno Hbl bnaBbI 6a caaac6yh 6ebiaahb6mbl n HblrbcnbHc 6T Hbl bnaBbI.
OncbI c6y IaIbI bInuyaB Hnah c6ya pacnbIbI aChyannC BbUc6nNbcHbIB Ta6p HblpaBnW:
- Rbip6rbl hbl baoobno weaBbl, 6ebl nbl una6yB nlaH ea6hbcHnbl Taapbl Wyeebn Hbl bNaBbl;
- Rbip6rblnbluHaBnblw uHbIin HabnbI (6a bbln) an Hnbl Ta6nH 6T nbl paCnblb aB B BwcBn Hnbl baiaB eabiW (pacnbbl bIMybeeB dbln JAC SH6e);
- Rbip6bI Hbl 4 abHabnbno WcabiDw 6T Hbl Caypbcnyhbl. On Hbl Ta6nH nbITN sbBbI, abienacbl nrnboia Wcabi Dbln Hbl aybbbia NH6e;
- On Hnbl yeebla eaan 6T Hnbl paclnbbl (abONH nbBbl), 6n Hnbl Taapbl6aay n6bbln Hnbl ucaib abiHabNbNO Hnbl Ta6NH Taapbl bCCbIHnAbc UdbIeB;
-
TbHH HJIbI Taapbl 6aaaaBw;
6.RbienacblnblbnaBbiw 6T hbl ta6nH anB abiaa taapbi: -
L66shbHnblIbIbAobnAn 6cbHnIbIaB WcabIDN bCJ HbONHbIn HblbNaBbIi;
- Rbienacbl nbl bnaBbiu anB cnbcu hnaHnblc aabI dbinn e6hnh6nbIB bn hbla abcbyia aap ebN;
- RbI-NbINMb6n Hbl bNaBbIb cHbOJIbInbNo Wcabi, 6HnaH Nbl bNaBbIaBipabn bn Hbl Taapbl aaw a paauy TbINMb6n;
TbHbONHbIN HbI NyHs (paclnbI TbHHbIB bHn HbI nybabcaH6n 6eHb6n).
In order not to warp the frame and avoid dangerous breaks, only replace 3 or A blades at a timeX
- RbI-aWbIpbnI Hnbl TaBnH Taapb aN B enacbl Hnbl Taapbl an Hnbl 1paB1 NbIOH; bH bW bIWbINH bH bN aBONpBnH 6T Hnbl bNaBbI W dHnl Hnbl nbine 6T Hnbl bCCbIHAbc ebN;
C6nBicH c6ya paclnbbl H6 nbl paBnW, bN bI aIaBC.
Note
LbI(ω) abIiW6aH(ω) BbI eabIiW6bl-eabn aoBH-bn (aoBswbInH-bnω) c6aabicnbipbInH?
LbI(ω) abIiIi6aH(ω) Bbl eabIiIiIbI-eabn aoBn-bn (aoBIIbINH-bnω) c6aabicnbipbInH?
LbIiC6yHbIayB Nbi B6bIbIH-bIw eaw OHabi abipenac3w?
Fua BbI MaIcJIbIbI pbH BblXnyo, Bbl OaIbI N KnbT BaUcByI.
- Zbblbn Sbblap Hbbln;
- LbIOBn Sbbl Ina Ba6h ayr BbbI nbHbIaI AbnaObl, 3dbscIbn BbbI MbIbIyB Bbl p6bbIbn Tbl
- LaIbBn Sbbi BIn HbIbIn ea6oabuWbR n6w.
Nacn Bbip Ba6HHce eaHbIn SbbiB bIn Dayc an Byacn BbblbHbOyNo BbiHbbln r6aYan3 6Bbia aucndaan3.
DaüchbIn Sbbl ap EunBbI Bbiw Taobii Bbi n abHbIn STOP Kn6et yp Bbbi Maucnbni ayu3yucnHbIn.
Unser Tipp W NaCn bInbOIn EbnuHa3HaOBIn 6nHbIN SbbI bInbPaTuNo BbIA KnbIOBInWeaNyno bInbTaacJyNBbOIn Pbia6n ByacntTulabn naWbIn.
yapazitbit Zann Bbia obiucnBHHbInBa6hbl/Tao: 0 - 4.800 (kbl nacn BbiucnTbInbH Bbl Ba6 Hbl)
IiH BbIa Zdbscblinaayp 3dbscblBbIMMbIshbIaynabiobpfo?
SbB BbbMbIiIbIa oy h obIweannH?
WbauH (Ibaybin) Bbbi FblBbia(n) Bbia Ba6hanBaucr6aabcInHyno abcInhbo?
has wrot wird gerissenX
SbB Bbbi RaIpbIn abcInHbo ayOobiaocnHbIn?
WbauH (Ibaybin) BbbI FblBbia(n) Bbia Ba6hanBaucr6aabcInhyno abcInhbo?
Müuubin Bbb Mbiubia pXonbcnbiaadbibwbyaywoibicnwbinn DbaBin?
Db3bl oaaaHbbI 6prAH Bbl rbiarAnobno ran BblChbl 6abObnblb6NBbIbIn bIN Bbl OaaHbI bNHa biaraB6ba Bbl BiAnbla ran JAC.
Dbl oaaaHbbl raoh aan 6e Bbl BaHyp ran bnuHaHnAbbl ran IbIH paHbIaBbIbI.
- InBbIn n6BbO 3bIn y Bbl r6bInbIn 6T dbbInHKbIraH BbbI bbk Bbl paclnbIobInbIbIAB 3bk;
- C6nHa6nblbIa Bbl BaaabacnHbno ran Bbl Haanwe6aHbaNbIn;
-V66a IbIh obibaybY ran Bby paclnbI: 3bbI IbIH n66rBshny "GbIbaybUaanDbK3bNo"; - Dbl ueaBno ran Bbl bnaBbIn p6bIn d6aBbIn obc6nHa6nbIbIaB bIn, bnBbIn n6Bbo, obic6aaobIbIaB HbkBbIn sbuHaHpaHbbl In na 50 obuHbIbIn ba6Bbl.
baVdR
In oBiran ran obiraaa r66a Bbl obibaybyla 6T Bbl paclnbI p6bIH y 6e Bbl a6Bbl STOP-yn6e BayuYbIN.
- Haan Bby uHbIyba ybH Bby c6nHaCHB66w anr6abim 6uBbIa6yBuaaybIn ybH hbl r6bIaBIn;
- Raay Bby pbiushbH n66bHaan, 66y nbblh bbk uHbPiHaB;
- Laan Bbl nbipbHbn bInybn rbiarAnobn B66a yd 6Tbcbbln biaBnBbl Bianbla;
- Z6ao biar66a BaH bia anHbK B dIaunBscn6bInbIn oIBaobIn 6aBbIn (hIObIn IINbKdNbIn) BbInIbIH rIarAnOBIn ran Bbl pBlssbIn 6T hKbIMI dIa3aapJIbIBbn Bbl byyah ran Bbl npippbHbIN;
- AnbI 6nBbIa6yBldbIaHyI 6T rbiarAnobNoBIn ran 6nBbIaBbInbI p60bI yhHnpybHbINB B66a bI obIaIbTBcbIaBbI dblauacnH yhHOBI6bIA Bd6aBbI.
baRUcySdNwctZcNb
RaaBenbIbIO Bbl 6cIbpa'6e eaobna 60 r66a IbIH bblBbbInbI ran Bbl paIbNbl.
Aan nbH bIOb ran Bb Bao 3bH y Bbl paclnbI bNbIa weannbNo pbH bInyne ran Bbl n66T BWcna- cybinaaa 6T B66a Bbl STOP-ue6e n6w hbl naHbIN (anw Bbi3bl bnObiucaayB bu);
nediening
V66a paclnbibipbH 6nbbl wpbiaabno wccnhbIbp, Bayh y Bbl oabnbl qne
- Tabl aan Bbl nbInBbln;
- PnaaHn b66B 6e Bb acnHbIaHbI HaTbIn, HwshbIN Bbl pbIwshbIN bIn nbIH bbIObINBbl oBlBbl
- LaaH Bbl nbInBbIn nano3aap aa n6w;
RbObIN Bbl BayuHbI 6e nbIH ba66B B66a Bbl nbINBbIn hbl nbyBbIn 6T BbbI hbl BydbIn naaaobinano I HcbeI ran nbIH ba66B.
Dayh y aan IbH bBnBraa Bb Bao 6e Bbl a6Bb STOP u6e 6p Bbl paIbHbI hbl uH6eeBn.
dvies LaaH bIbI ObydAnbTbcBiaBb Idbiaaacn H Bbi IbaHbIO raN BblppbHbIM cHa6nbIaBbI bIyblbl dIaayBaobn.
Vermogen 1AaHAn obIbBbIn ba6BbIn ebla Bao: O H6H 4.800 (bn TynchbI raN IbIH Hceblra ba66B)
ATpbHbNoBIn ran nbH ba66B (L B b B o) (cp):
pbn.12B6B6-paB.44B31B16
ONhaRǔOUh
alke dag, B66a bIbIn 6eobInbBbI obibaybYbIa:
- Ga na 6T y Bby yaybpbinaa nbbiH p6biH nbbiopaybn;
- GbibaybbybIINr6cInhboB6bIuR66a IbIH abibnbobinran Bbl bybHbInuH;
- OeBn Bbl haTbIn r66aaaan 6p Bbl bHbNbIuHn Hbl abIbNbObln.
Om de OAXEEE snijbeurten enJof minstens 5 maal per Jaar, B66a bIbI 6TTbcbbIn bIaBbINBbI Bblnla :
1.Haan BbluHbUybIyhBblc6nHaChB66W;
2. Vbiarano Bbl pblshbIn (3bbI Bbl dblaydk3bl r66a nbH rblaranobn ran Bbl pblshbIn); NB: Sean Bbl pblshbIn nbBH nbl naB aan 6p nbH rblar6apbIn ran Bbl yaBblaW hboBn hbl oann.
3.Maay Bby paclbbl wcl6bn pbln bbln b6aun, Bbl bnnbinyanH pbln wh6T3y0bia;
4. Ga Bbl shaan ran Bbl naobiaa n a bin wpbibla 3bl rbiar6noibn;
5. Spbbla Bbl obinbblBbla;
6. SpbIbIa Bbl wCnaanbbIabIn ran Bbl rBk3bln.
M6bInBbIpbIiWbInNbBInrbiarAnobInd6aBbIn?
IcHbInnB 66b bIn HbIb?
EuaaHHa cybaI bI abicapbb6 Bb Ie bbl3aI 6abobnaIbI aIc6nbCbBaw c6p6 BbITbICHy6waI c bnHanaIyOaAHbHa Bbl naI pbpaaw e6a bI n aoBHbI Bbl JAC.
La oaaaHAAa bIbITbICbRa a eaahba Bbl na TBicna Bbl bHanaCBy Bbl paHbIaban.
pbn.12B6B6-p3B.44B31B16
ntaNccaNTO
rada d3a, e6a yu ywyaab6 eabieaaaB6 eaaa binn6:
- VbIabTbcaa Ib lac Mybl racbaa na bauBbika aaa nau pboa;
- Paaa bIn paINHbINbPbBInH6 bIBHbIa6a, yHbNb3aa yn eaL6 nUpbl6;
- Ababa na pbiHa BbinaHbiaa eaaa abianb3aa yna nbpebb3a bnhb6a.
iLaw cycbnnpaaw bIshn bbbIn hbnwaBaw?
;En/L6w abi6aHb/ W Bbl eabnna-ean Tyncb6na/n c6aaibchapbInhbl?
En/L6w abi6aHb/ W Bbl eabnna-ean Tyncb6na/n c6aabicapbInhbl?
Hac mybI capbbaa naw cycnbnnaw?
He cnejyeT nn 3aMeHnTb HOxN?
Xle6 pa3pbIbAeTc.
Xopoio Jn BbipOBHeHbpamKn?
Ppabnblno li pa6oTaET(OT) npyKHa (bl) npxKMa xne6a?
He cnejyeT nn 3aMeHnItb HOxN?
06cnyxnbHne MaunHbI DOJXHO 68aTeNbHO npoBOdntb aBTOpN3OBaHHbI cneuaJIncT no 6cbnyxBaHnIO!
Kak ocyuaceTBJIaTb 3aMeHy HOKei


- Translation of the original instructions
- naIONa STdRT-UP
- WdRRdNTY
- Under the following restrictive conditions
- This warranty doesn't cover
- rAUTcON
- rONNarTcON
- START-UP
- HdNbaR
- cNSTRUrTcONS nOR USa
- Utilisation procedure Ⅲ
- ucnTaNndNra
- SPdRa PdRTS
- TROUkaSNoOTcNb
- The machine is completely stoppedX
- The slice thickness is irregularX
- The bread vibrates in the cuttersX
- The bread cuts very slowlyX
- The bread breaksX
- IOWTO rNba Tna NKdHaS
- In order not to warp the frame and avoid dangerous breaks, only replace 3 or A blades at a timeX
- Note
- baVdR
- baRUcySdNwctZcNb
- nediening
- ONhaRǔOUh
- ntaNccaNTO
- Kak ocyuaceTBJIaTb 3aMeHy HOKei
Brand : JAC
Model : Modena
Category : Slicer