
MQ67115 - Food Processor SIEMENS - Free user manual and instructions
Find the device manual for free MQ67115 SIEMENS in PDF.
| Product type | Hand blender with accessories |
| Brand | Siemens |
| Model | MQ67115 |
| Category | Food processor |
| Power supply | 220-240 V ~ 50/60 Hz |
| Speed | Variable and Turbo |
| Included accessories | Universal chopper, whisk, puree accessory |
| Functions | Mixing, chopping, whisking, pureeing |
| Blade material | Stainless steel |
| Cleaning the universal chopper | Dishwasher safe (except overlay element) |
| Cleaning the whisk | Dishwasher safe |
| Cleaning the puree accessory | Dishwasher safe |
| Cleaning the multi-purpose attachments | By hand with a damp cloth |
| Safety | Sharp blades - do not touch |
| Spare parts | Universal chopper (ref. 657248), Whisk (ref. 657428) |
Frequently Asked Questions - MQ67115 SIEMENS
User questions about MQ67115 SIEMENS
0 question about this device. Answer the ones you know or ask your own.
Ask a new question about this device
Download the instructions for your Food Processor in PDF format for free! Find your manual MQ67115 - SIEMENS and take your electronic device back in hand. On this page are published all the documents necessary for the use of your device. MQ67115 by SIEMENS.
USER MANUAL MQ67115 SIEMENS
Operating instructions
This accessory is designed for the hand blender MQ6....
Follow the operating instructions for the hand blender.
The accessories are suitable only for the use described in these instructions.
Safety instructions for this appliance
Risk of injury from sharp blades/rotating drive!
Never grip the blade in the universal cutter.
Take hold of the universal cutter blade by the plastic handle only.
Never clean the blades with bare hands. Use a brush.
Important!
Do not attach or remove accessories until the appliance is at a standstill.
Never use the hand blender/blender foot in the universal cutter.
The universal cutter is not microwave-safe.
Never immerse the attachment of the universal cutter in liquids and do not clean under flowing water or in the dishwasher.
Never insert the whisk or masher attachment into the base unit without the gear attachment.
Never use the masher attachment in a pan over direct heat.
Do not strike the masher attachment on hard edges (pan, bowl).
Never immerse the gear attachment in liquids and do not clean under flowing water or in the dishwasher.
Explanation of the symbols on the appliance or accessory

Instructions for removing/locking the masher paddle (lock anti-clockwise).
Before use, read these instructions carefully in order to become familiar with important safety and operating instructions for this appliance.
Please keep the operating instructions in a safe place. If passing on the appliance to a third party, always include the operating instructions.
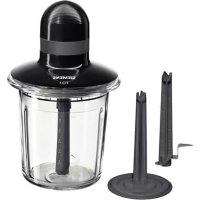
Universal cutter
Please fold out the illustrated pages.
Fig. A
1 Universal cutter
2 Blade
3 Attachment
4 Lid
A universal cutter can be ordered from
customer service (order no. 657248).
Operation
The universal cutter is suitable for cutting meat, hard cheese, onions, herbs, garlic, fruit, vegetables, nuts, almonds.
With the universal cutter use the appliance at full power to prepare honey spread (according to the recipe see Fig. ②).
Always observe the maximum quantities and processing times in the table (Fig. ⑥).
Warning!
The universal cutter must be completely assembled before use.
Caution!
Before cutting meat, remove gristle, bones and sinews.
The universal cutter is not suitable for cutting very hard items (coffee beans, radishes, nutmeg) and frozen food (fruit, etc.).
Fig. B
- Place the universal cutter on a smooth, clean work surface and press.
- Insert the blade.
Add food.
Warning!
Blade must sit straight in the universal cutter so that the attachment sits correctly (Fig. 3-3).
- Place the attachment on the universal cutter and rotate in a clockwise direction until it "clicks" into position.
- Place the base unit on the attachment and lock into position.
- Insert the mains plug.
- Hold the base unit and universal cutter firmly and switch on the appliance (Turbo speed).
- Release the On button after processing.
After using the appliance
- Remove mains plug.
- Press the release buttons and remove the base unit from the attachment.
- Rotate the attachment in an anticlockwise direction and remove from the universal cutter.
Take hold of the blade by the plastic handle and take out. - Place the lid on the universal cutter to keep in the processed ingredients.
Cleaning
Warning!
Never immerse the attachment of the universal cutter in liquids and do not clean under flowing water or in the dishwasher.
Universal cutter and blade are dishwasher-proof.
- Wipe the attachment with a damp cloth only.
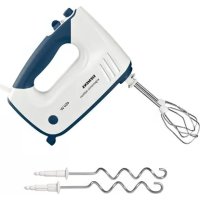
Whisk
Please fold out the illustrated pages.
Fig. A
5 Gear attachment for whisk
6 W h i s k
A whisk can be ordered from customer service (order no. 657428).
Operation
The whisk is suitable for whipping cream, beating egg whites and milk froth (from hot (max. 70^ ) and cold milk (max. 8^ ) as well as for preparing sauces and desserts.
!
When processing hot milk, use a tall, narrow receptacle for blending. Hot milk may splash and scald you.
Fig. D
- Put ingredients into the blender jug.
- Place the gear attachment on the base unit and lock into position.
- Insert the whisk into the gear attachment and lock into position.
Warning!
Never insert the whisk into the base unit without the gear attachment (Fig. D-3).
- Set required speed using the speed control (if fitted) (recommendation: high speed).
- Grip base unit and blender jug and press required On button.
- Release the On button after processing.
After using the appliance
- Remove mains plug.
- Press the release buttons and remove the base unit from the gear attachment.
- Remove the whisk from the gear attachment.
Cleaning
Warning!
Never immerse the gear attachment in liquids and do not clean under flowing water or in the dishwasher.
The whisk can be cleaned in the dishwasher.
- Wipe the gear attachment with a damp cloth only.
Masher attachment
Please fold out the illustrated pages.
Fig. A
7 Gear attachment for masher attachment
8 Masher attachment
9 Masher paddle
Operation
The masher attachment is suitable for mashing boiled potatoes and for mashing other suitable foods (e.g. cooked pulses, cooked fruit and vegetables).
Warning!
Risk of damaging the masher attachment.
- Never use the masher attachment in a pan over direct heat.
- Do not strike the masher attachment on hard edges (pan, bowl).
- Do not process hard or raw ingredients, e.g. coffee beans, chocolate.
- Always work with cooked ingredients.
- Chop up large ingredients (e.g. potatoes) in smaller pieces beforehand.
Fig. 3
- Place cooked food in a suitable receptacle. The receptacle should be maximum two-thirds full!
- Place the gear attachment on the base unit and lock into position.
- Insert masher attachment into the gear attachment and fix in position by turning it clockwise.
- Insert masher attachment into the food which is to be processed.
- Hold base unit and receptacle firmly and switch on appliance (turbo speed).
- Move masher attachment up and down until the puree has reached the required consistency.
- Release the On button after processing.
After using the appliance
- Remove mains plug.
- Press the release buttons and remove the base unit from the gear attachment.
- Remove masher attachment from the gear attachment by turning it anticlockwise.
Cleaning
Warning!
Never immerse the gear attachment in liquids and do not clean under flowing water or in the dishwasher.
Tips:
- To remove mashed food, use a dough scraper or plastic spoon.
Never remove food by knocking masher attachment on a hard edge! - If processing e.g. carrots and red cabbage, the plastic parts will become discoloured by a red film which can be removed with a few drops of cooking oil.
- Wipe the gear attachment with a damp cloth only.
- Preferably clean the masher attachment immediately after use. Doing so prevents residue from drying on. Put a little lukewarm water and washing-up liquid in a suitable receptacle. Immerse masher attachment in the water and switch on appliance for approx. 10 seconds.
- The masher paddle can be detached easily (turn clockwise) if the gear attachment is still attached to the masher attachment.
- Masher attachment and masher paddle can be washed in the dishwasher.
After cleaning the masher paddle, always check that there is no residue in the interlock opening. Remove any residue with a wooden stick (e.g. toothpick). - Assemble by turning the masher paddle anti-clockwise.
Application example
Mashed potatoes
1 kg of boiled potatoes
0.15 I warm milk
50 g soft butter
- Place ingredients in a suitable receptacle and process with the masher attachment for approx. 1 minute.
- Finally, add salt, pepper, nutmeg and, according to taste, a pinch of cinnamon.
Pour votre sécurité
Fare for skade pa pasatsen for stapping.
- Påsatsen for stapping ma aldri brukes i en gryte direkte over varmen.
- Påsatsen for stapping ma ikke slås mot harde kanter (gryte, skål).
- Det må ikke bearbeides harde eller rå ingredienser, som f.eks. kaffebnner, sjokolade.
- Det må alltid arbeides med kokte ingredienser.
- Store ting (f.eks. poteter) må Först skjæreres i mindre biter.
Bilde E
1 YHIBePcAJIbHn IoDiPi6HIOBaU
2 Hix
3 Hacaɪka
4 Kapu Shka
YHiBepcaIbHn Ioppi6HIOBaM OxHa 3aMoBHTn uepe3 cepBicHy cIyK6y (Homep dIra 3aMOBJIeHHA: 657248).
BnKOpncTaHHa
YHIBePcAblnNoDpi6HOBaU npHaTHN dna NoDpi6HeHH Ma ca, TBepDo rCy, u6yI, 3eJIeHI, YacHNky, ppyKtIB, OBOuIB, rOpiIB, MngdaiIO.
YHIBepcaIbHnIOdpio6HOBa3a6e3neueyec Bam BnKOpncTaHHMaKcHMaJIbHOI NOTyHKHOCTi npuIaNpynpnrOToyBaHHMeDObOI 6yTepeoHOI MaCH (3a yMOBn DOTpMaHHBAa3iBOK, npNBedeHnx B peeNTi, INB.MaHIOHOK).
3BepTaIte 6OB'3KOBO yBaIy Ha MaKcHMaIbHy KInbKicTb i Yac nepepo6Kn, 3a3HaueHi B Ta6nui (MaIOHOK C).
YBara!
YHIBEpcalbHn NpOpi6HOBauch BHKOpNCToBByBaTH TINbKN Y NOBHCTU CKIaDeHOMy BNJIaI!
Obepekho!
Ipeen nepepo6koM m'raCa BndaJIITb i3 Hboro Xpaui, KiCTKN Ta cyXoKnnna.
YHIBePcAhnNoPi6HOBaHu He npuaTHn dnnnoPi6HOBaHHaUKe TBepHX IpOdyKTIB (KaBOBnx 6o6iB,pebKn, MyCKaTHNX ropixib) Ta 3amOpOKeHNx IpOdyKTIB (pkykTBtoio).
MaHIOHOK B
- YctaHOBIb yHIBepcaIbHN noDpi6HOBaH a pIBHI i uNCTiIN poOoHIOBepxHi Ha npTnCHITb.
BctaTe HiK.
3anobHitb npOdyKTn.
YBara!
HIX NOBUNHe pIBHO cnDITN B yHIBePcA b-HOMy NODPi6HOBaYi, ue 3a6e3neuTb IpaBnIbHe PO3TaUyBaHHa HacaIKN (MaHIOHOK 3-3).
HaHbTe HacaKy Ha yHBepcalbHn noPi6HOBaTu NOBepHiTb 3a rOdHHoC tpiKoHO, uoBoHa CyTHO 3acKOuHa B n a 3.
- YctaHObitb OCHOBHn6JOK npHaNy Ha HacaIky, 06OyTHo 3ackOuHB n3.
BbIMKHyTN BnKy Do po3eTK.
TpmaoumioOCHOBn6Iok npnaLy Ta yHibepcaIbHn noDpi6HOBaB, BBIMKHiTb npnaad (Typ6o-peKm).
- Plicna nepepo6Kn BiDnycTiB KHonky BBIMKHeHHa.
Picra po6otn
BnIMtB BnIKy 3 p03eTKN.
HaTnCHiTb KHONKn IJy po36NoKyBaHH Ta 3HiIMtB OCHOBnI 6Iok npuJaIy 3 HaCaKn.
- Поверніть наcaДу npOTи рODиHоi CTPIKn Ta 3HIMiTb II 3 yHiBepcaIbHOro NOpi6HOBaHa.
Bi3bMitb Hix 3a nlaactMacoby pyky Ta BnIMt b Noro.
3akpnite KpnuKOU yHIBepcaIbHn noDpi6HOBaU dna 36epiraHHn nepepo6neHnx npOdykTIB.
OuHueHH
ybara!
HacaKy yHibepcaIbHoro noDpi6HOBaHa HI B RAKOMy pa3i He 3aHypIOBaTH y pIDnHy, a TAKoKHe MNTPiD PpOTOHO BOHO Ta B NocydomHiMawHHi.
- YHIBePcaJIbHn NOpi6HOBaY Ta HIX MOxHa MNTn B NocyDomnHi MaunHi.
HacaKy npotpiB Inwe BOnoroIraHupkoI.
Biniyok
Будлackа,po3rophHITbCTOPIHKIMaJIIOHKaMn.
MaJIHOHOK A
5 PnCTaBka npNBOy dIa BiHnUka dIa 36nBaHH
6 B i n y o k
BiHnOk 36nBaHHa MoXHa 3aMOBHTn Chepe3 cnyK6y cepbicy (Homep dIa 3aMOBHeHH: 657428).
BnKOpncTaHn
Binuok dna 36nBaHH npndaTHn dna 36nBaHH 36ntnx BepkIB, 36ntx 6iKIB Ta MOnouHOi NiH (i3 rapyoro (MaKc. 70^) Ta XOJODHOro MoNoka (MaKc. 8^) ), a taKoK dna nprirotybaHH coycib Ta DecepTb.

He6e3neka onikie!
Takm YINHOM 3aJIuShKn npOdyKTiB He npICOXHyTb.
HaInTu HeBEnKy KInbKicTb TeNIOI BOIN 3 MNUOUM 3acOBom Do npndaTHOI EMHOCTI.
HacaKy-TOBkaun 3aHypnTu Body i BBIMKHyTn npnaI np6J. Ha 10 ckyHd.
IOnaTb TOBkaUkA BnMaetbcraJeRKO (NOBOPOTOM 3a rOdINHHKOBOIO CTpIJKOIO), NOKn PnCTaBkA npNbOdy Ie 3akpinneHa Ha HacaDi-TOBkaUkY.
HacaKy-TOBkaunKa Ta IonaTb TOBkaunKa MOxHa MHTy NocydomnHiMaunHi.
IicnMNTTJNONaTI TOBkaUHa cId 06OB'3KOBO NpeBipNTu, YH HeMaE 3aNtKIB npOdyKTIB B OTbopi dIg 6NokyBaHH.
36napaHnBnKoHcyTbcra nobopoTom IonatitobKaUkA npOTn rOdHHNKOBoi CtpiIKN.
PnKlaIaI IJI BnKOpNCTaHHa
KaptonJIaHe nIOpe
300 r BapeHo'i KaptonJI
0,15 n tenloro monoka
50 r M'rkoro BepkOBoro Macna 3aBaHTaKHTn iHrpeDiEHTN Do npndaTHoi cMHOCTI Ta nepepo6nTn HacaKDIO- TOBkaUHKOM pOraRGM np6n.1 XBUNHH.
Hapnkiu i odaTe ciB, nepeub, MyckaTHn ropix Ta 3a 6aKaHHM Ondhy uinky Kopu.
HacaIky-TOIkyuHnB KOem Cnyae He IcnoIb30BaTb B KacTpHJe HENOCpeIdCTBeHHO HaN ICTOUnHKOM TeIIa.
He yadapTb hacaKoN-TOkUkoN O TBepDble Kpa (KaCTpOJI, MnCKN).
PeDyKTOpHyO npIcTaBky HnKOrDa He OpyCKaTb B JxNkOCTn HHe Mblb NOd IpOTOUHO BODoH NIn B NOCyDOMOEuHO MaunHe.
Pa3bYcHHe cIMBOJOB Ha np6ope nI npHaJIeXHOCTaX

Yka3aHnI dIe ChTn/6JIOKInPOBKn IOnaCTN ToJIkyUShKn (6JIOKInPOBKa npOTnB yacOBoCtpeKN).
Ipeed nCNoB3OBAHHem BHNMaTeJbHOpnoHTte 3Tu HnCTpyKcNIO dJa NOnyuCeHnBaXhblx yKa3aHn NO TexHke 6e3OnaCHOCTn EKcnPyatauN daHHOr npnbopa.
Pojkayncta, coxpaHnte HnCtpyKuHIO no 3Kcnpyaatau.
Pnpepaepbopatbemy Heo6xOIMO TaKHe nepeaMb Emy 3Ty HNCTpykUIO NO 3Kcnpyaatau.
YHnBepcaIbHbI N3MeIbUHTeJIb
IopKaanyIcTa,OTKpoITe cTpaHnUbICpNcYHKaMn.
PncyHok A
1YHnBepcaJIbHbI IN3MeIbUHTeIb
2 Hoxk
3 Hа садда
4 K p bI u Ka
YHnBepcaJIbHbI N3MeJIbUHTeJIb MOxHO 3aKa3aTb YpeE3 cepBnCHyU cIyX6y (Homep dIra 3aKa3a: 657248).
YnpaBneHne
YHnBepcaIbHbI N3MeIbUHTeJIb npHroDeH dJIa N3MeIbUeHra MCA, TBepDOrO cbIPA, LyKa, TpaB, YecHoka, FpyKTOB, OBOUeH, opEXOB INMHdJIa.
YHnBepcaIbHbI N3MeJIbUHTeIb OBeCneuBaET Bam nCnoJIb3OBAHHe MaKcImaJIbHO MoUHOCTN pInoBopa Prn pInrTOBLeHm MeIOBOI 6yTeP6pOJHO Maccbl (pN COJIHOdeHn yKa3aHn, pINBEDeHHbIX B peCenTe, CM. pncyHOK C).
O6ra3aTeIbHO CO6JIHOaTb yKa3aHHOe MaKcHMaJIbHOe KOINueCTBO IN BpeM nepepa60TKN B Ta6-Plue (pncyHOK C).
BHIMAHHe!
YHNBepcaJIbHbI IN3MeJIbUHTeJIb MOXHO HCIOJIb3OBAb TOJIbKO B IONHO CO6paHHOM BnIe!
OctopoXHO!
Ipeud N3MeIbYeHHeM Mca N3 Hero CneJeYET ydaJIHTb XpaU, KOCTN CyXOXHNIA.
YHnBepcaIbHbI H3MeIbUHTeJIb He npHro-DeH IJIa H3MeJIbUeHn OueHb TBepIbIX npOyKTOB (KopeHbIX 3epeH, peIbKN, MyCKaTHoro opexa) n 3aMOpOJKeHHbIX npOyKTOB (pOyKTOB nn T.I.).
PncyHok 3
- YctaHOBnTb n npnxKaTb yHNBepCaJbHbI n3MeJIbUHTeJIb Ha rJaDKyU N UcCTyO pa6oyU IOBePxHOCTb.
BCTaBnTb HOJ.
3arpy3ntb npoodyKtbl.
BHIMAHHe!
HOKdoJKeHPOBHOpacNoIaratbcB yHnBepcaJIbHOMN3MeJIbUHTeNE,TOObl HacaJaCaCnEJaPpaBnIbHo (pncyHOK-3).
- YctaHOBtB Ha yHnBepCaJIbHbI n3MeJIb-HTeJIb HacaIky I NOBepHyTb No yacoBOI CTpeJIke, NOKa OHa He 3aΦHKcIpyETC4 CO UeJyKOM.
- YcTaHOBbToOCHOBHOn npHbOp Ha HacaIky N 3aΦnKcHpoBaTb eRo.
BCTaBnTb BnIky Bpo3eTKy. - YdeprKnBaTb OCHOBHO6JOK n yHnBepCaJIbHbI N3MeJIbUHTeJIb I BKJIIOHTb npIbOp (Typ6o-CKOPOcTb).
- Nocne nepepa60TKN OTnycTnTB KHOnky BKJIIOUeHn.
Pocne pa6oTbI
- 3Bnueb Bnky n3 po3eTKN.
HaKaTaB Ha KhoPi Ka36JIOKInoBKNn CHaTb OCHOBHOn 6JNoC HacaIKN. - Повернту наcaдку потив уасовий CTpeлки И сгть с уньерсально n3-Melьчпеля.
B3aHb HOK 3a nlaCTMaCCOByO pyky N3BJIeYb.
-Дяханеняперарботаньи npodуKTOBHaKpbIb yHnBepcaIbHbI N3MeJIbUHTeIb KpbIshkoI.
UHCTka
BHHMaHHe!
HnKOrda He nOpykaTb HacaIky YnHBepcaIbHO r3MeIbYHTeIaB XnIDKOCTN HcMbITb ee NOI pOToUHO BODOn IINB NOCyDOMoeHOn MaUNHe.
- YHnBepCaJIbHbI N3MeJIbUHTeJIb HHOK MOxHOMbITb B IOCyDOMOeHuOH MaUNHe.
HacaKy TOnbKO npOTnpaTb BnaXHOI TKaHbIO.
Béhuyk Дяваньня
POnKaIyIcTa,OTKpoITe cTpaHnCbI
cpcuHkamn.
PncyHok A
5 PeDyKTopHaI npHCTaBka IJI BHeHUnKa JINB3OHBaHH
6 BeHnK nIa B3bBaHHa
BeHnK DnB36nBaHHaMOxHo 3aKa3aTb uepe3 cepBnCHyO cnJxK6y (Homep dNn 3aKa3a:657428).
YnpaBneHne
Benchik DnB36nBaHn npiroDeH dIb B36nBaHn CnIBOK, 6eKOB N MOJOKa B neHy (u3 ropeYo (MaKc. 70^) n xoJOnHOroMOJOKa (MaKc. 8^) ), a TaKKe dIpynpuroTOBHeHn COyCOB n DecepTOB.

Onachocmb ownapueahua!
IINNEpepa6OTKNrOpaeryo MONOKA NCIOB3OBaTB BbICOKyU, y3KYIO EMKOCtB IIN CMeUNBaHn. Iopayee MOnKO MOKeT 6pb3HyTb N OwnapNTb KOxy.
PncyHOK D
3arpy3ntb npOdyKtbi B cTaKaH dJa CMeuBaHH.
- YCTaHOBnTB peDyKTopHyIO npHcTaBky Ha OCHOBHO6JOK N 3aΦHKcnpOBA Tb ee.
BCTaBnTb BeHnK IJIa B36nBaHHaBpeDyKTOpHyIO npNCtAByu 3aΦnKcHpOBaTb.
BHHMaHne!
HnB KOEM Cnyae He BCTaBnA Tb B OCHOBHOI 6IOK BEHnK IIN B3OuBaHn 6e3 peDyKTOpHOI pncTaBKn (pncyHOK-3).
- YctaHOBntb Heo6xOJHMOe YncIoo OboPOTOB C NOMOupeRyIINPOBKn YncIa OboPOTOB (pRn HaJIuHn) (peKOMeHdaunr: BbICOKoe YncIoo OboPOTOB).
- YdeprKnBaTb OCHOBHO6NOK N CTAKaHДЯ CMeUWBaHnHaKaTb HaKeNaeMyIO KHOKNy BKNIOyeHnA.
- Pocne nepepa60TKn OTnyCTNTb KHOHky BKJIIOUeHHa.
Pocne pa60tbI
- 13Bnueb Bnky n3 p03eTKN.
HaKaTb Ha KHOKn pa36JOKnOBoBKn n CHaTb OCHOBHOJ 6JOK C peyKToPHO npNCtABKn. - CHTb BeHnK IJI B36BaHnC peDyKTOpHOI npNCtABKn.
UncTka
BHHMaHHe!
PeDyKTOpHyIO npIcTaBky HnKOrJa He NOrpyKaTb B KnIqKoCTu Hr MeMbITb NOD IpOTOuHO BODoH NII B NOCyIOMoeHOr MaUNHe.
- BeHnK JIJI B36NBAHIN M0XHO MbITb B NOcyDOMOeHON MaUNHe.
PeDyKTOpHyIO npHcTaBky TOnbKO npOTnpaTb BlaJHHO TkaHbIO.
Hacadka-ToJkyuKa
NoKaIyIcTa, OTKpoIte CtpaHnCb cPncyHKaMn.
PucyHOK A
7 PeDyKTopHaI npHCTaBka IJI HAcAKnTOnkUkN
8 Hacaikka-Tokkyuika
9 Ionoactb ToIkyuKn
3Kcnpnyataun
HacaKa-ToKuSha Ka npiroHa IJI
IIOnpoBaHHa BapeHoro KapToOeHa IJIA
PnroTOBLeHn Hope n3 DpyHX NOxOHaX
PnoyKToB (HaNP.: BapeHbIX CTrpyKOBbIX
PiODoB, OBOSei n OpyKToB).
BHHMaHHe!
Onachoctb nobpeKdEHHaHacdkn-TOKyLLIKN.
-HacaIky-TOKUkHy HN B KOEM Cnyae He IcnoIb3OBaTb B KaCTpHone HeNoCpeIcTBeHHo HaI NCTOuHnKOM TeIIa.
-He yIapTb HacaKoH-TOKNUKOIO TBePdbie Kpaia (KaCTpHOnn, MNUCKN).
-He nepepa6aTbIBaTb TBepIbe HnCbIpBie INHrpEJaHEtbl,HaNP.,KoPeyHbIe 3epHa, WOKOJaI.
- IepepaabaBbBaTb Bcerda TOnbKO BapeHbIe INHrpEneHTbl.
-KpynHbIe HrpeJeHbI (Ha np., KApToΦeNb) IpeBapuTeNbHo pa3pe3aTb Ha 0one MeJKNe KyCKN.
PcyHOK
BapeHbI npOdyKtbl 3aarpy3ntb B noDxOJaUyO EMKOCTb.
EMKocTb DOJXHa 6bITb 3aONHeHa He 6OJIee Yem Ha DBe TpeTI!
- YcTaHOBnTb peDyKTopHyIO npNCtABky Ha OCHOBHoi 6IOK n 3aΦNKcHPOBaTb ee.
BCTaBnTb HacaIky-TOIkyu Ky B peDyK-TOpHyIO npICTaBky u 3aKpeNtB NOBOPOTOM NO YacOBoi CTpeJIke.
- Iorpy3ntb Hacaiky-TokkyuB npedHa3-Haehhble dIe nepepa60TK npOdykTbl.
- YdeprKHBaTb OCHOBHO6IOK n eMKoCTb N BKNIOHTb np6Op (Typ6o-CKOPOCTb).
HacaKy-TOKky NepemeaTb BBepx HBN3 Do Tex nop, Noka NIOpe He DOCTnHET XeLaEMO KoHCnCTeHcN.
- Pocne nepepa60TKn OTNcyCTNTb KHOJky BKNIOUeHn.
Pocne pa6oTbI
- 13Bnueb BnKy n3 p03eTkn.
HaKaTb Ha KhoNKn pa36IoknpoBKn n ChrTb OCHOBHOJ bOK c peDyKTOpHO npNCtABKn.
HacaKy-TOJKyUkCy CHaTb C peDyKTopHO npCTaBKn NOBOpOTm IpOTnB YacOBo CTpeJIKN.
UHCTka
BHIMAHHe!
PeDyKTOpHyIO npIcTaBky HnKOrda He NorpyJXaTb B JnIDKOCTN H He MblTb NOD IpTOOHOB BOOn INN B NOCyDOMOeHON MaunHe.
PekomeHdaUIM:
-Дя удалени поpe сеует BOCNoIb3OBaTbcr cKpe6kOM ДЯ TeCTa ИппаCTmaccOBо Лжко.НВ Koem cnyuae He O6NBaTb O TbePdbIe KpaI!
-ПрипегерабOTke,Нар.,Моркови Краснокочин Калуctы Ha Пл actMaccobbIX DeTajx NOBJIeTcR CBetHOn HaIeT, KOTOpbIM MOKHO yДaJIITb C NOMOцьH HeCKOLbKx KAneIb pactnteHOro Macla.
PeDyKTopHyIO npCTaBky ToIbKO npOTnPaTb BJaXHOtTKaHbIO.
HacaKy-TOkUkUky LyuWe Bcero
NouchTb Cpa3y JHe NocLe npImeHnHa. TaK OCTaTKn He npcoxHyT.
HaHTb HEMHO TepNO BODbI C MOIOUM
CpeDCTBOM B npHROdHyO eMKoCTb.
TOrpy3NtB HacaKy-TOkUkUky B Body
IN BKIOUHTb Pnp6Op npImepHo Ha
10 cekyHd.
- Ionoactb ToIkyuKIN CHnMaetcra NERKO (noBOpOTOM no yacobOy cTpeKe),ecn peDyKTOpHa npHCTaBka eue 3akpenHeHa Ha HacaKe-ToIkyuKe.
HacaKy-TOKkyI nonactb TOKyyM0XHO MbITB INOCyDOMOeHOn MaUNHe.
- Iocne uNCTKn IOnaCTn TOnKyuShKn CJIeDyET O6raTeIbHO NpOBepHTb, YTO B OTBepCTHn DnA 6JIOKNPOBKN HeT OCTaTKOB npOdyKTOB. Pn HAnuyn UdaIITb nx DepeBHHo nANoUkOi (HaNP., 3y6OuNCTKO).
C6opka ocuueCTBnreTcnyTeM NOBopaunBaHnI IOnaCTN ToKUShKn IpOTNB YacOBoCtpeKN.
PpHmep nCNoJb3OBAHnA
KapToΦeJIbHoe nIope
1 Kr OTBapHoro KapToΦeJIa
0,15 mOLOka
50 r márkoro cInbOuHOro MacJa
HnrpeJeHbI NomeCTbB NOxOJaUyO emKocTb I nepepaTaIBaTb HacaKoI- TOJKyuKO B TeueHne PnIMepHO 1 MNHyTbI.
B 3aBepseHn Iobabntb coIb, nepeu, MyckaT n IO BKcCy UeNoTky KopnUbl.
IpaBO Ha BHeCHe N3MeHEnIOCTaBnREm 3a CO6oN.
flll Joo Lao afoo loa aea
121 10
0gJg1iUjLJxJxJxJxJxJxJxJxJxJxJxJxJxJxJxJxJxJxJxJxJxJxJxJxJxJxJxJxJxJx
LlaJg Lda121 JlaJg JLa
aLoo go jolal sll no wliio gao
sU1 g wAJI oJg Jnac pia 1wLio sLCg
10g>La#oJg
()
abws pssw y aagaae b8a1j
a.s.u. a a
aaggl aobal allj! pcc aaalbo oogg
aL aIg cpaal gJgJg Jc
Jll Jwgl aill gll jaoa oic
1jz810gJ 1jz8i jz81
pIi:wiLgJ1j;uS Cui:ji 0i. aS wJI
pleb ci jcbj
a#g p<1 b#1 sli g jL 2
a gccjll jieejj jglc hnnn
aagglgaiy aiallglal 10slae
Jieiill jglc hiaii
Joo 10
jlll jaii jao jla i
S OBC = S AOB + S_ BOC
Lc
Jgaiia
Jogill aai no yaiy
S APQ = S AQP + S_ QPQ
1
j1g2 = x1 so j0g1 = x0 故 j0x0 = x_0
g sLslo cis Lgabii pac Jilgaw gLoa
g 21 aLwic
gJgJJIaLwCgAabiiipjNc
Jx 8! jagill aai bii puc
glll joo Jlaa aJoo Juae ae
W
g 1c aagai gai bai cai
A
j 7
8
9
j a ÷ 1 ( a > 0 a ≤ 1)
aagluo (lbb) jublb, atlel atLo wgaj
a + b = 3
Lgsscl 11 11 11 11 11 11 11 11
aclbll lcbn uana 1bllg
iie oio pia iuiw 1oLoe o1r poio jy
1c1gla 1
1g aolj 2i jaiy g aoLJ jaiy oiao
A = 1
plesiWx1 cLaeJe Ic JbIeJ
aIbI aIy jy JyJyJyJyJy
jLg10gWpwnwXlLa
p1234567890101101010101
gaii giaiaiaiaiaiaiaiaiaiaiaiaiaiaiaiaiaiaiaiaiaiaiaiaiaiaiaiaiaiaiaiaiaiaiaiaiaiaiaiaiaiaiaiaiaiaiaiaiaiaiaiaiaiaiaiaiaiaiaiaiaiaia
A a
pluxx 1 agio acn 1
x^2 + 5x - 6 = 0
J 3
( ) = s
gJgJgJgJgJgJgJgJgJgJgJgJgJgJgJgJgJgJgJgJgJgJgJgJgJgJgJgJgJgJgJgJgJgJgJgJgJgJgJgJgJgJgJgJgJgJgJgJgJgJg
iiill 110 a) lii aai iil yao j Sjoo
.657248
[{j}{L}{g}{L} = \rho {l}_{L}\sin {\omega L}]
gaii gaii aiio piinwiaacgill acbi
15g21,0g21,1Lc21,1L21,1L21
jglg(jglg)c1w≤1,g2
4iE plaiwWgill acbiil aclbll plsiwiic
a,b = 11
!plo
Lolc Llcagio jlg 102g Cg 11 11 p d c b g aal lalblll 11 11 11 11 11 11 11 11 11 11 11 11
()
Jg>JL JsI pAaI pAe aagaa IaBaaI aIb aalbaa
Jglll 15
aagaae aeggagagagagagagagagagagagagagagagagagagagagagagagagagagagagagagagagagagagagagagagagagagagagagagagagag
(sLg,slj) aLs oJc wgrg 1 g
Lgaiipc JgW LgJgJgJgJgJgJgJgJg
gX1 aLwC gJ sLsLo
A
aLc y f y 1y
(aclw)

Siemens Info Line


- Safety instructions for this appliance
- Important!
- Explanation of the symbols on the appliance or accessory
- Universal cutter
- Fig. A
- Operation
- Warning!
- Caution!
- Fig. B
- After using the appliance
- Cleaning
- Whisk
- !
- Fig. D
- Masher attachment
- Fig. 3
- Tips:
- Application example
- Mashed potatoes
- Pour votre sécurité
- Bilde E
- BnKOpncTaHHa
- Picra po6otn
- OuHueHH
- Biniyok
- BnKOpncTaHn
- He6e3neka onikie!
- PnKlaIaI IJI BnKOpNCTaHHa
- KaptonJIaHe nIOpe
- Pa3bYcHHe cIMBOJOB Ha np6ope nI npHaJIeXHOCTaX
- YHnBepcaIbHbI N3MeIbUHTeJIb
- YnpaBneHne
- BHIMAHHe!
- PncyHok 3
- Pocne pa6oTbI
- UHCTka
- BHHMaHHe!
- Béhuyk Дяваньня
- Onachocmb ownapueahua!
- PncyHOK D
- BHHMaHne!
- Pocne pa60tbI
- UncTka
- Hacadka-ToJkyuKa
- PucyHOK A
- 3Kcnpnyataun
- PcyHOK
- PekomeHdaUIM:
- PpHmep nCNoJb3OBAHnA
- KapToΦeJIbHoe nIope
- Joo 10
- Siemens Info Line
Brand : SIEMENS
Model : MQ67115
Category : Food Processor