
HD7753/00 - Coffee maker PHILIPS - Free user manual and instructions
Find the device manual for free HD7753/00 PHILIPS in PDF.

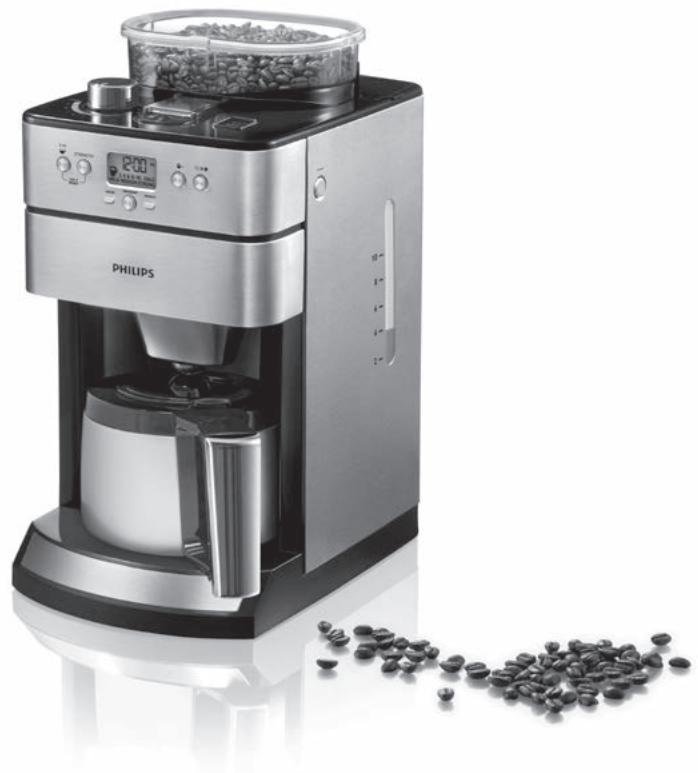
| Product type | Electric coffee maker with built-in grinder |
| Brand | PHILIPS |
| Model | HD7753/00 |
| Water tank capacity | Up to 10 cups (1.375 L) |
| Bean container capacity | Maximum 250 g |
| Grind setting | 9 levels (fine to coarse) |
| Coffee strength | 3 levels: mild, medium, strong |
| Delayed programming | Yes, start time setting |
| Drip-stop function | Yes, allows removing the carafe during preparation |
| Carafe | Thermal carafe with rotating lid |
| Display | Screen with clock and indicators |
| Descaling indicator | "CALC" message after approximately 60 cycles |
| Maintenance | Descaling recommended every 60 to 120 cycles depending on water hardness |
| Safety | Drip-stop system, automatic shut-off, overheat protection |
| Spare parts | Available at www.shop.philips.com/service |
| Warranty | International warranty (see leaflet) |
| Supplied accessories | Cleaning brush, paper filter (no. 4) not included |
Frequently Asked Questions - HD7753/00 PHILIPS
User questions about HD7753/00 PHILIPS
0 question about this device. Answer the ones you know or ask your own.
Ask a new question about this device
Download the instructions for your Coffee maker in PDF format for free! Find your manual HD7753/00 - PHILIPS and take your electronic device back in hand. On this page are published all the documents necessary for the use of your device. HD7753/00 by PHILIPS.
USER MANUAL HD7753/00 PHILIPS
Always here to help you
Register your product and get support at www.philips.com/welcome

HD7753
EN User manual 5
DA Brugervejledning 13
DE Benutzerhandbuch 21
EL EYxεipidio xρησns 30
ES Manual del usuario 40
Fl Käyttoopa 49
FR Mode d'emploi 57
IT Manuale utente 66
NL Gebruiksaanwijzing 75
NO Brukerhandbok 84
PT Manual do'utilizar 92
SV Anvandarhandbok 101
TR Kullanim kilavuzu 109
1 Introduction
Congratulations on your purchase and welcome to Philips! To fully benefit from the support that Philips offers, register your product at www.philips.com/welcome.
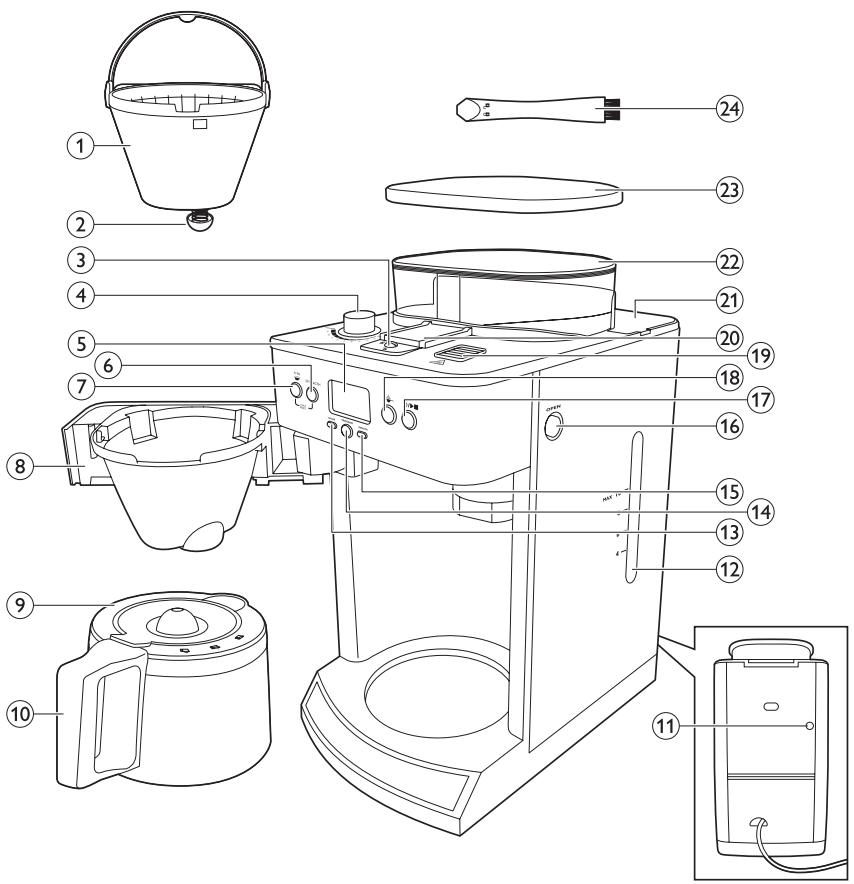
2 General description (Fig. 1)
1 Filter basket
2 Drip stop
3 Lock of coffee bean chute
4 Grind selection knob
5 Display
6 STRENGTH button
7 4-10 cups button
8 Filter basket holder
9 Insulated jug lid
10 Insulated jug
11 Overflow hole
12 Water reservoir with water level window
13 HOUR button
14 PROGRAM button
15 MINUTE button
16 OPEN button for filter basket holder
17 On/off, start/standby button
18 Pre-ground coffee button
19 Steam vent
20 Lid of coffee bean chute
21 Water reservoir lid
22 Coffee bean container
23 Coffee bean container lid
24 Cleaning brush
3 Important
Read this user manual carefully before you use the appliance and save it for future reference.
3.1 Danger
- Never immerse the appliance in water or any other liquid, nor rinse it under the tap.
3.2 Warning
- Check if the voltage indicated on the bottom of the appliance corresponds to the local mains voltage before you connect the appliance.
If the mains cord is damaged, you must have it replaced by Philips, a service centre authorised by Philips or similarly qualified persons in order to avoid a hazard. - This appliance can be used by children aged from 8 years and above and persons with reduced physical, sensory or mental capabilities or lack of experience and knowledge if they have been given supervision or instruction concerning use of the appliance in a safe way and understand the hazards involved. Children shall not play with the appliance. Cleaning and user maintenance shall not be made by children without supervision.
Children shall not play with the appliance. -
Keep the mains cord out of the reach of children. Do not let the mains cord hang over the edge of the table or worktop on which the appliance stands.
-
Do not touch the grinding burrs of the appliance, especially when the appliance is connected to the mains.
- Keep the packaging materials (plastic bags, cardboard buffers, etc.) out of the reach of children, as they are not a toy.
- Do not touch the hot surfaces of the appliance when it operates.
- This appliance is designed to grind beans and make coffee. Use it correctly and with care to avoid scalding by hot water and steam.
- Do not use the appliance if the plug, the mains cord or the appliance itself is damaged.
- If a problem occurs that you cannot solve by means of this user manual, contact the Consumer Care Centre in your country. If the problem cannot be solved, take the appliance to a service centre authorised by Philips for examination or repair. Do not attempt to repair the appliance yourself, otherwise your guarantee becomes invalid.
3.3 Caution
- Do not place the appliance on a hot surface and prevent the mains cord from coming into contact with hot surfaces.
- Unplug the appliance if problems occur during grinding or brewing and before you clean it.
-
Do not move the appliance while it is operating.
-
Wait until the appliance has cooled down before you store it. The appliance may be hot.
- Do not disassemble the insulated jug.
- Never immerse the insulated jug in water or any other liquid, as this could cause water to enter between the walls of the jug.
- The insulated jug is not dishwasher-proof.
- When the insulated jug is filled with coffee, keep it in upright position to prevent leakage.
- During brewing, the lower part of the appliance and the bottom of the insulated jug become hot.
- After you have unpacked the appliance, make sure it is complete and undamaged. If in doubt, do not use the appliance but contact the Consumer Care Centre in your country.
- This appliance is intended for normal household use only. It is not intended for use in environments such as staff kitchens of shops, offices, farms or other work environments. Nor is it intended to be used by clients in hotels, motels, bed and breakfasts and other residential environments.
3.4 Electromagnetic fields (EMF)
This Philips appliance complies with all standards regarding electromagnetic fields (EMF). If handled properly and according to the instructions in this user manual, the appliance is safe to use based on scientific evidence available today.
4 Before first use
4.1 Setting the clock
1 Put the mains plug in the wall socket.
The start/standby button lights up.
Press the start/standby button (Fig. 2).
The display lights up and the appliance beeps twice.

Note:
If you do not press any button within 5 minutes, the appliance goes into standby mode. In this case, the display goes out and only the start/standby button stays on to indicate that the appliance is still switched on. In standby mode, you can press any button to reactivate the appliance.
- On the display 12:00 flashes to indicate that you have to set the clock time. (Fig. 3)
3 Press the HOUR button repeatedly to set the hour (Fig. 4).
The appliance beeps each time you press the button.
4 Press the MINUTE button repeatedly to set the minutes. (Fig. 5)
The appliance beeps each time you press the button.
5 The display shows the set clock time. The coffeemaker is ready for use.
4.2 Flushing the appliance
You need to flush the coffeemaker once before first use.
1 Open the water reservoir lid. Fill the water reservoir with fresh cold water up to the 10-cup indication. (Fig. 6)

Note:
Do not put coffee beans or ground coffee in the appliance.
2 Close the water reservoir lid.
3 Put the insulated jug in the appliance (Fig. 7).

Note:
Make sure the jug lid is on the jug and the arrow on the lid points to the 'closed/brewing' symbol (see chapter 'Using the appliance', section 'Using coffee beans'). Also make sure the jug is placed properly in the appliance. Its spout has to face forward into the appliance. If the lid is not on the jug or the jug is not placed properly in the appliance, the drip stop function is activated automatically (see chapter 'Using the appliance', section 'Drip stop function').
4 Press the start/standby button (Fig. 2).
The appliance beeps and the display lights up.
Press the pre-ground coffee button to switch off the grinder (Fig. 8).
The pre-ground coffee button lights up.

Note:
When you switch off the grinder, the number of cups and the strength setting are not shown on the display.
Press the start/standby button to start the brewing process (Fig. 9).
- The freshness indicator flashes rapidly on the display until the brewing process is finished.
The coffeemaker produces 5 beeps when the brewing process is finished.
Empty the jug.
5 Using the appliance
5.1 Filling the water reservoir
1 Open the water reservoir lid and fill the water reservoir with the required amount of cold water. (Fig. 6)
There are indications for 4 to 10 cups (550ml to 1375ml) on the water level window. You can use these indications to determine how much water to put in the water reservoir. Keep in mind that the amount of brewed coffee will be slightly less, since ground coffee absorbs water.
Do not fill the water reservoir beyond the 10-cup indication, otherwise water spills from the opening at the back.
5.2 Using coffee beans
Warning:
Do not put espresso coffee beans in the coffee bean container. Only use regular coffee beans.
Warning:
Always keep the water reservoir lid closed when you fill the coffee bean container with coffee beans. Otherwise coffee beans can fall into the water reservoir and block up the water inlet.
Press the OPEN button on the right-hand side of the coffeemaker to open the filter basket holder. (Fig. 11)
2 Place a paper filter (no. 4) in the filter basket to collect the ground coffee. (Fig. 12)
3 Close the filter basket holder.
4 Turn the lid of the jug by its lever to 'closed/ brewing' position. In this position the arrowhead on the lid points to the 'closed/ brewing' symbol on the rim (Fig. 13).
Put the jug in the appliance.

Tip:
To keep the coffee hot longer, rinse the jug with hot water to preheat it before you start brewing coffee.
6 Remove the coffee bean container lid (1) and fill the container with coffee beans (2). Make sure there are enough coffee beans in the container for the amount of coffee you want to brew (Fig. 14).

Note:
Always make sure the bean container is at least half full.

Warning:
The maximum capacity of the coffee bean container is 250g . To prevent the grinder from jamming, do not exceed this amount.

Warning:
To prevent the grinder from jamming, do not use unroasted or caramelised beans.
7 Turn the grind selection knob to select the desired type of grind (from fine to coarse). There are nine grind settings (Fig. 15).

Tip:
We advise you to experiment with the different grind settings to find out which setting you prefer.
To select the number of cups, press the 4-10 cups button as many times as the desired number of cups (Fig. 16).
- When you press the 4-10 cups button, it lights up briefly and the appliance beeps.
The selected number of cups appears on the display.

Note:
Make sure that the number of cups you select with the 4-10 cups button is consistent with the amount of water in the water reservoir. Please keep in mind that the coffeemaker uses all the water in the water reservoir. If you select a number of cups that is smaller than the amount of water, the coffee becomes weaker than you intended.
9 Press the STRENGTH button once or several times until the desired coffee strength is selected (mild, medium or strong) (Fig. 17).
- When you press the STRENGTH button, it lights up briefly and the appliance beeps.
The display shows the selected coffee strength.
10 Press the start/standby button (Fig. 18).
The appliance beeps and the display lights up.
Press the start/standby button again to start the brewing process (Fig. 19).

Warning:
Keep away from the steam vent during brewing, as hot steam escapes through the vent.
- The grinder grinds the required amount of coffee beans.
- The freshness indicator flashes rapidly on the display until the brewing process is finished.
The coffeemaker beeps 5 times when the brewing process is finished.
12 Wait until the coffeemaker has stopped beeping before you remove the jug.

Note:
After brewing, coffee drips from the filter basket for several seconds.
The freshness indicator flashes slowly on the display for 30 minutes after brewing, to indicate that the coffee is fresh. (Fig. 20)
13 To pour out coffee, turn the lid to the 'pour' position. In this position, the arrowhead on the lid points to the 'pour' symbol on the rim (Fig. 21).

Note:
To keep the coffee hot, always close the lid after pouring out.
5.3 Using pre-ground coffee
If you want to use pre-ground coffee instead of coffee beans, follow the steps below.
1 Follow steps 1 and 2 in section 'Using coffee beans'.
Put pre-ground coffee in the paper filter.

Note:
How much pre-ground coffee you use is a matter of personal taste. For a medium-strong cup of coffee, use one measuring spoon (approximately 6g) for each cup (125ml).
3 Close the filter basket holder.
4 Turn the lid of the jug by its lever to the 'closed/brewing' symbol on the lid. Put the jug in the appliance.
5 Press the start/standby button.
The appliance beeps and the display lights up.
6 Press the pre-ground coffee button to switch off the grinder (Fig. 8).
The button lights up when you press it.

Note:
When you switch off the grinder, the number of cups and the strength setting are not shown on the display.
7 Follow steps 11 to 13 in section 'Using coffee beans'.
5.4 Setting the timer
The timer enables you to program the time for starting the coffee-making process.
1 Keep the PROGRAM button pressed until the program button starts flashing and 0:00 appears on the display (Fig. 22).
Press the HOUR button repeatedly to set the hour. (Fig. 23)
The appliance beeps each time you press the button.
3 Press the MINUTE button repeatedly to set the minutes. (Fig. 24)
The appliance beeps each time you press the button.
The display shows the set timer time.
4 Select the number of cups you want to brew. (Fig. 25)
5 Select the desired coffee strength (mild, medium or strong). (Fig. 26)
6 Press the PROGRAM button to save the settings. (Fig. 27)
The PROGRAM button lights up continuously.
The clock time appears on the display.
7 To interrupt the process, press the PROGRAM button again.
The PROGRAM button light goes out.

Note:
If you want to change the set timer time, press the PROGRAM button. The PROGRAM button indicator starts flashing again. Now you can set the new timer time by pressing the HOUR and MINUTE buttons.

Note:
If you want to brew coffee with ground coffee, press the pre-ground coffee button to switch off the grinder before you select the number of cups.
5.5 Drip stop function
The drip stop function enables you to remove the jug from the coffeemaker before the brewing process is finished. When you remove the jug, the drip stop stops the flow of coffee into the jug.

Note:
The brewing process does not stop when you remove the jug. If you do not put the jug back in the appliance within 20 seconds, the filter basket overflows.
6 Cleaning and maintenance
6.1 Cleaning after every use

Warning:
Never immerse the appliance in water or any other liquid, nor rinse it under the tap.
1 Remove the mains plug from the wall socket.
Wipe the outside of the coffeemaker with a damp cloth.
3 Clean the filter basket with hot water and some washing-up liquid.
6.2 Cleaning the coffee bean chute
You have to clean the coffee bean chute every 1 to 2 weeks, depending on the frequency of use.
1 Put the mains plug in the wall socket.
Press the start/standby button (Fig. 2). The display lights up.
Press the start/standby button and then remove the mains plug from the wall socket.
4 Insert the flat end of the cleaning brush handle into the lock of the coffee bean chute and turn the lock to the 'open' position. (Fig. 28)
5 Open the lid of the coffee bean chute (Fig. 29).
6 Use the cleaning brush to brush ground coffee residues into the lower part of the chute (Fig. 30).

Tip:
Place a paper filter in the filter basket to collect the ground coffee.
- The ground coffee residues fall into the filter basket.
7 Close the lid of the coffee bean chute and turn the lock to the 'locked' position (Fig. 31).
8 Remove the paper filter with the ground coffee residues and throw it away.
6.3 Cleaning the insulated jug

Warning:
Do not immerse the insulated jug in water or any other liquid and do not clean it in the dishwasher.
To remove the lid from the jug, turn it by its lever to the 'remove lid' symbol. Then pull the lid off the jug (Fig. 32).
- Clean the inside of the jug with a soft brush, hot water and some washing-up liquid (Fig. 33).

Tip:
To remove stubborn brown deposits, fill the jug with hot water and add a spoonful of sodium carbonate. Let the sodium carbonate do its work for some time.
After cleaning, rinse the jug with fresh hot water (Fig. 34).
- To put the lid on the jug, insert the two projections of the lid into the openings in the rim of the jug. Then turn the lid to the right to the 'closed/brewing' symbol. (Fig. 35)
6.4 Dscaling the coffeemaker
When the message 'CALC' appears on the display (after approx. 60 brewing processes), you need to descale the coffeemaker, as scale can clog the coffeemaker.
Regular descending prolongs the life of the coffeemaker and guarantees optimal brewing results and a constant brewing time for a long time. Descale the coffeemaker:
every 120 brewing cycles if you use soft water (up to 18dH
every 60 brewing cycles if you use hard water (over 18dH).
You can contact your local water board for information about the water hardness in your area.
Note:
If you do not know the water hardness in your area and are unable to contact your local water board, we advise you to descale the appliance every time the 'CALC' message appears on the display.
Note:
To remove the 'CALC' message from the display, press the 4-10 cups button and the STRENGTH button simultaneously.
1 Open the water reservoir lid.
2 Fill the water reservoir with 7 cups of white vinegar (5% acetic acid) and 3 cups of water (Fig. 36).
3 Place a paper filter (no. 4) in the filter basket and close the filter basket holder.
Put the empty jug in the appliance (Fig. 7).
Put the mains plug in the wall socket.
6 Press the start/standby button (Fig. 2).
7 Press the pre-ground coffee button to switch off the grinder. Then press the start/standby button to start the brewing process. (Fig. 8)
8 Wait until half of the vinegar-water solution has flowed into the jug. Then press the start/ standby button to stop the brewing process and let the solution act for at least 15 minutes.
Press the start/standby button to switch the coffeemaker back on and let the appliance complete the brewing process.
10 Empty the jug and throw away the paper filter.
11 Fill the water reservoir with cold water and press the start/standby button to start another brewing process. Let the coffeemaker complete the entire brewing process and empty the jug.
12 Repeat step 12 until the water no longer tastes or smells like vinegar.
13 Clean the filter basket and the jug with hot water and some washing-up liquid.
7 Ordering accessories
To buy accessories or spare parts, visit www.shop.philips.com/service or go to your Philips dealer. You can also contact the Philips Consumer Care Centre in your country (see the worldwide guarantee leaflet for contact details).
8 Environment
- Do not throw away the appliance with the normal household waste at the end of its life, but hand it in at an official collection point for recycling. By doing this, you help to preserve the environment (Fig. 37).
9 Guarantee and support
If you need information or support, please visit www.philips.com/support or read the separate worldwide guarantee leaflet.
10 Troubleshooting
This chapter summarises the most common problems you could encounter with the appliance. If you are unable to solve the problem with the information below, visit www.philips.com/support for a list of frequently asked questions or contact the Consumer Care Centre in your country.
The appliance does not work.
- Make sure that the voltage indicated on the appliance corresponds to the local mains voltage.
- Fill the water reservoir with water.
When I use the grinder, the coffee is too weak.
- Make sure the number of cups you select with the 4-10 cups button is consistent with the amount of water in the water reservoir. Please keep in mind that the coffeemaker uses all the water in the water reservoir.
- Use the STRENGTH button to set the coffee strength to 'strong'.
- When you use coffee beans, make sure you do not press the pre-ground coffee button, as this switches off the grinder.
- Use coffee beans of a stronger blend or flavour.
- To increase the coffee strength, select a higher number of cups with the 4-10 cups button than the number of cups for which you filled the water reservoir:
When I use pre-ground coffee, the coffee is too weak.
- Make sure the amount of pre-ground coffee in the filter is consistent with the amount of water in the water reservoir. Please keep in mind that the appliance uses all the water in the water reservoir.
- Use ground coffee of a stronger blend or flavour:
- To increase the coffee strength, increase the amount of pre-ground coffee or decrease the amount of water.
The filter overflows when I remove the jug from the appliance while it is brewing coffee.
- If you remove the jug for more than 20 seconds during the brewing process, the drip stop causes the filter basket to overflow. Also note that the coffee does not reach its full taste before the end of the brewing process. Therefore we advise you not to remove the jug and pour out the coffee before the end of the brewing process.
The appliance continues to drip long after the brewing process has ended.
- The dripping is caused by condensation of steam. It is completely normal that the appliance drips for some time.
- If the dripping does not stop, the drip stop may be clogged. To clean the drip stop, press the OPEN button on the right-hand side of the appliance to open the filter basket holder. Take out the filter basket. Then rinse the filter basket and the drip stop under the tap.
- If you remove the jug for more than 20 seconds during the brewing process, the drip stop causes the filter basket to overflow.
The coffee is not hot enough.
- Preheat the jug with hot water before you start brewing coffee.
- The coffee in the jug cools down faster if you brew only a few cups. The coffee stays hot longer if you brew 10 cups, which is a full jug.
- Use thin-walled cups, because they absorb less heat from the coffee than thick-walled cups.
- Do not use milk that comes directly out of the fridge.
- Descale the appliance. See section 'Descaling' in chapter 'Cleaning and maintenance'.
1 Introduction
Fyld违法犯罪.
Fyld maybe a good man, but he's not a good man.
For 10 kopper, da vendet ellers vil lobe ud af abningen bagpá.
6.3 Rengoring after termokanden
Advarsel:
To koumi avaBcI otav to natae.
∑ημεiωη:
Otau aievpyoioite to ulo, o api0uoc
phiaviw kai npuoum yeuonc kae 8ev
εphiaviovtai ony oovn.
Akoaloutheta ta ata 11 13 otnv evotnta "Xpion kokkw kaef".