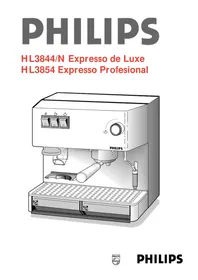
HL3844 - Coffee maker PHILIPS - Free user manual and instructions
Find the device manual for free HL3844 PHILIPS in PDF.


| Product Type | Drip Coffee Maker |
| Brand | Philips |
| Model | HL3844 |
| Dimensions (W x D x H) | 25 x 20 x 30 cm |
| Weight | 1.5 kg |
| Power Supply | 120-240 V, 50/60 Hz |
| Power Consumption | 900 W |
| Capacity | 12 cups (1.5 L) |
| Water Tank Capacity | 1.2 L |
| Filter Type | Permanent mesh filter (included) or paper filters (size #4) |
| Brewing Time | Approx. 10 minutes for full pot |
| Keep Warm Function | Automatic keep warm for up to 2 hours |
| Auto Shut-off | After 2 hours of inactivity |
| Anti-Drip System | Yes, allows removing carafe mid-brew |
| Water Level Indicator | Yes, transparent water tank with markings |
| Materials | Plastic housing, glass carafe, stainless steel heating element |
| Cleaning and Descaling | Descaling recommended every 3 months; removable drip tray |
| Safety Features | Auto shut-off, boil-dry protection, cool-touch handle |
| Warranty | 2 years |
| Spare Parts Available | Glass carafe, filter basket, permanent filter, drip tray |
Frequently Asked Questions - HL3844 PHILIPS
User questions about HL3844 PHILIPS
0 question about this device. Answer the ones you know or ask your own.
Ask a new question about this device
Download the instructions for your Coffee maker in PDF format for free! Find your manual HL3844 - PHILIPS and take your electronic device back in hand. On this page are published all the documents necessary for the use of your device. HL3844 by PHILIPS.
USER MANUAL HL3844 PHILIPS
English Page 6
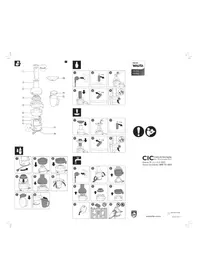
- Keep pages 4, 5, 22 and 23 open when reading these operating instructions.
Italiano Pagina 10
English
- Inside the Espresso machine water is heated up. This water will expand and as a result some drops may leak from the steam pipe and/or the water outlet opening. This is quite normal. Do not forget to move the steam pipe backwards into a position over the grid if you do not wish to use it.
Important
- Read the instructions in conjunction with the illustrations (pages 4, 5, 22 and 23) before using the appliance.
- Check that the voltage rating at the bottom of the appliance corresponds to your mains voltage.
- The appliance should be connected to an earthed mains socket by means of an earthed plug.
- Never immerse the appliance in water.
- Unplug the appliance before cleaning.
- If the mains cord of this appliance is damaged, it must only be replaced by Philips or their service representative, as special tools and/or parts are required.
- Bleed-off air before using the appliance for the first time to guarantee proper pump functioning. Please refer to the sections “Before using for the first time and not using for a while” and “Refreshing water in the boiler”.
General description (fig. 1, page 4)
Cover (removable)
B Water tank (removable)
c Tubes for water
D Window of water tank
E Lid of coffee mill with granularity indication:
F Coffee mill
HSpout for ground coffee
① Push button of coffee mill
Main On/Off switch with pilot light
K Pump switch ■ with pilot light
Steam switch 🎨 with pilot light
M Steam control (rotary knob)
coarse
∴ = fine
G Coffee mill granularity control rotary knob
N Filter holder attachment - water outlet opening
Filter
For 1 cup: filled up to the indentation
For 2 cups: filled to the top
P Filter holder
Steam pipe with "Cappuccino Extra"
R Tamper for ground coffee
s Grid (removable)
T Drip basin (removable)
Container for used ground coffee (removable)
“Cremacaffé” valve
Before using for the first time and not using for a while
- Wash the removable water tank, the coffee filter and the filter holder in hot soapy water. Rinse with clean water.
- Fill the water tank (figs. 2 and 3). Be careful to insert the two tubes (fig. 4).
Refreshing water in the boiler
The appliance has a boiler which contains about 200 ml water. When the appliance is new or when it has not been used for a while (more than three days) it is advised to refresh the water in the boiler before brewing coffee:
- refresh the water in the water tank. Be careful to insert the two tubes;
- place a small jug (200ml min.) under the steam pipe;
- open the steam pipe by turning the steam control knob anti-clockwise;
- switch on the appliance (On/Off) (J);
- switch on the pump ■;
- when you have filled the jug, switch off the pump ■ and close the steam control knob (clockwise).
Then the appliance is ready for further use.
Espresso
Espresso is made by pumping hot water rapidly and at a high pressure through ground Espresso type coffee.
This tasty Espresso is best served in special small-sized cups (50 ml).
- Your Espresso coffee will be at optimum (hot!) temperature, if the filter holder is screwed into place while the machine is heating up.
- You can pre-heat your cups by rinsing them with hot tap water.
- Ensure that there is enough fresh cold water in the tank.
- Switch on by setting the main On/Off switch (J) to position "on". The pilot light comes on. The appliance is now heating-up (fig. 5).
- Insert the filter (O) into the filter holder (P) (fig. 6).
If you use ground Espresso coffee, scoop ground coffee into the filter. Preferably use a special espresso coffee. Never fill the coffee mill with ground coffee.
If you use Espresso coffee beans:
- Take the lid (E) from the coffee mill (F). Fill the coffee mill with Espresso coffee beans (fig. 7).
- Replace the lid (fig. 8). Please note the correct position. The indications on the lid correspond with the set granularity (“fineness”)
- If required, set the coffee granularity by turning the lateral control knob (G) (fig. 9):
•••=coarse, ••=fine (please also refer to "Tips").
- Push the filter holder against the on/off switch of the coffee mill (I) (fig. 10). The coffee mill starts operating and the ground coffee flows into the filter.
- As soon as there is enough ground coffee in the filter (for 1 cup filled up to the coffee filter indentation; for 2 cups to the top), withdraw the filter holder. Then the coffee mill stops automatically.
- Press the coffee down using the tamper (R) (fig. 11).
- If necessary, clean traces of coffee off the edge of the filter.
- Position the filter holder (fig. 12) and screw in from left to right (fig. 13).
- Place 1 or 2 Espresso cup(s) (approx. 50 ml) under the spouts of the filter holder (fig. 14).
- As soon as the pilot light of pump switch ■(K) comes on, you can turn the switch "on" (fig.15). Hot water will then be pumped through the ground coffee and after a few seconds the Espresso coffee will start flowing into the cup(s) (fig. 16).
- Set pump switch ■ (K) to position “O” as soon as there is enough Espresso in the cup(s) (fig. 17).
- Serve and savour your Espresso right away!
Cappuccino
"Cappuccino" is the Italian name for Espresso with a little milk and a layer of milk froth.
The froth is made of cold milk in a jug using
the steam pipe. The froth, together with a little milk, is added to the Espresso.
The steam pipe of your Espresso machine is equipped with a handy accessory, named "Cappuccino Extra". This will help you to make an excellent milk froth for Cappuccino, simply and effectively.
- First prepare the milk froth, then the Espresso.
- Use the wider special "Cappuccino" cups (approx. 70 ml) for the same quantity of coffee!
- BEFORE USING THE STEAM PIPE, ALWAYS TAKE THE FILTER HOLDER OFF.
- Switch on main On/Off switch (J) (fig. 18). The pilot light will now come on.
- Fill a milk jug about half full with cold milk.
- Set the steam switch ⚙(L) to position “on”. As soon as all three pilot lights illuminate, the appliance is ready for making steam.
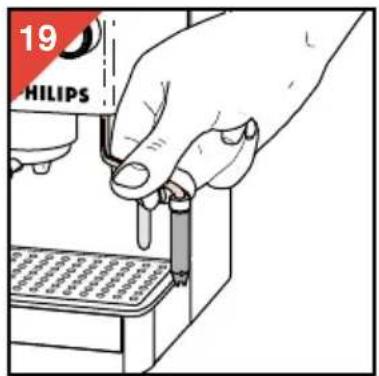
- You can swing the steam pipe (Q) to bring it into the most suitable position (fig. 19).
- Keep the jug under the steam pipe.
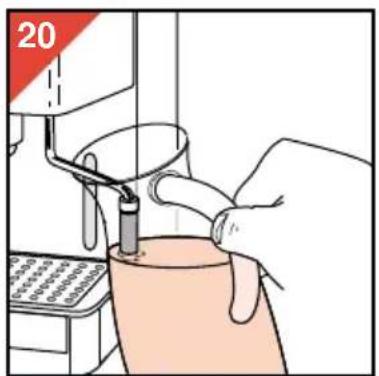
Please note: the air outlet holes of the accessory should remain under the milk level (fig. 20).
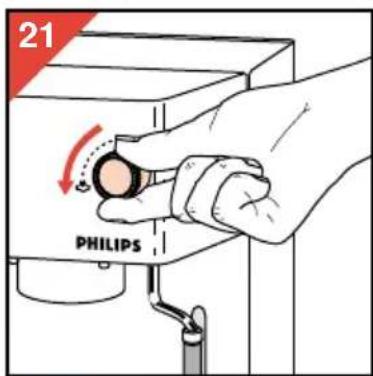
- Open the steam control (M) by turning anticlockwise (fig. 21). At the first moment the steam condensates into water and some drops will come out of the steam pipe. You can collect these drops into the drip basin (T). Afterwards steam will come out of the steam pipe, making the milk bubble (fig. 22).
Using the steam control (M) you can adjust the steam output.
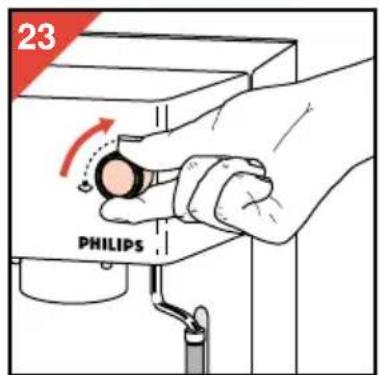
- When the milk froth has been formed, you can close the steam control (fig. 23).
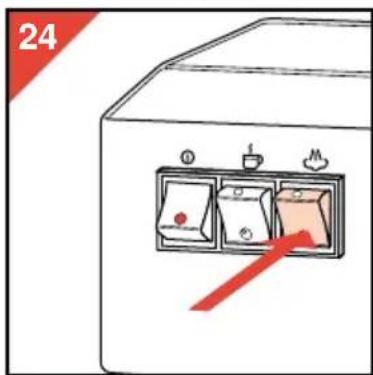
- Set the steam switch ⬇(L) to position "off" (fig. 24).
- Then remove the milk jug.
- Move the steam pipe backwards into position over the grid.
After use
- Switch off by setting the main On/Off switch (J) to position "off".
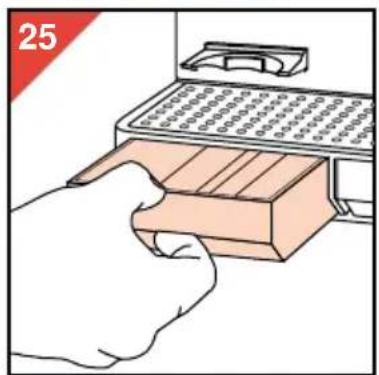
- Slide the container for used ground coffee (U) out (fig. 25).
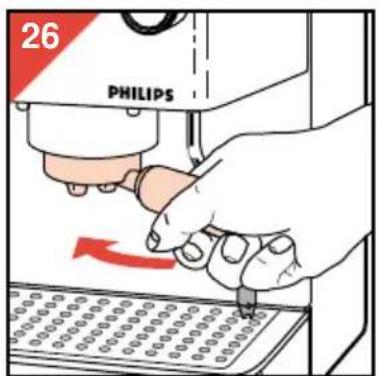
- Unscrew the filter holder (fig. 26).
- Tap the filter holder to remove the ground coffee out of the filter (fig. 27).
Tips
"Wonderful tasty and aromatic Espresso... and preferably with such a nice brown crest on top... How do you get that?"
- Use exclusively fresh real Espresso-coffee.
- Try out a number of types of Espresso and find out which suits your taste best.
- Store the coffee in an air-tight and lightproof container in a cool and dry environment.
- In special cases please follow the instructions of the manufacturer of the coffee.
- If ground Espresso is used: from time to time shake the coffee container. The finer grains tend to drain to the bottom of the container and remain there. By shaking from time to time you maintain even granularity.
- Genuine Espresso-coffee is granulated properly: Espresso is ground a little more finely than “fast filter” type coffee used for coffee makers. When the coffee has been ground too coarsely, and also when the ground coffee has not been pressed down sufficiently, the Espresso will not be tasty and aromatic. The hot water will be pumped through the ground coffee too quickly.
On the other hand, when the coffee has been ground too finely, or pressed down too firmly, it will take longer for the cup(s) to fill.
The Espresso may become rather bitter in such a case.
- Use authentic Espresso cups (50 ml), which you fill between half and three-quarters: that will give you the right quantity of Espresso.
Cleaning
- Wash the filter, the filter holder, the water tank, the "Cremacaffé" valve, the drip-basin and grid regularly.
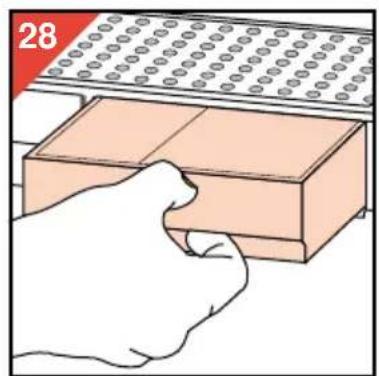
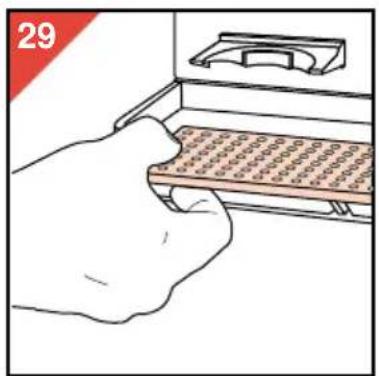
The drip-basin and grid can be removed as illustrated in fig. 28 - 30. - Regularly clean the location for filter holder connection (N) removing any stuck grains of coffee.
- Regularly clean the water outlet opening, removing any stuck grains of coffee.
Always clean the "Cappuccino Extra" accessory of the steam pipe after making Cappuccino:
- Remove the outside pipe by pulling in the direction of the arrow (fig. 31).
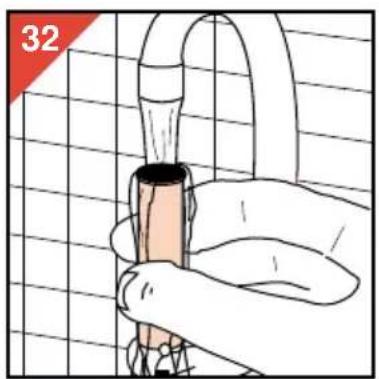
- Rinse the outside pipe under the tap (fig. 32).
-
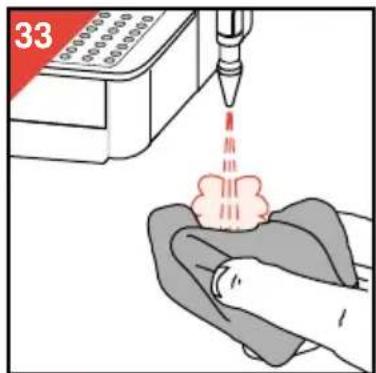
Let some steam escape to clean the inner section (fig. 33).
-
Finish cleaning with a damp cloth (fig. 34).
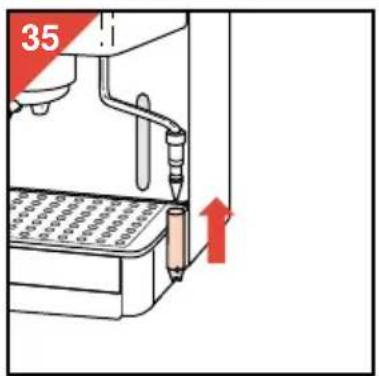
- Push the outer pipe back into place. Push firmly to ensure that it fits well at the top (fig. 35).
Descaling
Descale your Espresso machine regularly.
With normal household use the following rule applies:
- hardness up to 18° DH - two or three times a year;
- hardness over 18° DH - four or five times a year.
Your water supply company can inform you about the hardness of your water.
- Operate the appliance twice as indicated in section "Making Espresso". However, now use ordinary vinegar to half fill the water tank and do not fill the filter with ground coffee.
- To remove any scale that has set in the inside of the steam pipe, let the appliance produce vinegar steam for some time.
- To remove all remainders of vinegar and scale, operate the appliance twice with fresh cold water in the same manner. Then clean all removable items.
If the appliance is cleaned and descaled regularly as indicated in the instructions for use, it will probably not be necessary to carry out the following cleaning & descaling procedures.
However, if the performance of the espresso machine should decline and non of the indicated measurements (such as bleeding off air!) helps, some extra cleaning/descaling may be required.
- For very effective descaling first follow the instructions in section “Descaling” of the instructions for use. However, interrupt the descaling procedure once or twice after pumping and steaming hot vinegar and let the vinegar act on the scale for at least half an hour. Then continue the procedure.
- If no more (or too little) hot water comes out of the outlet opening: clean/descale the perforated outlet plate.
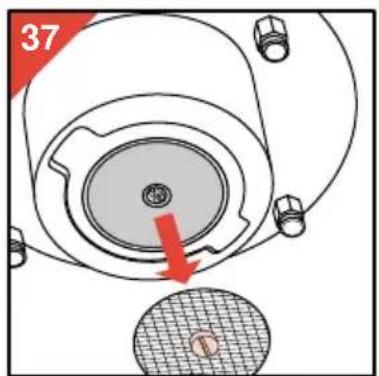
Switch off and unplug the appliance and let it cool down. With the help of a screwdriver or coin unscrew the outlet plate (fig. 36, 37) and also the valve system will come out. Clean with a firm brush. To descale, leave the plate and the valve immersed in ordinary vinegar for min. 15 minutes. Use a brush to remove loose scale remainders. Rinse with clean water.
If the appliance does not function as required
If your Espresso machine does not operate as expected you may, in most cases, find the cause and cure below. Also refer to the corresponding sections in these instructions for use!
The pump is too noisy.
- There is no water in the water tank. Refill with water.
- The water tank is not placed correctly.
The machine does not produce Espresso.
- There is no water in the water tank or the water tank is not placed correctly.
- The coffee has been ground too finely and/or has been tapped down too much.
- The water outlet opening is clogged.
- The machine needs descaling.
Water leaks from the water outlet opening and/or the steam pipe.
- The water inside the appliance expands when being heated up. This is quite normal. Swing the steam pipe into a position over the grid.
- If excessive leaking occurs: descale or clean the valve.
The “crema” crest on the Espresso is too thin or isn’t there altogether.
- The coffee has not been tapped down firmly enough.
- There was not enough coffee in the filter.
- The machine was not heated-up sufficiently. (Had the pilot light gone out?)
- The coffee had been ground too coarsely.
- The "Cremacaffé" valve is not in the filter.
The “crema” is too dark and/or the coffee has a burning taste.
- The machine was too heated-up. (Was the steam button still in "on" (down) position?)
- The coffee has been ground too finely.
- The coffee has been tapped down too much.
Italiano





- ENGLISH PAGE 6
- ITALIANO PAGINA 10
- ENGLISH
- IMPORTANT
- GENERAL DESCRIPTION (FIG. 1, PAGE 4)
- BEFORE USING FOR THE FIRST TIME AND NOT USING FOR A WHILE
- REFRESHING WATER IN THE BOILER
- ESPRESSO
- IF YOU USE ESPRESSO COFFEE BEANS
- CAPPUCCINO
- AFTER USE
- TIPS
- WONDERFUL TASTY AND AROMATIC ESPRESSO... AND PREFERABLY WITH SUCH A NICE BROWN CREST ON TOP... HOW DO YOU GET THAT
- CLEANING
- ALWAYS CLEAN THE "CAPPUCCINO EXTRA" ACCESSORY OF THE STEAM PIPE AFTER MAKING CAPPUCCINO
- DESCALING
- IF THE APPLIANCE DOES NOT FUNCTION AS REQUIRED
- THE PUMP IS TOO NOISY
- THE MACHINE DOES NOT PRODUCE ESPRESSO
- WATER LEAKS FROM THE WATER OUTLET OPENING AND/OR THE STEAM PIPE
- THE “CREMA” CREST ON THE ESPRESSO IS TOO THIN OR ISN’T THERE ALTOGETHER
- THE “CREMA” IS TOO DARK AND/OR THE COFFEE HAS A BURNING TASTE
- ITALIANO
Brand : PHILIPS
Model : HL3844
Category : Coffee maker