USER MANUAL IKE64450XB AEG
SQ Udhezimet per perdorim 2
EL OdyieXpnns 198
BG PbKOBOIDCTBO 3a ynoTpe6a20
HU Hasznalati utmutato 217
How to install your AEG Induction Hob - Worktop installation
4. PERSHKRIM I PRODUKTIT
4.1 Skema e sipéfaques sé gatimit
1 Zone gatimi me induksion
2 Paneli kontrollit
4.2 Struktura e panelit te kontrollit
OBCJNYXBAHE HA KJINEHTN
BnHaHn n3noJ3BaIe OpunHauJIH pe3epBHN qactn.
Korato ce cBbP3BaTe c Haunn OToPn3npan OToJeN „ObcnyXbaHe“, Tp6Ba Da nMaTe noDpbKa cIeHaTa INΦopMaunr: Moden, PNC, cepneH Homep.
HOpMaunTa MoKe Da 6bJe OTKpNa Ha Ta6eKkata C OCHOBn daHHN
IpeDynpexKdEHe / BnMaHne-InfOpMaun 3a 6e30NaChOCT
① Ośza uHΦopMaζη n CbBεTn
HΦopMaζηa 3a OKoJHaTa cpea
3ana3BaMe cn npaBTo Ha n3MeHeHn.
CbDbPjKAHNE
- INHOPMALI 3A BE3OJACHOCT 20
- INHCTPYKUIN 3A BE3OJACHOCT 23
3.MOHTAK 25
- ONICAHNE HA YPEDA 26
5.BCEKnDHEBHA YIOTPEBA 28
- INPENOPbKN IN CbbETN 32
7.ΓPINAI NOUICTBAHE 34
- OTCTPAHRABE HA HEN3INPABHOCTN 34
9.TEXHINUeCKN DAHHN 36
- EHEPNIHA EΦEKTINBHOCT 37
- ONA3BAHE HA OKOJIHATA CPEDA 37
1. INHΦOPMALÇNЯ 3A BE3OПACHOCT
Ppei moHTnpaHTo n ynoTpe6aTa Ha ypeHa BnMaTeJHo npOyEtTe ppeIOCTaBeHnte IHcTpyKcN. PpOn3BOdnteJIaT
He e OTROBOpEh 3a HapaHbAHnI NII NOBpeDN B pe3yJITaT Ha He npabINHa INCTaIauZn IIN yNtpe6a. BInHarI dpbXTe INCTpyKcUNTe Ha 6e3ONaCHO I neCHO DOCTbPiHO MxCTO 3a CnpaBka B 6bDeJe.
1.1 Be3opacnoct 3a Deca N Iuca B HepaBHOCTOHO NOLOXKeHne
To3n ypei moKe da 6bIe n3noJ3BaH OT deca na 8- roDnshna Bb3pact, KaKTO IOT IINa C HamaJIeHN fN3nueckn, CETNBn I YMCTBeHn Bb3MOxHOCTn IIN OT IINa 6e3 OINT I N03HaHnA, cAmO aKO Te ca IOD Ha6JIHODeHne IIN 6bDaT INHCTpykTnpaHn OTHOCHO 6e3OpacHaTa YNoTpe6a Ha ypea n pa3bnpaT Bb3MOxHnte pncKOBe. Deza IOD 8-roDnshna Bb3pact n Xopa C TeJKN IIN KOMPJIeKCHn YBpeJdaHn Tp86Ba Da ce Ibpxat daJeU OT ypeDa, OCBEN aKO He ca IOD NOCToAHNO Ha6JIIODeHne.
-ДeцаТрЯбВа Дa 6БдАТ ПОД HabиюдЕнe,Зa Дa ce rapaHTиpa,Чe HeСи ИграТ Cуpeда.
-ДрьжTe BCnчКи ONaKOBKn Далеу ot Deça и n3XBbPJIeTe ONaKOBKInTe NO MeCTHInTe npaBnJa.
- ПРЕДУПЕЖДECHNE: Па3ete DeцаТи ДомашнITE liobmцi dajee ot ypeDA, KOraTO pa6OTn nIn KOraTo n3CTnBa. ИMa DoCTbПн YuactN, KOINTO ce HarPraBAT no BpeMe Ha ynotpe6a.
- Ako ypeDbT nMa yCTpoiCtBO 3a DeTcKa 6e3OpaCHOCT, TTo Tp8Ba Da ce aKTHBnpa.
-Дeца He TpЯБВa Дa ИЗВьршВaT NOчиСТВaHe ИЛп ПОДдрьЖka Ha уpeda, KOrato ca 6e3 NaДЗOp.
1.2 Ośza 6e3o nanopoct
- ПРЕДУПЕЖДЕНЕ: Урети нееговпес дocьни частп се нагоршагл по врeme на уnotpe6a. Тразва за се Вима вда се ИЗбягва дOKOCBAнe Ha нагаявшт eelenements.
- Доступные мелaneous рыковские мелating polities.
-
ПРЕДУПЕЖДЕHINE: ГOTBEHETO сжИВOTINHСКА Или pactителна мaЗниha 6e3 надзор можеда e onасно и за прediиЗвикадожар.
-
HNKOfA He ce onntBaIte da 3aracnte nojap c Boda, a n3KJIouTe ypeDa n CJeD TOBa NOKPnIe TpAmbKa Ha np. c Kaapan OHeynopHo OdeJIo.
- ПЕДУПЕЖDEHNE: Урет He Тра Ва Да e 3axpaHВaнЧeЗ Вьншно певкючвацу устpoиCTBO KaTO TaIMep Илд a e CBbp3ан Кьм eLEKtpnuecka BepURA, KОТо NOCTOЯНHOce BKЛЮчВа ИИЗКЛЮчВа OT устpoиCTBO.
BHIMAHNE: PpoecbT ha rotBeHe Tp86Ba da 6bde Ha6JIOdaBaan. KpaTKnT Ppoec Ha rotBeHe Tp86Ba da 6bDe Ha6JIOdaBaan NOCTOaHHO.
- ПЕДУПЕЖДЕHINE: Onacnoct OT пожар: He cbyхраняваite пapedmetи Вьрху NOBьрхноCTITE 3a rotbehe.
- MeTaJIHn npEdmEtN KaTo HOxOBe, BnJIuZn, IbJxUzn i KaNaZn He Tp8Ba Da ce NoCTaBraT Bbpxy Rot. NlOT, TbN KaTO MoRat Da Ce 3aRpeYr.
- He n3noJ3BaIte ypeDa, npeDn da ro IHCTaIIpate BbB BrpaHeHaT KoHcTpKzna.
- He постваite урEDA c napоочстачka.
Cnei ynoTpe6a, n3KJIoueTe PLOTa NocpeIcTBOM KJIoua 3a ynpabIeHne i He pa3uNTaIte Ha yHKcIyra 3a IOKaJIIN3IpaHe Ha rOTB. CbdoBe.
Ako cTbKIOKepaMnUHaTa / cTbKJIeHaTa NOBbpxHocTe e HanykaHa, n3KIOUcTe ypeDa n rO n3KIOUcTe OT eJeKTPnueckaTa MpeJa. B cIyauaYe ypeDbTe cBbP3aH dIpeKTHo KbM eJeKTPnueckaTa MpeJa C NOMOuTa Ha cBeINHTeJHa KyTna, npemaxHeTe ppeDn3nteJra, 3a Da n3KIOUHTe ypeDa OT eJeKTPnueckaTa MpeJa. BbB BCEkn eDInCJIyaua Ce CBbPxKeTe C OToPn3nPaHnA cepBn3eH ceHTbp.
Ako 3axpaHbauT Ka6eI e NobpeDeH, ToI Tp8Ba Da ce 3aMeHn OT npON3BODNTeJI, OT yNbJHOMOSeHn CepBn3eH ZeHTbp NIIOT IINcC XoDHa KBaJIINKAcuN, 3a Da Ce n36erHe onaCHOCT.
- ПЕДУПЕЖДЕHINE: Използваite само пpeдпа3ител 3а кOTлони pa3pa6оTeHи OT прОЗВODИТелЯ Или
ynpomeHaTn OT Hero B INHCTpyKcunTe 3a ynpotpe6a, nIIN IpeDnA3nteN 3a KOTIOHN BrpaDeH N BypeDa.
2.2 EneKtpnuecko CBbp3BaHe

BHIMAHHE!
Pnck OT noxap nJn TOKOB ydap.
- BcnuK eNeKtpnueckn Bp3Kn Tp6Ba da ce n3BpWBaT OT KBaHnΦnUpaH eneKtpOTexHnK
- UpeT Tp8Ba Da e 3a3eMeH.
-Ппсдзаи3ВьршITE DeiCTBVE,ce yBepTe,Ye ypeIbT e n3KJIIOUeH OT eNEKTpO3axpaHBAHeTo.
- YBepTe ce, Ye napaMeTpne Ha TabeIkata C TexHnueckn DaHHn ca CbBMEcTUMN C eJeKTPnuECKnte DaHHN Ha 3axpaHBaUaTa MpeKa.
- YBepete ce, ye ypeT e MOHTnpaH npabnno. Xna6abn HnePabnHn eNeKtpnueckn 3axpaHbau n Ka6eNn IJn IeNceJI (aKO ca HaIynch) MoarTa da DOBeDaT Do npeHaarpBaHe.
- I3noI3BaIte noIxOJaI 3axpaHbA,I Ka6eI.
He no3B0JIaIe 3axpaHbauT Ka6eJ da ce npennnta.
- YBepete ce, Ye e INHCTaIIpaHa 3aIuTa OT TOKOB ynap.
- 3akpenete kaeba c npitraa cko6a npOTNB ONBaHe.
- YBepTe ce, Ye Ka6eJIbT 3a eIeKTPo3axpaHbAHeTo NIIu IeNcEJIbT (aKe e HAIuYeH) He DOKOCBaT HArOpESeHnA yPeD NIIu RopeUu CbIOBe 3a RotBeHe, KOraTO BKnIOChTe ypeDa B KOHTaKT.
He n3no3BaIte pa3KIOHnTeJI nn aDAnTepn C MHO BoOIOBe.
He noBpeKdAaTe 3axpaHbauuIy IeNceJ (ako e HaJIuYeH) IIN 3axpaHbauu Ia6eI. CbByKeTe ce c Hauu IOTOpn3npaH cepBn3eH ueHTbp IIN eNeKTpOTExHk 3a CMHaTa Ha NOBpeDeH 3axpaHbau, Ka6eI.
3aunata OTOKOB yap Ha ropeuinte n 30nnpaHn Yactn Tp8Ba da 6bde 3aTeHaTaNtKaBb HauHH,Ye Da He MOKe Da ce OTCTpaHn 6e3 INHCTpyMeHTN.
CbpxeKa6ena 3a 3axpaHbaHeTo KbM KOHTaKta eINHCTBeHO B KpaHa INCTaIauyra. YBepTe ce, ye IeNceJIbT 3a 3axpaHbaHe e DocTbneH CNei INCTaIIpaHETo.
Ako KOHTaKbTe pa3xla6eH, He CBbp3BaIte 3axpaHBAunu IeNco
He n3dbpnbaiTe 3axpaHbauJa Ka6eJ, 3a da n3KIOUHTe ypeJa. BnHaru n3dbpNbaiTe uencela Ha 3axpaHbAHeTo.
- I3noI3BaIte cAmO npaBnHn yCTpoiCTBa 3a n3Olaun: npeIpa3Hn npekbcBauHa MpeXata, npeIpa3nteI (npeIpa3nteJIte OT BnHTOB TnT Tp6Ba Da ce n3BaJrT OT facyHraTa), N3KnIOUbATEI IN KOHTaKTopn 3a yTeUka Ha 3a3EmRABaHETo.
- EneKtpnueckaTaNHCTaNaCuaTyrpaBa da NMa n3oNIPAuO yCTPOINCTBO, KoTo Bn No3BOJRADa n3KJIOnHTe Upea ot en. MpeXaTa npN BCNUKN OJIIOcN. N3oNIPAuto yCTPOINCTBO Tp6Ba Da e c ShnPINA Ha OTBapAHe Ha KOHTaKaTAMHNIMyM 3 MM.
2.3 V3noJ3BaHe

BHIMAHHE!
PnCK OT HapaHbAHe, n3rapHnIy TOKOB yap.
OTCTpaHETe BCnKOn ONAKOBKn, eTUKeTN 3aunTHo FOJNO (ako e Heo6xoDnMo) npden nbpBOHaayHaTa ynotpe6a.
To3n ypeD e npedHa3NaueH cmo 3a DomaSHA (Ha 3akpnto) ynoTpe6a.
He npomeHnTe npedHa3HaueHneTo Ha ypeDa.
- YBepete ce, Ye BEHTnlaucnoHHnte OTBOPn He ca 6IokupaHn.
He octabry Te ypea 6e3 ha30p no BpeMe Ha pa6ota.
-ИЗклочаиTe 30HaTa 3a roTbeHe cJIeД BCЯka yNoTpe6a.
He nocTaBraIte npnbOpn 3a xpaHene nn TeHxepn Bbpxy 3OHnTe 3a rotBeHe. Te MORat da ce HaRopeuT.
He pa6oTeTc ypeDa c MOKpn pBue nJIN KOraTo mA KOHTaKT C BODa.
He n3no3BaIte ypeDa KaTo pa6oTHa IOBbpxHOCT INI NOBbpxHOCT 3a CbXpaHEHne.
- Ako NOBbpxHOCCTTa Ha ypea e HanykaHa, He3a6abHo N3KIOUcTe ypea OT 3axpaHbaHeTo. Toba ce npaBn c zeI npedOTbpaTBAHe Ha TOKOB yap.
- IopTeBnTeJn C neiCmeKbTpR6Ba da cna3BaT dNCTaHcHn Hau-MaNko 30 cm ot INdYkUHOHHTe 3OHn 3a rOTBeHe, KOrato ypeDbT pa6OtN.
Korato noctabare xpaHa B ropeo MacNo, TЯ MoKe Da npbcka Ma3HnHa.

BHIMAHNE!
OnachocT OT noXap nJn ekCnNo3nA
HaRopeeHHeMa3HnHn nn MacNo MOrat Da DOBeaT Do OTdEJaHe Ha Bb3PnAmEneHmnpn. He doBnKabTe PnAmbK nHn HArOpEeHn npEaMeTu Do Ma3HNHaTa nn MacNtO, KOraTo rOTBnTe C TaKnBa.
- Napute, KonTO OTdEJIa MHORO HAropeueHOTo MacNo, MOraT Da DOBeMaT Do BHe3aHNO Bb3PJaMeHЯBaHe.
- I3noI3BaHOTo MacNo, KOeTo MoKe Da CbIbPka OCTaTbU NT XpaHa, MoKe Da npuHH NoXap Pn N-O-HNcKa Tempepatypa B cpaBHeHne C MacNOTo, IN3NoI3BaHO 3a IIpbN NbT.
He nocTaBraTe 3anaJIMn npOdyKTn nn npEaMeTn, KOInTo ca HAMOKpeHn CbC 3anaJIMn npOdyKTn, B 6IIN3oCT Do ypeHa NN Bbpxy Hero.

BHIMAHHE!
OnachocOT nobpeBaBypea.
- He dpbXHe ropeu ngTbapckn cbdoBe Bbpxy Ta6lOTo 3a ynpabIeHne.
He noctabraIte ropeu kanaKHa TnraH Bbpxy CTbKJeHaTa NOBbpxHOCT Ha NIOTA.
He octabray Te TeyhoCTTa B roTbapcknte CboBE da n3Bpu HnblHO.
BnIMaBaIe Da He n3TbPbAte npedMeTNnnrTOBapcKn CbIOBe Bbpxy ypeDa. NobbpxHocTTa MoKe Da ce nobpeiN.
He BKIOUbaIte 30HITe 3a rotBeHe, KOrato Ha TEx NMa Ipa3HN RotBapCKN CbDOBE, INI KOrato HMA TaKINBa.
He nocTaBraIte anyMnHneBO fOJINo Bbpxu ypeDa.
- TOBapcknTe CbIOBe, HApBaEH OTHyHy, aIyMHNi NIIc TaKINBCNOBpeDeHO DbHO, MOraT Da HaDpaCKaTCTbKnIoTO/CtBKnOKepaMKkata. BInHarNIOBdrraTe Te3N IpeMeTu, KOraTo Tp6Ba Da rN IpemecTnTe Bbpxy NOBbPxHOCTTa 3a rotBeHe.
To3n ypeE npedHa3NaueH cMo 3a roTBeHe. ToI He Tp8Ba Da ce n3No13Ba 3a dpyrN uei, KaTO HApPmEp 3a OTOpJIeHne Ha NOMEeHneTO.
2.4 Frpka n nouchTbaHe
-Почистваite peodOBno ypeda,3a da npedeOTbpaTne yBpejdahe Ha NOBbpXHOCTHnMaTePnAIn.
- N3kIIOUeTe ypeDa n ro octaBeTe da ce oxlaDi, npEdu Da ro NOuCTnTe.
He n3no13BaIte BODoctpyika nn npapa, 3a da noUncTnTe ypeDa.
-Почистеуразс мokра и мека кьрп. Използваши само Heyтралиnpenapatn. He n3ползваши abpa3иВнипожкн, ралabи, почstваши Кьрп, pa3TBOPNTeIN ИИ MeТАНH п徴metи.
2.5 O6cnyXbaHe
- 3a nonpaBka Ha ypeIa ce CbpxKeTe c OToPn3npaHn cepBn3eH ueHTbp.
3. MOHTAK

BHUMAHNE!
Bx. rnaBa "Be3oNaCHocT".
3.1 Празд монтжа
IpeHnHa HnCTaJInpaTe NIOyata, NO-DOny 3aNNuWeTe INHΦopMaunrTa OT Ta6eKkata C daHHN. Ta6eKkata C OCHOBHnTE DaHHN e pa3noJoxEHa B DOJHATA YAcT Ha NIOyata.
CepneHHomep
N3PON3BaIte cAmO opnHaJIHPe3epBHN YactN.
- OTHOCHO JAMnata(HTe) BbTpBe B To3n npOdyKT n pe3epBHNte JAmn, npOdaBaHn OTdEnHo: Te3n JAmn ca npEHa3HaueHn Da n3DbpxKaT ha ekCTpeMn Hn3NueCKn ycNoBnB DOMaKnHcN ypeHn, KaTO TemnepaTypa, Bn6paun, BJaXHOCT nIi Ca npEHa3HaueHn Da CNrHaJIN3npaT INOpMaun 3a pa6OTHOTo CbCToHnE Ha ypeDa. Te He ca npEHa3HaueHn 3a IN3IOJ3BaHe B dpyrN pRINOKeHn I He ca NODxOJaU 3a OCBETraBaHe Ha NOMeUeHn B DomaKInHCTBOTO.
2.6 IV3XBbPJIaHe

BHIMAHNE!
PnCK OT HapaHbAHe NJI 3aDyUbaVe.
CbpxeTe ce c o6uHcknte BnaCTn 3a HOpMaun KaK da N3XBpNtE ypeJa.
- I3kIIOUeTe ypeDa ot eNEKtpo3aXpaHbAHeTo.
- ɪЗbaɪdete 3axpaɪnBaɪsɪŋ eɪ. kaβeɪ B 6ʌnɪzɔct ὄуpeə n ɪrənɪxBbɒpɪneT.
3.2 Brpaedn nloyn
BrrpaenTe nnoH MOraT da ce n3noJ3BaT
cAmo cIeI KaTo ca MOHTnpaHn B NOxOJaU
BrrpaenEHNu pa6OTn PLOTOBE,
KoNTO OTROBaprHa CTaHdApTNe.
3.3 Cbbp3Baau ka6eI
- IIOyata ce DoCTaBc CbC Cbbp3BaU Ka6eJ.
3a da noIMeHnte NOBpeH 3axpaHBaU Ka6en, n3noJ3BaIte Ka6en TnI: H05V2V2-F KOJTO n3DbpxHa Na Tempepatya ot 90^ nIi no-BvcoKa.
CbpxTe ce c yIbHOMOeH cepBn3eH ueHTbp.CbP3Baunr KaBeJ MoKe da ce NOdMeHa camo OT KBaJIuΦnUpaH eNeKTPoTEXHK.
3.4 Crno6yBaHe
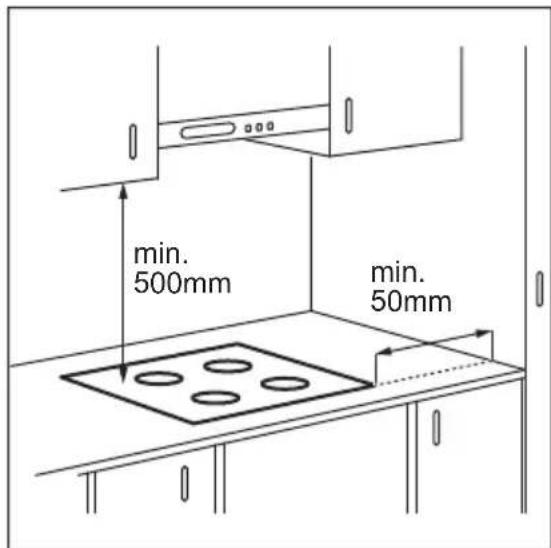
Ako nHCTaJInpaTe pIOT noI naHeJa Ha a6cop6aTopa, MoJIA, BIXTe MInHMaJIHOTo pa3cToRHe MeKdY ypeDITe B INHCTpyKcUInTe 3a MOHTaK Ha a6cop6aTopa.
Ako ypeBt e nHCTaInpaH naYeKMeJxke, BeHTnlaqyTa Ha IIOTa MoKe da 3arpee eneMeHTnte, CbXpaHraBaHn B YeKMeJxKeTo no BpeMe Ha npoCeca Ha rotBeHe.
NoTbpcTe BnDeo ypoka ,KaJa moHTnpate BaunnaHndykuHOHeH pnoAEG - MoNTaK Ha pa6OteH pIOT" , KaTo HAnuWeTe PbJNHOTo IMe, NOKa3aHO Ha rpaФNKaTa NO-DOny.
YouTube www.youtube.com/electrolux www.youtube.com/aeg
How to install your AEG Induction Hob - Worktop installation
4.ОПИСАНЕHA YPEDA
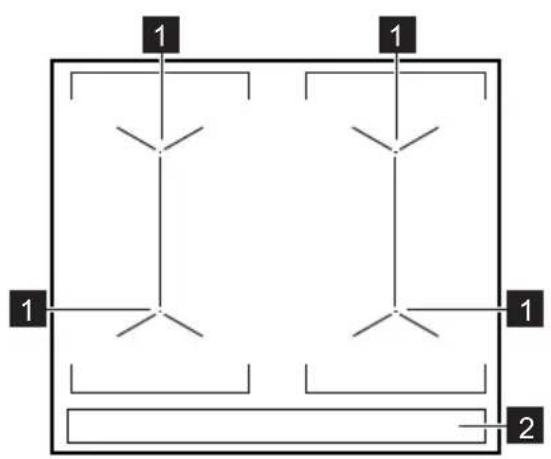
4.1 Pa3noJoxHeHa nobbpxHocTta 3a rotBeHe

1 INHykUHOHHa 3OHa 3a TOTBeHe
2 KoHTpOJen naneJ
4.2 OΦopMJIeHne Ha KOMaHdHTo Ta6I0

I3noJ3BaIte cEH3OpHnTe noJeTa, 3a da pa6oTnte cypeJa. Ioka3aHnra Ta Ha dnCnpei, HndIkAToPnte n 3ByKOBIne CnHaJI N oKa3BaT KOI φyHKuN pa6OTr.
| Сени
Зорно
поля | Функция Белекka | |
| 1 | ① | ВКЛ. / ИЗКЛ. 3a akтувирае и.deakтувирае на пioоча.Ta. | |
| 2 | | Зakлочаhe / Зашиета 3a Deça 3a зakлочаhe / оTKлочаhe Na komандото ТаБп. | |
| 3 | || | Пayза 3a akтувирае и.deakтувирае на ФункцияТa. | |
| 4 | | Bridge 3a akтувирае и.deakтувирае на ФункцияТa. | |
| 5 | -Дистпей 3a steentha Na harpopа-
He | Показа в steentha Na harpopа.
Ногая.
Ту.
Ту.
Ту.
Ту.
Ту.
Ту.
Ту.
Ту.
Ту.
Ту.
Ту.
Ту.
Ту.
Ту.
Ту.
Ту.
Ту.
Ту.
Ту.
Ту.
Ту.
Ту.
Ту.
Ту.
Ту.
Ту.
Ту.
Ту.
Ту.
Ту.
Ту.
Ту.
Ту.
Ту
Ту.
Ту.
Ту.
Ту.
Ту.
Ту.
Ту.
Ту.
Ту.
Ту.
Ту.
Ту.
Ту.
Ту.
Ту.
Ту.
Ту.
Ту.
Ту.
Ту.
Ту.
Ту.
Ту.
Ту.
Ту.
Ту.
Ту.
Ту.
Ту.
Ту.
Ту.
Ту.
Ту.
Tу.
Tу.
Tу.
Tу.
Tу.
Tу.
Tу.
Tу.
Tу.
Tу.
Tу.
Tу.
Tу.
Tу.
Tу.
Tу.
Tу.
Tу.
Tу.
Tу.
Tу.
Tу.
Tу.
Tу.
Tу.
Tу.
Tу.
Tу.
Tу.
Tу.
Tу.
Tу.
Tу.
TУ.
Tу.
Tу
Tу
Tу
Tу
Tу
Tу
Tу
Tу
Tу
Tу
Tу
Tу
Tу
Tу
Tу
Tу
Tу
Tу
Tу
Tу
Tу
Tу
Tу
Tу
Tу
Tу
Tу
Tу
Tу
Tу
Tу
Tу
Tу
Tу
Ту
Tу
Tу
Tу
Tу
Tу
Tу
Tу
Tу
Tу
Tу
Tу
Tу
Tу
Tу
Tу
Tу
Tу
Tу
Tу
Tу
Tу
Tу
Tу
Tу
Tу
Tу
Tу
Tу
Tу
Tу
Tу
Tу
TУ
TУ
TУ
TУ
TУ
TУ
TУ
TУ
TУ
TУ
TУ
TУ
TУ
TУ
TУ
TУ
TУ
TУ
TУ
TУ
TУ
TУ
TУ
TУ
TУ
TУ
TУ
TУ
TУ
TУ
TУ
TУ
TУ
TУ | |
| 6 | -Индikatopii 3a Врет氧 To Na 30H-
Te 3a rotbe He | Зддпсгь
Зддпсгь
Зддпсгь
Зддпсгь
Зддпсгь
Зддпсгь
Зддпсгь
Зддпсгь
Зддпсгь
Зддпсгь
Зддпсгь
Зддпсгь
Зддпсгь
Здд�сгь
Здд�сгь
Здд�сгь
Здд�сгь
Здд�сгь
Здд�сгь
Здд�сгь
Здд�сгь
Здд�сгь
Здд�сгь
Здд�сгь
Здд�сгь
Здд�сгь | |
| 7 | -Дистпей Na таймера Показа Врет氧 To MInHyТ. | | |
| 8 | | -Избор Na зона 3a rotbe He. | |
| 9 | +/- | -Увелчава Или hamajяba Врет氧To. | |
| 10 | P | PowerBoost 3a за akтувирate ФункцияТa. | |
| 11 | - Лента 3a уразалене | Зддпсгь
Зддпсгь
Зддпсгь
Зддпсгь
Зддпсгь
Зддпсгь
Зддпсгь
Зддпсгь
Зддпсгь
Зддпсгь
Зддпсгь
Зддпсгь
Зд徳псгь
Зд徳псгь
Зд徳псгь
Зд徳псгь
Зд徳псгь
Зд徳псгь
Зд徳псгь
Зд徳псгь
Зд徳псгь
Зд徳псгь
Зд徳псгь
Зд徳�псгь
Зд徳�псгь
Зд徳�псгь
Зд徳�псгь
Зд徳�псгь
Зд徳�псгь
Зд徳�псгь
Зд徳�псгь
Зд徳�псгь
Зд徳�псгь
Зд徳徵псгь
Зд徳徵псгь
Зд徳徵псгь
Зд徳徵псгь
Зд徳徵псгь
Зд徳徵псгь
Зд徳徵псгь
Зд徳徵псгь
Зд徳徵псгь
Зд徳徵化物
Зд徳徵化物
Зд徳徵化物
Зд徳徵化物
Зд徳徵化物
Зд徳徵化物
Зд徳徵化物
Зд徳徵化物
Зд徳徵化物
Зд徳徵化物
Зд徳徵化物
Зд徳徵化物 | |
4.4 OptiHeat Control (3-cTbNKOB INHdNKaTOP 3a OCTaTbUHa TOnJIHa)

BHIMAHHE!
7 Dokato HndkaTopbT CBETN, CbIeCTByBa pNCK OT N3rapHnO T OCTaTbUHa TOPIHnA.
NHyKUHOHHTe 3OHn 3a RotBeHe npOn3BExJaT TOnnHa, Heo6xOdIma 3a npoueca Ha rotBeHe, HAppaBO Ha IbHOTo Ha rotBapcknca bD. CtbKnOkepamKaTa ce 3aRpaBa OT TOnnHaTa Ha cBdoBeTe 3a rotBeHe.
HnkaTopTe /7 cnoBBAt, KOrato 30Ha 3a roTbeHe e ropesea. Te
NOKa3BAt HNBOTO Ha OCTaTbUHaTATA TOIINHa 3a 3OHnte 3a rOTBeHe, KONTO N3PON3BaTe B MOMeHTa.
INHnkaTOpbT MoXe CbUO Da ce nOBn:
- 3a CbceDHNTe 3OHN 3a rotBeHe,ДОри aKO He rN n3nON3BaTe,
KOraTo RopeuN CbDoBe 3a roTBeHe ca NoCTaBeHn Ha CTyDeHa 3OHa 3a roTBeHe,
Korato nloata e n3KnioyeHa, Ho 3oHaTa 3a rotBeHe e BCE oSe ropeua.
HnIkaTOpbT n3ye3Ba, KOraTo 3oHaTa 3a RotBeHe Ce OxlaDi.
5. BCEKNiDHEBHA YIOTPEBA

BHIMAHHE!
Bx. rnaBa "Be3oNaCHocT".
5.1 AkTnBnpaHe n DeaakTnBnpaHe
IokochTe 1cekyHda,3a da aKtNBnpaTe nn DeakTNBnpaTe nNoyata.
5.2 ABTomatnUHO n3KJIIOUyBaHe
Ta3nФункциспupa aBTOMaTHUHOn NNOTA, aKO:
BCNCHK3OH3aTOTBeHe Ca N3KJIIOUeHn
CNEI BKIOUBAHe Ha IIOTa He 3aJaTeCTeHnHa HargBaHe,
pa3neeTe TeHOCr NJIIOCTaBnTE HRAKcBb
PpeDMET (cbI, Kbpna I np.) Ha
KOMaHdHOTo TabNo 3a NOBce OT 10
CEkyHNI. PpO3ByuBa 3BykoB CnHaJ IN
IIIOyata ce n3KnIOyBa. MaxHeTe
PpeMeTa NJIIONUcHcTe KOMaHdHOTo
TabNo.
KOTJHObT CTaBA MHOrO rOpEu (HaNP., KOrato TeHxepaTa e n3Bpyna HAnbNo). OctabeTe 3oHaTa 3a rotBeHe da ce
OxlaN, npei OTHOBO da N3NOJ3BaTe nnota.
- IN3NOJ3BaTe HeNoJXOJaI rOTBapCKn CbI. CmMBoJIbT FCBETBa H 30HaTa 3a ROTBeHe Ce DeaKTINBInpa aBTOMaTHUHO cJe2 MInHyTu.
He DeakTNBpuTe 3oHaTa 3a roTBeHe NJIH He npomeHrTe CTeneHTa 3a HarpBaHe. CneI n3BecTHO BpeMe CBETBa KOTIOHBt Ce DeakTNBpuA.
Bpb3kata mexky cteneHTa 3a harpaBe n BpeMeTo, cJeK KaTO pTbTe cnpH:
CTenEnHaHarpBaHe
IIObT ce deaktnBnpa cnei

1-3
6 yaca
4-75yaca
8-94yaca
10-141,5yaca
5.3 CTepeHa Ha HarpBaHe
3a HactpoBbHe NJI npomHa Ha CTeneH Ha HarpaBaHe:
MaTePnA Ha roTbApckNte cBdoBe
- PpaBnIHo: UyHyN, CTOMaHa, eMaJInpapaHcTOMaHa, HepbXJaema CTOMaHa, MHorocnoiHO DbHO (C npBaUNHaMapKnipOBKa OT pOn3BOdnteJIa).
He npabnHNO aIyMHH, Mei, MecnHCTbKIO, KepaMnKa, nopceHaH.
CbIbT 3a rotBeHe e noDxOJaU 3a HndykuHHa nNoya, aKO:
BODaTa 3aBnpa MHOrO 6bP30 Ha 3oHa, HAcTpoEHa Ha Ha-BuCOKaTa HAcTpoiKa 3a HaarpBaHe.
MaHHT npBnHa DbHOTo Ha rOtBapckna CbD.
Pa3mepn Ha rotBapckn cbdoBe
- INHdukunOHnTe 30HN 3a rotBehe aBTOMaTHUHO ce npncnoc6BaT KbMa pa3Mepa Ha DbHOTo Ha rotBapcknCsbD.
- EfeKTHBHOCTTHa 30Hata 3a rotBeHe 3aBnCn OT dNaMeTbpa Ha rotBapCKn CbI. CbIOBE 3a rotBeHe C NO-MaIbK dNaMeTbp OT MInHMaJIHn IOnlyuBaAT Camo Yact OT MOUHOCTTa, rHeepnpaHa OT 3OHATA 3a rotBeHe.
OTcbo6paKeHn3a cnrypHOCT n 3a ONTImaHn pe3yIITaN npN rOToBeHe, He H3NoJ3BaIte rO TBapCKn CbD, KOHTo e No- roJAM OT NocOyeHTo B, CneuΦnKaUHn Ha 30Hn 3a rOToBeHe". N36aRBAiTe H3NoJ3BaHTo Ha rO TBapCKn CbD 6JIH3O Do KOHTPOJHOTo Ta6No NO BpeMe Ha rOToBeHe. Toba MoKe Da nOBnRe Bbpxv cyHKUOHnPaHTo Ha KOHTPOJHOTo Ta6No IJIN MoKe cIyauHDo aAKTNBnPa cyHKUInTe Ha KOTJOnHa.

BnxTe,TexHnueckn xapaKTepeNCTnKN".
6.2 Wymobete no Bpeme ha pa6ota
Ako cyBaTe:
- NykaцшуM: rotBapcknT cБд e HappaBeH OT pa3nueH MaTePnaI (KOHCTpyKcIa CaHDbu).
- CBnpeHe: Bne n3non3BaTe 3oHa 3a rotBeHe C BnCOKO HnBO Ha MOUHOCT, a rotBapCKnT CbI e HApPaBeH OT pa3nueH MaTePnaJI (KOHCTpyKuia caHDbN).
- 6yuhe: Bne n3noJ3BaTe BnCOKO HnBO Ha MOUHOCT.
- UpaKaHe: eJekTpuecko npeBknUoyBaHe.
CBNCTeHe,6pbMueHe:BeHTnIaTOpbT pa60Tu.
UymoBeTe ca HopMaJIHn I He NOKa3BaT HeN3npaBHOCT.
6.3 Öko Timer (Eko Taïmep)
3a da neCTIte eHepnra, HArpeBaTeJIrT Ha 30HaTa 3a rotBeHe ce DeakTNBnpa npedn CnHaJa Ha TaMepa 3a OTbpoRaHe Ha OCTaBaUTo Bpeme. Pa3nKaTa BvB Bpemeto 3a pa6Ota 3abncn OT CTeNEHTa Ha HarpBaHe n BpemETpaEHeTo Ha rotBeHeTo.
Hnyk7.35kW POn3BeNo Bb:RepMaHn
CepneH No 7.35 kW
AEG
9.2 CpeunФикадан Ha 3OHTe 3a roTBeHe
| 30ha 3a rotBeHe | HOMHaJIHa MOU-
HOCT (πρι MaKcN-
MaJIHa TOnJIiHHa
HacTpρoɪKa) [W] |
| PowerBoost [W] PowerBoost |
| MaKcHMaJIHa |
| nPoДьЛЖИТeЛ-нocT [MиH.] |
EheprnHa KOncymaun Ha nlouTa 3a roTBeHe (EC electric cooking)
JIaBa 183,9 Wh / kg
EheprnHa KOncymaun Ha nlouTa 3a roTBeHe (EC electric cooking)
Дяна 183,9 Wh / kg
EheprnHa KOHcymaun Ha nIota (EC electric hob) 183,9 Wh / kg
How to install your AEG Action Hob - Worktop installation

4. OPIS PROIZVODA
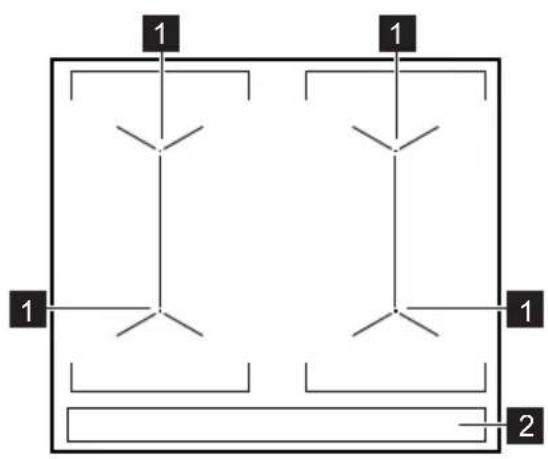
4.1 Raspored povrsine za kuhanje
1 Indukcijska zona kuhanja
Upravljacka ploca
5. SVAKODNEVNA UPORABA

UPOZORENJE!
How to install your AEG Induction Hob - Worktop installation
4. PRODUKTBESKRIVELSE
6.2 Lyden under drift
Hvis du kan hare:
6.3 Öko Timer (Eco-timer)
How to install your AEG Induction Hob - Worktop installation
4. BESCHRIJVING VAN HET PRODUCT
4.4 OptiHeat Control (3-staps restwarmte-indicator)

WAARSCHUWING!


ang het
5.13 Stroommanagement
6.3 Öko Timer (Eco-timer)
8. PROBLEEMOPLossing

WAARSCHUWING!
Thank you for choosing this AEG product. We have created it to give you impeccable performance for many years, with innovative technologies that help make life simpler – features you might not find on ordinary appliances. Please spend a few minutes reading to get the very best from it.
Visit our website to:

Get usage advice, brochures, trouble shooter, service and repair information: www.aeg.com/support

Register your product for better service: www.registeraeg.com

Buy Accessories, Consumables and Original spare parts for your appliance: www.aeg.com/shop
CUSTOMER CARE AND SERVICE
Always use original spare parts.
When contacting our Authorised Service Centre, ensure that you have the following data available: Model, PNC, Serial Number.
The information can be found on the rating plate.
Warning / Caution-Safety information
1 General information and tips
Environmental information
Subject to change without notice.
CONTENTS
1.SAFETY INFORMATION. 108
2.SAFETYINSTRUCTIONS. 110
3. INSTALLATION 113
4.PRODUCT DESCRIPTION. 114
5.DAILYUSE 116
6.HINTS AND TIPS 119
7.CARE AND CLEANING 120
8.TROUBLESHOOTING. 121
9. TECHNICAL DATA 122
10. ENERGY EFFICIENCY 123
11. ENVIRONMENTAL CONCERNS 124
Before the installation and use of the appliance, carefully read the supplied instructions. The manufacturer is not responsible for any injuries or damage that are the result of incorrect
installation or usage. Always keep the instructions in a safe and accessible location for future reference.
1.1 Children and vulnerable people safety
- This appliance can be used by children aged from 8 years and above and persons with reduced physical, sensory or mental capabilities or lack of experience and knowledge if they have been given supervision or instruction concerning the use of the appliance in a safe way and understand the hazards involved. Children of less than 8 years of age and persons with very extensive and complex disabilities shall be kept away from the appliance unless continuously supervised.
- Children should be supervised to ensure that they do not play with the appliance.
- Keep all packaging away from children and dispose of it appropriately.
- WARNING: Keep children and pets away from the appliance when it operates or when it cools down. Accessible parts become hot during use.
- If the appliance has a child safety device, it should be activated.
- Children shall not carry out cleaning and user maintenance of the appliance without supervision.
1.2 General Safety
- WARNING: The appliance and its accessible parts become hot during use. Care should be taken to avoid touching heating elements.
- WARNING: Unattended cooking on a hob with fat or oil can be dangerous and may result in fire.
- NEVER try to extinguish a fire with water, but switch off the appliance and then cover flame e.g. with a lid or a fire blanket.
-
WARNING: The appliance must not be supplied through an external switching device, such as a timer, or connected to a circuit that is regularly switched on and off by a utility.
-
CAUTION: The cooking process has to be supervised. A short term cooking process has to be supervised continuously.
- WARNING: Danger of fire: Do not store items on the cooking surfaces.
- Metallic objects such as knives, forks, spoons and lids should not be placed on the hob surface since they can get hot.
- Do not use the appliance before installing it in the built-in structure.
- Do not use a steam cleaner to clean the appliance.
- After use, switch off the hob element by its control and do not rely on the pan detector.
- If the glass ceramic surface / glass surface is cracked, switch off the appliance and unplug it from the mains. In case the appliance is connected to the mains directly using junction box, remove the fuse to disconnect the appliance from power supply. In either case contact the Authorised Service Centre.
- If the supply cord is damaged, it must be replaced by the manufacturer, an authorized Service or similarly qualified persons in order to avoid a hazard.
- WARNING: Use only hob guards designed by the manufacturer of the cooking appliance or indicated by the manufacturer of the appliance in the instructions for use as suitable or hob guards incorporated in the appliance. The use of inappropriate guards can cause accidents.
2. SAFETY INSTRUCTIONS
2.1 Installation

WARNING!
Only a qualified person must install this appliance.

WARNING!
Risk of injury or damage to the appliance.
- Remove all the packaging.
- Do not install or use a damaged appliance.
- Follow the installation instructions supplied with the appliance.
-
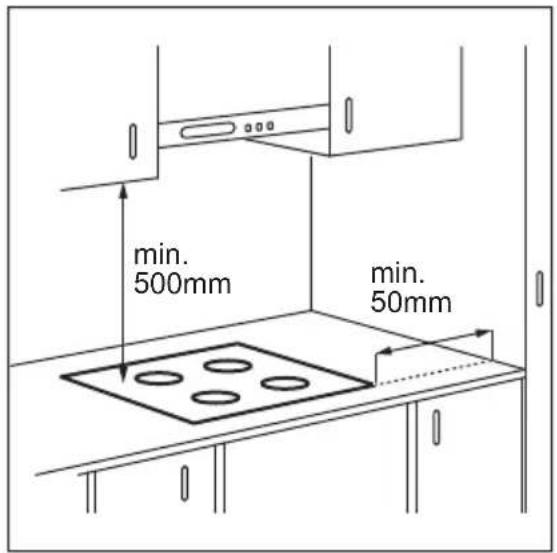
Keep the minimum distance from other appliances and units.
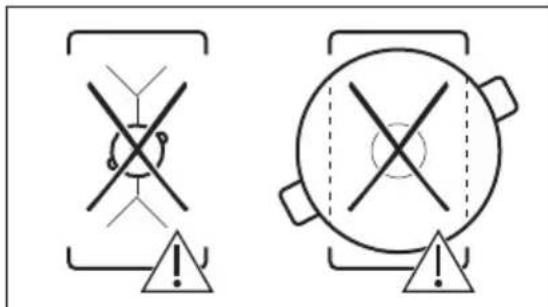
Always take care when moving the appliance as it is heavy. Always use safety gloves and enclosed footwear.
-
Seal the cut surfaces with a sealant to prevent moisture from causing swelling.
- Protect the bottom of the appliance from steam and moisture.
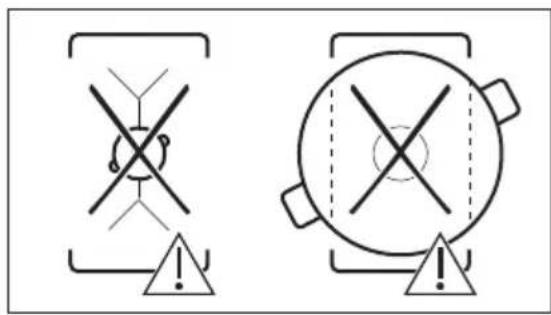
- Do not install the appliance next to a door or under a window. This prevents hot cookware from falling from the appliance when the door or the window is opened.
Each appliance has cooling fans on the bottom.
-
If the appliance is installed above a drawer:
-
Do not store any small pieces or sheets of paper that could be pulled in, as they can damage the cooling fans or impair the cooling system.
- Keep a distance of minimum 2 cm between the bottom of the appliance and parts stored in the drawer.
- Remove any separator panels installed in the cabinet below the appliance.
2.2 Electrical Connection

WARNING!
Risk of fire and electric shock.
- All electrical connections should be made by a qualified electrician.
The appliance must be earthed.
- Before carrying out any operation makesure that the appliance is disconnectedfrom the power supply.
- Make sure that the parameters on the rating plate are compatible with the electrical ratings of the mains power supply.
- Make sure the appliance is installed correctly. Loose and incorrect electricity mains cable or plug (if applicable) can make the terminal become too hot.
- Use the correct electricity mains cable.
- Do not let the electricity mains cable tangle.
- Make sure that a shock protection is installed.
- Use the strain relief clamp on the cable.
- Make sure the mains cable or plug (if applicable) does not touch the hot appliance or hot cookware, when you connect the appliance to a socket.
-
Do not use multi-plug adapters and extension cables.
-
Make sure not to cause damage to the mains plug (if applicable) or to the mains cable. Contact our Authorised Service Centre or an electrician to change a damaged mains cable.
- The shock protection of live and insulated parts must be fastened in such a way that it cannot be removed without tools.
- Connect the mains plug to the mains socket only at the end of the installation. Make sure that there is access to the mains plug after the installation.
- If the mains socket is loose, do not connect the mains plug.
- Do not pull the mains cable to disconnect the appliance. Always pull the mains plug.
- Use only correct isolation devices: line protecting cut-outs, fuses (screw type fuses removed from the holder), earth leakage trips and contactors.
- The electrical installation must have an isolation device which lets you disconnect the appliance from the mains at all poles. The isolation device must have a contact opening width of minimum 3 mm.
2.3 Use

WARNING!
Risk of injury, burns and electric shock.
- Remove all the packaging, labelling and protective film (if applicable) before first use.
- This appliance is for household (indoors) use only.
- Do not change the specification of this appliance.
Make sure that the ventilation openings are not blocked.
- Do not let the appliance stay unattended during operation.
- Set the cooking zone to "off" after each use.
- Do not put cutlery or saucepan lids on the cooking zones. They can become hot.
- Do not operate the appliance with wet hands or when it has contact with water.
- Do not use the appliance as a work surface or as a storage surface.
- If the surface of the appliance is cracked, disconnect immediately the appliance
from the power supply. This to prevent an electrical shock.
- Users with a pacemaker must keep a distance of minimum 30~cm from the induction cooking zones when the appliance is in operation.
- When you place food into hot oil, it may splash.

WARNING!
Risk of fire and explosion
- Fats and oil when heated can release flammable vapours. Keep flames or heated objects away from fats and oils when you cook with them.
- The vapours that very hot oil releases can cause spontaneous combustion.
Used oil, that can contain food remnants, can cause fire at a lower temperature than oil used for the first time.
- Do not put flammable products or items that are wet with flammable products in, near or on the appliance.

WARNING!
Risk of damage to the appliance.
- Do not keep hot cookware on the control panel.
- Do not put a hot pan cover on the glass surface of the hob.
- Do not let cookware boil dry.
- Be careful not to let objects or cookware fall on the appliance. The surface can be damaged.
- Do not activate the cooking zones with empty cookware or without cookware.
- Do not put aluminium foil on the appliance.
- Cookware made of cast iron, aluminium or with a damaged bottom can cause scratches on the glass / glass ceramic. Always lift these objects up when you have to move them on the cooking surface.
- This appliance is for cooking purposes only. It must not be used for other purposes, for example room heating.
2.4 Care and cleaning
- Clean the appliance regularly to prevent the deterioration of the surface material.
- Switch off the appliance and let it cool down before cleaning.
- Do not use water spray and steam to clean the appliance.
- Clean the appliance with a moist soft cloth. Use only neutral detergents. Do not use abrasive products, abrasive cleaning pads, solvents or metal objects.
2.5 Service
To repair the appliance contact the Authorised Service Centre. Use original spare parts only.
- Concerning the lamp(s) inside this product and spare part lamps sold separately: These lamps are intended to withstand extreme physical conditions in household appliances, such as temperature, vibration, humidity, or are intended to signal information about the operational status of the appliance. They are not intended to be used in other applications and are not suitable for household room illumination.
2.6 Disposal

WARNING!
Risk of injury or suffocation.
- Contact your municipal authority for information on how to dispose of the appliance.
- Disconnect the appliance from the mains supply.
- Cut off the mains electrical cable close to the appliance and dispose of it.
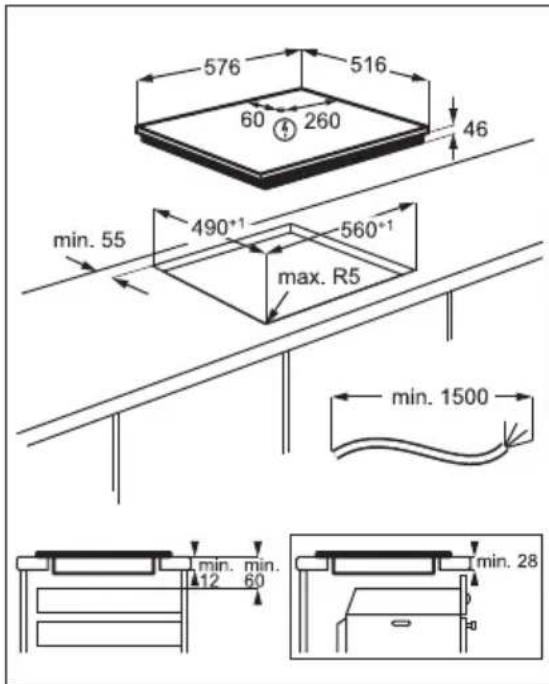
3. INSTALLATION

WARNING!
Refer to Safety chapters.
3.1 Before the installation
Before you install the hob, write down the information below from the rating plate. The rating plate is on the bottom of the hob.
Serial number
3.2 Built-in hobs
Only use the built-in hobs after you assemble the hob into correct built-in units and work surfaces that align to the standards.
3.3 Connection cable
The hob is supplied with a connection cable.
- To replace the damaged mains cable, use the cable type: H05V2V2-F which withstands a temperature of 90^ or higher. Contact an Authorised Service Centre. The connection cable may only be replaced by a qualified electrician.
3.4 Assembly
If you install the hob under a hood, please see the installation instructions of the hood for the minimum distance between the appliances.
If the appliance is installed above a drawer, the hob ventilation can warm up the items stored in the drawer during the cooking process.
Find the video tutorial "How to install your AEG Induction Hob - Worktop installation" by typing out the full name indicated in the graphic below.

YouTube
www.youtube.com/electrolux
www.youtube.com/aeg
How to install your AEG
Induction Hob - Worktop installation

4. PRODUCT DESCRIPTION
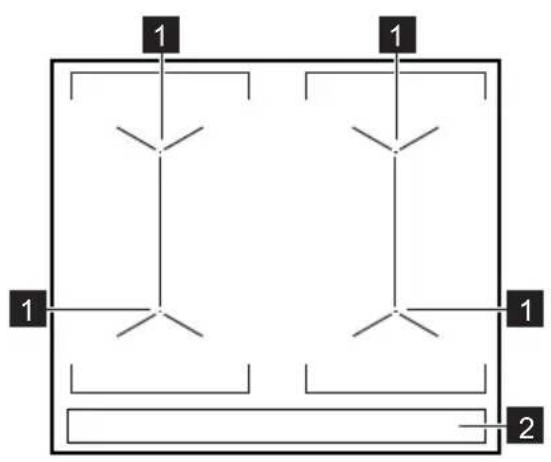
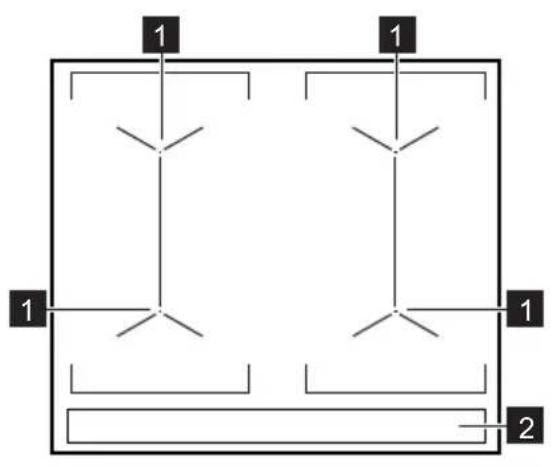
4.1 Cooking surface layout

1 Induction cooking zone
2 Control panel
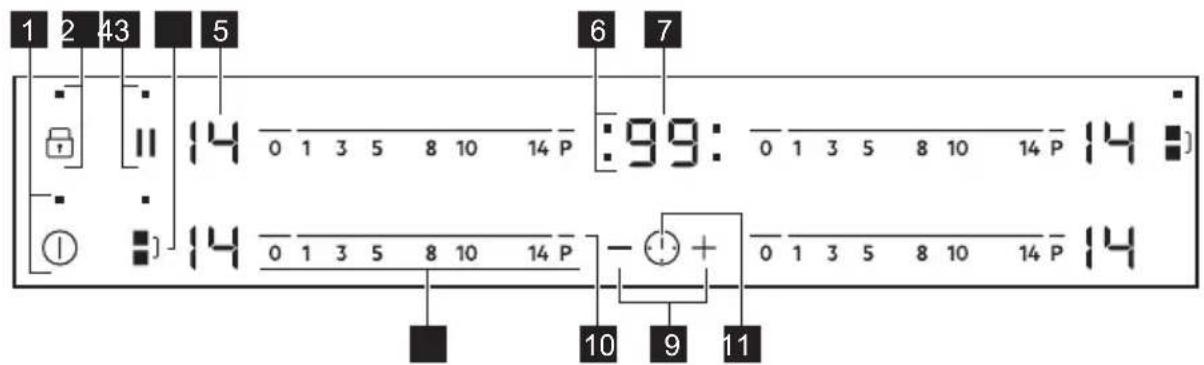
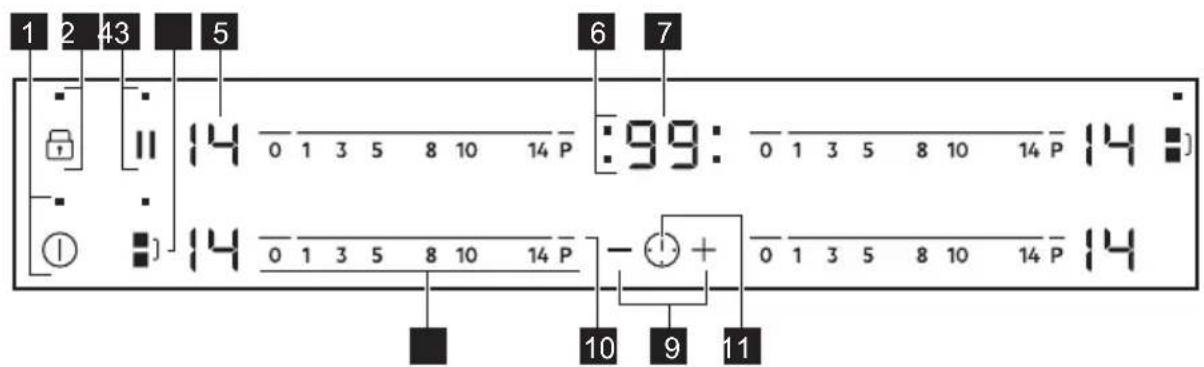
4.2 Control panel layout
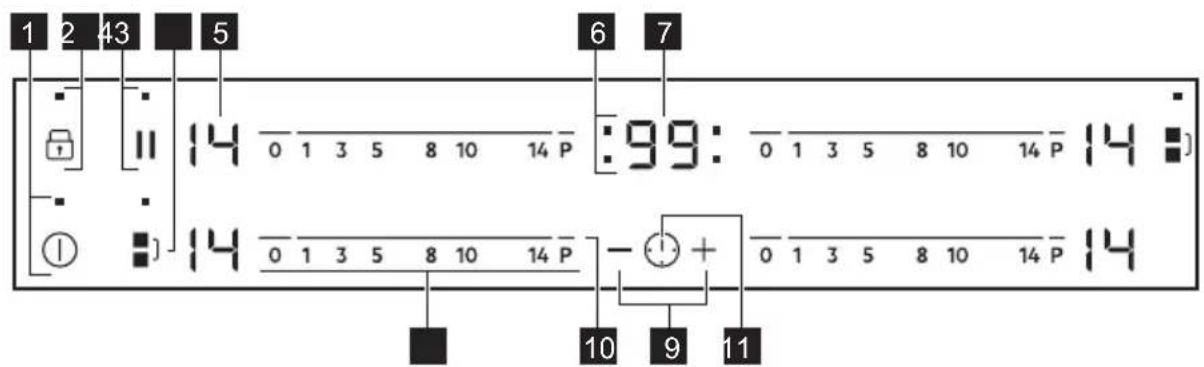
Use the sensor fields to operate the appliance. The displays, indicators and sounds tell which functions operate.
| Sensor field | Function Comment |
| 1 | ① | ON / OFF To activate and deactivate the hob. |
| 2 | ② | Lock / Child Safety Device To lock / unlock the control panel. |
| 3 | || | Pause To activate and deactivate the function. |
| 4 | - | Bridge To activate and deactivate the function. |
| 5 | - Heat setting display To show the heat setting. |
| 6 | - Timer indicators of cooking zones To show for which zone you set the time. |
| Sensor | Function Comment |
| field | |
| 7 | - Timer display To show the time in minutes. |
| 8 | ① | - To select the cooking zone. |
| 9 | +/- | - To increase or decrease the time. |
| 10 | P | PowerBoost To activate the function. |
| 11 | - Control bar To set a heat setting. |
4.3 Heat setting displays
| Display Description |
| 0 | The cooking zone is deactivated. |
| 1-14 | The cooking zone operates. |
| u | Pause operates. |
| A | Automatic Heat Up operates. |
| P | PowerBoost operates. |
| E+ digit | There is a malfunction. |
| / Z | OptiHeat Control (3 step Residual heat indicator): continue cooking / keep warm / residual heat. |
| L | Lock / Child Safety Device operates. |
| F | Incorrect or too small cookware or no cookware on the cooking zone. |
| - | Automatic Switch Off operates. |
4.4 OptiHeat Control (3 step Residual heat indicator)

WARNING!
E /7 As long as the indicator is on, there is a risk of burns from residual heat.
The induction cooking zones produce the heat necessary for the cooking process directly in the bottom of the cookware. The glass ceramic is heated by the heat of the cookware.
The indicators / appear when a cooking zone is hot. They show the level of the residual heat for the cooking zones you are currently using.
The indicator may also appear:
- for the neighbouring cooking zones even if you are not using them,
- when hot cookware is placed on cold cooking zone,
- when the hob is deactivated but the cooking zone is still hot.
The indicator disappears when the cooking zone has cooled down.
5. DAILY USE

WARNING!
Refer to Safety chapters.
5.1 Activating and deactivating
Touch for 1 second to activate or deactivate the hob.
5.2 Automatic Switch Off
The function deactivates the hob automatically if:
- all cooking zones are deactivated,
- you do not set the heat setting after you activate the hob,
- you spill something or put something on the control panel for more than 10 seconds (a pan, a cloth, etc.). An acoustic signal sounds and the hob deactivates. Remove the object or clean the control panel.
- the hob gets too hot (e.g. when a saucepan boils dry). Let the cooking zone cool down before you use the hob again.
- you use incorrect cookware. The symbol
F comes on and the cooking zone deactivates automatically after 2 minutes.
- you do not deactivate a cooking zone or change the heat setting. After some time
comes on and the hob deactivates.
The relation between the heat setting and the time after which the hob deactivates:
Heat setting The hob deactivates after

1-3
6 hours
4-75 hours
8-94 hours
10-14 1.5 hour
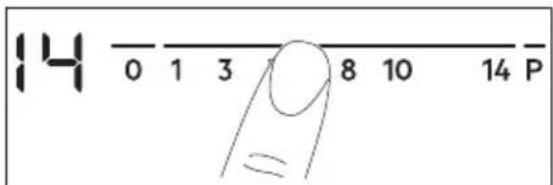
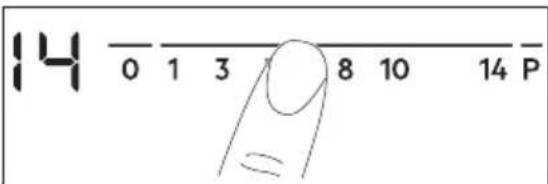
5.3 The heat setting
To set or change the heat setting:
Touch the control bar at the correct heat setting or move your finger along the control bar until you reach the correct heat setting.
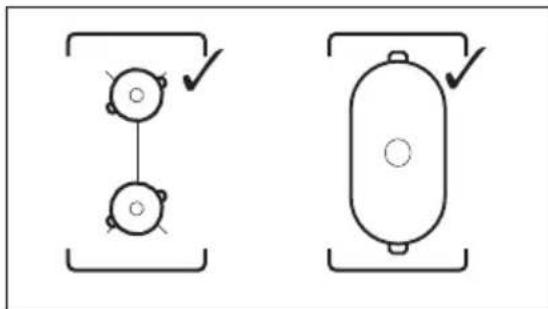
5.4 Using the cooking zones
Place the cookware in the centre of the selected zone. Induction cooking zones adapt to the dimension of the bottom of the cookware automatically.
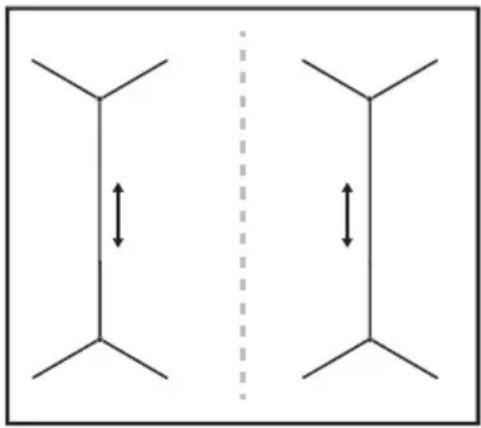
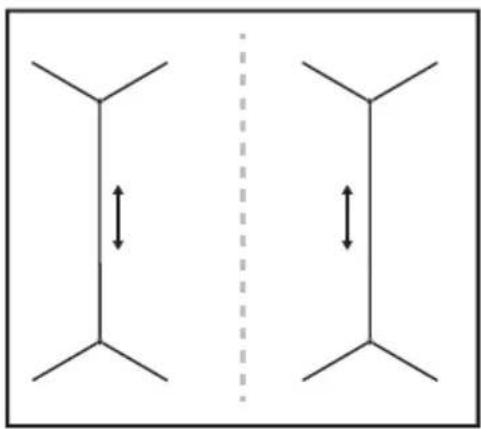
You can cook with large cookware placed on two cooking zones at the same time. The cookware must cover the centres of both zones but not go beyond the area marking. If the cookware is located between the two centres, Bridge function will not be activated.
5.5 Bridge

The function operates when the pot covers the centres of the two zones.
This function connects two cooking zones and they operate as one.
First set the heat setting for one of the cooking zones.
To activate the function for left / right cooking zones: touch to set or change the heat setting touch one of the left / right control sensors.
To deactivate the function: touch The cooking zones operate independently.
5.6 Automatic Heat Up
Activate this function to get a desired heat setting in a shorter time. When it is on, the zone operates on the highest setting in the beginning and then continues to cook at the desired heating setting.

To activate the function the cooking zone must be cold.
To activate the function for a cooking zone: touch R comes on). Immediately touch a desired heat setting. After 3 seconds A comes on.
To deactivate the function: change the heat setting.
5.7 PowerBoost
This function makes more power available to the induction cooking zones. The function can be activated for the induction cooking zone only for a limited period of time. After this time the induction cooking zone automatically sets back to the highest heat setting.

Refer to "Technical data" chapter.
To activate the function for a cooking zone: touch P. comes on.
To deactivate the function: change the heat setting.
5.8 Timer
- Count Down Timer
You can use this function to set the length of a single cooking session.
First set the heat setting for the cooking zone, then set the function.
To set the cooking zone: touch repeatedly until the indicator of a cooking zone appears.
To activate the function: touch of the timer to set the time (00 - 99 minutes). When the indicator of the cooking zone starts to flash, the time counts down.
To see the remaining time: touch to set the cooking zone. The indicator of the cooking zone starts to flash. The display shows the remaining time.
To change the time: touch to set the cooking zone. Touch or
To deactivate the function: touch to set the cooking zone and then touch. The remaining time counts down to 00. The indicator of the cooking zone disappears.

When the countdown ends, an acoustic signal sounds and 00 flashes. The cooking zone deactivates.
To stop the sound: touch
- CountUp Timer
You can use this function to monitor how long the cooking zone operates.
To set the cooking zone: touch ① repeatedly until the indicator of a cooking zone appears.
To activate the function: touch of the timer. uP appears. When the indicator of the cooking zone starts to flash, the time counts up. The display switches between uP and the counted time (in minutes).
To see how long the cooking zone
operates: touch to set the cooking zone. The indicator of the cooking zone starts to flash. The display shows how long the zone operates.
To deactivate the function: touch and then touch . The indicator of the cooking zone disappears.
You can use this function when the hob is activated and the cooking zones do not operate. The heat setting display shows
To activate the function: touch and then touch + or of the timer to set the time. When the time finishes, an acoustic signal sounds and 00 flashes.
To stop the sound: touch

The function has no effect on the operation of the cooking zones.
5.9 Pause
When the function operates, all other symbols on the control panels are locked. The function does not stop the timer functions.
Press to activate the function. comes on. The heat setting is lowered to 1.
To deactivate the function: press The previous heat setting comes on.
5.10 Lock
You can lock the control panel while cooking zones operate. It prevents an accidental change of the heat setting.
Set the heat setting first.
To activate the function: touch. comes on for 4 seconds. The Timer stays on.
To deactivate the function: touch The previous heat setting comes on.

When you deactivate the hob, you also deactivate this function.
5.11 Child Safety Device
This function prevents an accidental operation of the hob.
To activate the function: activate the hob with Do not set any heat setting. Touch for 4 seconds. comes on. Deactivate the hob with
To deactivate the function: activate the hob with ① do not set any heat setting. Touch for 4 seconds. ② comes on. Deactivate the hob with ①
To override the function for only one cooking time: activate the hob with ①. L comes on. Touch for 4 seconds. Set the heat setting in 10 seconds. You can operate the hob. When you deactivate the hob with the function operates again.
5.12 OffSound Control (Deactivating and activating the sounds)
Deactivate the hob. Touch for 3 seconds. The display comes on and goes out. Touch for 3 seconds. of the timer to choose one of the following:
- the sounds are off
- the sounds are on
To confirm your selection wait until the hob deactivates automatically.
When the function is set to b you can hear the sounds only when:
- you touch ①
- Minute Minder comes down
- Count Down Timer comes down
- you put something on the control panel.
5.13 Power management
If multiple zones are active and the consumed power exceeds the limitation of the power supply, this function divides the available power between all cooking zones. The hob controls heat settings to protect the fuses of the house installation.
- Cooking zones are grouped according to the location and number of the phases in the hob. Each phase has a maximum electricity loading (3700 W). If the hob reaches the limit of maximum available power within one phase, the power of the cooking zones will be automatically reduced.
The heat setting of the cooking zone selected last is always prioritised. The remaining power will be divided between the previously activated cooking zones in reverse order of selection.
- The heat setting display of the reduced zones changes between the initially selected heat setting and the reduced heat setting.
- Wait until the display stops flashing or reduce the heat setting of the cooking zone selected last. The cooking zones will continue operating with the reduced heat setting. Change the heat settings of the cooking zones manually, if necessary.
Refer to the illustration for possible combinations in which power can be distributed among the cooking zones.
6. HINTS AND TIPS

WARNING!
Refer to Safety chapters.
6.1 Cookware

For induction cooking zones a strong electro-magnetic field creates the heat in the cookware very quickly.
Use the induction cooking zones with suitable cookware.
- The bottom of the cookware must be as thick and flat as possible.
- Ensure pan bases are clean and dry before placing on the hob surface.
- In order to avoid scratches, do not slide or rub the pot across the ceramic glass.
Cookware material
- correct: cast iron, steel, enamelled steel, stainless steel, multi-layer bottom (with a correct marking from a manufacturer).
not correct: aluminium, copper, brass, glass, ceramic, porcelain.
Cookware is suitable for an induction hob if:
Cookware dimensions
- Induction cooking zones adapt to the dimension of the bottom of the cookware automatically.
- The cooking zone efficiency is related to the diameter of the cookware. The cookware with a diameter smaller than the minimum receives only a part of the power generated by the cooking zone.
- For both safety reasons and optimal cooking results, do not use cookware larger than indicated in "Cooking zones specification". Avoid keeping cookware close to the control panel during the cooking session. This might impact the functioning of the control panel or accidentally activate hob functions.

Refer to "Technical data".
6.2 The noises during operation
If you can hear:
- crack noise: cookware is made of different materials (a sandwich construction).
whistle sound: you use a cooking zone with a high power level and the cookware
is made of different materials (a sandwich construction).
- humming: you use a high power level.
- clicking: electric switching occurs.
- hissing, buzzing: the fan operates.
The noises are normal and do not indicate any malfunction.
6.3 Öko Timer (Eco Timer)
To save energy, the heater of the cooking zone deactivates before the count down timer sounds. The difference in the operation time depends on the heat setting level and the length of the cooking operation.
6.4 Examples of cooking applications
The correlation between the heat setting of a zone and its consumption of power is not linear. When you increase the heat setting, it is not proportional to the increase of the consumption of power. It means that a cooking zone with the medium heat setting uses less than a half of its power.
i
The data in the table is for guidance only.
| Heat setting Use to: Time | Hints
(min) |
| u-1 | Keep cooked food warm. as neces-sary | Put a lid on the cookware. |
| 1 - 3 Hollandaise sauce, melt: butter, choco-late, gelatine. | 5 - 25 Mix from time to time. |
| 1 - 3 Solidify: fluffy omelettes, baked eggs. 10 - 40 Cook with a lid on. |
| 3 - 5 Simmer rice and milkbased dishes, heat up ready-cooked meals. | 25 - 50 Add at least twice as much liquid as rice, mix milk dishes halfway through the procedure. |
| 5 - 7 Steam vegetables, fish, meat. 20 - 45 Add a couple of tablespoons of liquid. |
| 7 - 9 Steam potatoes. 20 - 60 Use max. ¼ l of water for 750 g of po-tatoes. |
| 7 - 9 Cook larger quantities of food, stews and soups. | 60 - 150 Up to 3 l of liquid plus ingredients. |
| 9 - 12 Gentle fry: escalope, veal cordon bleu, cutlets, rissoles, sausages, liver, roux, eggs, pancakes, doughnuts. | as neces-sary Turn halfway through. |
| 12 - 13 Heavy fry, hash browns, loin steaks, steaks. | 5 - 15 Turn halfway through. |
| 14 Boil water, cook pasta, sear meat (goulash, pot roast), deep-fry chips. |
| P | Boil large quantities of water. PowerBoost is activated. |
7. CARE AND CLEANING

WARNING!
Refer to Safety chapters.
7.2 Cleaning the hob
- Remove immediately: melted plastic, plastic foil, sugar and food with sugar, otherwise, the dirt can cause damage to the hob. Take care to avoid burns. Use a special hob scraper on the glass surface at an acute angle and move the blade on the surface.
- Remove when the hob is sufficiently cool: limescale rings, water rings, fat
stains, shiny metallic discoloration. Clean the hob with a moist cloth and a non-abrasive detergent. After cleaning, wipe the hob dry with a soft cloth.
- Remove shiny metallic discoloration: use a solution of water with vinegar and clean the glass surface with a cloth.
8. TROUBLESHOOTING

WARNING!
Refer to Safety chapters.
8.1 What to do if...
| Problem Possible cause Remedy |
| You cannot activate or operate the hob. | The hob is not connected to an elec-trical supply or it is connected incor-rectly. | Check if the hob is correctly connected to the electrical supply. |
| The fuse is blown. Make sure that the fuse is the cause of | the malfunction. If the fuse is blown again and again, contact a qualified electrician. |
| You do not set the heat setting for 10 seconds. | Activate the hob again and set the heat setting in less than 10 seconds. |
| You touched 2 or more sensor fields at the same time. | Touch only one sensor field. |
| Pause operates. Refer to "Daily use". | |
| There is water or fat stains on the control panel. | Clean the control panel. |
| An acoustic signal sounds and the hob deactivates. An acoustic signal sounds when the hob is deactivated. | You put something on one or more sensor fields. | Remove the object from the sensor fields. |
| The hob deactivates. You put something on the sensor field ① | Remove the object from the sensor field. |
| Residual heat indicator does not come on. | The zone is not hot because it oper-ated only for a short time or the sen-sor is damaged. | If the zone operated sufficiently long to be hot, speak to an Authorised Service Centre. |
| Automatic Heat Up does not op-erate. | The zone is hot. Let the zone become sufficiently cool. |
Problem Possible cause Remedy
| The highest heat setting is set. The highest heat setting has the same power as the function. |
| The heat setting changes between two levels. | Power management operates. Refer to "Daily use". |
| There is no sound when you touch the panel sensor fields. | The sounds are deactivated. Activate the sounds. Refer to "Daily use". |
| L comes on. | Child Safety Device or Lock oper- ates. | Refer to "Daily use". |
| F comes on. | There is no cookware on the zone. Put cookware on the zone. |
| The cookware is unsuitable. Use suitable cookware. Refer to "Hints and tips". |
| The diameter of the bottom of the cookware is too small for the zone. | Use cookware with correct dimen-sions. Refer to "Technical data". |
| E and a number come on. | There is an error in the hob. Deactivate the hob and activate it again after 30 seconds. If E comes on again, disconnect the hob from the electrical supply. After 30 seconds, connect the hob again. If the problem continues, speak to an Authorised Service Centre. |
| You can hear a constant beep noise. | The electrical connection is incor- rect. | Disconnect the hob from the electrical supply. Ask a qualified electrician to check the installation. |
8.2 If you cannot find a solution...
If you cannot find a solution to the problem yourself, contact your dealer or an Authorised Service Centre. Give the data from the rating plate. Give also three digit letter code for the glass ceramic (it is in the corner of the glass surface) and an error
message that comes on. Make sure, you operated the hob correctly. If not the servicing by a service technician or dealer will not be free of charge, also during the warranty period. The information about guarantee period and Authorised Service Centres are in the guarantee booklet.
9. TECHNICAL DATA
9.1 Rating plate
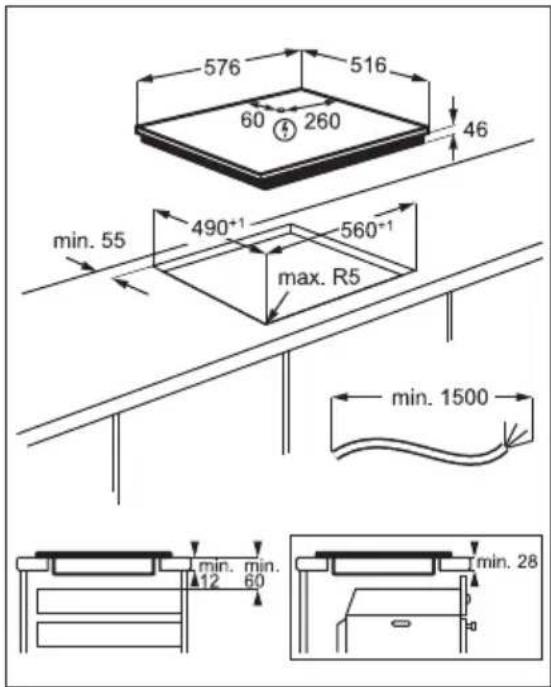
Model IKE64450XB PNC 949 597 193 00
Typ 61 B4A 04 AA 220 - 240 V / 400 V 2N 50 - 60 Hz
Induction 7.35 kW Made in: Germany
Ser.Nr. 7.35 kW
AEG
9.2 Cooking zones specification
| Cooking zone Nominal power (maximum heat setting) [W] | PowerBoost [W] PowerBoost maximum dura- tion [min] | Cookware diameme- ter [mm] |
| Left front 2300 3200 10 125 - 210 | | |
| Left rear 2300 3200 10 125 - 210 | | |
| Right front 2300 3200 10 125 - 210 | | |
| Right rear 2300 3200 10 125 - 210 | | |
| The power of the cooking zones can be different in some small range from the data in the table. It changes with the material and dimensions of the cookware. | For optimal cooking results use cookware no larger than the diameter in the table. |
10. ENERGY EFFICIENCY
| Model identification IKE64450XB |
| Type of hob Built-In Hob |
| Number of cooking areas 2 |
| Heating technology Induction |
| Length (L) and width (W) of the cooking area Left L 39.2 cm | W 22.0 cm |
| Length (L) and width (W) of the cooking area Right L 39.2 cm | W 22.0 cm |
| Energy consumption of the cooking area (EC electric cooking) | Left 183.9 Wh / kg |
| Energy consumption of the cooking area (EC electric cooking) | Right 183.9 Wh / kg |
| Energy consumption of the hob (EC electric hob) 183.9 Wh / kg |
- For European Union according to EU 66/2014. For Belarus according to STB 2477-2017, Annex A. For Ukraine according to 742/2019.
EN 60350-2 - Household electric cooking appliances - Part 2: Hobs - Methods for measuring performance.
The energy measurements referring to the cooking area are identified by the markings of the respective cooking zones.
10.2 Energy saving
You can save energy during everyday cooking if you follow below hints.
- When you heat up water, use only the amount you need.
- If it is possible, always put the lids on the cookware.
- Before you activate the cooking zone put the cookware on it.
-
Put the smaller cookware on the smaller cooking zones.
-
Put the cookware directly in the centre of the cooking zone.
-
Use the residual heat to keep the food warm or to melt it.
11. ENVIRONMENTAL CONCERNS
Recycle materials with the symbol Put the packaging in relevant containers to recycle it. Help protect the environment and human health by recycling waste of electrical and electronic appliances. Do not dispose of
appliances marked with the symbol with the household waste. Return the product to your local recycling facility or contact your municipal office.
PARIMATE TULEMUSTE SAAVUTAMISEKS
How to install your AEG Action Hob - Worktop installation

4. TOOTE KIRJELDUS
4.1 Keeduala paigutus

-
helid on valjas
-
helid on sees
8.1 Kayttohairiot...
Sous reserve de modifications.
TABLE DES MATIÈRES
- INFORMATIONS DE SECURITE 160
- CONSIGNES DE SECURITE 163
- INSTALLATION 165
4.DESCRIPTION DE L'APPAREIL 167
- UTILISATION QUOTIDIENNE 169
- CONSEILS 173
- ENTRETIEN ET NETTOYAGE 174
- DEPANNAGE 175
9.CARACTERISTIQUES TECHNIQUES 177
- RENDEMENT ENERGÉTIQUE 177
- EN MATIÈRE DE PROTECTION DE L'ENVIRONNEMENT 178
How to install your AEG
Induction Hob - Worktop installation

4. DESCRIPTION DE L'APPAREIL
How to install your AEG Induction Hob - Worktop installation
How to install your AEG Motion Hob - Worktop installation

4.1 Diatae n eTiaVaeiac maeyepaTOs
1 Etnaywyikn zovn mayeipepaTOC
2 NivaKacXeipiOtnpiw
4.2 Iataxg n xepiopnpiou
Xpnoiotoinate ta Tbeia apnca yia tn aeitoupyia tnc ouakeunc. Oi oovcs, oi evdeieic kai o i nxoitodekivouuv tic aeitoupyiesiouivai evpyoioinuevcs.
How to install your AEG Induction Hob - Worktop installation
4. TERMÉKLEÍRÁS
How to install your AEG Induction Hob - Worktop installation
4. IZSTRÄDÄJUMA APRAKSTS
How to install your AEG Action Hob - Worktop installation

4. GAMINIO APRASYMAS
2.2 Nobp3yBaHbe Ha ctpya

PPEyPENEYBAHbE!
Pn3nk oJ noXap n cTpyeH yDap.
CnTe eJektpuHn Bpckn Tpe6a da rIn n3Bpwn KBaJIncKyBaH eJekTpupap.
Anapatot Mopa da 6nide 3a3emjeH.
- PpeДа ce n3BényBaat KaKbN 6nno pa60TN, npOBepTe dann anapatoT e nCKnyeH OJ CTpyja.
-Проверete дann napametpinte Ha
ПLOчкata co cneцнkaци ce
КOMnatnHnH co eNeKtpnHaTa MOKHOCT
Ha Мржata Ha eNeKtpnHa eHeprna.
- IorpiKte ce anapaToT da e npaBnHOMontupan. Ja6abN HecooDBeTeH Ka6e3a cTpyja nn npNKnyOk (ako enpImeHnBO) MoKe Da npEdu3BnKa nperpeBaHe Ha TepMNHaIOT.
Kopntete cooDBeTeH eJeKtpuueh ka6eI.
He 03BOJyBajTe eJekTpUHnOT Ka6eJ da ce 3anJeTka.
- IorpnjkeTe ce da 6nnde nHcTaInpaHa 3aHTnTa oD eNeKtpuyeH WOK.
KopncTeTe cteraay 3a 3aterHyBaBe Ha Ka6eNoT.
- YBepete ce deka Ka6eNoT 3a cTpju nnn npnKnyokOT (ako e npnMeHnBO) He ro dOnnpaaT TonNnot anapat nn TOnnIte caOBN 3a rotBeHe Kora rnoBp3yBaTe anapatOT co wTeKePn.
He KopncTeTe aanTepn co noBeke npKnyOuNi npoJxHn Ka6nn.
BHHMaBajTe Da He ro OWTeTnTe npNKJyOKOT 3a Ctpyja (ako e npImeHnBO) nn Ka6eNoT. KOHTaKtnpajTe co HaSiNOT OBlaCTeH cepBnCeH ueHTap nn EJIeKTPuYap 3a da cMeHInTe OWTeTeH Ka6eI.
3aHTnTaT oN eJIeKtpuYdap Ha aKTINBHInTe N I3OJInpaHInTe DeIOBn Mopa Da Ce NOBp3e Ha TaKOB HauH N To HeMa Da MoKe Da ce N3BaAn 6e3 aNaTkN.
-Поврзete ro npNKnyOKOT 3a cTpyja co
штЕкерТ ha краJOТ od моNTажата.
пpoвереTe дали npNKnyOKOT 3a cTpyja e
прuctanen NO моHTиранeto.
-Дokonkyшт ekpoTe e na6ab,He npKnyyBajTe ro npKnyOkOT 3a cTpyja.
He BneyeTe ro Ka6eNoT 3a da ro ncknyuHte anapatot od ctpya.CekoraW noBnekyBaJte ro npNKnyUOKOT 3a ctpya.
KopncTeTe cAmo COOdBETHn ypeiN 3a n30launja: 3aHTNTHn IpeKNHyBaun Ha nnHja,OCnrypBaun (ocnrypBaun Ha BpTeBe N3BaDeHN OJ dpXkaOT), 3a3emjyBaHe N KOHTaKTOpN.
- EneKtpnHaTaNHCTaNaJMaMpaDaNMa N3OJaUncN ypeD KoJ wTO Bn OBO3MOKyBa Da rNCKIyUHTe anapaTOT oN pNkJyOkoT 3a cTpyja OD CITE NOLOBNI. N3OJaUcNtO ypeD Mopa Da NMa KOHTaKTeh OTBOP CO WInPnHa OD HajMaJIky 3 MM.
2.3 Ynotpe6a
PPEyPENEYBAHe!
Pn3nk oJ noBpeJa, n3ropeHnCn, n cTpyeH yap.
- OtctpaheTe ja ceNaTa am6aJaxa, etnkeTn 3aWtHTHnot fNIM (doKoNky e npimHeNBO) nped npBaTa ynoTppe6a.
- Oboj anapat e camo 3a DomaSHA ynoTpe6a (BHaTpe).
He mehybajte ja cneuФkauijata Ha OBOJ anapaT.
OcnrgypaTe ce deKa OTBOpnte 3a BEHTnlaunja He ce 6nokupaHn.
He ro octabajte anapatot da pa6oTu 6e3 Hau3Op.
- NocTabete ja pHrlata Ha "NCKnyeHO" no cekoja ynoTpe6a.
He ctabajte npnbop 3a jaedehe nnn KaanaHn Ha caobn 3a coc Ha pHHnTe. Tne moke da ctaHaT Jekn.
- He pakybajte co anapaTc co MOKpn pace INN KORA NMa KOHTaKT CO BODa.
He ynoTpe6yBajTe ro anapaToT kaKo pa60THa NOBpHnHa INI NOBpHnHa 3a cknaDnpaHe.
- Ako NOBpUnHaTa Ha anapaTc e nyKaHata, BeDnA uNCKnyuTe rO anapatOT od HanojyBaHe. Oba e 3a da ce cnpeu n EneKTPnueH wok.
Kopncnnte co nejcmejkep Mopa da ce dpkata Ha pactojaHne od mHmym 30 cm od INdkyKTNBHTe pHHrnn Kora anapatot pa60tn.
Kora Ke CTaBnTe XpaHa BO BpeNo MacNo, Toa MoKe Da ce pacnpcHe.
PPEyPENEYBAHbE!
OnachocT od noxkap n 13ropeHnC
-ПиЗагреваьe,MACOTNTe n MacNOTO MoKAT Da ИСпУшТaAT 3aNaJIbN napen.Држete ro памeHOT nJIn 3aRpeAHnTe npEdmETn NOdaJIeKy Od MACOTNTe n MacNOTO KORA rotBNTe CO HNB.
- IcnapyBaHaTa KOn Tn NcnyuTa MHOry XeSKOTO MacNo MoXe Da npedN3BnKaaT CNOHTaHo corOpyBaHbe.
- YnOTope6eHToMaCNo, Koe MoKe Da CoOpJN OCTaTOuN Od XpaHa, MoKe Da NpeDn3BnKa NoXap Ha NoHnCKa TemNepaTypa OTKoNky MacNoTO KoE Ce KopnCTn 3a npBnaT.
He ctabajte 3anaanBn npoun3BOOn nI npedmetn KOn ce MOKpn 3aeHNO CO 3anaJINB npoun3BOOn BO anapaTOT, IJI N BO HeROBa 6nN3Ha.
PPEyPENEYBAHbE!
6.1 CaIOBn 3a roTBeHbe

3a INHdYKTNBn PNHJN, CNJHO eNeKTpOMaTHeTHO NOIe ja CO3daBa TOnJIINHaTa BO CAIOBNTe 3a rOTBeHbe MHOry 6p30.
Kopntete Hn HnykTNBHTe pHrnn CO COOBETH caobn 3a rotBehe.
-ДНОТа caOВиTe 3a rotBeHbe Mopa da 6nIe KOJIky wTo MoKe nOde6eNo n nopamHo.
OcnrypeTe ce deKa dHOTo Ha TeHuepeTo e uNcTO n CyBO nped Da rO CTaBnTE Ha NOBpUnHaTa Ha NIOUaT3a rOTBeHe.
3a da ce n36erhat rpe6haTnH, He IIN3rajTe ja uHn He TpujTe ro TeHepeto BP3 KepaMNUKOTO CTAKIO.
MaTepnjAn Ha caObnte 3a rotBeHe
- noroHeN: IneHo JxeJe3O, YeJIHK, emajnpan HyeNK, YeNIK 1to He 'procyBa, NOBeKeecNoJHO dHO (03NaueHO KaKO nOroHOb OI pON3BOdnteJOT).
- HenorodeH: anyMnHym, 6akap, 6poH3a, cTakno. KepaMka, NOpueHaH.
CaIOBNTe 3a rotBeHbe ce norOHN 3a HNDyKTHBHaTaNIOya 3a rotBeHbe aKO:
BODaTa Bpne MHory 6p30 Ha pHrIa NOCTaBeHa Ha HajBnCOKaTa NocTaNka 3a jaUnHa Ha TOnNnHaTa.
MaHET Ce npBneKyBa Ha dHOTo Ha caD0T 3a rOTBeHe.
HMeH3nHa caObnte 3a rotBeHe
- INdYkTNBHNTe pINrnn aBTOMaTcKn ce npnilarOdyBaat Ha dIMeH3NHTe Ha dHOTo Ha caD0T 3a rOTBeHe.
- EФикасоcta Ha pIHrIaTa e noBp3aHa co dInjamETapOT Ha caTOT 3a rOTBeHbe. CaTOT 3a rOTBeHbe co dInjamETap KOJwTo e NOMaI ON MInHMaJIHnO Tdo6NbA cMo DeI od eHeprNiJaTa KoJaTu Ja nCnyuTa pIHrIaTa.
3apaH6e36eHocn npuHHn 3a NOCTINHyBaHbe ONTImaHn pe3yIITaTN OJ ROTBeHbTe, He KOpNCTeTe caOBN 3a ROTBeHbe NOrOJIeMn OJ HabEDeHOTo BO "CneuΦnKaun Ha pIHrIInTe". IV36erHyBajTe Da rN dpxKtte caOBnTe 3a ROTBeHbE Bo 6n3nHa Ha KOHTPOHnHaTa IIOya BO TEKOT Ha RotBeHbTe. Toa MoKe Da BnJae Ha cyHKUHOHPaHbTe HO KaHTPOHnTa IILOua IN HeHaMePHO da Rn BKJyHcHKnTe Ha NOBpUnHaTa 3a ROTBeHbE.

BudTe Bo,Texnukn noDaTou.
6.2 3ByuBo TeKoT Ha pa6oTaTa
Ako cnyuatae:
3ByK Ha NyKaHe: caIOT 3a rotBeHe e HAnpaBEn OJ pa3nUHm MaTepnJaN (ceHDbu KOnCTpyKunja).
3Byk Ha CBnPKaHe: ja KOpNCTnTe pHrIaTa Ha rOleMa jaUnHa n caObIte 3a rotBeHe ce HapBaHeHn Od pa3nUHm MaTePnJaHn (ceHDbuKoHcTpyKuJia).
- SyHeBe: KopnCTnTe BnCOKO eHepreTcKO HnBO.
Knkahe: ce nojabyBa eJekTpnuHo npedeppnyBahe.
- NnWTeHe, 6pmueHe: BeHTnTaTopoT pa60Tu.
3ByuTe Ce HOpMaJIHn N He Ce 3HaK 3a HeNCnpaBHOCT.
6.3 Öko Timer (Ekokoшк Тajмep)
3a 3aCyByBaHe Ha eHeprJna, rpejaOT 3a pHHrIata Ce NCKJyUba npeДа ce orJacn nporpaMaTOpOT 3a O6pojyBaHe. Pa3NIkata BO BpemeTo Ha pa6Ota 3aBnCn Od HNBOTO Ha NOCTaBeHaTa TOnJIHa N DoJxHaTa Ha rotBeHbeto.
KOPINCHNCHKA NOIDPIKAI CEPBNC
YBek Kopuncte opunhaJIne pe3epBHe JeIOBE.
Kada kohtaKTnpate obnaawheHn cepBnCHn ceHTap,BoNTe paUHa da kOd c6be mATE cIeHe noatke: Moden, 6poj npOn3BOda, cepnjckn 6poj.
IopauMory da ce npohny Ha nnouucn ca TexHnUcKm KapaKTepncTKkama.
Uno3opehe/onpe3- nHopmaunje o 6e36eHocTn
① OnuTe HOpMaunje n cabetn
HΦopMaunjeOxNBOThoJcpeINH
3aDpxaHo npaBO n3MeHa.
CAДРЖAJ
- INHΦOPMAUJIJE O B6E3BEdHOCTN 289
- B63BEOCHA YIyTCTBA 292
- INHCTAJINPAHbE 294
- ONIC PPOIN3BOIDA 296
5.CBAKOJHEBHA YIOTPEBA. 298
6.KOPINCHNCABETN 301
- HEGA N YUWTHEHE 303
8.PeWABAHbE PPOBJIEMA 304
- TEXHnUKNIOaUN 305
10.EHEPETCKA EOKACHOCT 306
- EKOJIOUKA NITAHbA 307
1. HOPMAUJJE OBE3BEOHOCTN
Ipe nHcTanaJne i KOpnshHeBa ypehaja, naKbNBO npOuHTajTe npInoXeHo ynyTCTBO. Ipon3Bohau Hnje OndroBopah 3a 6nlo KaKBe NOBpeDe nII nSTeTy Koje cy
pe3yIITaT HeINcnpaBHe INHCTaIauzije IIn yNOTpe6e. CyBaJTe UnyTCTBO 3a yNOTpe6y Ha 6e36eDNOM I npNCTyNaChom MeCTy 3a 6dyhKeopuShHe.
1.1 Be36eHocT deue n ocetJBnBnx oc06a
Obaj ypehaj mory da kopncTe deca ctapnja od 8 roDInHa n Oco6e ca cMaJIbeHIM qn3NcKIM, yJINHM nIIM MeHTaJIHIM Cnooc6HoCTnMa, KAO n oc6e KoJIma HeIOCTajy NCKyCTBO n 3HaJIbe, yKOJIko IM ce obe36eDi Ha3Op IINI m Ce dajy UnyTCTBa y Be3n ca yNoTpe6om ypehaja Ha 6e36eDaH Naun H yKOJIko CXBaTajy moryhe onacHocTn. Deuy MnaHa oD 8 roDInHa, Kao n oc6e ca BeOMa TeWKIM n CLOXeHIM INBaJIndTeTom, Tpe6a dpJkATn daJIbe od ypehaja, OCIM aKO cy IOd CTaJIHIM Ha3OpOM.
-Дeцу Треба КонтPORINCSATи Кадо се He 6и Играла ca ypeнajem.
Држinte сby ambaлajу дajbe od deuceи odnojte je ha odroBapajyн наун.
- yIIO3OPEHbE: NocTapajTe ce da Deca n KyhHi JbYbIMn He 6yDu 6IIN3y ypehaja dOK ypehaj paDi n nn Ce pacxnahyje. DocTyHNi DeIOBn NocTajy BpeJI N TOKOM ynoTpe6e.
- Ako obaj anapatima ypehaj 3a 6e3bendnoct dece,Treba ra akTINBnpaTN.
- Deça He cmejy da obabajy ynišhebe n Koprncnuko odpxaBaBe ypehaja 6e3 na3opa.
1.2 Onstemepe 6e36eHoctn
-УПОЗЕБЕ:Урегajи НBEROBNdoCTUПНДeЛOBN MOry 6NTNВpeJI N TOKOM KOpuShneBa.Tpe6a 6NTN NaJbNB KaKo 6n ce n36eIIO DoIDnPBAHe rpejHnx eIemehata.
-УПОЗРЕHBЕ:Опасно ќе оставьатихрану на гревовпочи за се пжни мacrten плел ульby 6e3 habдзора,Jerр може донdo пожара.
- HNKAДA He nokywaBajTe da noxap yracnte BODom, Beh Hajnpe nckbuynte ypehaj a 3atm npekpnjTe pIamEn, Hnp. POKNONCEM nIIH he6etom.
-УПОЗЕРБЕ:Урehaj He cme Да ce Hanaja pyTeM ekстеруpehajа 3a yKbUyHbAbe Kao wTo je TajМeR HHTI da 6Bye NOBe3aH Ha KOIo KoJe Ce peDoBHO yKbUyJe И NCKbUyJe pyTeM cTpyJe.
How to install your AEG Induction Hob - Worktop installation

4.ОПИС ПОНЗВОДА
4.1 Wema noBpHnHe 3a KyBaHbe

1 INduknoHa 30Ha 3a KyBaHe
2 KomaHdHa Ta6na
5.2 Aytomatcko nckbyuBaHe
ObaФункциjaayTomatckn nckbyuyje nnooy y cnepehnm cnyuajebma:
CBe 30He 3a KyBaHbE cy DeakTnBnpaHe.
Hncte noDecnn CTeneh TOnIote HakoH uTo cTe AKTNBupan nnOuy 3a KyBaHe.
- PocyI nCTe nn CTaBnI HeWTo Ha KOMaHdHy Ta6ny n OCTaBnI ra dyXe od 10 cekyn (nnex, kpy, nTd.).OrnaawBa ce 3ByuHn CnHaJ n NLOa 3a KyBaHbe Ce DeakTNbupa. YKnOHTe ppeMTe nn OuchNTe KOMaHdHy Ta6ny.
Ako npoqa 3a KyBaHbe noCTaHe npeTOnna (Ha npimep, Kaia n3 wepe Ne Ncnapn Cba TeuHoc).Nycntte da ce 30ha 3a KyBaHbe OxlaDi npe HrO uTO pNOHO BO KOpNCNTe PNOuy 3a KyBaHbe.
Ako KopnCTne norpseHNO nocyhe. Cmbof ce ykbuyje n 30ha 3a KyBaBe ce ayTomATCKN DeaKTINBnpa noCne 2 MNHyTa.
Ako nocne odpehjehor BpemeHa He NCKbYuHTe Heky OJ 30Ha 3a KyBaHbe NnN aKO He npomeHnte NOdeWeH CTepe HToJIote. HakoH n3BeCHor BpemeHa ce yKbUyje I IIOya 3a KyBaHbe Ce DeakTINBIPA.
Ondoc n3MeHy cTeNeHa TOnlote INBpeMeHa HAKOH KOr ce IIOUa 3a KyBaHBe DeakTNBupa:
NoeWaaBaHe cTeNeHa TOnlNote
IIOua 3a KyBaHbe ce DeaAKTNBnpa HaKOH

1-3
6 catn
4-75 catn
IopEaBaBe cTene- IIOua 3a KyBaBe ce Ha TOnlOTe EaKTHBnpa HAcOH
8-94 cata
10-14 1,5 catn
5.3 NoidewaBaHe Tonlote
Cnykna noeaaabahe nnn npomehy CTeneha TOnlote:
IodnHHTe KOMaHdHy TpaKy Ha NcnpabHOM CTeneHy TOnlNote Hnn NomepajTe npct DyK KOHTpONHe TpaKe CBe DOK He DoCTNHeTe NCnPabAH CTeneH TOJIOTE.
5.4 Kopnshhebe 30Ha 3a KyBaHe
CTaBnte nocyhe 3a KyBaHbe y cpeDnHy n3a6paHe 30He. INdYkCIOHe 30He 3a KyBaHbe ce ayTOMaTcN npIraOHaBajy dImMeH3NJama DHa nocyhe 3a KyBaHbe.
IcTObPemHo MoKeTe Da KyBaTe y BeNkoj NocyuN 3a KyBaHe Koja je NoCTaBbEHa Ha DBe 3OHe 3a KyBaHe. NocyHe Mopa NOKpNBaTu CEHTpe oBe 3OHe, aNn He CMe Da npEJa3n I3BaH O3HaKe NOBpUInHe. Ako ce NocyHe 3a KyBaHe Hana3n I3MeHy DBA ueHTpa, cyHKuJa Bridge Hehe 6NTn AKTNBnPaHa.

5.5 Bridge

Oba yHKunja He yTnue Ha pa30Ha 3a KyBaHe.
5.9 Nay3npaj
KaJa je cyHKuJa y Toky, cBn octaHcIM6OJIHa KOMaHdHm Ta6JaMa cy 3aKbUaHn.
Oba yHKunja He 3ayctabJa yHKnju Tajmepa.
PnTCHNTe da 6nCTe aKTHBnpaJIn yHKunjy.
ce naHn. CTeEN ToINote je cnuyTeH Ha 1.
Ja 6nCTe DeakTNBnpanu N yHKunjy: npNTnCHnTe lyKbuyje ce npetXoHNOdeWabHe TOnlote.
5.10 KoHTpoJHa 6paBa
MokTe Da 3aKbUyAte KOMaHdHy Ta6ny DOK 30He 3a KyBaHpe paJe. To cnpeuaba CnyujHy npomEny noDeWeHOr CTeneHa TOnlOte.
IpbO noodeCte ctenen tonlote.
Ja 6ncte aKTHBnpaJIN
Функию:ДодирноTe 6e nann Ha 4 cekynde. Tajmep octaje yKbvyeh.
Da 6nCTe neakTNBnpaJn
Функию:Додирнite IpeTXODHO NOdeшени CTeENH TOnnOte ce yKbuyje.

KaJa DeaKTHBnpuTe NIOuy 3a KyBaHBe, TakoHe DeaAKTNbupate N OBy cyHKunjy.
5.11 Ypehaj 3a 6e36eHocT deue
Oba yHKnja cnpeayaba cnyajHo KopuShneIe nloye 3a KyBaHe.
Ja 6ncte aKTHBnpaJn fynHkunjy:
akTNBnpaJTe nloy 3a KyBaHe nomohy ① He noDeWabajTe HnjeDaH cTeen TOnnoTe. DOnnPHnTe Ha 4 cekyHne. nojabByje. DeakTNBnpaJTe nlovy 3a KyBaHe nomohy ①
Ja 6ncte deaktnBnpa nn yHKunjy:
akTNBnpajTe nIOuy 3a KyBaHe nomohy ① He noDeWabajTe HJeDaH CTeneH TOnlNote.
IodnnpHnTe Ha 4 cekyHne.
nojabbyje. DeaktnBnpajTe nNooy 3a KyBaHbe nomohy
Ja 6nCTe DeaKTHBnPaJn FyHKunjy cMo 3a jean nyT: aKTHBnpajTe nNooy 3a KyBaHe ca 1ce nojaBbyje. DOnpHnTe Ha4 ceKyHne. y pOky od 10 cekynn noDecnte TonnoTy. MoKeTe Da KopncTne nNooy 3a KyBaHe. KaJa DeaKTHBnpaTe nNooy 3a KyBaBe ca cyHKunja noHOBO paN.
5.12 OffSound Control (ДeakTNBnpaHbe n aKTHBnpaHbe 3ByuHnx cnHaJa)
DeaktnBnpaJTe nnoy 3a KyBaHe.
DopnTe Ha 3 cekHne. Dncnpej ce
nojabByje n Hectaje. DOpnpHTe Ha 3
cekyHne. NojabByje ce nn .
Do npHTe Ha Tajmepy da 6nCTe
n3a6pann jeNO od cneheher:
-3ByuCyNCKbUyeHn
- -BbUc cy yKbUyeHn Da 6nCTe IOTBpDnIu36Op cauekajTe DOK ce nOoHa 3a KyBaHe He DeaKTNBnpa ayTomatckn.
KaJa je cyHKunja noctabbeHa ha MoKTe 3Byk jeDInHO KaJa:
-ДODINPHETe ①
Tajmep ce cnyuTa
Tajmep 3a o6pojaBaHe BpeMeHa ce cnyuTa
CTaBnTe HeITo Ha KOMaHdHy Ta6Ny.
5.13 YnpaBbaIbe noTpoShbOM
Ako je akTnBHO HeKoJINo 3OHa, a yKynHa Chara npeHe orpaHnueHe NtPoUHbe, Oba cyHKuJa he pacnoJeNTn pacNOJxNBy eNeKTpUHy eHepnju Ha cBe 30He 3a
KyBaIbe. IIOva 3a KyBaIbe peryIuIe IIOdeIaBaHaToTnOte KaKo 6n 3aUHTnIa OcHrypaue y KYHOJ INCTaIauNJ.
30he 3a KyBaIbe cy rpynicaHe npema Iokaunu n 6pojy f3a y nloyn 3a KyBaIbe.Cbaka f3a nMa MaKcImaJIHo eKeKtpnHOn ONTepehHe oD (3700 W). Ako nloya 3a KyBaIbe DoCTnHRe MaKcImaJIHy paCNOJoxNBy cHary 3a jeJHy f3y, Chara 3oHa 3a KyBaIbe he ce ayTomatCKn CmAHHTN.
- YBek he npnopntet 6nTu nOdeuBaBe TOnIote NocJeHbe n3a6paHe 3oHe 3a KyBaHbe. IpeocTana eJekTpUHa eHeprJa 6nHe pacNoeJbEHa Ha IpeTXoJHO AKTNBUnpaHe 3oHe 3a KyBaHbe. O6pHyTm peDcneDom HuxOBor AKTNBUnpaHa.
- POneWaaBaBe TOnIOTe peDyKOBaHux 3OHa MeBa Ce N3MeHy NoeTHo Oda6paHOr n CmaHbeHor NOpEwaBaHa TOnJIOTE.
CauekajTe DOK dinCnJIe npctaHe da TpeHne nIN CmaHbIte NOdeWabHe TOJIOte NocJeBHe N3a6paHe 3OHe 3a KyBaHe. 3OHe 3a KyBaHe he HacTaBHTn Da paDe y3 CmaHbeHO NOdeWabHe TOJIOte. IIO NOTpe6n pyHNO npomEnTe NOdeWabHe TOJIOte 3OHa 3a KyBaHe.
IorpeJaTe Ha cInuMoryhe KombnaJe
pacnoJe eKeKtpnHe eHeprJMeHy
30HaMa 3a KyBaHe.
6. KOPINCHN CABETN

YN03OPEHBe!
Iorneajte nornaBba o 6e36eHocTn.
6.1 Nocyhe

Jako eIeKtpomarHeTHO noBe y INduknoHm 3oHaMa 3a KyBaHe BpNo 6p30 CTbapa TOnlOTy y nocyhy 3a KyBaHe.
Kopnstte HndyKunoHe 30He 3a KyBaBe y KombHauncaJn ca odroBapajyHm nocyHem 3a KyBaBe.
-Дно посуна 3a Куваье мора да буде Deбени n StTo je мoryhoe paBnije.
OcnrypajTe da cydohe noBpuHne nocya uNCTe n cyBe ppe Hero wTO nx CTaBNTe Ha NOBpuHny PIOue.
-Дабисте спpeчлн Habcaнak orpe6OTnHa, He npeBnaHTe H He TpIbajTe wepy npeKo KepaMnKOr cTaKna.
MaTepnjAn 3a KyBaHbe
- NcnpaBHO: JINBeHO rBOXHe, YeJIHK, emajnnpaHn YeJIHK, HEPJajyHn YeJIHK, nocyHe ca BNIWeCNoJHm dHOM (ca NcnpaBHOM 03HaKOM pON3BOHa).
HeNCppaBHO:anyMnHjym,6aKap, MeCNrCTaKnO,KepaMnKa,NOpceHaN.
Nocyhe je noroJHO 3a INduknoHy nNoCy 3a KyBaHbe aKO:
BODa 6p30 npOKbUya Ha 3OHN 3a KyBaHBe Koja je NOpeSeHa Ha HajBnUn HNBO TOnlOTE.
-Дно nocyha npuBnaqun MaHHeT.
ДиMuH3nje nocyha 3a KyBaHbe
-Индукционо 3онe 3a KyBa№ ce ayTomatcKn npinarohabajy dImeH3nju nДHa nocyha 3a KyBa№.
- EФикасоCT 3оHe 3a KyBa№ je Be3aHa 3a npeunK nocyha 3a KyBa№. Nocyhe 3a KyBa№ YnJi je npeunK MaHbN Od MInHmAlHOr npIma cAmO Deo eHeprNiJe KoJy reHepnIe 3OHa 3a KyBa№.
PaN6e36eHOCnI ONTmAlnHex pe3yNTaTa KyBaHa He KopnCTnte nocyhe 3a KyBaHe Koje je Behe od nocyha HabedeHOr y „CneuФиKaunjaama 30Ha 3a kyBaHBe". IV36erabajTe da nocyhe 3a
KyBaHBe DpXnTe 6n3y KOMaHdHe Ta6Je TOKOM KyBaHa. OBO MOKe Da yTnue Ha YHKUHOHaNHOCT KOMaHdHe Ta6Je IIN Da CnyajHo aKTtBnpa YHKuJe PNOe 3a KyBaHBe.

IornejaTe oJeBaK ,TexHnUKN noDaun".
How to install your AEG Induction Hob - Worktop installation
4. POPIS VYROBKU
4.1 Rozlozenie varnej plochy

1 Indukcná varná zona
2 Ovladaci panel
4.2 Rozvrhnutie ovladacieho panela

How to install your AEG Motion Hob - Worktop installation

4. OPIS IZDELKA
How to install your AEG Induction Hob - Worktop installation

4. DESCRIPCION DEL PRODUCTO
How to install your AEG
Induction Hob - Worktop installation

4.PRODUKTBESKRIVNING
4.1 Hällens layout
1 Induktionskokzon
2 Kontrollpanel

