
KX1682 - Heat gun BLACK & DECKER - Free user manual and instructions
Find the device manual for free KX1682 BLACK & DECKER in PDF.
| Product Type | Heat Gun |
| Brand | Black & Decker |
| Model | KX1682 |
| Power | 1600 W |
| Adjustable Temperature | Position 1: 140 °C, Position 2: 380 °C |
| Cable Length | 3 m |
| Power Supply | 230 V ~ 50 Hz |
| Double Insulation | Yes |
| Weight | 0.8 kg (estimated) |
| Stand for independent use | Yes |
| Hanging ring | Yes |
| Scraper included | Yes (scraper blade) |
| Glass protection nozzle | Optional accessory (A9883) |
| Sound pressure level | 68 dB(A) |
| Sound power level | 81 dB(A) |
| Hand-arm vibration | < 2.5 m/s² |
| Warranty | 2 years |
| Maintenance and cleaning | Use a damp cloth with mild soap; do not immerse |
| Safety | Double insulation, automatic cooling (tip-over), do not block air intakes |
| Main uses | Paint stripping, defrosting, plastic welding, drying, etc. |
Frequently Asked Questions - KX1682 BLACK & DECKER
User questions about KX1682 BLACK & DECKER
0 question about this device. Answer the ones you know or ask your own.
Ask a new question about this device
Download the instructions for your Heat gun in PDF format for free! Find your manual KX1682 - BLACK & DECKER and take your electronic device back in hand. On this page are published all the documents necessary for the use of your device. KX1682 by BLACK & DECKER.
USER MANUAL KX1682 BLACK & DECKER
On the purchase of your Black & Decker product.
To ensure the best results from your power tool please read these safety and usage instructions carefully. If you have any questions or queries after reading this user manual please do not hesitate to call our Service and Information Centre, whose number you will find towards the back of this user manual, or one of our Authorised Repair Agents. A list of these Agents and further information is available on the Internet at www.2helpU.com.
ESPNOL
JENHORABUENA!
TITLE: DRIFT I HVILESTILLING
Brian Cooke - Director of Engineering Black & Decker Ltd, Spennymoor, County Durham DL16 6JG, United Kingdom
AHΩΣH ΣYMMPΦΩΣH ΘE K
Ynueuva 8nawoue o1 ouokuec:
CD700,KX1600,KX1682,KX1683 oumuoppouvtai npoc tic diataeic 89/392/EOK,89/336/EOK,EN55014, 73/23/EOK,EN61000,EN60355,EN55104,EN60555 Tia kataaetpnuev nieo n xou 68dB (A) Tia kataaetpnuev ioxc n xou 81dB (A) Kataeptpono dovnncxepiou/bpaxiova < 2.5m / s^2

Warning! When using electric tools, the following basic safety precautions should always be taken to reduce the risk of fire, electric shock and personal injury. Read all these instructions before attempting to operate the product and save this booklet.
For safe operation:
- Keep the work area clean. Cluttered areas and benches invite injuries.
- Consider the work area environment. Do not expose the power tool to rain and do not use in damp or wet locations. Keep the work area well lit. Do not use the power tool where there is a risk to cause fire or explosion.
- Guard against electric shock. Avoid body contact, where possible, with earthed or grounded surfaces (e.g. pipes, radiators, ranges and refrigerators).
- Keep children away. Do not let visitors touch the tool or extension cord. All visitors should be kept away from the work area.
- Store idle tools. When not in use, tools should be stored in a dry, high or locked place, out of reach of children.
- Do not force the tool. It will do the job better and more safely at the rate for which it was intended.
- Use the right tool. Do not force small tools or attachments to do the job of a heavy duty tool. Do not use the tool for purposes not intended; for example, do not use a circular saw to cut tree limbs or logs.
- Dress properly. Do not wear loose clothing or jewellery as they can be caught in moving parts. Rubber gloves and non-skid footwear are recommended when working outdoors. Wear protective hair covering to contain long hair.
- Use safety glasses. Use a face or dust mask as well, if the operation is dusty or if the tool is being used in enclosed spaces.
- Connecting dust extraction equipment. If devices are provided for the connection of dust extraction and collection ensure these are connected and properly used, especially in confined areas.
- Do not abuse the cord. Never carry the tool by its cord or yank it to disconnect it from the socket. Keep the cord away from heat, oil and sharp edges.
- Secure the work. Use clamps or a vice to hold the work. It is safer than using a hand and it frees both hands to operate the tool.
-
Do not overreach. Keep proper footing and balance at all times.
-
Maintain the tool with care. Keep a cutting tool sharp and clean for better and safer performance. Follow the instructions for lubricating and changing accessories. Inspect the tools cord periodically and, if damaged, have repaired by an authorised service facility. Inspect the extension cord periodically and replace if damaged. Keep the handles dry, clean and free from oil and grease.
- Disconnect the tool when not in use, before servicing and when changing accessories such as blades, bits and cutters.
- Remove adjusting keys and wrenches. Form the habit of checking to see that keys and adjusting wrenches are removed from the tool and replaced in the storage area before switching on.
- Avoid unintentional starting. Do not carry a plugged-in tool with a finger on the switch. Ensure the switch is off when plugging in.
- Use an outdoor extension cord. When a tool is used outdoors, only use an extension cord intended for outdoor use and so marked.
- Stay alert. Watch what you are doing, use common sense and do not operate the tool when tired.
- Check damaged parts. Before further use of the tool, a guard or other part that is damaged should be carefully checked to determine whether it will operate properly and perform its intended function. Check for alignment of moving parts, free running of moving parts, breakage of parts, mounting and any other conditions that may affect its operation. A guard or other part that is damaged should be properly repaired or replaced by an authorised service agent unless otherwise indicated in the product booklet. Have defective switches replaced by an authorised service agent. Do not use the tool if the switch does not turn it on and off.
- Warning! The use of any accessory or attachment, other than recommended in the product booklet, may present a risk of personal injury.
- Have the tool repaired by a qualified person. The electrical tool is in accordance with the relevant safety requirements. Repairs should only be carried out by qualified persons using original spare parts, otherwise, this may result in considerable danger to the user.
ADDITIONAL SAFETY INSTRUCTIONS FOR HEATGUNS
- Always switch off before putting tool down.
- Extreme care should be taken when stripping paint, the peelings, residue and vapours of paint may contain lead, which is poisonous. Any pre -1960
ENGLISH
buildings may have been painted in the past with paint containing lead and covered by additional layers of paint. Once deposited on surfaces, hand to mouth contact can result in the ingestion of lead. Exposures to even low levels of lead can cause irreversible brain and nervous system damage; young and unborn children are particularly vulnerable. Do not smoke, eat or drink in a work area that could or may be contaminated by lead. Lead based paints should only be removed by a professional and should not be removed using a heatgun.
- When removing paints you should ensure that your work area is enclosed. It is advisable to wear a dust mask.
- Do not burn the paint. Use the integral scraper where supplied otherwise keep the nozzle at least 25mm (1") from the surface as this keeps the temperature below the required 450^ . If you are scraping from a vertical position then you should scrape downwards to prevent the paint from falling back into the heatgun and burning. Dispose of all paint debris safely and ensure that the work area is thoroughly cleaned after completing the job.
- Do not use in a damp atmosphere or where flammable gases may be present or use near combustible materials. Spaces behind boards, ceilings and floors and wall cavities in timber frame constructed houses can contain flammable materials. Check before using the heatgun.
- Allow the tool to cool fully before storing.
- Ensure adequate ventilation when using heatguns as toxic fumes may be produced.
- Do not use as a hairdryer! The air temperature is far higher than a hairdryer.
- Do not obstruct either the air intake or nozzle outlet as this may cause excessive heat build up resulting in damage to the tool.
- Do not direct the hot air blast at other people.
- Do not touch the metal nozzle as it gets very hot during use and remains hot for up to 30 minutes after use.
- Do not place the nozzle against anything while using or immediately after use.
- Do not poke anything down the nozzle as it could give you an electric shock. Do not look down the nozzle while the unit is working because of the high temperatures being produced.
- Do not allow paint to adhere to the nozzle or scraper as it could ignite after a time.
- Do not operate your heatgun whilst it is hanging by the hanging ring.
Save these instructions!
DOUBLE INSULATION
The tool is double insulated. This means that all the external metal parts are electrically insulated from the mains power supply. This is done by placing insulation barriers between the electrical and mechanical components making it unnecessary for the tool to be earthed. Note: Double insulation does not take the place of normal safety precautions when operating the tool. The insulation system is for added protection against injury resulting from a possible electrical insulation failure within the tool.
ELECTRICAL SAFETY
Be sure the supply is the same as the voltage given on the rating plate. The tool is fitted with a two-core cable and plug.
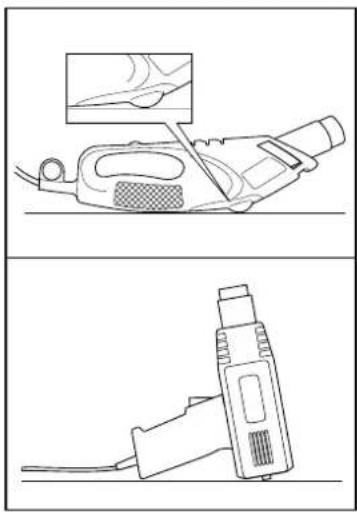
MAINS PLUG REPLACEMENT (UK ONLY)
Should the mains plug need replacing and you are competent to do this, proceed as instructed below. If you are in doubt, contact a Black & Decker service agent or a qualified electrician.
- Disconnect the plug from the power supply.
- Cut off the plug and dispose of safely. A plug with bared copper conductors is very dangerous if engaged in a live socket outlet.
Only fit BS1363A approved plugs fitted with the correctly rated fuse. Note: Fuses do not give personal protection against electric shock. - The cable wire colours, or a letter, will be marked at the connection point of most good quality plugs. Attach the wires to their respective points in the plug (see diagram). Brown is L (live) and blue is N (neutral).
- Before replacing the top cover of the plug ensure that the cable restraint is holding the outer sheath of
ENGLISH
the cable firmly and that the two leads are correctly fixed at the terminal screws. If the fuse cover is missing or damaged do not use the plug.
For replacement or detachable fuse covers, contact a Black & Decker service agent.
Warning! Never connect live or neutral wires to the earth pin marked E or
MAINS PLUG REPLACEMENT
(AUSTRALIA AND NEW ZEALAND ONLY)
Should the mains plug or cordset of the product be damaged, it must only be replaced by an authorised Black & Decker service agent because special purpose tools are required.
EXTENSION CABLES
Up to 30m (100ft) of 3-core extension cable can be used without undue loss of power.
Note: An extension cable should not be used unless absolutely necessary. Use of an improper extension cable could result in a risk of fire and electric shock. If an extension cable must be used, make sure it is properly wired, contains the correct rated fuse as recommended in its literature and is in good electrical condition.
UNWANTED TOOLS AND THE ENVIRONMENT

Should you find one day that the tool needs replacement or is of no further use, think of the protection of the environment. Black & Decker service agents will accept old tools and will dispose of them in an environmentally safe way.
THE BLACK & DECKER GUARANTEE
(UK, AUSTRALIA AND NEW ZEALAND ONLY)
If the Black & Decker product becomes defective due to faulty materials and workmanship, within 24 months from the date of purchase, we guarantee to either replace all defective parts or at our discretion, replace the unit free of charge provided that:
The product is returned to us or our authorised repairers with evidence of date of purchase.
- The product has not been used for trade, professional or hire purposes.
The product has not been subjected to misuse or neglect.
- The product has not sustained any damage through foreign objects, substances or accidents.
- Repairs have not been attempted by anyone other than our authorised repair distributors.
This guarantee is offered as an extra benefit and is additional to the customers statutory rights.
AFTER SALES SERVICE FOR YOUR BLACK & DECKER PRODUCT (UK, AUSTRALIA AND NEW ZEALAND ONLY)
It is our aim that all Black & Decker customers should be totally satisfied with their Black & Decker product and after sales service.
Black & Decker offers a nationwide network of authorised service agents to give help and advice. The use of other than genuine Black & Decker accessories and parts may damage or reduce the performance of your Black & Decker product and may also endanger the user. The terms and conditions of the warranty may also be effected.
ACCESSIONS
The performance of any power tool is dependant upon the accessory used. Black & Decker accessories are engineered to high quality standards and are designed to enhance the performance of your tool. Buying a Black & Decker accessory will ensure that you get the very best from your Black & Decker tool.
TECHNICAL DATA
The level of sound pressure of the tool is in accordance with EEC legislation. It is recommended that you take appropriate measures for the protection of your hearing if the sound level seems uncomfortable. This normally equates to a sound pressure in excess of 85dB (A).
CD700 KX1600 KX1682 KX1683
| Power | 1400W | 1400W | 1600W | 1600W | |
| Cable length | 2m | 3m | 3m | ||
| Switch position 1 | 550°C | 550°C | 140°C | 140°C | |
| Switch position 2 | -- 560°C | 380°C | |||
| Switch position 3 | - | - | - | 5 | 6 |
Note: This user manual also covers more than one catalogue number within this product group. Refer to your carton for details of your product.
Your product includes some or all of these features.
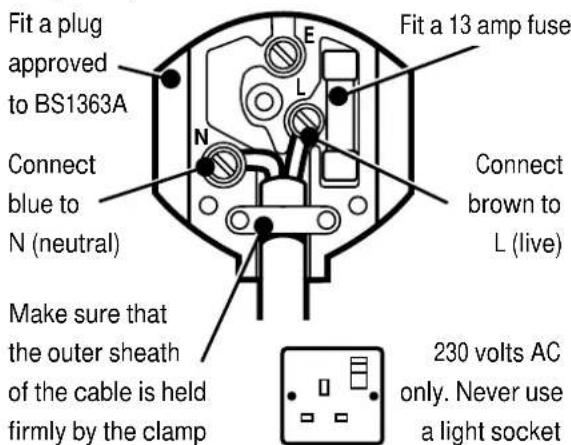
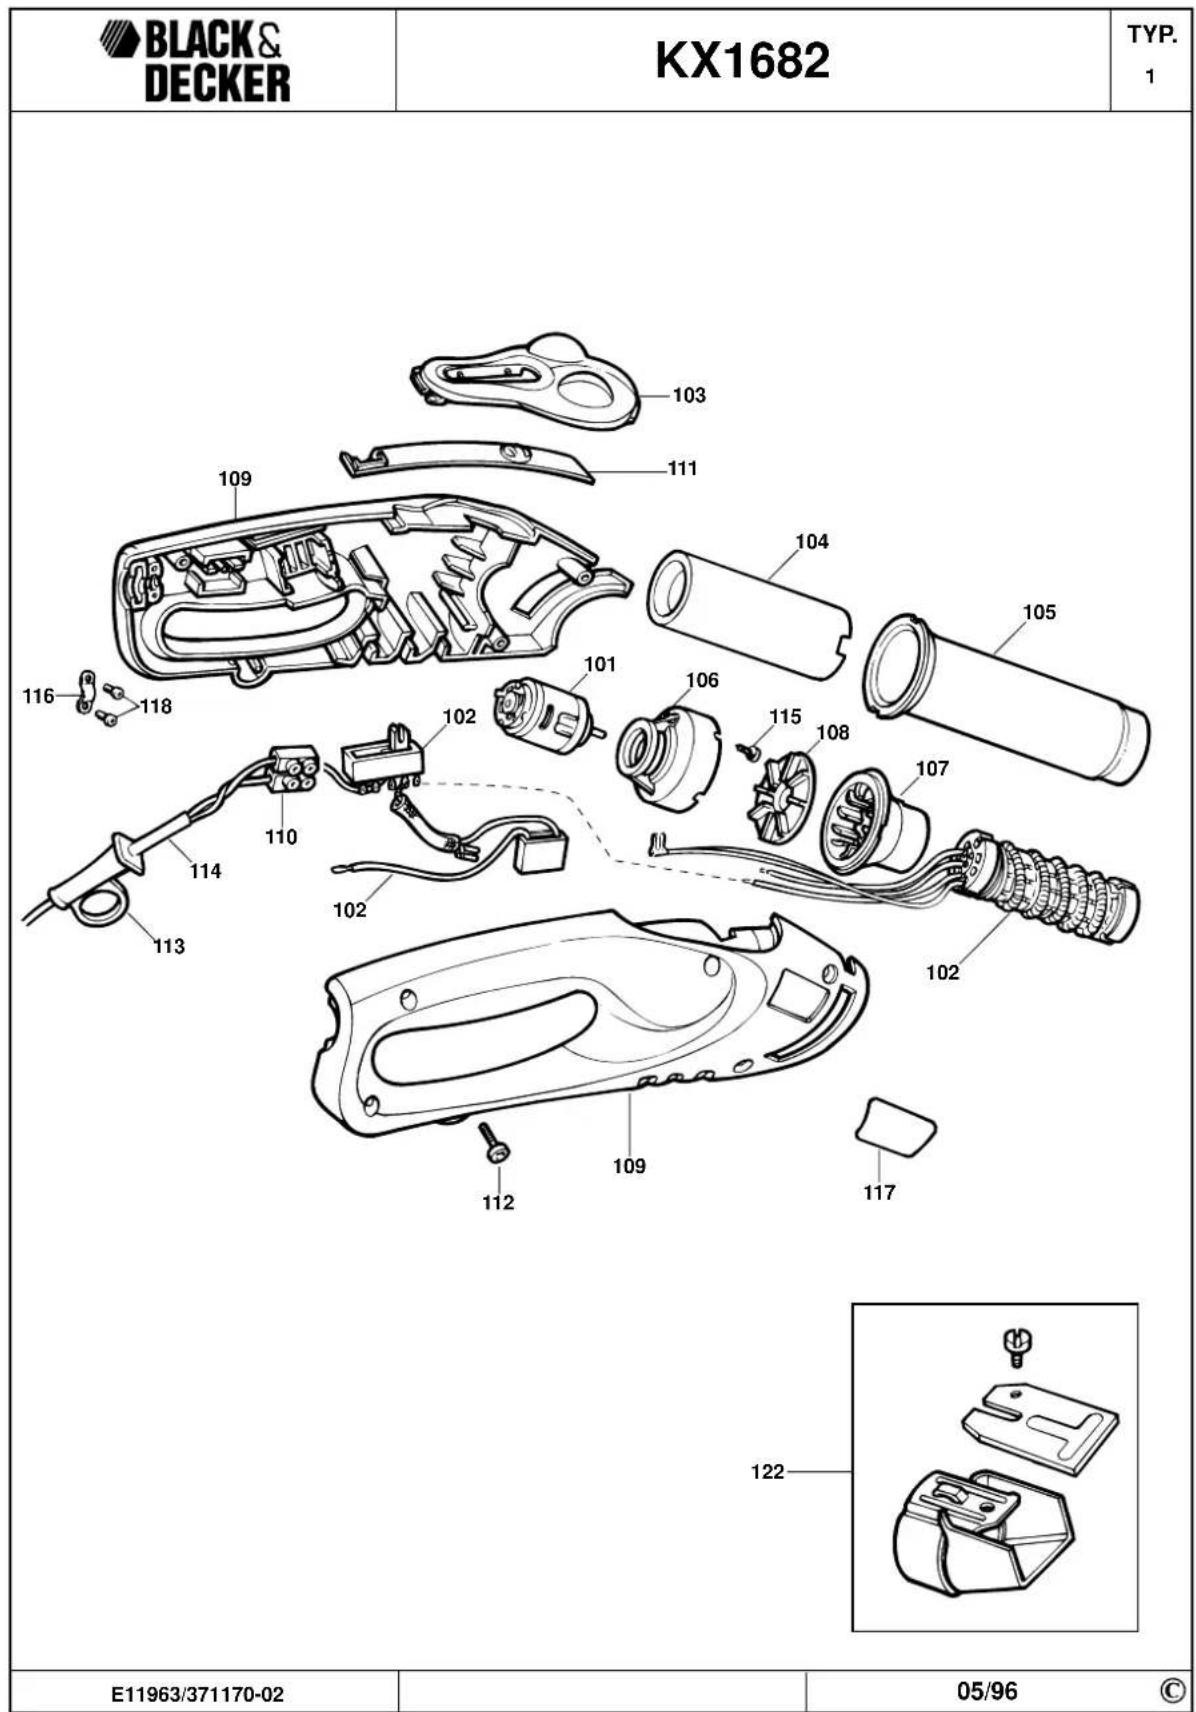
FEATURES
- Nozzle
- On/off heat setting switch
- Air inlet holes
- Stands
- Hanging ring
ENGLISH
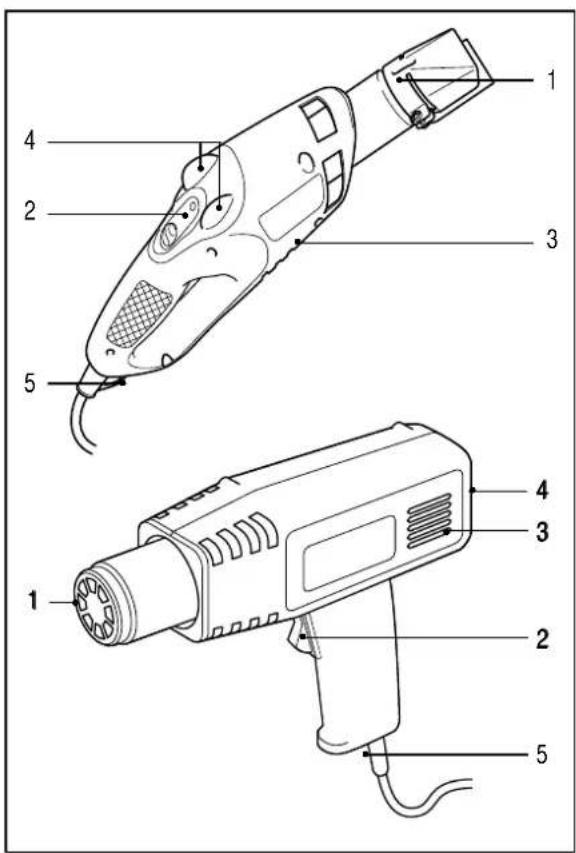
HANDLING YOUR HEATGUN
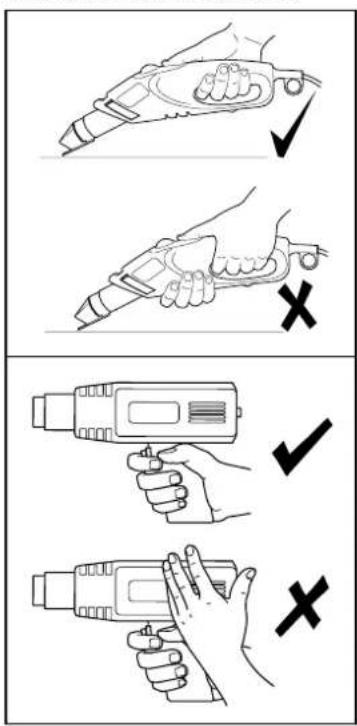
Do not place your hand over the air vents or block these vents in any way. This restricts the airflow through the element and causes over heating. Your heatgun is designed for one-handed use.
KX1682, KX1683 only:
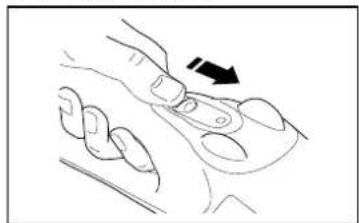
To turn your heatgun on, push the orange switch (2) forward to the 1, 2 or 3 position (position 3 is on KX1683 only). The
position numbers represent the heat numbers described in the table above. To switch your heatgun off, pull the orange switch back to reveal the off (O) position.
CD700, KX1600 only:
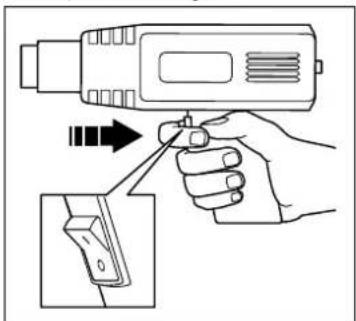
To switch your heatgun on, press the rocker switch to depress the 'I' position. To switch your heatgun off, press the rocker switch to depress the 'O' position.
Note: Allow the element to heat up for a few seconds before use. Initially, some smoke may emit from your heatgun. This is normal and will soon cease.
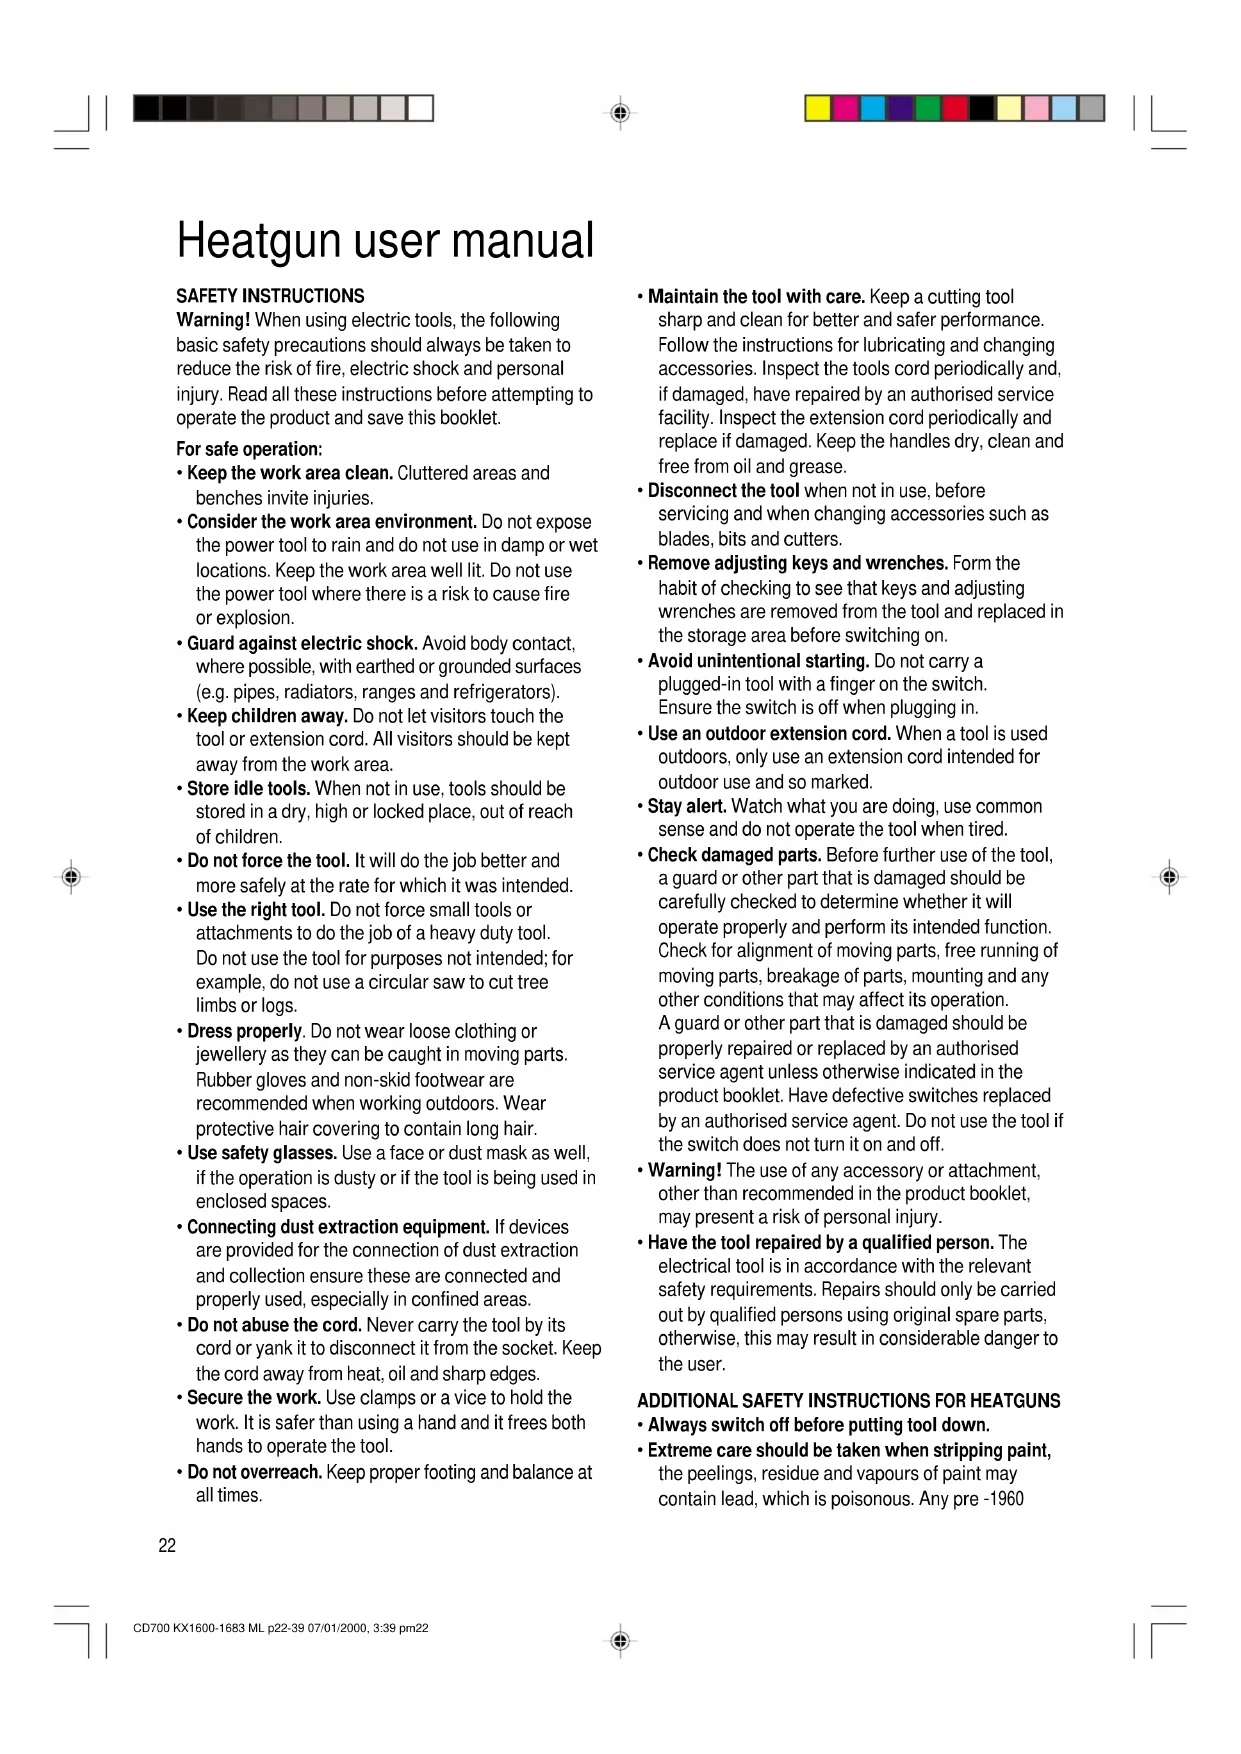
COOLING DOWN
In use, the nozzle of your heatgun becomes extremely hot. Great care is necessary when cooling your heatgun after use.
KX1682, KX1683 only:
To speed up the cooling time, set the orange switch to heat setting 1 for a few minutes before switching your heatgun off.
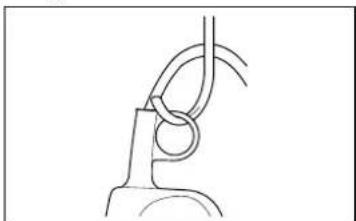
Only after switching off, suspend your heatgun on the handing ring (5) or stand the tool as in "Hands free
use". Leave to cool for at least 30 minutes.
KX1682, KX1683 only:
A rollover feature prevents your heatgun being placed nozzle down, thus preventing damage to the surface on which your heatgun is placed.
HANDS FREE USE
Your heatgun is also designed for operation while
ENGLISH
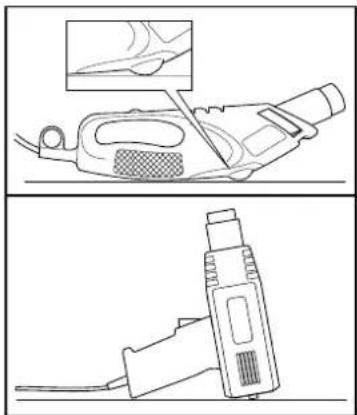
placed on the
stands (4). Always
point your
heatgun away
from you. Secure
the cable to
prevent pulling
your heatgun off
the stand.Do not
touch the nozzle and ensure that nothing is dropped into the
nozzle. Carefully switch off your heatgun and then allow it to cool (see cooling down procedure).
FITTING THE SCRAPER (KX1682, KX1683)
Ensure your heatgun is cool.
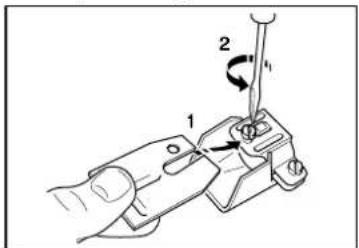
Align the slot of the scraper blade with the protrusion on the blade holder and position under the retaining screw.
Note: Ensure the hole in the scraper is to the left of the screw in the blade holder.
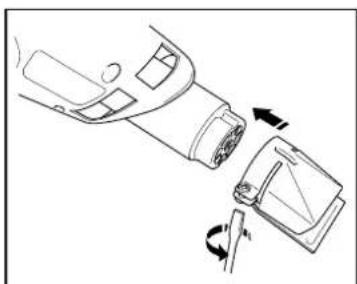
Tighten the retaining screw. Place the blade holder over the nozzle outlet. Ensure it is aligned. The small bump on the inside of the blade
holder engages with the recess on the nozzle. Tighten the blade holder clamp screw.
PAINT STRIPPING
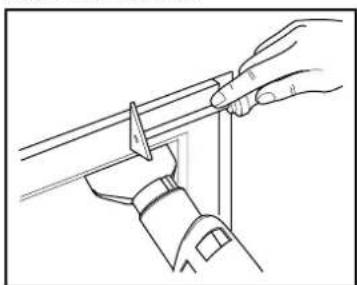
When stripping a point next to glass, it is necessary to protect the glass from the heat. A Black & Decker glass protector nozzle is used for
this purpose (available as an accessory). Your heatgun
is not suitable for stripping metal framed windows. This is because the heat from the heatgun is conducted through the metal and can crack the glass. Scrape with the grain of the wood wherever possible. Do not linger on one spot for too long as the surface may char or ignite.
KX1682, KX1683 only:
Your heatgun is designed for use with the scraper blade to strip paint. Proceed as follows:
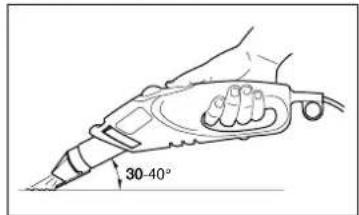
Ensure the nozzle is cool and fit the scraper blade. Hold your heatgun with the scraper blade in contact with the surface
at an angle of 30 - 40^
When the paint softens, scrape firmly. Experiment to establish the length of time necessary to apply the heat to obtain optimum results. Scrape the softened paint immediately or it will harden again.
Take care to prevent paint and debris collecting on the scraper because it may ignite. Carefully clean the scraper blade with a knife should any build up occur. When scraping vertical surfaces, scrape downwards to prevent debris falling into the nozzle.
Note: When stripping a point next to glass, use a glass protector nozzle instead of the scraper blade - a manual scraper is needed to scrape off the paint.
CD700, KX1600 only:
Your heatgun is designed to soften paint and laquer enabling it to be removed using a good quality hand scraper.
Proceed as follows:
Direct the hot air onto the area to be removed. When the paint softens, scrape firmly. Experiment to establish the length of time necessary to apply the heat to obtain optimum results. Scrape the softened paint immediately or it will harden again.
OTHER USES FOR YOUR HEATGUN
On low heat (KX1682, KX1683):
- Drying paint and varnish.
- Removing stickers and decorations.
Waxing and dewaxing (eg. ski's). - Drying wet timber prior to filling.
- Shrinking PVC wrapping and insulation tubes.
- Thawing frozen pipes.
ENGLISH
On medium heat (KX1683):
Welding plastics.
- Bending plastic pipes and sheets.
- Loosening rusted or tightly fastened nuts and metal screws.
On high heat (CD700, KX1600, KX1682, KX1683):
- Removal of paints and lacquers.
Starting barbecues. - Soldering plumbing joints.
ACCESSIONS
A9883 Glass protector
A9884 Spoon reflector
A9887 Cone nozzle
A9881 Fish tail
A9890 Kit which includes all of the above
CLEANING
Use only mild soap and a slightly damp cloth to clean your heatgun. Many household cleaners contain chemicals which could seriously damage the plastic. Also, do not use petrol, turpentine, lacquer or paint thinners or similar products. Never let any liquid get inside the tool and never immerse any part of the tool into liquid.
EC DECLARATION OF CONFORMITY
We declare that units: CD700, KX1600, KX1682, KX1683 conform to 89/392/EEC, 89/336/EEC, EN55014, 73/23/EEC, EN60555, EN55104, EN60355, EN61000 A weighted sound pressure 68dB (A) A weighted sound power 81dB (A) Hand/arm weighted vibration < 2.5m / s^2

Brian Cooke - Director of Engineering
Black & Decker Ltd, Spennymoor, County Durham
DL16 6JG United Kingdom
The Black & Decker policy is one of continuous improvement to our product and as such we reserve the right to change the product specification without prior notice.
89/392/CEE, 89/336/CEE, EN55014, 73/23/CEE
Black & Decker Ltd, Spennymoor, County Durham,
DL16 6JG, RU
KX1682, KX1683subsection:
CD700,KX1600,KX1682,KX1683
dont conformes aux 89/392/EEC, 89/336/EEC, EN55014,
73/23/EEC, EN61000, EN60355, EN55104, EN60555
Black & Decker, Spennymoor, Co Durham DL16 6JG UK
CD700,KX1600,KX1682,KX1683
sono conformi a 89/392/EEC, 89/336/EEC, EN55014, 73/23/EEC, EN61000, EN60355, EN55104, EN60555
Brian Cooke - Director of Engineering
Black & Decker Ltd, Spennymoor, County Durham
DL16 6JG, United Kingdom
Black & Decker Ltd, Spennymoor, Co. Durham DL16 6JG, United Kingdom
CD700,KX1600,KX1682,KX1683
er overens med 89/392/EEC, 89/336/EEC, EN55014,
73/23/EEC,EN61000,EN60355,EN55104,EN60555
Brian Cooke - Director of Engineering
Black & Decker Ltd, Spennymoor, County Durham
DL16 6JG, United Kingdom
Manual do utiliser de pistola de ar quente
INSTRUÇÖS DE SEGURANCA
CD700,KX1600,KX1682,KX1683
ovat 89/392/EEC, 89/336/EEC, EN55014, 73/23/EEC,
EN61000, EN60355, EN55104, EN60555 mukaiset
Mitattu melupaine 68dB (A)
Brian Cooke - Director of Engineering
Black & Decker Ltd, Spennymoor, County Durham
DL16 6JG, United Kingdom
Bruksanvisning for varmluftspistol
SAKERHETSINSTRUKTIONER
Brian Cooke - Director of Engineering
Black & Decker Ltd, Spennymoor, County Durham
DL16 6JG, United Kingdo
| BLACK& DECKER® | CD700 KX1600 | TYP. 2 | |
| 104 105 106 115 108 107 102 118 119 120 113 114 109 108 107 102 118 119 120 113 114 109 108 107 102 118 119 120 113 114 109 108 107 102 118 119 120 112 113 114 109 108 107 102 118 119 120 113 114 109 108 107 102 118 119 120 113 114 109 108 107 102 11 12 | |||
| E11969 / 373032 | 05 / 96 | ||


Part no:373340-38 2/99.2


nName/Naam/Navn/Nome/Nimi/Namn: machinecadeau?/Er maskinen en gave?/ Recebeu esta ferramenta como presente?/ Onko kone lahja?/Ar maskinen en gava? /Ja/Ja/Nau/Yes/Si/Oui/Si/Ja/Ja/Sim/ Kylla/Ja
Adresse/Adresse/ 1 Address/ Direcction/Adresse/Indirizzo/Adres/Adresse/ Morada/Osoite/Adress: Nej/Nein/Ox/u/No/No/No/No/Neo/Nei/ Nao/Ei/Nej Hvor meget kostede maskinen?/Was war der Preis dieeses Werkzeuges/?Piou eiva n tum Tou epyaieiou autou?/What was the price of this tool?Cual fue el preco de esta herrmienta/?Prix paye/?Quanto ha pagato Anything to do pris van dit produkt?Hvor meget kostet maskinen?/Que preco pagou por esta ferramenta?Paljonko cone maksoi?Hur myket kostade maskinen? Forhandler adress/Handleradress/Aicuovon avtupooounl/Address of dealer/Direcnion del detallista/Cachet du revendeur/Indirizzo del rivenditore/Dealerres/Forhandlers adress/Morada do revendedor/Jalleenmyj an osoite/Aterforsajarens adress: CD700 Cat.no.KX16
Part no:373340-38 2/99.2
Por favor, recorte esta parte, colocque-a num envelope selado
endereço e envie-o logo après a compra do seu produto pa.
o endereço da Black & Decker do seu pais.
Leikkaia ir tami osa, laita se oheisen kuroen ja postta
kuori yi alevaan paikalliseen Black & Decker osoitteeseen.
Var vänlug klipp urenna del. Skriv Ditt namn och adress pa.
et frankerat kuvert, och sind det genest till Black & Deckers
adress i Ditt land (se oven).
| Denmark i dt land. Deutsch Bitti schreiben Sie diesen Abschmitt ab, steken他们在 einen frankierten Unschlag und schicken im direkten die Black & Decker Adress Ires Landes. Eahvika Noopakoda koure autro to koulart kal toxuyipounote to aquiocu tera tvayopa tou tpoovtoroo goo orny Steubuvon Trio Black & Decker orny eXiaodja (Bxiac ravao). English Please complete this section immediately after the purchase of your product and post it to the Black & Decker address in your country (above). If you live in Australia or New Zealand, please register by using the alternative guarantee card supplied. Español Despues de haber comprado su ferramenta envieasted por favor, esta tarjeta a la central de Black & Decker en su pais. Fronçais Découpez cette partie et envoyez-la sous enveloppe timbrée à etter frankerat kuvert, och sand det genast till Black & Deckers ceci immediattement aprèsVote. |
. GARANTI KORT. GARANTIEKARTE. KAPTA EFTVHZ2. GUARANTEE CARD. TARJETA DE GARANTIA. CARTAO DE GARNTIA. TAKUKORTI. GARANTBEVIS


- On the purchase of your Black & Decker product.
- ESPNOL
- JENHORABUENA!
- TITLE: DRIFT I HVILESTILLING
- AHΩΣH ΣYMMPΦΩΣH ΘE K
- For safe operation:
- ADDITIONAL SAFETY INSTRUCTIONS FOR HEATGUNS
- ENGLISH
- DOUBLE INSULATION
- ELECTRICAL SAFETY
- MAINS PLUG REPLACEMENT (UK ONLY)
- MAINS PLUG REPLACEMENT
- (AUSTRALIA AND NEW ZEALAND ONLY)
- EXTENSION CABLES
- UNWANTED TOOLS AND THE ENVIRONMENT
- THE BLACK & DECKER GUARANTEE
- (UK, AUSTRALIA AND NEW ZEALAND ONLY)
- AFTER SALES SERVICE FOR YOUR BLACK & DECKER PRODUCT (UK, AUSTRALIA AND NEW ZEALAND ONLY)
- ACCESSIONS
- TECHNICAL DATA
- FEATURES
- HANDLING YOUR HEATGUN
- KX1682, KX1683 only:
- CD700, KX1600 only:
- COOLING DOWN
- HANDS FREE USE
- FITTING THE SCRAPER (KX1682, KX1683)
- PAINT STRIPPING
- OTHER USES FOR YOUR HEATGUN
- On low heat (KX1682, KX1683):
- On medium heat (KX1683):
- On high heat (CD700, KX1600, KX1682, KX1683):
- CLEANING
- EC DECLARATION OF CONFORMITY
- KX1682, KX1683subsection:
- Manual do utiliser de pistola de ar quente
- INSTRUÇÖS DE SEGURANCA
- Bruksanvisning for varmluftspistol
- SAKERHETSINSTRUKTIONER
Brand : BLACK & DECKER
Model : KX1682
Category : Heat gun