V1040 - Vacuum packaging machines FOODSAVER - Free user manual and instructions
Find the device manual for free V1040 FOODSAVER in PDF.
| Brand | FoodSaver |
| Model | V1040 |
| Product Type | Household vacuum sealing appliance |
| Dimensions (L x W x H) | Approximately 40 x 20 x 15 cm |
| Weight | Approximately 2.5 kg |
| Power Supply | Mains 220-240 V, 50/60 Hz |
| Power | Not specified, estimated 120 W |
| Main Functions | Automatic vacuum sealing, hermetic seal, automatic stop, hands-free indicator |
| Included Accessories | Starter bags, roll, accessory hose |
| Maximum Capacity | 30 bags per session, then 25-minute break |
| Seal Levels | Regular and moist setting |
| Cooling System | 20-second pause between cycles |
| Overheat Protection | Automatic stop and reset |
| Usage | Household only |
| Maintenance and Cleaning | Clean with a damp cloth, removable drip tray dishwasher safe |
| Safety | Operates only with lid closed, automatic stop, do not immerse |
| Available Spare Parts | Bags, rolls, accessory hose, drip tray |
| Warranty | 2 years from date of purchase |
| General Information | Made for FoodSaver, distributed by Holmes Products (Europe) |
Frequently Asked Questions - V1040 FOODSAVER
User questions about V1040 FOODSAVER
0 question about this device. Answer the ones you know or ask your own.
Ask a new question about this device
Download the instructions for your Vacuum packaging machines in PDF format for free! Find your manual V1040 - FOODSAVER and take your electronic device back in hand. On this page are published all the documents necessary for the use of your device. V1040 by FOODSAVER.
USER MANUAL V1040 FOODSAVER
1 Francis Grove, London SW19 4DT, England
Fax:020894/8272
Email: enquiriesEurope@jardencs.com
UK Free Phone Customer Service Helpline: 0800 052 3615 For replacement parts and calls please call: 0870-696-8757
For replacement bags and tons please call: 6670-888-1455
FRANCE:
Holmes Products France
1015,Rue du Marechal Jun
Z.I Vaux Le Penil
77000Melun-France 1966-1984
Telephone:+331624104580 Email:ir@cox.net
FAX:+3316402 02 32 FRANCE - SERVICE CONSOMMATEURS:08258582
DEUTSC
Carrera Sales & Licensing GmbH
Schleitheimer Straße 93 a
Please read this manual carefully before using this appliance, as correct use will give the best possible performance.
Retain these instructions for future reference. When using electrical appliances, basic safety precautions should always be followed, including the following:
- Read the instructions carefully.
- Do not use the Vacuum Food Sealer on wet or hot surfaces, or near a heat source.
Always use the Vacuum Food Sealer on a level flat surface.
Do not immerse any part of the Vacuum Food Sealer, power cord or plug into water or other liquid.
- To disconnect, unplug the power cord from the electrical outlet. Do not disconnect by pulling on the cord. Always unplug the Vacuum Food Sealer before cleaning.
- Do not operate the Vacuum Food Sealer with a damaged power cord or plug.
- Do not operate the Vacuum Food Sealer if it malfunctions or is in any way damaged. If the cord or the machine is damaged, it must be returned to an authorised service center. See warranty for more information.
- Use the Vacuum Food Sealer only for its intended use.
- Close supervision is required when this product is used near children.
This appliance is not intended for use by persons (including children) with reduced physical, sensory or mental capabilities, or lack of experience and knowledge, unless they have been given supervision or instruction concerning use of the appliance by a person responsible for their safety. Children should be supervised to ensure that they do not play with the appliance. - Do not allow the Vacuum Food Sealer to be used as a toy.
- The Vacuum Food Sealer is not for commercial use. If sealing more than 30 bags in a row, wait at least 25 minutes before continuing to use your vacuum food sealer.
CAUTION: This Vacuum Sealer is equipped with a technologically advanced, safety system that will auto reset the Vacuum Sealer in case of a potential overheat situation. After having sealed a few bags, the system will automatically shut the unit off for about one minute. This appliance is for HOUSEHOLD USE ONLY.
FITTING OF A PLUG - FOR U.K. AND IRELAND ONLY
If the plug is not suitable for the socket outlets in your home, it can be removed and replaced by a plug of the correct type. Please refer to "Installation of a plug" below.
Installation of a plug - Applicable to U.K. and Ireland
CAUTION: If the terminals in the plug are not marked or if you are unsure or in doubt about the installation of the plug please contact a qualified electrician. If a 13A 3-pin plug is fitted, it must be an ASTA approved plug, conforming to BS1363 standard. Replacement 3A fuses must be BSI or ASTA BS1362 approved.
The wires in the mains lead are coloured as such:
LIVE NEUTRAL
Please note that the colour of these mains wires may not correspond with the colour markings that identify the terminals in your plug. Please proceed as follows:
The BROWN coloured wire must be connected to the terminal, which is marked with the letter "L" or is coloured RED.
The BLUE coloured wire must be connected to the terminal, which is marked with the letter "N" or is coloured BLACK.
DO NOT CONNECT either of these wires to the earth terminal in the plug.
DO NOT CONNECT either of these wires to the 'other' E, or with the earth symbol , or coloured GREEN, or GREEN and Yellow.
IMPORTANT SAFEGUARDS
Do not attempt to service this product. Service should be performed by an authorised service representative.
A short power-supply cord is provided to reduce the risk resulting from becoming entangled or tripping over a longer cord. Extension cords are available and are not prohibited from being used when care is exercised in their use. When an extension cord is
used the marked electrical rating of the extension cord shall be no less than the marked electrical rating of the appliance. The longer cord shall be arranged so that it does not drape over the countertop or tabletop where it is capable of being tripped over, snagged, or pulled on unintentionally, especially by children.
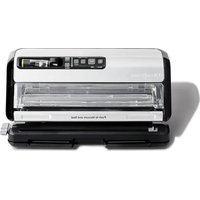
START ENJOYING THE BENEFITS OF YOUR FOODSAVER VACUUM FOOD STORAGE SYSTEM
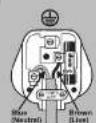
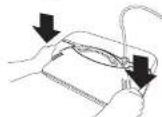
With the new Press/Hold and Release system, you firmly press down on the lid and when the Hands-Free Indicator Light illuminates you can remove your hands and let your vacuum sealer do the rest! The machine continues to vacuum and then seals the bag.
Your unit includes the following:
Food Sealer
- Starter Bags and Roll
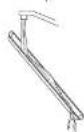
- Accessory Hose
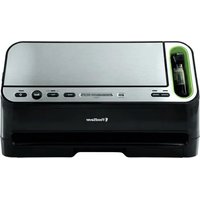
KNOW YOUR FOODSAVEVACUUM FOOD STORAGE SYSTEM
PREPARING YOUR FoodSaver® VACUUM FOOD STORAGE SYSTEM FOR USE
Carefully unpack your FoodSaver™ Vacuum Sealer and place it on a level surface. Be sure to remove all packing materials from the inside of the machine.
Clean all parts according to the CARE AND CLEANING section in this manual before first use.
4
www.foodsavereurope.com
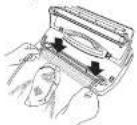
HOW TO MAKE CUSTOM SIZED BAGS WITH THE INTEGRATED BAG ROLL
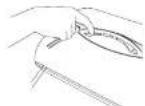
- Open Lid and place bag roll into roll storage compartment.
- Lift up Bag Cutter Bar.
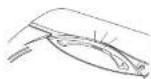
- Pull enough bag material from roll to hold item to be vacuum packaged, plus 7.5 cm. Lower the Bag Cutter Bar.
NOTE: Sealer will not operate if Lid is not properly closed.
7. Continue to hold the Lid. When the Hands-free Indicator Light illuminates, it is safe to remove your hands from the lid. The Sealing Indicator Light illuminates when the unit starts sealing the bag.
-
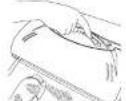
Cut desired bag length from Bag Roll. Make sure to cut a straight line. Plug in Power Cord.
-
When the motor stops and the Progress Indicator Lights shut off, sealing is complete.
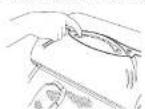
- Press the Open/Cancel button.
-
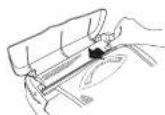
Open the Lid. Place one end of the cut bag between the Sealing Strip and the Lower Sealing Gasket. DO NOT place open end of bag in the Drip Tray.
-
The custom sized bag is ready for vacuum sealing.
NOTE: The Open/Cancel button can be used to cancel the process mid-cycle and open the Lid. The bag will not be sealed when doing this.
CAUTION: This sealer is not for commercial use. If sealing more than 30 bags in a row wait at least 25 minutes before continuing to use your vacuum food sealer.
CAUTION: The unit has a cool down period between cycles, Wait 20 seconds before using again. -
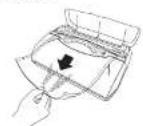
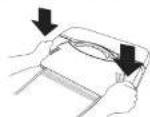
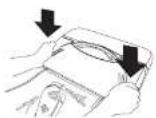
Close Lid. Position hands on both sides of the Lid. Press firmly on both sides of the Lid and hold until the motor starts.
www.foodsavereurope.com
5
HOW TO VACUUM SEAL WITH FoodSaver® BAGS
- Place the items to be sealed into a pre-cut or custom sized bag. Leave at least 7.5cm between the contents and the top of the bag to allow for bag contraction.
- Open the Lid and place the open end of the bag into the Drip Tray.
- Close Lid.
- Change Press to Select the appropriate Seal Level - Choose Moist for foods with high liquid content or Regular for dry foods.
- To begin the vacuum process, press down firmly on Lid with both hands and hold until the motor starts. Continue to hold the Lid. When the Hands-free Indicator Light illuminates, it is safe to remove hands from the Lid. The unit continues to vacuum and seal the bag.
-
When the motor stops and the Progress Indicator Lights shut off, sealing is complete.
-
Press the Open/Cancel button.
- Lift the Lid and remove the bag.
NOTE: The Open/Cancel button can be used to cancel the process mid-cycle and open the lid. The bag will not be sealed when doing this.
CAUTION: This sealer is not for commercial use. If sealing more than 30 bags in a row wait at least 25 minutes before continuing to use your vacuum food sealer.
CAUTION: The unit has a cool down period between cycles. Wait 20 seconds before using again.
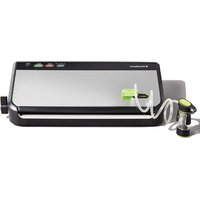
HOW TO VACUUM SEAL WITH OTHER BRAND ACCESSORIES
- Firmly insert one end of the Accessory Hose that came with your machine into the Accessory Port.

- Attach the other end of the Accessory Hose to the accessory.

- To begin the vacuum process, press down firmly on Lid with both hands and hold until the motor starts. Continue to hold the Lid. When the
Hands-free Indicator Light illuminates, it is safe to remove hands from the Lid. The unit continues to vacuum. Once all of the air is removed, the motor and indicator lights will automatically turn off.
NOTE: Sealer will not operate if Lid is not properly closed.
NOTE: The Open/Cancel button can also be used to cancel the process mid-cycle and open the Lid.
Care and Cleaning
- Always unplug the unit before cleaning.
- Do not immerse in water.
- Do not use abrasives to clean the unit.
- Wipe the outer surfaces with a soft, damp cloth and soap.
- To clean the inside of the unit, wipe away any food or liquid with a paper towel.
- Dry all parts thoroughly before you plug in and operate the unit again.
Cleaning the Removable Drip Tray
The FoodSaver™ Vacuum Food Sealer is equipped with a Removable Drip Tray to trap any liquid that may be drawn from the bag. Normal cleaning practices should be maintained.
1. Lift the lid and carefully remove the Drip Tray as to not spill any contents.
- Wash the Drip Tray in warm, soapy water or on the top rack of the dishwasher.

- Allow to dry completely.
- Replace Drip Tray.
Cleaning the Bags
- Wash bags in warm, soapy water.
-
Bags can be washed in the dishwasher if desired. Turn bags inside out and spread them over the top rack only.
-
Allow bags to dry completely before using. NOTE: Do not reuse bags if they have been used to store raw meats,fish,oily foods or have been boiled or microwaved.
6
www.foodsavereurope.com
www.foodsavereurope.com
7
HINTS AND TIPS
- Save Money: Buy in bulk, separate food into meal size portions, vacuum seal, and freeze. Just remove the sealed bag, thaw in the refrigerator, and prepare your meal.
- Save Time: Prepare meals in advance, vacuum seal, store in the refrigerator or freezer, and reheat for a quick, no-hassle meal.
- Save Food: Vacuum seal leftovers to eliminate waste.
- Save Flavour: Wash, vacuum, seal, and freeze seasonal fruits and vegetables to enjoy any time of the year.
FoodSaver® Vacuum Food Storage System Outperforms Conventional Bags & Wraps
Storage Time with
Conventional Bags & Wraps
Storage Time with FoodSaver
Vacuum Food Storage System*
| Beef (Steaks, Roasts) 6-12 months 2-3 years |
| Beef (Mince, Stew Meat) 3-4 months 1 year |
| Lean Fish (Cod, Haddock) 4-6 months 2 years |
| Fatty Fish (Salmon, Trout) 2-3 months 1 year |
| Pork Chops 4-6 months 2-3 years |
| Poultry 6-12 months 2-3 years |
| Soups and Sauces 2-4 months 1-2 years |
| Vegetables 6-9 months 2-3 years |
| Refrigerator |
| Cheese 2-4 weeks 4-8 months |
| Deli Meats 3-4 days 7-10 days |
| Fruits (Berries) 1-5 days 7-10 days |
| Vegetables 2-7 days 7-14 days |
| Pantry |
| Cereal 2-3 months 6-12 months |
| Coffee (Ground) 2 weeks 1-2 years |
| Cookies (Homemade) 1-2 weeks 3-6 weeks |
| Flour 6-8 months 1-2 years |
| Nuts 6-8 months 1-2 years |
*FoodSaver® vacuum food storage time estimates may vary depending upon preparation, quality of food, and storage conditions.
TROUBLESHOOTING
| PROBLEM | SOLUTION |
| Nothing happens when I press down on the lid | Make sure the power cord is correctly plugged into the electrical outlet. Make sure the power cord is not damaged in any way. Make sure the electrical outlet is operative by plugging in another appliance. If it is not, please check the circuit breakers or fuses in your home. Make sure the bag is positioned correctly in the vacuum channel. (See Figures on previous pages) Press down firmly on both sides of lid. Wait 20 minutes to allow appliance to cool off, and then try using again. |
| Air is not vacuumed from the bag | Check that there are no gaps, folds, wrinkles or holes in the pre-sealed bags. Verify that the Dip Tray is inserted properly into the unit. Make sure the Accessory Hose is not inserted into the Accessory Port. Check for loose, worn or cracked Upper and Lower Sealing Gaskets. Foods with high liquid contents may prevent the bag from sealing properly. Cut bag open and wipe top inside of bag and reseal. Check to see if bag is properly inserted into the Dip Tray. Make sure you've placed the bag in the proper place. When making a bag from a roll, make sure end of cut piece is on Sealing Strip, NOT over Lower Sealing Gasket or in Dip Tray. |
| Air has seeped back into the vacuumed bag | Check the seal of the bag. There may be a hole or wrinkle that is allowing air to re-enter the bag. Carefully cut the bag open and re-seal it, or use an entirely new bag. Make sure there is no moisture or liquid from the food present within the bag. You may need to cut open the bag and re-seal it in moist setting, or use an entirely new bag. Partially freeze foods with excess liquids, prior to vacuum sealing. Make sure there were no food items with sharp edges that may have punctured the bag. If you find a puncture hole seal the item in an entirely new bag. Make sure no liquids were drawn into the sealing strip area. Check for loose, worn or cracked Upper and Lower Sealing Gaskets. Moisture of foods with high liquid content will prevent the bag from sealing properly. Cut bag open and wipe top inside of bag and reseal. |
| Bag mells | The sealing strip may have been too hot during the sealing process. Allow the unit to cool for 20 seconds between uses. If the bag continues to melt, allow the unit to cool with the lid in the upright position for 25 minutes before using. |
| Bag will not seal | Check that there aren't any gaps, folds, wrinkles or holes in pre-sealed edges. Moisture of foods with high liquid content will prevent the bag from sealing properly. Cut bag open and wipe top inside of bag and reseal. Make sure you've placed the bag in the proper place. When making a bag from a roll, make sure end of cut piece is on Sealing Strip, NOT over Lower Sealing Gasket or in Dip Tray. Make sure you give the appliance time to cool down. Wait at least 20 seconds between seals. |
GUARANTEE
Please keep your receipt as this will be required for any claims under this guarantee.
This appliance is guaranteed for 2 years after your purchase as described in this document.
During this guaranteed period, if in the unlikely event the appliance no longer functions due to a design or manufacturing fault, please take it back to the place of purchase, with your till receipt and a copy of this guarantee.
The rights and benefits under this guarantee are additional to your statutory rights, which are not affected by this guarantee. Only Holmes Products (Europe) Ltd. ("Holmes") has the right to change these terms. Holmes undertakes within the guarantee period to repair or replace the appliance, or any part of appliance found to be not working properly free of charge provided that:
you promptly notify the place of purchase or Holmes of the problem; and
the appliance has not been altered in any way or subjected to damage, misuse, abuse, repair or
alteration by a person other than a person authorised by Holmes.
Faults that occur through, improper use, damage, abuse, use with incorrect voltage, acts of nature, events beyond the control of Holmes, repair or alteration by a person other than a person authorised by Holmes or failure to follow instructions for use are not covered by this guarantee. Additionally, normal wear and tear, including, but not limited to, minor discoloration and scratches are not covered by this guarantee.
The rights under this guarantee shall only apply to the original purchaser and shall not extend to commercial or communal use.
If your appliance includes a country-specific guarantee or warranty insert please refer to the terms and conditions of such guarantee or warranty in place of this guarantee or contact your local authorized dealer for more information.
This marking indicates that this product should not be disposed with other household wastes throughout the EU. To prevent possible harm to the environment or human health from uncontrolled waste disposal, recycle it responsibly to promote the sustainable reuse of material resources. To return your used device, please use the return and collection systems or contact the retailer where the product was purchased. They can take this product for environmental safe recycling.
Holmes Products (Europe) Limited
1 Francis Grove
London
SW10.4DT
UK
10 11
www.foodsavereurope.com

CONSIGNES IMPORTANTES
Holmes Products (Europe) Limited
1 Francis Grove 2
London
SW19401UK
18 19
www.foodsavereurope.com

Holmes Products (Europe) Limited
1 Francis Grove
London
SW94DT
Großbritannien
PRECAUCIONES IMPORTANTES
Holmes Products (Europe) Limited
1 Francis Grove
London
SW94DT
Reino Unido

PRECAUZIONI IMPORTANTI
Holmes Products (Europe) Limited
1 Francis Grove
Londra
SW194DT
UK
4243
www.foodsavereurope.com

BELANGRIJKE VEILIGHEIDSRICHTLIJNEN
Holmes Products (Europe) Limited
1 Francis Grove
London
SW194DTUK
5051
www.foodsavereurope.com
V1040-1 12MLM1indd 61-62127711 10:20AM
VIKTIG SAKERHETSINFORMATION
Forbasta prestanda bor du laseigenom den harhandboken nogrgrant innan du anvander apparaten. Spara instruktionerna for eventuale framtida refereens. Narn man anvander elektriska apparater maste alltidgrundlaggande sakehetsfreskrifter foljas, Inklusivefolande:
Holmes Products (Europe) Limited
1 Francis Grove
London
SW19 4DTUK
5859
www.foodsavereurope.com
www.foodsavereurope.com