
ES7017 - Shaver PANASONIC - Free user manual and instructions
Find the device manual for free ES7017 PANASONIC in PDF.
| Product Type | Electric Shaver |
| Brand | Panasonic |
| Model | ES7017 |
| Power Supply | Charging Adapter RE3-88 (100-240 V) |
| Battery Type | Rechargeable Nickel-Metal Hydride (Ni-MH) |
| Charging Time | Approximately 1 hour for full charge |
| Operating Time | Approximately 20 shaves (3 minutes per shave) |
| Usage | Dry or wet shaving (Wet/Dry) |
| Waterproof | Yes, can be used in the shower |
| Shaving Head | System outer foil with center blade |
| Integrated Trimmer | Yes, retractable with handle |
| Cleaning | Under running water with liquid soap |
| Replacement Outer Foil | Every year |
| Replacement Inner Blades | Every two years |
| Included Accessories | Protective cap, wall mount, cleaning brush, travel pouch |
| Dimensions (approx.) | 15 x 5 x 5 cm |
| Weight (approx.) | 200 g |
| AC Adapter | RE3-88 |
| Safety | Do not use if foil or blade is damaged |
Frequently Asked Questions - ES7017 PANASONIC
User questions about ES7017 PANASONIC
0 question about this device. Answer the ones you know or ask your own.
Ask a new question about this device
Download the instructions for your Shaver in PDF format for free! Find your manual ES7017 - PANASONIC and take your electronic device back in hand. On this page are published all the documents necessary for the use of your device. ES7017 by PANASONIC.
USER MANUAL ES7017 PANASONIC
Wet/Dry Rechargeable Shaver
Operating Instructions
Model No. ES7017
Before operating this unit, please read these instructions completely.
Thank you for purchasing the Panasonic Wet/Dry Rechargeable Shaver Model No.ES7017.


Index
ENGLISH Page 5 NORSK Side 43
This Wet/Dry shaver can be used for wet shaving with shaving lather or for dry shaving. You can use this watertight shaver in the shower and clean it in water. Treat yourself to wet lather shaves for at least three weeks and notice the difference. Your Panasonic Wet/Dry shaver requires a little time to get used to because your skin and beard need about a month to adjust to any new shaving method.
Charge the shaver for at least 8 hours before using it for the first time or when it has not been in use for more than six months.
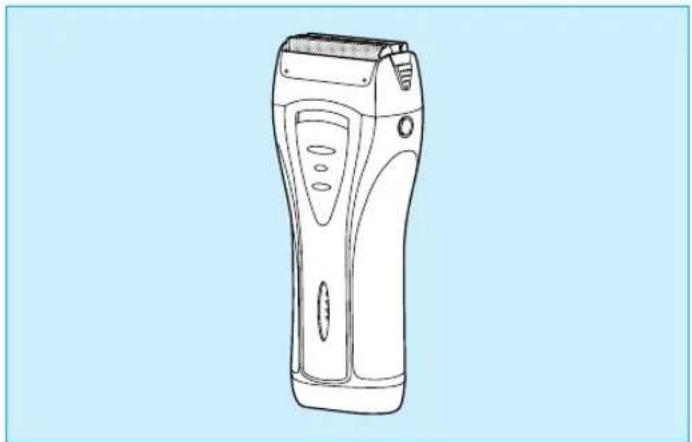
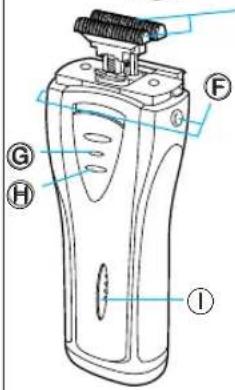
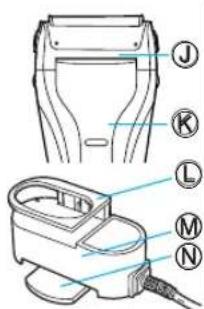
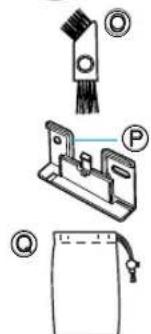
Parts identification
(see fig. 1)
Protective cap
System outer foil
System outer foil release buttons
① Foil frame
Inner blades
Foil frame release buttons
Switch lock button
On/Off switch
① Battery capacity monitor/ Charge status lamp
①Trimmer
Trimmer handle
Charging adaptor holder
Charging adaptor with automatic voltage adjustment
Rotatable stand
Cleaning brush
Wall mount
@Travel pouch
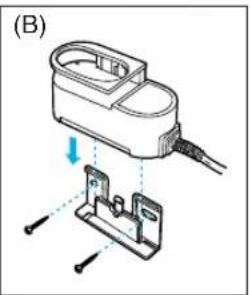
How to use the wall mount
The charging adaptor can be hung on the wall using wood screws.
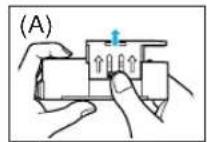
- Lift up the charging adaptor holder. (see fig. 1 (A))
- Select an appropriate location on the wall where the screws can go in.
- Attach the wall mount to the wall as shown with the wood screws, making sure that the arrow points up.
- Slide the charging adaptor grooves into the wall mount until it clicks in. (see fig. 1 (B))
To remove the charging adaptor from the wall mount, slide the adaptor upward.
Charging adaptor
(see fig. 1)
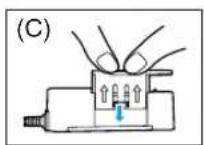
Lift the charging adaptor holder until it clicks in when charging the shaver. (see fig. 1(A))
(Restore the charging adaptor holder when carrying the unit.) (see fig. 1(C))
Rotate the stand on the bottom of the charging adaptor when you need extra stability. (see fig. 1(D))
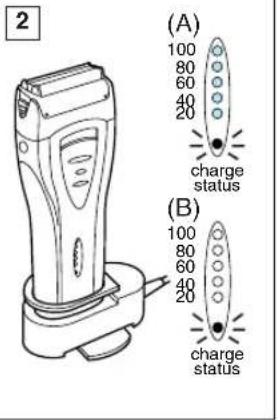
Charging
(see fig. 2)
Place the charging adaptor upright on a flat surface or mount it on a wall. Plug the adaptor into an AC outlet.
It will adjust automatically to voltages


between 100-240V AC.
In some areas, a special plug adaptor may be required.
Switch the shaver to the "0 - charge" position and place it upright into the charging adaptor with the switch facing toward the front.
The charge status lamp will glow red when the shaver is placed on the correct position. It will flicker red when the charging is completed.
At the same time, the battery capacity monitor will display the fully charged condition (see fig. 2 (A)).
The system will turn off in about 10 minutes after the charging has been completed (see fig. 2 (B)).
You can fully charge the shaver in one hour if the battery capacity monitor flashes down to the 20% level.
A full charge will supply enough power for about 20 shaves (three minutes per shave for a normal beard).
You can always store your shaver in the charging adaptor to maintain full power capacity. This shaver cannot be overcharged.
Before traveling, charge it fully for 1 hour if you will not be taking the charging adaptor with you.
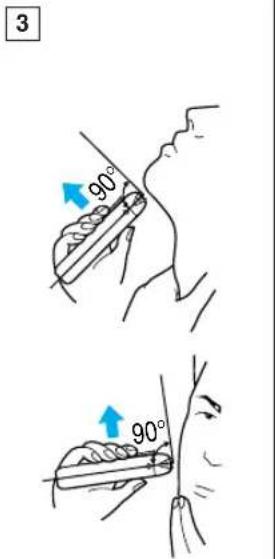
Using your shaver
Depress the switch lock button and slide the On/Off switch upward to turn the shaver on. Hold the shaver at a right angle (90^) to your skin (see fig. 3). Start out shaving by applying gentle pressure to your face. Stretch your skin with your free hand and move the shaver back and forth in the direction of your beard. You may gen
tly increase the amount of pressure as your skin becomes accustomed to this shaver. Applying excessive pressure does not provide a closer shave.
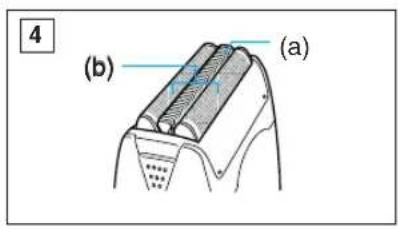
System outer foil
(see fig. 4)
System outer foil has a slit blade (a) between two foils (b). They move up and down independently to follow the contours of your face.
The slit blade catches and cuts longer and lying hairs easily.
For wet shaving
Put a thin layer of shaving foam on your face which works as a lubricant. Shaving foam is the most suitable among many other shaving aids (gel, soap, cream, etc). Do not put a thick layer of shaving foam as it may affect the shaver's performance. If the shaving head is clogged with foam, simply rinse it under running water.
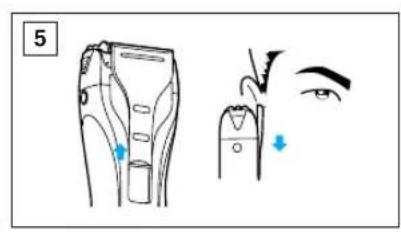
Using the trimmer
(see fig. 5)
Slide the trimmer handle up to the position until it clicks in.
Place the trimmer at a right angle to your skin and move it downward to trim sideburns.
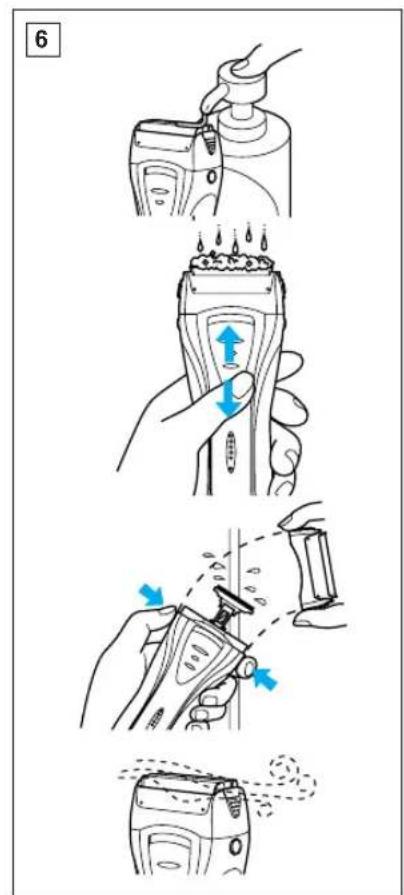
Cleaning your shaver
(see fig. 6)
For cleanliness and convenience, we recommend that you clean your shaver with water and a liquid hand soap. Regular cleaning will keep your shaver in good condition while preventing odors or bacteria from devel


oping, and maintain the cutting performance.
With the system outer foil in place, apply some hand soap onto the outer foil.
Turn the shaver on and pour some water over the outer foil.
After about 10-20 seconds, turn the shaver off.
Remove the foil frame and clean it with running water.
Wipe off any moisture from the shaver with a dry cloth and remove the protective cap to allow the system outer foil to dry completely.
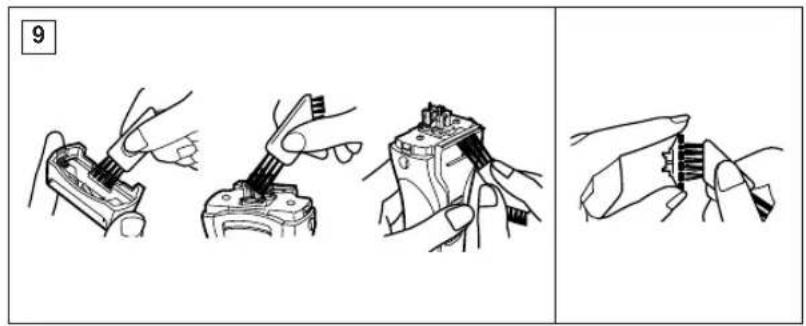
Brush cleaning
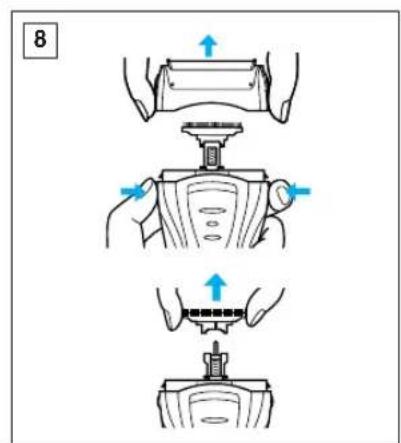
Squeeze the system outer foil release buttons and lift the system outer foils upward to remove them (see fig. 7). Remove the inner blades by grasping them firmly at both ends and pulling them straight away from the shaver (see fig. 8). Clean the outer foils, the shaver body and the trimmer with the long side of the brush. Clean the inner blades with the short side of the brush. Do not use the short brush to clean the outer foils (see fig. 9).
Replacing shaving head components
It is recommended that you replace the outer foil at least every year and the inner blades at least every two years to maintain your shaver's cutting performance.
Replacing the system outer foil (see fig. 7)
Squeeze the system outer foil re
lease buttons and lift the system outer foil upward to remove it. To insert the new system outer foil, press down until it snaps into place.
Replacing the inner blades (see fig. 8)
Squeeze the foil frame release buttons and lift the foil frame upward to remove it. Remove the inner blades, one at a time, by grasping them firmly at both ends and pulling straight away from the shaver. To insert the new inner blades, hold the blades, one at a time, at both ends and press downward until they snap into place.
For environmental protection and recycling of materials
This shaver contains Nickel-Metal Hydride battery(s).
Please make sure that the battery(s) are disposed of at an officially assigned location, if there is one in your country.
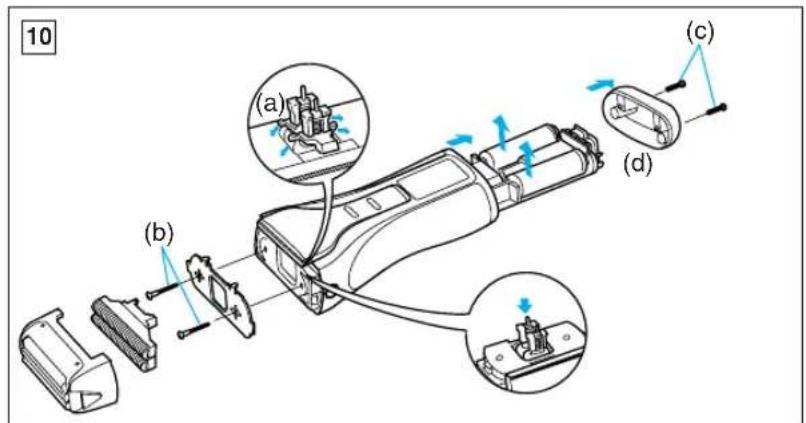
How to remove the built-in rechargeable battery(s) before disposal of the shaver (see fig. 10)
The battery(s) in this shaver is not intended to be replaced by consumers. However, the battery(s) may be replaced at an authorized service center. The procedure described below is intended only for removal of the rechargeable battery(s) for the purpose of proper disposal.
-
Remove the cap, outer foil frame and inner blades.
-
Remove the two screws (b) and


driving bars (a).
- Remove two screws (c) and bottom cover (d).
- Push the chassis out of the housing.
- Remove the battery(s) from the chassis.
Caution
- Do not charge the shaver where the temperature is below 0^ (32^) or above 40^ (104^) , where it will be exposed to direct sunlight or a heat source, or where there is a lot of moisture.
- Use only the included shaver charging adaptor RE3-88 to charge the ES7017 shaver.
- The supply cord of the charging adaptor cannot be replaced; if the cord is damaged, the entire charger should be discarded.
- Dry the shaver completely before setting it in the charging adaptor.
- Keep the charging adaptor away from water and handle it only with dry hands. Do not use an extension cord to connect the charging adaptor to an outlet.
- The shaver may not immediately begin to charge after being placed into the charging adaptor after use. Allow the shaver to sit in the charging adaptor for a few- minutes and check again to make sure that it is being charged.
- Do not place any metal objects like coins and paper clips on the charging adaptor as they will become warm.
- Grip the plug when disconnecting
the charging adaptor from a receptacle; tugging on the cord may damage it.
- Store the charging adaptor and its cord set in a dry area where it will be protected from damage.
- The outer foil is very thin. If handled improperly, it can be easily damaged. To avoid personal injury, do not use the shaver if it has a damaged foil or inner blade.
- Wash the shaver in tap water. Do not use salt water or boiling water. Also, do not use cleaning products that are designed for toilets, bath rooms or kitchen appliances. Do not submerge the shaver for a long time.
- Do not wipe any part of the shaver with thinner, benzine or alcohol. Clean it by using a cloth dampened with soapy water.
- Do not take the housing apart as this can affect the watertight construction.
- If the shaver is not working properly, have it inspected at the place of purchase or an authorized service center.
Always use your shaver for its intended use, as described in this manual.
This product is intended for household use only.


Vor dem Gebrauch
Parts identification
(siehe Abb. 1)
HaMeHOBaHne y3IOB n DeTalei
(cm.pnc.1)
3aHTbIKoJNaOc
BHeuHra CeTKa CnCTeMbI
KhoNKn OcBo6OxDeHnBHeuHcTeKN CNTeMbI
PamaДЛЯceTKN
BByTpeHHH HOX
ΦuKcaToppaMbI DnA CeTKn
⑥ΦHKCaTOp BbIKIIOuHaTeNA
HbiknouateIb"Bkn./BbIKn."
①MOHHTOP éMKOCTn 6aTapeu/CBeTOBOU HNDAKATOp COCTOHH3apAKn
HOxHnUbI
@PyuKa HOXHNu
DepkaTeIb 3apAnHoro yctpoNCTBa
3apndoe yctpoicTBO c aBtOMaTHuEcKIM TpaHcΦopMaTOpom Hnpanjxehn
NpObopaHbMaen onopa
UeKa dJa YnCTKn
HacTeHHbKPOHHTeH
@DopoxHbIyexoJ
Ykpenenne HacteHHoro KpoHwTeHa
3apAnHoe yctpoNCTBO MOxHO yKpeNtB Ha CTHe C NOMOuBo U npyOB.
1.ПоднIMITE epKteIb 3apHOrO yCTpoIcTBA.(CM. pnc.1(A))
2. BbIbepuTe COOTBeTCTByIOuee MeCTO Ha CTHe, KyDa MOryT BOITN Wypynbl.
3. 3aKpEnnte KpoHsTeH Ha cTeHe, KaK yKa3aHo Ha nnIIOCTpaunn, C NOMOsbIO WypynOB, y6eINBwncb, YTO CTpeNka HAnpaBNeHa BBepx.
4.ПpoBnraIte KaHABKn 3apHOrO yCTpoNCTBa B HAcTeHHbIKPOHHTeIN Do Tex NOp, NOKa OHO He 3aKpeNITcA CO UeNtKOM.(CM.pnc.1(B))


YTo6bI CHaTb 3apAnHoe yCTpoiCTBO C HAcTeHHoro KpOnuTeHa, npoDbHbTe 3apAnHoe yCTpoiCTBO BBepX.
3apAnoe yctpoIcTBO (cm.pnc.1)
Pn3apnke 6pntBbI NOHmnte
depeKaTeJI 3apJdHoro yCTpoNCTBa
do uenka. (cm.pnc.1(A))
(BepnTe depKaTeJI 3apJdHoro
yCTpoNCTBa B nepBOHaayabHoe
noJIOXeHne, KOrJa nCNoJb3yeTe
6pNTBy.) (cm.pnc.1(C))
IobepHnTe onopy 3apJHoro yctpoiCTBa,ecnn Tpe6yETcA DOIOJIHNHTeJIbHaYyCTOINHBOCTb. (cm.pnc.1(D))
3apAka
(cm.pnc.2)
IomeCTNe 3apHoe yctpoiCTBO BepTKaJIbHO Ha poBHOI NOBepxHOCTN IIN 3akpenTe erOHa cTeHe. POnKIOUHTe 3apHoe yCTpOJCTBO K pO3ETKe nepemEnHOro TOka.
OHO 6yIaT aBToMaTuCKn prynpoBaTb HnPaxHn oT 100-240 B.
B HeKoTOpbIx perNoHax, BO3MOxHO, nOTpe6yeTc CneuaIbHbI nepeXoDnIK dIa IIOkJIuOeHnK p03eTke nepemehHoro Toka.
IpeekJIOUHTe 6pNTby Ha no3nHIO, o6o3haeHHyO "0" (noJIOKeHne 3apAKn), n NOMeCTnte ee BepTKaIbHO B 3apAHOE yCTpoiCTBO TaK, YTO6bl BbIKIOuATeJIb paCnOlaRaIcna HanepeDHe CTOpOHe.
CBeTOBOHnDnKaTOp COCTOHNH 3apAnk6yDet KpaChbIM,ecn6pNTBa paONIOXeHa npaBnIbHO.
Oh 6ydet Mrratb KpaCHbIM, Korda 3aprka 3aKOHueHa.
OndHOBpemehno MOHITOp EMKoCTn 6batape 6yDet NOKa3bIBaTb COCTOHHne NOHNO 3apAdkn (CM. pnc.2(A)).
CnCTema OTKJIIOHTcnpMepHO uepe3 10 MNHyT nocne 3aBepHnna 3apJdkn (cm.pnc.2(B)).
BblMOXTe NONHOCTbIO 3apAHTb6pNTBy B TeueHne ODHORO Yaca,ecn MOHITOp EMKoCTN 6atapeMnraet Ha ypoBHe 20%
IOnnHa 3apKa o6ecneuNT DOCTaTOUHy OHeprHOpn6JIn3nteBHO n20 ceaHCOB 6pHTb (TPI MNHyTBi Ha 6pHTbe npn HOpMaJIbHOM BOIOcHOM NOKPOBE).
BbBCERda MoKTe XpaHHTb 6pHTBy B3aprHOM yCTpoNCTBe, YTO6bl NOdepKnBaTb e e NOnHOCTbO 3apRKeHo. 3Ta moJeB 6pHTBbl 3aunueHa OT n36bIToHNo 3apJKn.
Ecnn Bby ye3kaete n3 Domy n He 6bepe Tc c06o3apnHoe yCTpOINCTBO, NIOHOCTbIO 3apHnTe 6pNTBy B TeueHne Ondoro Yaca.
IcnoJb3OBaHHe 6pntBbl
HaXmTe pKcATOp BbIKIOHateTn I npOdbNtBe bIKIOHateTb BkI./ BbIK. BBepx, YTO6bI BKIOHTb 6pntBy. DePxtne 6pntBy nOIpnMIM yIOM K KOKe (90^) (CM.pnc.3).PiNCTynaIte K 6pntbIO, OCTopoxHo npIXmAM 6pntBy K liu. HataRnBaIte Koxy Cbo6oHOn pyKoN n NepemEuaIte


6pntby B3ad N Bnepei NO HanpaBHeHIO BOLOcHoro NOKPOBa. IIO Mepe TORO, KAK BaWaKOka 6yDet PnBBkAtb K 6pNTBe, Bbl MOKeTe OCTopoXHO yCNJNTb HaxIM Ha KOxy. N36bIToUHbI HAXMM Ha KOxy He Tpe6yETc, TaK Ka 3TO He daet yJnyUeHnRAqctBa 6pntbA.
CnCTema BHeuHcetKn N NOdbemHa INaCTnHa
(cm.pnc.4)
CnCTema BHeHHe CetKn NMeet DnCKOBbH HOX (a), 3aKpePJIeHHbIM MExdy DByMn CeTKamn (b). OHN DnBraOTc BBepx-BHN3 He3aBNCmO dpyr OT dpyra, CneDy OeepTaHnM Baawero Niua.
HIOKOBHOJNKeIeKO3aXBaTbIBaETnO6pe3aET 60oeE nnHHbIe, npneraOuNE K NcUy BONocbl.
MOKporo6pntb
HaHecnte Tohkn Cnoi nebl d
6pntbHa Inlo: 3ta neha 6ydet
BbINOHNHTb Cma3bIBaIOUyIO
fynkcuio. Nepa Dnla 6pntbI
nyuwe CpeCTBO B cpabHeHH C
MHORMN DpyrMM (reB, MbIO,
Kpem nT.d.). He HaHocTe neHy ha
IINTO TONCTbIM CNOEM, TAK KAK 3TO
MOXET OPnuatelbHO cKa3aTbCRA
3oPfekTNBHOCT na 6pNTbI.
Ecnn 6pntBeHHa rOJOBKa 6ydet
3a6nta NeHoi, TO DOCTaTOH0
nponolockTa ee NO kpaHOM.
IcNoJIb3OBAHnE HOXHnU
(cm.pnc.5)
PpOdBnHbTe pyKy HOxNc BBepx Do NIOXKeHNA OHa He 3aKpeNTcCo UeJYKOM.
IomeCTHe HOXHNuBI NOD npRMBIM yrnom K KOKe N npOdBnraIte 6pNTBy BHN3, YTO6bl NOpOBHATB BNCKN/ 6aKeH6apDbI.
UncTka 6pntBbl
(cm.pnc.6)
B ueJax rHneHbI n o6ecneeyHn ydo6CTBa nCNoJIb3OBAHHa peKOMeHdyETc YnCTNTb 6pNTby BOOn I XnIKM MblON. PeryJrpaH a NcTka NOMoxet nopeKHBaTB 6pNTby B xopoWem coCToHN, npedOTbpaaag noRBJIeHHe HnprnTHbIX 3anaxOB uN 6akTePn, a TAKKe o6ecneHTBicOKyIO 30fpeKTNBHOCTb 6pNTb. He ChmMa BHeuHIO cETky, HAMblTE ee MblON.
BknIOHTe 6pNTby n npomOnTe BHeuHIOcTeKy BoOJ. IpImepHo uepe3 10-20 cekynD BbIKIOUHTe 6pNTby.
YdaJInte pamky cETKN INPOMOnTe ee NOJ npoTOUHOBOIO.
Cyxon Tpnooyu dannte Bnary C 6pnTbI IN CHNMTe 3aunTHbI KOJnaQOK CTEM, YTObI BHEHNA CETKa NOHOCbIO BbICoxla.
OuNCTKa c NOMOuBIO uETKn
CoxMnte fncatopbl cnCTembl BheHne CETKN ydaNTe CNTEmy BHeHne CETKN, NOHNB eBBepx (cm. pnc.7). Chmnte BHyTpEHnHOxN, yBepeHHO 3axBaTbIBa INx C DByX CTOpOH IN BbITARNBaINx IN3 6pntBbl (cm. pnc.8). IpOuNCtNE BHeHIO CTeKy, KopNc 6pntBbl IN HOxHnCbI DnHHoN CTOpOH
77


TETK. Ipouchnte BHytpenhne HOxK KOPOTKO CTOpOH OETKn. He nCnoJIb3yIte KOpOTKYIO TETKy DnA YNCTKN BHeUHHe CETKN (CM. pnc.9).
3aMeHa 3IeMeHToB roIOBKn 6pNTbbl
Длг obecneuehen BaICOKoI 3ФФeKTHBHOCTn 6pNTbI peKOMeHdyETc npOn3BOIDHT b3aMeHy BHeUHNe CTeKN IO KpaHNe Mepe exKeOdHO, a BHyTpEHnX HOKei -No KpaHNe Mepe KaXdbIe 2 roda.
3aMeHa CnCTembl BHeuHneCetKu
(cm.pnc.7)
HaKaB HaФKcaTopbl paMKcTeKn, NOHHTe ee BBepx, YTObI CHATb ee. No OHOMy ydaJIte BHYTeHHne HOXN, TBepIO 3aXBtBIBA INx O OBENxC TOpOH N OTaHB INX BBepx OT bPNTbI. YTObI BCTaBtB HOBbie BHYTeHHne HOXN, BCTaBJIte INx IIO OHOMY, 3axBaTNB KaKdbI HOK C DByX CTOpOH, IN HAxIMaBHIN3, YTObI OHN NIOTHO BCTaJIN Ha CBOIN MecTa B6pNTBe.
3aMeHa BHyTpEHnX HOKei (cm. pnc. 8)
HaxabHa qKCaTopb paMK cETKn, NOHTHe ee BBepx, YTObI CHATb ee. Io ONDomy ydaJInte BHYTpEHnE HOXN, TBepIO 3aXBtBIBaIN X C O6Enx CTOpOH INOTAHyB INBepx OT 6pNTbbl. YTObI BCTaBnTb HOBbie BHYTpEHnE HOXN, BCTaBnTte IN X NO ODHOMY, 3aXBaTNB KaKDbI HOX C DByX CTOpOH, HAXIMAR BHN3,
YTO6bI OHN NIOTHO BCTaJIN Ha CBOM MeCTaB6pNTBe.
3aunTa OkpykaOuSei Cpebl N yTnN3aCnH MCNoJIb3OBaHHbIX MaTePnaIOB
3ta 6pntBa coepKNT HnkeJIb-MeTaIINpIuHbIe 6aTapeu.
IoxaIyIcTa, BbIbpaIbIaIte 6BaTapeN B CNEuHaJIbHO OTBeJeHHOM 4nA 3TOrO MeCTe, ecNI TaKa nCnyK6a npedymOTpeHa B BaWei CTpAHe.
YdaJIeHHe BcTpoEHHO 3apAnHO6aTapen (6aTapen) Do yTuIN3aCmN 6pNTBbl
(cm.pnc.10)
BaTapeB (6aTapeB) B 30ToB 6pntBe He npEHa3HaueHa dIa 3aMeHbI nOTpeBnTeJIaMn.
Ondako,6atapeo (6atapeu) moKHO 3aMeHnTB B ceHTpe TexHueckoro 06cnyxnbAHn, nmeoUe mcoTBeTCTByIOUe pa3peWeHne. IopAdoK DeicTBn,OnncAHbI Hnke,IpeHa3HaueH ToJIbKO dNCHrTHa3apADHO6atapeu (6atape) c cIbHn HaJnxKaueyTuIN3auun.
- Chmnte Kollnayok, paMy BHeuHne CeTKN N BHyTpeHHne HOXN.
2.YdaInte IBa BnHTa (b) XOIOBOI CTePKeHb HOHNu (a). - YdaIInTe IBa BnHTa (c) HxHIO KpbIky (d).
- BbIaHInTe WacCn n3 Kopnyca.
- YdaJInte 6aTapeu n3 waccn.


OctopoxHo
He npo3BOJnte 3ap4ky 6pntbbl,ecnTtemepaTpya Hxke 0^ nnn Bblwe 40^ ,ecn6pntBa 6ydtnoDBepKeHa BO3dEcnCTBnIO npMbIX COJIHeHbIX Lyuee nnNcTOUHNKa TENla,nnEcnB NOMeueHm OTMeueaTe 6OJIbwaB JIaxHOCTb.
Испобьуг Te TОьko BKNHQueHHOB KOMNJIeK T NOCTaBKn 3apJHNOe yCTpoIcTBO RE3-88 dЯ 3apRdKn 6pITbbl ES7017.
- Wnhyp nntaHn 3apAnHoro yCTPOIcTBA He NOJNEXKIT 3aMeHe; npn NOBpeXJeHn Whypa CJIeDyET yTHIN3HPOBaTB BCE 3apAnHOe YCTPOIcTBO.
- PpocuBnBaTe 6pntBy nONHOCTbH,npexKe Yem yCTaHaBnBaTb ee B 3apAnHOe yCTpoNCTBO.
XpaHnTe 3apAnHoe yCTpoNCTBO BdaIeKe OT BObl I DOTparINBaInTecb DO Hero TOnbKO cyxIMn pykam. He nCnoNb3yJte Whyp-ydInnHTeJIb dIra NOcOeDInHeHH 3apAnHoro ycTPOnCTBa K po3eTKe nepemehHOro TOka.
- Pn yctahOBKn 6pntBb B 3apnHoe yctpoNCTBO nocJe ee NcNoIb3OBAHn, pOceC 3apnKMOKeT Haatcbn C HeKOTOpbIM 3aOn3dAnHeM. OctabTe 6pntBy B 3apnHOM yctpoNCTBe Ha HeCKoJIbKO MNHT, 3aTEM y6eInTECb B TOM, 4TO npoucc 3apnHaayanCn.
He nomeuate KaKne-Jn6o MetaJInuueckne npedMetbl,
HAnpImep,MOHeTbI INNCKpeKNINJ6ymarnHa3apnDHOeYCTPOIcTB0,NoCKOJIbKy OHN 6ydyHarpeBaTcb.
- Pnp OTcoeHHeHH 3apnHoro yCTpOINCTBa OT pOzETKn nITaHH 3axBaTbBAInTe BnIKy Whypa nITaHH: eCmBbl BydTe TnHyTb HENOCpeIDCTBeHHO 3a WHP, Bbl MOKeTe NOBpeNTb erO.
XpaHnTe 3apAHHoe yCTpoNCTBO nero shyP nHTaHnB C cyxom MceTe, rDe OHn 6dyT 3aunuEhbl OT NOBpeKJdeHn.
BHeuHcetKa Oeyb Tohka. Pn HeBepHom 6paueHnn ee Ierko nobpeDntb.Bo n36ekaHne JInyHOI TpaMbI He ICNOJb3yIte 6pntBy,ecn cetKa nn BHyTpEHN HOX NOBpeKDeHbl.
-ПомьваиTe 6pntbY NOKpaHOM. He moTe 6pntbY B coJeHOn uNn KInnaeHOBoJe.TakKe 3anpeaetcNcNoIb3ObaTb YnCTAunie CpeDCTBa, npEdHa3NaeHHbIe IJN cNCTKN TyaIeTOB.BAHN INN KYXOHHO 0bOpyDoBaHn. He norgykaIte 6pntbY B OBy Ha dNITeNbHoe Bpema.
3aPepaetcnpotpaTbIIO6bIe
TeTaN 6pNTBbl pa36aBnteJIeM,
BeH3nHOM nIN CNnPTOM.
IpotpaTne ux TkaHbIO,
CMOeHHoB MBJbHO Bode.
He pa36npaTKeKpNc 6pntBbl, NocKOJIbky 3TO MoXeT HApUHTbe ee BOHOHpeHOnHaemocTb.
Ecnn 6pntBa pa6oTaet HeyIOBJIeTBOPHTeIbHO,OTHeCINTe ee IINHCNEKUN B MeCTO


npno6peTeHn 6pntBbl nIn B ynoHOMOeHHbI cepBnCHbI ueHtp.
Bcerda npimehaTe 6pntby no Ha3HaueHIO, Ka yka3aHO B daHHOM pyKOBOdCTBe.
YcTaHOBJIeHHbI pOn3BOJnteMeB nopnKe n.2 CT.5 FeepaIbHoro 3aKaHa PΦ “O 3aunTe npab nOTpe6nte" cPOK cnXkbI dna daHHoro n3dennpaBeH 7 roam C DaTbI pOn3BOCTBa npu ycNoBN, yTO n3dennncnONb3yETcB B CTPOROM COOTBETCTBnC HactoJe mHcTpkynei NO 3KcNpyataunn npmehmblIMn TEXHueckm nCTAHapTaMn.


BZ02
CdeNaHOeIIOHm
3TOT np60p npedha3NaeH ToIbKO DnA DomawHero NcNoB3OBaHn.
80
P01-04(ES7017欧州) 02.1.31 19:56
Matsushita Electric Works, Ltd.
1048, Kadoma, Osaka 571-8686, Japan
No.1 EN, GR, FR, IT, NE, SP, DN, PO, NR, SW, FN, Po, Cz, Hu, Ru, Russi
Printed in China