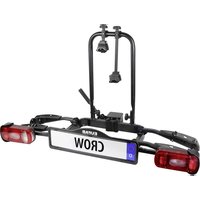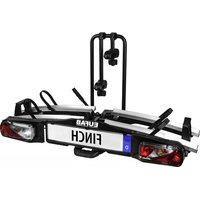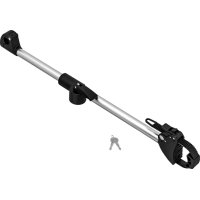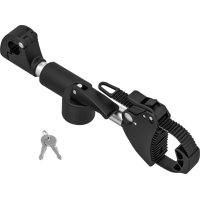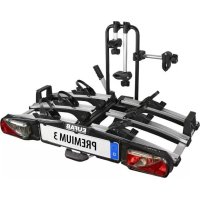
Premium III - Bike rack Eufab - Free user manual and instructions
Find the device manual for free Premium III Eufab in PDF.



Frequently Asked Questions - Premium III Eufab
User questions about Premium III Eufab
0 question about this device. Answer the ones you know or ask your own.
Ask a new question about this device
Download the instructions for your Bike rack in PDF format for free! Find your manual Premium III - Eufab and take your electronic device back in hand. On this page are published all the documents necessary for the use of your device. Premium III by Eufab.
USER MANUAL Premium III Eufab
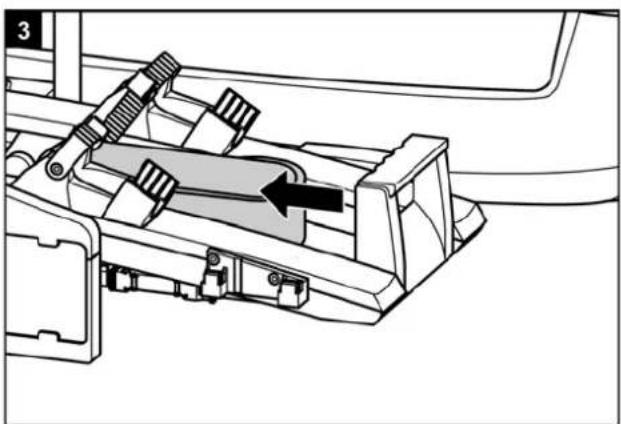
text_image
Technical diagram showing mechanical assembly with labeled components and directional arrows indicating motion or movement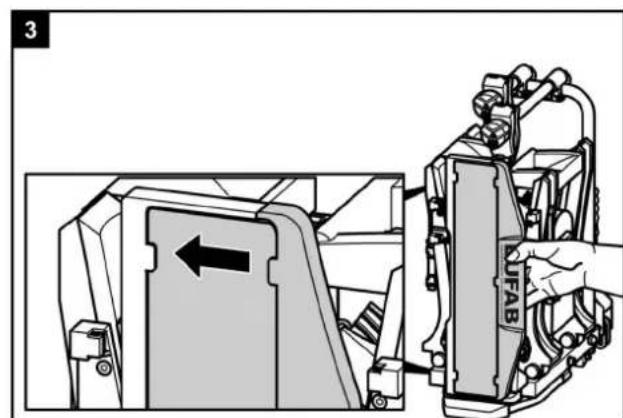
text_image
3 UFABnatural_image
Illustration of a hand gripping a curved object against a horizontal line (no text or symbols)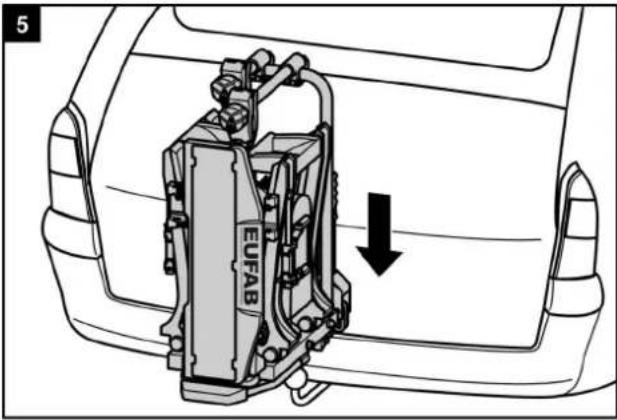
text_image
5 EUFAB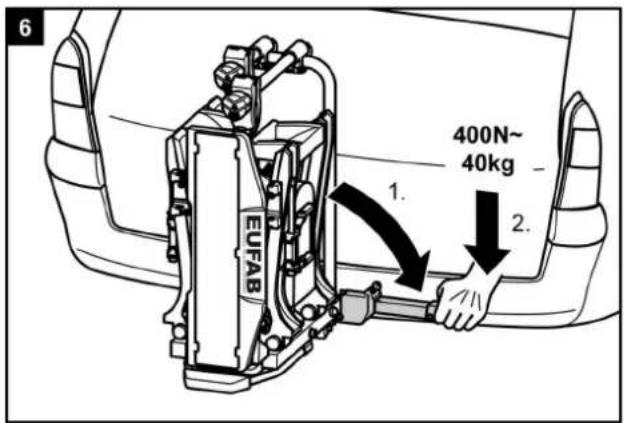
text_image
6 400N~ 40kg 1. 2.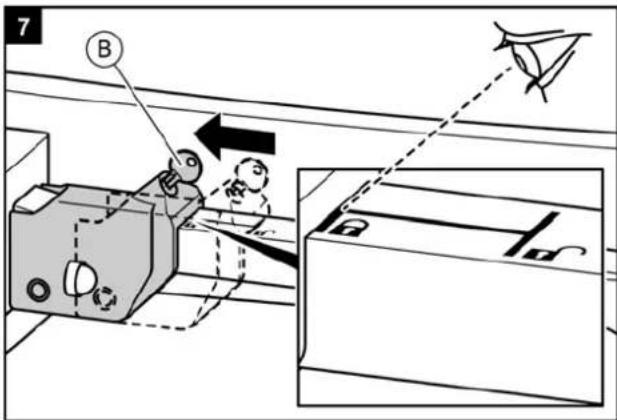
text_image
7 B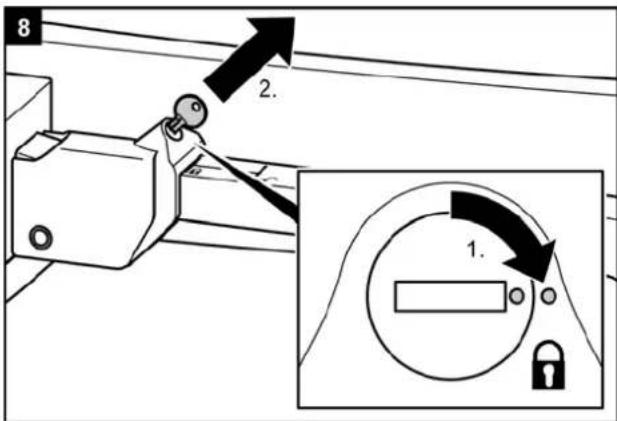
text_image
8 2. 1.WARNUNG!

natural_image
Mechanical assembly diagram showing a lever mechanism with an arrow indicating rotational motion (no text or symbols present)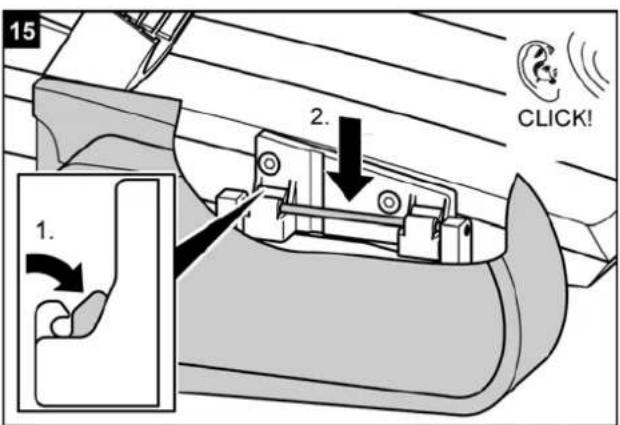
text_image
15 2. 1. CLICK!WARNUNG!

text_image
Diagram illustrating bicycle wheel assembly steps with labeled instructions for each step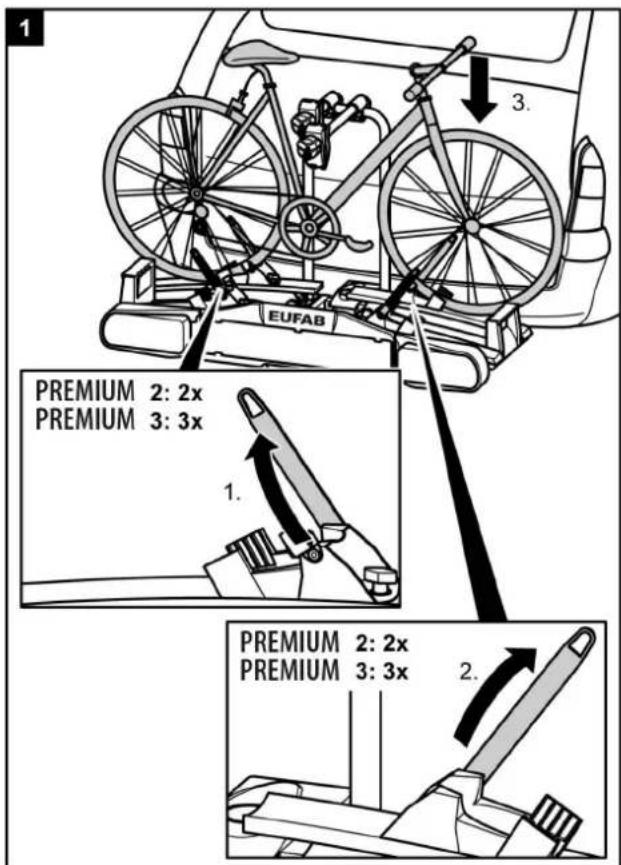
text_image
1 3. EUFAB PREMIUM 2: 2x PREMIUM 3: 3x 1. PREMIUM 2: 2x PREMIUM 3: 3x 2.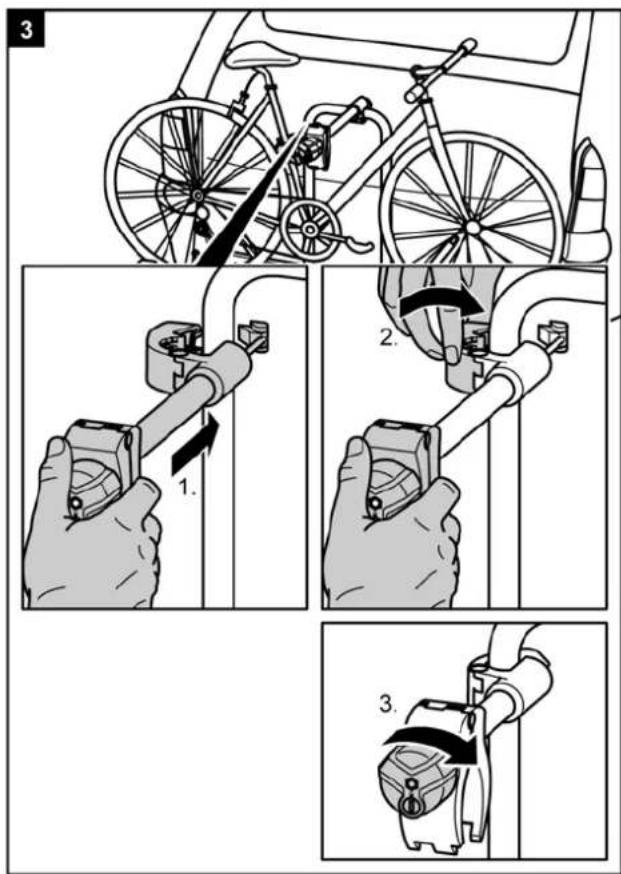
text_image
Diagram illustrating bicycle wheel assembly steps with labeled instructions for each step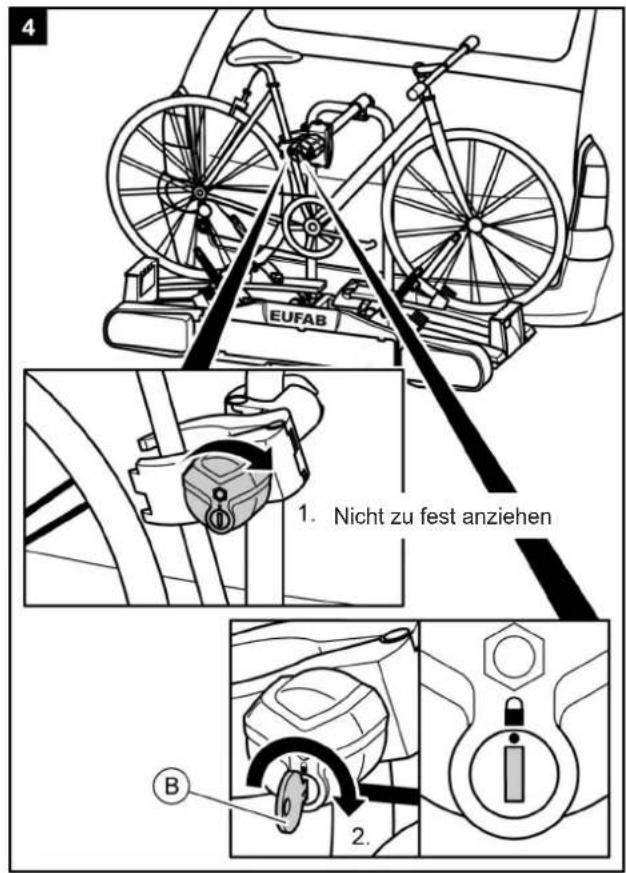
natural_image
Technical line drawing of a bicycle frame assembly with labeled components (no readable text or symbols)WARNUNG!

natural_image
Side view of a car with a mechanical device and exhaust arc (no text or symbols)ACHTUNG!

natural_image
Line drawing of a hand operating a bicycle with visible wheels and components (no text or symbols)WARNUNG!

text_image
1 ← Push to release ↑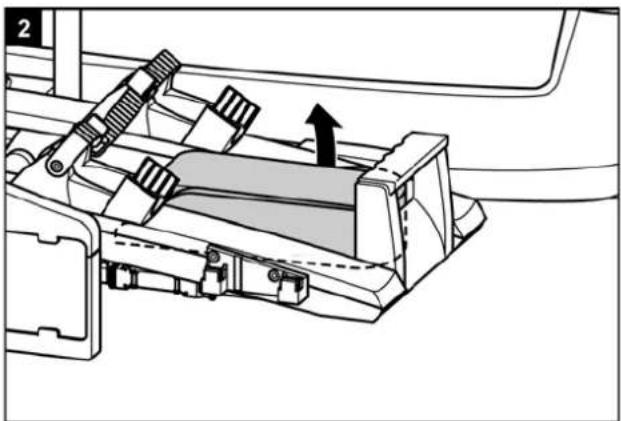
natural_image
Mechanical assembly diagram showing a lever mechanism with an arrow indicating motion (no text or symbols present)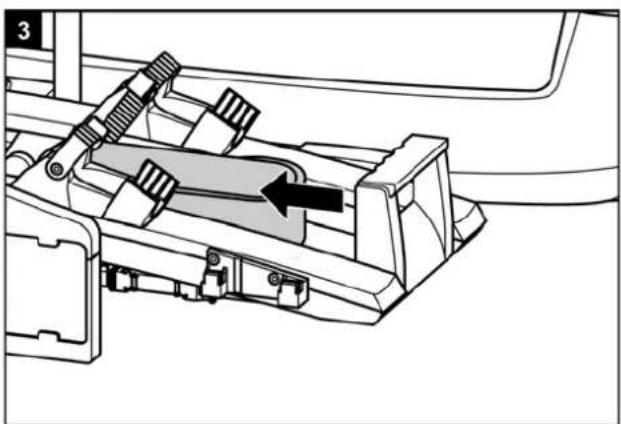
natural_image
Mechanical assembly diagram showing a lever mechanism with no visible text or symbolsnatural_image
Illustration of a hand operating a mechanical device with gears and levers (no text or symbols)text_image
1/L 6/54 2/54G 7/58L 3/31 5/58R 4/R 2/54G 7/58L 1/L 3/31 6/54 5/58R 4/Rtext_image
Diagram showing two circular electrical connectors with numbered internal components, likely for circuit or signal labeling.text_image
Exploded view diagram of a car's internal components with numbered parts for identificationOperating instructions
text_image
EUFAB PREMIUM EUFAB PREMIUMPREMIUM 2
Item no. 11521
PREMIUM 2 PLUS
Item no. 11523
PREMIUM 3
Item no. 11522
Contents
Information on these operating instructions....23
Foreword....23
Obligations regarding these fitting instructions....23
Proper use....23
Safety instructions – Explanation of the categories....23
Scope of delivery....24
Technical data....24
Coupling requirements.... 24
Safety instructions.... 24
Before first use....26
Fitting the registration plate to the bicycle....26
Fitting and use....27
Fitting the bicycle carrier to the trailer coupling....27
Mounting bicycles....30
Tilting the bicycle carrier, access to the luggage space....33
Dismantling the bicycle carrier....34
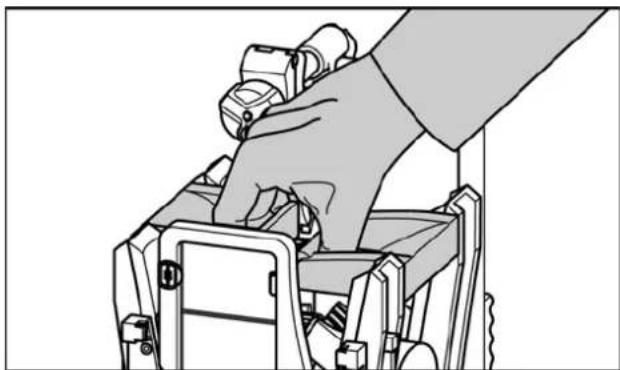
Carrying the bicycle carrier without the transport bag 35
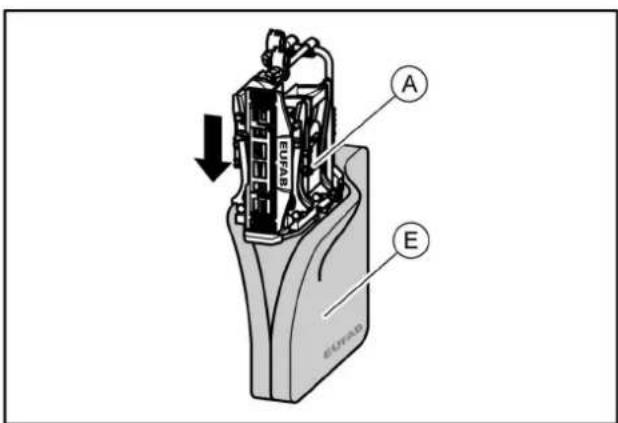
Stowing the bicycle carrier in the transport bag....35
Cleaning and care....35
Maintenance....36
Adjustment of the quick-fastener 36
Disposal....36
Contact....36
Appendix....37
Plug assignment....37
Spare parts overview - Exploded drawing....38
Spare parts overview - Table....39
Effective: 11.2018
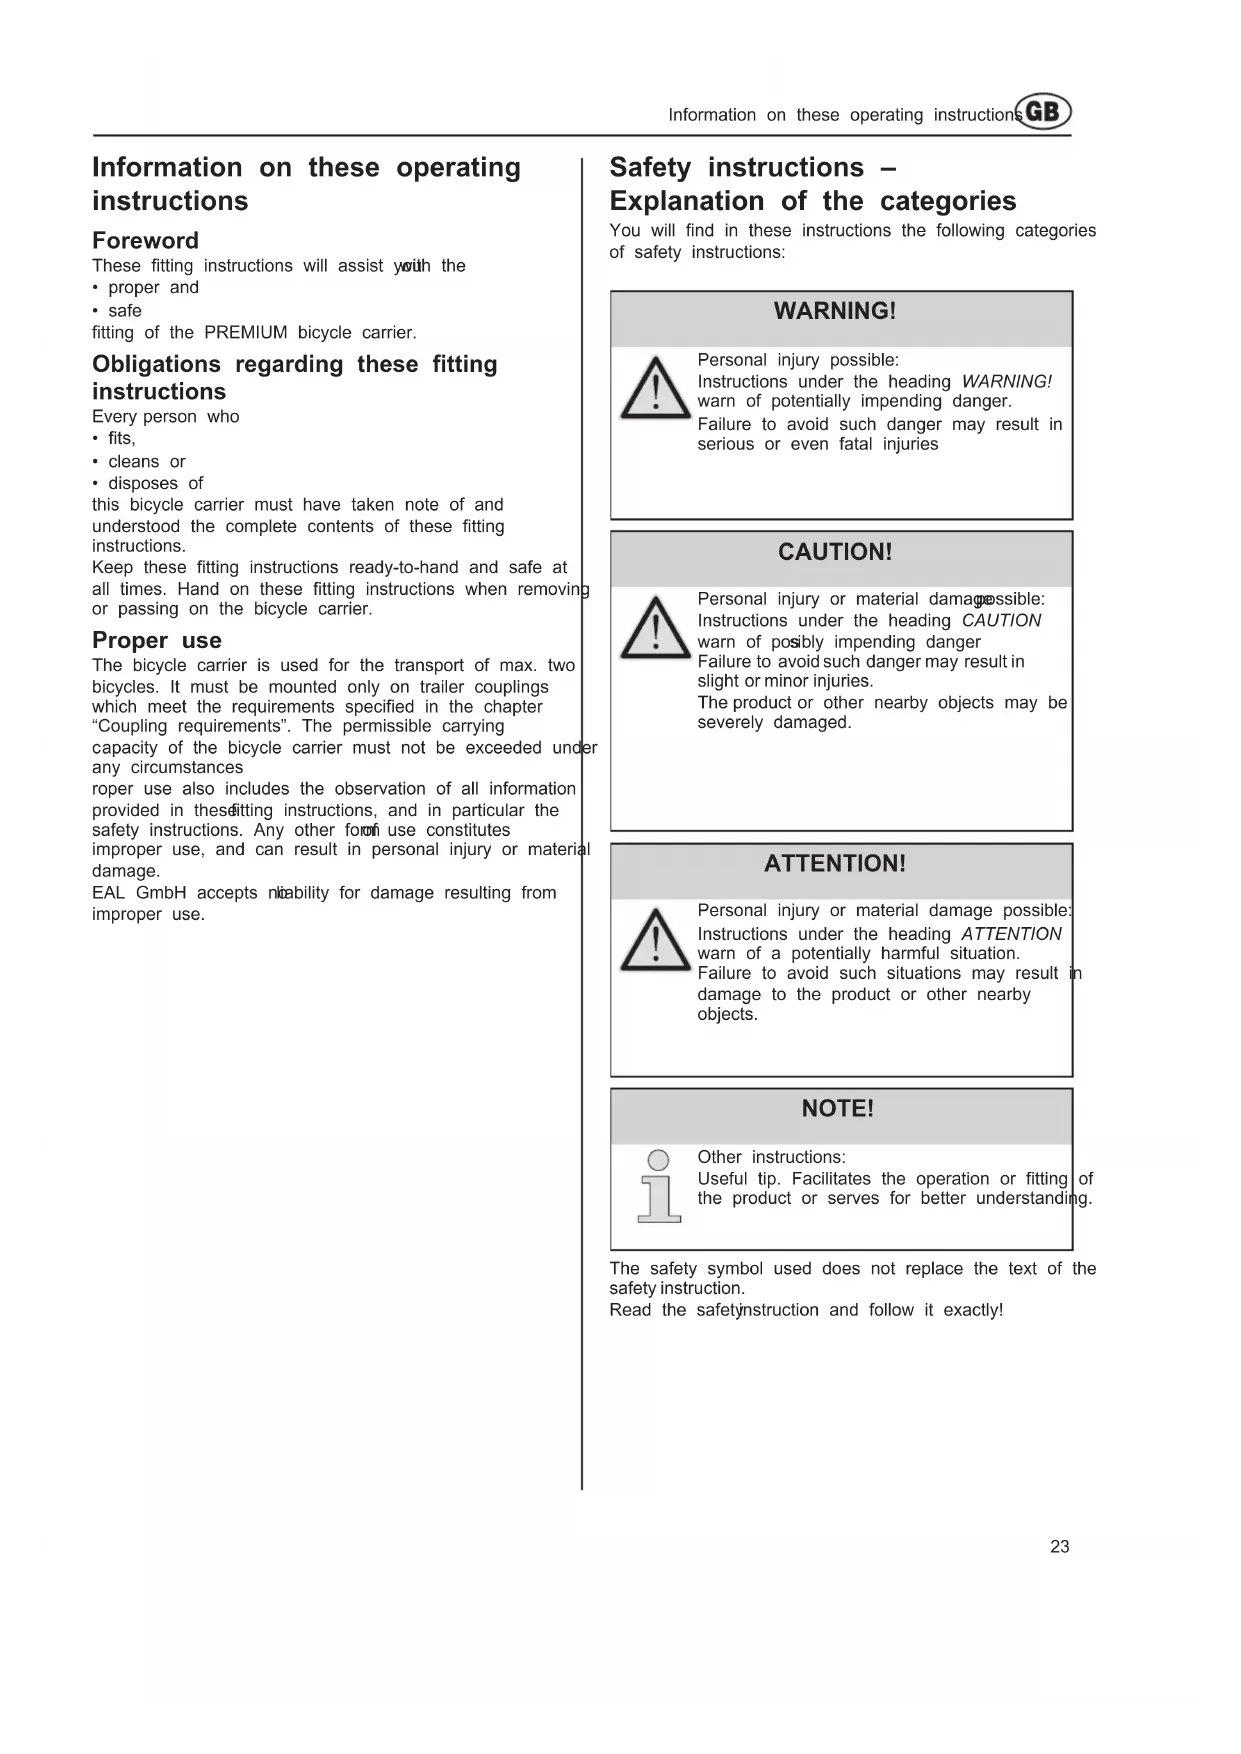
Information on these operating instructions
Foreword
These fitting instructions will assist with the
- proper and
- safe
fitting of the PREMIUM bicycle carrier.
Obligations regarding these fitting instructions
Every person who
- fits,
- cleans or
- disposes of
this bicycle carrier must have taken note of and understood the complete contents of these fitting instructions.
Keep these fitting instructions ready-to-hand and safe at all times. Hand on these fitting instructions when removing or passing on the bicycle carrier.
Proper use
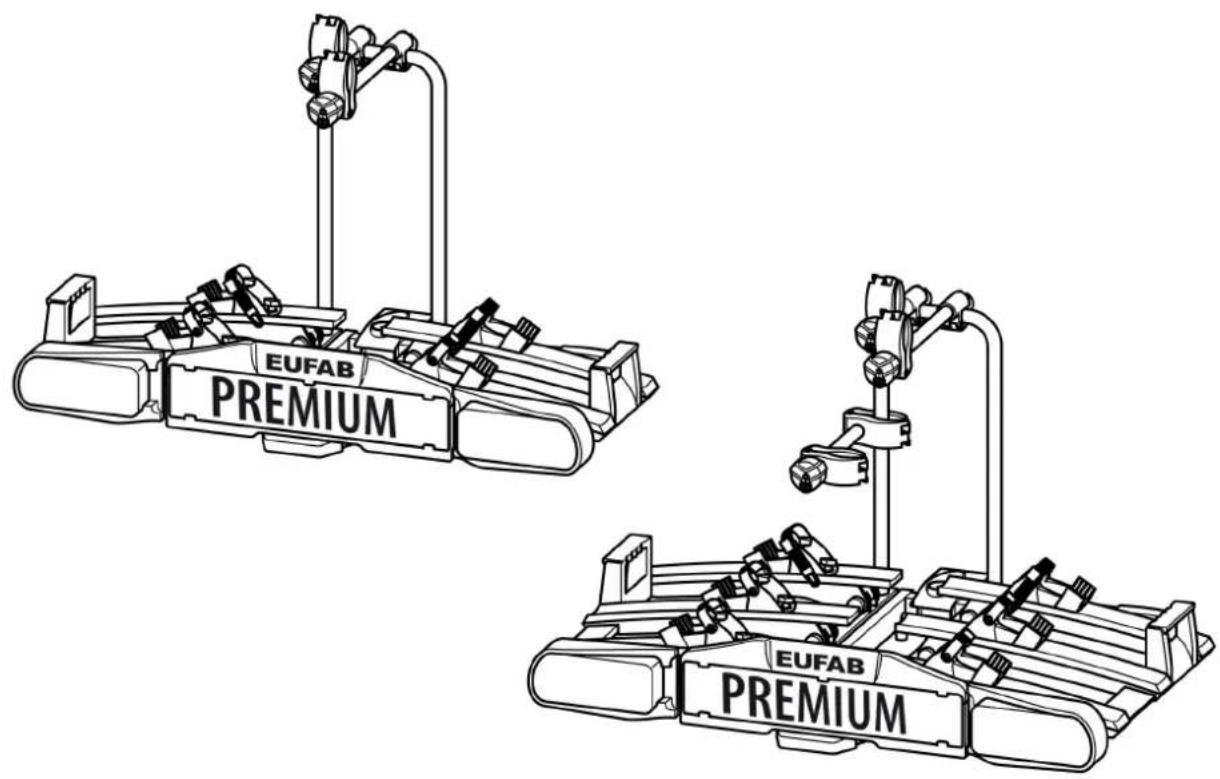
The bicycle carrier is used for the transport of max. two bicycles. It must be mounted only on trailer couplings which meet the requirements specified in the chapter "Coupling requirements". The permissible carrying capacity of the bicycle carrier must not be exceeded under any circumstances roper use also includes the observation of all information provided in these editing instructions, and in particular the safety instructions. Any other form use constitutes improper use, and can result in personal injury or material damage.
EAL GmbH accepts liability for damage resulting from improper use.
Safety instructions – Explanation of the categories
You will find in these instructions the following categories of safety instructions:
WARNING!

Personal injury possible: Instructions under the heading WARNING! warn of potentially impending danger.
Failure to avoid such danger may result in serious or even fatal injuries
CAUTION!

Personal injury or material damage possible: Instructions under the heading CAUTION warn of possibly impending danger
Failure to avoid such danger may result in slight or minor injuries.
The product or other nearby objects may be severely damaged.
ATTENTION!

Personal injury or material damage possible: Instructions under the heading ATTENTION warn of a potentially harmful situation.
Failure to avoid such situations may result in damage to the product or other nearby objects.
NOTE!

Other instructions: Useful tip. Facilitates the operation or fitting of the product or serves for better understanding.
The safety symbol used does not replace the text of the safety instruction.
Read the safety instruction and follow it exactly!
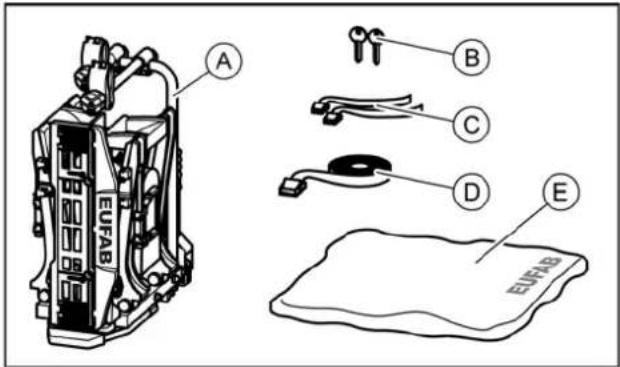
text_image
A B C D E EUFABA = Bicycle carrier
B = 2 keys
C = 2 safety straps for front wheels, PREMIUM 2
(3 safety straps for front wheels, PREMIUM 3)
D = 1 Safety strap for bicycle frame
E = Transport bag
Technical data
| PREMIUM 2 PREMIUM 2 PLUS | PREMIUM 3 | |
| Item no.: | 11521 | 11522 |
| Material: | Steel Aluminium | Steel Aluminium |
| Weight: | 17 kg | 21 kg |
| Carrying capacity, max.: | 60 kg | 60 kg |
The max.carrying capacity of the bicycle carrier and the permissible bearing load of the trailer coupling must not be exceeded.
The bicycle carrier and load must not exceed the permissible overall weight, or the permissible axle load of the vehicle.
Examples for PREMIUM 2 / PLUS
| Max. bearing load Trailer coupling | Weight Bicycle carrier | Max. carrying capacity on bicycle carrier |
| 50 kg | 17 kg | 33 kg |
| 60 kg | 17 kg | 43 kg |
| 75 kg | 17 kg | 58 kg |
| 90 kg | 17 kg | max. 60 kg ! |
Examples for PREMIUM 3
| Max. bearing load Trailer coupling | Weight Bicycle carrier | Max. carrying capacity on bicycle carrier |
| 50 kg | 21 kg | 29 kg |
| 60 kg | 21 kg | 39 kg |
| 75 kg | 21 kg | 54 kg |
| 90 kg | 21 kg | max. 60 kg ! |
Coupling requirementsScope of deliver
WARNING!

Personal injury is possible due to breakage of the trailer coupling.
The coupling could break if the bicycle carrier is fitted to a coupling made of too soft a material.
- Fit the bicycle carrier only tocaupling made of steel St52, grey cast iron GG52 or higher quality.
- Never fit the bicycle carrier to coupling made of aluminium, other light metals or plastic.
Fit the bicycle carrier only to trailer couplings with the following properties:
Material:......min. steel St52 or grey cast iron GG52
D-value: ≥ 7,6 kN
Note the instructions of the coupling manufacture.
Safety instructions
ollow the fitting instructions carefully. Failure to follow the instructions can lead to personal injuries and material damage.
If you are not sure about correct fitting, ask your dealer or the manufacturer for further information.
Neither the manufacturer nor dealer are liable for damages which are due to improper use or fitting.
Check the bicycle carrier and the load regularly: you are required to do so and may be held liable in case of damage.
NOTE

European operating approval has been obtained for this bicycle carrier. This is supplied with the carrier, and must be carried when using the carrier.
NOTE

The legal regulations and provisions on the transport of goods on the back of your vehicle apply when driving with a mounted bicycle carried.
WARNING!

Personal injury or material damage due to changed vehicle driving characteristics. Driving with the bicycle carrier fitted will affect the driving characteristics of your vehicle.
- Adjust your speed to the newiving characteristics.
- Never exceed a speed of 30 km/h.
- Avoid sudden and jerksteering movements.
- Remember that your vehicle is longer than usual.
WARNING!

Personal injury or material damage due to overloading.
Exceeding the max. carrying capacity of the bicycle carrier or the permissible bearing load of the trailer coupling or the permissible overall weight can lead to serious accidents.
- Observe the information on the max. carrying capacity, permissible bearing load and permissible overall weight of your vehicle. Never exceed these specifications.
WARNING!

Personal injury or material damage due to loss of the bicycles.
Carrying bicycles without using the safety straps can lead to accidents.
- Before the start of every journey, check the correct and firm attachment of the strap around the bikes and the U-shaped bracket of the carrier (see Step 10).
- Before the start of every journey, check the correct and firm attachment of both straps around the front wheel, and the strap around the rear wheel of the bicycle.
- Tighten the straps if necessary.
- Before the start of every journey, check that the straps are not worn or damaged.
- Worn or damaged straps must be replaced with undamaged straps before the start of the journey. The straps used must be approved by EAL GmbH.
WARNING!

Personal injury or material damage due to incompletely fitted bicycle carrier.
Driving with a folded bicycle carrier can lead to accidents.
The moving parts of bicyo-barrier constitute a source of danger if not properly fitted.
- Remove the bicycle carrier if it is not needed.
- Never drive with a folded bicycle carrier.
WARNING!

Personal injury or material damage due to projecting parts.
Parts projecting beyond the edge of the vehicle or bicycle carrier can cause personal injury or material damage when driving.
- Fit only such parts which do project beyond the edge of the vehicle or bicycle carrier.
WARNING!

Personal injury or material damage due to tarpaulins.
Tarpaulins increase the air resistance. They can become loose and fly about leading to serious accidents.
- Never use tarpaulins or covers.
WARNING!

Personal injury or material damage due to loss of the bicycles.
After the attachment, the carrier first settles properly into the coupling after driving several kilometres.
- Check the attachment of the carrier for secure attachment after driving several kilometres.
- Redo the attachment if it is loose.
WARNING!

Personal injury or material damage due to the breaking off of the bicycle carrier.
Driving with a mounted bicycle carrier over difficult terrain can lead to the carrier breaking off.
- Do not use the bicle carrier when driving over difficult terrain.
Only suitable for use on the hitch of a passenger car
ATTENTION!

Material damage due to opening tailgate.
The tailgate could impact against the bicycle carrier and be damaged.
- Switch off electric tailgates and operate them manually.
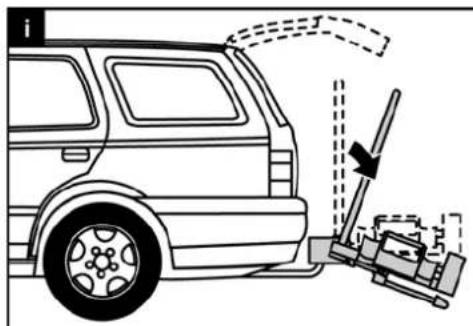
- Fold down the bicycle carrier before opening the tailgate.
ATTENTION!

Material damage due to hot exhaust gases. Damage can be caused to the bicycle carrier or the bicycles if the exhaust pipe is too close
- Fit an exhaust deflector if necessary.
Before first use
Fitting the registration plate to the bicycle carrier
text_image
1 EUFAB
text_image
Technical diagram showing mechanical assembly with labeled components and directional arrows indicating motion or movement
text_image
3 JFABFitting and use
Fitting the bicycle carrier to the trailer coupling
- Park your vehicle on a level surface.
- Apply the handbrake.
WARNING!

Personal injury or material damage due to damaged bicycle carrier.
Damage of the carrier, e.g. by bent parts, cracks or scratches, prevent the safe operation of the carrier.
- Do not fit the bicycle carrier if it is damaged in any way.
- Proceed as described in the chapter "Maintenance".
WARNING!

Personal injury or material damage due to loss of the bicycle carrier during the journey.
A faulty or defective connection between the bicycle carrier and trailer coupling can lead to the detachment of the bicycle carrier.
- Replace the trailer coupling if it is damaged.
- Clean the trailer coupling dirt, dust and grease.
NOTE

There is often a layer of paint on the coupling ball.
For the best possible attachment of the bicycle carrier, this paint coating should be carefully removed. Note the instructions of the coupling manufacturer.
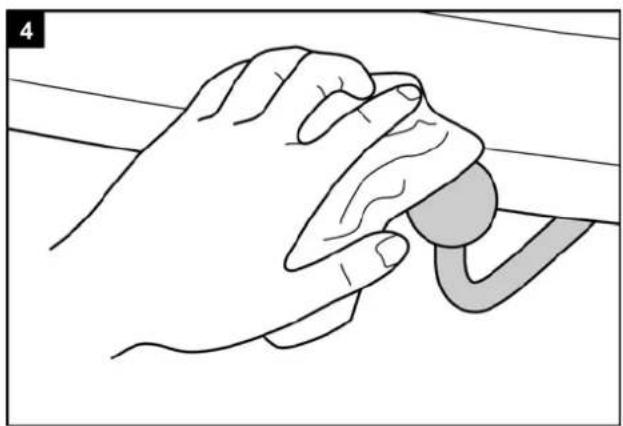
natural_image
Illustration of a hand gripping a circular object on a curved surface (no text or symbols)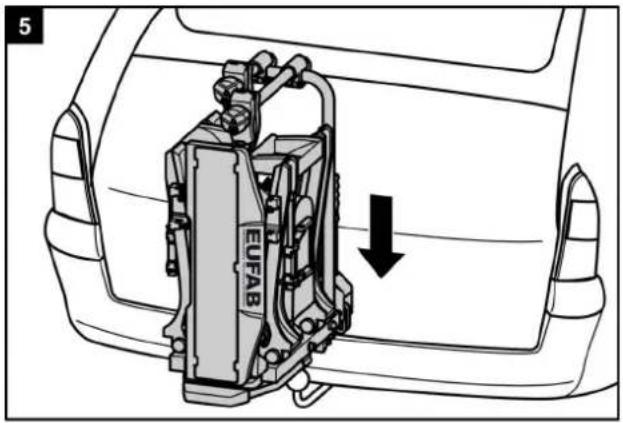
text_image
5 EUFAB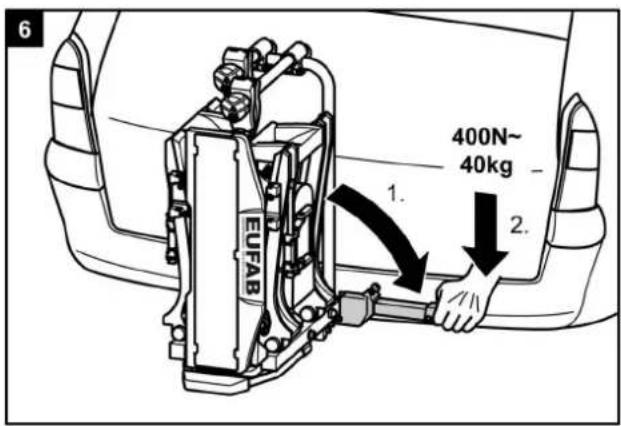
text_image
6 1. 2. 400N~ 40kg EUFAB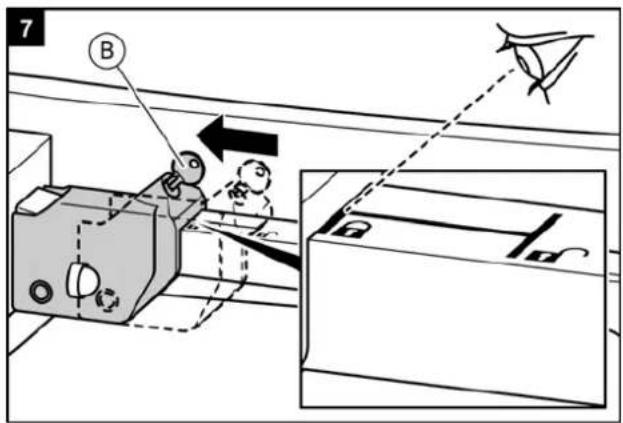
text_image
7 B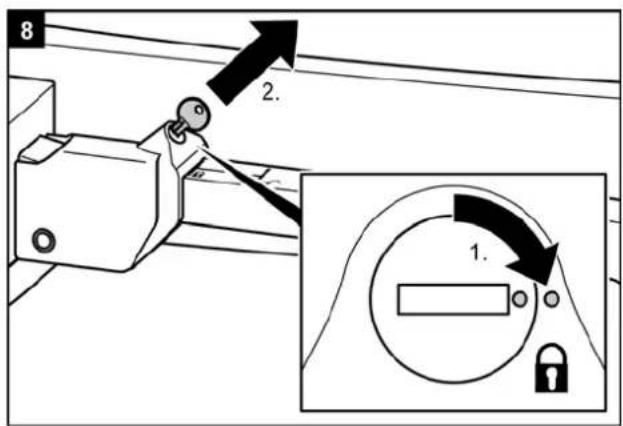
text_image
8 2. 1.WARNING!

Personal injury or material damage due to unsecure bicycle carrier.
If the lever is not secured by locking, the bicycle carrier could become detached from the vehicle during the journey
- Lock the bicycle carrier.
- Check that you have locked the lever and removed the key.
Locking the bicycle carrier also prevents its possible loss by theft.
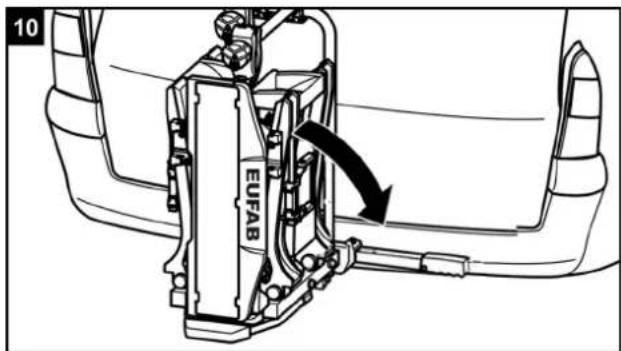
text_image
10 EUFABWARNING!

Personal injury or material damage due to loss of the bicycle carrier during the journey.
A loose connection between the bicycle carrier and trailer coupling can lead to detachment of the bicycle carrier.
- Check the bicycle carrier for secure attachment.
- Repeat steps 4 to 8 in the event close connection. If this brings about no improvement, the quick-fastenemay need to be adjusted, see chapter "Maintenance".

WARNING!
Personal injury or material damage due to unsecure registration plate holder. If the registration plate holder is not secured by the locking bolt, it could become detached during the journey.
- Withdraw the Idong bolt.
- Fold down the registration plate holder until it is heard to engage.
- Release the locking bolt and allow to engage in the hole in the registration plate holder.
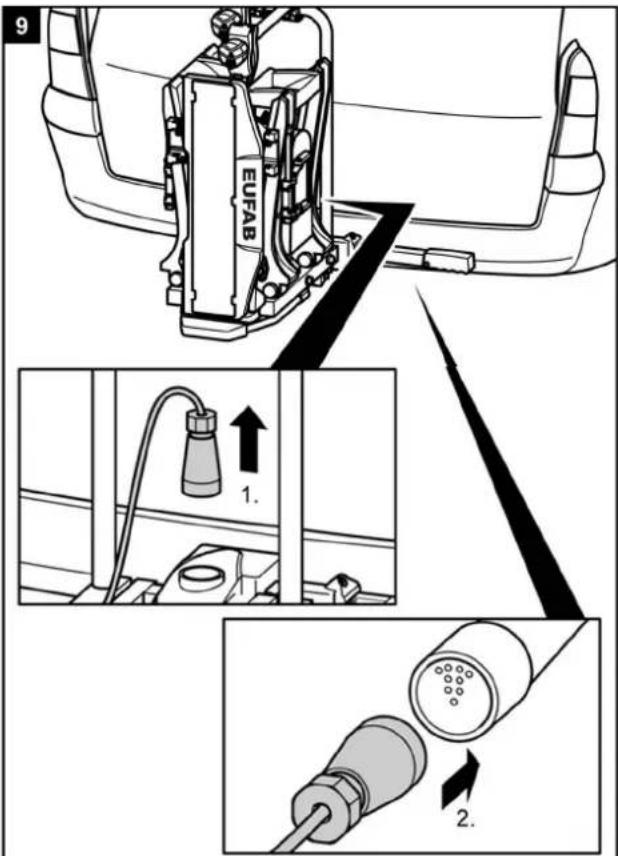
text_image
9 EUFAB 1. 2.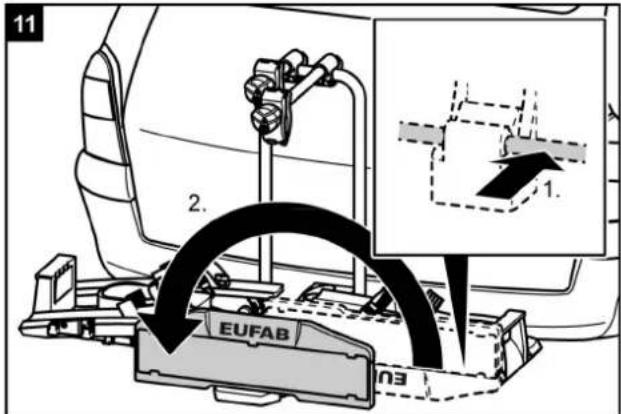
text_image
11 2. EUFAB n3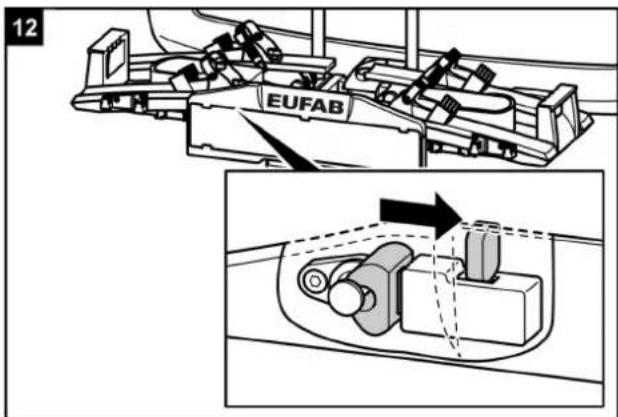
text_image
12 EUFAB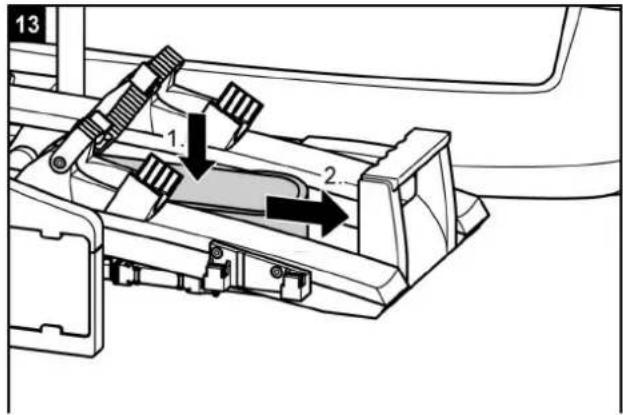
text_image
13 1. 2.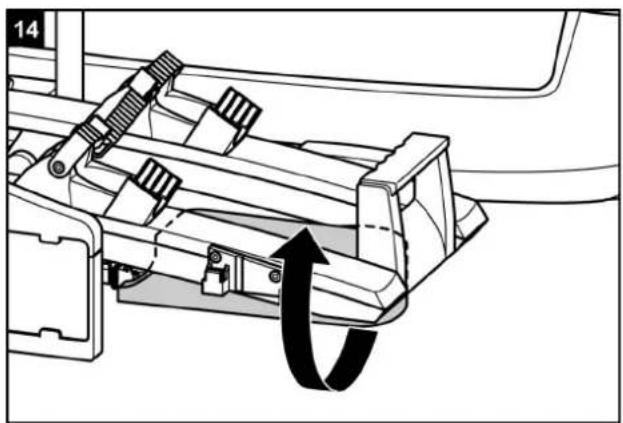
natural_image
Mechanical assembly diagram showing a lever mechanism with an arrow indicating rotational motion (no text or symbols present)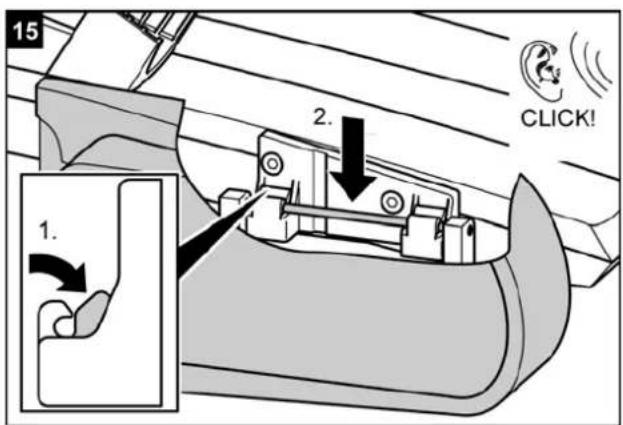
text_image
15 2. 1. CLICK!WARNING!

Personal injury due to not being seen by other road-users.
Driving with a defective lighting system can lead to accidents.
- Check the correct operation of the lighting system before the start of every journey.
- Replace any defective bulbs.
- Check the connection between the plug and coupling.
Mounting bicycles
ATTENTION!

Personal injury or material damage possible due to loose parts. Improperly tightened parts on the bicycles can become loose during the journey.
- Remove all partsnot firmly attached to the bicycle, such as bicycle pumps, panniers, navigation devices obatteries.
NOTE

In order to improve the driving characteristics of your vehicle, mount the heavier bicycle first. If carrying only one bicycle, this should be mounted in the rail closest to the of the vehicle.
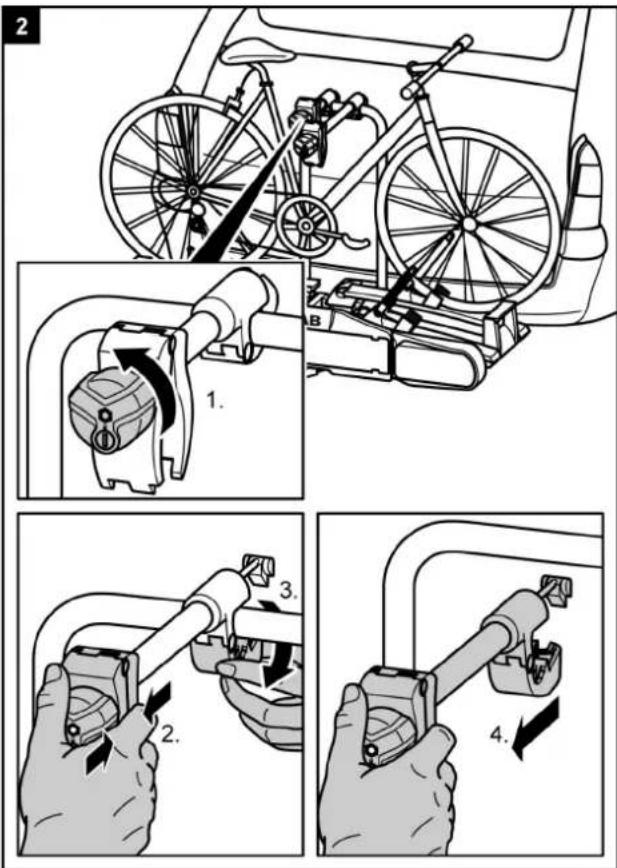
text_image
Diagram illustrating bicycle wheel assembly steps with numbered instructions for each step1
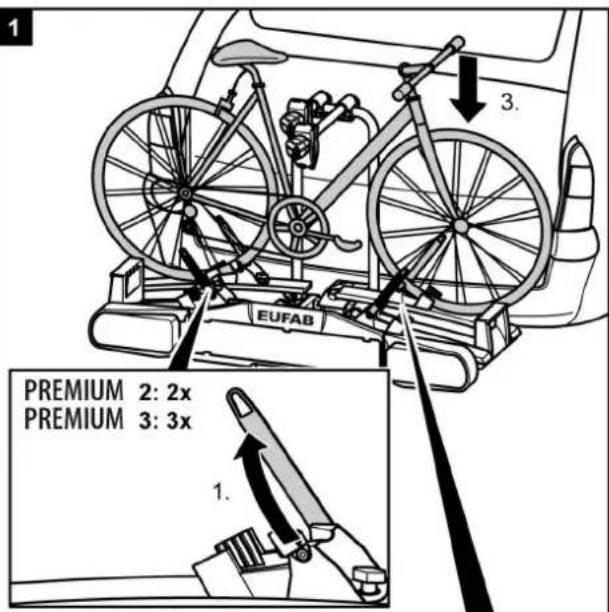
text_image
1 3. EUFAB PREMIUM 2: 2x PREMIUM 3: 3x 1.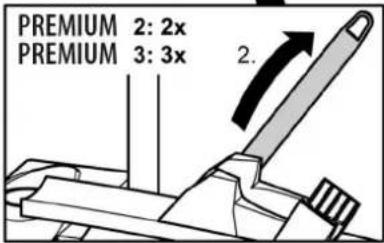
text_image
PREMIUM 2: 2x PREMIUM 3: 3x 2.3
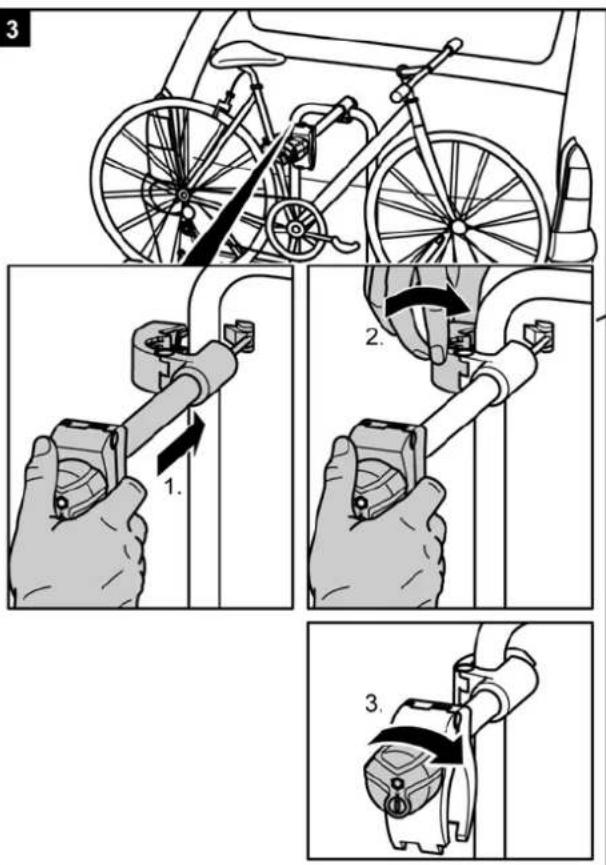
text_image
Diagram illustrating bicycle wheel assembly steps with labeled instructions for each step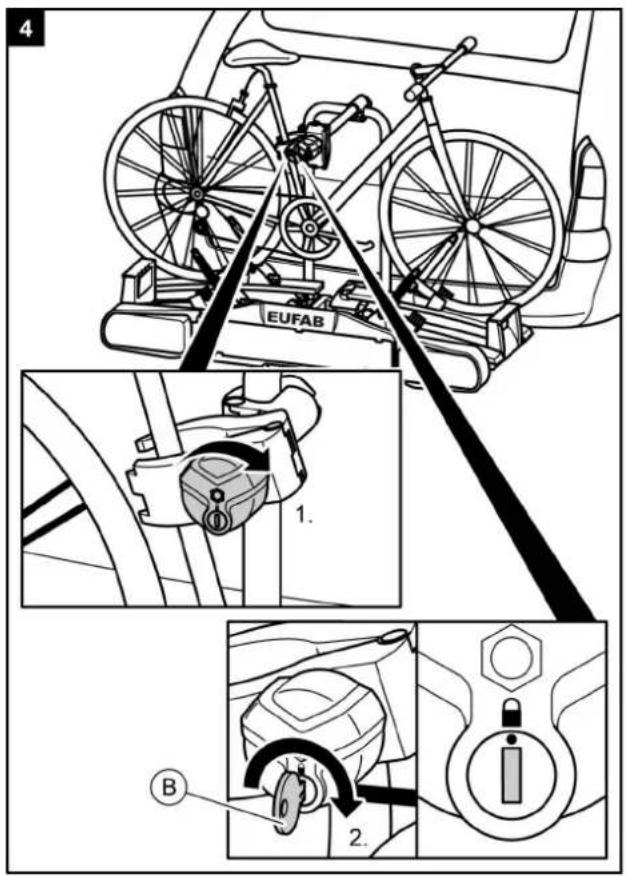
text_image
4 EUFAB 1. B 2.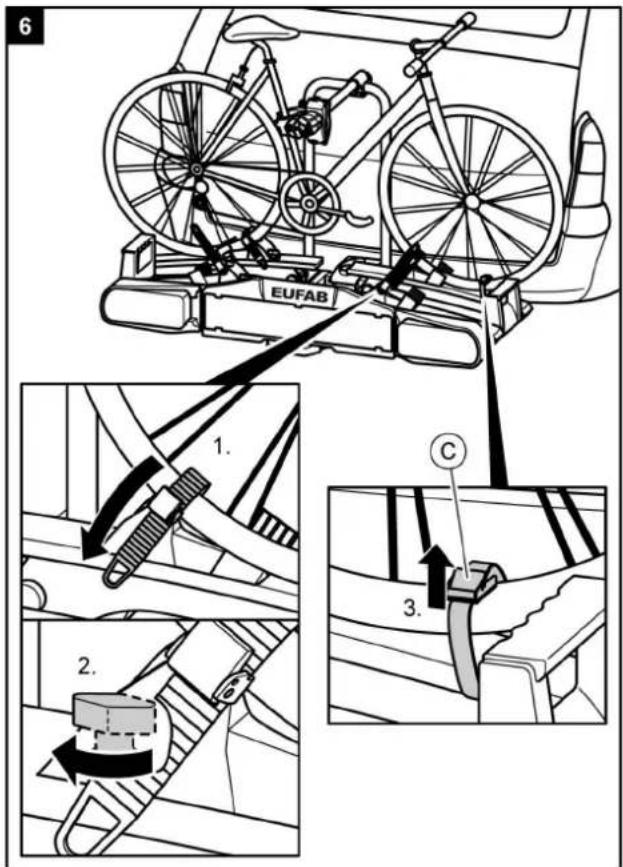
text_image
6 EUFAB 1. 2. 3. C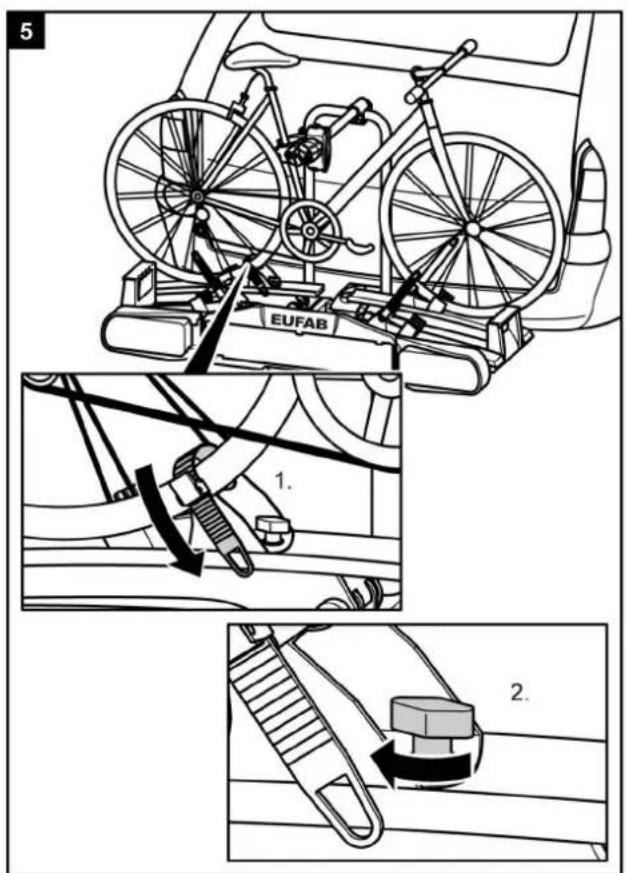
text_image
5 EUFAB 1. 2.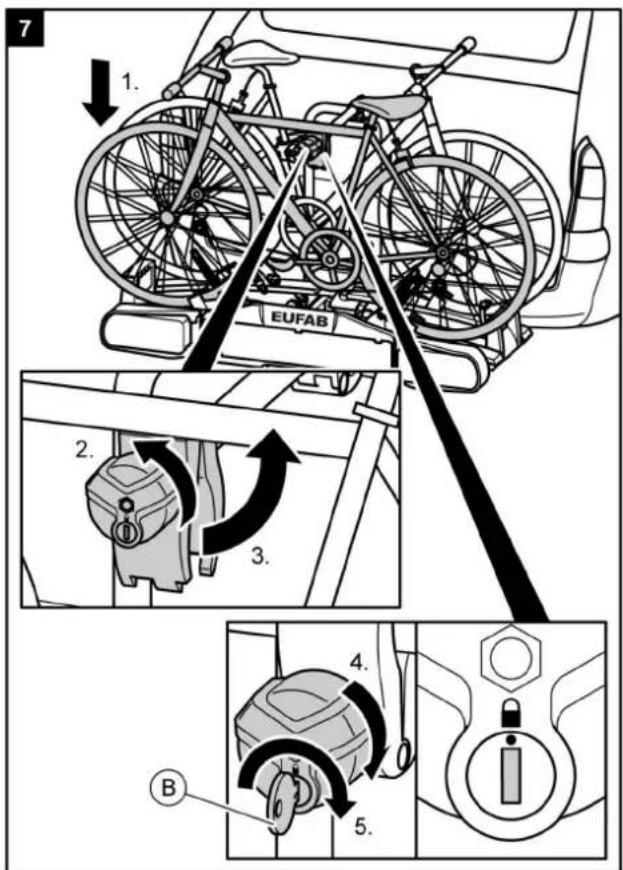
text_image
7 1. EUFAB 2. 3. 4. 5. B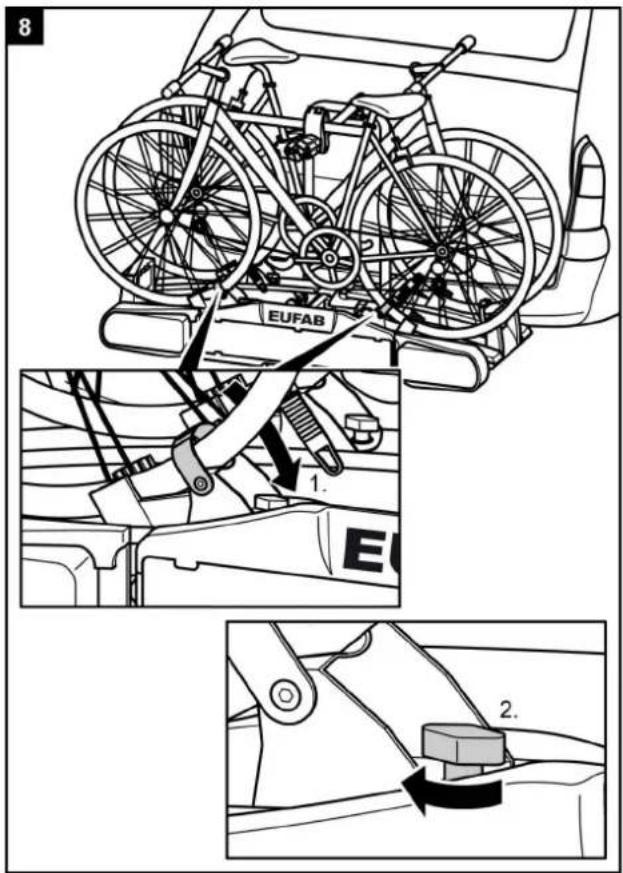
text_image
8 EUFAB 1. 2.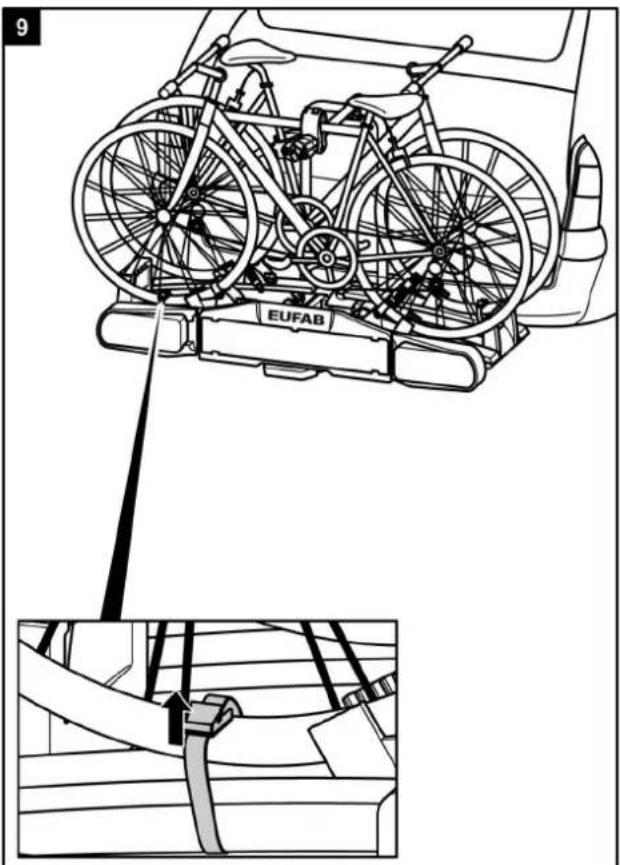
text_image
9 EUFAB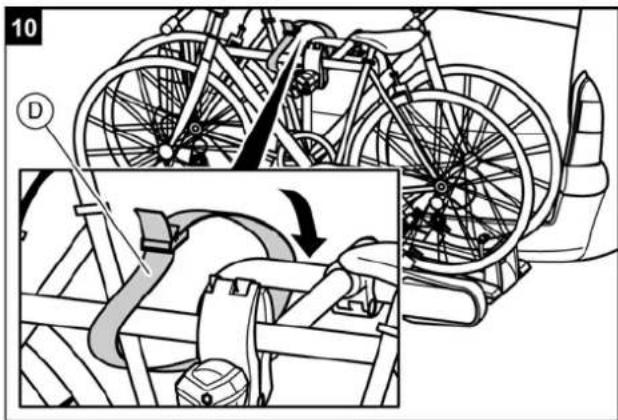
text_image
10 DWARNING!

Personal injury or material damage due to loss of the bicycles.
Carrying bicycles without using the safety straps can lead to accidents.
- Before the start of every journey, check the correct and firm attachment of the strap around the bikes and the U-shaped bracket of the carrier (see Step 10).
- Before the start of every journey, check the correct and firm attachment of both straps around the front wheel, and the strap around the rear wheel of the bicycle.
- Tighten the straps if necessary.
- Before the start of every journey, check that the straps are not worn or damaged.
- Worn or damaged straps must be replaced with undamaged traps before the start of the journey. The straps used must be approved by EAL GmbH.
WARNING!

Personal injury or material damage due to loss of a bicycle during the journey.
A loose connection between the bicycle carrier and bicycle can lead to detachment of the connection and loss of the bicycle.
- Check the bicycles for secure and complete attachment.
- Repeat steps 1 to 10 of this chapter the event of a loose connection.
PREMIUM 3: Assembly of a third bicycle
NOTE

The assembly of a third bicycle is done using the free wheel stoppers on the eastyas with the attachment of the first and second bicycles. The third bicycle is additionally connected to the centre bicycle frame with the short lock bracket.
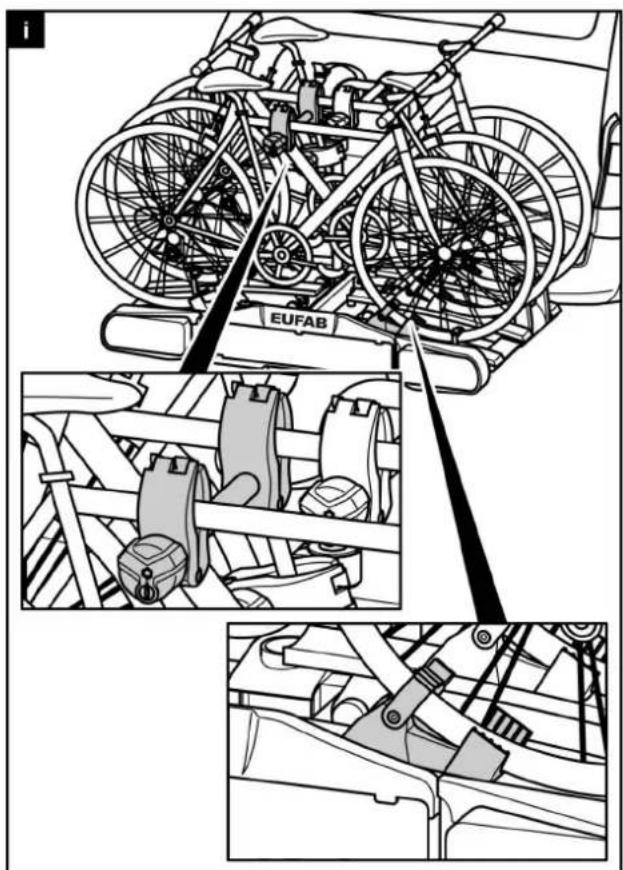
natural_image
Technical line drawing of a bicycle frame assembly with labeled components (no readable text or symbols)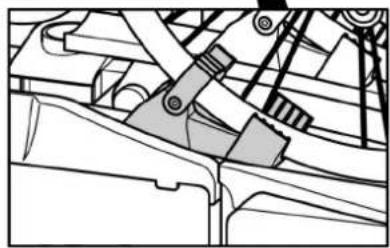
natural_image
Mechanical assembly diagram showing linkage components (no text or labels)WARNING!

Personal injury or material damage due to loss of the bicycle carrier during the journey. Carrying bicycles without using the safety straps can lead to accidents.
A loose connection between the bicycle carrier and bicycle can lead to detachment of the connection and loss of the bicycle.
- Carefully observe all warnings on page 30.
Tilting the bicycle carrier, access to the luggage space
natural_image
Diagram of a car being towed by a mechanical device, showing motion and safety instructions (no text or symbols)ATTENTION!

Material damage due to opening tailgate. The tailgate could impacagainst the bicycle carrier and be damaged.
- Switch off electric tailgates and operate them manually.
- Fold down the bicycle carri before opening the tailgate.
text_image
1 KLMIUN 1. 2. EUFABCAUTION!

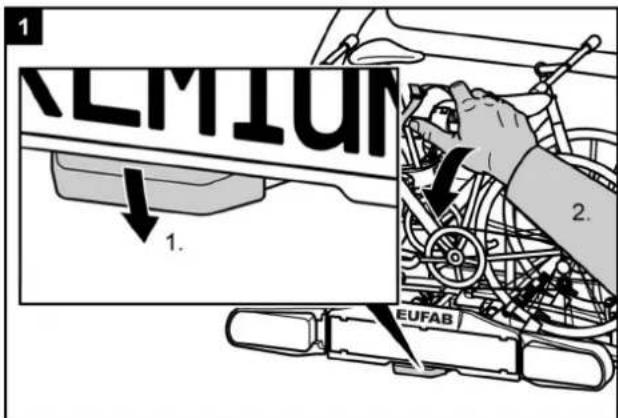
Personal injury or material damage due to sudden folding down of the carrier. Body parts or objects under or in front of the carrier when it is folded down may be trapped.
• Make sure that there is nothing under the carrier.
- Keep all body parts, and particularly your head, clear, and maintain a suitable safety distance.
- Hold the carrier by the U-bracket when folding it down. With your foot loosen the locking device(1.) and then tilt the carrier downward with your hand (2.)
CAUTION!

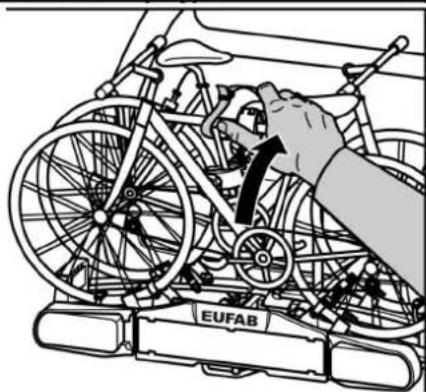
Personal injury or material damage possible when folding up the carrier.
and
Body parts or objects between the carrier and the vehicle when it is folded up may be trapped.
• Make sure that there is nothing between the carrier and the vehicle.
- Remove any objects between the carrier and the vehicle.
2

natural_image
Line drawing of a hand operating a bicycle with visible wheels and components (no text or symbols)WARNING!

Personal injury or material damage possible due to loss of the bicycle carrier during the journey.
A bicycle carrier which is not folded up car result in detachment of the carrier or the coupling.
- Fold the carrier up before the start of the journey.
- Check that the bicycle carrier is correctly engaged and the rotary knob is set "locked". Lock the carrier if necessary as described above and set the rotary knob to "locked".
Dismantling the bicycle carrier
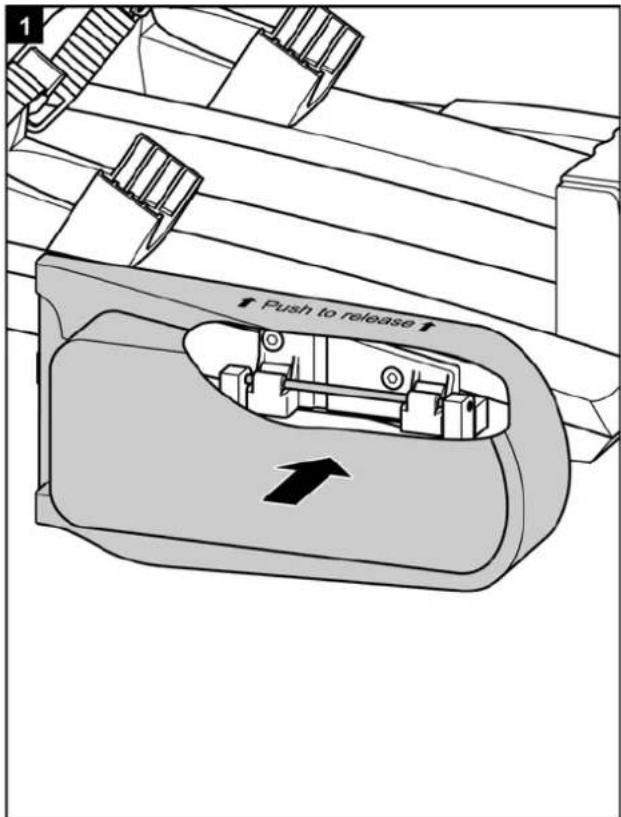
text_image
1 ← Push to release ↑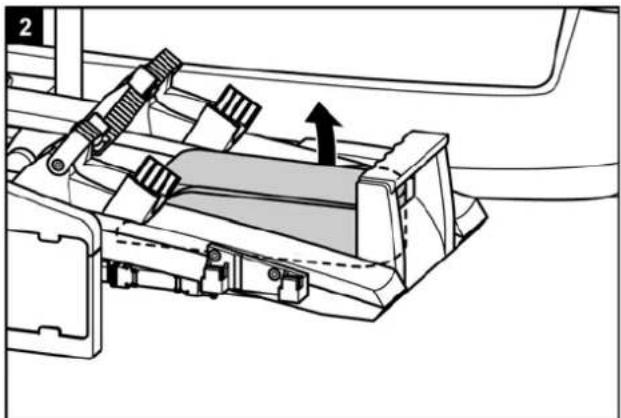
natural_image
Mechanical assembly diagram showing a lever mechanism with an arrow indicating motion (no text or symbols present)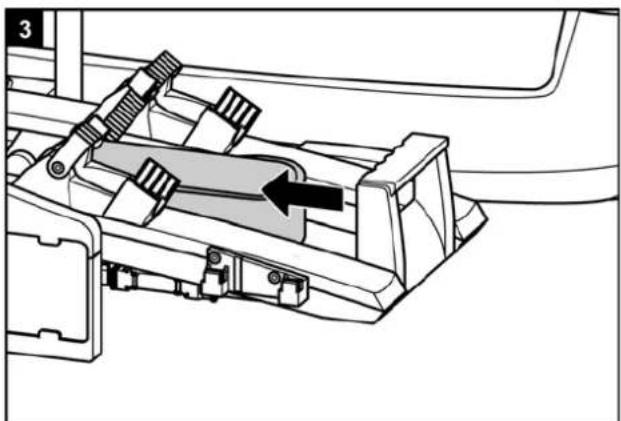
natural_image
Mechanical assembly diagram showing a lever mechanism with a black arrow indicating direction (no text or symbols present)First release the locking bolt behind the registration plate holder.
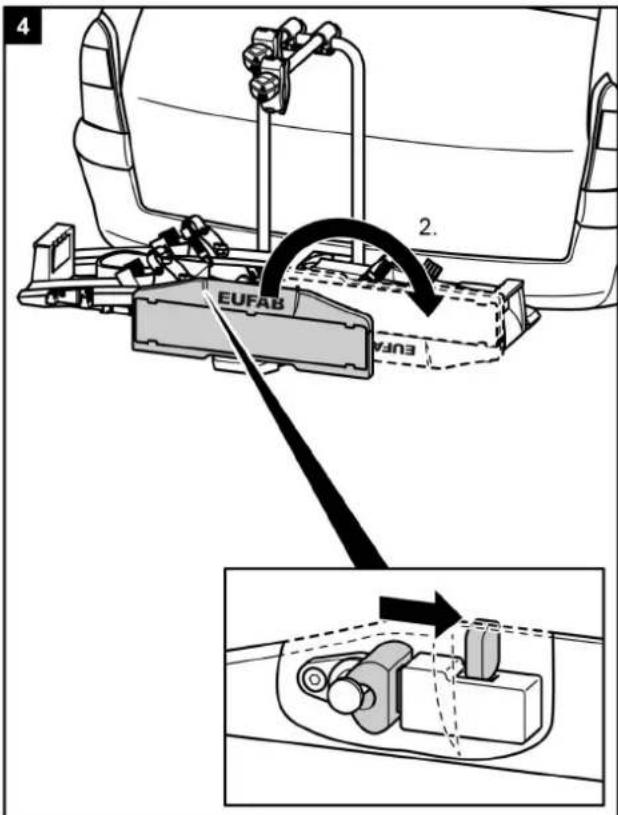
text_image
4 2. EUFAB EUFABTo dismantle the bicycckarrier, proceed in the reverse order to fitting
Carrying the bicycle carrier
natural_image
Illustration of a hand operating a mechanical device with no visible text or symbolsStowing the bicycle carrier in the transport bag
text_image
A ECleaning and care
The bicycle carrier can be cleaned with a mild cleaning agent, with warm water and/or a soft cloth.
First remove any coarse dirt and dust. not use any solvents or similar cleaning agents, since these can damage the bicycle carrier.
Leave the bicycle carrier to dry on its ownoDase any electrical driers or other heating equipment to speed up the drying process.
Clean the bicycle carrier regularly when used in coastal areas or in winter conditions in order to wash off any salt and prolong the service life of the bicycle carrier.
Store the bicycle carrier in a dry and protected area when not used for extendeperiods (e.g. over winter) in order to prolong the service life of the bicycle carrier.
Maintenance
Check the bicycle carrier for wear before the start of every journey. Defective metal parts and straps in particular must be replaced.
Please refer to our customer service for the replacement of parts.
Any modification of original parts and materials or the construction of bicycle carrier can adversely affect its safety and serviceability.
The steel parts of the bicycle carrier are protected in the works against corrosion by a powder-paint coating. If this paint coating is damaged, please have the damage rectified professionally as soon as possible.
Under normal conditions and use, the bicycle carrier only requires cleaning, and is otherwise maintenance-free.
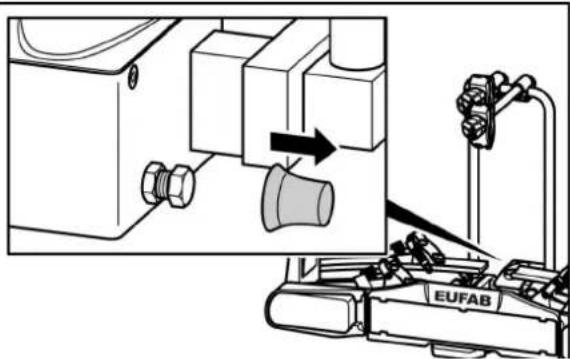
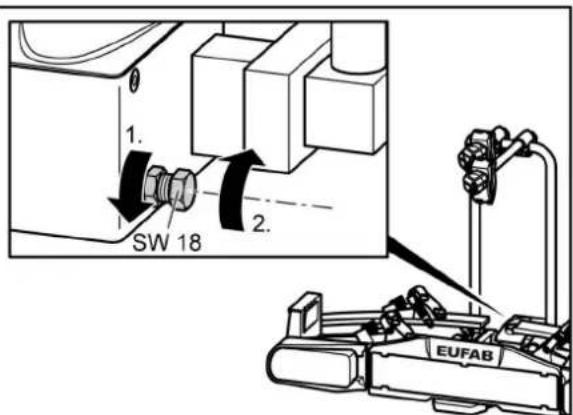
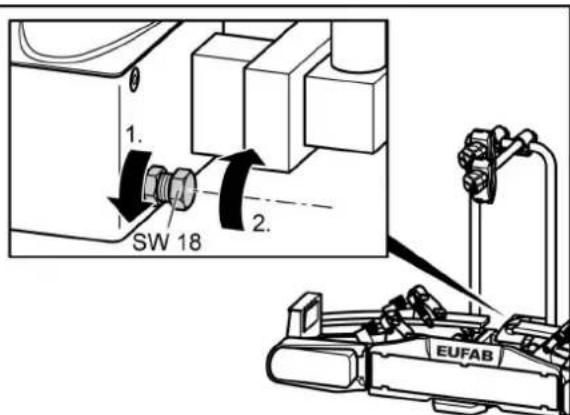
Adjustment of the quick-fastener
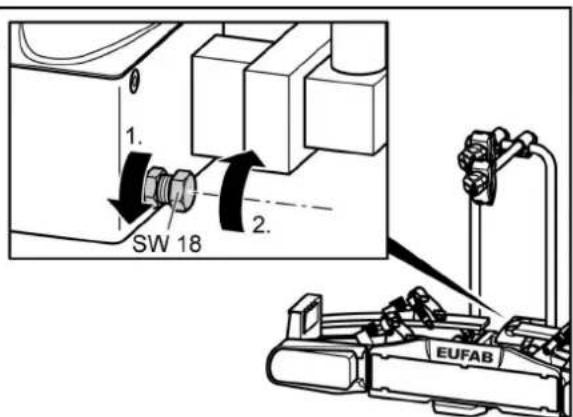
Carry out this maintenance operation only if the bicycle carrier cannot be fitted firmly to the trailer coupling, as described in the chapter "Fitting".
- Remove the bicycle carrier from the trailer coupling, as described under "Dismantling".
- Remove the dust protection cap.
- Loos en the locking nut slightly, as shown in the illustration.
- Screw in the setting screw one quarter of a turn.
- Tighten the locking nut.
- Check whether the carrier is now firmly seated on the trailer coupling, as described under "Fitting". If not, repeat the above steps.
1
text_image
Technical diagram showing mechanical assembly with labeled components and directional arrow indicating process flow2
text_image
1. SW 18 2. EUFAB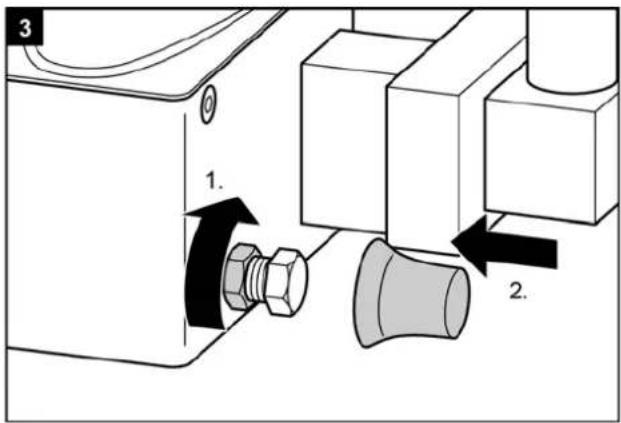
text_image
3 1. 2.Disposal
Environmental note

Due to its lighting system, the bicycle carrier is an electrical device.
Do not dispose of electrical appliances in household waste! Discarded electrical and electronic equipment must be collected separately and recycled in an environmentally sound manner. Contact your municipal or city government on how to dispose of old electronic equipment.
The materials are recyclable. You are making an important contribution to protecting our environment through recycling, material recycling or other forms of re-utilising old appliances!
Dispose of the bicycle rack in accordance with the laws and conditions in your country.
Contact
EAL GmbH
The bicycle carrier is equipped with a lighting system. This is connected to the socket on the trailer coupling with a13-pin plug. If your vehicle has a 7-pin connection instead of a 13-pin one the corresponding assignments are listed below. This information is only for the retrofitting by a specialised dealer A retrofitting by non-trained persons is not permitted.
7 Pin
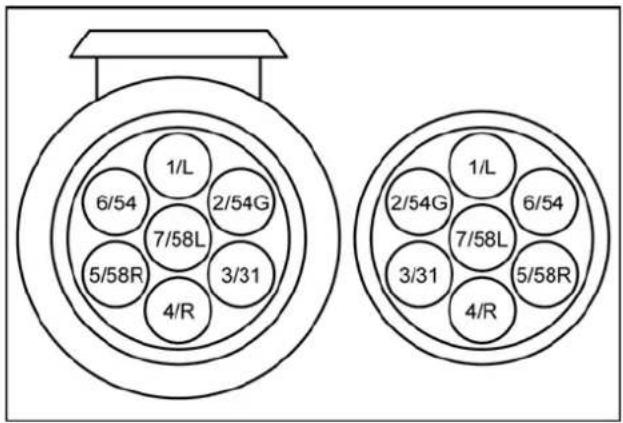
text_image
1/L 6/54 2/54G 7/58L 5/58R 3/31 4/R 2/54G 7/58L 3/31 1/L 6/54 5/58R 4/R| 1/L | Blinker left | yellow |
| 2/54G | Rear fog light | blue |
| 3/31 | Earth | white |
| 4/R | Blinker right | green |
| 5/58R | Taillight right | brown |
| 6/54 | Brake light | red |
| 7/58L | Taillight left | black |
13 Pin
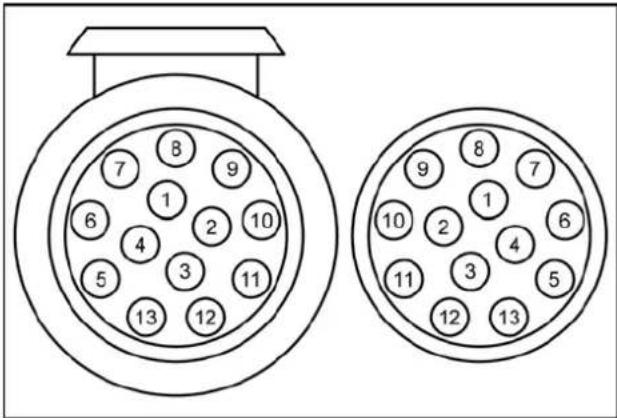
text_image
7 8 9 1 2 10 4 3 11 5 13 12 10 2 4 6 11 3 5 12 13| 1 | Blinker left | yellow |
| 2 | Rear fog light | blue |
| 3 | Earth | white |
| 4 | Blinker right | green |
| 5 | Taillight right | brown |
| 6 | Brake light | red |
| 7 | Taillight left | black |
| 8 | Reserving light | grey |
| 9 | Not assigned | |
| 10 | Not assigned | |
| 11 | Not assigned | |
| 12 | Earth | |
| 13 | Not assigned |
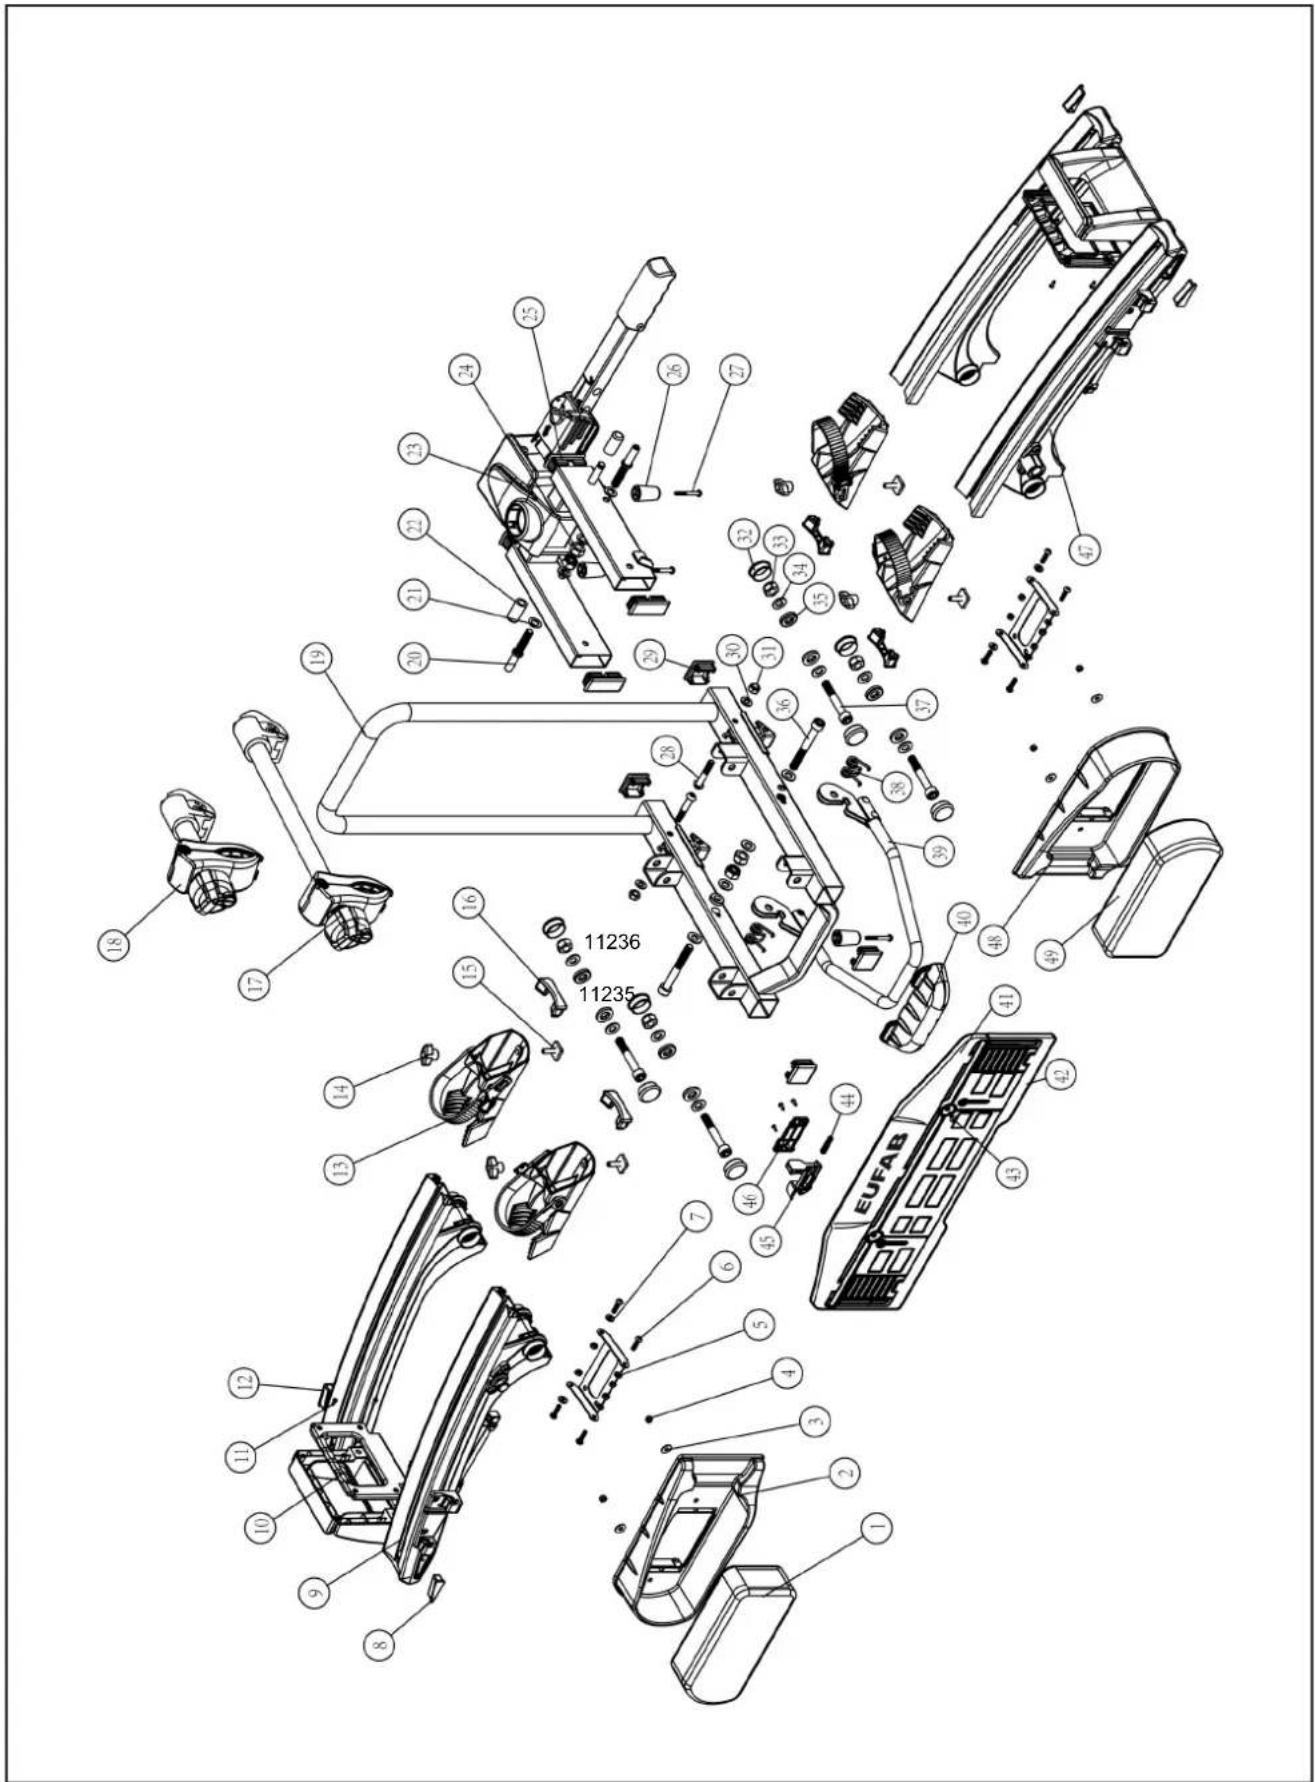
text_image
Exploded view diagram of a car's internal components with numbered parts, including EUFAB and 11235 variants.| Pos. | Spare part no. | Quantity | Designation |
| 1 | pre-assembled 11503 | 1 | Lamp complete left |
| 2 | pre-assembled 90836 | 1 | Lamp guard left |
| 3 | pre-assembled 90254 | 4 | Washer M5 |
| 4 | pre-assembled 90837 | 4 | Capped nut M5 |
| 5 | permanently assembled 90838 | 2 | Lamp countersink |
| 6 | pre-assembled 90839 | 8 | "Screw M5 x 20 mm" |
| 7 | pre-assembled 90254 | 8 | Washer M5 |
| 8 | pre-assembled 90844 | 2 | Cover cap handle bracket |
| 9 | permanently assembled 90843 | 4 | Aluminium wheel rail |
| 10 | pre-assembled 90842 | 2 | Carrier handle cover |
| 11 | permanently assembled 90872 | 8 | Screw |
| 12 | permanently assembled 90844 | 2 | Cover cap handle bracket 0 |
| 13 | pre-assembled 90845 | 4 | Wheel blocker with tension belt |
| 14 | pre-assembled 90515 | 4 | Wing nut M6 |
| 15 | pre-assembled 90846 | 4 | "Setting screw M6 x 20mm" |
| 16 | pre-assembled 90847 | 4 | "End cap aluminium rail interior" |
| 17 | pre-assembled 11236 | 1 | Lock bracket long |
| 18 | pre-assembled 11235 | 1 | Lock bracket short |
| 19 | permanently assembled 90848 | 1 | Carrier table bracket and U-bracket |
| 20 | pre-assembled 90849 | 2 | Locking pin M10 |
| 21 | pre-assembled 90321 | 2 | Washer M10 |
| 22 | pre-assembled 90850 | 2 | Bearing pad |
| 23 | permanently assembled 90851 | 1 | Base frame with quick release |
| 24 | pre-assembled 90320 | 2 | "Self-locking nut M10" |
| 25 | pre-assembled 90020 | 4 | "Stopper 60mm x 25mm" |
| 26 | pre-assembled 90852 | 3 | Foot plastic |
| 27 | pre-assembled 90853 | 3 | Screw foot M6 x 40mm |
| 28 | pre-assembled 90854 | 2 | "Allen wrench M8 x 45mm" |
| 29 | pre-assembled 90855 | 4 | "Stopper for no. 19 35mm x 35mm" |
| 30 | pre-assembled 90252 | 2 | Washer M8 |
| 31 | pre-assembled 90255 | 2 | "Self-locking nut M8" |
| 32 | pre-assembled 90856 | 8 | Cover cap hinge |
| Pos. | Spare part no. | Quantity | Designation |
| 33 | pre-assembled 90320 | 4 | "Self-locking nut M10" |
| 34 | pre-assembled 90321 | 4 | Washer M10 |
| 35 | pre-assembled 90857 | 4 | Inner pane M10 |
| 36 | pre-assembled 90858 | 2 | "Allen wrench M10 x 80mm" |
| 37 | pre-assembled 90858 | 4 | "Allen wrench M10 x 80mm" |
| 38 | permanently assembled 90859 | 2 | "Spring for locking no. 39" |
| 39 | permanently assembled 90860 | 1 | Fold up locking mechanism |
| 40 | pre-assembled 90861 | 1 | "Kick plate for locking mechanism" |
| 41 | pre-assembled 90864 | 1 | Registration plate holder |
| 42 | permanently assembled 90863 | 2 | Registration plate lock |
| 43 | pre-assembled 90871 | 1 | Registration plate mounting |
| 44 | permanently assembled 90856 | 1 | Bolts |
| 45 | permanently assembled 90866 | 1 | "Registration plate bracket- locking mechanism" |
| 46 | permanently assembled 90867 | 1 | Holder locking mechanism |
| 47 | pre-assembled 90870 | 1 | Plastic cover wheel rail |
| 48 | pre-assembled 90869 | 1 | Lamp guard right |
| 49 | pre-assembled 11502 | 1 | Lamp complete right |
text_image
Technical diagram showing mechanical assembly with labeled components and directional arrows indicating motion or movement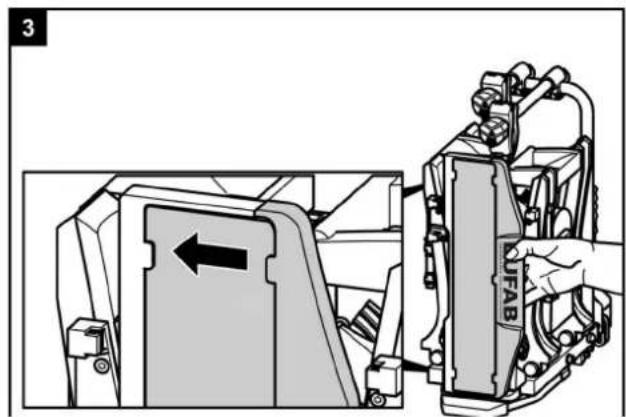
text_image
3 UFABnatural_image
Illustration of a hand gripping a circular object with a curved handle, against a plain background (no text or symbols)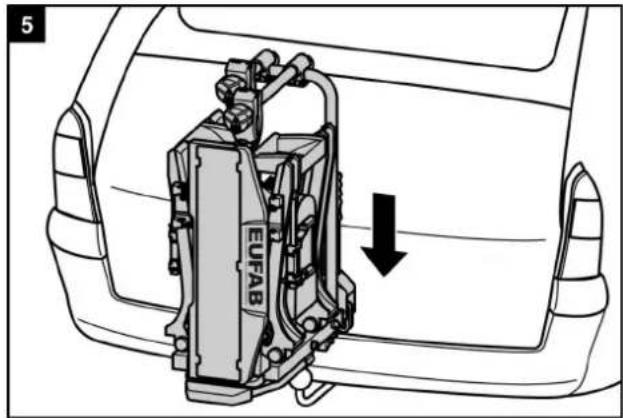
text_image
5 EUFAB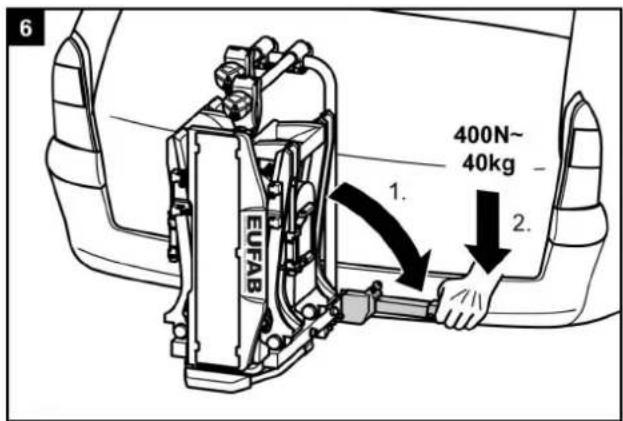
text_image
6 1. 2. 400N~ 40kg EUFAB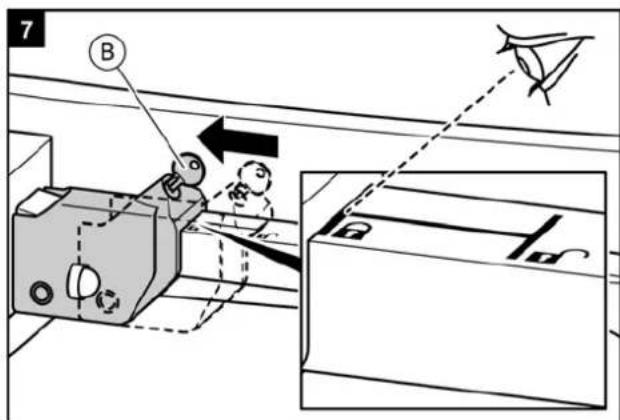
text_image
7 B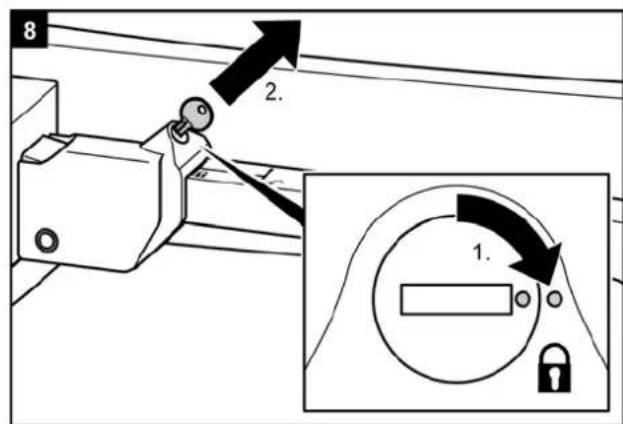
text_image
8 2. 1.AVERTISSEMENT !

natural_image
Mechanical assembly diagram showing a lever mechanism with a curved arrow indicating motion (no text or symbols present)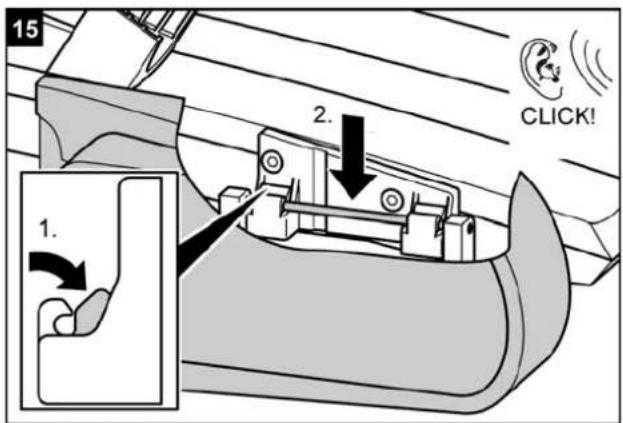
text_image
15 2. 1. CLICK!AVERTISSEMENT !

natural_image
Technical line drawing of a bicycle under assembly, showing front and side views with no readable text or symbols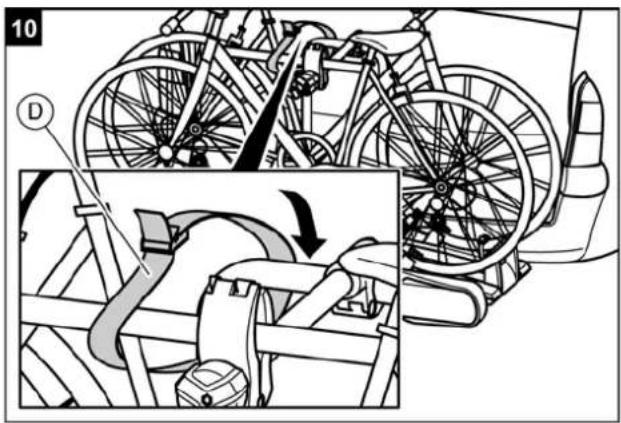
text_image
10 DAVERTISSEMENT !

natural_image
Technical line drawing of a bicycle frame assembly with labeled components and exploded views (no readable text or symbols)AVERTISSEMENT!

natural_image
Side view of a car with a mechanical device and exhaust pipe (no text or symbols)ATTENTION!

text_image
1 ← Push to release ↑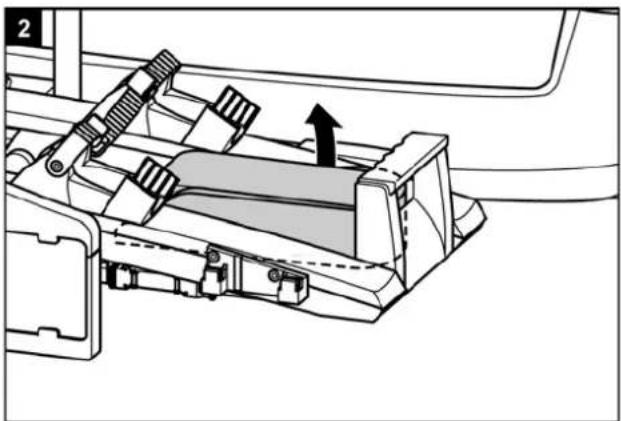
natural_image
Mechanical assembly diagram showing a lever mechanism with an arrow indicating motion (no text or symbols present)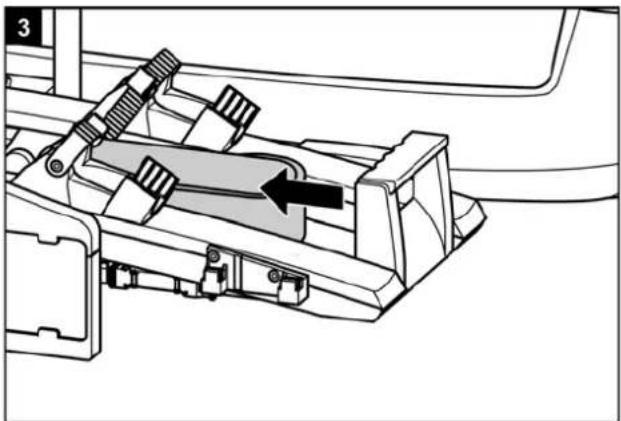
natural_image
Mechanical assembly diagram showing a lever mechanism with a black arrow indicating direction (no text or symbols present)natural_image
Illustration of a hand operating a mechanical device with gears and levers (no text or symbols)text_image
Technical diagram of a device with labeled parts A and E, showing internal components and a downward arrow indicating motion or movement.Due to its lighting system, the bicycle carrier is an electrical device.
Do not dispose of electrical appliances in household waste! Discarded electrical and electronic equipment must be collected separately and recycled in an environmentally sound manner. Contact your municipal or city government on how to dispose of old electronic equipment.
The materials are recyclable. You are making an important contribution to protecting our environment through recycling, material recycling or other forms of re-utilising old appliances!
text_image
1/L 6/54 2/54G 7/58L 5/58R 3/31 4/R 1/L 2/54G 6/54 7/58L 3/31 5/58R 4/Rtext_image
Exploded view diagram of a vehicle's internal components with numbered parts for identificationtext_image
Technical diagram showing mechanical assembly with labeled components and directional arrows indicating motion or movement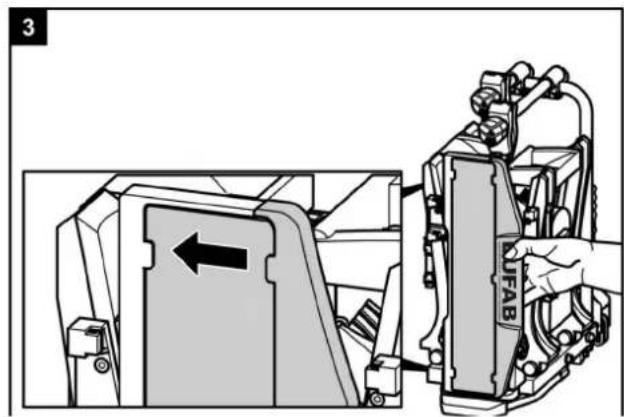
text_image
3 UFABMontaggio e uso
natural_image
Line drawing of a hand gripping a circular object against a horizontal line (no text or symbols)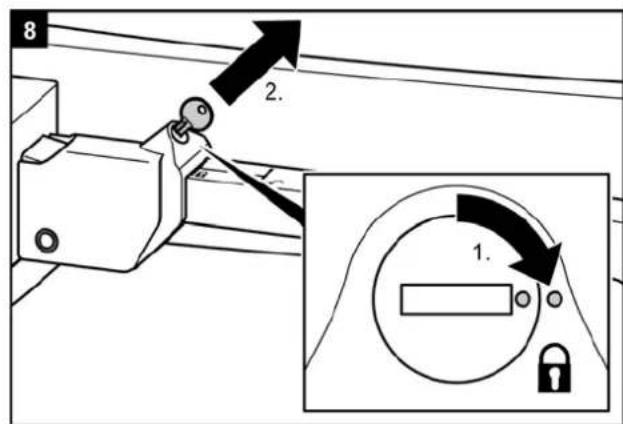
text_image
8 2. 1.PERICOLO!

natural_image
Mechanical assembly diagram showing a lever mechanism with a black arrow indicating rotational motion (no text or symbols present)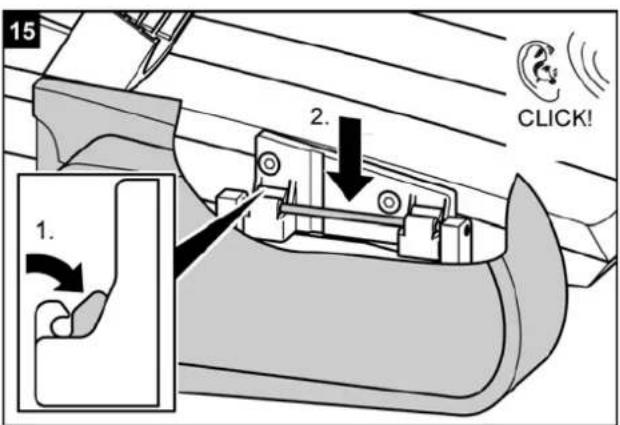
text_image
15 2. 1. CLICK!PERICOLO!

text_image
Diagram illustrating bicycle wheel turning process with labeled steps 1 and 2 showing hand positioning and adjustment.
natural_image
Diagram of a mechanical device with a numbered label (3) and no visible text or symbols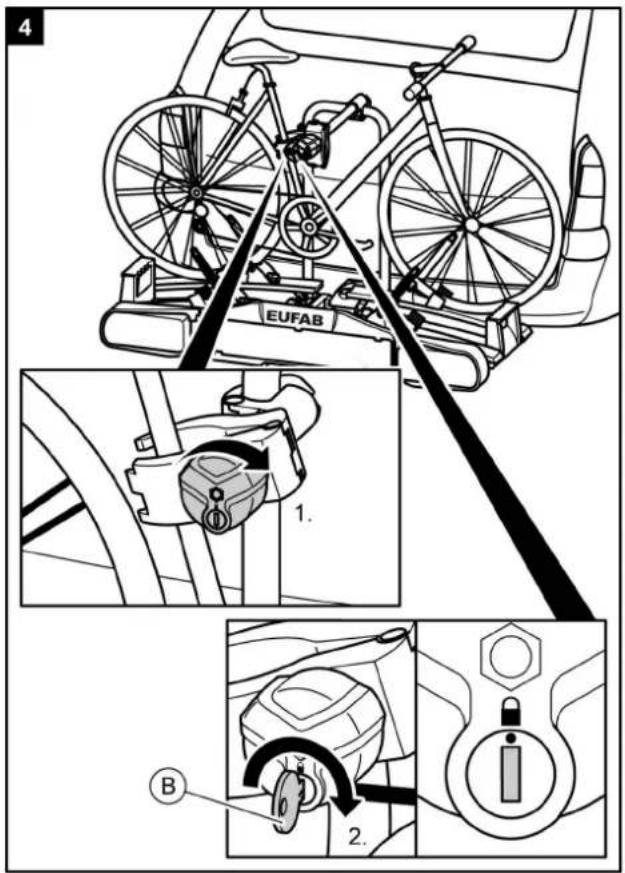
text_image
4 EUFAB 1. 2.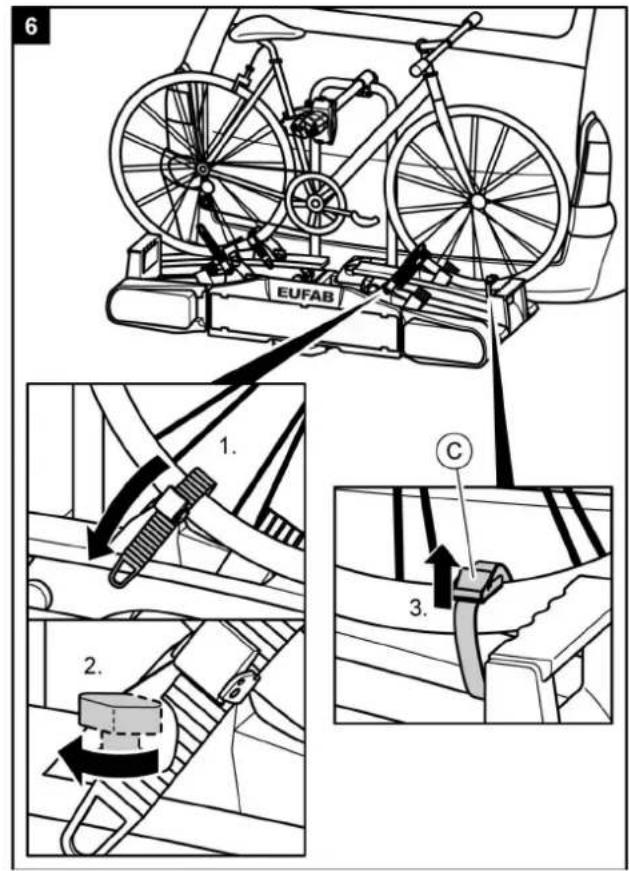
text_image
6 EUFAB 1. 2. 3.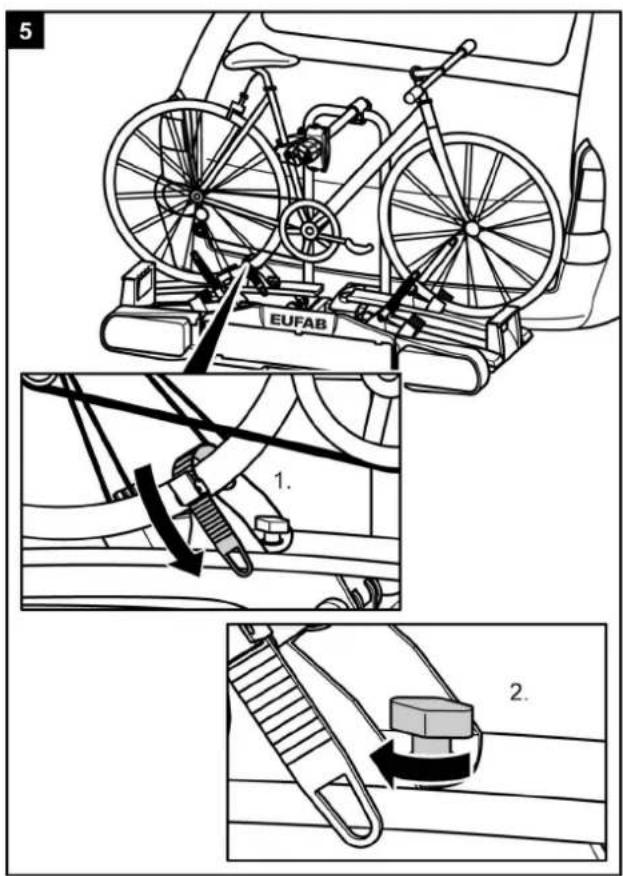
text_image
5 EUFAB 1. 2.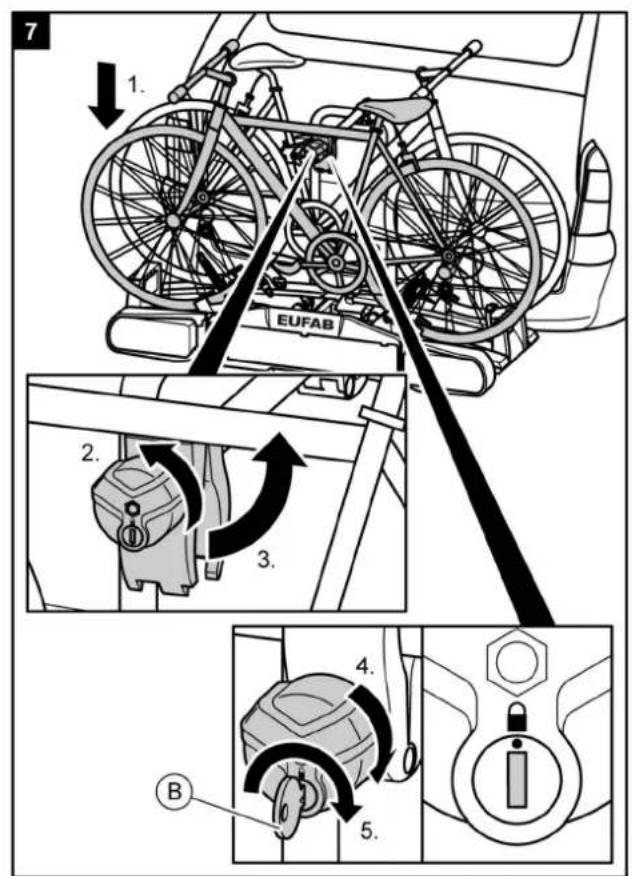
text_image
7 1. EUFAB 2. 3. 4. 5. B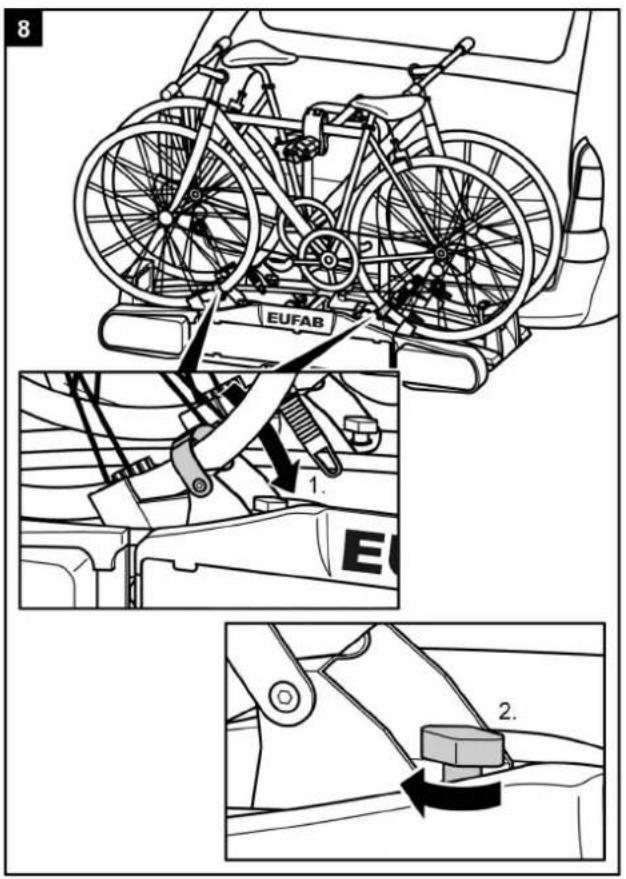
text_image
8 EUFAB 1. 2.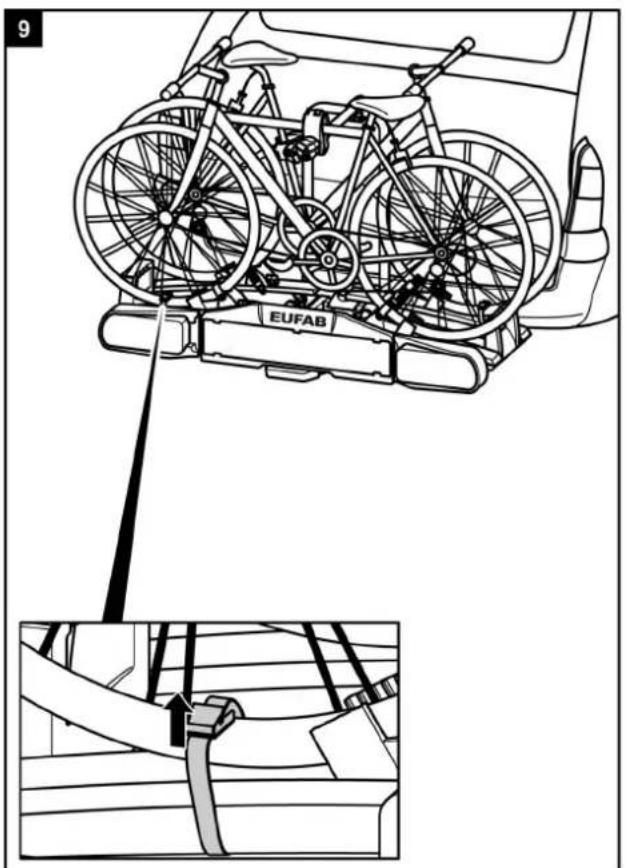
text_image
9 EUFAB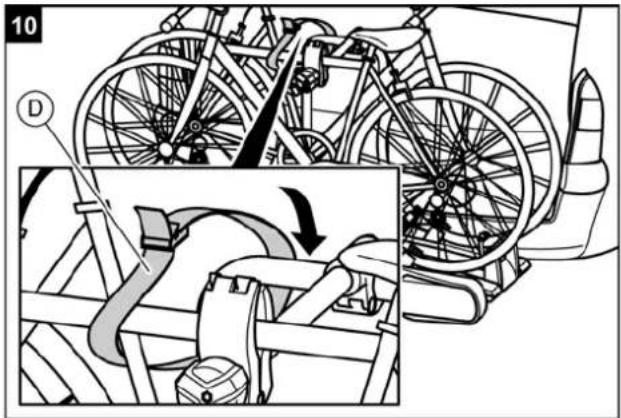
text_image
10 DPERICOLO!

natural_image
Technical line drawing of a bicycle frame assembly with three views: front view, side view, and top-down view (no text or symbols)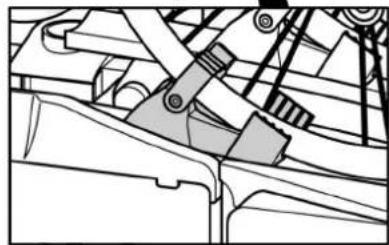
natural_image
Technical line drawing of mechanical components or assemblies (no visible text or symbols)PERICOLO!

natural_image
Diagram of a car with a lever and mechanical component, showing no text or symbolsATTENZIONE!

natural_image
Illustration of a hand assembling a bicycle with visible wheels and components (no text or symbols)PERICOLO!

text_image
1 ← Push to release ↑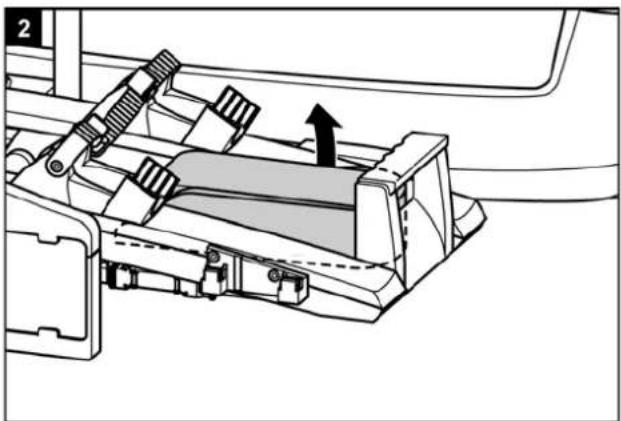
natural_image
Mechanical assembly diagram showing a lever mechanism with an arrow indicating motion (no text or symbols present)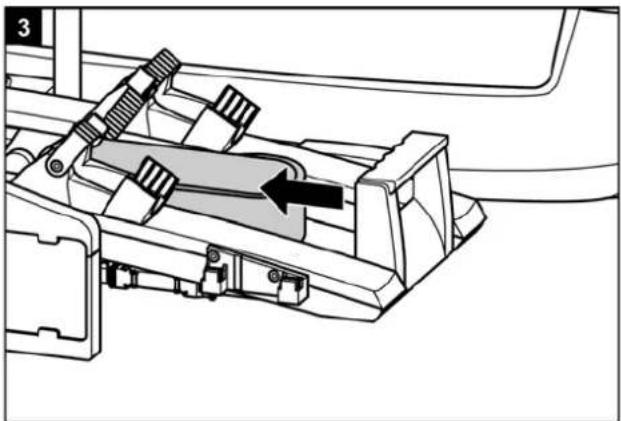
natural_image
Mechanical assembly diagram showing a lever mechanism with a black arrow indicating direction (no text or symbols present)natural_image
Illustration of a hand operating a mechanical device with no visible text or symbolstext_image
Technical diagram showing a mechanical assembly with labeled components and directional arrow indicating process flow2
text_image
1. SW 18 2. EUFAB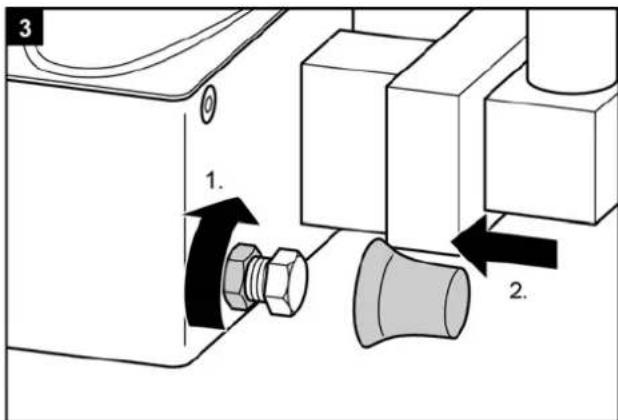
text_image
3 1. 2.Smaltimento

text_image
1/L 6/54 2/54G 7/58L 5/58R 3/31 4/R 1/L 2/54G 6/54 7/58L 3/31 5/58R 4/Rtext_image
Exploded view diagram of a car interior with numbered components for identificationtext_image
Technical diagram showing mechanical assembly with labeled components and directional arrows indicating motion or movement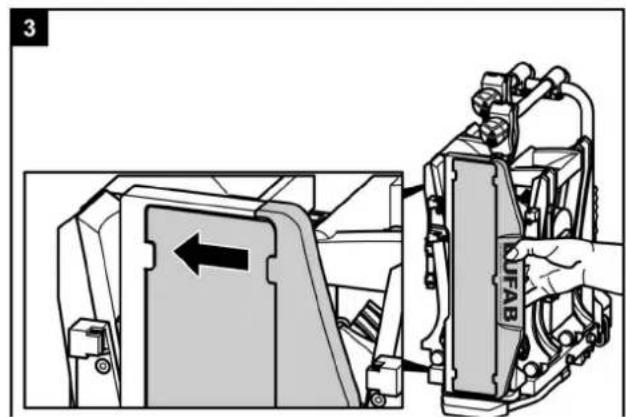
text_image
3 UFABMontage en gebruik
natural_image
Illustration of a hand gripping a curved object, possibly a tool or device (no text or symbols present)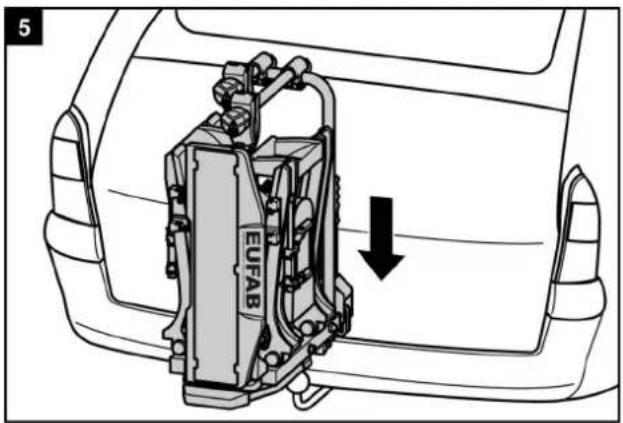
text_image
5 EUFAB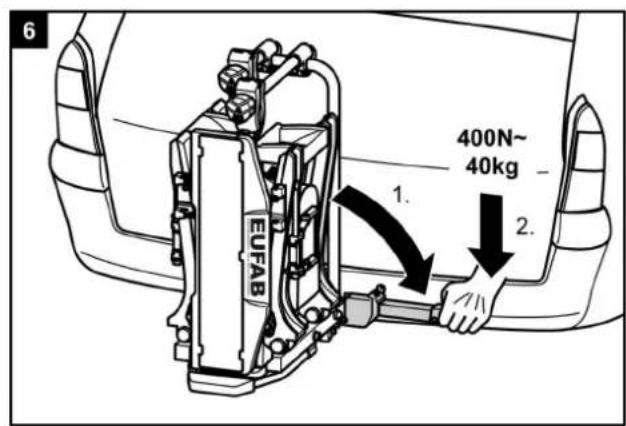
text_image
6 400N~ 40kg 1. 2.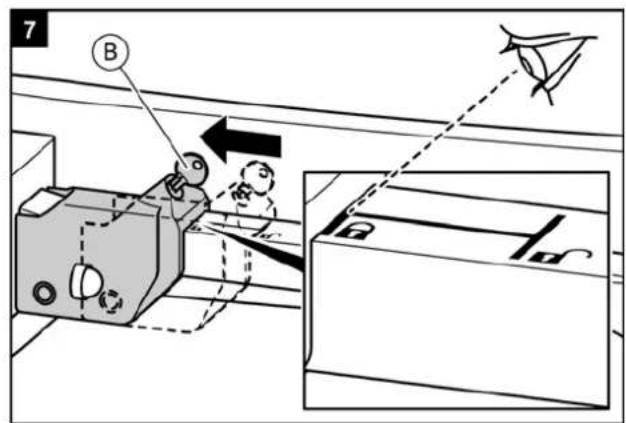
text_image
7 B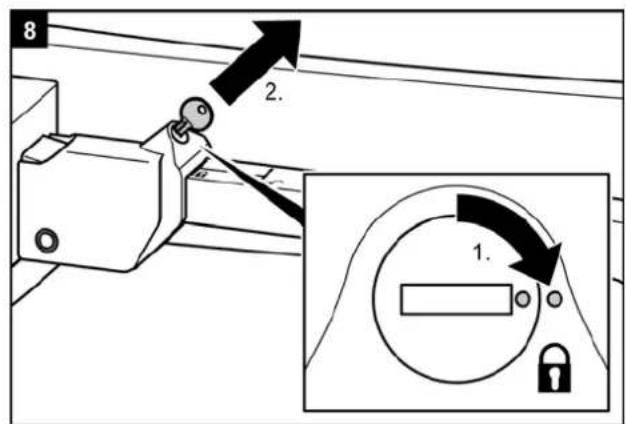
text_image
8 2. 1.WAARSCHUWING!

natural_image
Mechanical assembly diagram showing a lever mechanism with an arrow indicating motion (no text or symbols present)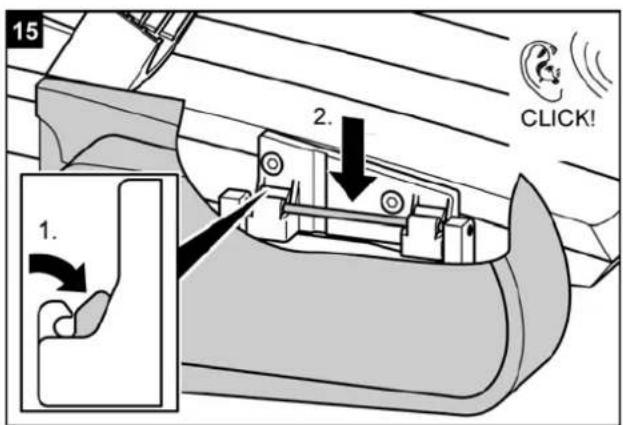
text_image
15 2. 1. CLICK!WAARSCHUWING!

natural_image
Technical line drawing of a bicycle under assembly, showing front and side views with no readable text or symbols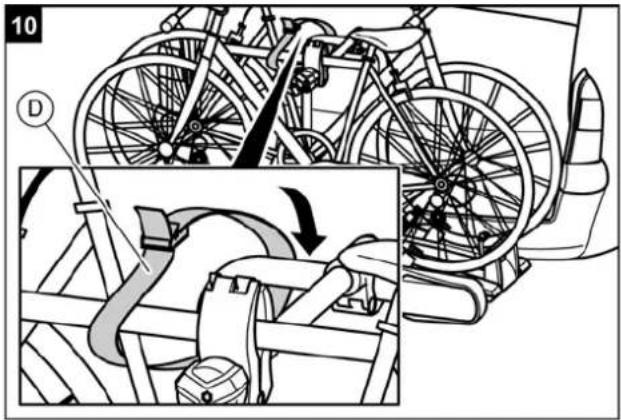
text_image
10 DWAARSCHUWING!

natural_image
Technical line drawing of a bicycle frame assembly with labeled components (no readable text or symbols)WAARSCHUWING!

natural_image
Side view of a car with a mechanical device and exhaust pipe diagram (no text or symbols)LET OP!

natural_image
Line drawing of a hand operating a bicycle with visible wheels and control components (no text or symbols)WAARSCHUWING!

text_image
1 ← Push to release ↑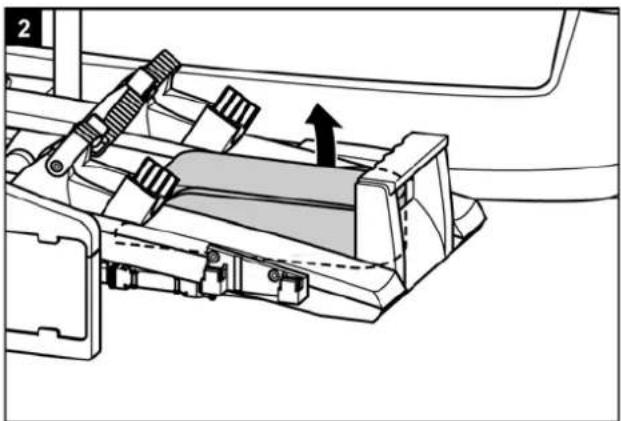
natural_image
Mechanical assembly diagram showing a lever mechanism with an arrow indicating motion (no text or symbols present)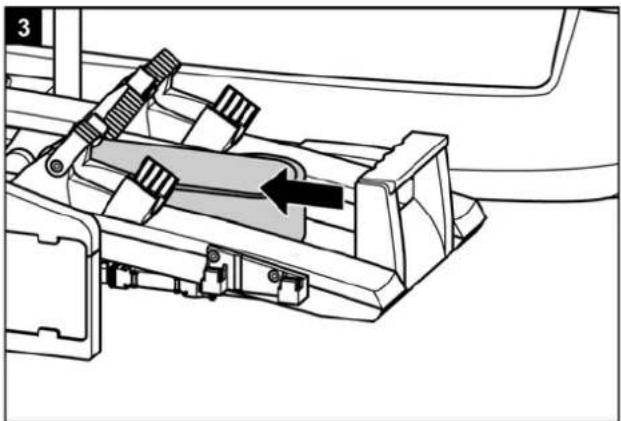
natural_image
Mechanical assembly diagram showing a lever mechanism with a black arrow indicating direction (no text or symbols present)natural_image
Illustration of a hand operating a mechanical device with no visible text or symbolstext_image
Technical diagram showing mechanical assembly with labeled components and directional arrow indicating process flow2
text_image
1. SW 18 2. EUFAB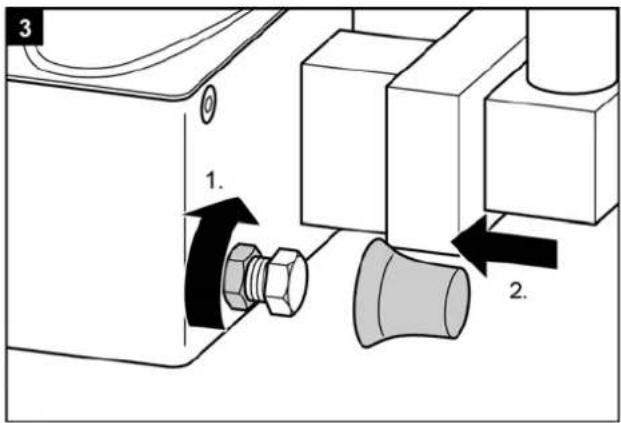
text_image
3 1. 2.Verwijdering
Milieuvoorschriften

+HWHYHUCLFKILQJVV\VWHHPIYDQIGHILHWVHQGUDJHU P DDNND KHWRWHQQHHNMLVFKODSSDUDDND
* RRLJJHHQ#HCHNULVFKHDSSDUDWHQQLQUKHIKXLVKRXGHQHN DIYDC##S IJHGDQNWH#CHNNULVFKHDHQ#HCHNIURQLVFKHD DSSDUDWXUIP RH#JHVFKHLGHQIZRUGHQQLQJH] DP HCGUHQ# RS#HHQQP LCLHXYULHQGHLNHHP DQLHUZ RUGHQ# JHUHF\FHG#&RQWDF#HHU#XZ#JHP HHQWHRI#VDG#YRRU# LQIRUP D'LHORYHUDYHUZ#IGHULQJVP RJHCLINKHGHQ#YRRU# DIJHGDQNWH#CHNURQLVFKHDSSDUDWXU
' H□P D□HULDOHQ□] L□Q□HF □F□HHUEDDU□' R□U□HF □F□LQ□J P D□HULDDOKHUJHEUXIN□R□DQGHU□YRUP HQ□YDQOKHUJHEUXIN□ YDQ□RXGH□DSSDUDXX□CHYHUMX□HHQ□EHCDQJUUNH□ELVGUDJH□ DDQ□GH□EHVFKHUP LQJ□YDQ□RQV□P LLHX³ 9 RHU□GH□ILHVHQGUDJHU□DIYRAJHQV□GH□LQ□XZ□CDQG□ JHQGHQGH□ZHJHYLQJ□HQ□EHSDOLQJHQ
Contact
EAL GmbH
text_image
1/L 6/54 2/54G 7/58L 3/31 5/58R 4/R 2/54G 1/L 7/58L 6/54 3/31 5/58R 4/Rtext_image
Exploded view diagram of a car's internal components with numbered parts for identificationtext_image
Technical diagram showing mechanical assembly with labeled components and directional arrows indicating motion or movement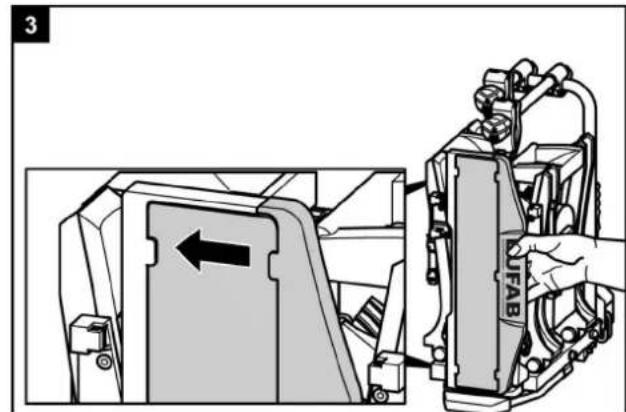
text_image
3 JFABMontáž a použití
natural_image
Illustration of a hand gripping a curved object, possibly a tool or device (no text or symbols present)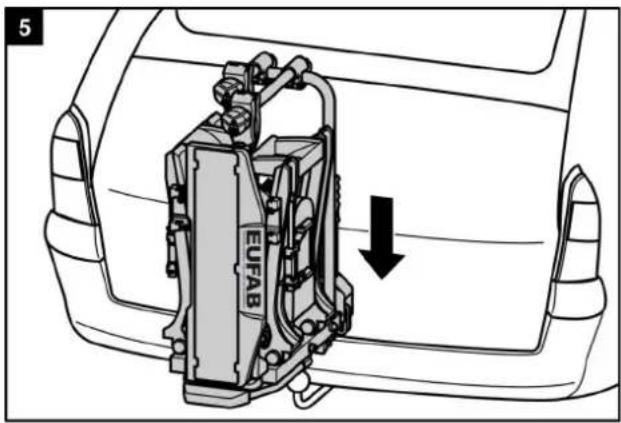
text_image
5 EUFAB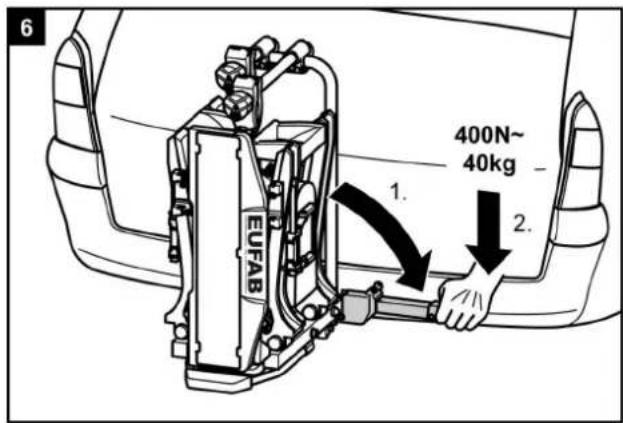
text_image
6 1. 2. 400N~ 40kg EUFAB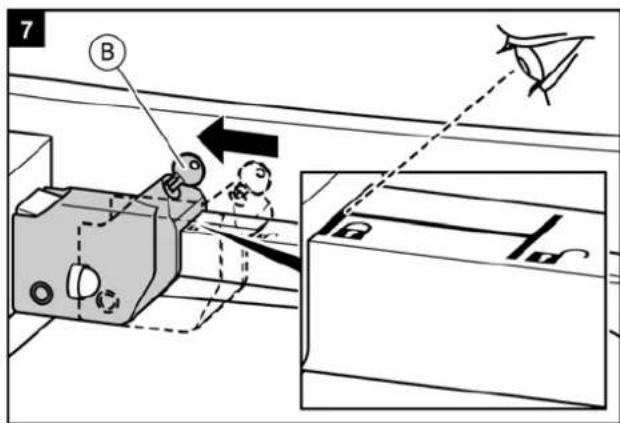
text_image
7 B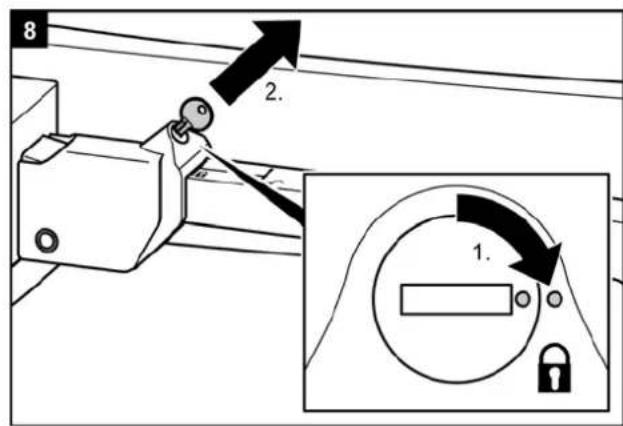
text_image
8 2. 1.VAROVÁNÍ!

natural_image
Mechanical assembly diagram showing a lever mechanism with an arrow indicating rotational motion (no text or symbols present)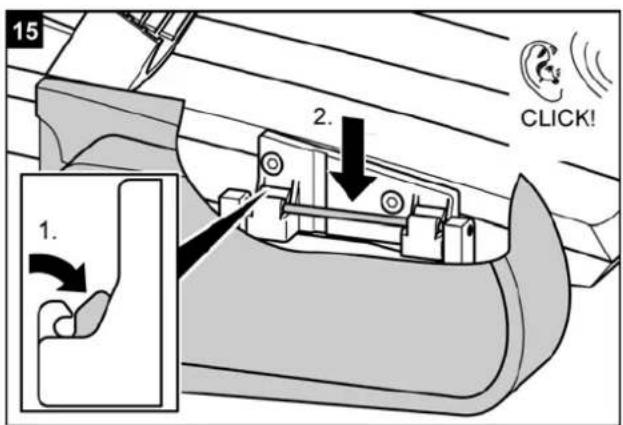
text_image
15 2. 1. CLICK!VAROVÁNÍ!

natural_image
Technical line drawing of a bicycle under assembly, showing front wheel and rear wheels with a close-up inset (no text or symbols)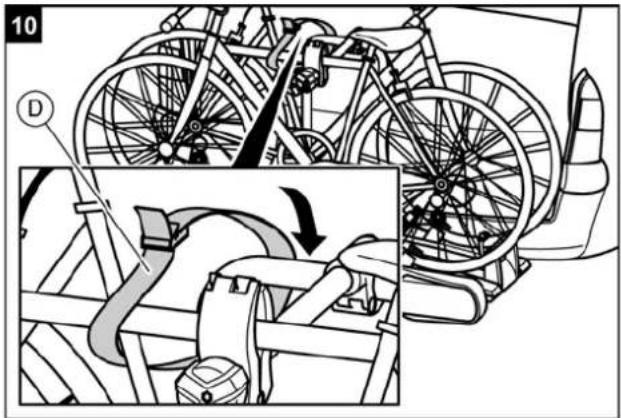
text_image
10 DVAROVÁNÍ!

natural_image
Technical line drawing of a bicycle frame assembly with three views (top, front, side), no visible text or symbols.
natural_image
Technical line drawing of mechanical components and assemblies (no text or symbols)VAROVÁNÍ!

natural_image
Side view of a car with a mechanical device and exhaust arc (no text or symbols)POZOR!

natural_image
Illustration of a hand operating a bicycle with visible wheels and a labeled component (no text or symbols beyond the label)VAROVÁNÍ!

text_image
1 ← Push to release ↑
natural_image
Mechanical assembly diagram showing a lever mechanism with an arrow indicating motion (no text or symbols present)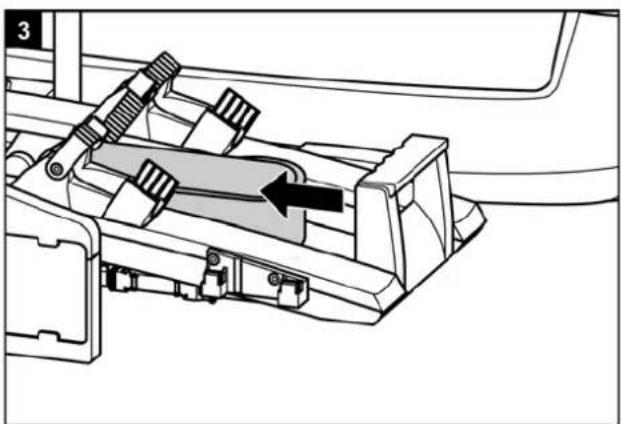
natural_image
Mechanical assembly diagram showing a lever mechanism with no visible text or symbolsnatural_image
Illustration of a hand operating a mechanical device with gears and levers (no text or symbols)text_image
1/L 6/54 2/54G 7/58L 5/58R 3/31 4/R 1/L 2/54G 6/54 7/58L 3/31 5/58R 4/Rtext_image
Exploded view diagram of a mechanical device with numbered components for identificationtext_image
Technical diagram showing mechanical assembly with labeled components and directional arrows indicating motion or movement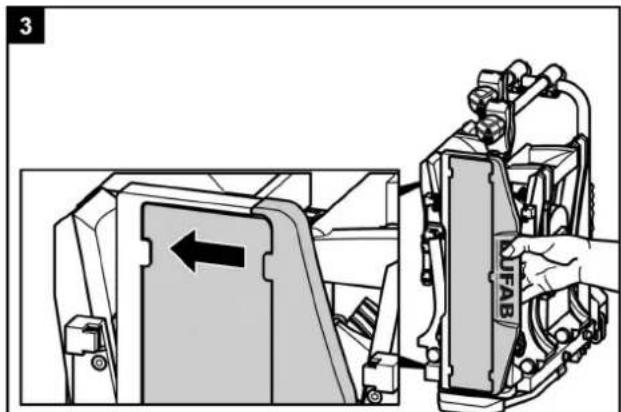
text_image
3 UFABMontaje y uso
natural_image
Illustration of a hand gripping a curved object, possibly a tool or device (no text or symbols present)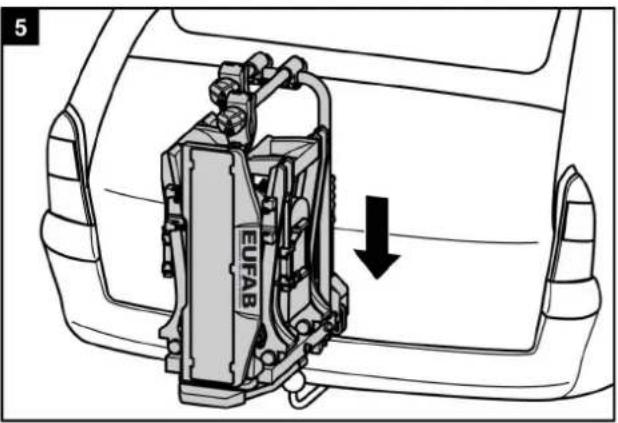
text_image
5 EUFAB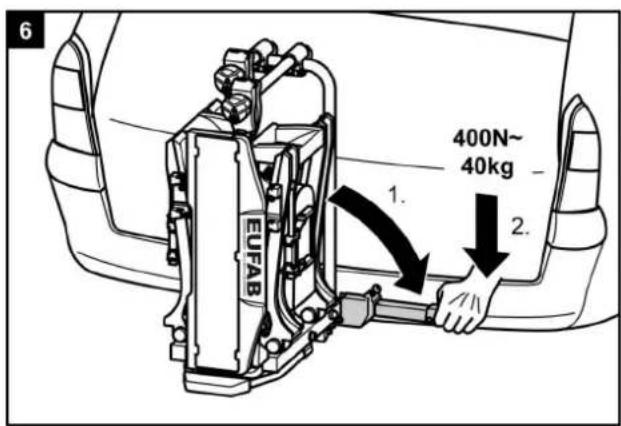
text_image
6 400N~ 40kg 1. 2.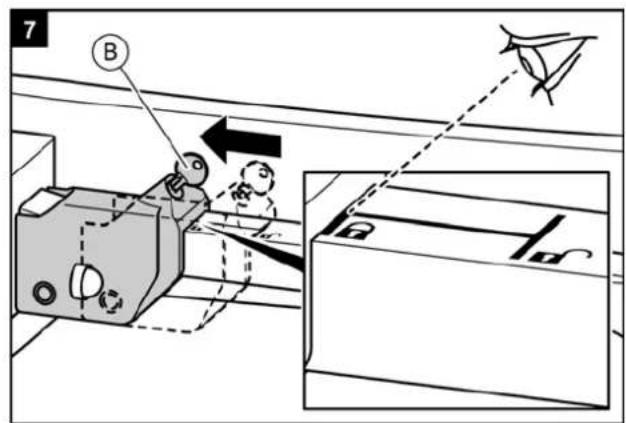
text_image
7 B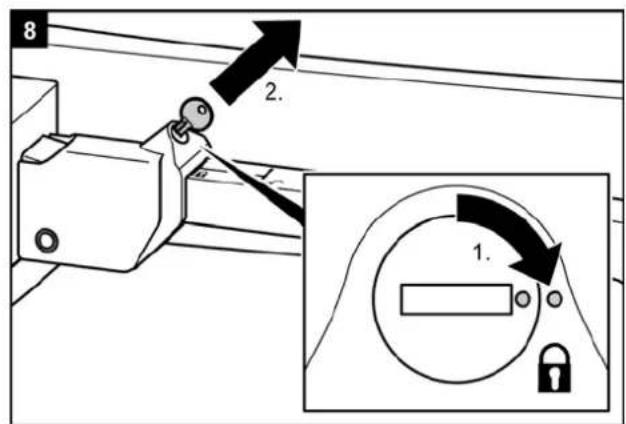
text_image
8 2. 1.¡ADVERTENCIA!

natural_image
Mechanical assembly diagram showing a lever mechanism with an arrow indicating rotational motion (no text or symbols present)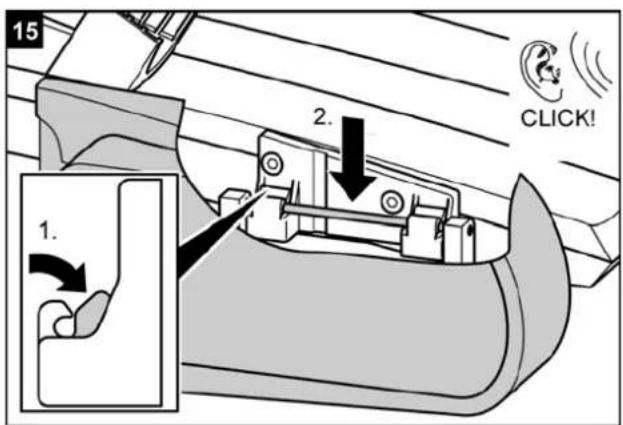
text_image
15 2. 1. CLICK!¡ADVERTENCIA!

text_image
Diagram illustrating bicycle wheel assembly steps with labeled instructions for each step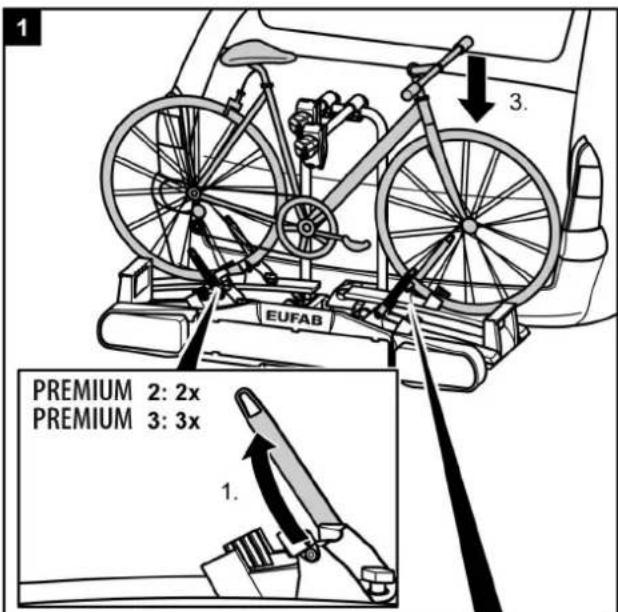
text_image
1 3. EUFAB PREMIUM 2: 2x PREMIUM 3: 3x 1.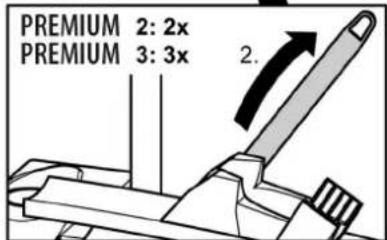
text_image
PREMIUM 2: 2x PREMIUM 3: 3x 2.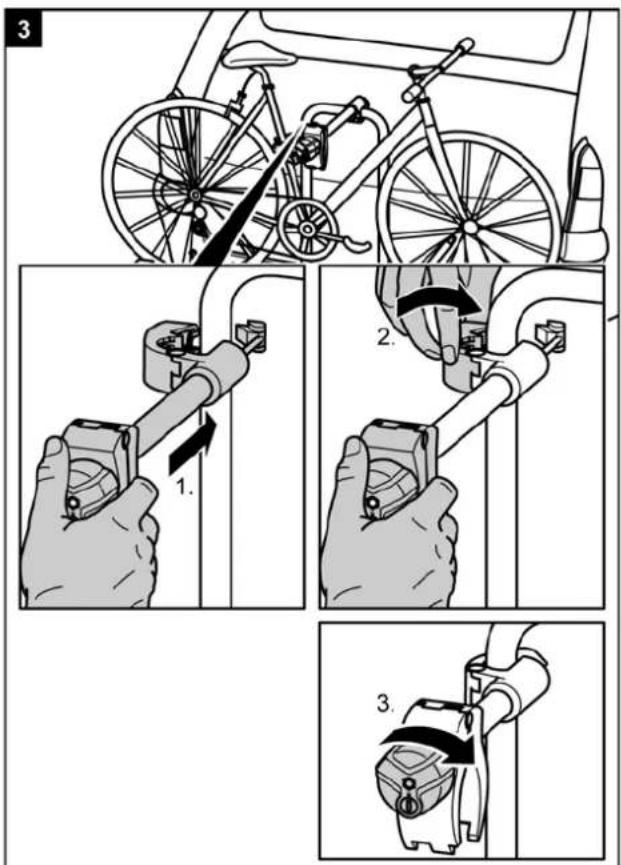
text_image
Diagram illustrating bicycle wheel turning process with three steps: grip, press, and lock mechanism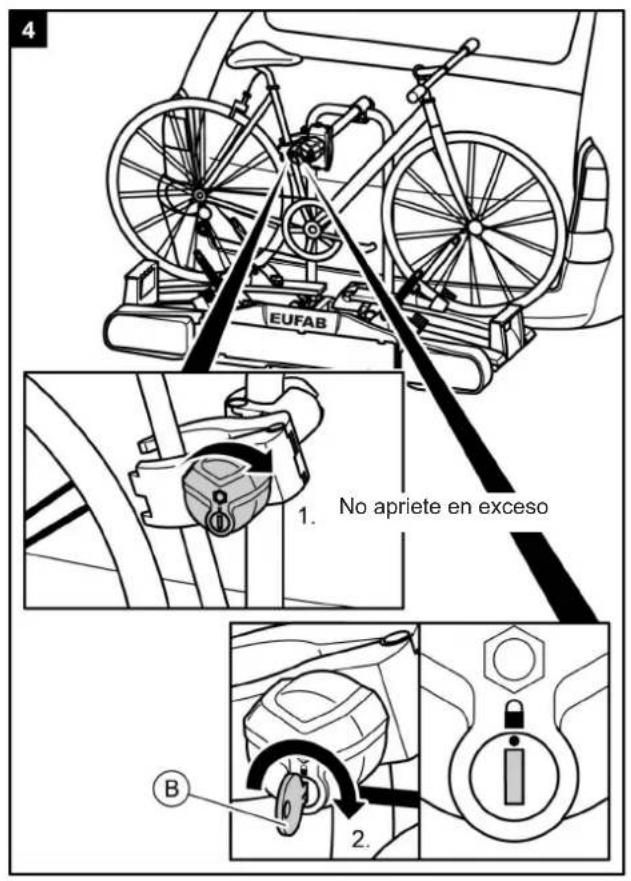
natural_image
Technical line drawing of a bicycle under assembly, showing front and side views with no readable text or symbols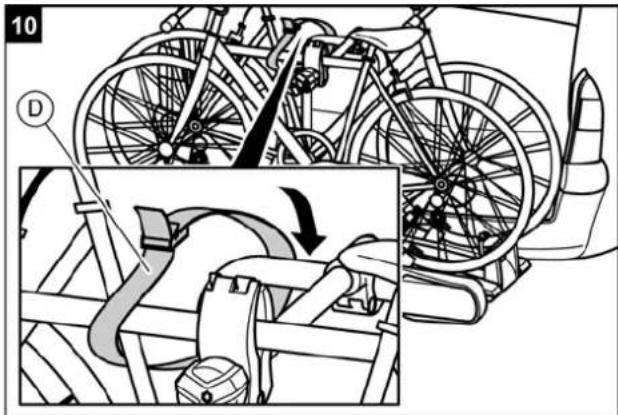
text_image
10 D¡ADVERTENCIA!

natural_image
Technical line drawing of a bicycle frame assembly with labeled components and exploded views (no readable text or symbols)¡ADVERTENCIA!

natural_image
Side view of a car with a mechanical device and directional arrow indicating motion (no text or symbols)¡ATENCIÓN!

natural_image
Illustration of a hand assembling a bicycle with visible wheels and components (no text or symbols)¡ADVERTENCIA!

text_image
1 → Push to release →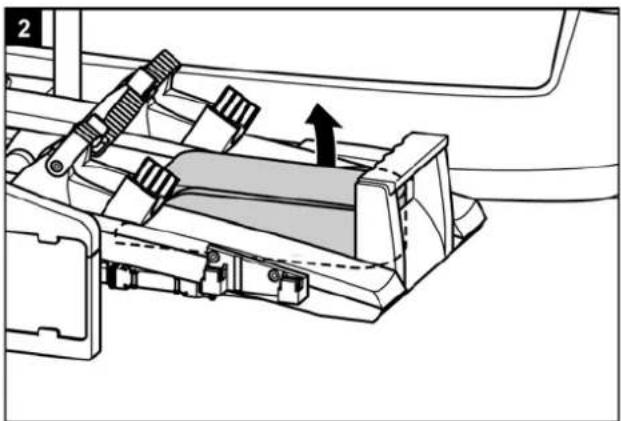
natural_image
Mechanical assembly diagram showing a lever mechanism with an arrow indicating motion (no text or symbols present)