
VG MGR 1 - Slicer Venga - Free user manual and instructions
Find the device manual for free VG MGR 1 Venga in PDF.
Frequently Asked Questions - VG MGR 1 Venga
User questions about VG MGR 1 Venga
0 question about this device. Answer the ones you know or ask your own.
Ask a new question about this device
Download the instructions for your Slicer in PDF format for free! Find your manual VG MGR 1 - Venga and take your electronic device back in hand. On this page are published all the documents necessary for the use of your device. VG MGR 1 by Venga.
USER MANUAL VG MGR 1 Venga
- Hopper plate
- Motor housing
- ON/OFF/Reverse switch
- R/ON switch
- Locking knob hole
- Locking knob
- Food pusher
- Head
- Feed screw
- Cutting plate (fine)
- Cutting plate (medium)
- Cutting plate (coarse)
- Fixing ring
- Cutting blade
- Sausage attachment
- Kebbe attachment
- Head inlet
FR
Please read these instructions carefully before using the appliance, and always follow the safety and operating instructions.
Important: People (including children) who are not able to use the appliance in a safe way, due to their physical, sensorial or mental capacity or their lack of experience or knowledge, must never use the appliance except if they are supervised by a person responsible for their safety or if they previously received instructions concerning the safe use of the appliance.
Close supervision is necessary to prevent children from using the appliance as a toy.
Check that your mains voltage corresponds to that stated on the appliance.
Never leave the appliance unsupervised when in use.
From time to time check the appliance for damages. Never use the appliance if it shows any signs of damage, but have it checked and repaired by a competent qualified electrician (^) . Should the cord be damaged, it must be replaced by a competent qualified electrician (^) .
Only use the appliance for domestic purposes and in the way indicated in these instructions. Most of all, follow the instructions concerning the assembly of the accessories before starting the appliance.
Switch off the meat grinder and unplug it when not using it or during assembly and disassembly, respectively.
Never touch the worm or the blade without having removed the cord from the power outlet beforehand.
Do not use the meat grinder near sources of heat (cooking tops, grill, oven...).
Never immerse the appliance in water or any other liquid for any reason whatsoever.
Never use the appliance outside and always place it in a dry environment.
Never use accessories which are not recommended by the producer. They could constitute a danger to the user and risk to damage the appliance.
Never move the appliance by pulling the cord and never hang it by the cord. Make sure the cord cannot get caught in any way. Do not wind the cord around the appliance and do not bend it.
Stand the appliance on a stable surface so that it cannot fall over.
This kind of appliance cannot function continuously; it is not a professional type of appliance. It is necessary to make temporary stops. Check the section "Important information" in the instruction manual.
To push the meat to the worm, always make use of the pusher only. Never use your fingers or other accessories.
You must keep this appliance clean at all times, as it is in direct contact with food.
The reverse function is prohibited while the appliance is operating (for example switch "ON" knob to "R" or on the contrary), wait at least one minute until the grinder has come to a complete stop otherwise it may cause an abnormal noise, vibration or a transitory electric spark in the appliance. It could easily result in damage to the appliance and make a user frightened.
(*) Competent qualified electrician: after-sales department of the producer or importer or any person who is qualified, approved and competent to perform this kind of repairs in order to avoid all danger. In case of need you should return the appliance to this electrician.
Keep these instructions in a safe place.
IMPORTANT INFORMATION
This appliance is not intended for professional use. You should follow the requested breaks. Failure to follow this instruction carefully may result in damage to the motor. Please refer to the rating label for the maximum continuous usage time (KB xx min where xx is the maximum usage time). The breaks should last at least 10 minutes.
BEFORE THE FIRST USE
Check that the voltage indicated on the rating label corresponds to the mains voltage in your home.
Wash all parts (except the body) in warm soapy water.
Before plugging in, ensure the "ON/OFF/Reverse" switch is turned to the "OFF" position.
INSTRUCTIONS FOR USE (see page 5)
ASSEMBLING
Hold the head and insert it into the inlet with one hand (fig. 1), place the locking knob into the hole on the side of the motor housing with the other hand, and tighten it clockwise to secure the head (fig. 2).
Place the feed screw into the head, long end first, by turning the feed screw slightly until it is set into the motor housing (fig. 3).
Place the cutting blade onto the feed screw shaft with the blade facing the front as illustrated (fig. 4). If it is not fitted properly, meat will not be ground.
Place the desired cutting plate next to the cutting blade, fitting protrusions in the slots (fig. 5). Support or press the centre of the cutting plate with one finger, then screw the fixing ring until tight with the other hand (fig. 6). Do not overfighten.
Place the hopper plate on the head and fix into position.
Locate the unit on a firm place.
The air passage at the bottom and the side of the motor housing should be kept free and not blocked.
MINCING MEAT
Cut all foods into pieces (sinewless, boneless and fatless meat is recommended, approximate size: 20mm× 20mm× 60mm ) so that they fit easily into the hopper opening.
Plug in and turn the "R / ON" switch to "ON" position, then turn the "ON/OFF/Reverse" switch to "ON" position.
Feed foods into the hopper plate. Use only the food pusher (fig. 7).
After use, switch the unit off and unplug it from the power supply.
REVERSE FUNCTION
In case of jamming, switch the appliance off by turning the "R / ON" switch to "R" position and the "ON/OFF/Reverse" switch to "R" position.
The feed screw will be rotating in the opposite direction, and the head will get empty. If it doesn't work, switch the unit off and clean it.
MAKING KEBBE
RECIP
STUFFING
Mutton 100g
Olive oil 1½ tablespoons
Onion (cut finely) 1 12 tablespoons
Spices to your taste
Salt to your taste
Flour 1 12 tablespoons
Mince mutton once or twice.
Fry onion until brown and add minced mutton,
allspice, salt and flour.
OUTLET COVER
Lean meat 450g
Flour 150-200g
Spices to your taste
Nutmeg (cut finely) 1
Powdered red pepper to your taste.
Pepper to your taste
Mince meat three times and mix all ingredients
together in a bowl. More meat and less flour for
outlet cover creates better consistency and taste.
Grind the mixture three times.
Disassemble by reversing the steps from 5-3 to
remove the cutting plate and cutting blade.
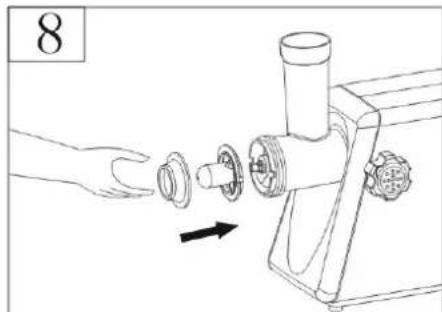
Place kebbe attachments onto the feed screw shaft
together, fitting protrusions into the slots (fig. 8).
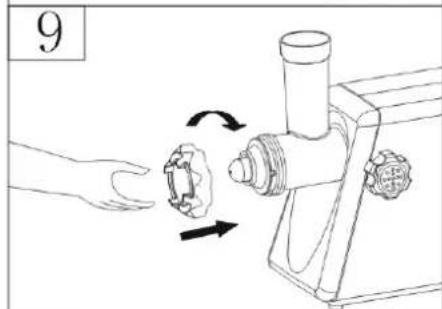
Screw the fixing ring into place until tight. Do not overfighten (fig. 9).
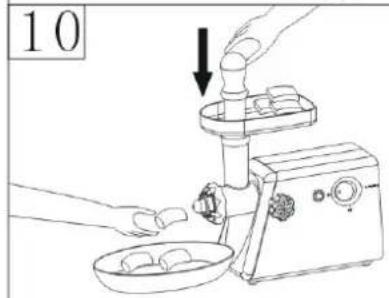
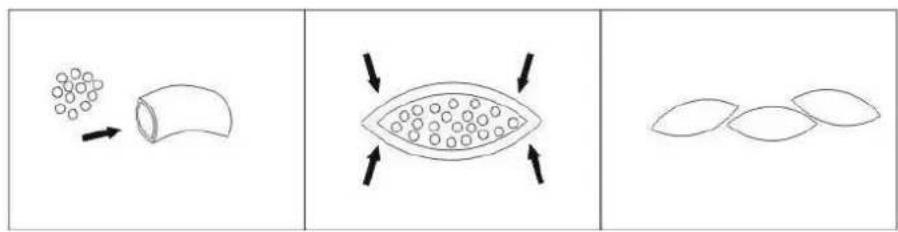
Make the cylindrical outlet cover (fig. 10).
Form kebbe as illustrated below and deep-fry.
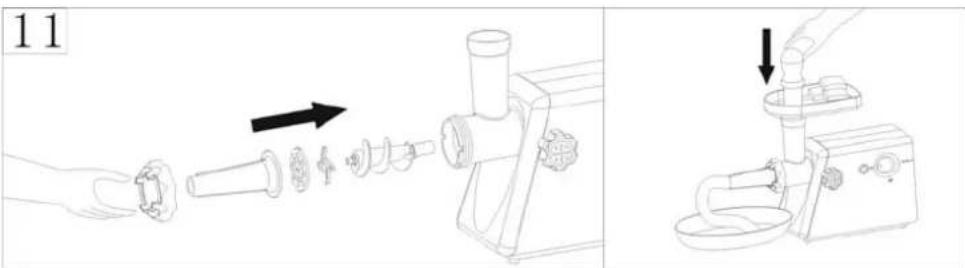
MAKING SAUSAGE
Before starting, please assemble the sausage attachment as follows (fig. 11).
IN CASE THE MOTOR IS BLOCKED
In case the motor slows down or stops, it is possible that the meat blocks the grinder. In this case, use the reverse switch. To do so, first switch off the meat grinder by pressing the on/off switch, then press the reverse switch. The worm will start rotating in the other direction and the meat will move in the other direction as well in order to release the funnel. To stop the reverse function, simply release the reverse switch. You can now press the on/off switch again.
Be very careful when handling the blade, as it is very sharp. Should the motor still be blocked, unplug the appliance and disassemble its attachments.
CLEANING AND CARE
Always unplug the appliance and let it cool down before cleaning it.
Clean the plastic parts of the appliance with a soft cloth.
- Never use abrasive products.
- Never immerse the motor block into water or any other liquid.
Clean the accessories with lukewarm water and some mild detergent, rinse and dry.
- Never put any part of your appliance in the dishwasher.
PROTECTION OF THE ENVIRONMENT - DIRECTIVE 2002/96/EC
In order to preserve our environment and protect human health, the waste electrical and electronic equipment should be disposed of in accordance with specific rules with the
implication of both suppliers and users. For this reason, as indicated by the symbol on the rating label or on the packaging, your appliance should not be disposed of as unsorted municipal waste. The user has the right to bring it to a municipal collection point performing waste recovery by means of reuse, recycling or use for other applications in accordance with the directive.
FR MODED'EMPLOI
POUR VOTRE SECURITE
BELANGRIJKVEVELIGHEIDSVOORSCHRIFTEN
Team International Romania Srl;
Str. Industriilor 56A, sector 3, Bucuresti CUI 16991287; R.C. J40/19685/29.11.2004
VG MGR 1
| Deutsch | 6 |
| English | 10 |
| Français | 14 |
| Nederlands | 18 |
| Espanol | 22 |
| Português | 26 |
| Italiano | 30 |
| Polska | 34 |
| România | 38 |