LM 2146 CMD - Lawn mower JONSERED - Free user manual and instructions
Find the device manual for free LM 2146 CMD JONSERED in PDF.
| Product type | Wheeled gasoline rotary lawn mower |
| Brand | Jonsered |
| Model | LM 2146 CMD |
| Cutting width | 46 cm |
| Cutting height | Centralized adjustable (multiple positions) |
| Engine type | 4-stroke gasoline engine |
| Starting | Manual (pull start) and electric (key) |
| Fuel | Unleaded gasoline |
| Fuel tank capacity | Approx. 1.2 L |
| Engine oil type | 4-stroke oil (check level regularly) |
| Battery (electric start) | 12 V lead battery, requires initial charge |
| Drive | Automatic with clutch (lever) |
| Cutting system | Mulching (plug) and rear discharge with bag or deflector |
| Grass bag | Included (capacity not specified) |
| Weight | Approx. 32 kg |
| Dimensions (L x W x H) | Approx. 140 x 50 x 100 cm |
| Sound level | Guaranteed (measured value not provided) |
| Safety | Engine brake (handle), hand/foot protection, automatic stop |
| Maintenance | Under-deck cleaning with water connection, blade inspection, oil change |
| Warranty | Manufacturer warranty according to conditions (wear not covered) |
Frequently Asked Questions - LM 2146 CMD JONSERED
User questions about LM 2146 CMD JONSERED
0 question about this device. Answer the ones you know or ask your own.
Ask a new question about this device
Download the instructions for your Lawn mower in PDF format for free! Find your manual LM 2146 CMD - JONSERED and take your electronic device back in hand. On this page are published all the documents necessary for the use of your device. LM 2146 CMD by JONSERED.
USER MANUAL LM 2146 CMD JONSERED
INSTRUCTION MANUAL (Original instruction)
IMPORTANT INFORMATION: Please read these instructions carefully and make sure you are not confused with the instructions in this text. Data in this section is for reference only.
understand them before using this unit. Retain these instructions for future reference. BETRIERSANWEISUNG (Ubersetzung der Originalanleitung).
IMPORTANT INFORMATION: Please read these instructions carefully and make sure you
understand them before using this unit. Retain these instructions for future reference.
RO BAXKHbIE CBEDEHINB: BHMaTeIbHO IpOuHTaTb HnCTpyKmN XpoIoNX noHaTb, nepeD TeM
KAK NOB3OBATBC6NOKOM.XpaHHTb INCTpyKUNDN daNBHeHNX KOHCyBraUH.
KASUTUSJUHEND (Algse juhendi tolge)
TAHTIS INFORMATSICON: Lugee kasutujhend enne seadme kasutamistkindasti pohjalulti laji nino veyende, et plete konieit taseilr au saapund.
NAUDO JIMOSINSTRUKCIA (Laikytojas techning dokumentacija)
SVARBI INFORMACIJA: pries pradedantdirbtj renginiu, praosme atidzaiperskaityt siq instrukcija
ir isitikinti, kad viska supratote, Issauqokite ja tolimesniam naudoijmui.
Due to a constant product improvement programme, the factory reserves the right to modify technical details mentioned in this manual without prior notice.
This manual has been prepared for use with different models of lawn mowers having different shapes and equipment.
We wish to thank you for choosing our lawn mower. We are confident that the high quality of our machine will meet with your satisfaction and appreciation and that your lawn mower will give you long-lasting service. Before starting to use your machine, make sure to read with care this manual, which has been purposely drawn up to provide you with all the necessary information for proper use, in compliance with basic safety requirements.
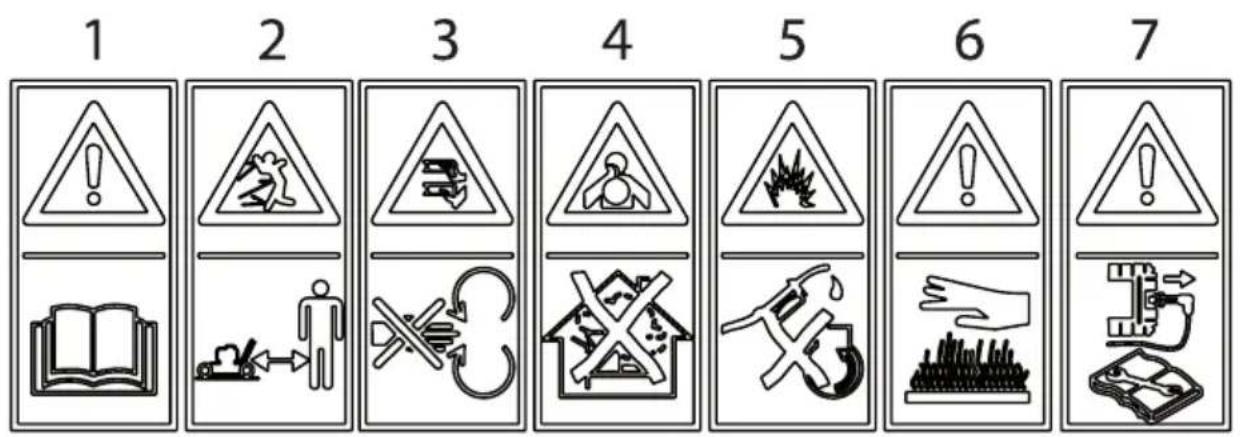
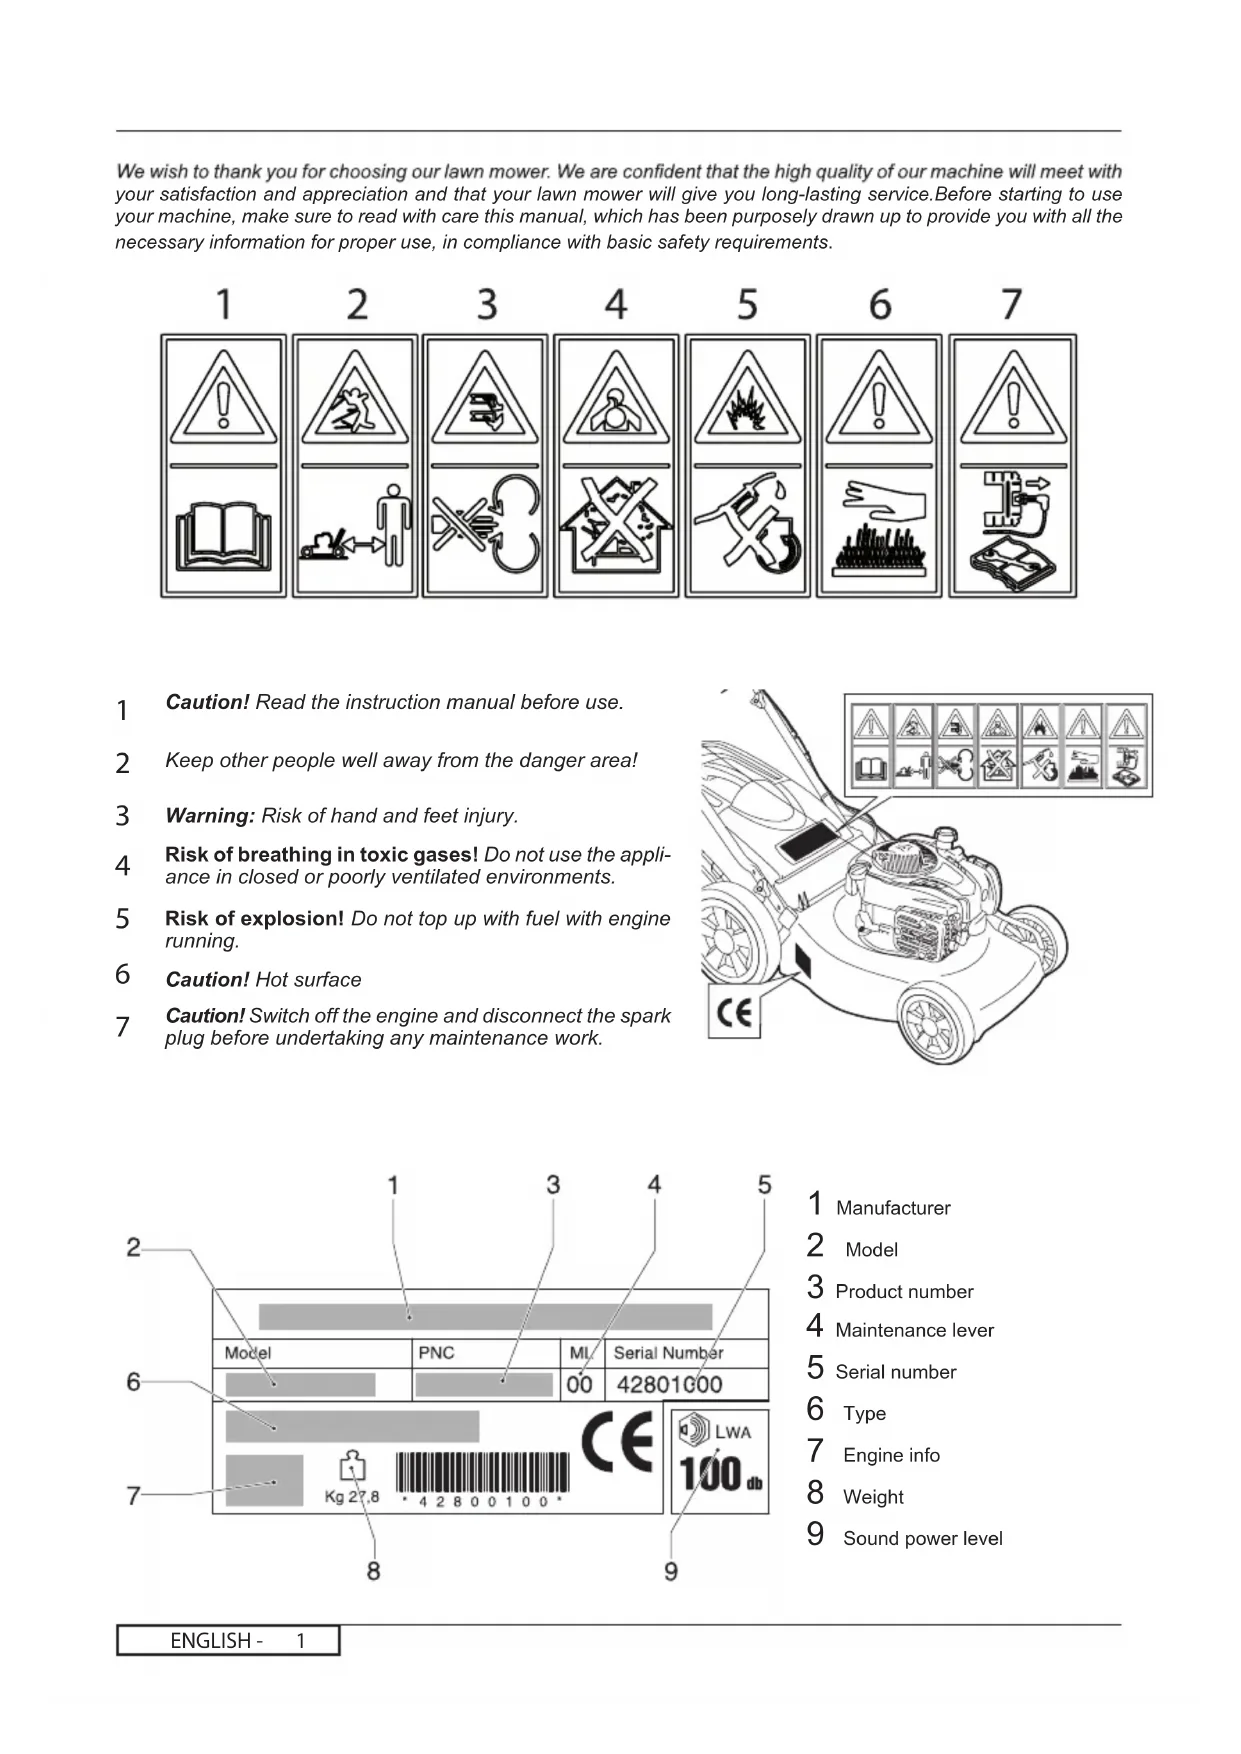
1 Caution! Read the instruction manual before use.
2 Keep other people well away from the danger area!
3 Warning: Risk of hand and feet injury.
4 Risk of breathing in toxic gases! Do not use the appliance in closed or poorly ventilated environments.
5 Risk of explosion! Do not top up with fuel with engine running.
6 Caution! Hot surface
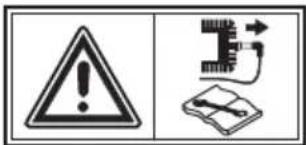
7 Caution! Switch off the engine and disconnect the spark plug before undertaking any maintenance work.
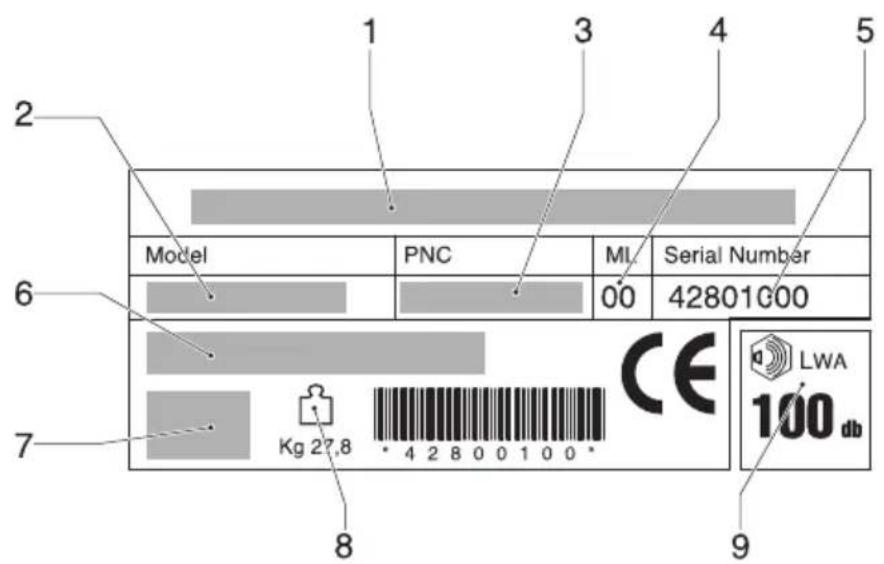
1 Manufacturer
2 Model
3 Product number
4 Maintenance lever
5 Serial number
6 Type
7 Engine info
8 Weight
9 Sound power level
SAFETY RULES
Safe Operation Practices for Pedestrian-Controlled Rotary Lawnmowers
IMPORTANT: This cutting machine is ca pa ble of amputat ng hands and feet and throwing objects. Failure to observe the following safety instructions could result in serious injury or death.
I. Training
- Read the instructions carefully. Be familiar with the controls and the proper use of the equipment.
- Never allow children or people un familiar with the instructions to use the lawnmower. Local regulations may restrict the age of the operator.
- Never mow while people, especially children, or pets are nearby.
- Keep in mind that the operator or user is responsible for accidents or hazards occurring to other people or their property.
II. Preparation
- While mowing, always wear substantial footwear and long trousers. Do not operate the equipment when barefoot or wearing open sandals.
- Thoroughly inspect the area where the equipment is to be used and remove all objects which may be thrown by the machine.
-
WARNING - Petrol is highly flammable.
-
Store fuel in containers specifically de signed for this purpose.
-
Refuel outdoors only and do not smoke while refueling.
-
Add fuel before starting the engine. Never remove the cap of the fuel tank or add petrol while the engine is running or when the engine is hot.
- If petrol is spilled, do not attempt to start the engine but move the machine away from the area of spillage and avoid creating any source of ignition until petrol vapors have dissipated.
- Replace all fuel tanks and container caps securely.
- Replace faulty silencers.
- Before using, always visually inspect to see that the blades, blade bolts and cutter assembly are not worn or damaged. Replace worn or damaged blades and bolts in sets to pre serve balance.
- On multibladed machines, take care as rotating one blade can cause other blades to rotate.
III. Operation
- Do not operate the engine in a confined space where dangerous carbon mon oxide fumes can collect.
- Mow only in daylight or in good artificial light.
- Avoid operating the equipment in wet grass, where feasible.
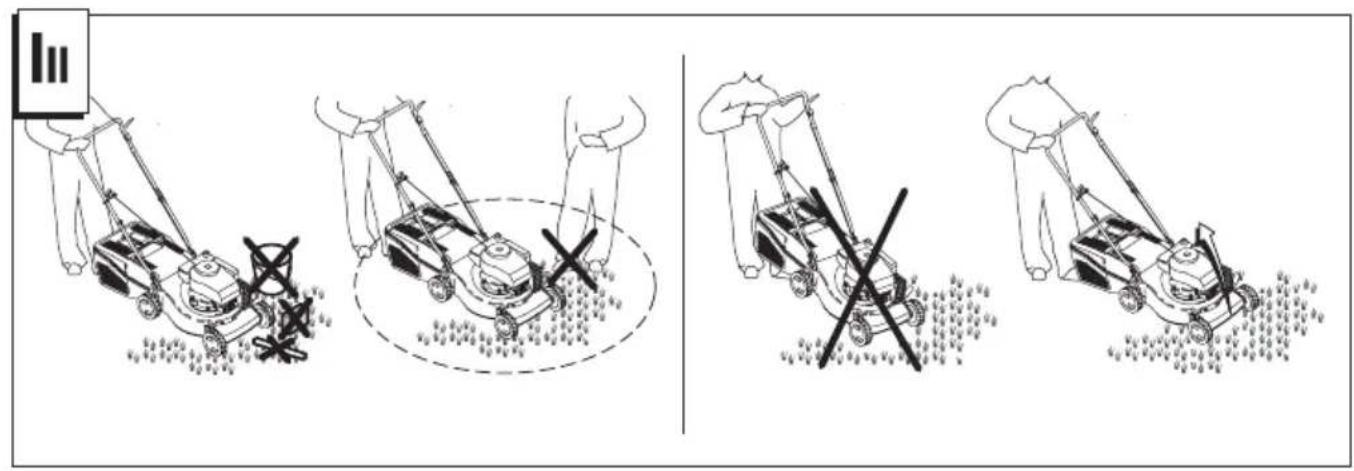
Always be sure of your footing on slopes. - Walk, never run.
For wheeled rotary machines, mow across the face of slopes, never up and down.
Exercise extreme caution when changing directions on slopes. - Do not mow excessively steep slopes.
-
Use extreme caution when reversing or pulling the lawnmower towards you.
-
Stop the blade if the lawnmower has to be tilted for transportation when crossing surfaces other than grass, and when transporting the lawnmower to and from the area to be mowed.
- Never operate the lawnmower with defective guards, or without safety de vis es, for example defl ectors and/or grass catchers, in place.
- Do not change the engine governor settings or overspeed the engine. Operating the engine at excessive speed may increase the hazard of personal injury.
- Disengage all blade and drive clutches before starting the engine.
- Start the engine or switch on the motor carefully according to instructions and with feet well away from the blade.
- Do not tilt the lawnmower when starting the engine or switching on the motor, except if the lawnmower has to be tilted for starting. In this case, do not tilt more than absolutely nec es sary and lift only the part which is away from the op er a tor.
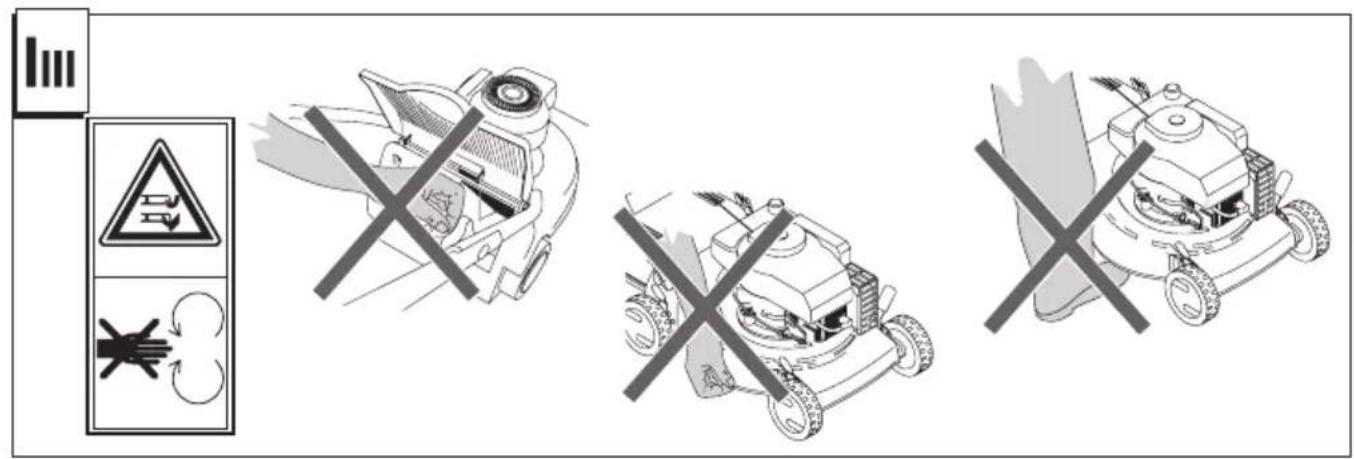
- Do not start the engine when standing in front of the discharge chute.
- Do not put hands or feet near or under rotating parts. Keep clear of the dis charge opening at all times.
- Never pick up or carry lawnmower while the engine is running.
-
Stop the engine and disconnect the spark plug wire:
-
before cleaning blockages or un clog ging chute;
-
before checking, cleaning or working on the lawnmower;
- after striking a foreign object. Inspect the lawnmower for damage and make repairs before re starting and operating the lawnmower;
-
if the lawnmower starts to vibrate abnormally (check immediately).
-
Stop the engine:
-
whenever you leave the lawnmower;
-
before refuelling.
-
Reduce the throttle setting during en gine shut down and, if the engine is provided with a shut-off valve, turn the fuel off at the conclusion of mowing.
- Go slow when using a trailing seat.
IV. Maintenance and Storage
- Keep all nuts, bolts and screws tight to be sure the equipment is in safe working condition.
- Never store the equipment with petrol in the tank inside a building where fumes may reach an open flame or spark.
- Allow the engine to cool before storing in any enclosure.
- To reduce the fire hazard, keep the engine, silencer, battery compartment and petrol storage area free of grass, leaves, or excessive grease.
- Check the grass catcher frequently for wear or deterioration.
- Replace worn or damaged parts for safety.
- If the fuel tank has to be drained, this should be done outdoors.

DESCRIPTION
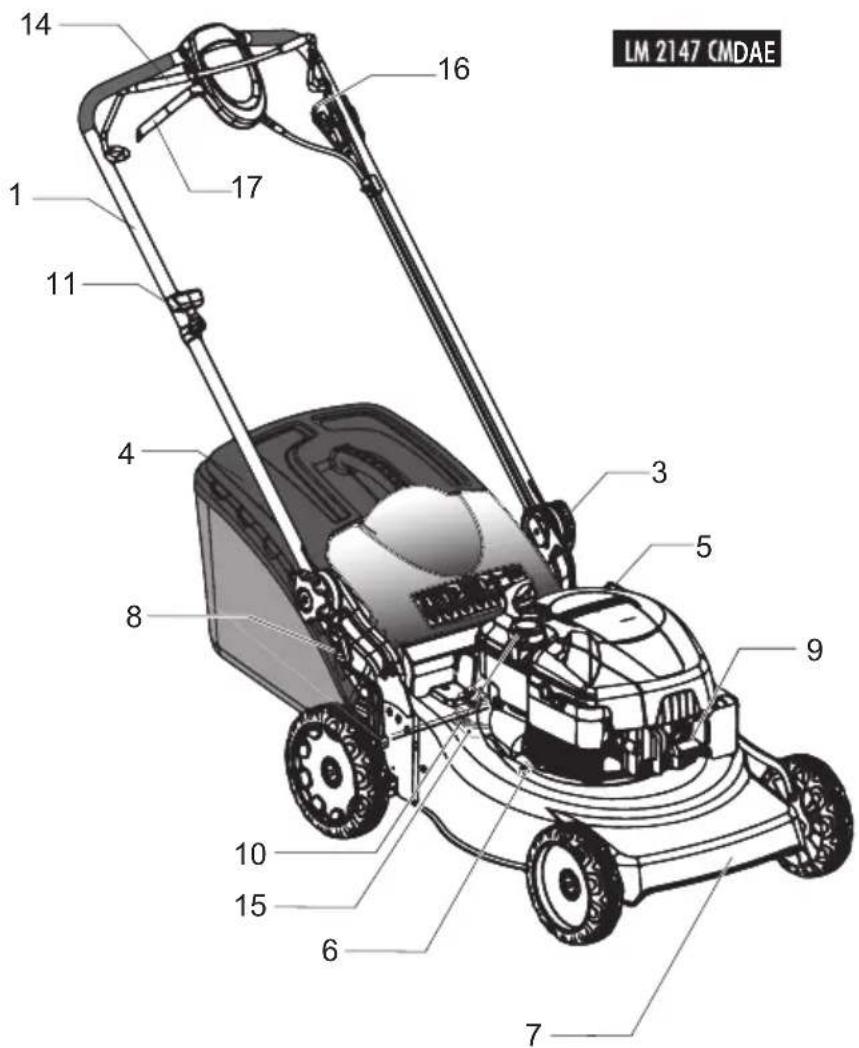
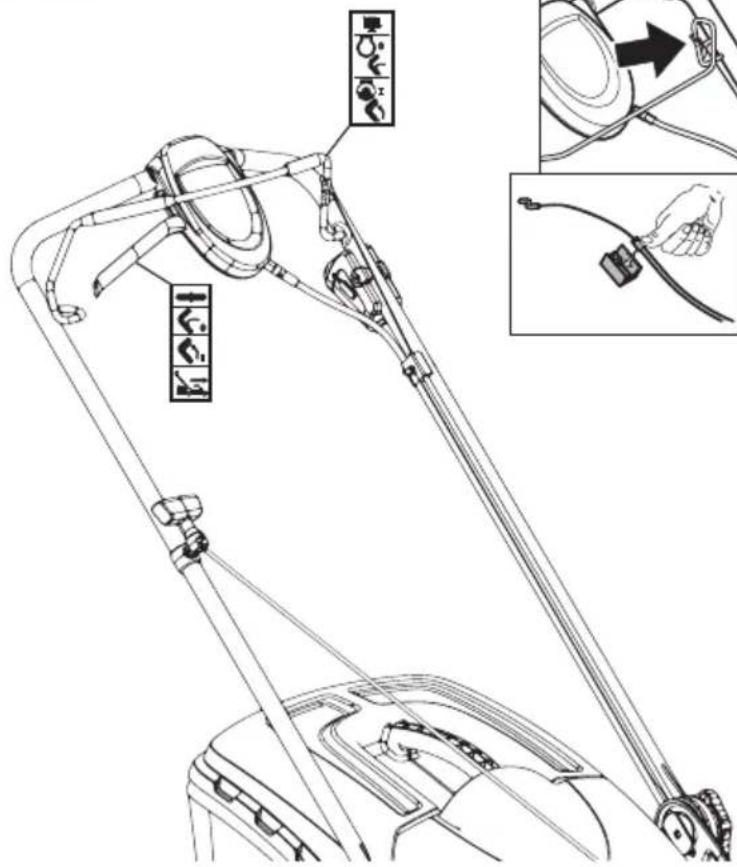
1 Upper handles
2 Fuel-enrichment pump
3 Fastening knobs for upper handles
4 Grass catcher
5 Oil filler cap
6 Oil drain plug
7 Deck
8 Adjusting levers for cutting height
9 Spark plug
10 Fuel cap
11 Engine start-grip
12 Rear deflector
13 -
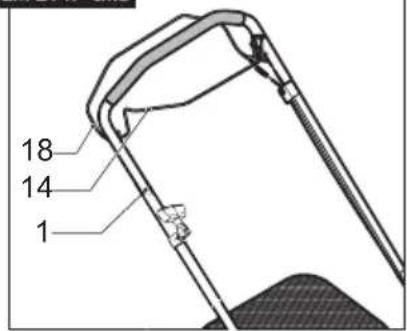
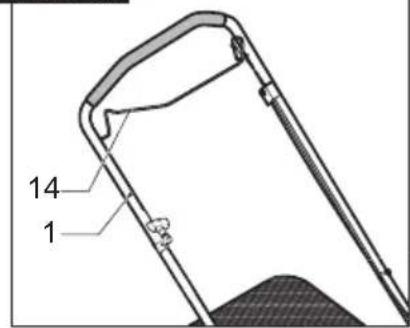
14 Engine stop lever
15 Reduction gear
16 Ignition key
17 Handle advance speed
18 Clutch lever

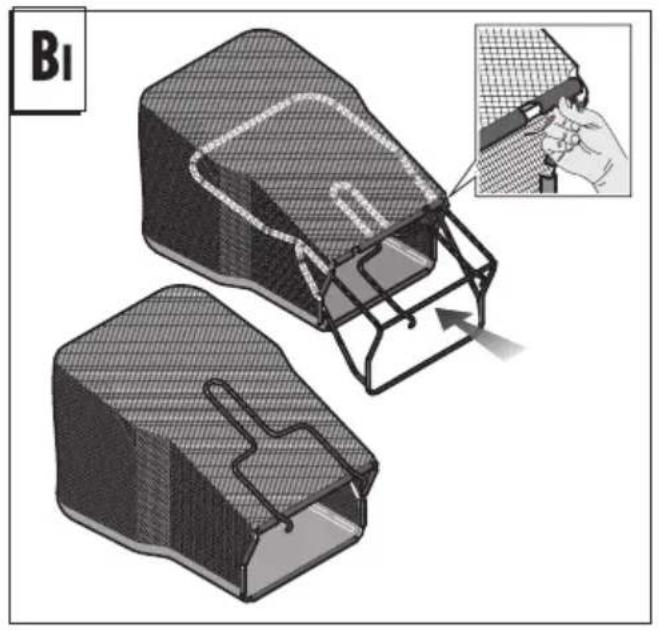
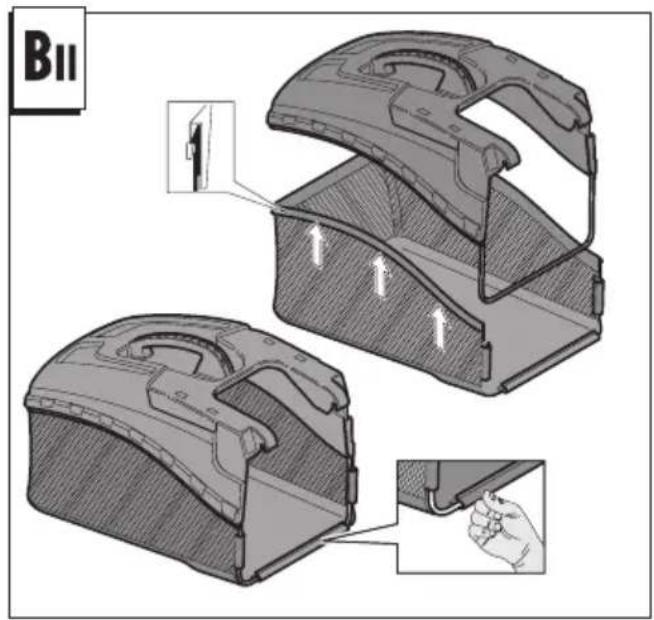
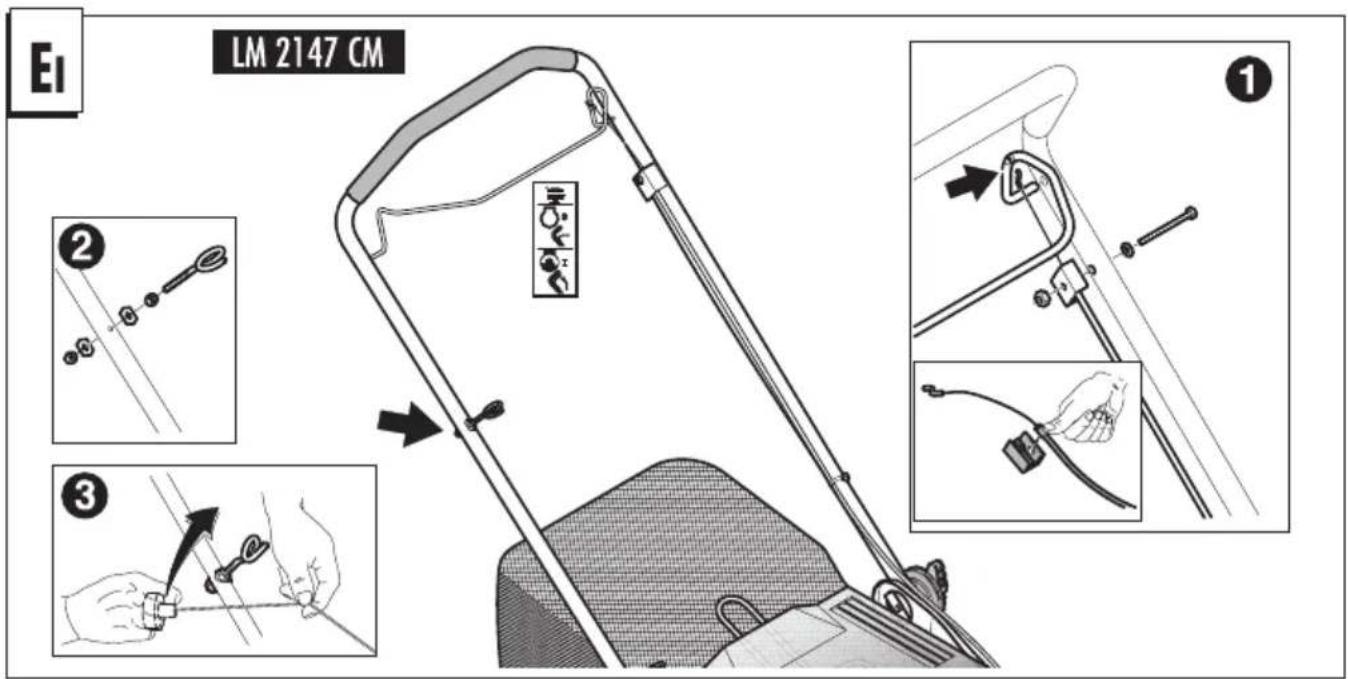
ASSEMBLY OF GRASS CATCHER
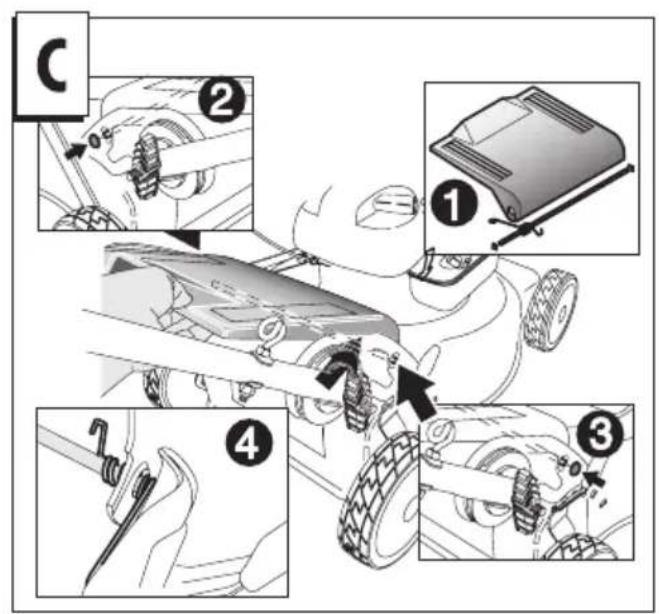
ASSEMBLY DEFLECTOR (if not already assembly)

ASSEMBLYHANDLES (lower)

ASSEMBLYHANDLES (upper)
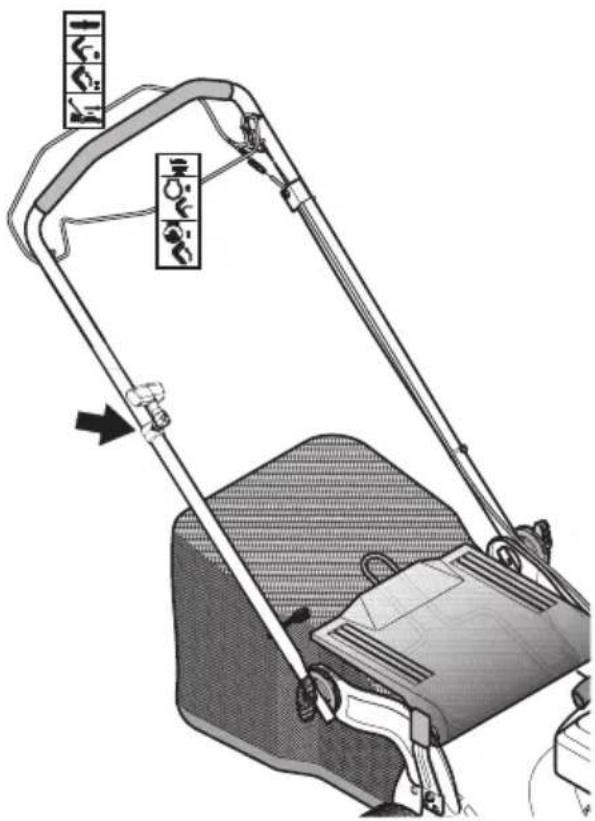
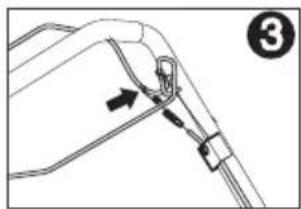
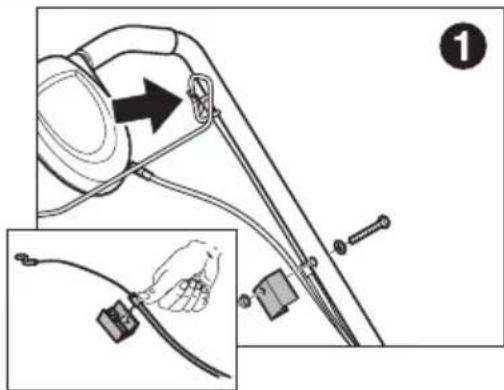
Use enclosed straps to secure cables to the handle, as shown in E1. Do not overstretch cables when mounting.

ADJUSTMENT OF HANDLES

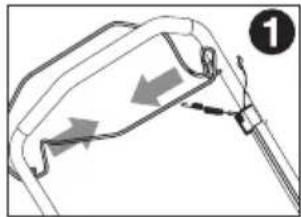
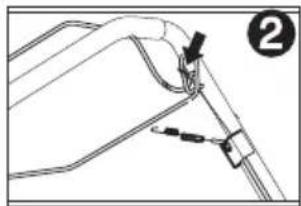
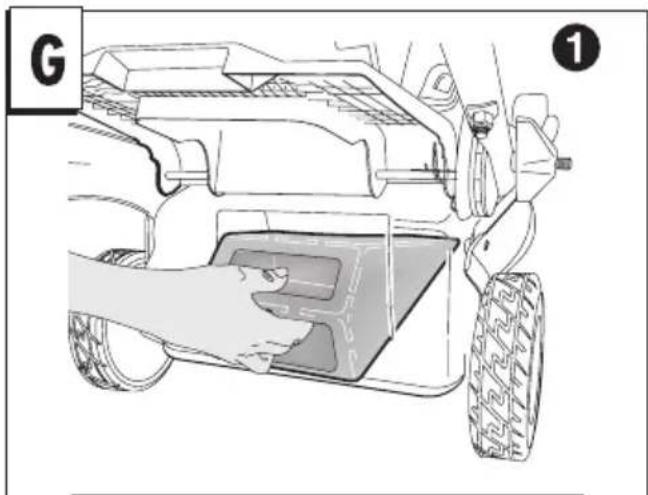
MULCHING CAP INSERTION (for the models where it is included only)
To cut the grass with the mulching system (no grass collection), lift the rear deflector panel and insert the cap by fixing it with the spring as shown in the figure.

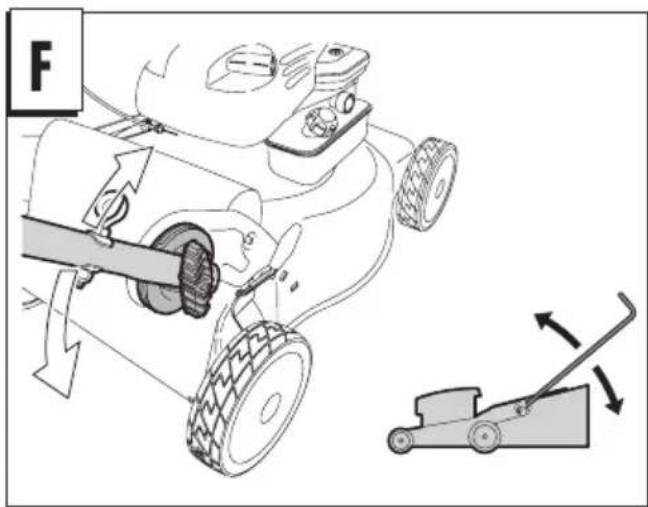
ADJUSTMENT OF CUTTING HEIGHT

SAFETY PRECAUTIONS

- Always operate with the deflector or grasscatcher in the correct position.
- Always stop the engine before removing the grasscatcher or adjusting the height of cut.
- Never place your hands or feet underneath the deck or into the grass discharge chute while the engine is running.
Before mowing, remove all foreign objects from the lawn which may be thrown by the machine. While mowing, stay alert for any foreign objects which may have been missed.
Never lift the rear of the mower while starting the engine or during normal operation.
Never place your hands or feet underneath the deck or into the rear discharge chute while the engine is running.

OPERATION
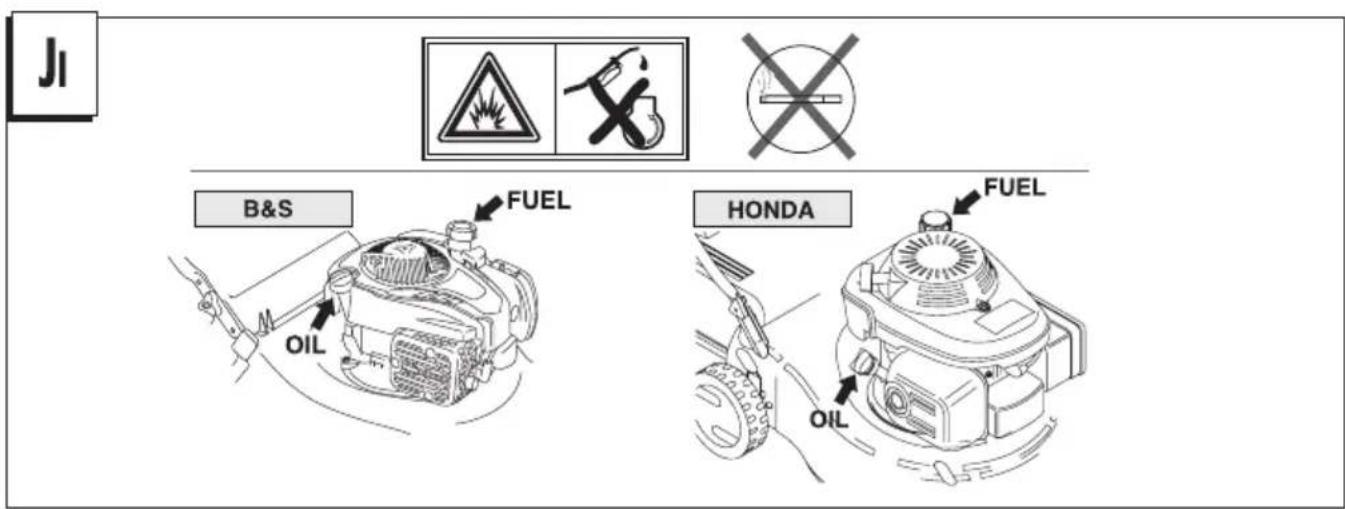
ENGINE ADJUSTMENTS (Fig.JI)
Refer to the engine manufacturer's maintenance manual.

TION:- Oil must be added to the he before use
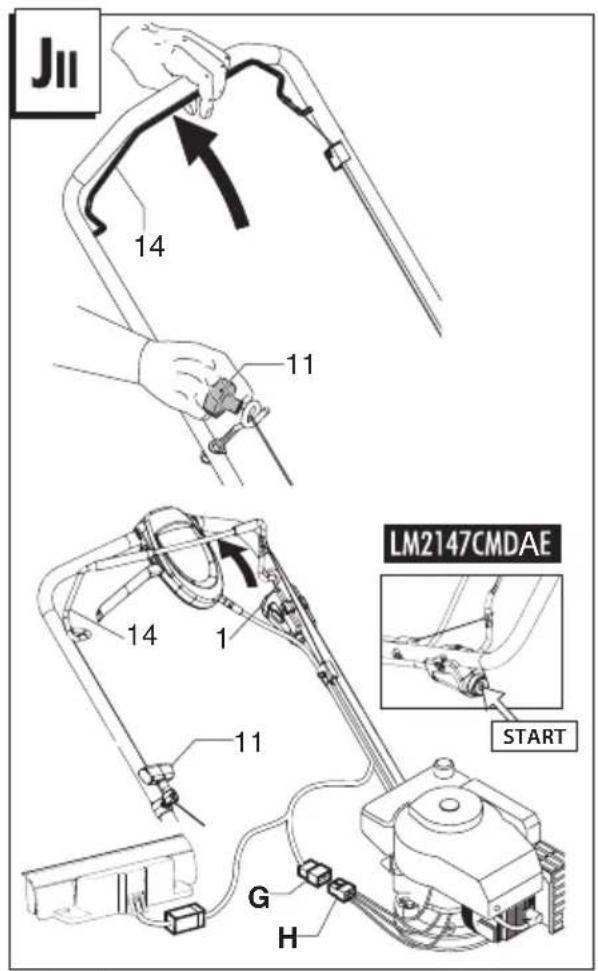
STARTING THE ENGINE (Fig.JI)
Once the machine has been set up properly, start the engine as follows:
a)Operate the engine stop lever (14) to prepare the engine for start, keep lever pressed against handle while starting and using the machine (it operates the engine brake).
b) Engines with primer system: Press the fuel-enrichment pump (2) located on the carburettor 3 or 4 .semit
For further information and explanations, read carefully the user instruction manual of the engine.
c) Start engine.
MANUAL STARTING: (While holding the engine stop lever (14)).
Hold the engine start-grip (11) and pull the starter rope gently until you feel the resistance caused by compression. Return the starter rope slowly then pull the handle firmly towards you to it's full extent
ELECTRICALS TARTING: (While holding the engine stop lever (14)).
Insert the plug (G) in the socket (H) on the engine.
Turn the ignition key (16).

ION: The blade starts turning as soon as engine is started.
Keep the engine stop lever (14) depressed during machine operation. When the lever is released, the engine stops.
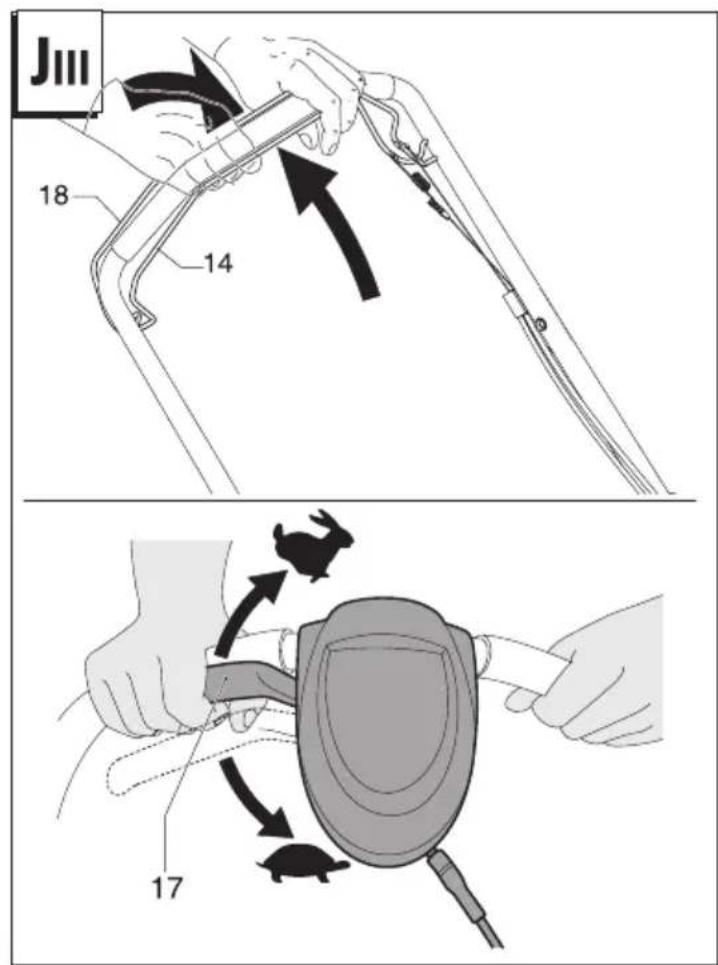
MOWING
To cut the grass, push the lawn mower manually or insert the automatic advance gear.
How to insert automatic advance (Fig. J III): Lift up the clutch handle (17 - 18) and keep it pressed in position.
CAUTION: Engage the gear only when the engine is running.
How to disengage advance: Release the clutch handle.
Before pulling the machine towards you, disengage the drive and push the machine forward approx 10cm

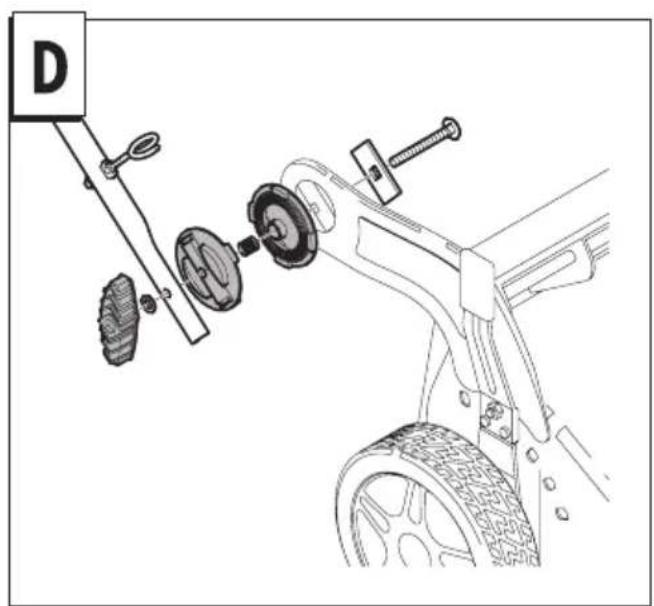
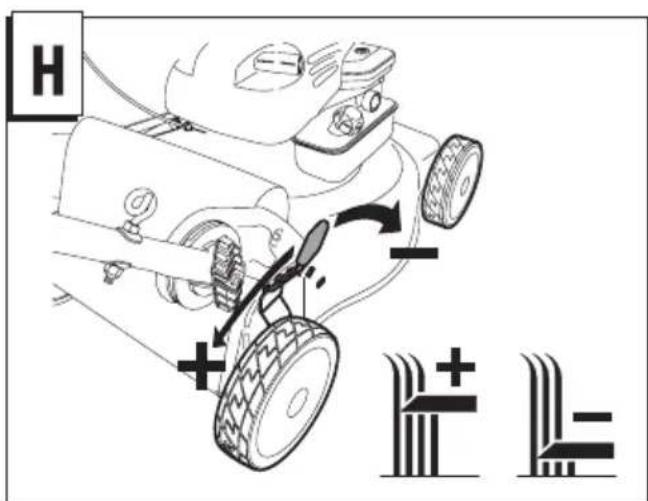
ADJUSTMENT OF CLUTCH CABLE (for self-propelled versions only)
Important: If, when you press the clutch lever, the automatic advance gear does not engage, the clutch cable should be adjusted by inserting the spring (P) in one of the subsequent holes in the plate (R) or in the hole "S".

MAINTENANCE
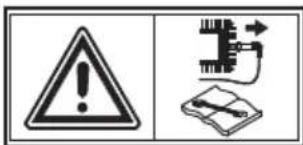
Caution! Switch off the motor and disconnect the spark plug before undertaking any maintenance work.
- For a four stroke engine, check the oil level and change the oil when dirty. For further explanation, see ENGINE INSTRUCTION BOOK.
- Frequently check the mower and ensure that all grass deposits are removed from beneath the deck.
- Never clean the mower by pouring water over it: this may seriously damage the electric start system.
Take care, the exhaust muffler may be vaery hot. -
Frequently check the blade for damage.
-
The lawn mower must be checked by a SERVICE DEALER.
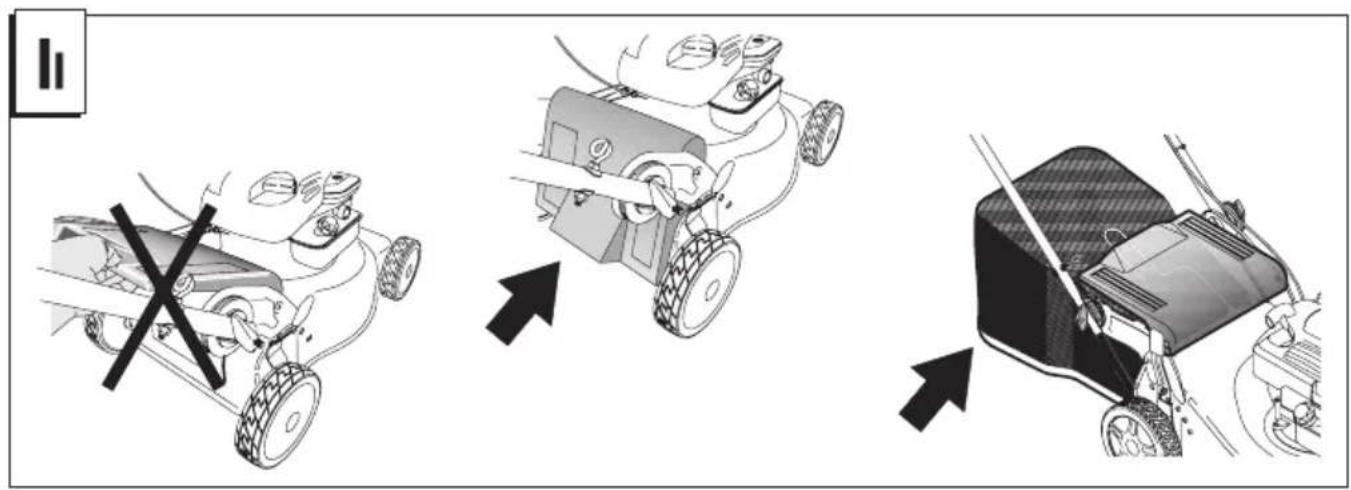
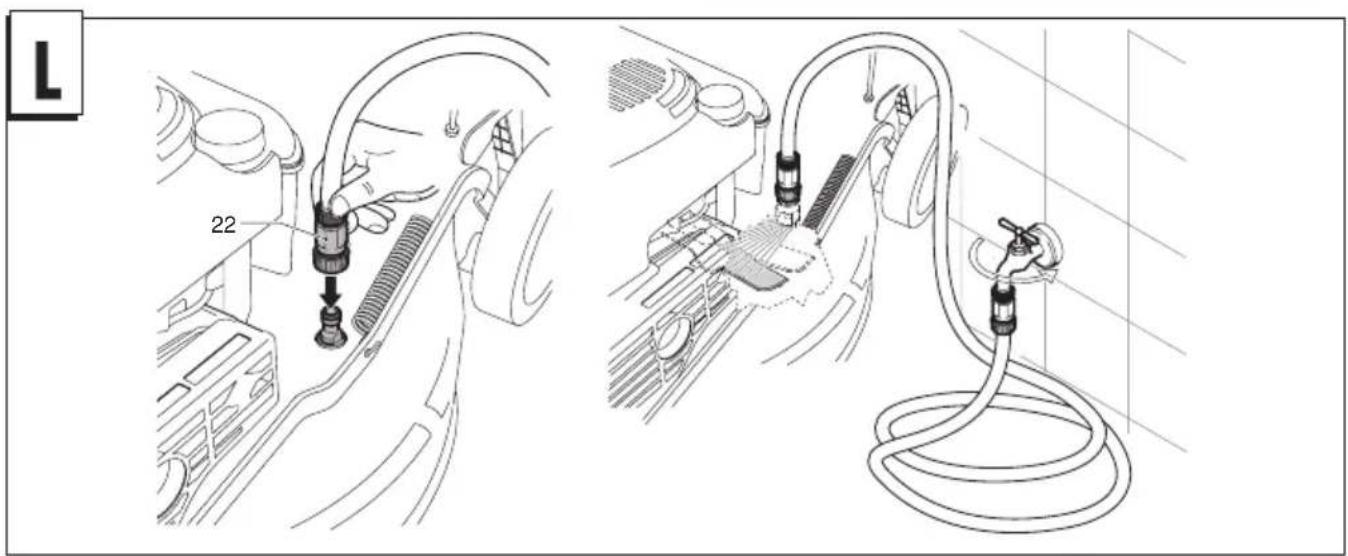
- Cleaning under the bodywork
With machine at a standstill and off.
- Attach fitting (22) on the deck to the water supply tap.
Turn on the tap. - start up the motor (blade in rotation), allowing it to warm up for a few minutes.
- at the end of cleaning switch off the motor, turn off the tap, detach the tube from the deck connection.

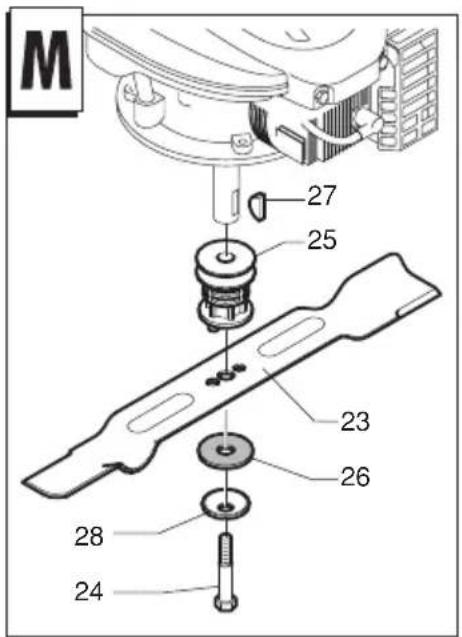
BLADE
To remove the blade (23) unscrew the screw (24).
-
Check the conditions of the blade-support (25), the washer (26), the key (27) and the washer (28) and replace any parts which are damaged.
-
When reassembling, make sure that the key (271) is correctly seated in the shaft and that the cutting edges face in the direction of the engine rotation. The blade screw (24) must be torqued to 5,34 Kgm (52,4 Nm).

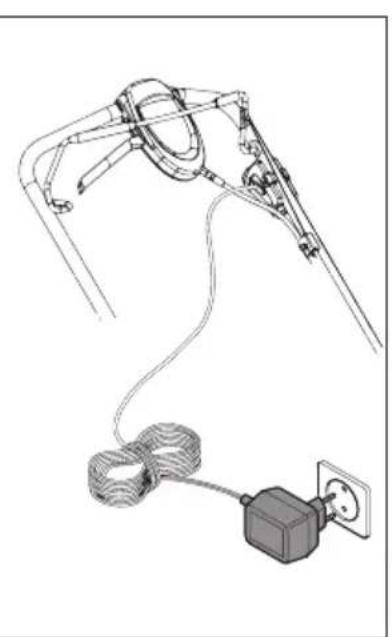
KIT ELECTRIC STARTING
Before starting the motor for the first time, you are advised to keep the battery on charge for 2 to 3 hours.
If the battery proves to be low during starting, charge it for 24 hours.
When starting, don't keep trying to start for more than 5 seconds.
BATTERY MAINTENANCE

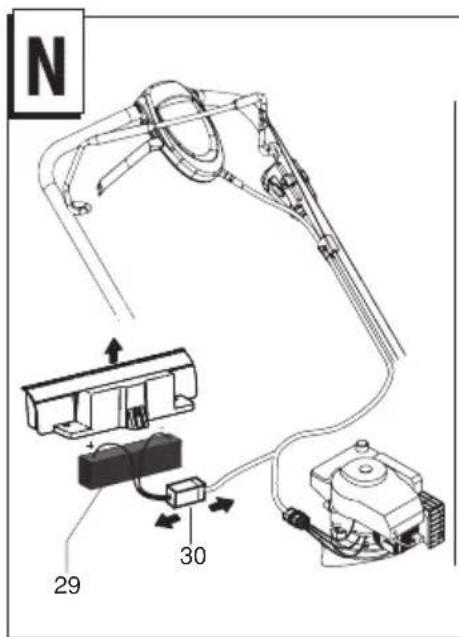
IMPORTANT
For correct battery maintenance (29), especially in preparation for a long period of inactivity, and for recharging, it is not necessary to remove it from its casing, but to simply proceed as follows:
1) Remove contact (30
2) Store the battery in a fresh and dry place.
3) Recharge the battery before use at room temperature for 24-36 hours.
4)Restore the contact (30) before use
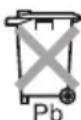
BATTERY DISPOSAL
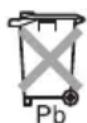
Those batteries marked with a "crossed out waste disposal bin" and bearing the chemical symbol Pb (battery containing lead) are not to be disposed in domestic waste bins.

The user is legally obliged to take the used batteries to special collection points or to return them to the retailer.
GUARANTEE AND GUARANTEE POLICY
If any part is found to be defective due to faulty manufacture within the guarantee period, Husqvarna AB, through its Authorised Service Repairers will effect the repair or replacement to the customer free of charge providing:
a) The fault is reported directly to the Authorised Repaier.
b) Proof of purchase is provided.
c) The fault is not caused by misuse, neglect or faulty adjustment by the user.
d) The failure has not occurred through fair wear and tear.
e) The machine has not been serviced or repaired, taken apart or tampered with by any person not authorised by Husqvarna AB.
f) The machine has not been used for hire.
g) The machine is owned by the original purchaser.
h) The machine has not been used commercially.
- This guarantee is additional to, and in no way diminishes the customers statutory rights.
Failures due to the following are not covered, therefore it is important that you read the instructions contained in this Operator's Manual and understand how to operate and maintain your machine:
Failures not covered by guarantee
- Replacing worn or damaged blades
- Failures as a result of not reporting an initial fault.
- Failures as a result of sudden impact.
- Failures as a result of not using the product in accordance with the instructions and recommendations contained in this Operator's Manual.
- Machines used for hire are not covered by this guarantee.
- The following items listed are considered as wearing parts and their life is dependent on regular maintenance and are, therefore not normally subject to a valid warranty claim: Blades, Electric Mains cable, Belt
CAUTION!
Husqvarna AB does not accept liability under the warranty for defects caused in whole or part, directly or indirectly by the fitting of replacement parts or additional parts that are not either manufactured or approved by Husqvarna AB, or by the machine having been modified in any way.
EC DECLARATION OF CONFORMITY
I, the undersigned Claes Losdal, Husqvarna AB, Drottninggatan, SE-561 82 Huskvarna, Sweden (keeper of technical documentation). Certify that the Lawnmower:-
Category . . .Petrol Wheeled Rotary
Make .Husqvarna AB
Conforms to the specifications of Directive 2000/14/EEC
Type.
Version. B
Width of cut. C
Guaranteed sound power level.
Measured sound power level.
Sound pressure livel at the ear (measurement uncertainty)) K = 1 dB( A) F
Vibration of the handle (measurement uncertainty) K = 1 m/s^2
(See the last page for references)
Type of Cutting Device . Rotary Blade
Identification of Series . See Product Rating Label
Conformity Assessment Procedure . ANNEX VI
MOD.LM2147CM,LM2147CMD,LM2147CMDAE
Notified Body.. .Nr. 0470 - NEMKO AS
Gaustadalleen 30 - PO Box 73 Blindern
0314 OSLO - Norway
MOD.LM2146CMD
Other Directives 2006/42/EC,93/68/EEC,2002/88/EC,2004/108/EC
& applicable standards normative EN836,EN ISO14982,EN1033,EN ISO 3744,EN ISO11201

Claes Losdal
Technical Manager
Husqvarna AB
Drottnggatan, SE-561 82 Huskvarna, Sweden
2013/08/30
MOD.LM2147C;LM2147CMD,LM2147CMDAE
Organisme notified.. .Nr.0470- NEMKO AS
Gaustadalleen 30 - PO Box 73 Blindern
0314 OSLO - Norway
MOD.LM2146CMD
Organisme notified.. .Nr. 0404 - SMP Svensk Maskinprovning AB
Fyrisborgsgatan 3
754 50 Uppsala - SWEDEN
Autres directives. 2006/42/EC, 93/68/EEC, 2002/88/EC, 2004/108/EC
et aux normes. EN836,EN ISO14982,EN1033,EN ISO 3744,EN ISO11201

Claes Losdal
Technical Manager
Husqvarna AB
WERKEN MET DE MAAIMACHINE
VOORBEREIDING VAN DE MOTOR (Fig.JI)
Uppmatt Ijudniva pa motor. E
Ljudtrycks niva (matosakerhet) K = 1 dB(A)
Vibrationer i styre (matosakerhet) K = 1m / s^2 G
e com as normas EN836,EN ISO14982,EN1033,EN ISO 3744,EN ISO11201

Claes Losdal
Technical Manager
Husqvarna AB
ELEKTROMOS INDITÓ KIT
"AAeO8yie" 2006/42/EC,93/68/EEC,2002/88/EC,2004/108/EC
GWARANCJA I WARUNKI GWARANCJI
OctaHOBNTe DnBraTeJIb:
- KaKdIpa3, KOrDa Bbl OCTaBnIeTe Ra3OHOKOcNkY 6e3 npncmToTa;
-пегдзарвкоТОЛВOM. - PnB BbIKIIOHEn DBIRATEJr Heo6xOJMo yMeHBWITb perynpoBky npoccej n,ecnn Dbiratb OcHaueh OTceHbIM KnaHOM,BbIKIOHTb NOaTy TOnJIbA No 3aBepseHIO pa60Tb Ira3OHOKOcnIKN.
- Пи ИСПОЛБОВАИЗ 3адHERO CINDEHЯ nepemeuaTecb MeДпЕнHO.
IV. Texo6cnykBaHne npaHeHne
Bce raikn,60ntbI BNHTbl DOJXHbI 6bITb HaDeXHO 3aTMytbl dny oBeCneueHn 6e3OnacHbix ycNoBni pa60tbl obopydoBaHH.
3aIpeaaetcXpaHnTbO6OpyIOBaHne C 6eH3HOM B 6akeB NOMEueHnn, rIe ra3bl MOrY T IOCTNHy OTKpbIToro PnAmEH nn NCKp.
- Doxntecb oxnaekn Hn ABnraTe npeTem, KaK NOMEaTaHa XpaHeHne B IIO6oe 3akpbIToe NOMEueHne.
CueIbIO NCKHoueHnB BO3ROPaHnI DEpKInTe DnurTaTeJIb, rnyuHTenb, 6atapeHbI OTCek N MeCTo XpaHeHnB 6EH3nHa CBO6OdHbIMN OT TpaBbl, INCTbeB ININ N3NJnHrero KOJNUcEcbTA CMA3OuHbIX MaTePnAIOB.
-Перноюескп поверяite Травocборнк Ha npedmet n3Hoca nI npOu.
Buejx oecneueHn 6e3onacHOCTn npoBOnte 3aMeHy n3HOweHHbIX INI NOBpeKDeHHbIX YacteN.
- EcIn Heo6xOIMO CInTb TOnJIINBO n3 TOnJIINBHO 6aKa, npOBOnTe 3Ty OnepaunHO Ha OTKpbITOM BO3dyxe.

ONINCAHNE
1 BepxHne pyKoTkn
2 Hacoc oboraueHnraopyeo
3 3aKpeHneHne pyueK BpaueHnHa BepxHne pykoTkn
4 yIIOBtEnb TpaBbl
5 KpbIshKa MaCJIaHOrO ΦNbTpα
6 CNBna npo6ka nla Macna
7 nnta
8 perynpoBOHbIe pbuarn IaB BbcOTbI cpe3AH
9 CBeua 3axnraHna
10 TOPIINBHaK PblIka
11 cTapTeP DnBraTeNa
12 3aHnOtpaKaTeNb
13
14 pyuOCTaHOBKn DBuRaTeTn
15 peynknoHHnpepa)
16 KIOU3aKUNAHN
17 pyka cKOpocTn noBoda
18 pyIaR BKNIOeHn MyfTbI CcENIIeHn
C6OPKA YJIOBNTJIa TPABbl
C6OPKA OTPAXKATEJI (ecn yke He co6paHo)
C6OPKA PYKORTOK (HNXHNX)
CBOPKA BEPXHIX PYKORTOK (BEPXHIX)
C nomoouBxOaIuX B KOMnKeT peHne 3akpeNte Ka6eH Na pyKoRtke, Ka noka3aHo Ha pncyHke E1. 3anpeaaetc ype3MePno paCTaRnBaTb Ka6eH np Nx KpeJIeHN.
PERYUNPOBKA PYKORAJK
YCTAHOBKA KOLNAKA MYIbHINPOBAHINBKKIOUeHO B COCTaB)
(Tonbko Dnma MoedeJe, rIe 3TO
3NEKTPUeCKN 3ANyCK: (Ppyn ydepkaHnn pbyara octaHOBKn DnurataTeTn (14)).
BCTaBbTe Bnky (G) BrHe3do (H) HaDburatene. NobepHnte KIOU 3aKunraHn (16).

BHMHHe:Je3BHe NaHHaET BpaueHHe, KaK TOnbKO 3aNyCKaeTcBnRaTeNb.
ДерхиTe pyuhar octaHOBKn DBuratela (14) npnxTaBIM B TeueHne pa6Obl MaunHbI. Korda pyuhar OTnyckaetc, DBuratelb OCTaHaBJIbAeTc.
KOLJEHIE
IJIcpe3Kn TpaBbl,ToJIkaIte Ra3OHOKOcnKy BpyHyIO nn BCTabBe 3y6uyTO nepeauy ABTomATnueckoro NOBODa. KaBCtABNTb ABTomATnueckn NOBOD (PncyHOK JIII): IOpHMmTEpyKoRTky ynpabNeHnMyfToN cUeHnna(17-18) n UdepXNBaITe ee npxKaTOn B DaHHOM NIOJKeHN.

BHMHHe: BBOInTe cUeHNHe H3y6aToI nepeau ToIbKO, KOrda DBnraTeIb pa60TaT.
Kak oToeHnHTb NO DBO; OcBo6oJte pyky ynpaBHeHH MyfToI cUeJIeHH.
Ipejde yem notaHyb arperat Ha ce6ra, Heo6xOAMNO OTKIOHTB npBOJnToKHyb arperat Bnepe np6bn3nteBHO Ha 10 cm.

PENIPOBKA KABELA MYOTBI CJIENJIEHIN
(TOJIbKOДЯ CAMOXODHbIX BapNaHTOB)
Baxhoe 3ameuHHe: Ecn, KOrda BbI HaxmaeTe pbyar ynpabJeHMyfToi CcenHeHn, ABtOMaTueckoe cCenHeHne noBoDa He npocxOanT, Tpoc MyfTbI CuenHe NdoJxH perynipoBaTbcra YCTaHOKoi npyKnHbI (P) B OAnHO n3 nocJeDyUOxOTBepCTnB PAACTnHE (R) nnB OTBepCTnn (S).

TEXHINUCKOE OBCJYKINBAHNE
BHHMaHHe! OTKJIIOUHTe DnurTaTeN b NTcoEduHInTe Ka6eNb CBeuN 3aXnRanHnpepe npOBeHEm pa6o NO TexHnueCKOMy O6CnyKuBaHnO
ДячырextakTHOrO DBnraTeIЯpoBepbTe yPOBeHb Macna n 3aMeHnTe MaCNo, KOrda OHO rpa3Hoe.ДаNBHeuWne 06brcHeHn CMOTpuTE PyKOBoCDTO NO DBnraTeIIO.
Kak MoXHo YaIe npOBepaTe Kocunky n 06ecneYbTe, UTo6bl BCE ocTaTKu TpaBbl y6npaIncb N3-noD onany6kn (npn6OpHoro 6noka).
HnKorda He BbUuauTe DnurateIb, NOnBaa erO BOOn CBepx: 3TO MOKeT npNBecTn K cepBe3HbIM NOBpeXdEHNrM CNTembl 3NeKtpNueCKORo 3aNyCka.
6 Bybte OCTOPOXHbl, BblNONHaT py6a MoKet 6blb oueHb ropaye.
Kak MoXHo YaSe npOBepaTe Je3Bne Ha npEmdT NOBpeKeHn.
Tg30HOKOcUNKa DOJIXHa npOBepaTbCn PpeCTaBteneM cepBucHO CnyK6bl.
BbHnauTe npoctpaHCTBO NOKOHcTpkyKnei. KOrda MaunHa B NOKOE nOTKJIouHeHa:
-ПисоeДиHITe NaIpy6ok (22)Ha onaIy6ky K KpaHy nOdaH BOdbl. OTBepHITe KpaH.
-3anyctnte DBrIaTeIb (Je3BVe BO BpaueHn), daBaI eMy nporpeTbc HecKO bKO MNHyT.
-B KOHcE YNCTK OTKJIIOHTe DUNrAteNB, 3aKpOInTe KpaH, OTCOeINHInTe Tpy6y OTONDcoEINHeHnK ONaIy6Ke.

JIE3BNE
IIJIa CHaTHa Ie3BnA (23),OTKpyTHTe BnHT (24).
- PpOBepe coCToHHe IepKaTeJIe3Bn (25),
IIpoKJaIKN (26), IIIOHKn (27) n IIIaIbI (28) n
3ameHHTeJIIObIeJeTALINKOTOpBIEIOBpeKeJdeHbI.
- IIpnIOBtOPOHc6OpKe,y6eIHTecb,HTo IINHOKa (27)
IpaBnIbHO caNTcH Na BaJI N YTO peKyuNHe KpaOobpaIeHb
B HapabHeHH BpaHHeHH IbHrAteJI. BnHT Je3Bn (24)
JIOJIKeH 3aKpyuHaBaTbc8 cyHJHeM IO 5,34 Km (52,4 Hm).

KOMIIJEKT IJIЯ 3JIEKTPHUECKOTO 3AIIYCKA.
- IIpeep3aIyckOM IBHrataJI B IepBbI pa3, BaM peKOMeHJyETc HIOdepKaTb 6aTaPe1O Ha 3apJke B TeChHe 2 -3 YacOB.
EcJIN 6aTapeI IPOIOJIkaeT OITBaTb HN3Koe HAIPJKeHHe B TcYCHHe 3aIyckA, 3apJHTc CBe TcYCHHe 24 YacOB.
Ipn 3aynycke, He yIepKbaiTe HaKaTbIM cTAP 6oJee 5 cKeYH.
TexHHueckoe 6cbIyKHBHne aKKymJITopHOB 6aTapeH.

Hoc 3aMeHaHHc:
IⅡIpaBnIbHOrO TcXHHueckKOrO 06cIyJKBaHHA KkyMylrTopHo 6aTapen (29),OCo6cHNO Iprn IOITROBKe IJIINTEbHO IcPHoJa 6e3IeCTBHe, H IJI INpe3ApJIKN, HEo6BaTeJIbHO BbIHMaTb ee H3 OTceKa, a IpocTo IpoJeJaIte CJIeDyHOIIee:
1) OToeJHHTe KOHTaKT (30).
2) CoXpaHnIe aKKyMJIaTOpHyIO 6aTapeIO B IpOxJaIaHOM H cyXOM McCTc.
3)IpeepaJIHTc6aTapeIOIePcIHCIOJIb3OBAHHcMIIpH KOMHaTHOH TcMIpePaTypeB TeUcHHe 24-36 YacOB.
4) BocTaHOBHTe KOHTaKT (30) IepcI HcIOJIb3OBAHHcM.
YTHI3aIIHAAKKyMy.1rTopHO6aTapcn.
JaHHbIe 6aTapen MapKnpyIOTe HaJIINHcBIO
<3aMKHyTaa 6aHka Ha OTXoJbI yTHJIN3aIHHN> H
HccyUHc cHMBOJ Pb (6aTapc, coCpKaIIaIc BCHNC)
HC JOJIKNbI yTHJIN3HPOBaTbcR B KOHTcHcpax IJIa
6bITOBbIX OTXoIOB.

IIOJIb3OBaTeCJIb NO 3aKOHy 6oJ3aH INpcpeJaBaTb HcIIIOJIb3OBAHHBc AKKMyJIITOpHbIe 6aTapEn Ha cIEINHaJIbHbIe C6OpHbIe IYHKTBI HIN BO3BpaAaTb IH TOProBiy.
ГAPAHТИУСЛOBИ ГAPAHТИ
B cIyuc IOIOMKn IIO60J qAcTH, B 3aBHCMOCTH OT HeKaueCTBeHHoO6pa6OTKN BO BpeM IepHOJa rapaHTHN, CHPMa HUsqvarna AB, IOCpeIcTBOM CBOHX pa3peIeHHbIX peMOHTbIX IIeHTpOB, 6yIDtB BBIIIOJIHHTb 6e3IIaTHo peMOHT HIN 3AmcHy, B cIyuc ccJIN:
a)IIIOJIOKMa 6bIa COOOHeHa IIpRAMo pa3peIeHHOMy peMOHTHOMy IeHTpy.
b)IIpeTcBAJIeTcK BHTaHUNIO NOKyKN.
c)IIOJIOKMa He 3aBnCt OHTHeIIpaBnIBbHOTo HcIOJIb3OBAHn, He6peXKHOCTN HIN HeIIpaBnIBbHbIX peYJInpOBOK, BbIOJIHeHbI IOJIb3OBATeJIeM.
d)IIOJOMKa He 3aBHCnT OTo 06bIuHOro H3HOca H3-3a HIOJIb3OBAHH.
c)Ha MaIHHHe He 6bJIb BbIOJIHHe bI OepaIIHH 0bcJyKhbIHH, pcMOHTa, OHa He 6bIIa IcMOHTpObaHa HIN HcKaKeHa IIepCOHaJIOM He pa3peIeHHbIM hIpMoH Husqvarna AB.
f) ManuHa He 6bJa cdaHa Hapokat TpBeTM JIiAm.
g)MaHnHa YBHeTc HMyIeCTBOM opHrHnHaJIbHorO nOKyIaTcJI.
h) MaHHHa He HcIOJIb3yETcra IJIa KOMMepueckoro yIOTpeBJIeHHa.
HactoIaIraIpaTHn -IOIOJIHHCTIcraJIbHbcIpaBaKJIncHTa HcCOKpAHTHXBJIIO6OM CIIOC6OM.
IIoJOMKn, KOtOpbIe 3aBnCrt O T OHOH HIN 60JIbIiHe
HnKcIepueHcJIeHHbIX npHnH He NOKpbITbI rapaHTHn, HO3TOMy peKOMEHdyETc HHTaTB BHIMATEJBHO HHCTpyKUHN Ha PyKOBOICTBE IIO IOJIb3OBateJIIO H BIIIOJHE IOHNMaTHpa6OTy INpoIeDpybI NO 06CnyKBAHHO MaHHbI.
IIOJOMKHe IOKpbITbI rapaHTHn.
-3aMeHa H3HOceHHbIX HIN IOBpeKJDeHHbIX HOKOB.
-IOJOMKN, KOtOpbIe 3aBHCrT OT OTCyTCTBn r COO6HnHaayJIbHOHIOJOMKN.
-ПОЛIMКИ,ΚΟΤΟΡБΙ θΑΒΝΥΤΟν ΘΕΟχιναΗΝΟγίρα.
-IOJOMK, KOTOpbIe 3aBHCAT OT Heco6JIIOHeIIH HnCTpyKuHH n peKOMeHuaHn yKa3aHHbIX Ha PyKaBOcTBe IIOJb3OBaTeJIIO.
- TapaHTHHe IIOKpbIbAeT MaIIHHb cHaHb HAnpOKaT.
-HnHexkyKa3aHHbIe YacTH cHHTaIOCTc paXoINbIX YAcTeH INx CPOK paOToBt 3aBHCNT OT HopMaJIbHOro O6CJyKHBaHHN, IIO3TOMy rapaHTHHe IOKpbBaet HOHN, IINTaTeJIbHbIE Ka6eHH, peMHH.
- OCTOPOXHO
BHytpn ycIObHn HAcTOIcH rapaHTn 0HpMa Husqvarna AB HE BO3bMet Ha ce68 OTBETCTBEHHOCtB 3a IeEkeTb, KOtOpbIE BIOJIHe HIN YAcTHHIO, INPMO HJIN KOCBeHHO, 3ABHCt OT yIOTpc6JIChHn 3aIHaCTe HJIN IOIOJIHNTCJBHX AcTe Hc IIPOH3BCdHb HIN HC pa3pcIIChHb IeHPMoH Husqvarna AB HIN 3a Te IeEeKbI, KOtOpbIE 3aBNCrOT H3MeHeHHN BBIIOJIHeHb B JIO6OM cIOco6e Ha MaIHHe.
EC DEKJIAPAUIN COOTBETCTBIA
IopnicaoHn Claes Losdal, Husqvarna AB, Drottninggatan, SE-561 82 Huskvarna, Swcden (XpaHntelb TexHuecko JOKymeHTann) 3aBnE, TTO raHOKOCy:
Kateropn.. BpaataeIbna, 6eH3nHO, c KonecAmN
Marca .Husqvarna AB
COOTBETCTByET HOpMaTnBaM DInpeKtNB 2000/14/CEE.
Tun A
Bapnnt B
Unpa pe3a.. C
「rapaHTnpoBaHHbI 3BykoBoy ypoBeHb. D
I3MepeHHbI 3ByKOBoI ypoBeHb. E
YpOBeHb akyctnueckoro daBHeHnI (IorpewHocTB n3MepeHH)K=1dB(A)F
Bn6paun Ha pykoTke(norpeuHoctb n3MepeHnK=1 m/s²
TnHoxa .BpaatelbHy
IeHTnphiKaua cepu... CMOTpn EtNKeTky O DaHbIx O PpOdyKTe
PpoeDpya OueHKn COOTBeTCTBnA.. ANNEX VI
MOD.LM2147CM,LM2147CMD,LM2147CMDAE
Opran 3aBneHn.. Nr.0470-NEMKO AS
Gaustadalleen 30 - PO Box 73 Blindern
0314 OSLO - Norway
MOD.LM2146CMD
Druge directive 2006/42/EC, 93/68/EEC, 2002/88/EC, 2004/108/EC
in po standardih .EN836,EN ISO14982,EN1033,EN ISO 3744,EN ISO11201

Claes Losdal
Technical Manager
Husqvarna AB
A
LM2146 CD LM 2147 CMD
LM 2147 CM
LM 2147 CMDAE
LM 2146 CD
LM 2146 CMD
LM 2147 CMD
EII
EIII
LM2147CMDAE

| ALM2146 |
| B CMD CM, CMD |
| C 46 cm |
| D 95 dB (A) |
| E 94 dB (A) |
| F 80 dB (A) |
| G 5 m/s2 |
| ALM2147 |
| B |
| C 46 cm |
| D 96 dB (A) |
| E 96 dB (A) |
| F 82 dB (A) |
| G 5 m/s2 |
| AL | M 2147 |
| B | CMDAE |
| C | 6 cm |
| D | 96 dB (A) |
| E | 96 dB (A) |
| F | 82 dB (A) |
| G | m/s2 |
HUSQVARNA AB