
Ultra AN64 4200 DC - Desktop computer TARGA - Free user manual and instructions
Find the device manual for free Ultra AN64 4200 DC TARGA in PDF.

| Product type | Desktop computer |
| Processor | AMD Athlon 64 4200+ |
| RAM | DDR-SDRAM (variable capacity, up to 4 GB) |
| Hard drive | 320 GB SATA |
| Burner | DVD/CD burner (DVD-RW, CD-RW) |
| Optical drive | DVD-ROM drive |
| Front connectors | 4x USB 2.0, 1x FireWire (4-pin), 1x FireWire (6-pin), 1x eSATA, audio input/output (mic, line), S-Video, composite |
| Rear connectors | 4x USB 2.0, 1x FireWire (6-pin), 1x eSATA, 1x LAN RJ45, 1x modem RJ11, 1x VGA, 1x DVI-I, 1x parallel, 1x serial, 2x PS/2, optical and coaxial SPDIF, 5.1 audio input/output, TV input (DVB-S, DVB-T, analog), FM antenna |
| Power supply | 230 V mains, main switch on the rear |
| Network | 10/100 Ethernet card, V.92 modem, WLAN IEEE 802.11b/g (optional) |
| Memory card reader | CompactFlash, Microdrive, SmartMedia, xD, Memory Stick, SD/MMC |
| Operating system | Windows XP preinstalled |
| Maintenance and cleaning | Clean with a soft, dry cloth. Do not use liquids or abrasive products. |
| Safety | Class 1 laser in optical drives. Keep batteries out of reach of children. Do not open the case. |
| Spare parts and repairability | Repair by qualified personnel only. Parts available at www.service.targa.co.uk. |
| Weight and dimensions | Standard tower (weight and dimensions not provided) |
| Warranty | Warranty subject to seal integrity. See manual for details. |
Frequently Asked Questions - Ultra AN64 4200 DC TARGA
User questions about Ultra AN64 4200 DC TARGA
0 question about this device. Answer the ones you know or ask your own.
Ask a new question about this device
Download the instructions for your Desktop computer in PDF format for free! Find your manual Ultra AN64 4200 DC - TARGA and take your electronic device back in hand. On this page are published all the documents necessary for the use of your device. Ultra AN64 4200 DC by TARGA.
USER MANUAL Ultra AN64 4200 DC TARGA
Copyright © by DATA BECKER GmbH & Co. KG
Merowingerstr. 30
40223 Dusseldorf
Germany
Author Christoph Prevezanos
Project Editor Christian Strauch
Cover Design DATA BECKER
Translation Think'Z International Europe Ltd. (www.thinkz.com)
Page Layout Andreas Quednau (www.aquednau.de)
Think'Z International Europe Ltd.
Production Coordinator Claudia Lotschert
This book is copyrighted. No part of this book may be
reproduced, copied or distributed using any means or transmitted in any form without the prior written permission of DATA BECKER GmbH & Co. KG.
Responsible Targa GmbH
Lange Wende 41
59494 Soest


Important Note
The procedures and programs described in this book are given regardless of patent. They are intended for amateur and training purposes only.
All information, technical specifications and programs in this book has been produced by the authors with the utmost care. However, the publishers can provide neither a guarantee, nor accept legal responsibility or any other responsibility, for consequences resulting from incorrect information.
The software and hardware designations and trademarks of companies used in this book shall generally remain subject to the legislation covering trade names, trademarks and protection under patent law.
The text contained in this book are suggestions and examples only. They include selective information only with no claims made for completeness.
In addition, although the text has been created with great care, the publisher and the author shall accept no responsibility for the completeness or correctness, for the contents of the text or for the success of the users action after following the information given in this manual. Using the information given in the text is solely at the user's own risk.
English
François
Nederlandss
Portugués
Svenska
English
Note
Before you use this device for the first time, please read the following notes in this manual and heed all warnings, even if you are familiar with handling electronic devices. Keep this manual in a safe place for future reference. If you sell or pass this device on to another person, it is imperative that you also hand over this manual.
Table of Contents
1. Quick Start in Five Minutes 3
1.1 Connectors and Ports 3
1.2 Connecting and Powering Up 4
Connecting Power and Monitor 4
Connecting Mouse and Keyboard 5
1.3 Starting Windows for the First Time 5
2. Advanced Configuration and Handling 7
2.1 Graphics Adapter 7
Configuring Your Monitor and Graphics Adapter 7
Image Output on a TV 8
2.2 Card Reader 10
Inserting a Memory Card 10
Transferring and Saving Data on the PC 11
Removing a Memory Card Safely 12
2.3 Modem, Internet and Network 12
Connecting the Modem 12
Setting Up the Dial-Up Networking 13
Configuring the Network 17
WLAN - Setting Up a Wireless Network 20
WEP - Security and Wireless Networks 24
WLAN Connections - Only Enable Them When Needed ... 26
2.4 Connecting USB and FireWire Devices 27
USB Devices 27
FireWire Devices 28
3. Troubleshooting, First Aid and FAQ 29
3.1 Troubleshooting 29
3.2 FAQ - Frequently Asked Questions 32
3.3 If Everything Has Crashed - the System Restore 33
Creating System Checkpoints 34
Restoring Your System By Using Checkpoints 35
3.4 Restoring the System by Using the System Recovery Software 37
Activation, Registration and Serial Number 41
Safety 43
EMC and Safety Regulations 43
Note to the User 43
Intended Use 43
Operating Environment 44
Batteries and Rechargeable Batteries 45
Laser (Safety Warning) 45
Important Safety Instructions 46
Additional Safety Instructions for Devices with Wireless LAN ... 47
CE Marking for Devices with Wireless LAN 47
Restrictions 48
RF Frequencies for Wireless LAN Devices 48
Regulations - Exclusion of Liability 49
Disposal of Old Devices 50
Conformity 50
Glossary 51
Index 53
Warning!
The supplied component driver CDs may not be up to date.
You'll find the latest approved drivers on the EasyInstall CD/DVD or on our
website www.service.targa.co.uk.
1. Quick Start in Five Minutes
1.1 Connectors and Ports
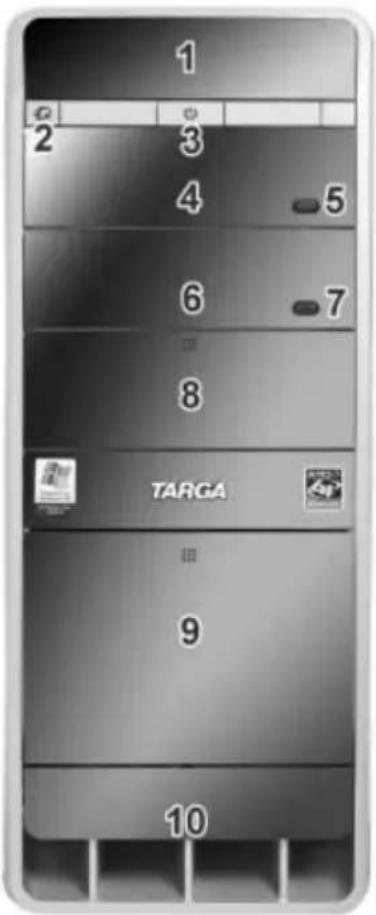
1 Display
2 Quick Media button
3 Power button
4 DVD-ROM drive
5 Eject button DVD-ROM
6 DVD/CD burner
7 Eject button DVD/CD burner
8 Front Access for 51 / 4'' drive bay
9 Front cover (card reader connection ports)
10 Ventilation holes
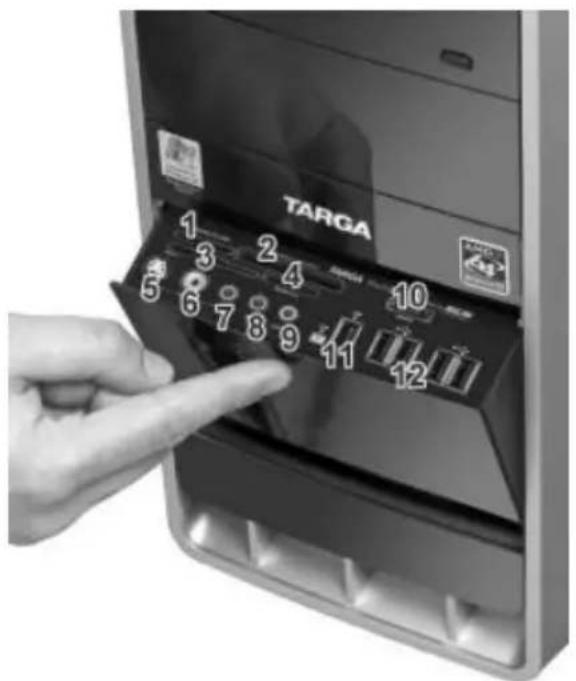
1 SD, SD-Mini, MMC, RS-MMC
2 CompactFlash / Microdrive slot
3 Smart Media /xD slot
4 Memory Stick / Pro slot
5 S-Video in
6 Composite-Video in
7 Audio-Line in (only for AV)
8 Mic in
9 Audio-Line out
10 eSATA interface
11FireWireport(4-pin,6-pin)
12 USB ports (4x)
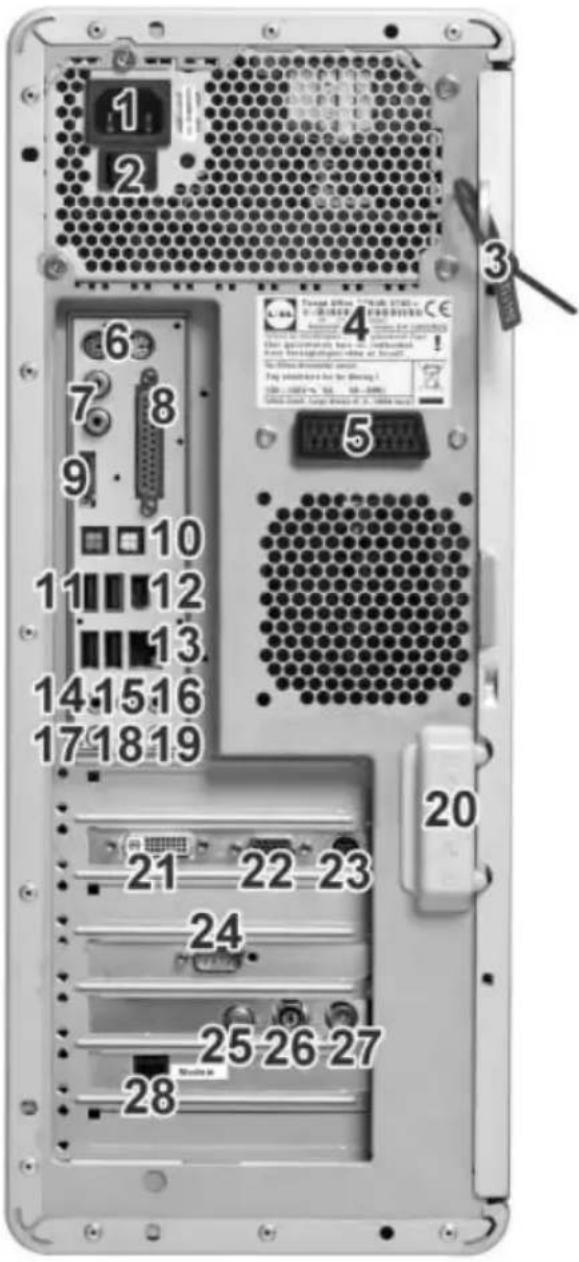
1 Power receptacle
2 Power switch
3 Security seal
4 Product designation and serial number
5 Scart (Euro AV) socket
6 PS/2 connectors
7 SPDIF digital output/input (Coaxial)
8 Parallel interface
9 eSATA interface
10 SPDIF digital output/input (optical)
11 USB port (4x)
12FireWireport(6-pin)
13 Network / LAN / Ethernet connector
14 Center / Subwoofer connector
15 Side loud speakers connector
16 Back loud speakers connector
17 Microphone connector
18 Audio- Line out/front loud speakers connector (stereo loudspeaker connector)
19 Audio-Line in
20 Housing lock
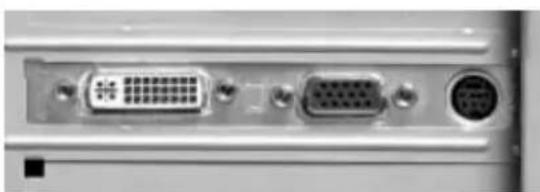
21 DVI/-I digital monitor connector
22 VGA analog monitor connector
23 S-Video out
24 Serial interface
25 TV signal input DVB-S
26 TV signal input - digital, analog, DVB-T
27 Broadcasting antenna input
28 RJ11 modem connector
1.2 Connecting and Powering Up
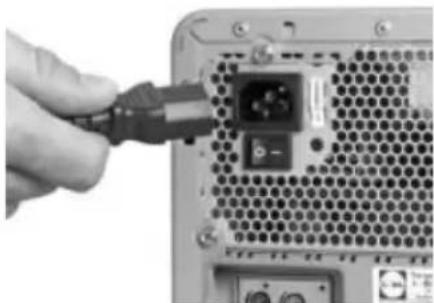
Connecting Power and Monitor
- Connect the PC to the wall outlet by inserting the supplied power cable into the corresponding power inlet.
- Toggle the main power switch on the back of your computer so that the label "I" is pressed. From now on, you can leave the main power switch turned on all the time and switch the computer on and off by using the power switch located at the front of the PC.
- Connect the cable (VGA monitor cable) to the corresponding port of your computer. When using a modern flat-panel computer display featuring a DVI port, you can connect it to this port. This will provide a better signal quality. Do not force the mechanical parts and only tighten the screws manually.
- Connect the monitor to the electrical wall outlet and switch it on.
Connecting Mouse and Keyboard
-
The devices now have to be synchronized. Turn on your computer. Press the configuration button on the wireless receiver so that this searches for new devices. Now you need to press the ID button on the underside of the keyboard and then on the underside of the mouse within the next 15 seconds.
-
First of all, the batteries or rechargeable batteries must be inserted into the keyboard and mouse. Open the compartment on the underside of the mouse and insert the batteries. Observe the labeling for the correct polarity.
- Next open the battery compartment on the underside of the keyboard and insert the batteries in accordance with the marks.
- Connect the wireless receiver to a USB port on the PC. You can use any USB port for this - e.g. one on the back of the device.
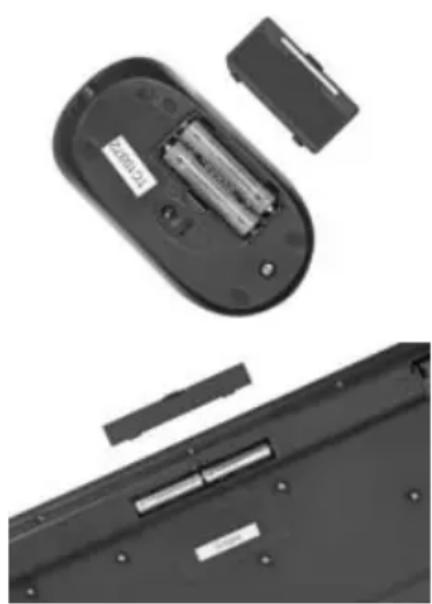
Note: The USB cable of the mouse is for charging the rechargeable batteries of the mouse!
1.3 Starting Windows for the First Time
First of all you have to power on the device by toggling the main power switch. Windows will automatically be loaded and you will see the Desktop. Here you can start your work immediately. However, when using your computer for the first time, the boot process will be different. Before using the computer for the first time, Windows has to be configured and customized for your working habits.
-
This process is very simple and can be completed within a few minutes. A setup wizard will appear automatically, guiding you through the different steps of the first-time setup. Follow the on-screen instructions to complete all the steps.
-
At the end, these settings will be saved automatically and will be available in the future. Therefore you will only have to perform this process once during the first-time startup.
- Once the first-time setup is completed, you must restart your computer. Most of the drives and components are still in a kind of "sleeping condition". After restarting, all hardware components will be enabled and Windows will re-load its configuration.
- To do so, click Start/Turn Off Computer in the lower left-hand corner. A new window appears offering three options. Click Restart. Windows will shut down and restart after a few seconds. Next, the Windows Desktop will load and you can start using your computer.
Optimizing the Screen Display
After you have launched and setup Windows for the first time, the display will use standard settings. The picture display might not be optimum and the graphics adapter does not work at highest quality. This is not a malfunction and you may fix it by changing the configuration. If the above is your case, please read on page 7 how to optimize the display quality.
2. Advanced Configuration and Handling
2.1 Graphics Adapter
Configuring Your Monitor and Graphics Adapter
You can optimize the screen display with just a few settings.
Note About Illustrations
The figures shown for configuration here are samples only. Any functions, menus and appearance may be different from hardware to hardware and driver to driver. However, the basic procedure will be the same.
-
First, open the display configuration screen. Click Start/Control Panel to open the Control Panel and open the configuration by clicking the Display icon.
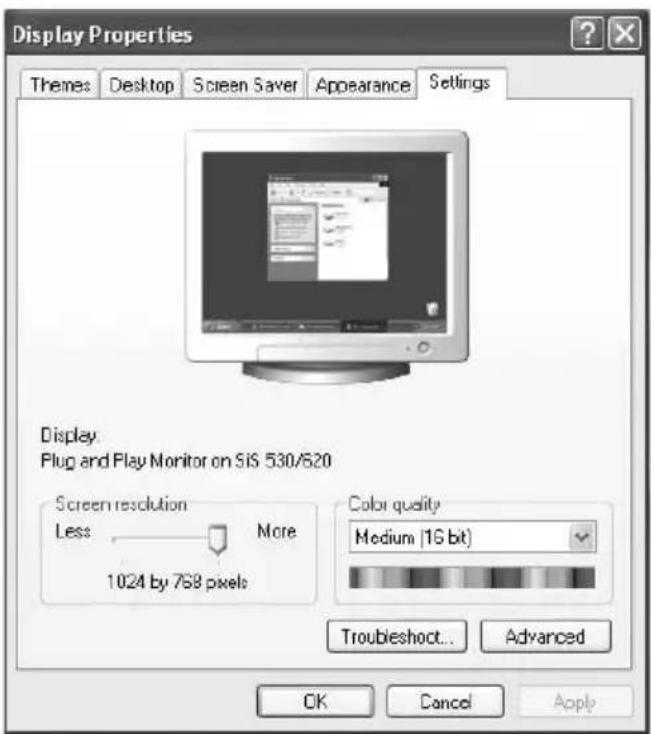
-
In the Display Properties window select the Settings tab. At the bottom you'll find the Screen resolution setting. You can grab the ruler with the mouse and move it to the left or right to enlarge or reduce the resolution.
-
Next to it there is the Color quality option where you can adjust the color depth. The setting Medium (16 bit) will offer you almost photo quality for your display. This setting is optimum for your daily work and for most of the image-editing applications. The option Highest (32 bit) is also called High Color. It still displays
more colors but this may also reduce the system performance.
-
Next click Advanced to open a new window. Click the Monitor tab on top. Here you can set the Screen refresh rate. Select the highest value possible to obtain a flicker-free image display and comfortable viewing. At least 70 Hz to 85 Hz are recommended.
-
When you are done with all settings, click OK to confirm. Windows will toggle to the new configuration for a test. If you are satisfied with the new settings, click Yes to keep them. If you are not, Windows will automatically toggle back to the original settings after 15 seconds. You can then correct the settings and try it again.
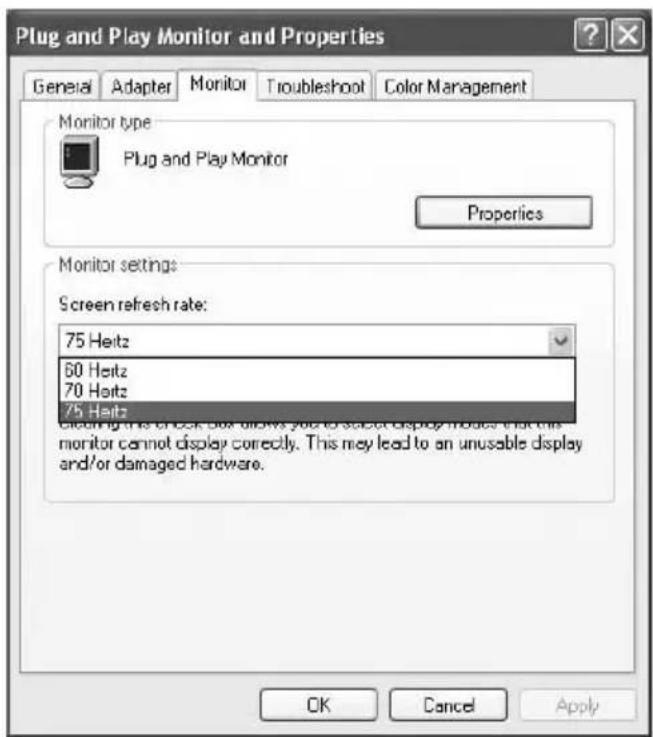
Image Output on a TV
When receiving a TV station or viewing a DVD movie you do not need to use your computer screen. Your computer also features a TV Out port for connecting a conventional television set or video projector. This allows you to enjoy your home theater on a large-size 16:9 TV or projector.
Most TV sets and projectors use conventional video cables (yellow Euro-Cinch) or S-Video connectors. You can use any of these cables as you can use an adapter to connect them to your graphics card. However, the display image quality will be better when using an S-Video cable. You will notice the difference especially when using high-end video sources like DVD movies.
TV output via S-Video port (right).
-
First connect the video cable to the TV Out port of your graphics adapter. Use any of the mentioned cable types (Euro-Cinch or S-Video). The type of cable depends on the signal input connectors of your TV set. Depending on the connection type you're using, you may need the (optional) adapter to make it fit. Next, connect the cable to the TV set or projector.
-
The TV Out port of your graphics adapter always provides a suitable signal for any TV sets. However, you can optimize this signal for better quality. Especially when using a professional projector resolution, refresh rate and interlaced/non-interlaced signals are possible.
In order to perform this setting, go to Start/Control Panel. The Control Panel window will open. Here you'll find the Display icon. Double-click on it to open it. The Display Properties window opens. Click the Settings tab. Open the configuration by clicking the Advanced button.
- A new window will pop up. Click the GeForce tab. Here you can select between the different output devices, such as a computer monitor, projector, television or flat screen.
Note ...
Once you have made the connection between your computer and the TV set, you must turn the TV set on and configure it to receive the video signal. This means that you select the "Video", "AV" or similar input source on your TV. Sometimes, your computer needs to be restarted in order for the graphics adapter to detect the new connection and to provide the proper signal automatically. If the described icons for your TV set are not available or grayed-out, check the cable connection or restart your PC.
The difference between a projector and a TV set is that the projector uses an S-Video or RGB signal by default, whilst the TV set uses a normal VHS (Composite) signal.
You can easily click on the desired device with the mouse and make it your "Primary Display". This device will then be used for the display output and the video signal
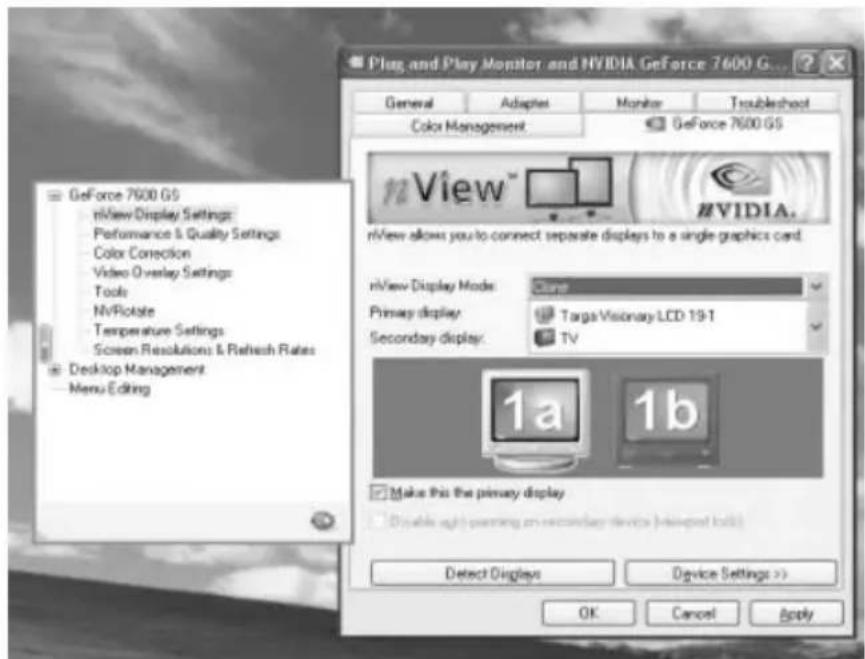
will be optimized for that device. You can modify the settings for the enabled device in the menu on the left-hand side. Depending on the features of your TV set or projector you can further optimize the video output.
Problems when Using Copy-Protected DVDs
The new copyright law does not allow any copying of protected media like music CDs or movie DVDs, even for private use! Any video output to an external device like a TV set would allow a copying of the movie to a VCR at the same time. Therefore, it is possible that protected movie DVDs (e.g. from Macrovision etc.) also block the graphics adapter's video output in order to avoid any copying of the movie through it. However, you may still view the movie on your TV set. Some protections are so severe that viewing the movie on the computer is only possible with interference or not possible at all. This is not a malfunction of your computer, it is only a copy-protection of the manufacturer.
2.2 Card Reader
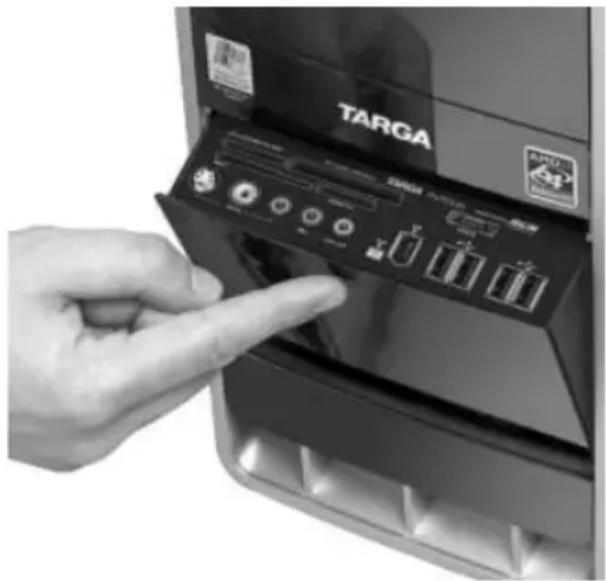
Inserting a Memory Card
You can find the memory card reader behind a cover on the front side of your computer. Press sharply on the upper side of the cover mechanism to open the front panel. It offers you several slots for the different types of memory cards. The appearance and location of the different card slots may be different from model to model. Depending on the card reader model, you can use the following types of memory cards:
- Compact Flash, Microdrive - Compact
Flash cards are available as Type I
and Type II (CF I, CF II). Standard flash memory card are usually Type I cards.
Other storage media such as IBM Microdrive follow the Type II specifications.
They are slightly thicker and larger.
- SmartMedia, SD-Cards, Memory Stick - Other typical memory cards include
SmartMedia and SD-cards as well as the Sony Memory Stick. Their compact
and robust design makes them the ideal companion for digital cameras, MP3
players or mobile phones.
Thanks to the distinguished appearance of the card reader, its slots and the cards themselves, you will probably not confuse the different types when inserting them.
Mechanically, they only fit into the right slot.
Note
Unfortunately, not all memory card manufacturers respect all the established specifications. Therefore, a global compatibility with all cards cannot be guaranteed due to the sheer number of manufacturers.
Transferring and Saving Data on the PC
Windows does not handle card readers as any specific devices but just as a normal disk drive. This means that you don't need to install or configure any drivers or need any special software for accessing them.
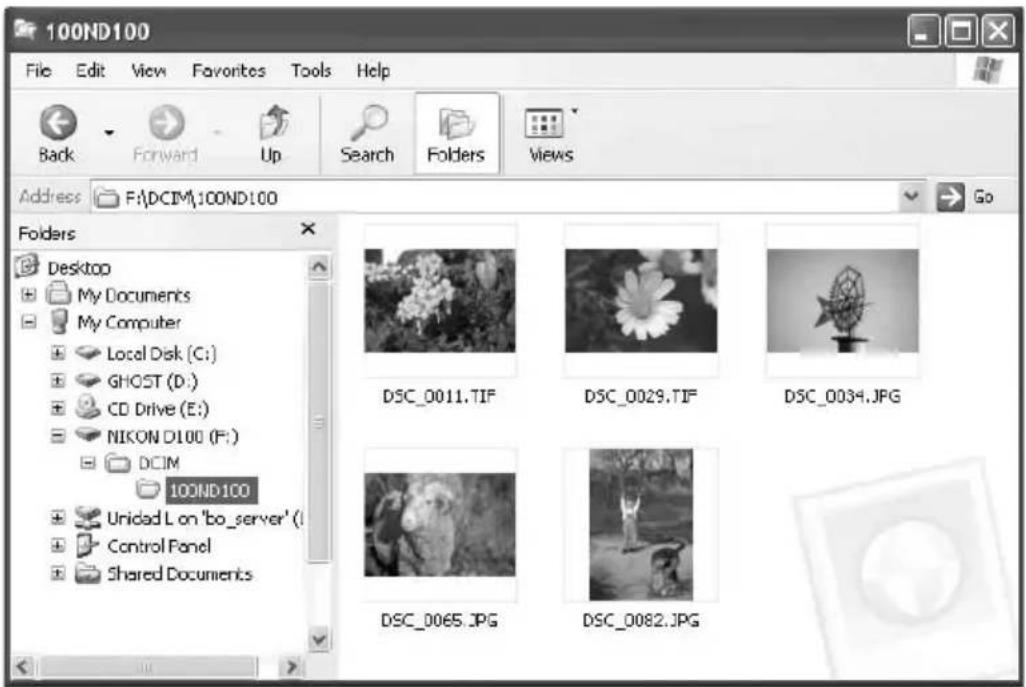
- As soon as a newly inserted card has been detected, a new window pops up offering several automatic features. You can choose one of these standard tasks or copy your data manually. For copying data manually, close the window by clicking Cancel.
- Open Windows Explorer from the Start menu. In the left Explorer frame, under the My PC icon next to the hard disk and the CD-ROM or DVD-ROM drive you'll also find some entries labeled Removable Disk. These drives correspond to the card reader slots.
- You can access the inserted memory cards like any other CD-ROM or hard disk drive. Mark the desired files and copy them to your local hard disk. The copying, moving or deleting of files does not differ from applying these procedures on conventional disk drives.
Removing a Memory Card Safely
The card reader's USB driver supports hot-swapping. This means that you can insert or remove any memory cards while the computer is still running. However, it is possible that a copying task hasn't been fully completed or that there are still files in the cache. This can occasionally lead to loss of data or damage the media. In order to remove your memory cards safely and without any risks form your computer, proceed as follows:
- Toggle to Windows Explorer. If it hasn't been opened yet, run it via the Start menu.
- Select the removable media drive you want to remove on the left window frame. Click once with the right mouse button. A context menu will show up. Select the Eject command.
- Windows will now end any access to the drive and you may remove it without any risk.
2.3 Modem, Internet and Network
Connecting the Modem
Prior to being able to use the internal modem you need to establish the cable connections. Modems use conventional telephone lines for the Internet connection. All you need is a standard telephone wall connector and the modem cable. The cable is supplied with your computer and can be installed straight away.
- Unpack the modem cable.
- Connect one end of the Western plug cable to the corresponding port on the back of your PC. This can be found on the lower part of the computer case. The Western plug features a small lock that faces slightly away from the plug. This lock needs to be aligned with the corresponding notch of the port. When the computer is standing up, this lock must face down. The cable clicks into place. If you want to remove the Western plug, carefully press the lock to unlock it. Then you can remove the cable.
-
The other end of the cable needs to be inserted into the wall telephone outlet. In some countries you may need an adapter in order to connect the modem. In this case, connect the modem cable to the supplied adapter first and then connect it to the telephone wall outlet. Insert the modem cable carefully, applying slight pressure. If the plug does not fit, you have probably tried the wrong port or your port is not suitable for the plug.
-
Once you have connected the cable to both the computer and the wall phone outlet, you are finished installing the modem physically. Now you can configure the modem on your computer. Your computer offers Internet access through the Windows Dial-Up Networking to your ISP. The following sections explain how this works in detail.
Setting Up the Dial-Up Networking
Before you can navigate the Internet in Windows, you must set up a new Dial-Up connection. A Wizard will guide you step-by-step through this process. Please have your ISP's access details ready at this point. The ISP number is quite long. Your ISP gave you the access details when you signed up. Of course, you can also use the Dial-Up Networking for a call-by-call access. Technically speaking, this makes no difference. Once you have all the necessary information ready, you can start configuring the Dial-Up Networking.
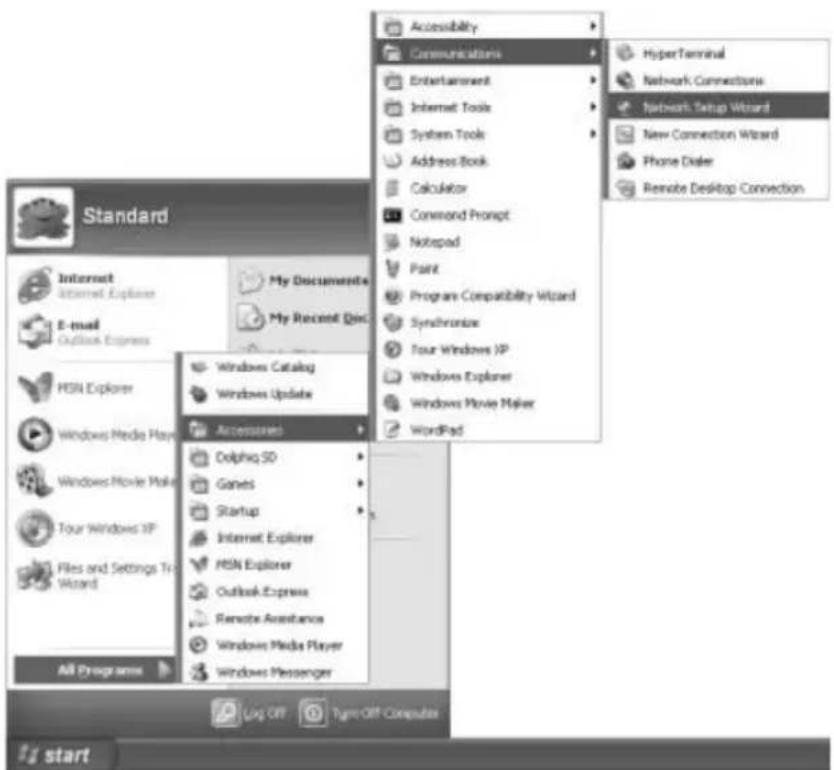
- First start the New Connection Wizard. To do so, click Start/All Programs/Accessories/Communications/New Connection Wizard.
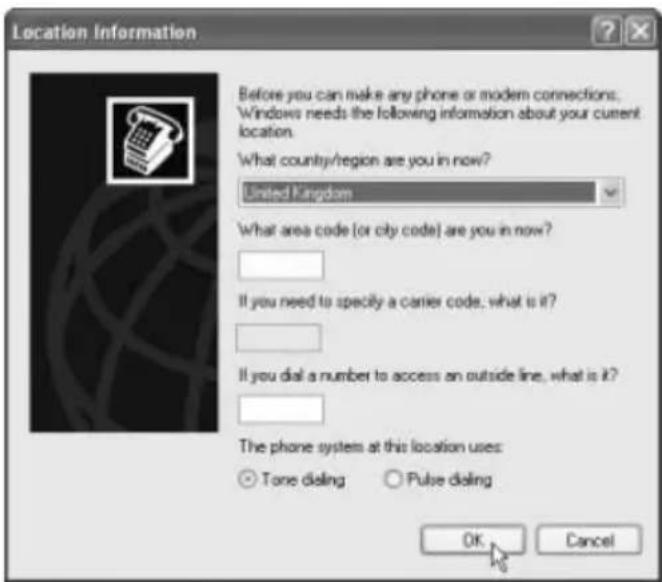
- Windows prompts you for some information about your location. Select your country under Country/Region. Underneath, you must type your area or city code. This is important for Windows to know if the prefix has to be dialed or not when establishing a connection.
If your modem is connected to a PBX, type the prefix for accessing the outside line into the corresponding field. Normally, this will be a zero (0). But this is not necessary for private telephone lines without any PBX!
Finally, specify the dialing system. Most of the countries use Tone dialing, that sends small beep tones when dialing. Alternatively, you can use pulse dialing where pulse tickers can be heard. If you are not sure about the dialing system for your telephone line, please contact your telephone provider prior to using the modem. Click OK to finish this step. Windows will finally prompt you if you wish to establish a new connection from this location. Click OK again to confirm your selection.
- The first window of the New Connection Wizard contains information that you can skip by clicking Next. The next window prompts you for the connection type. Select the first option Connect to the Internet and click Next to continue.
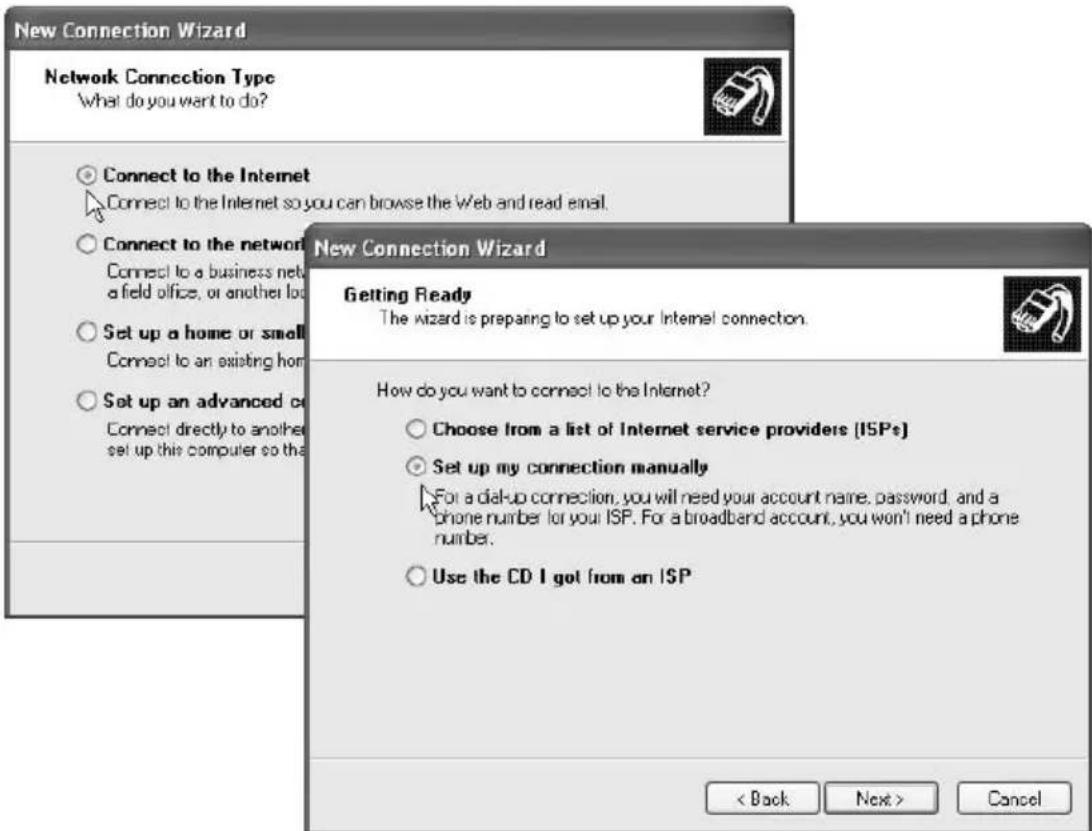
-
Now you can setup the connection automatically either from a list or manually. We recommend that you select the option Set up my connection manually. This is faster and very easy.
-
Next, Windows prompts you for the device you're using to connect to the Internet. Choose the first option Connect using a dial-up modem. This option is suitable for all modems and ISDN cards. The Wizard detects the internal modem automatically. If you have more modems installed, another window will appear asking you to choose the modem you wish to use for this connection. In this case,
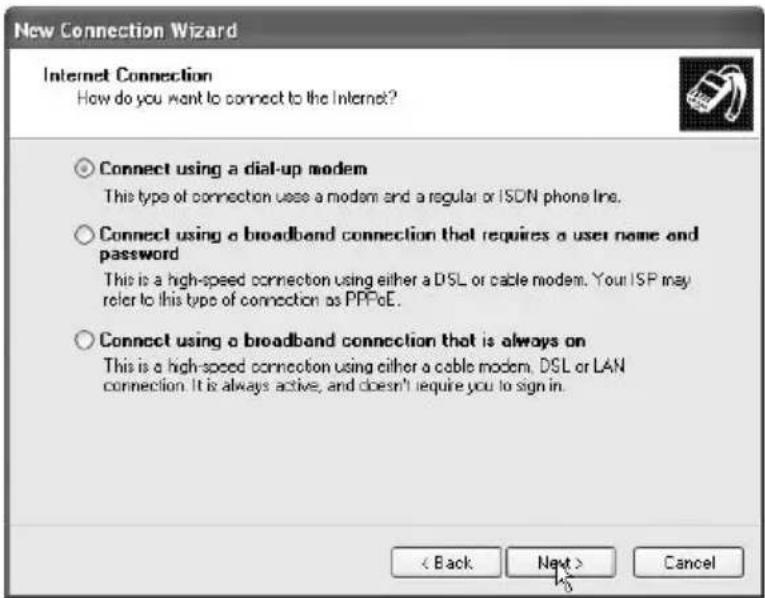
select the desired device from the list. If you don't have any additional devices installed, this prompt will not appear.
- Enter a name for the new connection. This has no technical relevance: the name is only for your personal purposes to distinguish it from other connections you may set up in the future. The name of your provider could be a good choice.
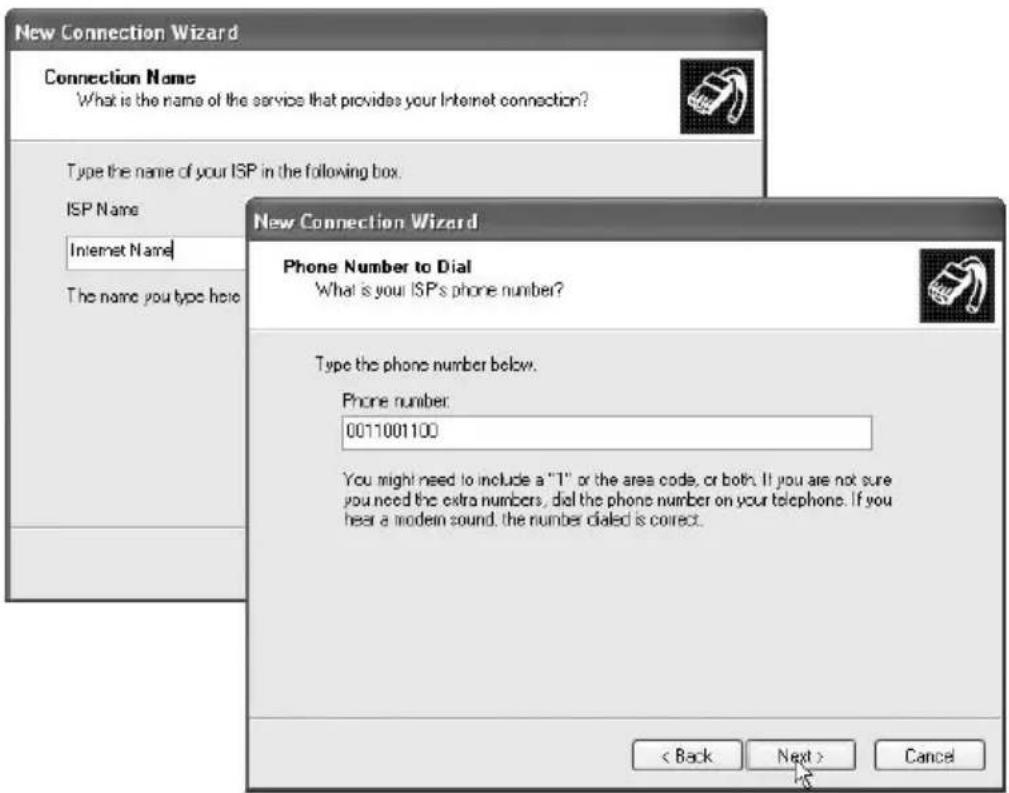
Now enter the phone number of your provider and the city or area code. Your provider should have given them to you when you subscribed. Call-by-call providers usually publish their access numbers in magazines, or you could contact the provider's hotline to find them out. The following data is for sample purposes only and does not work for real Internet connections.
- Finally enter your user-specific details for this connection. Enter your User name and the associated Password into the corresponding fields. You need to enter your password twice for verification purposes.
Underneath you can also specify whether other users of this computer are allowed to use the same connection. If another family member logs on at a later time, she or he can use your Internet account to establish an Internet connection. Windows also prompts you if you want this to be the default Internet connection. If you check this box, Windows will use this connection automatically for all future attempts to retrieve e-mails or navigate the Internet.
Finally you can enable the Windows-internal firewall. We highly recommend you to do so.A firewall is a filter that blocks attacks from external users to your computer. You should not lack this protection.

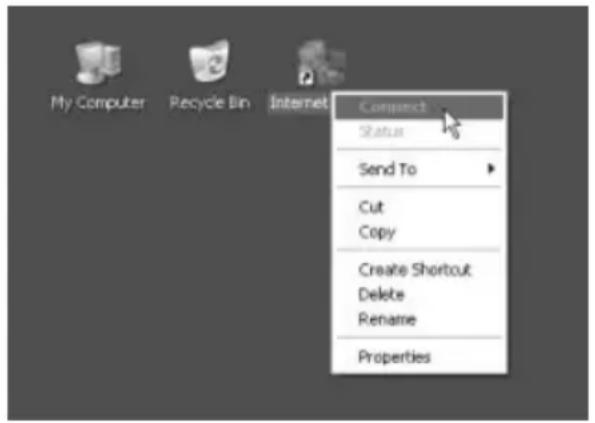
- Now your Internet access is almost configured. The last window shows an overview of all settings. If you want, you can create a shortcut on your desktop for this connection. This lets you avoid navigating through the different Windows menus to access the Internet – you can open your Internet connection by double-clicking the shortcut icon. You have successfully configured your Internet connection. If you have created a shortcut on your desktop during the last step, this is the fastest way to open the Internet connection.
Right-click on the icon to open a context menu. This lets you edit the configuration or establish the connection. Or double-click on the icon to access the Internet directly.
Configuring the Network
The easiest way to configure a network connection in Windows is by using the corresponding Wizard. This procedure is fast, but you cannot edit the pre-assigned addresses and information. However, this does not represent any problem when you are going to interconnect two or three computers only.
Interconnecting Two Computers Directly
When setting up a large network with many computers, a large amount of hardware is normally required. But if you just intend to interconnect two computers, you only need a so-called crossover cable. Simply connect this cable into the network port on both computers. Due to its special signal transmission, the cable interconnects the two computers without the need of a hub. However, this is only possible with this special type of cable. Normal network cables are not suitable for this purposes due to their different pin assignments.
The configuration will be the same for both cases. It doesn't matter whether you are setting up a "real" network or using a crossover cable. This cable makes both computers "see" a real network.
Your computer already features a network adapter. In order to setup a network, all other computers will also need a network adapter. You may also need to connect all computers to a hub. The hub is a type of distribution box that makes it possible for the computers to find and communicate with each other.
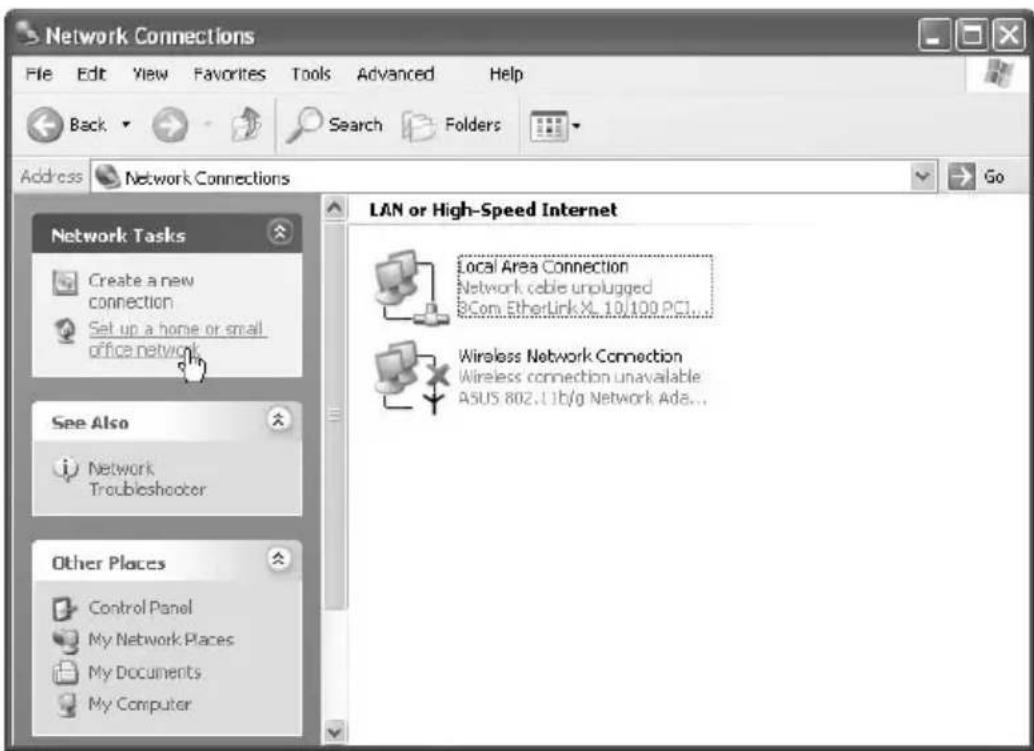
- To start, you need to launch the Wizard. To do so, click Start/Control Panel. Here you'll find the Network Connections icon. Select it by clicking on it. On the left window frame, click on the option Setup a home or small office network.
- The Network Setup Wizard opens. In the first window, click Next to proceed. The second window tells you some basic information and can be skipped. The next window prompts you for the type of computer. The first two options refer to the Internet access only. If you wish to share the Internet access over the network, or if this computer should use a different PC's Internet access, you will need these options.
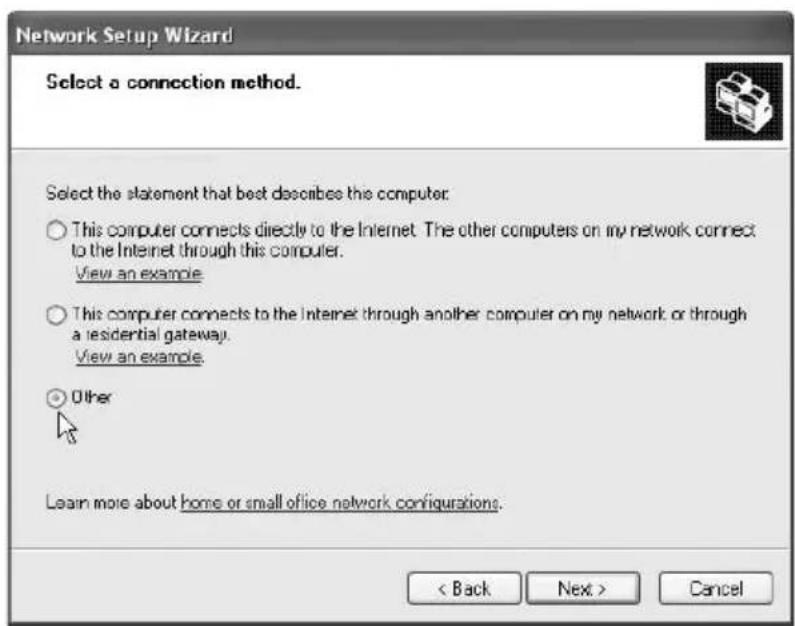
However, we will not consider the Internet access installation at this point. You should only share the Internet access after your network has been successfully set up. Therefore, select the last option labeled Other.
-
The next window prompts you for more information about the Internet access. Select This computer belongs to a network that does not have an Internet connection. Click the Next button.
-
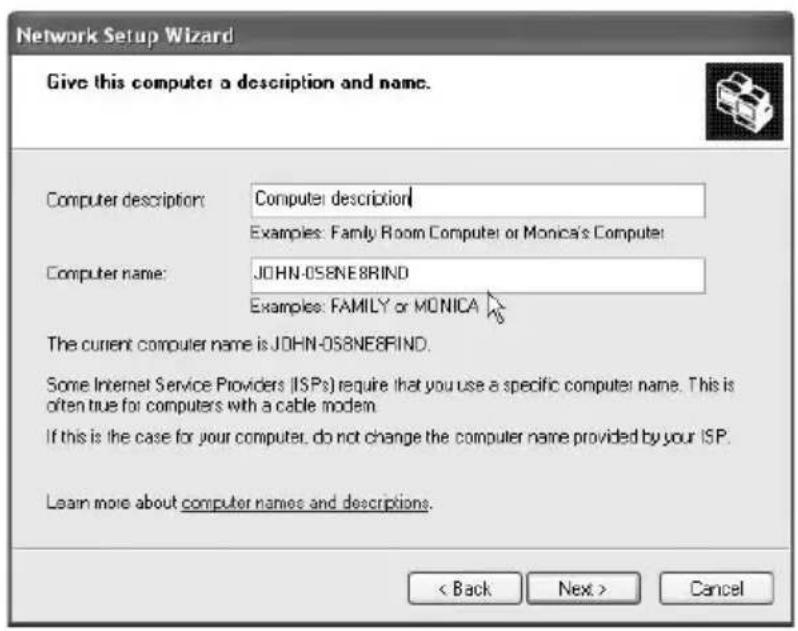
Next you must enter a name for your computer into the Computer name field. You can input any name. However, this name is restricted to a maximum of 15 characters. It should also not contain any spaces or special characters. In the field Computer description you can input some note texts about this computer. This lets you better distinguish the different workstations.
-
The next window prompts you for the name of a workgroup. Windows enables you to group several computers into a so-called workgroup. In a large company, these may represent the different departments. It is essential for all computers to belong to a workgroup. Otherwise they will not be able to find each other, and you must configure an extra share. It is best not to do this.
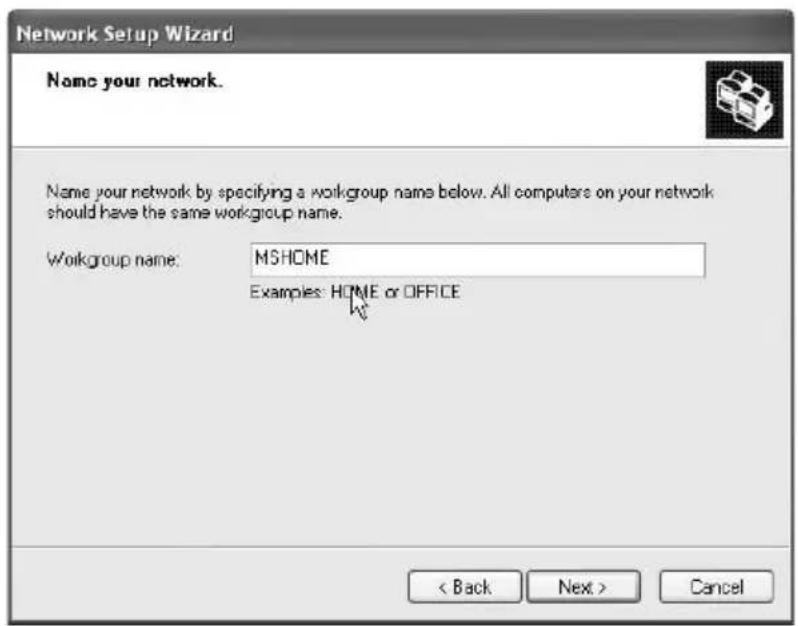
The current Windows versions use MSHOME as default workgroup name. If you have some other computers with Windows 98 or ME, you must pay attention at this point. Here, the default workgroup name is WORKGROUP. Therefore you must use the same name for all computers.
-
The next window will list an overview of all the information you have entered. If all information is correct, click Next to proceed. Windows will now configure your local area network. This may take several minutes.
-
The Wizard will also offer you the opportunity to create a setup disk for other computers.
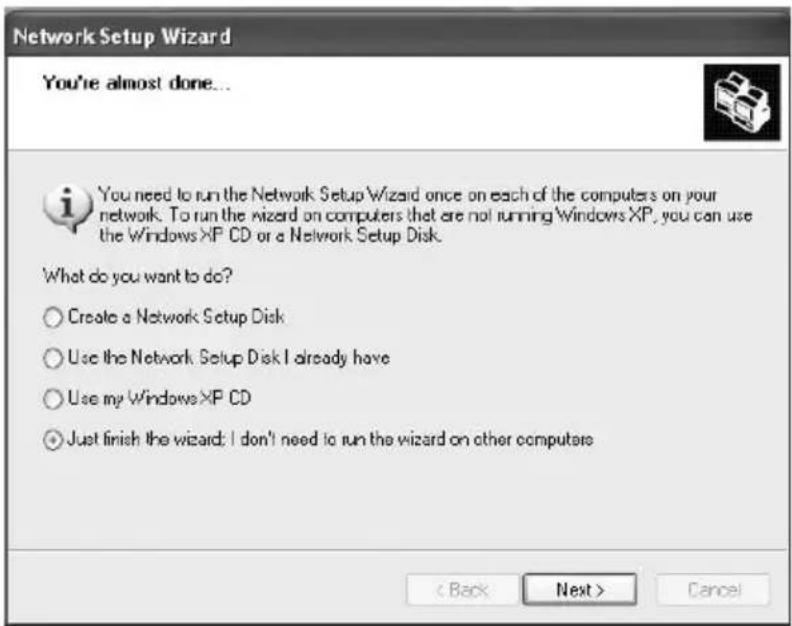
If these computers also run an up-to-date Windows, you do not need to do this. You can then perform the same steps as described above. This feature is only helpful if the other computers run Windows 98 or ME.
If you want to do this, insert a blank floppy disk into the floppy disk drive and let the Wizard copy the required files. You will then need to insert the floppy disk into the other computers, open drive A: in Explorer and double-click on the program Setup.exe. The Wizard will be launched and the procedure that follows is identical.
WLAN - Setting Up a Wireless Network
Nowadays, you cannot interconnect only PCs but also any kind of device such as mobile phones, notebooks, handheld PCs etc. In the past, only wired networks with hubs have been used, but wireless development is moving fast. One of the most interesting technologies is WLAN. It means "Wireless Network" and designates the connection of different computers and devices without the need of any wires (cables). The transmission is done by radio frequency. This technology offers completely new possibilities, as you can access the data stored on your PC whilst sitting in the garden working on your notebook – without any cabling.
Notice About Model-Specific Configuration ...
Some models do not feature the described Wireless LAN Adapter by default. However, this feature can be optionally installed.
There exist WLAN adapters for many devices. The advantage is that the IEEE 802.11 standard has been widely established for home applications. This means that basically any WLAN device can communicate with any other supporting this standard. The devices communicate via simple RF signals so that the communication is practically independent of the manufacturer and the software being used.
Many Targa computers already feature an internal IEEE 80.211 standard WLAN adapter by default and are therefore suitable for wireless communication. Please see the datasheet showing its technical specifications to see if your particular model already supports this feature. In order to be able to use a WLAN, you will also need another computer answering to your RF signals. But this should not represent any real problem. If you have another PC or a notebook, you can install a WLAN adapter and set up a wireless connection with just a few clicks.
If you only need to interconnect two computers, this procedure is very fast and easy via a so-called Ad-Hoc connection. You can set up this kind of data connection in a few minutes. Theoretically you can also connect more than two computers using the Ad-Hoc mode. However, this mode is not intended for this type of application and it will handle larger volumes of data and complex network architectures with difficulty. When connecting several WLAN computers in a network, a so-called Access Point or WLAN router is recommended. These devices represent a common node or distribution box in the network and manage its traffic. Therefore, an Access Point or WLAN router works in the same manner as a hub or router in a cable network. All WLAN adapters are usually compatible with these devices. Therefore, you can integrate your computer into an existing wireless network with Access Point and/or WLAN router without any problem.
If you have another computer with a WLAN adapter installed, you are ready for the network configuration. You must give the corresponding access and network information to your computer, similar to the procedure necessary for a cable network. This is not difficult and you will be able to perform it in just a few steps.
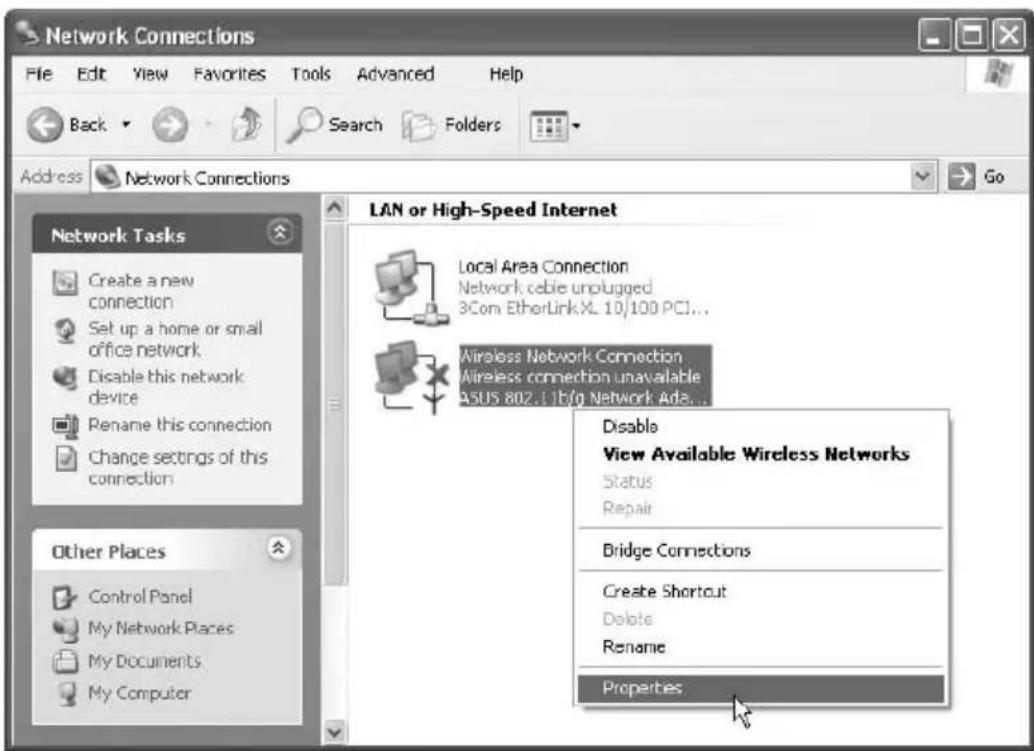
- Open the Control Panel window and select the Network Connections icon. A new window with all the connections of this computer will open. If you have been using a cable network in the past, the corresponding configuration will appear here. In addition, a network icon with an antenna will appear. This is for the wireless network. Right-click on this icon. Select Properties from the context menu that opens.
-
If you have already configured your computers for using a cable network you only need to do a few things to enable your wireless network. If you are not expanding your cable network but setting up a WLAN from scratch, you must first configure the TCP/IP protocol. WLAN does not represent a new network architecture but simply a replacement for your cables. The IP address, computer name etc. are also required.
-
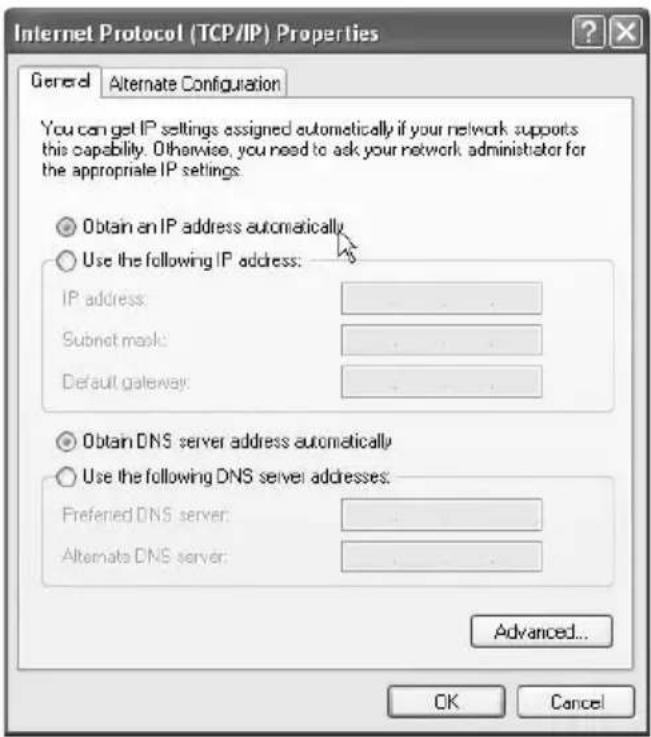
If you first have to configure the TCP/IP protocol, open the General tab. Here you'll see the entry Internet Protocol. Click the Properties button to open the configuration screen. For a direct network connection enable the option Obtain an IP address automatically. If you want to use an Access Point or Wireless LAN router for your network, you can also choose this option whenever this device supports the DHCP Server feature. Behind this is an automatic configuration of all devices that are connected to the Access Point or router. Click OK to return to the previous window.
-
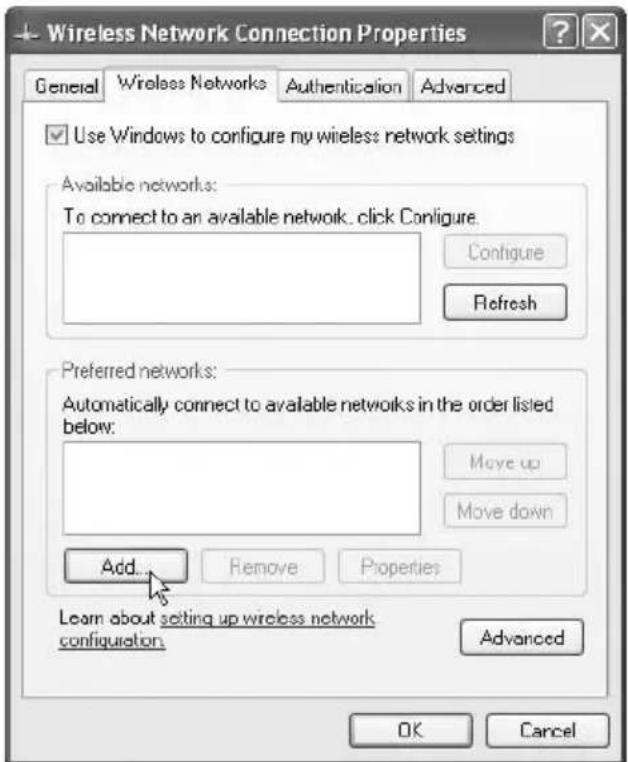
Once you have successfully finished the TCP/IP configuration or if this already existed from your cable network, you can concentrate on the WLAN settings. Click the Wireless Networks tab. For a simple wireless connection it is easier to have Windows do all the work for you. To do this, enable the option Use Windows to configure ... Unfortunately, there is still one action you need to perform. Therefore, click the Add button.
-
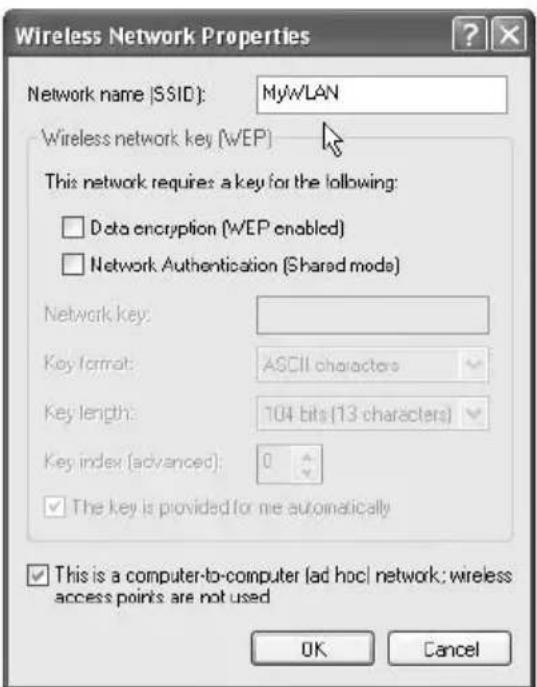
A window showing the network configuration opens. It is essential to assign a name to your network first. To do so, type a name into the SSID field. This name will appear on all the computers. It is important that all computers in your network use the same SSID. This will identify your network.
For safety reasons, you can encrypt the data transferred over the wireless network. For the first test you can disable this feature. Once everything is working fine you can enable the encryption. Select the option Open under Network Authentication and the option Disabled under Data Encryption.
At the bottom you need to enable the Ad-Hoc mode option. This tells Windows not to search for an Access Point, router or a similar device. The WLAN adapters will then interconnect with each other.
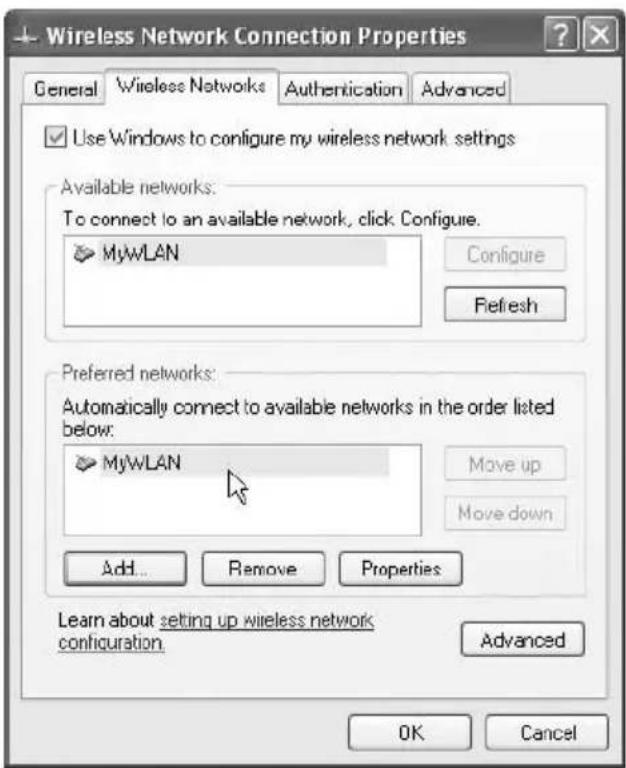
- Once you're back in the main window you'll find your new network in the list. Click OK to close the window. You have successfully finished the configuration. Now you have to repeat the same steps for all the other computers in your WLAN.
After all the computers have been configured, Windows will detect the wireless network. The example shows the network name (SSID) in the list. Because the encryption had been disabled for the first test, Windows will advise you about some possible security issues. Accept this message for the moment and click Connect.
If you open Windows Explorer now, you'll find the other computers in My Network Places. This procedure is identical to the one used in a cable network.
WEP - Security and Wireless Networks
In their default configuration, wireless networks are almost public. Any data is transmitted through space, and everybody can listen to them or access your computer. For the first functional tests the security features are not needed. But once the network has been successfully set up and tested, it is highly recommended that you use encryption. The simple and efficient encryption technology used for home networks is called WEP (Wired Equivalent Privacy). When using WEP you create a secret key that encrypts all data. This will enhance the security of your wireless network.
- In order to be able to use the WEP encryption you need a key. All data transferred over the network will be coded by using that formula. On the Internet you'll find key generators for free downloading. They convert a password (e.g. "abcdefghij") into a key (e.g. 0F9Bn7I9KKM). But you can easily create such a key yourself. It consists of a combination of digits and characters without any spaces whereby special characters are also allowed.
However, please keep in mind that there are different levels of keys. Windows usually uses a 104-bit encryption. This means that your key becomes 13 characters long. A modern 128-bit encryption uses 26 characters. The encryption must be the same on all computers. If a particular computer only supports 64-bit (10 characters) you have to use this key length for all the other computers too.
- If you have created a key on your own or have used a key generator for it, click Start/Control Panel to open the Control Panel. Select the icon Network Connections. Choose your WLAN connection, right-click on it and select the Properties command.
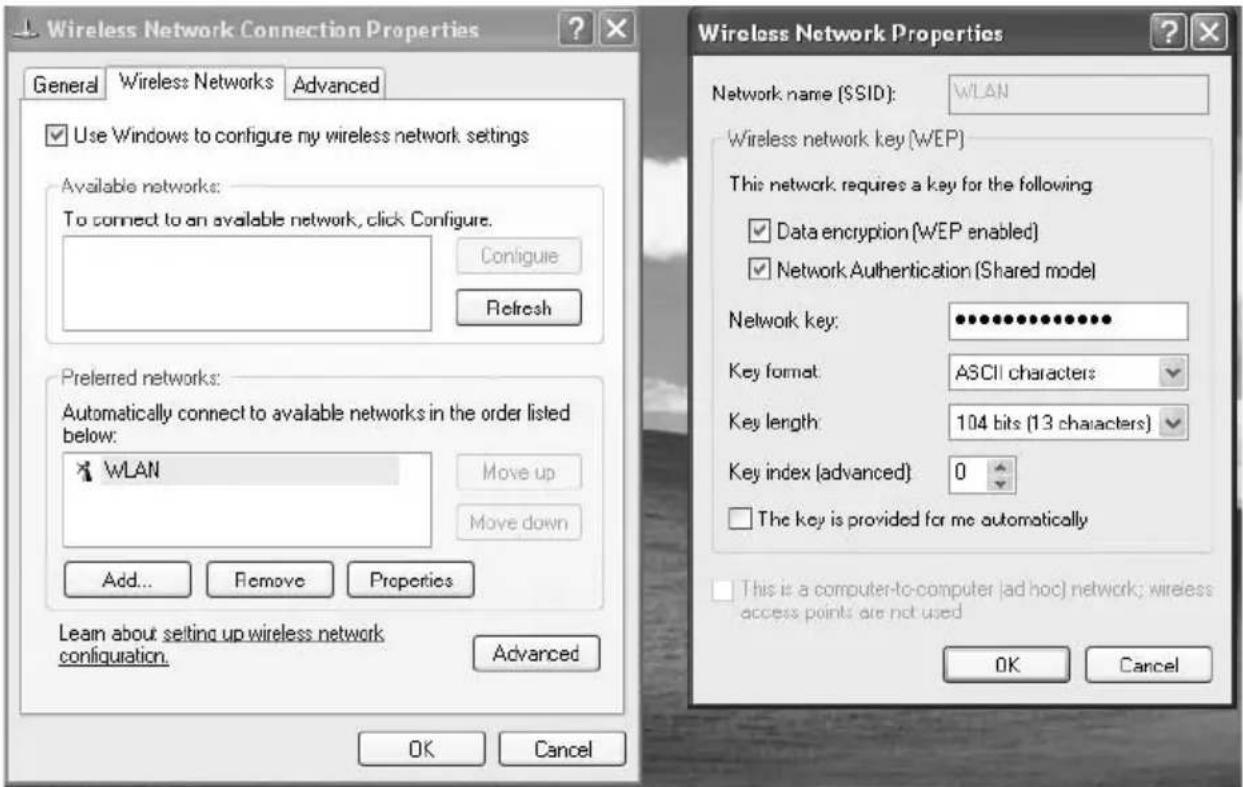
The network properties window will appear. Click the Wireless Networks tab. Choose your network from the list and select the Properties button.
- Enable the encryption by checking the Data Encryption/WEP option. We also recommend that you enable Network Authentication. The next step is defining the network key.
Disable the option The key is provided for me automatically. Next enter the key into the field Network key. You have successfully completed the configuration. Click OK to confirm your settings and to enable the encryption for the wireless connection.
Repeat the above procedure for all computers in your wireless network. It is essential that you use exactly the same key on all computers. A minimum difference will lead to different encoding so the computers will not understand each other! If you receive an error message about the length of the key, one of your computers does not support the length of your key. In this case you need to choose a shorter key, e.g. 104-bit (13 characters) instead of 128-bit (26 characters).
WLAN Connections - Only Enable Them When Needed
You should only enable the WLAN when you need to use it. If you already have a cable network you will rarely need your WLAN. In this case we recommend that you disable the WLAN. If you only have one computer, you should definitely disable it.
However, if you need a wireless connection at a specific time, you can enable it again with just a few clicks.
- Click Start/Control Panel. In the Control Panel window, open the Network Connections icon.
- A new window showing the current network connections will pop up. Choose your WLAN connection and right-click on it. A context menu will show up. Select the command Disable.
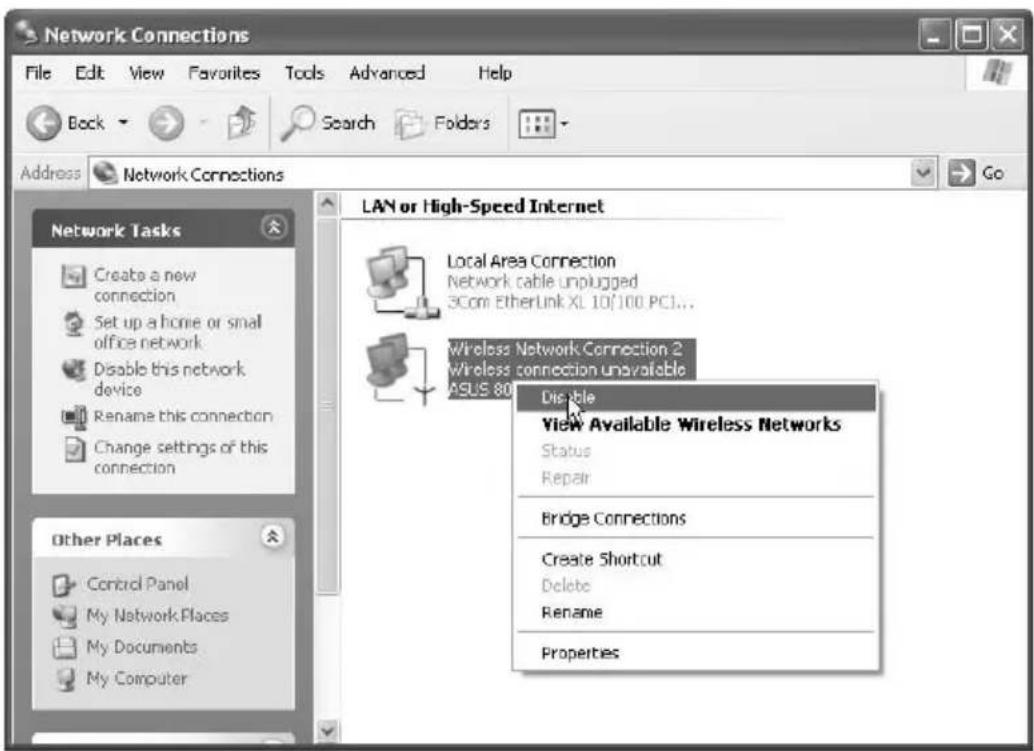
Your wireless adapter will still be present but it will not send or receive any data now. If you wish to use the WLAN at a later time, you simply need to repeat the above steps and choose Enable from the menu.

Wireless Network Connection 2 Wireless connection unavailable ASUS 802.11b/q Network Ada...
2.4 Connecting USB and FireWire Devices
Notice on Hardware Ports
The ports and connectors on your particular Targa Computer model may differ in both functionality and design!
USB Devices
The USB port has become a standard for computers and peripheral devices. In order to offer the maximum data transmission speed, your computer features a modern USB 2.0 port. Any compatible devices will communicate much faster than when using the older USB 1.0 or USB 1.1 standard. However, USB 2.0 is fully downwards compatible to USB 1.0 and USB 1.1 This means that you will still be able to use your existing devices that only support USB 1.1. No special configuration is necessary, as the interface automatically detects any connected devices and auto-adjusts to the corresponding standard.
The USB port supports both Plug & Play and Hot-swapping. Plug & Play means that the computer will detect the devices automatically and install a universal driver. Sometimes, for very specific devices like printers or scanners, it is recommended that you use the driver provided by the manufacturer. This driver usually offers a wider functionality as it has been especially developed for that particular device. Hot-swapping means that you can connect new devices while the computer is running. Windows will detect and connect to the device immediately. But not all devices support this feature. If the computer asks you to restart, you should do this.
Below are listed some devices that you can connect to the USB port:
external disk drives
digital still cameras
digital video cameras
- printers
- scanners
modems (analogue/DSL)
ISDN (external cards, PBX-boards)
- keyboards and mice
and much more
FireWire Devices
Depending on the model and its accessories your computer features a FireWire port. Many devices also designate this port as "IEEE 1394". FireWire offers a very fast data transmission and is especially suitable for applications that require a huge volume of data like digital photo or digital video cameras, If you want to use FireWire you should pay attention to the ports offered by the peripheral devices when buying them.
In a similar manner to the USB, the FireWire port also supports Plug & Play and Hot-swapping. Therefore you only need to plug the devices in. Windows will detect them automatically and install the corresponding driver. However, some older FireWire devices do not take advantage of this feature. In this case, you must connect the device and restart Windows. Afterwards, Windows will detect and configure the device.
Here are some examples of typical FireWire devices:
digital video cameras, e.g. DVCam, Digital8
- high-end digital still cameras (photo cameras)
external drives, e.g. DLT for data backup
and some others
3. Troubleshooting, First Aid and FAQ
This PC is a carefully tested, high-quality computer system offering the latest technology. However, problems and malfunction can never be totally avoided. In order to help you to restore a fully-functional system we have collected some detailed information about identifying and resolving the most common problems. If you have any problem, proceed as follows:
- Read the "Troubleshooting" section below.
- Try to find the solution to your problem in the Chapter "FAQ" starting on page 32.
Note
You'll find the latest FAQ on your desktop under Manufacturer Information and also on the Internet. Go to www.service.targa.co.uk to search for the latest FAQ and drivers.
- Read the corresponding chapter in this manual.
- Make use of the Windows System Recovery starting on page 33.
- If the computer does not boot or there are errors during the boot up process, use the Recovery Software found on the EasyInstall CD/DVD starting on page 37. This software will help you restore the Windows boot and system files, and also reset your PC to the factory default configuration if necessary.
- Call our hotline.
3.1 Troubleshooting
If your PC hangs while running or booting this can be due to a recently installed software. This can be solved as follows:
-
Press and hold the F8 key after turning the PC on and select the option Safe Mode from the boot menu. Click Start/All Programs/Accessories/System Tools/System Restore to restore it to an earlier time when it worked. If this does not succeed, please also try all the other restore options.
-
Uninstall the recently installed software via the Add or Remove Programs option from the Control Panel (this also works in Safe Mode).
- Start your computer with the Windows CD inserted into the drive and hold any letter key (e.g. H) until the Windows Setup is launched. Wait until all files have been loaded. In the Windows Welcome screen, press Enter, confirm the End User License Agreement by pressing F8 and press R to repair an installation. (You only need to reinstall the drivers from the supplied EasyInstall DVD once Windows has been repaired.)
- Contact the manufacturer of the third-party software.
If you do not hear any sound, there are several possible reasons for hardware or software malfunction. In order to locate them better, proceed as follows:
- Check the speakers by connecting them to the back and front-side speaker out jacks.
- Check the speakers with a different audio output device or connect some different speakers (or earphones) to your computer.
- Make sure that the sound card driver has been installed and that you have selected the sound card as default audio device. To do so, open the Control Panel and double-click on Sounds and Audio Devices, click the Audio tab and check that Realtek Audio is selected as default recording and playback device.
- For the standard playback device, click the Volume button and make sure that there is no check mark on any Mute option. Drag all the volume rulers to a medium volume level.
- Reinstall the chipset driver containing the sound driver from the EasyInstall DVD.
- Contact our Hotline.
If you cannot connect to the Internet via a modem, there are several possible reasons. Follow these steps to locate the problem:
- Uninstall the modem by opening the Device Manager found in Control Panel/ System/Hardware. Click the plus sign next to Modems and right-click on the modem to choose the Uninstall command. The modem will be removed from the list. Now you can reinstall it automatically by clicking on the Action/Scan for hardware changes.
- Also perform a diagnostics from the Device Manager. Double-click on the modem, open the Diagnostics tab and click the Query Modem button. The list that
pops up should contain a first entry Succeeded for a modem that is working properly.
- Try a different modem cable.
- Make sure that the modem cable has been properly inserted into the modem port.
- Try a different telephone wall socket (easy when using a notebook).
- Try connecting to a different ISP to get Internet access.
- Establish a test connection to a normal telephone number (e.g. your mobile phone) by clicking Start/All Programs/Accessories/Communications/ HyperTerminal.
No Picture Is Shown on a TV Connected To My PC
- You need to restart your PC in order to detect the TV as an additional display device.
If you output the monitor picture via the TV out port to the television set and the TV shows a blank screen, please proceed as follows:
- Make sure that you have connected the TV set properly, that it is turned on and that you have tuned the right channel before switching on your computer.
- Enable the TV Out port via the software. This procedure is explained on page 7.
If the picture shown on the TV set is black and white only, this may be due to the TV set.
- Make sure that your TV supports S-Video signals: please read the documentation of your TV or contact the manufacturer or dealer.
- When using an S-Video cable, replace it with a conventional Composite cable (Euro Cinch connector).
- Use the correct S-Video-to-Composite adapter instead of the normal adapter plug.
- Test your computer together with a different TV set where you are sure that it supports S-Video, e.g. in a shop.
3.2 FAQ - Frequently Asked Questions
Where Can I Find Spare Parts and Accessories?
Targa offers a wide range of spare parts and accessories for your PC. You can find a detailed list and further information on the Internet at:
http://www.targa-online.com
Information About Drivers, FAQs and Manual
In order to have all components of your Targa computer optimally tuned, you should regularly install the latest drivers. You can download them free from the Targa Service site on the Internet.
There you'll also find additional FAQs plus this manual as a PDF document for opening in Adobe Acrobat Reader. Acrobat Reader offers a comfortable search function that you can access via Edit/Search, so that you can easily find the desired information and help texts.
You'll find the Targa Service portal on the Internet at:
http://www.service.targa.co.uk
Will the Removal of the Seal Void the Guarantee?
Answer: You may open the case, but you will lose the guarantee for claims of missing components, i.e. after removing the seal you cannot claim for missing parts.
Warning: When original components get damaged during the installation of third-party devices, you will lose the guarantee on these components.
Why does My Computer show a smaller hard disk size than the advertised size, e.g. 298GB instead of the advertised 320GB?
Solution: The reason is the different units used for calculating this value. The hard disk manufacturer defines the size of one Kilobyte as 1,000 bytes. But one Kilobyte actually consists of 1,024 bytes. So, for example, the real size of a 320GB hard disk is the following:
320,000,000,000 bytes are, according to the manufacturer's definition, 320 GB, because they always divide by 1,000.
However, the real size is:
320,000,000,000 bytes / 1,024 = 312,500,000 Kilobytes
312,500,000 Kilobytes / 1,024 = 305,175.78125 MB
305,175.78125 MB / 1,024 = 298.023223876953 GB
Rounding this figure off gives a size of 298 GB. Windows would show this figure as the size of the complete media (e.g. in Explorer).
How Can I Enable/Disable the Autorun of CD-ROMs in Windows?
Answer: Click Start/Run and enter "regedit". Search for the key HKEY_LOCAL_MACHINE\System\CurrentControlSet\Services\Cdrom and then the entry Autorun. Double-click on the entry to edit the value:
1 = enabled 0 = disabled
After changing this value you must restart your computer.
General Information About BIOS and Firmware Updates
- Please use only official BIOS and firmware versions you find on our Service web site (www.service.targa.co.uk).
- Never use any third-party BIOS or firmware versions. This can void your guarantee.
- Make sure that the update is suitable for your model and only use approved BIOS and firmware updates.
- Please always read the fileREADME.txt.
How Can I Update my BIOS?
Answer: Search the correct service page at http://www.service.targa.co.uk by entering your serial number or search the exact model of your Targa PC. Open the Downloads tab and download the ZIP file containing the latest BIOS version. Extract the ZIP file and follow the instructions of the supplied Readme.txt file.
3.3 If Everything Has Crashed – the System Restore
Computers are very dynamic devices. Unfortunately, unexpected situations can happen easily or the system does not like a particular setting. Consequently Windows suddenly becomes unstable or fails to run completely. For such instances, Windows includes a tool called System Restore.
This program is a kind of backup tool for the Windows system files. It makes copies of all necessary configuration and setting files at an error-free time. If your computer system gives problems later on, you can restore the previously saved status with just a few clicks.
In order to restore a trouble-free operation of your computer you should use the System Restore function. Please note that this tool only backs up the most important Windows settings. Windows itself and any of your private data are not part of this automatic backup process, so you need to back them up manually.
Creating System Checkpoints
The System Restore feature works automatically and creates system checkpoints from time to time. But you can also define manual checkpoints. If something fails you can restore the last backed up status with ease.
- Click Start/All Programs/Accessories/System Tools/System Restore to open the System Restore main window. Next, select the option Create a restore point. Click Next to proceed.
-
Now you have to name the new checkpoint. Choose a description that helps you identify the restore in case of emergency, e.g. Full Installation or Before installing the program XYZ. Click Next to proceed to the next step.
-
At this point, the program will save the most important system files. This procedure may take a while - depending on the volume of data and the computer's processing speed. Finally, the backup will be confirmed in a window. You have successfully finish the backup. Click Close to exit the program, click Start to go back to the System Restore welcome window.
Restoring Your System By Using Checkpoints
If you experience problems with Windows, you can restore an earlier stage and therefore the normal operation of your computer based on checkpoints. If you are still able to boot Windows, launch the program as usual from the Start menu. In some particular cases the restore procedure can also be performed in Safe Mode, e.g. if Windows cannot be booted without any major problems.
Restoring The System in Normal Operation Conditions
When having trouble launching applications with error messages and other problems, in most of the cases Windows will still perform normally. You can then launch the System Restore under normal operating circumstances.
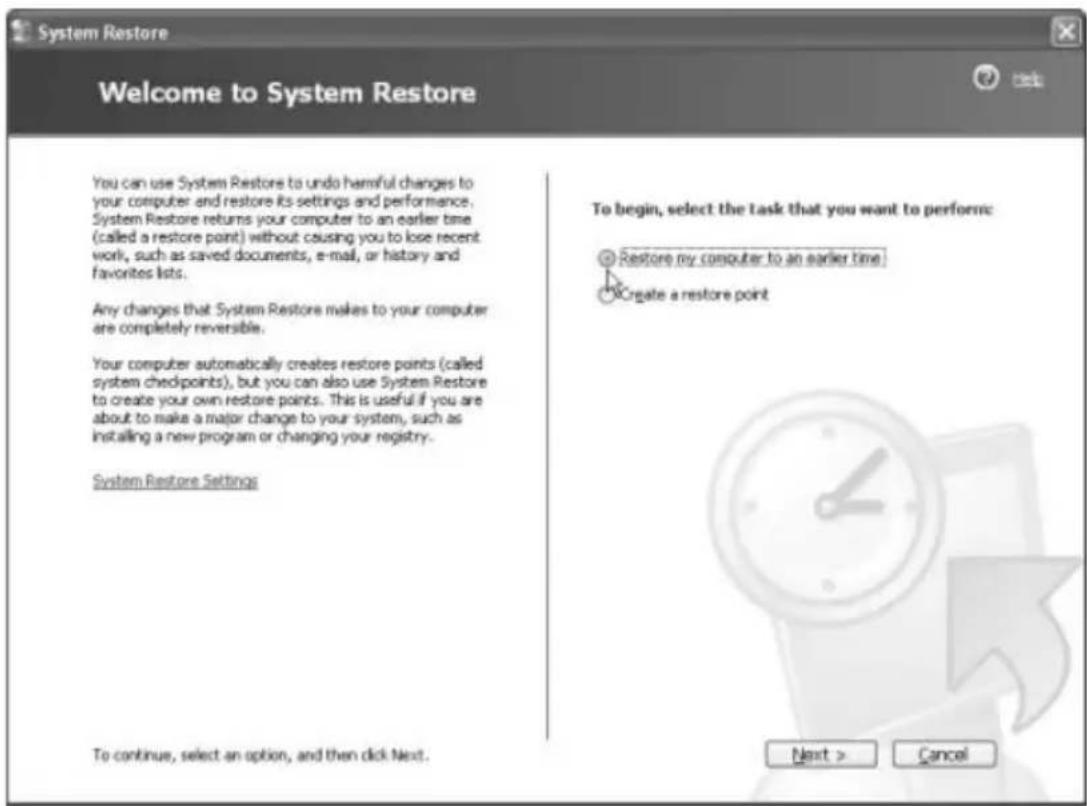
- Run the System Restore by clicking Start/All Programs/Accessories/System Tools/System Restore. Select the option Restore my computer to an earlier time. Click Next to proceed to the next window.
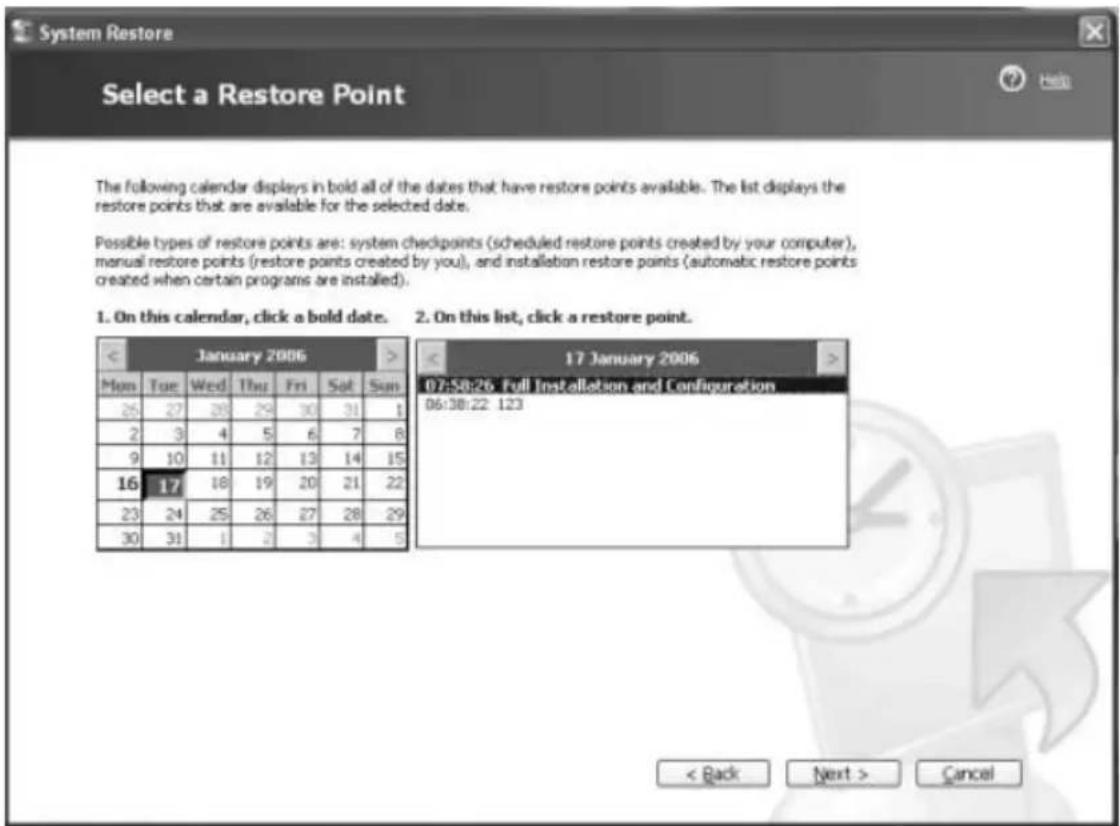
- This window will display a calendar. Any days where you have created a checkpoint will appear in bold letters. The right box contains the different restore points with their descriptions. The automated daily restore points are always named System Checkpoint. Select the desired backup and click Next to proceed to the next window.
- A window with a warning message alerts you that you should close any open programs before executing the restore process. Please follow this advice. The next window will show you again the information for the restore point you have selected.
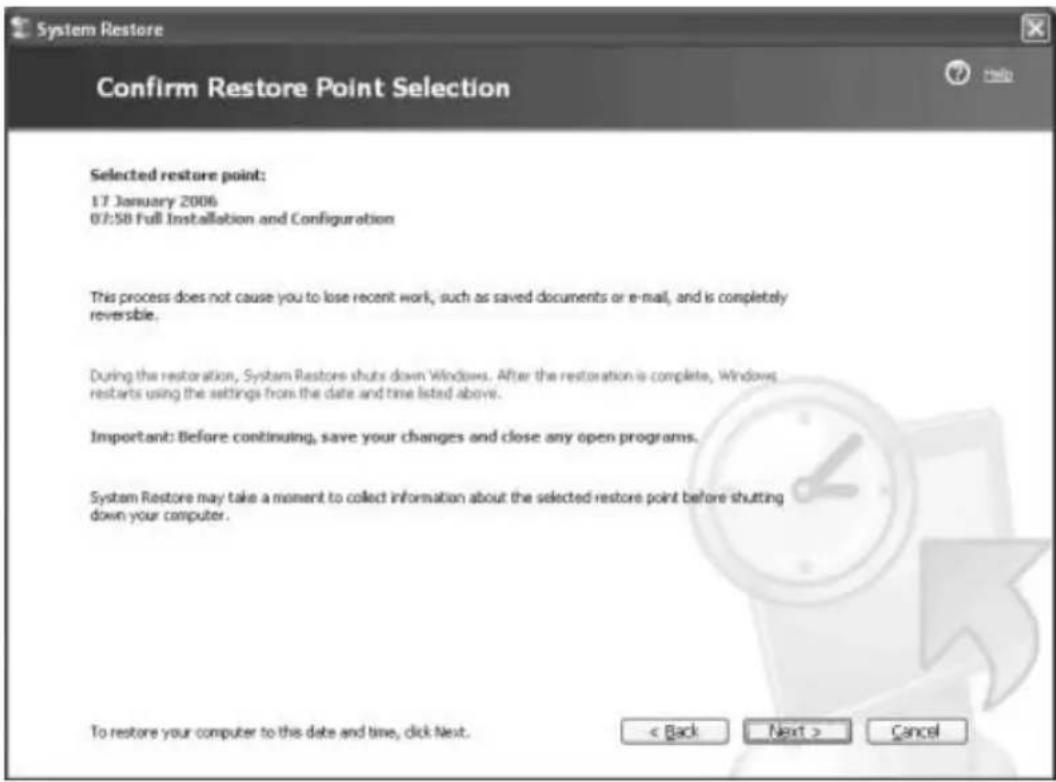
If you are not sure about your choice, click Back to go back to the calendar, where you can select a different point. If you want to cancel the restore process completely, click Cancel. Clicking Next executes the repair procedure.
- After you have launched the restore process, Windows will be busy for a moment and then it will restart and adjust the current configuration. Finally the system restore will be confirmed and you can click OK to accept.
Restoring The System in Safe Mode
If Windows has a bigger problem that makes it unable to boot normally, you should try to load it in Safe Mode. This is a kind of emergency mode that loads a minimum but (almost always) stable Windows configuration.
- First of all you need to restart your computer manually. Once the usual POST messages have been displayed, your computer will load Windows. Now quickly press and hold the F8 key.
- This will display a boot menu. Use the cursors keys to select Safe Mode and press Enter. However, this process must be performed quickly. The menu includes a visible countdown timer that launches the normal mode after a certain time.
- Windows will boot in safe mode. As your computer will only load the most necessary drivers and components, the screen display will be very large and with unusual colors. This is normal.
- Launch the System Restore from the Start menu and run the repair procedure. The program will work identically as described above. However, it will only let you restore the system or undo a previously performed restore process. It will not allow you to create new checkpoints. Next you can restart Windows normally or perform further adjustments or corrections.
3.4 Restoring the System by Using the System Recovery Software
The EasyInstall CD/DVD supplied with your Targa PC contains a completely new Recovery software that lets you restore your PC gradually into a normal operating status. It offers four options:
- Restore Boot Files Only
- Restore System Files
- Restore All Files (Leaves User Files Unchanged)
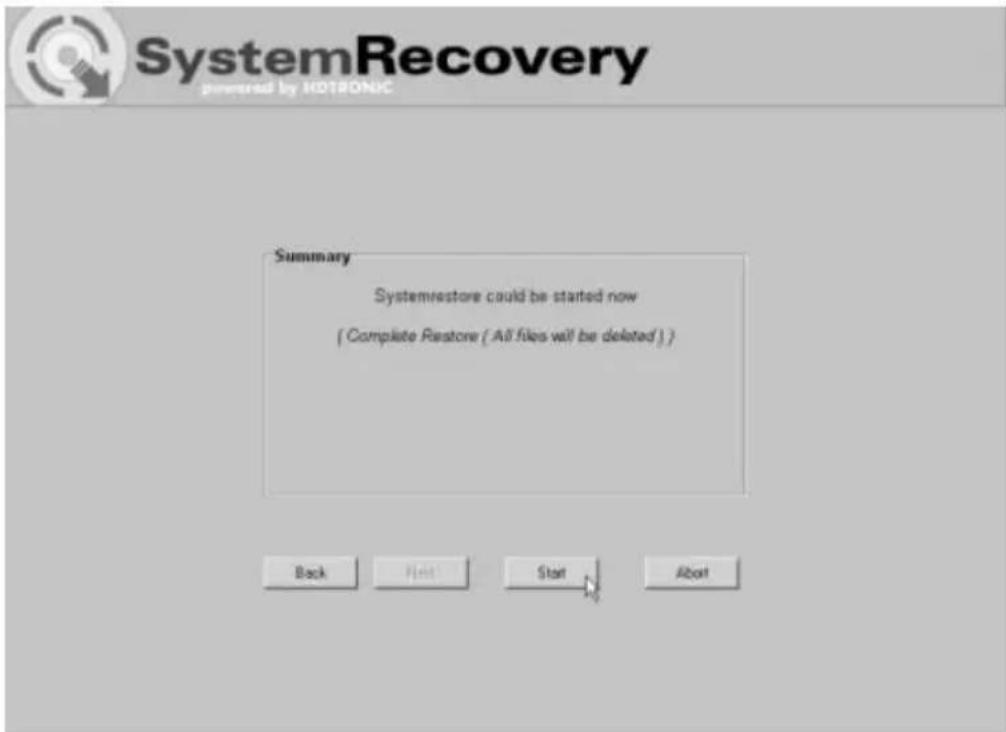
- Complete Restore (All Files will be Deleted)
If your PC does not boot or only boots giving trouble, insert the EasyInstall DVD-ROM into your CD/DVD drive and restart your computer.
- A message warning of a possible loss of data will appear. Click the button Run program.

SystemRecovery
Information for Recovery Process
With this program you can set back the software installation of your system step-by-step into the delivery state. It is precondition that the Factory-Prepared-Recovery data is remaining on your hard disk.
Please consider that the data of the system partition (Drive C) can be deleted by the restore-process.
If you don't want this, please exit this program now. Save your user data on a suitable media e.g. CD-ROM. After this start the process once more to put your system back into the delivery state.
There are four different methods of system-restore These methods are explained in the following menu. You can phase the individual methods top down. After each step you


- In the next step you can choose between the four options mentioned above.

SystemRecovery
pueeepd by PHTHONHC
Chose Restore Mode
Restore Boot Files only
The files needed by Windows for the start will be written newly.
The system files of Windows will be written newly
Restore all files (Leaves User files unchanged)
The software installation will be reset to the delivery state.
Complete Restore (All files will be deleted)
The software installation will be reset to the delivery state

New
A
- If you have trouble starting Windows, first try the option Restore Boot Files Only.
- If you have problems with Windows system files that cannot be solved after executing the Windows System Restore (as described on page 33), try the second option Restore System Files.
- If the computer still does not start after applying these procedures, try the third option Restore All Files (Leaves User Files Unchanged). Any user files will be kept as long as they have been saved into the pre-defined user folders.
- Only if this option also fails should you select the last item Complete Restore (All Files will be Deleted). Please note that this procedure will completely erase any data from your PC. Use this option to restore the factory-default software configuration.
Important!
Please remember that launching this process will restore the factory default configuration of your computer. This will erase any data from your hard disk (under Windows labeled drive C:). If you don't want this to happen, exit the Recovery software and backup your personal data first (e.g. on a CD or DVD). Once all your data has been backed up, invoke this step again.
- Launch the recovery process by clicking the Start button.
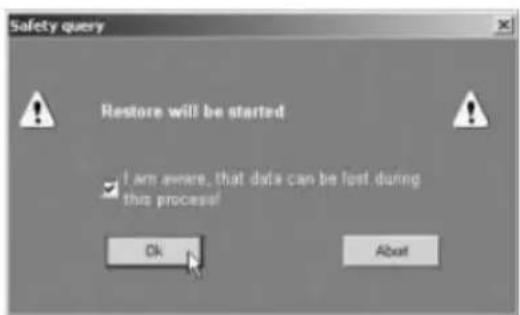
- Click the OK button to confirm the warning message in the next window.
- The system recovery process starts. This process may take a while. You can monitor the completion status of the recovery in the progress bar.
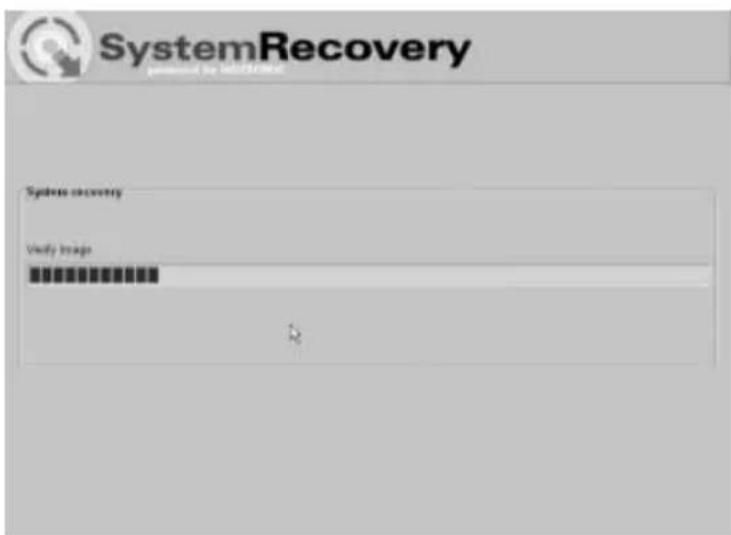
Important!
You must never turn off your computer while the recovery process is running. You must not interrupt the recovery process!
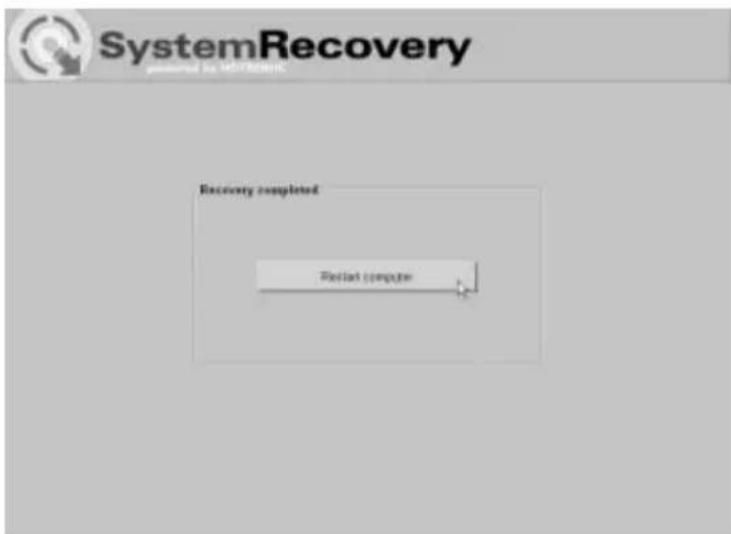
- After the recovery has finished click Restart Computer to restart your computer.
Activation, Registration and Serial Number
General
All supplied programs have been pre-installed on your computer and are ready for use. However, if you need to reinstall a particular program, you usually use a Setup Wizard. Together with your personal details (optional) you must enter a key, serial number, license code or activation code. This key belongs to your computer package contents and can be found at different places, for instance:
- on the back or top of your computer
- printed on the CD/DVD
on the front/back of the CD/DVD cover
A software normally consists of an installation media (CD/DVD/floppy disk), the License Agreement (contained in the manual or on the installation media) and the installation key. Please keep all documents, papers, proof or receipts that came with the PC. They may contain important information that you may need at a later time.
License Agreement
A Software License Agreement tells you how you are authorized to use the software. This will already cover some important differences between the client/user and the manufacturer. While the client/user normally thinks that they have purchased the software (have acquired its property), the manufacturer only says that the client has the right to "use" the software under certain circumstances. Normally, the software may only be used together with the computer system you have purchased. Its commercial use may also be restricted. Furthermore, the software may not be used to control machines or to develop or manufacture any weapons.
Another aspect is the limited liability of the manufacturer.
If you do not fully agree to all the terms contained in the License Agreement, you are not allowed to use the software. Sometimes, some terms in the License Agreement may not be fully legal. In this case, the particular terms may be made void so they do not compromise you any more.
The License Agreement may reserve the right to return the software whenever you do not agree with the terms. Please note that this refers to a return of goods to the manufacturer and not a refund from the dealer. You must contact the software manufacturer to inform them about your desire to return the software. Because your computer system is a package-priced product, a pricing refunds policy for individual
and software components is excluded from this offer. Any price comparisons cannot be made and are therefore not refundable.
Keys, Codes, and Serial Numbers
Your system is uniquely identified by keys, codes or serial numbers. This refers to the different components that were supplied with your computer and that are stored together with all the other computer system information by the manufacturer.
In the case of software components, they are part of a security feature for avoiding illegal and uncontrolled copying and publication of their software. Therefore, there are different labels and seals that will verify the authenticity of your product and that allow the purchaser of these codes to use the genuine software.
Registration and Product Activation
By registering your software product you demonstrate that you have a license and that you have accepted the License Agreement. Therefore, no other person can use your license at the same time. Registering a product is not mandatory, but most of the manufacturers offer the possibility to their clients to register with their names and addresses. Your personal details are normally used to keep you up-to-date about the latest product and program versions.
On the other hand there is the product activation. The product activation has been introduced by Microsoft and activates the previously restricted features of the product to full and unlimited use. It is therefore an important step beyond registration. The product activation is a protective mechanism to reduce software piracy. This also protects the consumer from using illegal software products. Persons using or distributing illegal software do not only harm themselves but also the global economy.
Safety
EMC and Safety Regulations
This device is compliant to the standards EN 55022, EN 55024, EN 61000-3-2, EN 61000-3-3 and EN 60950. The included RF appliances, e.g. WLAN, comply with the R&TTE Directive (1999/5/EG, ETSI EN 300 328, EN 301489-1, EN 301489-17). The supplied TV receiver conforms to the standards EN 55013 and EN 55020.
Any changes to the equipment other than those recommended by the manufacturer may result in these directives not being met any longer. In order to ensure the Electromagnetic Compatibility (EMC) of this equipment, follow the instructions of this User's Guide.
Note to the User
This equipment has been tested and found to be within the limits for interference suppression. When using external signal cables, please note the following: When replacing any of the signal cables provided by the manufacturer, the user must ensure that the EMC guidelines are followed. The shielding characteristics of all replaced cables must be at least equivalent to the original cables. You may only use shielded cables and only connect devices equivalent to the safety and EMC standards of this product.
If you do not follow the above-mentioned points, these directives are no longer met.
- Warning: this device belongs to Safety Class 1 and may only be connected to a wall outlet with protective grounding.
- The PC should be positioned in such a way that ensures direct and unobstructed access to the wall outlet so that the power plug can be immediately pulled out in an emergency situation. To avoid the danger of fire if the device is not going to be used for a long while (e.g. during holidays), it should always be disconnected from the power socket. Before stormy weather when there is the danger of lightning, disconnect the device from the power supply.
Intended Use
In its default configuration, this product has not been designed for medical, lifesaving, rescue or life-maintaining purposes. It may be used for home, office and small business applications (according to EN 61000-6-1 / EN 61000-6-3). This includes games, communication, office applications and others.
Furthermore, the device may not be used outdoors or in tropical climates. Only connection cables and external devices may be used that comply with safety standards and the electromagnetic compatibility and shielding quality of this device. This device fulfills all that relates to CE Conformity, relevant norms and standards. Any changes to the equipment other than the recommended changes by the manufacturer may lead to the result that these directives are not met any more. Only use accessories recommended by the manufacturer.
Targa accepts no liability for damages caused by the non-intended use of the PC.
Operating Environment
Position the device on a stable, even surface and do not place any (heavy) objects on the device.
The device is not for use in rooms with a high temperature or humidity (e.g. bathrooms), and must be kept free of dust.
Operating temperature and humidity: 10^ to 35^ , max. 85% RH.
Always make sure that:
- there is free circulation of air (do not place the device on shelves, on a thick carpet, on a bed, or anywhere that obstructs the ventilation slots, and leave at least 10cm clearance on all sides.
- no direct heat sources (e.g. heating) affect the device.
- no direct sunlight or bright artificial light reaches the device.
- contact with spray and dripping water and abrasive liquids must be avoided and the device should never be operated near water, and it must especially never be immersed (do no place any objects filled with liquids such as vases or drinks near the device).
- never place the device in the immediate vicinity of magnetic fields (e.g. loud-speakers).
- do not place any fire sources (e.g. burning candles) on or near the device.
- do not introduce any foreign bodies into the device.
- the device must not be subject to any great temperature changes as this may cause moisture through condensation.
- the device should not be subject to excessive knocks and vibrations.
- only grounded wall outlets must be used.
Batteries and Rechargeable Batteries
Only use rechargeable batteries and batteries of an identical type or a manufacturer-recommended type. Insert the batteries and rechargeable batteries with the correct polarity into the battery / rechargeable battery compartment. Never use different types of batteries or rechargeable batteries, for example, old and new, alkaline and carbon, or batteries and rechargeable batteries together,
Never try to recharge ordinary batteries – this is only possible for rechargeable batteries!
Rechargeable batteries and batteries should not be disassembled and under no circumstances brought into contact with fire. When handled incorrectly there is danger of explosion. Keep batteries and rechargeable batteries away from children.
Remove batteries when the device is not used for a long time. Non-intended use may cause explosion and danger to life.
Respect the environment! Old batteries and rechargeable batteries do not belong in with the domestic waste! They must be handed in to a collection point for old batteries and rechargeable batteries.
Laser (Safety Warning)
This device contains a laser system and is rated as a "Class 1 Laser Product". Please refer to the Operating Instructions, and read them carefully for instructions on correct operation. Keep them as reference for future use. If you encounter problems with your PC, please contact qualified service or maintenance personnel. In order to avoid direct contact with the laser beam, you must not open the case of optical drives such as the DVD-ROM or DVD burner.
CAUTION! Laser radiation when cover is removed!
This equipment may contain devices belonging to Laser Class 1 up to Laser Class 3B. When the cover is closed, the equipment meets the Laser Class 1 requirements. When opening the equipment, laser devices up to Class 3B may be exposed. This kind of laser radiation is contained in the optical drives. When removing or opening these drives you must follow these guidelines:
- Never look into the laser beam, not even when using optical devices and tools.
- Avoid direct or indirect (reflection/refraction) radiation to your eyes or skin.
The installed optical drives do not contain any parts that can be serviced by the user. Optical drives must be maintained and repaired exclusively by the manufacturer.
Important Safety Instructions
-
Electrical appliances do not belong in the hands of children!
-
Do not allow children to play with electrical devices when not under supervision. Children may not be able to comprehend the presence of potential risks.
-
Batteries, rechargeable batteries and small parts represent potential choking hazards. Keep batteries out of reach of children. If a battery is swallowed, seek medical help immediately.
-
Keep the packaging away from children to avoid the danger of suffocation
-
When connecting this device to an antenna installation, it must be grounded by a technical expert to guarantee adequate protection against electrical surges and electrostatic discharge.
-
Do not open your PC! Hardware modifications and repairs must be performed by authorized technicians or service personnel.
-
Inside your PC there is a Lithium battery. The replacement of this battery must be performed by authorized service personnel.
-
Always hold all cables by the plug and never pull on the cable itself. Never hold the power cord with wet hands as this may cause a short circuit or electric shock. Never place the device, heavy objects or furniture on the cable and take care that the cord does not become trapped, especially at the plug and sockets. Never make knots in the cable and do not tie it together with other cords. All cables should be positioned so that nobody can trip over them or be obstructed by them. A damaged power cord can cause a fire or electric shock. Inspect the power cord from time to time. Never use adapter plugs or extension cables that don't comply with the current safety regulations in your country, and don't modify any of the power cords or electrical installations yourself!
-
Servicing is required when this device has been damaged in any way, for example, when the power plug, power cord or housing is damaged, when liquid or objects have entered the device, when the product has been exposed to rain or moisture, when the product does not work normally or if the product has been dropped. If you notice any smoke, unusual noise or strange smells, switch off the device immediately and pull the plug from the wall outlet. In this case the device should not be used further and should be inspected by authorized service personnel. Contact qualified personnel when servicing is needed. Never open the casing of the device, the power adapter or the accessories. If the casing is opened, your life is in danger due to electric shock.
-
Only use a clean, dry cloth for cleaning.
-
When connecting peripheral devices, make sure the cables are not too short and that they don't force the connectors mechanically.
The computer will store all your data on a media with a magnetic surface. For this reason, keep your PC away from sources that generate magnetic and electromagnetic fields.
Additional Safety Instructions for Devices with Wireless LAN
Your PC features a Wireless LAN appliance. Therefore you must read and follow these safety instructions when working with your PC:
- When you are in a hospital, a surgery area or near an electronic medical device, turn off the wireless adapter of your PC! The RF signals may interfere with the functionality of the medical equipment.
- Place the PC at least 20cm (8 inch) away from pacemakers, as the RF signals may interfere with the functionality of the pacemaker.
The transmitted RF signals can cause interference to hearing aids. - Do not place the PC with the wireless adapter turned on near flammable gas or in an explosion-sensitive area, as the transmitted RF signals can cause explosions or fire.
- The range of the RF signals depend on the environmental conditions.
- When transmitting wireless data it is possible that unauthorized parties may receive data.
TARGA GmbH is not liable for any interference caused to RF or TV signals caused by unauthorized modification to this device. Furthermore, TARGA does not assume any liability for replacing any cables or devices that have not been specifically approved by TARGA GmbH. The user is solely responsible and liable for trouble-shooting any interference caused by unauthorized modification of this device and for replacing any appliances.
CE Marking for Devices with Wireless LAN
This device complies with the Directive 1999/5/EG of the European Parliament and Council dated March 9, 1999 for radio and telecommunications equipment and has been proven to meet mutual immunity and conformity.
Safety
This PC may be used in Belgium, Denmark, Germany, Finland, France, Greece, Great Britain, Ireland, Italy, Luxembourg, Netherlands, Austria, Portugal, Sweden, Switzerland, Spain, Iceland, Liechtenstein and Norway.
For information about possible operating restrictions, please contact the corresponding authority of the respective country. If your country is not listed here, please contact the corresponding Regulation Authority in order to find out whether you may use this product in your country.
| Belgium – www.bipt.be Netherlands – www.opta.nl | |
| Denmark – www.tst.dk Austria – www.rtr.at | |
| Germany – www.regtp.de Portugal – www.urt.gov | v.pt |
| Finland – www.fi cora.fi Sweden – www.pts.se | |
| France – www.art.telecom.fr Switzerland – www | bakom.ch |
| Greece – www.eett.gr Spain – www.cmt.es | |
| England – www.oftel.gov.uk Iceland – www.pta.is | |
| Ireland – www.comreg.ie Liechtenstein – www.ak.li | |
| Italy – www.agcom.it Norway – www.npt.no | |
| Luxembourg – www.etat.lu/ILT | |
Restrictions
France
Restricted Frequency Band Only channels 10 to 11 (2,457 MHz and 2,462 MHz) may be used in France. Outdoor use of the device is not allowed.
Info: www.artelecom.fr
Italy
A ministerial license is also required for indoor use. Contact your reseller for the required procedure.
Outdoor use of the device is not allowed.
Info: www.agcom.it
Netherlands
A license is required for outdoor use. Contact your reseller for the required procedure.
Info: www.opta.nl
RF Frequencies for Wireless LAN Devices
For up-to-date information, please contact the corresponding authority of your country (e.g. www.oftel.gov.uk).
Frequencies
According to the IEEE Standard 802.11b+g Wireless LAN adapters are designed for use on the ISM frequency band (Industrial, Scientific, Medical) between 2.4 and 2.4835 GHz. As each of the 11 available channels requires a DSSS (Direct Sequence Spread Spectrum) bandwidth of 22MHz , a maximum of three independent channels are available (for instance, channels 3, 8, and 11). In the following table you'll find the channels that may be used in each country:
| Channel | MHz | Europe, RøTTE | France, RøTTE |
| 1 2412 X | |||
| 2 2417 X | |||
| 3 2422 X | |||
| 4 2427 X | |||
| 5 2432 X | |||
| 6 2437 X | |||
| 7 2442 X | |||
| 8 2447 X | |||
| 9 2452 X | |||
| 10 2457 X X | |||
| 11 2462 X X |
Regulations - Exclusion of Liability
Exclusion of Liability for Wireless LAN Devices
Installing and operating wireless LAN devices must be in accordance with the instructions contained in the user documentation. This user documentation is contained in the product package. Any modifications to the device that have not explicitly been approved by the manufacturer may void the operating authorization of the device. The manufacturer will not be liable for any interference in the reception of radio and TV signals resulting from unauthorized modifications on the device or from replacing or installing cables and accessories that have not been explicitly recommended by the manufacturer. It is the full responsibility of the user to troubleshoot any existing interference resulting from unauthorized modifications, or from replacing or installing components. Neither the manufacturer nor its authorized resellers or distributors are liable for any damage or violation of existing laws resulting from violating these Regulations.
Disposal of Old Devices
- If the product is labeled with a crossed-out waste bin, it is subject to the European Guideline 2002/96/EC.
- All electric and electronic devices must be disposed of separately from household waste at established bodies.
- Avoid damaging the environment and danger to your personal health by disposing of the device properly.
- For further information about proper disposal, contact your local government, disposal bodies or the shop where you bought the device.

Conformity
The CE Declaration of Conformity can be found at www.service.targa.de and www.service.targa.co.uk.
C∈①
Glossary
AGP (Accelerated Graphics Port)
The most common bus slot for graphics adapters. Available in 4 speed levels: 1x = 264 MB/s, 2x = 528 MB/s, 4x = 1056 MB/s, 8x = 2112 MB/s
BIOS (Basic Input/Output System)
The Basic Input/Output System is the elementary program of every computer that has been stored in a chip on the mainboard. It lets you adjust the basic settings such as hard disk parameters, interface and power-saving options. The BIOS settings have been optimized for normal use at the factory. As any change to these settings may lead to a system crash or malfunction, you should read the User's Manual or ask a computer expert.
CD-R
A one-time writeable blank CD.
CD-RW
A blank CD than can be written several times (approx. 1000x) with a CD burner.
CPU (Central Processing Unit) = Processor
The processor is the core of each computer. It is installed into a socket onto the mainboard. CPUs and their clock rates are the most important factor to determine the computer's processing speed.
Today's modern high-performance processors need a cooling fan.
DDR-SDRAM (Double Data Rate-SDRAM)
DDR-SRAM is a very fast type of memory that can transfer twice as much data as normal SDRAMs.
DirectX
Multimedia programming interface developed by Microsoft. It enables programs - especially computer games - to quickly access the graphics, sound and network features as
well as game hardware such as joysticks or steering wheels.
DSL (Digital Subscriber Line)
Digital subscriber line to transfer data over conventional telecommunication wires by using high data transfer rates. A DSL connection is approx. ten times faster than ISDN. DSL requires special modems.
DVD-ROM (Digital Versatile Disc)
Successor of the Compact Disc with the same dimensions, read-only DVD. Available with different capacities: 4.7 GB (DVD-5, single-side), 8.6 GB (DVD-9, single-side, two layers), 9.4 GB (DVD-10, double-side for turning over), 17 GB (DVD-18, double-side, two layers).
DVD-R
A write-once but read-many (infinite) times DVD with a capacity of 4.7 GB.
DVD-RW
DVD that can be written many times (app. 1000x) and read infinite times with a capacity of 4.7 GB.
Ethernet
Ethernet is the world's most widely used network infrastructure that features a maximum data transfer rate of 10 or 100Mb / s to interconnect different computers.
Firewall
A program integrated into the communications path that avoids unauthorized access from the outer world to the PC. Normally a firewall secures the Internet communication.
FireWire, iLink, IEEE-1394
IEEE-1394 is an industry standard serial bus that provides a fast data transfer. FireWire has become very popular especially in DV (digital video) applications. Its high data
transfer rates up to 400 Mb/s make it the ideal choice for multimedia data.
ISDN (Integrated Services Digital Network)
Digital wired network. The most notable difference to the analogue telephone network is that ISDN transmits digital signals.
LAN (Local Area Network)
Common term for local network. Normally, no public access is possible.
Network
A network is a group of several computers that communicate each other. The Internet is the world's largest network.
Mainboard (also Motherboard)
The mainboard of the PC contains processor sockets, chipsets, expansion slots, memory bus and different interfaces to the exterior world.
Modem (Modulator/Demodulator)
Your PC uses the modem to dial into the conventional analogue telephone network in order to communicate with remote computers or the Internet.
PCI Bus (Peripheral Component Interconnect)
The latest technology for PC expansion cards featuring 32 bits of bus width and 33 MHz clock rate. It can transfer up to 132 MB/s.
Plug & Play or PnP
Translates as "Plug-in and Go ahead", compute technology where the components autoconfigure themselves. Windows detects expansion cards (such as network cards or modems) automatically and performs all the necessary settings.
SPDIF
SPDIF is the abbreviation for "Sony/Philips Digital Interface". It represents a standard cable connection for digital audio data that has been defined by Sony and Philips. By using a SPDIF cable and connector you can transfer music data between two audio devices. If supplied, you must use the provided SPDIF cable.
USB (Universal Serial Bus)
The abbreviation USB means "Universal Serial Bus". USB is a simple, but also universal, interface for almost any kind of device - ranging from mice and keyboards, through joysticks and gamepads, up to scanners, modems, memory sticks, digital cameras and MP3 players.
VGA Cable/Connector
VGA is the abbreviation for Video Graphics Adapter and represents the graphics card of your computer. In an analogue way, all components necessary for picture display are also called VGA components.
WHQL (Microsoft Windows Hardware Quality Labs)
A certification standard for hardware founded by Microsoft that tests for several criteria (compatibility, configuration etc.) in the above labs.
If the product meets those criteria, it obtains the certification "Microsoft WHQL approved" and is therefore certified for use with Windows. All Targa PCs and notebooks meet these quality requirements.
WLAN - Wireless LAN
WLAN is the abbreviation for Wireless LAN, which means "wireless network".
Index
Accessories 32
Auto-detect, USB 27
Backup, System Restore 33
Beamer 9
BIOS 33
Card reader
CF cards 10
general information 10
Memory Stick 10
Microdrive 10
Removing cards 12
SD cards 10
SmartMedia 10
Transferring 11
CD-ROM
parking position 6
Compact Flash cards 10
Computer
Direct connection 17
Name 19
WLAN 20
Connecting a TV set 8
Crossover cable 17
Dial-Up Networking
General information 13
Internet 13
Password 16
User name 16
Direct Connection 17
Driver 32
DVD-ROM, parking position 6
Encryption, WLAN 24
FAQ 32
FireWire
Hot-swap 28
IEEE 1394 28
Plug & Play 28
Firmware 33
First Setup 5
Graphics adapter
resolution 7
TV output 8
Hardware,WLAN 20
Hot-swap
FireWire 28
USB 27
IEEE 1394 28
Internet
Dial-Up Networking 13
Password 16
User name 16
Internet access 16
LAN
Setting up 17
Wireless 20
Manual 32
Memory cards, Removing 12
Memory Stick 10
Microdrive 10
Modem
Dial-Up Networking 13
installing 12
Password 16
Telephone wall connector 12
User name 16
Monitor, Resolution 7
Network
Computer name 19
Configuring automatically 17
Configuring using the Wizard 17
SSID 23
Wireless 20
WLAN, general 20
Workgroup 19
Network Setup Wizard 17
Patch cable 17
Plug & Play
FireWire 28
USB 27
Projector 9
Removable media 11
Removing memory cards 12
Screen, resolution 7
SD cards 10
Security, WLAN 24
Service 29
SmartMedia 10
Spare parts 32
SSID 23
System Restore
Basics 34
Checkpoints 34
Creating backups 34
System Restore
General information 33
Restoring Your System 35
Safe Mode 37
under normal operation conditions 35
TCP/IP
Wizard 17
WLAN 22
Telephone wall connector 12
Transferring pictures 11
Transferring, Memory cards 11
Troubleshooting 29
TV set, connecting 8
Update 32
BIOS 33
USB
1.0 27
2.0 27
Compatibility 27
Hot-swap 27
USB
Older devices 27
Plug & Play 27
USB 1.1 27
Video projector 9
WEP 24
Windows
Computer name 19
First Setup 5f
Network Setup Wizard 17
Workgroup 19
WLAN 20
Configuring 21
general 20
Security 24
SSID 23
TCP/IP 22
WEP 24
Workgroup 19
Français
Avertissement
AGP (Accelerated Graphics Port)
LAN (Local Area Network)
Bus PCI (Peripheral Component Interconnect)
WHQL (Microsoft Windows Hardware Quality Labs)
Opmerking over illustrations
AGP (Accelerated Graphics Port)
CPU (Central Processing Unit) = Processor
ISDN (Integrated Services Digital Network)
LAN (Local Area Network)
Modem (Modulator/Demodulator)
PCI Bus (Peripheral Component Interconnect)
WHQL (Microsoft Windows Hardware Quality Labs)
Monitor, Resolutie 7
Netwerk
http://www.targa.co.uk/
http://www.service.targa.co.uk/.
AGP (Accelerated Graphics Port)
CPU (Central Processing Unit) = Processor
ISDN (Integrated Services Digital Network)
LAN (Local Area Network)
PCI Bus (Peripheral Component Interconnect)
WHQL (Microsoft Windows Hardware Quality Labs)
Byte under drift FireWire, 32
USB, 32
CD-ROM
Parkeringslage, 7
Compact Flash-kort, 12
Dator